1
User Manual
Online Treasury Manager:
Security Administrator
Online Treasury Manager Security Administration User Manual
Table of Contents
OVERVIEW ......................................................................................................................................................... 1
System Access......................................................................................................................................................................1
Login/Logout Procedures .................................................................................................................................................2
Online Treasury Manager Modules ..................................................................................................................................2
Accessing Images ................................................................................................................................................................3
System Availability and Cut-Off Times............................................................................................................................3
SECURITY ADMINISTRATOR........................................................................................................................... 6
Administrative Tasks .........................................................................................................................................................6
Your Responsibility for Maintaining Security..................................................................................................................6
Add a User...........................................................................................................................................................................7
Updating a User ..................................................................................................................................................................8
Reset a user password.......................................................................................................................................................8
User Lock Out ..................................................................................................................................................................8
Suspend User Access........................................................................................................................................................8
Add User Permissions ........................................................................................................................................................9
Audit Report .....................................................................................................................................................................12
ACH ADMINISTRATION .................................................................................................................................. 14
Service Permissions ..........................................................................................................................................................14
ACH Companies ...............................................................................................................................................................15
ACH Map Definition ........................................................................................................................................................17
Standard NACHA Formats.............................................................................................................................................17
To add a delimited or fixed ACH map: ..........................................................................................................................18
Delimited format.............................................................................................................................................................19
Fixed format ...................................................................................................................................................................21
ACCOUNT TRANSFER ADMINISTRATION ................................................................................................... 23
Service Permissions ..........................................................................................................................................................23
Transfer Accounts, Type and Limits ..............................................................................................................................23
BALANCE REPORTING ADMINISTRATION.................................................................................................. 26
Service Permissions ..........................................................................................................................................................26
Previous Day Accounts.....................................................................................................................................................27
Same Day Accounts ..........................................................................................................................................................28
Add Transaction Groups .................................................................................................................................................28
v. 040306
page i
Online Treasury Manager Security Administration User Manual
Export to QuickBooks ......................................................................................................................................................30
ELECTRONIC REPORT DELIVERY ADMINISTRATION ............................................................................... 31
Service Permissions ..........................................................................................................................................................31
ERD Reports .....................................................................................................................................................................31
To assign the ERD Reports.............................................................................................................................................31
To assign the user’s accounts .........................................................................................................................................32
IMAGES ADMINISTRATION............................................................................................................................ 33
Service Permissions ..........................................................................................................................................................33
Image Accounts.................................................................................................................................................................34
POSITIVE PAY ADMINISTRATION................................................................................................................. 35
Service Permissions ..........................................................................................................................................................35
Positive Pay Accounts.......................................................................................................................................................36
STOP PAYMENT ADMINISTRATION ............................................................................................................. 37
Service Permissions ..........................................................................................................................................................37
Stop Payment Accounts....................................................................................................................................................38
WIRE TRANSFER ADMINISTRATION............................................................................................................ 39
Service Permissions ..........................................................................................................................................................39
Wire Transfer Accounts...................................................................................................................................................40
Template Permissions.......................................................................................................................................................41
To update a repetitive template for a user.......................................................................................................................41
Approval Requirements ...................................................................................................................................................42
To specify your default wire approval settings...............................................................................................................42
To specify the wire approval setting by account ............................................................................................................43
Wire Map Definition ........................................................................................................................................................44
To add a delimited or fixed Wire Transfer map: ............................................................................................................45
Delimited Template format.............................................................................................................................................46
Delimited Payment format..............................................................................................................................................47
Fixed Template format ...................................................................................................................................................49
Fixed Payment format ....................................................................................................................................................50
v. 040306
page ii
Online Treasury Manager Security Administration User Manual
OVERVIEW
With Online Treasury Manager, you can stay connected to SunTrust over the Internet. There’s no software to load, no security
devices to install and no intensive programming efforts to send and receive files. Just link to SunTrust using a standard web browser,
and you’re connected to the source for you treasury management needs.
To ensure the privacy of your company’s financial information, SunTrust provides multiple levels of security. From firewalls to
passwords and encryption, the system is designed to safeguard your privacy. In addition, your Security Administrator determines who
in your company can access information, as well as who can initiate and approve transactions.
System Access
Online Treasury Manager can be accessed on the Internet at this address: https://onlinetreasurymanager.suntrust.com.
IDs and Passwords
A combination of 4 elements (Customer ID, Customer Password, User ID, User Password) is required to access Online Treasury
Manager.
You will be required to create a new password when you access the system for the first time. Your password must be changed every
30 days. Online Treasury Manager prohibits the re-use of your previous 3 passwords.
Inactivity Time Out
The system will time out, suspending access, if your session is idle for more than 15 minutes. However, during a timeout period, your
browser can remain connected to Online Treasury Manager. Access can be regained by re-entering your user password.
Activity in Online Treasury Manager is recorded by screen changes or the use of the Submit button. If inactivity exceeds 30 minutes,
you will have to re-enter all login information to sign back into the system. Please note that data entry alone is not considered activity.
When entering large blocks of data, click on “Submit Changes” periodically, to avoid inactivity time-out.
Important Notes
When using Online Treasury Manager, please do not use your browser’s “Refresh” button. In some cases, this could cause a form to
be submitted twice.
Do not use the “Back” button, unless specifically instructed. While clicking the back button will return you to the previous page, it will
not reverse any transactions performed prior to your clicking the back button.
Required fields
With exception to the login screen, required data entry fields for Online Treasury Manager are noted in red.
v. 040306
page 1
Online Treasury Manager Security Administration User Manual
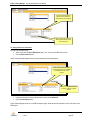
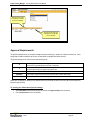
Login/Logout Procedures
After entering your Customer ID, customer Password, your User ID, and your user Password, and click on the Login button.
Customer ID
customer password
your User ID
your password
To exit the system you must click Logout, found at the top of the screen after this logon page.
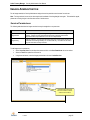
Online Treasury Manager Modules
Each module of Online Treasury Manager is accessible from the drop down box at the top left of your screen.
You will only see those groups that your user ID has permission to access.
v. 040306
page 2
Online Treasury Manager Security Administration User Manual
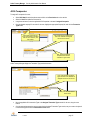
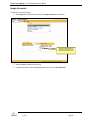
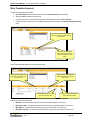
Accessing Images
Online Treasury Manager utilizes the ImageInsight java applet, distributed by CheckWorks, Inc, to retrieve and distribute images to
your desktop. When you click on an Image icon for the first time, the java applet downloads to your desktop dynamically.
This “Java Plug-in Security Warning” window appears.
Click Grant Always
•
Click on the Grant Always button
Within a few seconds, you should see your image.
•
If you do not see the image within a few minutes, close the image window and start over.
•
If you still do not see an image within the next 5 minutes, contact your IT department, as you may not have admin rights to
install software on your PC. If so, your Administrator will have to logon and install the Java applet for you.
If you continue to have problems, contact the Technical Services Group at 1-877-785-6925
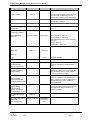
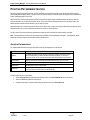
System Availability and Cut-Off Times
Online Treasury Manager can be accessed 24 hours a day, seven days a week for information reporting and transaction initiation
services. Specific account information is updated at various times throughout the day.
When new features and functions become available, these releases are introduced on weekends during non-business hours to
minimize any disruption to your usage of the service.
Function
ACH Initiate
Cutoff Time
Retention
10:30 A.M., 2:30 P.M.,
5:30 P.M., and 7:30
P.M.
Notes
The cut-off for both Debits and Credits is 7:30
P.M. ET two days prior to effective date. Files
received by 10:30 A.M. ET one-day prior will be
processed on a best effort basis.
ACH Batches
ACH Batches can be sent a max of 14 calendar
days in advance.
ACH Pass-Thru
7:00 P.M.
Follow same guidelines as ACH Initiate.
ACH Reversal
4:00 P.M.
In order for an ACH batch to meet the 4:00
P.M. deadline it will have to have been
received prior to the 2:30 P.M. cutoff time.
ACH Reports
186 Cal. Days
v. 040306
OTM ACH initiated activity (about 6 months)
page 3
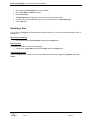
Online Treasury Manager Security Administration User Manual
Function
Cutoff Time
Audit Activity
Retention
Notes
93 Cal. Days
Account Transfer
5:30 P.M.
If it is done before 5:30pm, it is the Same Day.
If it is after 5:30, it is Next Day. Account
Transfers are processed by the ACH system.
Account Transfers
Account Transfers can be sent a max of 14
calendar days in advance.
Account Transfer Reports
Balance Reporting Previous Day
7:00 A.M.
Balance Reporting –
Previous Day (Images)
186 Cal. Days
(about 6 months)
93 Cal. Days
Date range inquiries limited to 45 days at a
time.
93 Cal. Days
Balance Reporting Same Day
Vary upon service
ERD Special Reports
93 Cal. Days
ACH Transactions - 7:30 a.m.
Account Transfers – Real-time
Controlled Disbursement, Late Presentment –
10:00 a.m.
Lockbox - 8:30 a.m.
Wire Transfers – Real-time
7 Cal. Days
5 Business Days
ERD (CAR)
8:00 a.m.
7 Cal. Days
ERD (ACH/EDI
Receiving)
9:00 a.m.
7 Cal. Days
Image
7 Years
Image (Transit Items)
5 Years
Positive Payment Report Exceptions/Images
(Pos Pay accounts only)
Positive Payment
Exception Pay/Return
Decision-Making
Available at 9 A.M.
93 Cal. Days
12:00 P.M. Same Day
Positive Payment Report
Reverse Positive
Payment and Payable
Thru Draft (Check Return)
Available at 9 A.M.
This is the earliest time the Positive Payment
reports are available for exception decisionmaking.
This is the deadline to notify the Bank
regarding the validity of the current business
day’s mismatched checks. A Pay or Return
decision is required by this time.
93 Cal. Days
Positive Payment Return 12:00 P.M. Same Day
Decision-Making
Reverse Positive
Payment and Payable
Thru Draft (Check Return)
Manual Issue/Void Input
Deadline
Paid items, deposits
This is the earliest time the Positive Payment
reports are available for exception decisionmaking. Images of checks or draft items are
available through the Image or Balance
Reporting modules.
This is the deadline to notify the Bank
regarding the validity of the previous business
day’s paid checks. Return decisions are
required by this time.
5:00 P.M.
Positive Payment Images Available at 7:00 A.M. Current Month +
- PREV DAY
One Month of
History
(CPR accounts only)
v. 040306
page 4
Online Treasury Manager Security Administration User Manual
Function
Cutoff Time
Positive Payment Report - Available at 1:00 P.M.
Images/Exceptions
(CPR accounts only)
Retention
93 Cal. Days
Notes
This is the earliest time the Positive Payment
reports are available for exception decisionmaking. Bank provides on-line access to
images of the current day's mismatched
checks.
Positive Payment
Exception Pay/Return
Decision-Making
(CPR accounts only)
12:00 P.M. Next day
Stop Payments Placed
8:00 A.M. – 10:00
P.M.
(DDA and ARP
Accounts Only)
12:00 P.M. - 10:00
P.M.
(CPR Accounts Only)
186 Cal. Days
Stop should be available to tellers within
seconds during normal bank business hours.
Otherwise, the stop is in queued status. Stops
are effective for 6 months.
Stop Payment and Paid
Item Inquiry
ARP and DDA
accounts – no time
constraints
12:00 P.M. - 10:00
P.M.
(CPR Accounts Only)
93 Cal. Days
Information is stored for 186 calendar days
(about 6 months).
186 Cal. Days
(about 6 months)
Stop Payment Reports
Stop Payment Summary
No limit.
Stop (Images) Availability
11:00 A.M.
Stop (Images - Mid
Atlantic Accounts)
11:00 A.M.
Wire
This is the deadline to notify the Bank
regarding the validity of the previous business
day’s mismatched checks. A Pay or Return
decision is required by this time.
Current Month + Bank provides on-line access to images of paid
One Month of checks from previous business day.
History
45 Calendar
Days
8:00 A.M. – 5:30 P.M.
Wires received after 5:30 P.M. are subject to
next-day processing.
Wire
Wire (By Phone)
Domestic wires and international wires in US
Dollars can be future dated a max of 30
calendar days in advance. Foreign currency
wires cannot be future dated.
8:30 A.M. – 4:30 P.M.
Wire Report
Wires done by phone ONLY.
186 Cal. Days
This is only for the Wire Report under the Wire
Transfer module.
** All times are in Eastern time zone
v. 040306
page 5
Online Treasury Manager Security Administration User Manual
SECURITY ADMINISTRATOR
Administrative Tasks
The Security Administrator (Administrator) maintains the user entitlements for Online Treasury Manager. The set-up process
includes:
•
Create and assign new Corporate Users
•
Grant users Permissions into the various services, such as wire transfer and ACH
•
Assigns the specific module permissions, which may include account access as well as transaction dollar limits.
The Administrator is also responsible for providing maintenance to the user entitlements and deleting user entitlements.
Please note - the Administrator cannot change his or her own permission status. When granting permissions to users the
Administrator can only grant functions that he or she currently possesses.
Your Responsibility for Maintaining Security
The Administrator has access to the Audit Report for system usage and activity information. Online Treasury Manager records
activity for exception activity, when successful attempts are made to use the system and complete activities, as well as normal events
where activity successfully completes.
If you discover or suspect a breach of security, disable the user’s ID immediately. If you suspect fraudulent transactions have been
initiated, call SunTrust Treasury Management Technical Services at 1-877-785-6925, Option 1 as soon as possible. Representatives
are available from 7:00 a.m. ET to 6:00 p.m. ET Monday through Friday on bank business days.
v. 040306
page 6
Online Treasury Manager Security Administration User Manual
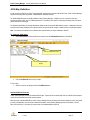
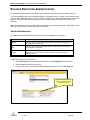
Add a User
•
Select Corporate Users from the group drop-down box
•
Select the Corporate Users tab from the task bar
•
Enter a unique ID into the Code fields. The user ID can be up to 12 characters in length
•
Enter the user’s Name, and click the Add button
Enter user’s ID
User’s name
Online Treasury Manager displays the user entry screen.
Temporary password
User’s name
User’s address
Administrator contact
Effective date for access
System administrator indicator
v. 040306
page 7
Online Treasury Manager Security Administration User Manual
•
Enter a ‘temporary’ User Password (and re-enter to validate)
•
Enter the User Name and Address information
•
Enter a Contact Name
•
The Enable Date defaults to today’s date, but may be revised to a future date if needed.
•
If this User will have Security Administrator rights, click on the Yes radio button for Administrator (Y/N)
•
Click the Add button
Updating a User
You can return to the Corp Users tab to change, delete and display a user profile. You can also reset password and lock, unlock, or
suspend a user.
Reset a user password
•
Enter a new password in the User Password field, and click the Change button.
User Lock Out
If a user becomes “locked out” of Online Treasury Manager,
•
Change the user’s Login Status radio button to Unlocked, and click the Change button.
Suspend User Access
If you want to suspend a user’s access to the system, but not delete their user ID, simply change their Login Status radio button to
Locked.
v. 040306
page 8
Online Treasury Manager Security Administration User Manual
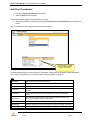
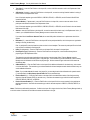
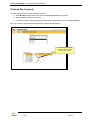
Add User Permissions
•
Click on the Corp User Permissions tab on the task bar
•
Select the User ID from the list of users
Online Treasury Manager displays the current Permissions for the user.
•
Select the permissions for the user ID by moving from the Inactive Services to the Active Services section with the arrow
buttons.
Note: The Administrator can only assign services in which he/she has access.
Select desired services and
move from Inactive to Active
with the arrow buttons
The following table describes the service permissions for each module. Shaded entries are designated for Security Administrator
users. Refer to each module section for the Corporate User permissions applicable for that service.
ACH
ACHActivate
Update entries and activate ACH batches.
ACHApprove
Approve ACH batches that have been activated.
ACHBatch
Add and manage ACH batches.
ACHImport
Import an ACH file from an outside source to assist in creating a batch
template.
ACHPartMnt
Change data associated with ACH Participants or delete the participants’
record.
ACHPassThru
Pass ACH files created outside of Online Treasury Manager through to the
bank’s ACH origination system for processing.
ACHPTReport
To query all pass-thru files.
ACHReversal
Submit a request to the bank for a reversal of a transaction already submitted.
ACHRpt
View current and historical ACH data.
v. 040306
page 9
Online Treasury Manager Security Administration User Manual
ACHUserPerm
Allows the Administrator to grant permissions of the ACH functions to Corporate
Users.
ACHMapDef
Defines the ACH maps Online Treasury Manager uses when you import files
into the ACH product. A map is a set of instructions that controls the format of
the import file and how the import file functions.
Account Transfer
BKIn
To initiate an account transfer.
BKRept
To review account transfers.
BKAcct
Assigns account permissions to Corporate Users.
Activity
Audit
Audit Report for system and user activity
Balance Reporting
BRRept
View or export the report that provides balance and transaction information for
accounts for the previous day.
Irrept
View or export a report that provides balance and transaction information for
accounts for the current day.
MultiDay
View or export a report that provides previous day balance and transaction
information for accounts within a range of dates. This report appears in a
statement format.
BRIIFMap
Enter the information necessary for a correlation to be made between the
Online Treasury Manager account number for an account and the account
name that QuickBooks uses for that same account. This information is
necessary when exporting debit and credit transactions from Online Treasury
Manager in the IIF export format.
BrAcct
Add and remove account permissions for previous day reporting for individual
corporate users. This determines which accounts the user can access when
producing a standard Previous Day Balance and Multi-Day statement reports.
IrAcct
Add and remove account permissions for same day reporting for individual
corporate users. This determines which accounts the user can access when
producing a standard Same Day Balance report.
BrGroups
Group individual balance reporting transaction types (BAI type codes) into
transaction groups. These groups are available as query options when
producing the Same Day Balance report and the Previous Day Balance report.
Corporate Users
UserMaint
To set up and manage Corporate Users.
UserPerm
To set up and manage Corporate User service permissions.
ERD Reports
ERDRpt
To view ERD reports.
ERD Permissions
Manages Corporate User permissions to ERD reports.
v. 040306
page 10
Online Treasury Manager Security Administration User Manual
Images
ImageSearch
Provides query to a image or range of images from the SunTrust image
archive. Images of most paper-based transaction including paid checks,
deposited tickets, deposited items, and account adjustments
ImageHistory
A list, by category, of all images retrieved (using the image search function) is
presented on the Image History for one business day. Provides fast access to
any item that was recently retrieved.
ImgPerm
Assign image accounts to Corporate Users.
Positive Pay
PPCRRqst
For reverse positive pay decision-making - to input return requests for one or
more paid checks from the previous business day.
PPIssueRept
Display manual check issues and manual voids placed on your accounts.
PPManIssue
To add manual check issues.
PPManVoid
To add manual check void requests.
PPRept
To display exception checks, display electronic images of an exception checks
(for Image services subscribers), indicate whether the bank should pay or
return the exception check, and enter manual check issue and manual check
void requests.
PPAcct
Assign positive pay accounts to Corporate Users.
Stop Payment
StopPay
Make check inquiries and perform stop payment add and delete requests.
StopPayRpts
Review all stop payment requests generated through the Online Treasury
Manager.
SPAccount
Assign or revoke Stop Pay accounts to Corporate Users.
Wire Transfer
MTApprove
Manages pending wire transfer requests that require approval. Approve
requests, delete requests, edit requests, and unlock requests from their user
ID.
MTBShortList
To add and manage Bank Short List, which is a personalized list of banks you
use for wire transfer activity.
MTCustTempl
To add and manage wire transfer templates for their own personal use or for
use by other Corporate Users.
MTIn
To add wire transfer requests, using wire templates or free-form requests.
MTRpts
To request and view processed wire transfer reports. The Outgoing Wire
Report displays your approved wire transfer requests.
MTImport
To import a wire transfer batch files from an outside source.
MTAcctPerm
Assign wire transfer accounts to Corporate Users. For each account, you also
set the wire transfer entry and approval limits.
MTTPerm
To add and manage permissions to bank-defined wire transfer templates for
Corporate Users.
MTAcctAppr
To set up and manage wire transfer approval settings for Corporate Users’
accounts.
MTMapDefinitions
Defines the wire transfer maps to use when importing batch wire transfer files.
A map is the batch record layout and record lengths according to your unique
file specifications
v. 040306
page 11
Online Treasury Manager Security Administration User Manual
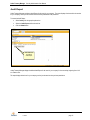
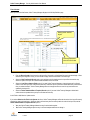
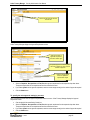
Audit Report
Online Treasury Manager provides an Audit Report for all users for your company. The report displays all actions within the services
for your company, and not just the services that the Security Administrator has permission.
To access the Audit Report,
•
Select Activity from the group drop-down box
•
Select the Audit Report tab from the task bar
•
Click the Submit button
Click Submit for
the default
Audit Report
Online Treasury Manager displays the default Audit Report for all users for your company for the current day, beginning from 12:01
a.m. Eastern time.
The report displays all services for your company, and not just the services that you have permissions.
v. 040306
page 12
Online Treasury Manager Security Administration User Manual
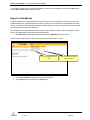
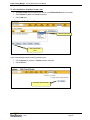
Report Options
You can customize this report to select one or more users and/or services. You can limit the time of day range from of the report,
and/or select a date within 93 calendar days from today’s date. You can also export the Audit Report as a comma-delimited file, to
use with other applications.
Exported Audit Report
v. 040306
page 13
Online Treasury Manager Security Administration User Manual
ACH ADMINISTRATION
For the ACH Initiation module, the Security Administrator assigns the service permissions, ACH companies, transaction types and
limits for each user.
If your company imports ACH batch files into Online Treasury Manager, the Security Administrator defines the format of the import file
and how it functions using the ACH Map service.
Service Permissions
The following table describes the ACH services that may be assigned to a corporate user:
SERVICE CODE
DESCRIPTION
ACHActivate
Update entries and activate ACH batches.
ACHApprove
Approve ACH batches that have been activated.
ACHBatch
Add and manage ACH batches.
ACHImport
Import an ACH file from an outside source to assist in creating a batch
template.
ACHPartMnt
Change data associated with ACH Participants or delete the participants’
record.
ACHPassThru
Pass ACH files created outside of Online Treasury Manager through to the
bank’s ACH origination system for processing.
ACHPTReport
To query all pass-thru files.
ACHRpt
View current and historical ACH data.
ACHReversal
Submit a request to the bank for a reversal of a transaction already submitted.
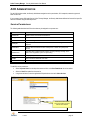
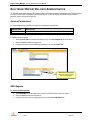
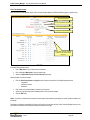
To add ACH service permissions,
•
Select Corporate Users from the drop-down menu and click on the User Permissions tab on the task bar
•
Select the User ID to update from the users list
•
Using the arrow buttons, move the applicable ACH permissions to the user’s Active Services
Select desired services and
move from Inactive to Active
with the arrow buttons
v. 040306
page 14
Online Treasury Manager Security Administration User Manual
ACH Companies
To assign ACH companies for a user,
•
Select ACH Admin from the drop-down menu and click on the Permissions tab on the task bar
•
Select the User ID to update from the users list
•
Using the arrow buttons, move the applicable ACH Companies to the user’s Assigned Companies
•
Once the desired company IDs are active for the user, highlight the appropriate Company Ids, and click the Transaction
Types button
Select desired services and
move from Inactive to Pending
with the arrow buttons, and
click Submit
First, select desired companies and
move from Available to Assigned
with the arrow buttons
Next, select the Assigned
Companies and click the
Transaction Types button
Online Treasury Manager displays the Transaction Type permissions screen.
First, select desired Transaction
Types and move from Available to
Assigned with the arrow buttons
Next, click the Authorization
Limits button
•
Move the applicable ACH transaction Types to the Assigned Transaction Types section for the user, using the arrow
buttons.
•
Once the appropriate transaction types are moved to the Assigned Transaction Types section, use your mouse or keyboard
to select all the types and click the Authorization Limits button
v. 040306
page 15
Online Treasury Manager Security Administration User Manual
Note: only transaction types allowed for this Company ID will appear on the Available list. See the table below for ACH transaction
types.
ACH Transaction Type Code
Description
Addenda
CCD+CD
Cash Concentration or Disbursement, mixed credits and debits
Yes
CCD+CO
Cash Concentration or Disbursement, credits only (tax payments included)
Yes
CCD +DO
Cash Concentration or Disbursement, debits only
Yes
CCDCD
Cash Concentration or Disbursement, mixed credits and debits
No
CCDCO
Cash Concentration or Disbursement, credits only
No
CCDDO
Cash Concentration or Disbursement, debits only
No
PPD+CD
Pre-arranged Payment and Deposit, mixed credits and debits
Yes
PPD+CO
Pre-arranged Payment and Deposit, credits only
Yes
PPD+DO
Pre-arranged Payment and Deposit, debits only
Yes
PPDCD
Pre-arranged Payment and Deposit, mixed credits and debits
No
PPDCO
Pre-arranged Payment and Deposit, credits only
No
PPDDO
Pre-arranged Payment and Deposit, debits only
No
RCK
Re-presented Check Entry, debits only
No
TELCO
Telephone Initiated Entry, credits only
No
TELDO
Telephone Initiated Entry, debits only
Yes
WEB+DO
Internet Initiated Entry with addenda, debits only
Yes
Online Treasury Manager displays the Transaction Type Authorization Limits screen.
Enter the item and batch limits
that the user can Submit
Enter the item and batch limits
that the user can Activate
Enter the item and batch limits
that the user can Approve
Enter the user’s amount limits for each transaction type, including the decimal point. If no limit is necessary, enter “99999999.99”
•
Batch Maintenance Limit/Item – maximum amount the user is allowed to submit per item
•
Batch Maintenance Limit/Batch – maximum amount the user is allowed to submit per batch
•
Batch Activation Limit/Item – maximum amount the user is allowed to activate per item
•
Batch Activation Limit/Batch – maximum amount the user is allowed to activate per batch
•
Batch Approval Limit/Item – maximum amount the user is allowed to approve per item
•
Batch Approval Limit/Batch – maximum amount the user is allowed to approve per batch
•
Click the Submit button
v. 040306
page 16
Online Treasury Manager Security Administration User Manual
ACH Map Definition
In order to import an ACH file into Online Treasury Manager, the import file must have a defined ACH map. Online Treasury Manager
supports the following ACH map formats: standard NACHA, delimited, and fixed.
The standard NACHA formats are readily available in Online Treasury Manager. A delimiter, such as a comma or semi-colon,
separates the fields on each record in a delimited import file. The fields on each record in a fixed import file always start in the same
position and are the same length.
For delimited and fixed files, the Security Administrator defines a map using the ACH Map Definition service. A delimited or fixed map
instructs Online Treasury Manager how to map the fields on an import file to add, change, or delete entries in a single batch template.
Note: You must use the Batches service to add the batch template before you import a delimited or fixed file.
To view your ACH maps:
•
Select ACH Initiation from the drop-down menu and click on the ACH Map Definition tab on the task bar
Click the Find/Refresh button
Select the map and click
Display
•
Click the Find/Refresh button to list your maps
To view a map
•
Select the map from the listing and click the Find/Refresh button
Standard NACHA Formats
Online Treasury Manager provides two standard NACHA maps. Import files that use these maps must be in NACHA format and must
contain the record formats that the ACH product supports.
When you import a standard NACHA file, Online Treasury Manager uses the information from the batch header (5 record), entry detail
(6 record), and addenda (7 record) records to build batch templates. Online Treasury Manager ignores the file header (1 record),
batch control (8 record), or file control (9 record) records in the standard NACHA import file.
v. 040306
page 17
Online Treasury Manager Security Administration User Manual
To add a delimited or fixed ACH map:
•
Select ACH Initiation from the drop-down menu and click on the ACH Map Definition tab on the task bar
Enter a Code for the ACH
Map Definition
Enter a descriptive name for
the map
•
Enter an ACH map Code of up to 20 alpha-numeric characters
•
Enter a descriptive Name for the ACH map
•
Select Delimited or Fixed from the Format drop-down list
•
Click on the Add button
v. 040306
Select delimited or fixed file
Format
page 18
Online Treasury Manager Security Administration User Manual
Delimited format
When you select the delimited format, Online Treasury Manager displays this ACH Map Definition page:
Field Delimiter code
End of Record
identifier
Field positions on the file
Overriding replacement
values from file data
•
Select the field Delimiter from the drop-down list of symbols
•
Select the End of Record ID from the symbol drop-down list
•
Select the Skip First Header Record option to skip and ignore the first header record on import files that use this map.
Select this option if the import file contains header information in the first record.
•
Select the Strip Quotes (“ “) Around Fields option to remove the quotation marks around fields
•
Select the Load Zero to Amount Fields option if you want Online Treasury Manager to change the amount for all batch
entries to zero when you import a file that uses this map. Select this option if you want to add the batch entry amounts each
time you activate the batch. Online Treasury Manager does not change the amount to zero for any batch entries not
updated by the import file.
•
Select the Delete Unmatched Batch Template Records option if you want Online Treasury Manager to delete batch
entries that are not updated when you import a file that uses this map.
In the Fields to Add, Match or Update section:
If you select a Match to this Field in the System check box, Online Treasury Manager verifies that the value in the import file exactly
matches the value in the batch entry. When the value in the batch entry does not exactly match the value in the import file, and the
Delete Unmatched Batch Template Records option equals
•
Yes, then Online Treasury Manager deletes the entry from the batch template
•
No, Online Treasury Manager skips the entry in the batch template and does not change it.
If you select an Update this Field once matched check box, Online Treasury Manager replaces the value in the batch entry with
either the value in the Replacement Value field on the map, if a value is specified, or the import file.
v. 040306
page 19
Online Treasury Manager Security Administration User Manual
•
Tran Code (2) - enter the Field Position on the import file, or select a NACHA transaction code in the Replacement Value
drop-down list
•
ABA Number (9 numeric) –enter the Field Position on the import file, or enter the receiving financial institution’s routing &
transit number in the Replacement Value.
Note: If the batch template type code is CBR+CO, CBR+DO, PBR+CO, or PBR+DO, use the Receiver's Bank ID field
instead of this field.
•
Account Number (17 alphanumeric) –enter the Field Position on the import file, or enter an account number for the
participant at the financial institution in the Replacement Value.
Note: If the batch template type code is CBR+CO, CBR+DO, PBR+CO, or PBR+DO, use the Receiver's Account Number
field instead of this field.
•
Amount – enter the Field Position on the import file, or enter the amount for the batch entry in the Replacement Value. (10
numeric, up to 9,999,999.99 Online Treasury Manager removes commas from amounts)
If you select Yes in Load Zero to Amount Fields, do not enter field position information or a replacement value for the
amount.
•
ID Number (15) – enter the Field Position on the import file for the participant identifier, which is the person or organization
sending or receiving the batch entry.
Rule: A participant ID cannot be listed more than one time in a batch template. This means the participant ID can be listed
only one time in a delimited or fixed import file.
•
Name (22 alphanumeric) - Enter the Field Position on the import file for the name for the participant
•
Disc/Payment Type (2 alphanumeric) - Enter the Field Position on the import file, or enter the discretionary data or
payment type in the Replacement Value.
The transaction type code associated with the batch template controls whether Online Treasury Manager uses the
information in this field as discretionary data or a payment type. If the transaction type code is WEB+DO, Online Treasury
Manager uses the information in this field as the payment type. All other transaction type codes use this information as
discretionary data.
•
Addenda Data (80) – Enter the Field Position on the import file for additional information for the batch entry, such as state
or local tax information. The transaction type code associated with the batch template controls whether the batch entry can
contain addenda information.
Rules: If you include addenda information in an import file, you must begin and end the information with quotation marks
(") and select Yes in the Strip Quotes Around Fields field for the associated map.
•
Receiver Bank ID (11) – Enter the Field Position on the import file for the identification number of the foreign receiving
depository financial institution (RDFI) for the batch entry. Used when the transaction type code for the batch template is
CBR+CO, CBR+DO, PBR+CO, or PBR+DO.
•
Receiver Account Number (25) – Enter the Field Position on the import file for the account number for the participant at
the financial institution. Used when the transaction type code for the batch template is CBR+CO, CBR+DO, PBR+CO, or
PBR+DO
Notes: Field limits are indicated in parentheses. If a field on the import file is longer than the limit, Online Treasury Manager loads up
to the limit number of characters for the field and truncates all characters to the right.
v. 040306
page 20
Online Treasury Manager Security Administration User Manual
Fixed format
When you select the fixed format, Online Treasury Manager displays this ACH Map Definition page:
Fixed record length
Starting position and field
lengths
Overriding replacement
values from the file data
•
Enter the Record Length of each record on the import file. All records in a fixed format file must be the same length. When
determining the length of a record, you must include carriage returns and line feeds in the total length.
•
Select the Skip First Header Record option to skip and ignore the first header record on import files that use this map.
Select this option if the import file contains header information in the first record.
•
Select the Load Zero to Amount Fields option if you want Online Treasury Manager to change the amount for all batch
entries to zero when you import a file that uses this map. Select this option if you want to add the batch entry amounts each
time you activate the batch. Online Treasury Manager does not change the amount to zero for any batch entries not
updated by the import file.
•
Select the Delete Unmatched Batch Template Records option if you want Online Treasury Manager to delete batch
entries that are not updated when you import a file that uses this map.
In the Fields to Add, Match or Update section:
If you select a Match to this Field in the System check box, Online Treasury Manager verifies that the value in the import file exactly
matches the value in the batch entry. When the value in the batch entry does not exactly match the value in the import file, and the
Delete Unmatched Batch Template Records option is
•
Yes, then Online Treasury Manager deletes the entry from the batch template
•
No, Online Treasury Manager skips the entry in the batch template and does not change it.
v. 040306
page 21
Online Treasury Manager Security Administration User Manual
If you select an Update this Field once matched check box, Online Treasury Manager replaces the value in the batch entry with
either the value in the Replacement Value field on the map, if a value is specified, or the import file.
•
Tran Code (2) - enter the Starting Field Position and Length on the import file, or select a NACHA transaction code in the
Replacement Value drop-down list
•
ABA Number (9 numeric) –enter the Starting Field Position and Length on the import file, or enter the receiving financial
institution’s routing & transit number in the Replacement Value.
Note: If the batch template type code is CBR+CO, CBR+DO, PBR+CO, or PBR+DO, use the Receiver's Bank ID field
instead of this field.
•
Account Number (17 alphanumeric) –enter the Starting Field Position and Length on the import file, or enter an account
number for the participant at the financial institution in the Replacement Value.
Note: If the batch template type code is CBR+CO, CBR+DO, PBR+CO, or PBR+DO, use the Receiver's Account Number
field instead of this field.
•
Amount – enter the Starting Field Position and Length on the import file, or enter the amount for the batch entry in the
Replacement Value. (10 numeric, up to 9,999,999.99 Online Treasury Manager removes commas from amounts)
If you select Yes in Load Zero to Amount Fields, do not enter field position information or a replacement value for the
amount.
•
ID Number (15) – enter the Starting Field Position and Length on the import file for the participant identifier, which is the
person or organization sending or receiving the batch entry.
Rule: A participant ID cannot be listed more than one time in a batch template. This means the participant ID can be listed
only one time in a delimited or fixed import file.
•
Name (22 alphanumeric) - Enter the Starting Field Position and Length on the import file for the name for the participant
•
Disc/Payment Type (2 alphanumeric) - Enter the Starting Field Position and Length on the import file, or enter the
discretionary data or payment type in the Replacement Value.
The transaction type code associated with the batch template controls whether Online Treasury Manager uses the
information in this field as discretionary data or a payment type. If the transaction type code is WEB+DO, Online Treasury
Manager uses the information in this field as the payment type. All other transaction type codes use this information as
discretionary data.
•
Addenda Data (80) – Enter the Starting Field Position and Length on the import file for additional information for the
batch entry, such as state or local tax information. The transaction type code associated with the batch template controls
whether the batch entry can contain addenda information.
Rules: If you include addenda information in an import file, you must begin and end the information with quotation marks
(") and select Yes in the Strip Quotes Around Fields field for the associated map.
•
Receiver Bank ID (11) – Enter the Starting Field Position and Length on the import file for the identification number of
the foreign receiving depository financial institution (RDFI) for the batch entry. Used when the transaction type code for the
batch template is CBR+CO, CBR+DO, PBR+CO, or PBR+DO.
•
Receiver Account Number (25) – Enter the Starting Field Position and Length on the import file for the account number
for the participant at the financial institution. Used when the transaction type code for the batch template is CBR+CO,
CBR+DO, PBR+CO, or PBR+DO.
Notes: Field limits are indicated in parentheses. If a field on the import file is longer than the limit, Online Treasury Manager loads up
to the limit number of characters for the field and truncates all characters to the right.
v. 040306
page 22
Online Treasury Manager Security Administration User Manual
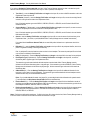
ACCOUNT TRANSFER ADMINISTRATION
For the Account Transfer module, the Security Administrator assigns the service permissions, accounts, transfer types and transfer
limits for each user.
Service Permissions
The following table describes the Account Transfer services that may be assigned to a corporate user:
SERVICE CODE
DESCRIPTION
BKIn
To initiate an account transfer.
BKRept
To review account transfers.
To assign user service permissions for Account Transfer,
•
Select Corporate Users from the drop-down menu and click on the User Permissions tab on the task bar
•
Select the User ID to update from the users list
•
Using the arrow buttons, move the applicable Account Transfer permissions to the user’s Active Services
Select desired services and move
from Inactive to Active with the
arrow buttons
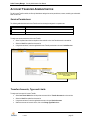
Transfer Accounts, Type and Limits
To assign user’s accounts for Account Transfer,
•
Select Acct Transfr Admin from the drop-down menu and click on Transfer Accounts tab on the task bar
•
Select the User ID to update from the users list
•
Using the arrow buttons, move the applicable accounts to the user’s Active Accounts
•
When the accounts are moved to Active, click on the Change Type/Limits button
v. 040306
page 23
Online Treasury Manager Security Administration User Manual
First, select desired accounts
and move from Inactive to
Active with the arrow buttons
Next, click the Change
Type/Limits button
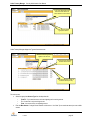
Online Treasury Manager displays the Type and Amounts screen.
Select the transfer type that
applies to this account
Enter the single and total
transfer amount limits
Enter the maximum number of
transfers allowed per day
For each account,
•
Select the appropriate Account Type from the drop-down list
o
From/To – if you want the account to be an originating and a receiving account
o
To – the account is only a receiving account
o
From – the account is only an originating account
•
Enter the Max Amount of a single account transfer on this account. Use “None” (for no maximum amount) or enter a dollar
amount.
v. 040306
page 24
Online Treasury Manager Security Administration User Manual
•
Enter the Max Amount per Day for the maximum dollar total that this account is allowed for daily account transfers for this
account. Use “None” (for no maximum) or enter a dollar amount.
•
Enter the Max # per Day for the maximum number of Account Transfers allowed per day for this account
•
Click the Submit button. Note: the submit button must be clicked to assign the appropriate permissions, even if assigning
the default settings.
v. 040306
page 25
Online Treasury Manager Security Administration User Manual
BALANCE REPORTING ADMINISTRATION
For the Balance Reporting module, the Security Administrator assigns the service permissions and accounts for each user.
The Security Administrator also has access to Balance Reporting customization functions. If desired, use the Transaction Group
function to create custom report query options for your company. In addition, if your company downloads data into a Quickbooks
application, use the BR IIF Map function to correlate your Online Treasury Manager accounts with your account names in
Quickbooks.
Note: For image retrieval, access to the viewer requires the installation of the ImageInsight Java applet. To download the applet,
please see Accessing Images in the Overview section of this document.
Service Permissions
The following table describes the Balance Reporting services that may be assigned to a corporate user:
SERVICE CODE
DESCRIPTION
BRRept
View or export the report that provides balance and transaction information for
accounts for the previous day.
Irrept
View or export a report that provides balance and transaction information for
accounts for the current day.
MultiDay
View or export a report that provides previous day balance and transaction
information for accounts within a range of dates. This report appears in a
statement format.
To add Balance Reporting Service permissions,
•
Select Corporate Users from the drop-down menu and click on the User Permissions tab on the task bar
•
Select the User ID to update from the users list
•
Using the arrow buttons, move the applicable Balance Reporting permissions to the user’s Active Services
Select desired services and
move from Inactive to Active
with the arrow buttons
v. 040306
page 26
Online Treasury Manager Security Administration User Manual
Previous Day Accounts
To assign a user’s accounts for Previous Day Balance Reporting,
•
Select BR Admin from the drop-down menu and click on Prev Day Accounts tab on the task bar
•
Select the User ID to update from the users list
•
Using the arrow buttons, move the applicable Previous Day Balance Reporting accounts to the user’s Active Accounts
Note: The Previous Day account permissions assigned will also apply for MultiDay Reporting.
Select desired accounts and
move from Inactive to Active
with the arrow buttons
v. 040306
page 27
Online Treasury Manager Security Administration User Manual
Same Day Accounts
To assign a user’s accounts for Same Day Balance Reporting,
•
Select BR Admin from the drop-down menu and click on Same Day Accounts tab on the task bar
•
Select the User ID to update from the users list
•
Using the arrow buttons, move the applicable Same Day Balance Reporting accounts to the user’s Active Accounts
Select desired accounts and
move from Inactive to Active
with the arrow buttons
Add Transaction Groups
The Transaction Group function allows you to customize a query option that groups one or more specific BAI type codes. Online
Treasury Manager lists your transaction group as a query option for your Same Day and Previous Day Balance Reports. When you
select this option, Online Treasury Manager filters the report to list only those transaction types.
To add a Transaction Group
•
Select BR Admin from the group drop-down menu and select the Transaction Groups tab from the task bar
•
Enter a unique identifying Code and a descriptive Name for this transaction group
•
Click the Add button
v. 040306
page 28
Online Treasury Manager Security Administration User Manual
Enter a transaction group code
Enter a descriptive name for
your code
Online Treasury Manager displays a list of the BAI codes and the corresponding description.
•
Use the arrow buttons to move your selected codes to the Active BAI Codes
Select desired BAI codes and
move from Inactive to Active
with the arrow buttons
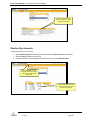
Changes and Deletions to Transaction Groups
Online Treasury Manager saves changes to this page each time you click an arrow button. If you need to make a change to only the
transaction group name, you must click either of the arrow buttons to save your changes.
v. 040306
page 29
Online Treasury Manager Security Administration User Manual
You can delete a transaction group by entering the Code name or selecting from the available list, and clicking the Delete button.
Press the OK and Delete buttons to verify your actions.
Export to QuickBooks
The BR IIF Map allows you to export detail debit and credit transactions to an Intuit Interchange Format (IIF) file (for use with the
QuickBooks applications.) As QuickBooks does not require you to define an account number as the unique identifier for the bank
account, you must use the BR IIF Map service to make the correlation between your account numbers in Online Treasury Manager
and your associated account names in QuickBooks.
Note: QuickBooks cannot detect duplicate transactions when an IIF file is imported. In order to reduce that possibility, the IIF file
format is only available when exporting the Previous Day Balance report.
•
Select BR Admin from the group drop-down menu and select the BR IIF Map tab from the task bar
Online Treasury Manager presents you with the list of all accounts you have permission to access.
Enter your Quickbooks account
name
•
Enter the Account Name as it appears in your Quickbooks application
•
Click the Export check box, and click on the Change button
v. 040306
Click on the check box indicate
account for export
page 30
Online Treasury Manager Security Administration User Manual
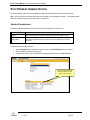
ELECTRONIC REPORT DELIVERY ADMINISTRATION
The Electronic Report Delivery Module (ERD) includes a variety of special reports available online through Online Treasury Manager,
by e-mail by Online Courier, or fax delivery from the Xpedite service. For ERD, the Security Administrator assigns the service
permission, reports, and accounts for each user.
Service Permissions
The following table describes the ERD services that may be assigned to a corporate user:
SERVICE CODE
DESCRIPTION
ERDRpt
To view ERD reports.
To add ERD service permissions,
•
Select Corporate Users from the drop-down menu and click on the User Permissions tab on the task bar
•
Select the User ID to update from the users list
•
Using the arrow buttons, move the ERD Report permission to the user’s Active Services
Select desired services and
move from Inactive to Active
with the arrow buttons
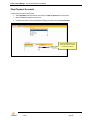
ERD Reports
To assign the ERD Reports
•
Select ERD Admin from the drop-down menu and click on the ERD Permissions tab on the task bar
•
Select the User ID to update from the users list
•
Using the arrow buttons, move the applicable reports to the user’s Active ERD Reports list
v. 040306
page 31
Online Treasury Manager Security Administration User Manual
First, select desired reports
and move from Inactive to
Active with the arrow buttons
Next, select a report from the
Active list and click the Permit
Accounts button
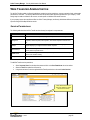
To assign the user’s accounts
From the ERD Permissions page,
•
Select a report from the Active ERD Reports listing. Note: select only one ERD report at a time.
•
Click the Permit Accounts button
Online Treasury Manager displays the user’s account permissions for the selected report.
First, select the desired report
accounts and move from Available
to Permitted with the arrow
buttons
Click the Permit Reports button
to return to the list of Active
Reports
•
Using the arrow buttons, move the desired accounts to the user’s Permitted list
•
Click the Permit Reports button
Online Treasury Manager returns you to the ERD Permissions page. Repeat the account assignment for each of the user’s Active
ERD Reports.
v. 040306
page 32
Online Treasury Manager Security Administration User Manual
IMAGES ADMINISTRATION
For the Images module, the Security Administrator assigns the service permissions and accounts for each user.
Note: For image retrieval, access to the viewer requires the installation of the ImageInsight Java applet. To download the applet,
please see Accessing Images in the Overview section of this document.
Service Permissions
The following table describes the Images services that may be assigned to a corporate user:
SERVICE CODE
DESCRIPTION
ImageSearch
Provides query to a image or range of images from the SunTrust image
archive. Images of most paper-based transaction including paid checks,
deposited tickets, deposited items, and account adjustments
ImageHistory
A list, by category, of all images retrieved (using the image search function) is
presented on the Image History for one business day. Provides fast access to
any item that was recently retrieved.
To add Images service permissions,
•
Select Corporate Users from the drop-down menu and click on the User Permissions tab on the task bar
•
Select the User ID to update from the users list
•
Using the arrow buttons, move the Images permissions to the user’s Active Services
Select desired services and
move from Inactive to Active
with the arrow buttons
v. 040306
page 33
Online Treasury Manager Security Administration User Manual
Image Accounts
To assign user’s accounts for Images,
•
Select Images from the drop-down menu and click on Image Accounts tab on the task bar
Select the desired accounts
and move from Inactive to
Active with the arrow buttons
•
Select the User ID to update from the users list
•
Using the arrow buttons, move the applicable Image accounts to the user’s Active Accounts
v. 040306
page 34
Online Treasury Manager Security Administration User Manual
POSITIVE PAY ADMINISTRATION
During the check fraud prevention process, SunTrust compares your issued check register to the checks presented for payment.
SunTrust identifies exception checks, or checks that do not meet the exception criteria, and sends the exception check information to
Online Treasury Manager’s Positive Pay.
With Positive Pay, you have until the daily cutoff time to review the exception checks and add processing instructions, which tell
SunTrust whether to pay or return the exception checks. If you do not enter processing instructions for an exception check, your
default payment instructions dictate whether to pay or return the check.
Reverse Positive Pay is an optional service that allows you to receive a list of checks from SunTrust when they are presented. With
Reverse Positive Pay, you have until the daily cutoff time to submit your return decisions.
For the Positive Pay module, the Security Administrator assigns the service permissions and accounts for each user.
Note: For image retrieval, access to the viewer requires the installation of the ImageInsight Java applet. To download the applet,
please see Accessing Images in the Overview section of this document.
Service Permissions
The following table describes the Positive Pay services that may be assigned to a corporate user:
SERVICE CODE
DESCRIPTION
PPRept
To display exception checks, display images of exception checks (for Image
services subscribers), indicate whether the bank should pay or return the
exception check, and a manual check issue and manual check void requests.
PPIssueRept
Display manual check issues and manual voids placed on your accounts.
PPManIssue
To add manual check issue records.
PPManVoid
To add manual check void records.
PPCRRqst
For reverse positive pay decision-making - to input return requests for one or
more paid checks from the previous business day
To add Positive Pay service permissions,
•
Select Corporate Users from the drop-down menu and click on the User Permissions tab on the task bar
•
Select the User ID to update from the users list
•
Using the arrow buttons, move the Positive Pay permissions to the user’s Active Services
v. 040306
page 35
Online Treasury Manager Security Administration User Manual
Select desired services and
move from Inactive to Active
with the arrow buttons
Positive Pay Accounts
To assign user’s accounts for Positive Pay,
•
Select Positive Pay Admin from the drop-down menu and click on Pos Pay Accounts tab on the task bar
•
Select the User ID to update from the users list
•
Using the arrow buttons, move the applicable Positive Pay accounts to the user’s Active Accounts
Select desired services and
move from Inactive to Pending
with the arrow buttons, and
click Submit
Select desired accounts and
move from Inactive to Active
with the arrow buttons
v. 040306
page 36
Online Treasury Manager Security Administration User Manual
STOP PAYMENT ADMINISTRATION
For the Stop Payment module, the Security Administrator assigns the service permissions and accounts for each user.
Note: For image retrieval, access to the viewer requires the installation of the ImageInsight Java applet. To download the applet,
please see Accessing Images in the Overview section of this document.
Service Permissions
The following table describes the Stop Payment services that may be assigned to a corporate user:
SERVICE CODE
DESCRIPTION
StopPay
Make check inquiries and perform stop payment add and delete requests.
StopPayRpts
Review all stop payment requests, check inquiries, and stop payment
cancellations generated through the Online Treasury Manager for specified
timeframe.
To add Stop Payment service permissions,
•
Select Corporate Users from the drop-down menu and click on the User Permissions tab on the task bar
•
Select the User ID to update from the users list
•
Using the arrow buttons, move the applicable Stop Payment permissions to the user’s Active Services
Select desired services and
move from Inactive to Active
with the arrow buttons
v. 040306
page 37
Online Treasury Manager Security Administration User Manual
Stop Payment Accounts
To assign user’s accounts for Stop Payment,
•
Select Stop Admin from the drop-down menu and click on Stop Pay Accounts tab on the task bar
•
Select the User ID to update from the users list
•
Using the arrow buttons, move the applicable Stop Payment accounts to the user’s Active Accounts
Select desired accounts and
move from Inactive to Active
with the arrow buttons
v. 040306
page 38
Online Treasury Manager Security Administration User Manual
WIRE TRANSFER ADMINISTRATION
For the Wire Transfer module, the Security Administrator assigns the service permissions, accounts, transaction limits, and template
permissions for each user. The Security Administrator also sets the wire transfer approval requirements for your company. These
settings may be made as a default for all accounts, or made specific to individual wire transfer accounts.
If your company imports wire transfer batch files into Online Treasury Manager, the Security Administrator defines the format of the
import file using the Wire Map Definitions service.
Service Permissions
The following table describes the Wire Transfer services that may be assigned to a corporate user:
SERVICE CODE
DESCRIPTION
MTIn
To add wire transfer requests, using wire templates or free-form requests.
MTApprove
Manages pending wire transfer requests that require approval. Approve
requests, delete requests, edit requests, and unlock requests from their user
ID.
MTRpts
To request and view processed wire transfer reports. The Outgoing Wire
Report displays your approved wire transfer requests.
MTCustTempl
To add and manage wire transfer templates for their own personal use or for
use by other Corporate Users.
MTBShortList
To add and manage Bank Short List, which is a personalized list of banks you
use for wire transfer activity.
MTImport
To import a wire transfer batch files from an outside source.
To add Wire Transfer service permissions,
•
Select Corporate Users from the drop-down menu and click on the User Permissions tab on the task bar
•
Select the User ID to update from the users list
•
Using the arrow buttons, move the applicable Wire Transfer permissions to the user’s Active Services
Select desired services and
move from Inactive to Active
with the arrow buttons
v. 040306
page 39
Online Treasury Manager Security Administration User Manual
Wire Transfer Accounts
To assign user accounts for Wire Transfer,
•
Select Wire Admin from the drop-down menu and click on the Wire Accounts tab on the task bar
•
Select the User ID to update from the users list
•
Using the arrow buttons, move the applicable accounts for Wire Transfer to the user’s Active Accounts
•
Once the accounts are active for the user, highlight the appropriate accounts and click the Change Entry/Approval Limits
button
First, select the desired accounts and
move from Inactive to Active with the
arrow buttons
Next, select the appropriate
Active Accounts and click the
Change Entry/Approval Limits
button
Online Treasury Manager displays the wire account limits screen.
Enter the user’s single and
total dollar entry limit per day
for this account
Enter the user’s single and total
dollar approval limit per day for
this account
Check this box if the user may
only enter template wires
Check this box if the user can
enter drawdown requests
Enter the user’s limits and authorizations
•
Max Entry – the maximum amount the user may enter a wire transfer request for this account
•
Max Entry per Day – the maximum total amount the user may enter wire transfer requests for this account
•
Max Approval – the maximum amount the user may approve a wire transfer from this account
•
Max Approval per Day – the maximum total amount the user may approve a wire transfer from this account
v. 040306
page 40
Online Treasury Manager Security Administration User Manual
•
Template Only – click this check box if the user may only enter wires created from a template for this account
•
Allow Drawdowns – click this check box if the user may enter drawdown request wires from this account
•
Click the Submit button to save your entries.
Template Permissions
The Wire Transfer template permissions control the:
• bank-defined repetitive templates a user can access
• maximum amount a user can enter or approve for each bank-defined repetitive
• maximum amount a user can enter or approve each day for a bank-defined repetitive
To update a repetitive template for a user
•
Select WT Admin from the group drop-down menu, and click on the Template Permissions tab on the task bar
•
Select a User ID from the list
Online Treasury Manager displays the user’s list of active and inactive bank repetitive templates.
First, select the desired templates
and move from Inactive to Active
with the arrow buttons
Next, select the appropriate
Active Templates and click the
Change Entry/Approval Limits
button
•
Move the desired template(s) to the Active Templates list, using the arrow buttons
•
Highlight the appropriate Active Templates, and click on the Change Entry/Approval Limits button
Online Treasury Manager displays the wire transfer entry and approval limits for the user’s active templates.
•
Enter the Max Entry - the maximum wire transfer amount the user can enter for each template. Use 0 for a zero limit, None
for no limit, or a dollar amount, including the decimal point.
•
Enter the Max Entry per Day - the maximum daily total the user can enter for each template. This amount must be greater
than or equal to the Max Entry field.
•
Enter the Max Approval – the maximum wire transfer amount the user can approve for each template
•
Enter the Max Approval per Day – the maximum total the user can approve for each template. This amount must be
greater than or equal to the Max Approval field.
•
Click the Submit button to save your changes.
v. 040306
page 41
Online Treasury Manager Security Administration User Manual
Enter the user’s single
and total entry limit per
day for this template
Enter the user’s single and
total approval limit per day
for this template
Approval Requirements
The approval requirements are your company’s settings for each wire transfer type: repetitive, non-repetitive and free-form. These
settings may be made as a default for all accounts, or made specific to individual wire transfer accounts.
The approval settings you can choose for each wire transfer type are:
0
No one approves wire transfers using this account. The person that enters the wire also
sends the wire (providing that he/she has a valid PIN.)
1
One person must approve wire transfers using this account. One person enters the wire, and
a second person logs in to approve (send) the wire.
2
Two people must approve wire transfers using this account.
Dynamic
Not Available
The number of approvers varies within a specific wire amount dollar range.
Users cannot add wire transfers using the selected account.
Please note: the settings you indicate for non-repetitive and free-form should be the same, as SunTrust’s MTS system treats these
transaction types the same.
To specify your default wire approval settings
•
Select Wire Admin from the drop-down group list and click on the Approval Reqs tab on the task bar
•
Click on All Accounts from the account listing
v. 040306
page 42
Online Treasury Manager Security Administration User Manual
Click on the All Accounts selection
from this list
Online Treasury Manager displays the Approval Requirements screen.
Select the number of
approvals required for
each wire transfer type
If dynamic approval is selected, enter
the amount ranges for each required
number of approval
Click the Change Limits
button to update the
dynamic limit ranges
•
Select the Repetitive, Non-repetitive and Free-Form wire approval requirement from the respective drop-down boxes.
The approval requirement for non-repetitive and free-form should be the same
•
If you select dynamic as the approval requirement, enter the amount ranges to assign to the number of approvals required
•
Click the Submit button
To specify the wire approval setting by account
Click on the desired account from the approval requirements selection screen. Online Treasury Manager displays the Approval
Requirement screen.
•
Clear the Apply All Accounts Setting? check box
•
Select the Repetitive, Non-repetitive and Free-Form wire approval requirement from the respective drop-down boxes.
The approval requirement for non-repetitive and free-form should be the same.
•
If you select dynamic as the approval requirement, enter the amount ranges to assign to the number of approvals required
•
Click the Submit button
v. 040306
page 43
Online Treasury Manager Security Administration User Manual
Wire Map Definition
In order to import a wire transfer batch file into Online Treasury Manager, the import file must have a defined map. Online Treasury
Manager supports the import of any outgoing wire type – repetitive, non-repetitive, domestic, and international (USD and foreign
currency) in delimited or fixed format files. A delimiter, such as a comma or semi-colon, separates the fields on each record in a
delimited import file. The fields on each record in a fixed import file always start in the same position and are the same length.
The custom maps are a one-time setup to instruct Online Treasury Manager how to map the fields on an import file. Separate maps
are required for free-form (payment map) and repetitive (or template map) wire transaction types. For delimited and fixed files, the
Security Administrator defines a map using the MTWire Map Definitions service.
To view your Wire Import map definitions
•
Select Wire Transfer from the drop-down menu and click on the Wire Map Definitions tab on the task bar
•
Click the Find/Refresh button to list your maps
•
Select the map from the listing and click the Display button
Click Find/Refresh to
list maps
Select import map from
list and click Display
v. 040306
page 44
Online Treasury Manager Security Administration User Manual
To add a delimited or fixed Wire Transfer map:
•
Select Wire Transfer from the drop-down menu and click on the Wire Map Definitions tab on the task bar
•
Select Delimited or Fixed from the Format drop-down list
•
Click the Add button
Select the map Format
then, click the Add
button
Online Treasury Manager presents the Map Type selection screen
•
Click the Payment (non-repetitive) or Template (repetitive) radio button
•
Click the OK button
Select Map Type and click OK
v. 040306
page 45
Online Treasury Manager Security Administration User Manual
Delimited Template format
When you select the delimited template format, Online Treasury Manager displays the Wire Map Definition page for repetitive wires.
Enter the Map Code
Enter a descriptive Map Name
Select the delimiter type
Select other file characteristics
as needed
Enter field positions of the
delimited import template file
In the Map Characteristics section:
•
Enter an Map Code of up to 12 alpha-numeric characters
•
Enter a descriptive Map Name for the wire transfer map
•
Select the field Delimiter from the drop-down list of symbols
•
Select the Skip Header Record, Striop Quotes and End of Record radio choices
Define the fields on the file to the Map
•
Enter the Field Position on the Import File for the following required fields:
o Template ID
o Transaction Amount
o Send Date
•
Enter positions of remaining fields, if provided on the import file
•
Specify any special formatting and if leading blanks or zeros should be stripped
•
Click the Add button
Note: Field limits are indicated in parentheses. If a field on the import file is longer than the limit, Online Treasury Manager loads up
to the limit number of characters for the field and truncates all characters to the right.
v. 040306
page 46
Online Treasury Manager Security Administration User Manual
Delimited Payment format
When you select the delimited payment, Online Treasury Manager displays this Wire Map Definition page for non-repetitive wires:
Enter the Map Code
Enter a descriptive Map Name
Select the delimiter type
Select other file characteristics
as needed
Enter field positions of the
delimited import non-repetitive
file
v. 040306
page 47
Online Treasury Manager Security Administration User Manual
In the Map Characteristics section:
•
Enter an Map Code of up to 12 alpha-numeric characters
•
Enter a descriptive Map Name for the wire transfer map
•
Select the field Delimiter from the drop-down list of symbols
•
Select the Skip Header Record, Striop Quotes and End of Record radio choices
Define the fields on the file to the Map
•
Enter the Field Position on the Import File for the following required fields:for the
o Debit Account Number
o Transaction Amount
o Transaction Currency
o Send Date
o Beneficiary Bank Code or Beneficiary Bank Name and Address 1
o Beneficiary Account Number
o Beneficiary Name
•
Enter positions of remaining fields, if provided on the import file
•
Specify any special formatting and if leading blanks or zeros should be stripped
•
Click the Add button
Note: Field limits are indicated in parentheses. If a field on the import file is longer than the limit, Online Treasury Manager loads up
to the limit number of characters for the field and truncates all characters to the right.
v. 040306
page 48
Online Treasury Manager Security Administration User Manual
Fixed Template format
When you select the fixed template format, Online Treasury Manager displays this MTWire Definition page for repetitive wires:
Enter the Map Code
Enter a descriptive Map Name
Select Skip Header Record
Select End of Record Method
Enter Start positions and Field
Lengths of the fixed template
import file
In the Map Characteristics section:
•
Enter a Map Code of up to 12 alpha-numeric characters
•
Enter a descriptive Map Name for the wire transfer map
•
Select the Skip Header Record and End of Record radio buttons
Define the fields on the file to the Map
•
Enter the Field Position Start and Length of each record on the import file for the following required fields:
o Template ID
o Transaction Amount
o Send Date
•
Enter positions of remaining fields, if provided on the import file.
•
Specify any special formatting and if leading blanks or zeros should be stripped
•
Click the Add button
Notes: All records in a fixed format file must be the same length. When determining the length of a record, include line feeds in the
total length.
Field limits are indicated in parentheses. If a field on the import file is longer than the limit, Online Treasury Manager loads up to the
limit number of characters for the field and truncates all characters to the right.
v. 040306
page 49
Online Treasury Manager Security Administration User Manual
Fixed Payment format
When you select the fixed payment format, Online Treasury Manager displays this MTWire Definition page for non-repetitive wires:
Enter the Map Code
Enter a descriptive Map Name
Select Skip Header Record
Select End of Record Method
Enter Start positions and Field
Lengths of the fixed nonrepetitive import file
v. 040306
page 50
Online Treasury Manager Security Administration User Manual
In the Map Characteristics section:
•
Enter an Map Code of up to 12 alpha-numeric characters
•
Enter a descriptive Map Name for the wire transfer map
•
Select the Skip Header Record and End of Record radio buttons
Define the fields on the file to the Map
•
Enter the Field Position Start and Length of each record on the import file for the following required fields:
o Debit Account Number
o Transaction Amount
o Transaction Currency
o Send Date
o Beneficiary Bank Code or Beneficiary Bank Name and Address 1
o Beneficiary Account Number
o Beneficiary Name
•
Enter positions of remaining fields, if provided on the import file.
•
Specify any special formatting and if leading blanks or zeros should be stripped
•
Click the Add button
Notes: All records in a fixed format file must be the same length. When determining the length of a record, include line feeds in the
total length.
Field limits are indicated in parentheses. If a field on the import file is longer than the limit, Online Treasury Manager loads up to the
limit number of characters for the field and truncates all characters to the right.
v. 040306
page 51