1
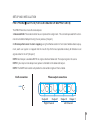
WADAX
The Art of Music Recreation
PRE1 PHONO
USER MANUAL
Thank you for purchasing the WADAX PRE1 Phono.
Please take some time to read this manual.
It will provide you with useful information to make your pleasure of listening to
the PRE1 even higher.
2
Index
Introduction
4
Set-up and Installation
6
■ Preliminaries
6
■ Unpacking
6
■ Choice of amplifier location
7
■ Power Supply
7
■ Connections
9
■ RC1 Remote Control
12
■ Phono section
16
■ Defeating the line stage: Phono stage and Pure DAC
20
■ PRE1 Phono REMAPPING
21
■ Hermes Streaming
22
Recommendations to obtain the best results
■ Cleaning
23
23
3
INTRODUCTION
PRE1 - UNIVERSAL PREAMPLIFIER
The PRE1 is an extremely high-quality universal preamplifier. Equipped with analog and digital inputs and analog outputs, the PRE1 is for any user seeking a unique, immersive, playback experience - it can be integrated into any system or can become part of the Wadax System concept.
Following Wadax design criteria of extreme performance and simplicity, the PRE1 acts both as a
State-of-the-Art preamplifier and digital/analogue converter. This way, the playback chain is shorter, more accurate, more musical.
The PRE1 accepts inputs from a computer – USB and Ethernet-, hi-fi equipment –SPDIF, TOSLINK, BNCand stereo line inputs and phono cartridge (PRE1 PHONO). It can also be connected to any amplifier
through its singled-ended or balanced outputs. Internal design follows a true-balanced topology, and
it has digital outputs in order to connect the PRE1 with digital input speakers, for a lossless connection.
The latest feature added to the PRE1 is the phono module, which allows the most accurate and musical
vinyl playback created to date. Wadax NanoVolt amplifier inside the PRE1 Phono amplfy weak analog signals from MC or MM cartridges before converting the signal to digital.
4
WARNING!
No connection or manipulation may be made before reading these instructions and observing all safety warnings. This extremely high quality Preamplifier possesses new technical features which are or will become necessary for accurate power amplification of high
quality analog sources.
Observe general electrical safety precautions particularly with regard to avoiding water,
moisture and heat. To reduce the risk of electric shock do not remove the covers and refer
servicing to qualified personnel. The installation instructions must be carried out in full and
the mentioned precautions taken to provide the satisfaction the PRE1 is designed to provide and to avoid jeopardizing personal and equipment safety or impairing performance.
Nevertheless, in the PRE1 Preamplifier, Wadax engineering excellence delivers extreme performance in a simple and convenient format that we hope you will enjoy for
many years to come.
5
SETUP AND INSTALLATION
PRELIMINARIES
For exacting technicians, musicians, and all high-fidelity music purists who demand the very best in
reproduction, we strongly recommend the use of top quality power amplifiers, since most of the analog
signal integrity delivered by the preamplifier, it can be destroyed by using lower quality amplifiers. The
connection between the analog sources and the preamplifier as well as between the preamplifier and
the power amplifiers are also critical. Ultra low reflection interconnect cables are absolutely mandatory
to retain the time integrity that the preamplifier is designed to provide.
UNPACKING
You will find within the two WADAX PRE1 PHONO transit boxes:
■ The PRE1 Phono
■ The mains powercord.
■ This manual.
■ The RC1 Remote Control.
Please keep the packaging in case you need to transport the PRE1 any time in the future. This packaging has been designed specifically to protect the PRE1 in transit. Use of alternative packaging is likely
to result in damage, invalidating warranty cover.
6
SETUP AND INSTALLATION
CHOICE OF PREAMPLIFIER LOCATION
The Wadax PRE1 has been especially designed to minimize vibration effects on the audiocircuits. The
preamplifier has been designed with four adjustable conical feet. These are used to ensure proper vibration transmission to the preamplifier support in order to evacuate all detrimental vibrations inside
the unit, following Wadax Mechalock fundamentals.
WARNING!
If the line voltage provided is not appropriate as supplied, please consult your dealer.
ATTENTION: At the 220V position, the Wadax PRE1 preamplifier will function properly for main
line voltages between 200V and 240V. At the 110V position, the main line must deliver between
105 and 125V. If your main supply operates out of these tolerances, please consult your Wadax
dealer.
This fuse is located on the power cord receptacle and can be accessed by raising the cover
using a small screwdriver when the power cord has been removed (ensuring power is disconnected before handling). Use a 2.5A slowblow fuse. Always ensure that the fuse cover is fitted.
7
SETUP AND INSTALLATION
POWER SUPPLY
The main POWER switch is located on the back panel of the Wadax PRE1. In regular use, this switch
should be left permanently ON and the circuits of the preamplifier activated or deactivated using the
STANDBY ON/OFF in the remote control.
When the POWER switch is switched ON, the preamp will become operative after few seconds delay to ensure proper stabilization of all the circuitry and avoid any unwanted noise.
After this delay, the output of the preamplifier is connected to
the power amplifier.
The preamplifier can be powered off by switching the
POWER switch to the OFF position. A special safety circuit
switches the preamp to MUTE to avoid any disturbance reaching the power amplifier and the speakers, even if the preamplifier is disconnected from the mains
supply by accident. .
8
SETUP AND INSTALLATION
CONNECTIONS
Warning! Always remember that a plug with bared connectors is dangerous if in contact
with a live socket. This appliance must be earthed. Connect the non-rewireable power cord
supplied to the back of the power supply and plug it into the nearest wall plug. Use only a 3
lugs grounded plug, for safety and noise reasons. Replacement mains leads can be obtained from your Wadax retailer. To get the best sound of the preamplifier, avoid any multiple
plugs or extension cords.
Warning! Take care to always handle the cable by the connectors. Never twist the cable excessively or attempt to connect or disconnect the connector by handling the cable body in
place of the connector. Connect the cabling from the power supply output to the preamplifier
input point labeled “Power”.
Warning! The next stage in setting up your Wadax PRE1 is to connect your sources, power
amplifiers and other peripheral devices. All devices should be disconnected from mains
power until safe.
9
SETUP AND INSTALLATION
CONNECTIONS: INPUTS
USB
TOSLINK AES/EBU
TOSLINK
EARTH
WADAX DIGITAL OUT
SPDIF OUT WCLK SYNC
STREAM
GAIN
AES|EBU
0
1
2
USB
BNC
RIGHT ANALOG OUTPUTS
2R
2R
1R
LEFT RIGHT OUTPUTS
1R
2L
2L
1L
Phono INPUT
RCA & BNC SPDIF IN
MC
MM
RCA2
RCA1
LINK
ANALOG INPUTS
1L
1R
1L
Analog IN 1
(DISABLED IN PRE1 PHONO)
2R
2L
Analog IN 2
10
SETUP AND INSTALLATION
CONNECTIONS: OUTPUTS
WADAX DIGITAL OUTPUT
WADAX DIGITAL OUT
EARTH
SPDIF OUT WCLK SYNC
OUTPUT 2:
RIGHT CHANNEL
AUX SYNC OUT
SPDIF OUT
STREAM
OUTPUT 1:
RIGHT CHANNEL
USB
OUTPUT 2:
LEFT CHANNEL
OUTPUT 1:
LEFT CHANNEL
11
SETUP AND INSTALLATION
RC1 REMOTE CONTROL
The WADAX PRE1 is designed to capture, control, shape and nurture the fragile source inputs, supporting
adjustment of volume and balance and other functions to deliver your desired output signal. The primary
control functions supporting these processes are outlined below. The RC1 Remote control uses 2 x
CR3032 3V batteries.
12
SETUP AND INSTALLATION
RC1 REMOTE CONTROL
To activate STANDBY mode, use the remote control top right key.
To select the source you want to listen to, use the left-hand rotary switch
or use the remote control keys 1-9. 1 to 7 access digital inputs and 8-9 for
analog inputs:
DIGITAL INPUTS
ANALOG INPUTS
1,2:RCA SPDIF
8: PHONO (PRE1 Phono)
3: BNC SPDIF
4: AES/EBU
Analog IN1 (PRE1)
9: Analog IN2
5: HERMES (IF INSTALLED)
6: TOSLINK
7: USB
13
SETUP AND INSTALLATION
RC1 REMOTE CONTROL
To change VOLUME / BALANCE / MUTE: The right-hand volume level
adjustment knob is used to adjust VOLUME. If volume is set to a value of
zero, outputs will be muted.
To change BALANCE from left to right, the remote control will be needed. For
this there are BAL keys on the RC1 control. Press the MUTE to mute output..
To enter SETUP: Press SETUP key on the RC1 Remote control.
The display will show SETUP. Use VOL UP/DOWN key to move between
different SETUP options. Once a SETUP option is on display, to enter further options press the OK key. Use VOL UP/DOWN keys to change values
and press OK again to set it. This value is saved in the internal memory
of the PRE1 and will remain even though power supply is turned off. Press
EXIT key to go back to SETUP menu options.
14
SETUP AND INSTALLATION
RC1 REMOTE CONTROL
SETUP OPTIONS SEQUENCE FOR FIRMWARE V2.27:
■ Balance L/R:
Changes Left to Right balance.
■ Output Level:
Sets maximum output level voltage to 5V, 2V or 1V.
■ Input Level:
Adjusts input level gain so sources match in level.
■ Display bright.:
Changes brightness.
■ Restore default:
Restores factory default settings.
■ Firmware version:
Displays current firmware version.
■ Map Load:
To load a new Map into the MusIC board.
■ Phase:
Changes output absolute phase NORMAL or INVERTED.
The WADAX key, located to the right of 9, gives a direct access to this
change.
■ Mode:
Sets the use of ANALOG IN1: Phono (PRE1 Phono) or LINE
(PRE1)
15
SETUP AND INSTALLATION
PRE1 PHONO
Phono back panel connections
The PRE1 Phono represents a New Paradigm in phono playback quality standards. The way signal is handled, reconstructed and delivered is different from what is used until now. Please
refer to WADAX PRE1 PHONO white paper for further info.
For installation, please ensure that the cartridge output is
sent directly to the PRE1 PHONO, WITHOUT any step-up device in between. If done, the message ANALOG OVERLOAD
Phono INPUT
Phono INPUT
Cartridge type
Gain selection
will be shown on the PRE1 display.
Once connected, please choose cartridge type with the level switch (MC/MM). In the way the PRE1
Phono operates, there is no need to do any cartridge loading adjustment, as in traditional analog equipment. The last step is GAIN selection. Ideally, the gain setting should be as high as possible, without receiving ANALOG OVERLOAD message on the display. The recommendation is to start with highest gain
setting (2) and decrease it if the message appears. The gain order is 2 for top gain, 1 for middle gain
and 0 for the lowest.
16
SETUP AND INSTALLATION
PRE1 PHONO
WARNING:
On a PRE1 Phono, the ‘ANALOG 1’ input will not work.
Please use ANALOG2 input instead.
IMPORTANT: Each output is available BOTH on single ended and balanced.
The output signal is the same.
IMPORTANT: If you require more output level, power is doubled on the balanced
output..
17
SETUP AND INSTALLATION
PRE1 PHONO ■ OUTPUTS (FOR STOCK, UNCUSTOMIZED UNITS)
The PRE1 Phono has 2 sets of stereo ouputs and the output is a RIAA reconstruction with an improved time
alignment . This is to compensate for the common time distortion footprint during the cut process.This is how
the PRE1 is delivered from the factory.
NOTE: Each output is available BOTH on single ended and balanced. The output signal is the same.
NOTE: If you require more output level, power is doubled on the balanced output.
NOTE: The EARTH connection will provide the connection to ground the turntable.
Earth connection
Phono output connections
EARTH
Output 2
Output 1
Right Channel
Output 2
Output 1
Left Channel
18
SETUP AND INSTALLATION
PRE1 PHONO ■ OUTPUTS (FOR CUSTOMIZED OR ‘MAPPED’ UNITS)
The PRE1 Phono has 2 sets of stereo outputs:
1. Advanced RIAA: The reconstruction has an improved time alignment . This is to compensate for the common time distortion footprint during the cut process. (Output 1).
2. Ultimate performance: Custom mapping: using the Wadax custom LP and some Wadax dealer equipment, each user system is mapped into the musIC chip for the best possible recovery of delicate music
signals stored in the LP. (Output 2).
NOTE: Each output is available BOTH on single ended and balanced. The output signal is the same.
NOTE: If you require more output level, power is doubled on the balanced output..
NOTE: The EARTH connection will provide the connection to ground the turntable.
Earth connection
Phono output connections
EARTH
Output 2
Output 1
Right Channel
Output 2
Output 1
Left Channel
19
SETUP AND INSTALLATION
PRE1 PHONO AS A PHONO STAGE AND DAC ■ DiVin AND PureDAC
Although the best results are attained when the PRE1 Phono drives the power amplifier directly, the unit
allows to deactivate the internal preamplifier and perform as a pure phono stage and as a stand alone DAC.
The internal preamplifier can be deactivated (or reactivated) by means of the remote control.
The key sequence required is:
1. Press SETUP
2. Press VOL UP key until the FIRMWARE message shows on the display.
3. Press OK
4. The display will show PREAMPLIFIER ON or PREAMPLIFIER OFF. Use VOL UP to select the desired value.
5. Once selected, press EXIT. The display will then show “Are you sure?”.
6. If you do NOT want to proceed with the changes, press SETUP and you will exit the menu.
7. If you DO want to proceed with the changes, a sequence of three keys must be pressed: WADAX, 9,
WADAX.
NOTE: The WADAX key is located to the right of ‘9’.
As soon as the last key is pressed, the required action will be done.
WARNING: Wadax assumes no liability for any damages that may occur due to improper handling or setup.
20
SETUP AND INSTALLATION
PRE1 PHONO ■ REMAPPING
The core of the PRE1 Phono is the Wadax propietary musIC chip. The parameters at which it operates are
stored in ‘maps’. The specific behaviour of a phono playback chain (cartridge, tonearm, loading, ..) is defined
in the map. The PRE1 Phono is shipped by default with a time aligned RIAA reconstruction but the user’s particular setup is not considered. To reach extreme performance, a characterization of the user system needs
to be done by the Wadax Lacquer and the approved recorder. The recording done is to be sent to Wadax and
after analysis the user will receive by e-mail two files that should be copied into a pendrive and inserted into
the PRE1 Phono. The following sequence should be followed to load the new files into the PRE1 MusIC board.
The key sequence required is:
1. Press SETUP
2. Press VOL UP key until the Map Load message shows on the display.
3. Press OK
4. The display will then show “Are you sure?”.
6. If you do NOT want to proceed with the changes, press SETUP and you will exit the menu.
7. If you DO want to proceed with the changes, a sequence of three keys must be pressed: WADAX, 9,
WADAX.
NOTE: The WADAX key is located to the right of ‘9’. NOTE: The pendrive must be formatted in FAT32.
As soon as the last key is pressed, the process will start. The total load process will take 3-4 minutes.
21
SETUP AND INSTALLATION
PRE1 PHONO ■ HERMES STREAMING
The Hermes Streamer built into the PRE1 (if installed), allows for audio file streaming with the best possible
quality. Supported file formats are FLAC (up to 192KHz | 24bits), WAV(up to 192KHz | 24bits), Apple Lossless
(ALAC -up to 192KHz | 24bits), WMA, MP3. The Hermes Streamer requires a server, a control point and a DHCP
server in the network. It is highly reccomended a professional computer network installer/dealer to guide/do
the home install.
The server hosts the audio file database and the control point is the user interface to control the streaming
playback. Although the Hermes Streamer is uPnP compatible, Wadax recommends Asset uPnP server from
Illustrate (PC) and Songbook Lite (available for iPad/iPhone, Android).
22
RECOMMENDATIONS TO OBTAIN THE BEST RESULTS
1. WARM-UP SONIC EFFECT:
If the preamplifier has been left un-powered for some time, the optimum sound quality may only be attained after 6 TO 24 hours. The critical circuits have to warm up to around +55 degrees Celsius (+131
degrees Fahrenheit) before achieving their optimal performances. This is why WADAX recommends
that the PRE1 is always powered on.
2. Use Hermes Streaming (if available), SPDIF sources (BNC, RCA) for best results. USB performance
heavily depends on the data source due to low quality signal resampling applied by the Operating
Systems of most computers. For this and other reasons WADAX does not reccommend using USB as
a top quality data source.
3. Absolute phase: From firmware version 2.16, the absolute phase can be toggled with the Wadax key on the remote for quick A/B evaluation. The Wadax key is the key to the right of ‘9’. Recorded music sound best when inverted
because they were recorded this way. It is a good listening practice to find best results inverting absolute polarity.
CLEANING
Use a soft, dry cloth to wipe dust off the music system. Do not use liquid cleaners or aerosol cleaners. Wipe
dust off the surfaces using a dry, soft cloth. To remove stains or dirt, use a soft,.damp cloth and a solution of
water and mild detergent, such as washing-up liquid.
23
Waste Electrical and Electronic Equipment (WEEE) Environmental protection
The European Parliament and the Council of the European Union have issued the
Waste Electrical and Electronic Equipment Directive. The purpose of the Directive
is the prevention of waste of electrical and electronic equipment, and to promote
the reuse and recycling and other forms of recovery of such waste. As such the Directive concerns producers, distributors and consumers.
The WEEE directive requires that both manufacturers and end-consumers dispose of
electrical and electronic equipment and parts in an environmentally safe manner, and that equipment and
waste are reused or recovered for their materials or energy. Electrical and electronic equipment and parts
must not be disposed of with ordinary household refuse; all electrical and electronic equipment and parts
must be collected and disposed of separately. Products and equipment which must be collected for reuse,
recycling and other forms of recoveryare marked with the pictogram shown.
When disposing of electrical and electronic equipment by use of the collection systems available in
your country, you protect the environment, human health and contribute to the prudent and rational
use of natural resources. Collecting electrical and electronic equipment and waste prevents the potential contamination of nature with the hazardous substances which maybe present in electrical and
electronic products and equipment.
Your Wadax retailer will assist with and advise you of the correct way of disposal in your country.
24
SPECIFICATIONS:
PRE1 - PRE1 PHONO HERMES
Power consumption ON/Stand-by: 30W/<1.5W
Digital input lock range:
SPDIF: 32-192 KHz, 16-24 bits
BNC: 32-192 KHz, 16-24 bits
TOSLINK: 32-96 KHz, 16-24 bits
USB lock range(KHz): No driver is needed. 48 KHz, 16-24 bits
Digital output: BNC SPDIF: 96KHz-24 bits.
Hermes Streaming: 32-192KHz, 16-24 bits. Supported formats FLAC, ALAC, WMA, WAV, MP3.
Analog inputs impedance: 18kohms
Analog input voltage at overload: 4V rms
Analog outputs impedance RCA/XLR: 75 ohms/150 ohms
Max output voltage RCA/XLR per leg: 5Vrms
Wadax Digital Outputs: RJ45 carrying high definition data traffic intended for WADAX SPEAKERS.
Phono loading: MC 100 Ohms||100pF. MM 47KOhms||100pF.
Custom mode compensates all loading effects in vinyl subsystem.
Weight: 20Kg. / 44 Lbs
Dimensions(WxDxH):
46.9cm x 34.1cm x 10.1cm
18.46”x13.42”x3.98”
This product is in conformity with the provisions of the Directives
25
WADAX
NORTH
AMERICA
www.wadax.us
[email protected]
R250712
NOTES
____________________________________________________________________________________________
____________________________________________________________________________________________
____________________________________________________________________________________________
____________________________________________________________________________________________
____________________________________________________________________________________________
____________________________________________________________________________________________
____________________________________________________________________________________________
27