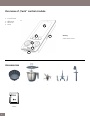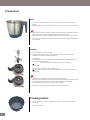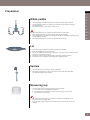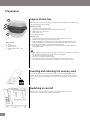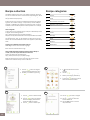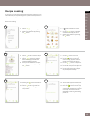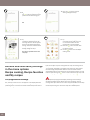
1
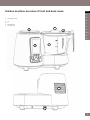
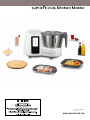
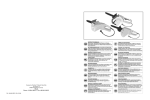
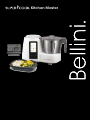
Kitchen Master
www.supercook.me
User manual SUPERCOOK
AUST
English
FR
DE
ES
Table of contents
Introduction2
Example uses of the multifunctional
kitchen machine
2
Important Safeguards
2
Care instructions
3
Warning3
Use of these operating instructions
4
Display and error messages
4
Kitchen machine overview of front and
back views
5
Overview of „Yumi“ control module
6
Accessories6
Getting started
7
Preparation8
Jar8
Knife8
Cooking basket
8
Whisk paddle
9
Lid9
Spatula9
Measuring cup
9
Vapore steam tray
10
Benefits of steaming
10
Using the Vapore
10
Inserting and removing the memory card
10
Switching on and off
10
IT
PT
Switching the control module on
for the first time
11
Menu structure
11
Settings
11
Date11
Time11
Standby timer
12
Screen saver
12
Language12
Volume12
Slide show
12
In-store promotion mode
13
Updating the „Yumi“ control module
13
FW version
13
Recipe collection
14
Recipe categories
14
Recipe cooking
15
Kitchen machine safety settings in the
menu options: Recipe cooking, Recipe
favorites and My recipes
16
Pre-programmed settings
17
Recipe favourites
17
My recipes
17
Help
17
Important instructions before started
17
Cleaning
17
Technical specifications
18
Copyright
18
NL
RUS
AR
HE
1
Introduction
Thank you for purchasing the SUPERCOOK kitchen machine. Please read
the user manual carefully and keep them in a safe place so you can refer
to them at a later date. We hope you enjoy using your kitchen machine and
that it produces good results.
Example uses of the multifunctional kitchen machine
• Puréeing fruit, vegetables, sauces and soups
• Mixing shakes and cocktails
• Pulverising sugar and dried chillies
• Grinding almonds and hazelnuts
• Grating fruit and vegetables
• Chopping onions and nuts
• Using the stirrer to emulsify mayonnaise and creams
• Grating cheese, breadcrumbs and potatoes
• Mixing light doughs, meringues and whipped cream
• Kneading yeast and bread dough
• Warming, frying and cooking at temperatures of 40 ° to 130 °C.
• Steaming in the Vapore steam tray or cooking basket
•
Important Safeguards
When using electrical appliances, in order to reduce the risk of
fire, electricshock and/or injury, these basic safety precautions
should always be followed:
For Your Safety
Read all instructions carefully, even if you are quite familiar with
the appliance
• To protect against the risk of electric shock, DO NOT IMMERSE main
body of this appliance, plug or power cord in water or any other liquid.
• This appliance is not intended for use by young children or infirm
persons unless they are adequately supervised by a responsible person
to ensure that they can use the appliance safely.
• Children should be supervised to ensure that they do not play with the
appliance.
• Switch off the power outlet and remove the plug before cleaning or
when not in use. To unplug, grasp the plug and pull from the power
outlet. Never pull the power cord. Never carry the appliance by the
power cord.
• Do not operate any appliance with a damaged power cord or plug; if the
appliance malfunctions; or if it is dropped or damaged in any manner.
• Do not allow the power cord to hang over the edge of a table or counter,
or touch hot surfaces.
• Do not operate or place any part of the appliance on or near any hot
surfaces (such as a hot gas or electric burner, or in a heated oven).
• Do not use this appliance for anything other than its intended use. This
product is intended for household use only.
• This appliance is intended to be plugged in a standard domestic power
outlet only.
• Do not attempt to repair, disassemble or modify the appliance. There
are no user-serviceable parts.
• Do not use outdoors.
• Operate on a dry level surface. Sinks, drainboards or uneven surfaces
must be avoided.
• The use of attachments or accessories not recommended or sold by the
manufacturer can cause fire, electric shock or injury.
• Never insert utensils into the appliance when the appliance is running.
• Allow to cool before cleaning.
• Do not use with an extension power cord.
• Store the unit indoors in a dry location.
• Do not operate under or near flammable materials, such as curtains,
drapes or any other combustible materials.
• Caution should be taken when handling this appliance as some
surfaces may be hot during and immediately after boiling. Severe burns
may result from misuse.
2
• Avoid contact with steam from the lid when water is boiling, or just after
the steamer has switched off. Take care when opening the lid when the
steamer has recently boiled, as steam can burn.
• Extreme caution is necessary when moving any appliance containing
hot water. Wait until the appliance has switched off automatically, or
switch it off manually before moving it.
• Do not move the appliance containing hot liquids or food.
• Do not touch food inside the bowl directly.
• Do not touch the appliance when it is producing steam. Use a cloth to
remove the steam compartment.
• To disconnect, remove plug from wall outlet.
• CAUTION: This appliance generates heat and escaping steam during
use. Proper precautions must be taken to prevent the risk of burns,
fires or other damage to persons or property.
• Do not touch any moving parts.
• Keep hands and utensils away from cutting blade while chopping food
to reduce the risk of injury to persons or damage to the food processor.
A plastic or wooden scraper may be used but only when the blender is
not running.
• Never attach the chopping blade without the bowl in place.
• Do not operate the appliance when empty.
• Do not operate any appliance with a damaged power cord or plug after
the appliance malfunctions, or is dropped or damaged in any manner.
• Ensure the bowl and lid are fitted correctly before starting appliance.
• Blades must stop completely before removing lid.
• Do not touch the blades when removing food from the bowl or when
removing the blades for cleaning as they are sharp.
• Do not attempt to override the cover lock mechanism.
• Do not touch the blades, especially when the appliance is plugged in.
The blades are very sharp.
• If the blades get stuck, unplug the appliance before you remove the
ingredients blocking the blades.
• The appliance becomes very hot during steaming and may cause burns
when touched. Only lift the bowl by its handle.
• Beware of hot steam that comes out of the steam basket during
steaming and when you remove its lid.
• Always unplug the appliance and let it cool down before you clean it.
• Never use the bowl or any other part of the appliance in a microwave,
as they are not suitable for this use.
• Never sterilise the bowl or any other part of the appliance in a steriliser
or in a microwave, as they are not suitable for this use.
• Do not use the appliance if it has fallen or is damaged in any way.
• Make sure that you do not overfill the bowl. Do not exceed the
maximum level indicated on bowl.
• When you steam ingredients, make sure that you do not overfill the
steam basket.
• When you blend liquids, do not exceed the maximum level indicated on
the bowl.
• Never connect this appliance to a timer switch or remote control
system in order to avoid a hazardous situation.
• Always check the consistency of baby food. Make sure there are no
chunks in the food.
• Turn the Measuring cup to lock position whilst using the machine at
high speeds or when using the Pulse function.
Warning
AUST
If the supply power cord is damaged, the power cord must be replaced by
the manufacturer, its service agent or similarly qualified persons in order to
avoid a hazard.
This product has not been designed for any uses other than those specified
in this booklet.
DE
Care instructions
IT
Handle the kitchen machine and accessories with care. The recommendations below will help you preserve your guarantee and ensure any
guarantee claims are valid.
1. Switch the kitchen machine off if you do not plan do use it for an
extended period.
2. Allow the kitchen machine to cool completely before cleaning.
3. Clean all components and accessories which come into contact
with food.
4. Use a soft, slight moistened cloth to clean the jar recess on the
kitchen machine.
5. The contacts under the jar must be kept clean and dry.
6. All accessories are dishwasher-safe.
7. To avoid the build-up of germs, clean the kitchen machine and sealing
rings after every use.
8. Never use abrasive or astringent detergents.
9. Any lime scale marks can be removed using vinegar.
10. It is normal for some discolouration to occur in the plastic accessories
from beta-carotin in carrots or tomatoes or spices in curry. You can
reduce the discolouration slightly by moistening a cloth with cooking
oil and rubbing the area gently. Then rinse off quickly with warm water,
then with cold water and a little washing-up liquid.
11.Only use the kitchen machine as described in these operating
instructions.
FR
ES
PT
NL
RUS
AR
HE
3
Use of these operating
instructions
This symbol indicates warnings which you must read before use:
Display and error messages
Symbol / Question /
Description of error
4
Explanation
Solution
The jar is not sealed correctly or the safety switch is not working.
Please check the seal again.
The kitchen machine has an error in the electrical circuit.
Please contact 1300 373 199 for
directions.
The motor is overloaded.
Please switch the kitchen machine off
and wait a few minutes until the motor
has cooled down.
The kitchen machine stops
The kitchen machine has a special control system. The speed can vary
when the whisk paddle is used. and the rotation is interrupted in 2-second intervals. This means that the
kitchen machine starts making an unusual noise. This is normal. This
The speed is irregular or the
noise means that the speed of the knife is being adjusted to prevent the
motor is sticking.
motor overheating.
Remove part of the mixture or increase
the speed to a maximum of 3.
The knife is working very slowly
when preparing dough.
Please check whether you have exceeded the maximum of 500 g of flour.
Remove some of the mixture from the jar.
There is smoke coming from
the kitchen machine.
The motor is overheating. Check the maximum fill level.
Remove some of the mixture from the jar.
Allow the kitchen machine to cool down
for around 20 minutes.
Kitchen machine not working
with the temperature set and
speed set over 5.
The temperature can only be set for speeds 1 to 4.
Change the speed setting to 1 to 4.
Jar is difficult to fit.
Positioning the jar gets easier with use, as the silicon seal alters as a
function of the heat and humidity, while still forming a seal.
Rub a little cooking oil into the silicon seal
or moisten it.
Is the kitchen machine used?
The jar base shows marks and
residual moisture on delivery.
All kitchen machine modules are tested prior to delivery. The jar is filled
with water and brought to the boil. As with a dishwasher, residual moisture
can be left behind. These residues can result in slight but perfectly safe
marks on the base of the jar.
In order to remove the marks, please use
a conventional stainless cleaner, such as
Sidol from Henkel.
Noises when first used or
under heavy load.
When first used and under heavy load, the motor can heat up and make
strange noises. As in any electric motor, e.g. in a model railway or model
motorway, the engine uses brushes needs to be ‚run in‘ to begin with. The
noises are nothing to be concerned about.
Allow the kitchen machine to cool
down after it has been working hard,
e.g. kneading firm dough. The kitchen
machine will be fully operational again
after cooling down.
Beeping noise.
The module beeps to tell you the kitchen machine has reached the right
temperature.
The beeping also indicates that the
pre-set time has run out.
Increase the speed from 1 to 2 or from
2 to 3.
Kitchen machine overview of front and back views
AUST
DE
1.
2.
3.
4.
5.
6.
7.
FR
Control module „Yumi“
Libra kitchen scale
Measuring cup
Lid
Jar
Ventilation slot
On/ off button
ES
IT
PT
3
2
4
NL
RUS
AR
HE
5
1
6
7
5
Overview of „Yumi“ control module
1.
2.
3.
4.
5.
6.
LCD display
4 control buttons
Right and leftt rotary knobs
MENU button
SD card slot
Socket
1
3
2
Warning :
Take care to ensure the
socket contacts remain
clean and dry .
4
5
6
Accessories
Cooking basket
SD card
6
Measuring cup, Lid, Knife, Jar
Stirring Blade
Whisk paddle
Spatula
Getting started
General symbols
AUST
Meaning
DE
FR
Calendar *
Sets date and date format
Language *
Selects language desired. * Only required when you first switch on or after the battery is
replaced by the service department.
IT
Confirm
Confirms selection
PT
Back
Scrolls back
NL
Next
Scrolls forwards
Play
Controls playback
Plus
Increases cooking time
Minus
Decreases cooking time
Down
Navigation: Down or sideways
Up
Navigation: Up or sideways
On/ Off
Switches control module on/ off
Quit
Quits cooking process for safety reasons
Pause
Process is paused, settings are kept
Favorite
Pressing this symbol saves the selected recipe in the Favorites menu.
Stop
Stops the process
Speed
Speed levels: 1 to 10 and turbo function
Time
• Cooking or processing time: 1 second to max. 60 minutes
•When you start the function, the clock counts backwards with the selected time shown on
the display in minutes and seconds with a clock symbol.
• The cooking or processing time can be adjusted at any time.
• In order to start processing, you need to set the time.
Temperature
•The temperature starts at 40 °C and can be adjusted up to the maximum temperature of
130 °C in 5 °C increments.
• The module beeps to tell you right temperature has been reached.
•This symbol flashes for a few seconds as soon as the kitchen machine has reached the
temperature set.
• If you are preparing foods at above 50 °C, you should avoid using the Turbo button.
• Temperatures above 100 °C are designed for steaming, frying and boiling.
More
Keep cooking manually after a recipe stage is complete.
Previous one
Go back one recipe stage within a recipe sequence (Recipe cooking).
Re-start
Restarts the cooking process at the next stage after stopping the programme for safety
reasons.
Warning
Warning - please note!
ES
RUS
AR
HE
7
Preparation
Jar
1. The jar has a capacity of 2 litres and has a handy measuring scale on the inside and
outside.
2. Once the knife has been properly fitted in the jar, place the jar in the recess on the kitchen
machine. Then gently press it down until the jar engages with the gear drive and contacts.
1. Do not fill the jar above the maximum level of 2 litres. Otherwise, safe operation cannot be
guaranteed and the quality of your finished dishes may be compromised.
2. When you remove the jar from the kitchen machine, make sure you do not spill any of the
contents. If the contents are hot, you could scald yourself.
3. If the jar does not engage with the drive on the kitchen machine immediately, carefully turn
the knife head.
Knife
1. The knife is fitted in the jar on delivery.
2. In order to remove the knife, put the jar in a vertical position. Push the lever down
anticlockwise to release the knife. (see Figure 1)
3. In order to insert the knife, move it into position and push the lever upwards clockwise.
(see Figure 2)
4. Chopping Blade: has a sharp edge and is intended for blending, chopping, mincing, ice
crushing and grinding functions.
Ensure great ca
care when handling the chopping blade, due to its sharp edge.
The display of this Icon in the recipe book , indicates that it requires insertion of the
Cutting blade.
5. Stirring Blade: has a blunt edge and is intended for gently stirring delicate foods which are
not required to be chopped, or for kneading dough.
The display of this Icon in the recipe book , indicates that it requires insertion of the
stirring blade.
Fig. 1
Fig. 2
1. The knife is very sharp! Be very careful when fitting and removing it.
2. Make sure that the sealing ring is properly seated on the knife bearing. If the sealing ring is
not fitted, the content of the jar can leak out and damage the kitchen machine.
3. When adding food, make sure that it does not block the knife.
4. Allow the knife to cool down completely after each cooking process before removing it.
5. The maximum processing amount is 500 g flour in a firm bread dough.
Cooking basket
1. The cooking basket is used for steaming small quantities of food and is fitted directly
into the jar.
2. There is an inset to the side which makes it easy to remove the cooking basket with
the aid of the spatula.
8
Preparation
AUST
DE
Whisk paddle
1. The whisk paddle is placed on the knife in the knife space with slight resistance.
2.The whisk paddle is perfect for producing, for example, creamy desserts, meringues
and whipped cream.
3. The whisk paddle can only be used at speeds 1 to 4.
FR
ES
IT
PT
NL
1. The whisk paddle must not be used in conjunction with the turbo button.
2. When adding food, make sure that it does not block the whisk paddle.
3.The whisk paddle is not suitable for kneading firm dough. Use the knife for kneading bread
or pizza dough, for example.
4. The whisk paddle must not be used in conjunction with the spatula.
RUS
AR
HE
Lid
1. The sealing ring must be fitted in the lid to avoid potential spillages.
2. Place the lid diagonally on the top of the jar.
3.Turn the lid clockwise until the notch on the bottom of the front part of the lid fits into the
relevant slot in the kitchen machine.
4. The kitchen machine can only be switched on if the lid is properly in position.
5. The lid has a top-up opening to make adding extra ingredients easier.
Spatula
1. Use this accessory for removing or mixing in ingredients.
2.The spatula is designed not to come into contact with the knife when ingredients
are added through the top-up opening.
Measuring cup
1.
The measuring cup has a capacity of 100 ml and is removable.
a. This makes it easy to add additional ingredients.
b. The temperature is maintained as soon as the measuring cup is on the lid.
c. This controls the steam output.
1.Only remove the measuring cup at speeds 1 to 3. Otherwise, ingredients can be
thrown out and you could get burnt.
2. If you are using a higher speed, turn the measuring cup to lock position to prevent spillages.
9
Preparation
1
Vapore steam tray
The Vapore steam tray is used to gently cook foods while preserving their vitamins. Steaming is
one of the healthiest ways of cooking.
2
3
4
Vapore overview
1.Cover
2. Flat steam tray
3. Deep steam tray
4.Condensation catcher to trap
fluids
Benefits of steaming
1. Vitamins and nutrients are preserved
2. Saves time as multiple dishes can be prepared at the same time
3. Healthy food, low in salt and fat
4. Food remains moist
5. No transfer of flavours
Using the Vapore
1. Fill the jar with at least 700 ml of water or other steaming fluid, such as stock.
2. Grease the inset bowls so that the food does not stick.
3.Place the ingredients on steam trays. Make sure that food that takes longer to cook is
placed in the deep steam tray. Leave some of the holes free to allow the steam to rise.
4. Place the Vapore straight on the lid without the measuring cup.
5.Check that the steam trays are fitted to one another and the lid is properly fitted so the
steam cannot escape.
1.When handling the Vapore steam tray, remember that there is hot water vapour coming out
of it and fluid in the condensation catcher. Warning - burning risk!
2. Only hold the inset bowls by the handles.
3. Remove the condensation catcher carefully.
4. The condensation catcher is made of plastic and heat resistant to approx. 90 °C.
5. The Vapore steam tray is not suitable for microwaves, ovens or other heat sources.
Inserting and removing the memory card
Insert the supplied SD card into the card slot in the „Yumi“ control module. Make sure the
contacts on the SD card are pointing upwards. Carefully push the SD card in until you hear it
click. In order to remove the SD card, push the card in until it is ejected and you can pull the
card out.
Switching on and off
Place the „Yumi“ control module in the recess on the kitchen machine. Press the
on/ off button (7) and the kitchen machine is ready for use.
10
Switching the control module on for the first time
AUST
When you first switch on, you are prompted to set the date/ time and the screen language.
Change the calendar and language settings as follows:
1.
1. Use the
buttons to switch
between calendar and language and
use the left and right rotary knob to
adjust the settings.
2. Confirm your setting by pressing the
button.
2.
MANUAL
COOKINg
3. Press or turn any control button apart
from the MENU button. This takes
4. Use the left rotary knob to set the
temperature you want.
5. Use the right rotary knob to adjust the
speed.
6. Use the
buttons to adjust the
time manually.
7. Pressing the
button increases the
speed for a short time (Turbo).
DE
FR
ES
IT
PT
NL
RUS
AR
HE
Menu structure
1. Use the
buttons to navigate
through the menu.
2. The
dot indicates the current
position.
3. Confirm your selection by pressing the
button.
4. If necessary, close the menu by
pressing the MENU button.
Press the MENU button to enter the main menu.
Settings
You can adjust various settings in the Setup sub-menu.
Date
Time
How to change the date:
How to change the time:
1. In the Setup menu, you can navigate
with the
buttons and select
Date.
2. Use the right rotary knob to adjust the
selection. Use the left rotary knob to
switch between year, month and day.
3. Then press the
button to confirm.
1. In the Setup menu, you can navigate
with the
buttons and select
Time.
2. Use the right rotary knob to adjust the
selection. Use the left rotary knob to
switch between hours and minutes. At
the same time, you can set the time
format as either 12 or 24 hours.
3. Then press the
button to confirm.
11
Standby timer
Language
The Standby timer allows you set a time at which the kitchen machine
automatically switches to Standby mode. After, for example, 1 minute
in Standby mode, the display switches off if there is no Screen saver
activated (see Screen saver).
How to change the Standby timer:
How to change the language:
1. In the Setup menu, you can navigate
with the
buttons and select
Language.
2. Use the right rotary knob to adjust the
selection.
3. Then press the
button to confirm.
1. In the Setup menu, you can navigate
buttons and select
with the
Standby timer.
2. Use the right rotary knob to adjust the
selection.
3. Then press the
button to confirm.
Volume
Screen saver
Use this setting to adjust the volume of the beeps emitted when you switch
on/off, when the device reaches temperature or when time is up.
How to change the volume:
The Screen saver is activated as a function of the time selected in the
Standby timer menu item. You can use any number of custom images
as a Screen saver. Please note that only image files can be used. Save
these in the „995SAVER“ system folder on your SD card. They need to
be saved in the following format in order to work:
1. In the Setup menu, you can navigate
with the
buttons and select
Volume.
2. Use the right rotary knob to adjust the
selection.
3. Then press the
button to confirm.
Example: XXX00001.jpg
XXX = max. 3 characters
12345 = max. 5 digits
.jpg = file format
The files need to be numbered in sequential order: XXX00002.jpg,
XXX00003.jpg, etc. The image size should match the LCD display
resolution of 480 x 272 pixels. Pictures which are not this size are
automatically cropped to the correct proportions.
How to change the Screen saver:
1. In the Setup menu, you can navigate
with the
buttons and select
Screen saver.
2. Use the right rotary knob to adjust the
selection. (Stop/ Play)
3. Then press the
button to confirm.
Slide show
Use this setting to customise the display of images in Screen saver mode.
How to adjust the slide show:
1. In the Setup menu, you can navigate
with the
buttons and select
Slide show.
2. Use the right rotary knob to adjust the
selection.
3. Confirm your selection by pressing the
button.
12
In-store promotion mode
FW version
In-store promotion mode provides an additional marketing tool for
retailers. This shows product information on the LCD display which is
saved in the „996PROMT“ system folder.
This setting allows you display the current firmware version, the device
serial number or a QR code. More information on the current firmware
version can be found at www.supercook.me. You will need the serial
number for all service requests and to register the product at
www.supercook.me.
DE
Displaying the firmware information:
IT
If In-store promotion mode is selected, all other device functions are
deactivated. In order to exit In-store promotion mode,Press MENU and
the left button of the 4 control buttons at same time.
AUST
FR
ES
PT
For safety reasons, remove the knife when displaying the kitchen
machine in store.
How to activate In-store promotion mode:
1. In the Setup menu, you can navigate
with the
buttons and select
In-store promotion mode.
2. Confirm your selection on or off by
pressing the
button.
3. In order to exit In-store promotion
mode, Press MENU and the left
button of the 4 control buttons at
same time.
1. In the Setup menu, you can navigate
buttons and select FW
with the
version.
2. Use the
button to return to the
Setup menu.
NL
RUS
AR
HE
Updating the „Yumi“ control
module
Use this setting to update the firmware of the „Yumi“ control module.
To do this, download the latest kitchen machine firmware from
www.supercook.me. Extract the firmware from the compressed file
and copy it to the root directory of the SD card.
1. Insert the SD card into the control
module:
2. In the Setup menu, you can navigate
buttons and select
with the
Update control module.
3. Confirm your selection by pressing the
button.
4. Follow the instructions on the screen.
Please switch the kitchen machine on
and off. After the update, the new FW
is displayed as described in the next
step.
13
Recipe collection
The Recipe collection menu item is your digital recipe book, which you
can use as a reference book. It contains all the recipe categories, all the
recipes and the individual instructions. The categories are designed to
help you find the recipes quickly.
Recipe categories
1.
Starters
2.
Soups
An SD card can save a maximum of 895 recipes although the memory
is greater than 1 gB. On average, a recipe takes up around 1 MB per
language. A 1 GB SD card is supplied as standard. In order to save the
maximum number of 895 recipes from www.supercook.me in multiple
languages, you will need a higher capacity SD card.
3.
Fish and meat main courses
4.
Vegetarian main courses
5.
Side dishes
How to Register
To gain access to the extensive Library of recipes to download you need
to register on the following website :
http://www.supercook.me/en/supercook/register/
Complete the requested information into the required fields ,then SAVE
it to register .
The Serial Number ( S/N ) of the appliance can be found on both the
back of the Yumi Control Module or base of the appliance ( Near Rating
label )
6.
Baby food
7.
Sauces
8.
Dressings
9.
Bakes
10.
Desserts
Logging on to Website www.supercook.me
Select English version from choice of languages
Pick Yumi APP
Enter Username and Password to Login
11.
Mixed drinks
12.
Pet food
How to FREE download existing recipes from the library or
create your own recipe and save it to SD Card
Login to the website as per following link:
http://www.supercook.me/en/supercook/login/
Enter Username and Password to Login
Follow the instructions on how to create your own recipe or make
selection from extensive library to Save to SD Card
How to select a recipe to view:
1.
2.
1. Use the
buttons to navigate
through the Recipe collection menu.
2. Confirm your selection by pressing
the
button.
3.
4.
7.
Use the
button to add the recipe
to your favorites selection.
8. Use the
buttons to navigate
within the category selected and
browse the different recipes.
9. Use the
button to confirm your
selection.
14
3. A
circle indicates the current
category.
4. Use the
buttons to navigate
and select the category you want.
5. Confirm your category selection by
pressing the
button.
6. Or press the
button if you wish to
switch off the control module.
10. Use the
buttons to navigate
through the recipe pages.
11. Use the
button to switch the
control module off.
12. Use the MENU button to exit the
recipe collection.
Recipe cooking
AUST
In this menu, you can begin working with the kitchen machine. You can
either follow the pre-set processing times, speeds and temperatures or
adjust them manually yourself.
DE
FR
ES
How to start cooking:
IT
1.
PT
2.
1. Use the
buttons to navigate to
the Recipe cooking menu option.
2. Confirm your selection by pressing
the
button.
3. A
circle indicates the current
category.
4. Use the
buttons to navigate
and select the recipe you want.
5. Confirm your selection by pressing
the
button.
NL
RUS
AR
HE
3.
6. Use the
button to add this recipe
to your favorites selection.
7. Use the
buttons to navigate
within the category selected and
browse the different recipes.
8. Once you have decided on a recipe,
confirm your selection by pressing
the
button.
5.
4.
9. Use the
button to start the
process with the default settings.
10. Use the
button to pause the
current setting. (Appears once the
process has started. See step 9).
11. Use the
buttons to adjust the
preset time manually.
12. Use the left rotary knob to adjust the
preset temperature manually.
13. Use the right rotary knob to adjust
the preset speed manually.
6.
14. Pressing the
button increases the
speed for a short time (Turbo).
15. Use the
button to go back one
step providing the cooking process is
not yet active.
16. This reminder appears after 80 % of
the pre-programmed processing time.
17. Press the
button to end the step
and add ingredients. The heating
automatically switches off at the end
of the step. The motor continues,
depending on how long the cooking
process is.
15
7.
8.
18. You
Y now have the option of using
button to extend the current
the
process with the new settings you
have selected.
19. Press the
button to continue
working through the recipe.
OR
9.
10.
20. If you wish to extend the process
manually as described in step 18,
the image shown to the left appears.
Once you have worked through the
settings, the kitchen machine reverts
to step 19 and you can continue
working through the steps.
This loop is repeated at the end of
every step.
Kitchen machine safety settings
in the menu options:
Recipe cooking, Recipe favorites
and My recipes
Pre-programmed settings
The „This step is about to end.“ note appears on the display after 80%
of the pre-programmed time (20% time remaining). For example, if the
processing time is 5 minutes, the kitchen machine beeps when there is
1 minute left to go.
16
21. If you do not do anything by the end
of the loop and the safety time runs
out, the motor switches off. The
image shown to the left appears.
22. Press the
button and revert back
to the next step in the recipe which
has already started.
23. Use the
button to exit the Recipe
cooking mode.
If you do not adjust any more settings after this step, the heating automatically switches off and the kitchen machine continues to run for a further
1 to 5 minutes, depending on the length of the recipe step. This prevents
the food sticking where possible. After this time, the kitchen machine
automatically exits the recipe and reverts to the category overview. You now
have the option of using the
button to revert back to the next step of the
recipe or stopping the cooking process completely using the
button.
If you adjust the pre-programmed recipe processing time manually by
overriding the safety prompt (20% of preset time remaining), then the
message ‚This step is about to end.“ does not appear. However, other safety
mechanisms as described above do kick in. The heating switches off at the
end of the processing time. The motor stops after a defined period.
Recipe favourites
Help
In this menu, you can find all your favourites. In order to start the
cooking process in the Recipe favorites menu, follow the description
under Recipe cooking.
This menu option provides explanations of the symbols used in the „Yumi“
control module.
This takes you to your favorites selection:
AUST
1. Use the
buttons to navigate
through the Help menu.
2. Confirm your selection by pressing the
button.
1. Use the
buttons to navigate
through the Recipe favorites menu.
2. Confirm your selection by pressing the
button.
DE
FR
ES
IT
PT
NL
RUS
AR
HE
Important instructions before
started
My recipes
No more collections of loose recipe cards, cut-outs from newspapers
and internet downloads. The kitchen machine is your personal recipe
book. You can create, cook, enjoy and collect your own recipes. Find
out how it works at www.supercook.me.
In order to start the cooking process in the My recipes menu, follow the
description under Recipe cooking.
1. Use the
buttons to navigate to
the My recipes menu option.
2. Confirm your selection by pressing the
button.
3. Select the category and follow the
instructions as described under
Recipe cooking.
1. Always use the multifunctional kitchen machine on an even surface
which is clean and stable and does not emit heat.
2. Remove all packaging.
3. Clean all accessories.
4. Never put your hand into the multifunctional kitchen machine while it is
turning.
5. Make sure that the sealing rings used are always clean and
undamaged.
6. The kitchen machine has an internal safety mechanism. If the jar is not
seated correctly on the kitchen machine, it will not work.
7. Disconnect the kitchen machine from the mains:
a. if the device is damaged or malfunctions
b. if the kitchen machine has been dropped.
c. if components are visibly damaged or the power supply is faulty.
8. Do not leave the kitchen machine unsupervised.
9. Only used accessories recommended by plawa.
Cleaning
1. Clean the kitchen machine before first use and after every use, and
clean all components and accessories which come into contact with
food. Make sure the kitchen machine is fully cooled before you start
cleaning it.
2. Remove the mains plug from the socket before cleaning.
3. The contacts on the bottom of the jar must also be kept clean and dry.
4. Remove both sealing rings (knife/ lid), as food residues can be present
underneath them. The knife is very sharp! So be very careful when
fitting and removing it.
5. All accessories are dishwasher-safe.
6. TTo avoid the build-up of germs, clean the kitchen machine and sealing
rings after every use.
7. Use a soft, slight moistened cloth to clean the recess for the jar on the
kitchen machine.
8. Do not use any abrasive or astringent detergents. These can damage
the surface.
9. It is normal for some discolouration to occur in the plastic accessories
from beta-carotin in carrots or tomatoes or spices in curry. You can
reduce the discolouration slightly by moistening a cloth with cooking
oil and rubbing the area gently. Rinse off quickly with warm water, then
with cold water and a little washing-up liquid.
17
Technical specifications
SUPERCOOK kitchen machine
Power consumption
Cooking
Mixing
1000 Watts
500 Watts
Capacity
2 litres
Minimum temperature
40 °C
Maximum temperature
130 °C
Speed levels
10 + turbo
Motor speed
20,000 rpm
Beeps
Yes
Mains voltage/Frequency
220-240V~50 Hz
Control module
Connection
LCD display for control module
5V socket to plug
4.3 inches
Memory card
Memory capacity
1 GB -> 32 GB
Vapore steam tray (optional)
Dimensions
approx. 23.1 x 19.2 cm (almost A4 size)
As part of our ongoing further development, we reserve the right to change
the product, including accessories, packaging, instructions and recipe book
at any time without prior notice.
18
Copyright
Copyright 2013. This user manual contains copyrighted information. All
rights reserved. No part of these operating instructions can be reproduced
using any means and in whatsoever form - whether mechanical, electronic
or otherwise - without prior written consent from the manufacturer.
SUPERCOOK is a brand of plawa-feinwerktechnik GmbH & Co. KG.
Kitchen Master
Cat. No. BTMKM800X
Nov 2014
www.supercook.me