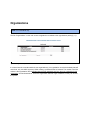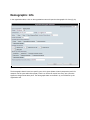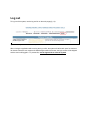
1
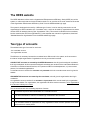
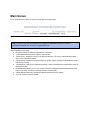
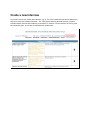
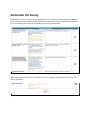
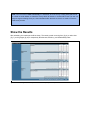
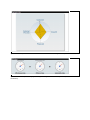
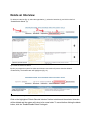
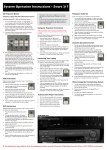
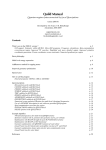
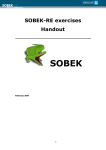
OEES Website V3.0 User Manual for Consultants doc.version: 1.0 | author: Kees Swart | date: Aug 13, 2013 | info: [email protected] Table of contents The OEES website Two type of accounts Time out Security Main Screen Create a new Interview Administer the Survey Show the Results Delete an Interview Organizations Demographic Info Log out The OEES website The OEES Website is build to use the Organization Effectiveness and Efficiency Scale (OEES) as a online system, to collect scale data and communicate its results. For an overview of the scale, download “Overview of the Organization Effectiveness & Efficiency Scale” from the OEES website login page. The system is developed to be used by 2 different type of users. It can be used by persons who consult organizations for OEES evaluation (the “Consultant”user) , and it can be used by organizations who want to use the OEES for strategic planning (the “Organization”user). This manual is intended for the consultants, but also mentions the role of the organizations. For the separate user manual for organizations, download “Website Manual for Organizations” from the OEES website login page. Two type of accounts The website has a type of account for each user: the consultant account the organization account The difference is necessary because the consultant has a different role in the system, and has access to the data of multiple organizations. Organizations can only access their own data. CONSULTANT accounts are created by the OEES Webmasters who will give the assigned consultants their login credentials. At this moment the assigned consultants are members of the International Research Consortium on Evidencebased Practices, who operate as OEES consultants/partners, or just as contact persons, for interested organizations. A consultant account consists of a username and password which the consultant must use to log into the website. ORGANIZATION accounts are created by the consultants, who will give the organizations their login credentials. An organization account consists of an username and password which must be used by the organization to log into the website. For organizations, the organization ID will be used as username, so for organizations the username is always an number. The conceived scenario is the following sequence of events: 1 Consultants request an OEES webmaster for a consultant account. 2 The OEES webmaster emails the consultant login credentials to the consultant. 3 The consultant logs in on the OEES website with the received credentials. 4 The consultant creates an organization for every organization he/she consults / partners or for which he/she acts as a contact person. 5 The consultant sends an email to every organization with the organization login credentials. NOTE: This scenario shows that an organization account never stands on its own, and is always linked to a consultant account which is owned by a consultant. As mentioned, this consultant may actually consult the organization, but he/she can also act as just a contact person without really visiting/consulting the organization, if this is desired. To log into the website, fill the textboxes with the username and password and click the “Log In”button (fig. 1): Fig. 1: log into the website Time out Security The website has a timeout security of 30 minutes. This means that when there’s no user activity for 30 minutes, the site will log you out automatically. When you are logged out, you will jump to the login screen when you try to navigate through the site. Main Screen Fig. 2 shows the main screen on which you land after a successful login: Fig. 2: the main screen NOTE: The main screen has a little difference for logged in organizations, they do not have a organizations dropdown box, and also no organizations link. The functionality on this page: ● Drop down boxes for selecting organizations / interviews. ● “Create New Interview” button creates a new interview. ● “Show Survey”; shows the survey for the selected interview. The survey is automatically loaded when a new interview is created. ● “Show Results”; shows the results (scoring from, profile, indices). Results are automatically shown after saving a survey. ● “Organizations”; leads to the organizations section, where to administer the organizations and their demographic data. ● “Enable/Disable Delete” is an “onoff” switch to enable or disable the “Delete Selected Interview” button. This switch is to prevent interview deletion unintentionally. ● “Delete Selected Interview”; deletes the selected interview from the system. ● “Logout”; meant to close the system. Create a new Interview On the main screen click “Create New Interview” (fig. 3). The newly created interview will be added to the dropdown box which is labeled “interview:”. The “CON”phrase following the date and time of creation indicates that this interview was created by a consultant. On creation of a new interview, the survey panel will immediately open, so the user can administer the questionnaire. Fig. 3: a newly created interview with the open survey panel. Administer the Survey To administer the scores, just click on the checkboxes or on the evidence criteria text itself, the checkbox will be “checked” and the evidence criteria text will be blue and bold, to indicate that this criteria is met (see fig. 4). The scoring column will show the resulting score of the checked criteria: Fig. 4: evidence criteria will be checked, blue, and bold when met. Before leaving this panel, the user must save the survey by clicking the “Submit” button (see fig. 5), or all choices will be lost: Fig. 5: click “Submit” to save your choices. NOTE: Due to the build in time out security, it is advisable, when the survey is being administered and the criteria are under debate, to submit the survey within 30 minutes, or choices will be lost. The user can always change an existing survey so, when submitted within the timeout, there’s no need to fill out the whole survey at ones. Show the Results After submitting, the results panel will be shown. The results contain a scoring form (fig. 6), a radar chart (fig. 7), and 3 gauges (fig. 8) for respectively Effectiveness, Efficiency, and Sustainability Index: Fig. 6: the OEES scoring form, a clear representation on how the perspectives relay to the indices. Fig. 7: the radar chart presentation of the OEES scores is meant to communicate the organization’s profile. Fig. 8: the OEES indices presented as gauges, showing how an organization’s sustainability is build up on it’s effectiveness and efficiency. Delete an Interview To delete an interview (fig. 9), select the organization (1), select the interview (2), and click on the link “Enable/Disable Delete” (3): Fig. 9: Select an Interview for deletion. By this you prepare the system for delete and this extra user action will prevent interview deletion unintentionally. The delete button will highlight red (fig. 10): fig. 10: the system is brought into delete state. Click on the highlighted “Delete Selected Interview”button to delete and the selected interview will be deleted and the system will return to its normal state. To cancel before clicking the delete button, click the “Enable/Disable Delete” link again. Organizations NOTE: For consultants only. The link “Organizations” on the main screen navigates the consultant to the organizations panel (fig. 11): Fig. 11: the organizations panel. It is here where the consultant adds the new organization(s). An organization can also be deleted (data will not be lost, only not visible anymore). While creating, a password must be inserted. The number in the first column is the organization ID and together with the given password they form the login credentials for the organization. As mentioned above, inform the organization with their login credentials, so they can access the system. Demographic Info In the organization table, a click on the organizations name will open the demographic info form (fig.12): Fig. 12: the demographic data. The demographic data is bound to a specific year, which gives all data a historic perspective (useful for research over the years with build up data). There’s no need to fill out this form every year, just when significant changes have taken place. The demographic data can be filled in by a consultant or by the organization self. Log out To log out of the system, use the log out link on the main page (fig. 13): Fig. 13: use the logout link to close the OEES system When closing the application without using the log out link, the system will still remain open for maximum 30 minutes. When the user reopens the website again within 30 minutes, the login screen will be skipped and the user is still logged in. To prevent this, use the logout link to close the system.