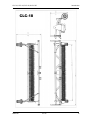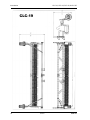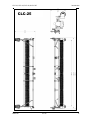
1
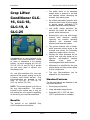
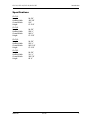
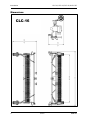
Crop Lifter/Conditioner CLC-16, CLC-18, CLC-19, CLC-25 MAN139 3rd Edition, Beg. S/N 440000 Read this manual before using this product. Failure to follow the instructions and safety precautions in this manual can result in serious injury or death. July 2014 ©2014 Updated February 2015 Crop Lifter and Conditioners CLC-16, CLC-18, and CLC-19 are manufactured by AMADAS Industries. You can find us on the Web at: www.amadas.com or e-mail us at: [email protected] You can also contact us at: 757-539-0231 P.O. Box 1833 / Suffolk, VA 23439 (mailing) 1100 Holland Road / Suffolk, VA 23434 (shipping) P.O. Box 3687 / Albany, GA 31701 (mailing) 1701 South Slappey Blvd. / Albany, GA 31706 (shipping) CLC-16, CLC-18, CLC-19, & CLC-25 Introduction Table of Contents Welcome .................................................. iii Specifications ........................................ v Dimensions ......................................... vi 1. Safety ................................................... 1 Safety at All Times ................................ 2 Safety Practices .................................... 3 Additional Safety for this Machine ....... 10 Safety Decals ...................................... 11 Decal Locations .............................. 13 2. Setup and Adjustment ...................... 15 READ FIRST! ...................................... 16 Setup Instructions................................ 17 Hook Up to Tractor ......................... 17 Adjust Wheel Height ....................... 18 Adjust Wheel Position ..................... 19 Adjust Lifter Position ....................... 20 3. Operation ........................................... 21 READ FIRST! ...................................... 22 Warning .......................................... 22 Transporting the Crop Lifter/Conditioner22 First Run ............................................. 23 After the Run ....................................... 24 4. Maintenance ...................................... 25 READ FIRST! ...................................... 26 Maintenance Schedule ........................ 27 Chains ............................................ 29 Pickup Rods ................................... 30 Pickup and Roller Assembly Bearings ...................................... 31 Roller .............................................. 31 Roller Bearing ................................. 31 Spring Teeth ................................... 32 Tires ............................................... 32 MAN139 2/1/15 i Introduction CLC-16, CLC-18, CLC-19, & CLC-25 4. Maintenance, Cont’d. Beginning of the Season ..................... 33 End of the Season ............................... 33 Troubleshooting................................... 34 Warranty ................................................. 35 ii 2/1/15 MAN139 CLC-16, CLC-18, CLC-19, & CLC-25 Introduction Welcome To AMADAS Industries MAN139 With origins dating back to 1963, AMADAS Industries and its predecessors have a long history of providing highquality, reliable, innovative equipment for the agricultural industry. AMADAS equipment is currently at work throughout the United States and in other countries. This equipment includes machinery such as the Self-Propelled Peanut Combine, Reel Rain Traveler Irrigation System, Infield Crop Transporter, and the AMADAS Crop Lifter/Conditioners. 2/1/15 iii Introduction CLC-16, CLC-18, CLC-19, & CLC-25 Crop Lifter/ Conditioner CLC16, CLC-18, CLC-19, & CLC-25 Congratulations on your purchase of an AMADAS Crop Lifter/Conditioner! Based on years of experience in the farming industry, we have designed the CLC-16, CLC-18, CLC-19, and CLC-25 to provide you with many years of efficient, lowmaintenance use. Our crop lifter/conditioner lifts vines and peanuts off the ground, shaking our dirt for a cleaner, more efficient harvest. Crop lifter/conditioners are available in four sizes, 16’ (CLC-16), 18’ (CLC-18), 19’ (CLC-19), and 25’ (CLC-25). NOTE! This manual applies to all sizes of the crop lifter/conditioner. The photos included in this manual may or may not look exactly like your machine, depending on the size of your crop lifter/conditioner. • The gentle action of our advanced design allows a windrow to be lifted and replaced without destroying the windrow, thus reducing loss. • An infinitely adjustable hydraulic drive allows an exact match of pickup speed to ground speed, eliminating PTO driveline maintenance and problems. • Low profile design minimizes the distance the plants fall back to the ground, which reduces loss. • Reduced dirt, rocks, and other foreign material enter combines, thereby improving the combine operating efficiency with increased dryer efficiency and improved grades. • The ground moisture seal is broken, which promotes uniform drying in the windrow and allows the harvesting operation to begin earlier in the day. • Utilizing the same advanced six bar pickup, rods, and roller design as our eight-row self-propelled combine headers, many parts are interchangeable with these headers. • Maintenance is simplified by the open pickup design and easy access plates to drive components. • The crop lifter/conditioner can be adapted for 30” row peanuts. Standard Features The following features are standard on the crop lifter/conditioner: • 6-bar spring tooth pickup • Large adjustable gauge wheels • Adjustable CAT III, CAT IIIN hitch (CAT II optional hitch kit available) Benefits The benefits of our AMADAS Lifter/Conditioner are as follows: iv Crop 2/1/15 MAN139 CLC-16, CLC-18, CLC-19, & CLC-25 Introduction Specifications CLC-16 Length: Header Width: Overall Width: Height: 94 5/8” 182 3/8” 210” 67 5/16” CLC-18 Length: Header Width: Overall Width: Height: 94 5/8” 208 ¼” 240 ¾” 67 5/16” CLC-19 Length: Header Width: Overall Width: Height: 94 5/8” 225 ¼” 243 5/16” 67 5/16” CLC-25 Length: Header Width: Overall Width: Height: 94 5/8” 311 ¼” 320 7/8” 68 ¾” MAN139 2/1/15 v Introduction CLC-16, CLC-18, CLC-19, & CLC-25 Dimensions CLC-16 CLC-16 vi 2/1/15 MAN139 CLC-16, CLC-18, CLC-19, & CLC-25 Introduction CLC-18 MAN139 2/1/15 vii Introduction CLC-16, CLC-18, CLC-19, & CLC-25 CLC-19 viii 2/1/15 MAN139 CLC-16, CLC-18, CLC-19, & CLC-25 Introduction CLC-25 MAN139 2/1/15 ix Introduction CLC-16, CLC-18, CLC-19, & CLC-25 NOTES x 2/1/15 MAN139 CLC-16, CLC-18, CLC-19, & CLC-25 Safety 1. Safety Safety at All Times! ............................... 2 Safety Practices .................................... 3 Additional Safety for this Machine ....... 10 Safety Decals ...................................... 11 Decal Locations ............................... 13 This symbol means: ATTENTION! BECOME ALERT! YOUR SAFETY IS INVOLVED! MAN139 02/01/15 1 Safety CLC-16, CLC-18, CLC-19, & CLC-25 Safety at All Times! Look for the Safety Alert Symbol! You, the operator, can help avoid accidents or injury by observing the precautions in this section and insisting that others working for or with you also follow them. • Do NOT attempt to operate this equipment under the influence of drugs or alcohol, or prescription/over-thecounter drugs that may cause impairment. • This equipment is dangerous to children and persons unfamiliar with its operation. They should never be allowed to operate this machinery or remain in its vicinity while in operation. • Only a trained operator familiar with this machinery and trained in its operation should be allowed to operate this machine. Do NOT allow any person to operate or perform maintenance on this machine until he or she has read this manual and understands the safety precautions. • To prevent injury or death, use a tractor equipped with a Rollover Protective System (ROPS). • NEVER exceed a machine’s limits. If a machine’s ability to perform a job safely is in question, DO NOT USE THE MACHINE TO ATTEMPT THAT JOB. Shields • • Certain photographs or illustrations in this manual may show a safety shield removed. However, NEVER operate this machine without all shields correctly in place! If a shield must be removed to make a repair or adjustment, replace the shield prior to use. Safety Signal Words Used Three safety signal words are used on the machine and in this manual to indicate the degree or level of hazard seriousness. These three words are: DANGER Indicates an imminently hazardous situation that, if not avoided, will result in death or serious injury. This signal word is to be limited to the most extreme situations, typically for machine components that, for functional purposes, cannot be guarded. WARNING Indicates a potentially hazardous situation that, if not avoided, could result in death or serious injury, and includes hazards that are exposed when guards are removed. It may also be used to alert against unsafe practices. CAUTION Safety Decals 2 The Safety Alert Symbol indicates a potential safety hazard to personnel and that extra precaution must be taken. When you see this symbol on the machine, remain alert and carefully read the message that follows it. ALWAYS follow the recommended precautions and safe operating procedures accompanying this symbol. If you have any questions, please contact your dealer or the manufacturer. • Replace any CAUTION, WARNING, DANGER, or instruction safety decal that is not readable or is missing. • Do NOT paint over, remove, or deface any safety sign or warning decals. 02/01/15 Indicates a potentially hazardous situation that, if not avoided, may result in minor or moderate injury. It may also be used to alert against unsafe practices. MAN139 CLC-16, CLC-18, CLC-19, & CLC-25 Safety NOTE! This section covers general safety. Some items may not apply to this type of machine. Safety Practices Transport Machine Safely • Comply with state and local laws. • • Be familiar with tractor operations and follow all safety instructions in the tractor’s manual. 20 MPH when weight is less than or equal to the weight of the tractor • Before moving away, always check immediate vicinity (e.g., for children). 10 MPH when weight is more than weight of the tractor • NEVER exceed a maximum speed of 20 MPH. • NEVER tow a load more than double the weight of the tractor! • Always adapt ground speed to road or field conditions, making sure you have adequate control of steering and stopping. • Sudden braking can cause a towed load to swerve and upset. Reduce speed if towed load is not equipped with brakes. • Avoid sharp turns, holes, ditches, and obstructions which may cause the tractor to tip, particularly on hillsides. Use following tow load weight ratios as guidelines: Avoid Electrical Power Lines Use a Safety Chain • • Use a safety chain to help control machinery if it separates from the tractor drawbar. • Use a chain with strength rating equal to greater than the gross weight of the towed machine. • Attach the chain to the tractor drawbar support, allowing only enough slack in the chain for turning. • ALWAYS attach the machine properly to the tractor drawbar. Do NOT use a safety chain for towing. • Make sure all components are secured in the proper position before transporting machine (for example: basket bin lip extension, mower deck, off-loading conveyor, etc.). AVOID all lines, particularly low-hanging electrical cables, during transport. DANGER Contact with electrical lines will cause the operator to suffer severe electrical shock or possibly death. MAN139 02/01/15 3 Safety Model number NOTE! This section covers general safety. Some items may not apply to this type of machine. Avoid High Pressure Fluids CAUTION 4 • Use extreme care when working with hydraulic components and high pressure sprays. • Escaping fluid or spray under pressure can penetrate the skin, causing serious injury. • To avoid injury, relieve pressure before disconnecting hydraulic or other lines. • Tighten all connections before applying hydraulic or spray pressure. • Search hoses/connections for leaks with a piece of cardboard. • Take appropriate safety measures to protect hands, body, and face from high pressure fluids. • Always wear appropriate safety gear to protect hands, body and face from exposure to high pressure fluids. • Never try to block the flow or search for leaks of high pressure fluids with your hands even if wearing gloves. High pressure fluids can penetrate gloves as well as your skin. • Always avoid direct contact of any high pressure fluid low. • If an accident occurs, respond as follows: 02/01/15 o Seek medical treatment immediately. Any fluid injected into the skin must be surgically removed within a few hours or gangrene may result. o Alert the medical professionals that a fluid injection or high pressure spray injury has occurred. o Give information on the type of fluid or spray and time the accident occurred. If known, include the amount of fluid injected and/or the system injection pressure. o Surgery will most likely be required, so no food or drink for the affected person. Doctors unfamiliar with this type of injury should reference a knowledgeable medical source. Such information is available in English from Deere & Company Medical Department in Moline, Illinois, U.S.A., by calling 1-800-822-8262 or +1 309-7485636. VERY IMPORTANT!! Although in some cases there is little or no pain from an injection or high pressure spray accident, THIS IS A SERIOUS EVENT THAT MUST BE TREATED BY MEDICAL PROFESSIONALS!!! MAN139 CLC-16, CLC-18, CLC-19, & CLC-25 Safety NOTE! This section covers general safety. Some items may not apply to this type of machine. Work in Ventilated Area Engine exhaust fumes can cause sickness or death. • • If it is necessary to run an engine in an enclosed area, remove the exhaust fumes from the area with an exhaust pipe extension. If you do not have an exhaust pipe extension, open the doors and get outside air into the area. AMADAS DOES NOT RECOMMEND RUNNING ANY ENGINE IN AN ENLCOSED AREA EVEN WITH VENTILATION. Handle Fuel Safety – Avoid Fires • Handle fuel with care; it is highly flammable. • Do NOT refuel the machine while smoking or when near open flame or sparks. • ALWAYS stop engine before refueling machine. • Fill fuel tank outdoors. • Prevent fires by keeping machine clean of accumulated trash, grease, and debris. • ALWAYS clean up spilled fuel. Prepare for Emergencies Wear Protective Clothing • Be prepared if a fire starts. • • Keep a first aid kit and fire extinguisher handy. Wear close-fitting clothing and safety equipment appropriate to the job. • Operating equipment safely requires the full attention of the operator. Do NOT wear radio or music headphones while operating machine. • Keep emergency numbers for doctors, ambulance service, hospital, and fire department near your telephone. MAN139 02/01/15 5 Safety Model number NOTE! This section covers general safety. Some items may not apply to this type of machine. Handle Chemical Products Safely • Avoid Contact with Moving Parts Direct exposure to hazardous chemicals can cause serious injury. Potentially hazardous chemicals used with AMADAS equipment include such items as lubricants, coolants, paints, and adhesives. • Before you start any job using a hazardous chemical, check the MSDS so that you are aware of the risks and know how to proceed safely. Carefully follow all procedures, using only recommended equipment. • See your AMADAS dealer for MSDS on chemical products used with AMADAS equipment. • Wear close-fitting clothing to avoid entanglement with moving parts. • Keep hands, feet, and clothing away from power-driven parts. • Never clean, lubricate or adjust machine when it is running. Remove Accumulated Crop Debris • The buildup of chaff and crop debris near moving parts or heat sources is a hazard. • Check and clean these areas frequently. • Before performing any inspection or service, engage tractor’s parking brake, turn off engine, and remove key. • Understand the service procedure before doing work. Use proper tools and refer to the User Manual. Keep all parts in good condition and properly installed. • Fix any damage immediately; replace worn or broken parts. • Keep service area clean and dry. • • Lower machine to ground, engage parking brake, turn off engine, and remove key before performing maintenance. Keep the machine free of any buildup of grease, oil, or debris. • Allow time for the machine to cool completely. • Never lubricate, service, or adjust machine while it is moving. • Keep hands, feet, and clothing from powerdriven parts. • Securely support any machine elements that must be raised for service work. Practice Safe Maintenance • 6 02/01/15 MAN139 CLC-16, CLC-18, CLC-19, & CLC-25 Safety NOTE! This section covers general safety. Some items may not apply to this type of machine. Remove Paint/Protective Coating Before Welding Or Heating o Allow any fumes to disperse for at least 15 minutes before welding or heating. • Do NOT use a chlorinated solvent in areas where welding will take place. Hazardous fumes can be generated when paint or coatings are heated by welding, soldering, or by using a torch. • • Do all work in an area that is wellventilated to carry toxic fumes and dust away. Do all work outside or in a well-ventilated area. • • Dispose of paint/coatings and solvent properly. Remove paint/coatings before welding or heating: • Avoid potentially toxic fumes and dust. • o If you sand or grind paint, avoid breathing the dust. Wear an approved respirator. o If you use solvent or paint stripper, remove stripper with soap and water before welding. o Remove solvent or paint stripper containers and other flammable material from the area. Keep Riders off of Machine Avoid Using Heat Near Pressurized Fluid Lines • • Flammable spray can be generated by heating near pressurized fluid lines, resulting in severe burns to yourself and bystanders. Do NOT heat by welding, soldering, or using a torch near pressurized fluid lines or other flammable materials. Pressurized lines can accidentally burst when heat goes beyond the immediate flame area. MAN139 02/01/15 • Only allow the operator on the machine. Riders obstruct the operator’s view, which results in the machine being operated in an unsafe manner. • Riders are subject to injury such as being thrown off of the machine. • Children should NEVER be allowed on the machine. 7 Safety Model number NOTE! This section covers general safety. Some items may not apply to this type of machine. • Dispose Of Waste Properly Inquire about the proper way to recycle or dispose of waste from your local environmental or recycling center, FEMA, or from your AMADAS dealer. Improperly disposing of waste can threaten the environment and ecology. Potentially harmful waste includes items such as oil, fuel, coolant, brake fluid, filters, and batteries. • Use leak-proof containers when draining fluids. • Do NOT use food or beverage containers that may mislead someone into drinking from them. • Do NOT pour waste onto the ground, down a drain or into a water source. Support Machine Properly Service Drive Belts Safely • When servicing drive belts, always observe these precautions: • Always lower the attachment or implement to the ground before you work on the machine. If the work requires that the machine or attachment be lifted, provide secure support for them. If left in a raised position, hydraulically supported devices can settle or leak down. Do NOT support the machine on cinder blocks, hollow tiles, or props that may crumble under continuous load. • Do NOT work under a machine that is supported solely by a jack. • Follow all safety procedures in this manual for supporting the machine. • When implements or attachments are used with a machine, always follow safety precautions listed in the implement or attachment operator’s manual. 8 02/01/15 • Avoid serious injury from hand or arm entanglement. Never attempt to clean, check, or adjust belts while the machine is running. Always shut off the engine, set the parking brake and remove the key. • Do NOT attempt to clean belts with flammable cleaning solvents. MAN139 CLC-16, CLC-18, CLC-19, & CLC-25 Safety NOTE! This section covers general safety. Some items may not apply to this type of machine. Service Tires Safely Explosive separation of a tire and rim parts can cause serious injury or death. • Do NOT attempt to mount a tire unless you have the proper equipment and experience to perform the job. • Always maintain the correct tire pressure. • Do NOT inflate the tires above the recommended pressure. • Never weld or heat a wheel and tire assembly. The heat can cause an increase in air pressure resulting in a tire explosion. Welding can structurally weaken or deform the wheel. • When inflating the tires, use a clip-on chuck and extension hose long enough to allow you to stand to one side and NOT in front of over the tire assembly. Use a safety cage if available. • Check wheels for low pressure, cuts, bubbles, damaged rims, or missing lug bolts and nuts. NEVER fill a damaged tire or one that is missing lug bolts or nuts. Pay Close Attention to Notes Use Safety Lights and Devices • Throughout the manual, information that needs to be emphasized is set apart with either a "NOTE!" or "IMPORTANT!" heading. • Please be sure to carefully read this information, as it usually indicates a situation that could cause machine damage. Slow moving tractors, self-propelled equipment and towed implements or attachments can create hazards when driven on public roads. They are difficult to see, especially at night. • Whenever you drive on public roads, use flashing lights and turn signals according to local regulations. • To increase visibility, use the lights and devices provided with your machine. • Keep safety items in good condition. • Replace missing or damaged items. Maintain Your Machine • It is crucial you maintain your machine in proper working condition. • Perform all scheduled maintenance and repairs in a timely manner. • Do NOT perform unauthorized modifications to the machine as these could impair the function and/or safety of the machine and affect machine life. MAN139 02/01/15 9 Safety Model number Additional Safety for this Machine Operate the Machine Safely • Keep hands, feet, and clothing away from moving parts. • Do NOT allow anyone to stand on or inside the machine during operation. • Do NOT crawl underneath the machine while it is in operation. • Do NOT operate unless all shields are in place. Set Up and Maintain Machine Safely • Do NOT make any adjustments or attempt any maintenance while the crop lifter/conditioner is in operation or being towed. • Make sure the tractor is in park, turned off and the key removed from the ignition before attempting maintenance. Do NOT allow anyone to sit on the tractor. • Follow all safety warnings for working with hydraulics. Move or Pick Up Machine Safely • Do NOT attempt to lift the crop lifter/ conditioner by the spring-toothed pick-up portion. • Use only safe lifting methods to raise the machine. NEVER pick up or move machine using spring-toothed portion! 10 02/01/15 MAN139 CLC-16, CLC-18, CLC-19, & CLC-25 Safety Safety Decals • Safety decals identify specific hazards, as well as general safety. A signal word ( DANGER, WARNING, or CAUTION) is included on • each decal to alert you to the severity of the hazard. Please note the following about the decals: • Keep them clean and legible. • Never remove a safety decal from the machine. • When you replace a part with a safety decal, also replace that decal. MAN139 02/01/15 For replacement AMADAS dealer. decals, call your Replacement safety decals are available free of charge. Safety decals used on this machine are shown on the following pages. Decal locations are also included. 11 Safety 9900 Self-Propelled Peanut Combine Decals 12 02/01/15 MAN139 CLC-16, CLC-18, CLC-19, & CLC-25 Safety Decal Locations 80941 80933 (behind shield) MAN139 02/01/15 13 Safety 9900 Self-Propelled Peanut Combine 80935 80936 8519 (Slow Moving Vehicle) 14 02/01/15 MAN139 CLC-16, CLC-18, CLC-19, & CLC-25 Setup and Adjustment 2. Setup and Adjustment READ FIRST! ........................................16 Setup Instructions ..................................17 Hook Up to Tractor .............................17 Adjust Wheel Height ...........................18 Adjust Wheel Position.........................19 Adjust Lifter Position ...........................20 MAN139 2/1/15 15 Setup and Adjustment CLC-16, CLC-18, CLC-19, & CLC-25 READ FIRST! Before you set up the crop lifter/conditioner for use, please read the following: • Please thoroughly read Chapter 1, Safety, before beginning the setup procedure. • Carefully read over the setup instructions and familiarize yourself with the procedure. • Make sure you have all the necessary tools on hand. • Carefully inspect the crop lifter/ conditioner and all associated parts and equipment. • 16 If there is any evidence of damage from shipment or handling, report it immediately to your dealer. 2/1/15 This chapter gives you information on setting up and adjusting your crop lifter/conditioner. Once your machine is in operation, make any necessary adjustments to maximize the crop lifter/conditioner’s performance for your specific conditions. CAUTION Once the crop lifter/conditioner is attached to the tractor, make sure the tractor is in park, with the ignition turned off, and the key removed before any adjustments are made. MAN139 CLC-16, CLC-18, CLC-19, & CLC-25 Setup and Adjustment Setup Instructions Hook Up to Tractor The Crop Lifter/Conditioners CLC-16, CLC18, CLC-19, CLC-25 are designed for use with a Category III hitch. If using the CAT III narrow hitch, the lower connecting points must be moved in the required amount. WARNING Escaping hydraulic fluid under pressure can penetrate the skin, causing serious injury. Avoid the hazard by relieving pressure before disconnecting hydraulic or other lines. Tighten all connections before applying pressure. NOTE! If your tractor is equipped with a Category 2 hitch, kit # 70764 is needed to use the crop lifter/conditioner. Search for leaks with a piece of cardboard. Protect hands and body from high pressure fluids. See Chapter 1, Safety, for more information on safe handling of hydraulics and for instructions in the event of a hydraulic injury. 1. Back your tractor up to the crop lifter/ conditioner and connect the hitch. 2. Connect the hydraulic hoses to the tractor. MAN139 2/1/15 17 Setup and Adjustment CLC-16, CLC-18, CLC-19, & CLC-25 Adjust Wheel Height Adjust the wheel height so that the wheels are appropriate for your row/vine conditions. 4. Remove the bolts shown. WARNING Do NOT attempt to lift the crop lifter/ conditioner, as serious injury could result. Use an appropriate lifting means such as the tractor to raise the machine. Remove bolts and reinstall for desired wheel height 1. With the crop lifter/conditioner hooked to a tractor, raise the machine and place appropriate supports (such as jack stands) up under each side where shown. CAUTION Wheel assemblies are heavy. Use a helper or appropriate lifting means to handle the assemblies. Place support here on each side 2. Lower the crop lifter/conditioner onto the supports. The supports should be high enough to allow the wheels to be free of ground contact. 3. Make sure the tractor is in park position. Shut off the engine and remove the key. 5. Raise or lower leg post to desired height. The crop lifter has two position holes drilled into the support. 6. Replace and tighten the bolts. 7. Repeat Steps 4-6 for the other wheel. 8. Restart the tractor and raise the crop lifter/conditioner. CAUTION 9. Remove the supports. 10. Check the air pressure in the tires. The tire pressure should be 35 PSI. Make sure the tractor is in park, with the ignition turned off, and the key removed. 18 2/1/15 NOTE! Make sure both wheels are set at the same height. It is important that the crop lifter is level to prevent crop or machine damage. MAN139 CLC-16, CLC-18, CLC-19, & CLC-25 Setup and Adjustment Adjust Wheel Position Adjust the horizontal position of the wheels so that they are appropriate for your row/vine conditions. 4. Remove the bolts indicated in the photo. WARNING Do NOT attempt to lift the crop lifter/ conditioner, as serious injury could result. Use an appropriate lifting means such as the tractor to raise the machine. Bolts for horizontal position 1. With the crop lifter/conditioner hooked to a tractor, raise the machine and place appropriate supports (such as jack stands) up under each side where shown. 2. Lower the crop lifter/conditioner onto the supports. The supports should be high enough to allow the wheels to be free of ground contact. CAUTION Wheel assemblies are heavy. Use a helper or appropriate lifting means to handle the assemblies. 5. Move the wheel to the desired position. 6. Replace and tighten the bolts. 7. Repeat Steps 4-6 for the other wheel. Place support here on each side 8. Restart the tractor and raise the crop lifter/conditioner. 3. Make sure the tractor is in park position. 9. Remove the supports. Shut off the engine and remove the key. 10. Check the air pressure in the tires. The tire pressure should be approximately 35 PSI. CAUTION NOTE! Make sure both wheels are set evenly. It is important that the crop lifter/ conditioner is level to prevent crop or machine damage. Make sure the tractor is in park, with the ignition turned off, and the key removed. MAN139 2/1/15 19 Setup and Adjustment CLC-16, CLC-18, CLC-19, & CLC-25 Adjust Lifter Position CAUTION Loosen these bolts If the crop lifter/conditioner is attached to the tractor, make sure the tractor is in park, with the ignition turned off, and the key removed before making adjustments. Remove these bolts CAUTION ALWAYS replace safety shields after adjusting or working on the crop lifter. Failure to do so can result in personal injury or machine damage. 4. Repeat for the other side of the machine. The entire assembly can be shifted backward or forward to accommodate your particular row/vine condition. You will need to drill new holes to move the lifter into the required position, if the new position is to be permanent. Loosen these bolts 1. Remove both shields. Remove these bolts Remove shields 5. Shift the assembly either back or forward, according to your needs. 2. Referring to the next photo, loosen the top bolts as indicated. 3. Remove the lower bolts as indicated in photo. 20 2/1/15 6. If this shift is to be long term or permanent, drill 9/32” diameter holes in the frame. Two holes are required for each side. Make sure to line up holes on both sides so that the assembly is straight in the frame. 7. Replace and tighten all bolts. 8. Replace the shields. MAN139 CLC-16, CLC-18, CLC-19, & CLC-25 Operation 3. Operation READ FIRST! ........................................22 Warning ..............................................22 Transporting the Crop Lifter/Conditioner 22 First Run ................................................23 After the Run..........................................24 MAN139 2/1/15 21 Operation CLC-16, CLC-18, CLC-19, & CLC-25 READ FIRST! Please read the following before operating the transporter: • Read Chapter 1, Safety, before operating. • Perform all required assembly in Chapter 2, Setup and Adjustment. Transporting the Crop Lifter/Conditioner If you do not have the optional end wise Tow Kit, please observe the following: Do NOT exceed 20 MPH when moving your machine. Check the local width laws before transporting. Raise the crop lifter/conditioner to a position that keeps it off of the ground. Pay close attention to ground clearance when entering or leaving roads and paths to avoid ground contact. Review your tractor operating manual for more information on transporting the machine with your tractor. Warning Depending on the model, the crop lifter/ conditioner can be as wide as 27 feet. Please be aware of this width when you transport the machine with your tractor. Make sure the support legs are secured at a height that does not interfere with operation when you begin your run. Failure to do so can cause damage to the machine or serious personal injury. Support leg 18-27 feet wide 22 2/1/15 MAN139 CLC-16, CLC-18, CLC-19, & CLC-25 Operation First Run After you have set up and adjusted your crop lifter/conditioner according to Chapter 2, Setup and Adjustment, perform a first run. CAUTION 6. Engage tractor hydraulics to operate crop lifter/conditioner. Make sure the flow is in the correct direction, so that the crop lifter/conditioner is not operating backwards. Do NOT attempt to use the machine with the support legs touching or near the ground. Doing so can cause serious machine damage or personal injury. 1. Pick a starting speed between 2 ½ and 3 MPH. 7. Pull forward into the crop. 8. Observe how the crop lifter/conditioner is functioning. 2. Choose the appropriate gear in the tractor. 9. Refer to the chart below for settings that may need to be adjusted. 3. Select the rows and line the tractor up appropriately. Refer back to Chapter 2, Setup and Adjustment, to make any adjustments needed to make your crop lifter/conditioner run more efficiently. 4. Lower the crop lifter/conditioner to operating position. Observation 5. Observe the height of the pickup springs. They should be just above ground. If not, adjust the top link so that the pickup springs are above ground. Keep the crop lifter/conditioner level from front to back while making the adjustment. Cause Remedy Gaps/breaks in windrow Pickup speed is too high or lifter is too high Adjust speed as necessary or lower lifter Peanuts bunching/crowding on pickup Pickup speed is too low Adjust speed as necessary Skipping vines or peanuts Pickup is set too high Lower pickup Excessive dirt Pickup is set too low Raise pickup Excessive loss Ground speed and pickup speed are too high Lower speeds MAN139 2/1/15 23 Operation CLC-16, CLC-18, CLC-19, & CLC-25 After the Run After you have completed your run and before unhitching the crop lifter/conditioner, set the support legs for storing the machine. 1. Raise the crop lifter/conditioner to the height needed to adjust the legs. 2. Place the tractor in PARK position, shut off the engine, and remove the key. CAUTION 6. Repeat Steps 3-5 for the other leg. 7. Once this has been completed, the crop lifter/conditioner can be set onto the ground and disconnected from the tractor. Remember to disconnect the hydraulic hoses before pulling the tractor away from the crop lifter/conditioner. NOTE! Make sure both legs are set at the same height. It is important that the crop lifter/conditioner remain level to prevent machine damage. CAUTION Make sure the tractor is in park, with the ignition turned off, and the key removed. Do NOT attempt to use the machine with the support legs down. Doing so can cause serious machine damage or personal injury. 3. Remove the clip and pin. WARNING Escaping hydraulic fluid under pressure can penetrate the skin, causing serious injury. Clip and pin Avoid the hazard by relieving pressure before disconnecting hydraulic or other lines. Tighten all connections before applying pressure. Search for leaks with a piece of cardboard. Protect hands and body from high pressure fluids. See Chapter 1, Safety, for more information on safe handling of hydraulics and for instructions in the event of a hydraulic injury. 4. Move the leg to the desired height. 5. Replace the pin and clip. 24 2/1/15 MAN139 CLC-16, CLC-18, CLC-19, & CLC-25 Maintenance 4. Maintenance READ FIRST! ........................................26 Maintenance Schedule ..........................27 Chains ................................................29 Pickup Rods .......................................30 Pickup and Roller Assembly Bearings 31 Roller ..................................................31 Roller Bearing ....................................31 Spring Teeth.......................................32 Tires ...................................................32 Beginning of the Season ........................33 End of the Season .................................33 Troubleshooting .....................................34 MAN139 2/1/15 25 Maintenance CLC-16, CLC-18, CLC-19, & CLC-25 READ FIRST! Before performing any maintenance on this crop lifter/conditioner, thoroughly read and understand Chapter 1, Safety. WARNING When performing maintenance on this crop lifter/conditioner: • Do NOT make any adjustments or attempt any maintenance while the crop lifter/conditioner is in operation or being towed. • Make sure the crop lifter/conditioner is on level ground. • Make sure the tractor is in park, turned off and the key removed from the ignition before attempting maintenance. • Follow all safety warnings indicated by decals on the crop lifter/conditioner or in this manual. • Follow all safety warnings for working with hydraulics. Escaping hydraulic fluid under pressure can penetrate the skin, causing serious injury. Avoid the hazard by relieving pressure before disconnecting hydraulic or other lines. Tighten all connections before applying pressure. Search for leaks with a piece of cardboard. Protect hands and body from high pressure fluids. See Chapter 1, Safety, for more information on safe handling of hydraulics and for instructions in the event of a hydraulic injury. CAUTION If the crop lifter/conditioner is attached to the tractor, make sure the tractor is in park, with the ignition turned off, and the key removed before any maintenance is performed. 26 2/1/15 MAN139 CLC-16, CLC-18, CLC-19, & CLC-25 Maintenance Maintenance Schedule We strongly recommend that you perform regular maintenance on your crop lifter/ conditioner to help ensure efficient and safe operation. Please read the following: • The following page contains the Maintenance Schedule we recommend you follow. Each item on the schedule is described in more detail in this chapter. • If you need to replace any machine parts, please contact your John Deere dealer. • Make sure all safety decals are replaced when any new parts are installed. • When you order parts, please make sure you have your model and serial numbers handy. These numbers are located on the plate shown in the photo. (The plate is located on the front of the crop lifter.) Plate MAN139 2/1/15 27 Maintenance CLC-16, CLC-18, CLC-19, & CLC-25 Maintenance Schedule Item Action Interval Notes Chains Lubricate Every 200 hours Chains Tighten Idlers As needed Header Rods Replace As needed Roller Lubricate Weekly Roller Bearing Replace As needed Spring Teeth Replace As needed Tires Check Weekly Inflate to 35 PSI Tire Wheel Bearing Lubricate Seasonally Take apart and lube 28 2/1/15 Use SAE 30 or heavier oil General purpose grease MAN139 CLC-16, CLC-18, CLC-19, & CLC-25 Maintenance Chains CAUTION Chain idlers Make sure the tractor is in park, with the ignition turned off, and the key removed. Lubricate chains as follows: • Every 200 hours of operation. • Use SAE 30 or heavier oil. Chains behind shields CAUTION ALWAYS replace safety shields after adjusting or working on the crop lifter. Failure to do so can result in personal injury or machine damage. Tighten the chain idlers as needed to prevent chains from slipping: 1. Loosen idler. 2. Move idler closer to chain to tighten chain. (Note that if chain is too tight, moving idler farther away will loosen the chain.) 3. Retighten idler. MAN139 2/1/15 29 Maintenance CLC-16, CLC-18, CLC-19, & CLC-25 Pickup Rods 2. Slide the pickup rod forward until it is free of the pickup rod mount. CAUTION 3. Repair or replace the rod. 4. Insert the repaired or new rod in the slot on the pickup rod mount. Make sure the tractor is in park, with the ignition turned off, and the key removed. Replace pickup rods when worn. See your dealer for parts; part numbers are listed in your Parts Catalog. Spring teeth 5. Push the pickup rod back as far as you can. 6. Reinstall the clamping bolts loosely. 7. Pull the pickup rod forward until it stops. 8. Tighten the clamping bolts. Pickup rods 1. Remove the clamping bolts that hold the pickup rods. Clamping bolts 30 2/1/15 MAN139 CLC-16, CLC-18, CLC-19, & CLC-25 Maintenance Roller CAUTION Lubricate the grease point on roller as follows: Make sure the tractor is in park, with the ignition turned off, and the key removed. Pickup and Roller Assembly Bearings The bearings in the pickup and roller assemblies are sealed and will not need lubricating. • Remove protective plastic cap (not shown). Replace after lubrication to keep dirt and debris away from fitting. • With each use or at least weekly. • Use a good quality bearing grease. • 2-3 pumps with a grease gun. IMPORTANT! Failure to lubricate the grease point on the roller may result in the roller seizing and will make it very difficult to replace the roller bearing when necessary. When a bearing becomes worn, it will need to be replaced. Refer to your Parts Catalog for the correct part numbers and assembly information. To replace bearings: Grease point 1. Remove flangette. 2. Remove worn bearing. 3. Reassemble bearing and parts as shown in Parts Catalog. Roller Bearing The roller bearing is sealed and nonlubricating. It does wear out and will need to be replaced when worn. Refer to your Parts Catalog for part numbers and assembly information. Bearing Bearing MAN139 2/1/15 31 Maintenance CLC-16, CLC-18, CLC-19, & CLC-25 2. Remove the spring retainer. CAUTION Spring retainer Make sure the tractor is in park, with the ignition turned off, and the key removed. Spring Teeth Be sure to check and straighten the spring teeth after every use. If the teeth get caught on the wrong side, they will wear out much more frequently. 3. Remove the spring. 4. Install the new spring. 5. Re-install the spring retainer and screws. Spring Teeth Tires Maintain tires as follows: To replace: • Check air pressure in tires frequently. Tire pressure should be maintained at approximately 35 PSI. • At the end of each season, take apart the tires/wheels and lube the bearings. 1. Remove the screws indicated in the photo. Screws 32 2/1/15 MAN139 CLC-16, CLC-18, CLC-19, & CLC-25 Maintenance Beginning of the Season End of the Season Before you begin using your crop lifter/ conditioner at the beginning of each season, perform the following maintenance: Perform the following maintenance at the end of each season to make sure your crop lifter/ conditioner is properly stored for winter. 1. Thoroughly clean the crop lifter/ conditioner. 1. Thoroughly clean the crop lifter/ conditioner to prevent moisture from accumulating and causing rust. IMPORTANT! If using a pressure washer, do NOT direct water spray at bearings. High pressure water can damage bearing seals, causing premature failure. IMPORTANT! If using a pressure washer, do NOT direct water spray at bearings. High pressure water can damage bearing seals, causing premature failure. 2. Check the tension of all chains and adjust as necessary. 2. Lubricate the crop lifter roller according to page 31. 3. Lubricate all grease points and bearings. 3. Lubricate all chains according to page 29. 4. Make sure all bolts and pins are properly in place and tightened. 5. After hooking up the crop lifter/ conditioner, run at half-speed for a few minutes. Check the bearings for overheating or any looseness. MAN139 2/1/15 4. Take the tires apart and lubricate the wheel bearings. 5. Use the support legs to level the machine during storage. 33 Maintenance CLC-16, CLC-18, CLC-19, & CLC-25 Troubleshooting Problem Cause Remedy Gaps/breaks in windrow Pickup speed is too high or lifter is too high Adjust speed as necessary or lower lifter Peanuts bunching/crowding on pickup Pickup speed is too low Adjust speed as necessary. Skipping vines or peanuts Pickup is set too high Lower pickup Excessive dirt Pickup is set too low Raise pickup Excessive loss Ground speed and pickup speed are too high Lower speeds 34 2/1/15 MAN139