1
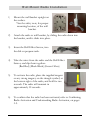
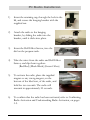
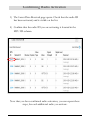
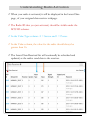
OWL UserManual TECHNOLOGY ASSURANCE LABS OWL User Manual Technology Assurance Labs 995 Westwood Square Unit C Oviedo FL 32765 United States Tel: (407)-542-0662 Email: [email protected] Table of Contents Wall Mount Radio Installation ....................................................... 1 Pit Radio Installation ......................................................................... 2 Confirming Radio Activation ....................................................... 3,4 Understanding Radio Activation ..................................................... 5 Accessing Your OWL Portal ........................................................... 6 Navigating Your OWL Portal ......................................................... 7 Customers Section ................................................................... 8 Add Customer ............................................................... 9 Customer Details ......................................................... 10 Service Address ........................................................... 11 Radio Management Section ................................................. 12 Radio Detail ................................................................. 13 Graphing ....................................................................... 14 Reporting Section .................................................................. 15 Mapping Section .................................................................... 16 Provisioning Your Radios ........................................................ 17-23 Frequently Asked Questions .......................................................... 24 Safety Note ....................................................................................... 25 Index .................................................................................................. 26 i Wall Mount Radio Installation 1) Mount the wall bracket upright on the surface. *See the safety note, for proper mounting location, of the wall bracket. 2) Attach the radio to wall bracket, by sliding the radio down into the bracket, until it clicks into place. 3) Insert the Hall Effect Sensor, into the dial on propane tank. 4) Take the wires from the radio and the Hall Effect Sensor, and clip them together: (Red-Red) (Black-Black) (Green-Other) 5) To activate the radio, place the supplied magnet or any strong magnet, on the triangle symbol, at the bottom right of the radio, and hold for two seconds. The radio will transmit in approximately 30 seconds. 6) To confirm that the radio has been activated, refer to Confirming Radio Activation and Understanding Radio Activation, on pages 3-5. 1 Pit Radio Installation 1) Insert the retaining cap, through the hole in the lid, and secure the hanging bracket with the supplied nut. 2) Attach the radio to the hanging bracket, by sliding the radio into the bracket, until it clicks into place. 3) Insert the Hall Effect Sensor, into the dial on the propane tank. 4) Take the wires from the radio and Hall Effect Sensor, and clip them together: (Red-Red) (Black-Black) (Green-Other) 5) To activate the radio, place the supplied magnet or any strong magnet, on the bottom of the label text, of the radio, and hold for two seconds. The radio will transmit in approximately 30 seconds. 6) To confirm that the radio has been activated, refer to Confirming Radio Activation and Understanding Radio Activation, on pages 3-5. 2 Confirming Radio Activation 1) To confirm your radio is activated, open your assigned data receiver web page. Click on the Latest Data tab at the top of the page. 2) The Latest Data page opens. Enter the radio ID, located on the bottom of the radio, into the box that says MTU ID. Then click View Data. 3 Confirming Radio Activation 3) The Latest Data Received page opens. Check that the radio ID has been activated, and is visible on the list. 4) Confirm that the radio ID you are activating is located in the MTU ID column. Now that you have confirmed radio activation, you can repeat these steps, for each additional radio you activate. 4 Understanding Radio Activation When your radio is activated, it will be displayed in the Latest Data page, of your assigned data receiver webpage. The Radio ID that you just activated, should be visible under the MTU ID column. In the Value Type column : 0 = Sensor and 1 = Power. In the Value column, the value for the radio should always be greater than 16. The Latest Data Received list will continually be refreshed and updated, as the radios send data to the receiver. 5 Accessing Your OWL Portal 1) To access your OWL Portal, open your internet browser, type http://portal.owlsite.net/ in the address bar, and then click Enter 2) The Technology Assurance Labs Dealer Portal opens, locate the login button, centered at the bottom of the page, and click on it. 3) The Dealer Portal Login opens. Enter your assigned username and password, and then click Sign In. This opens the dashboard (homepage) of your OWL Portal. 6 Navigating Your OWL Portal This is the dashboard of your OWL Portal; from here you have many tools at your disposal: Customers: Radio Create and manage customers and contact information. Management: Manage radios and check provisioned status. Reporting: Mapping: Upload View and export tank level and fill-up statistics. View a map of provisioned tanks and levels. Fill-Up: Select a Mid: Com file to upload fill-up data. 7 Customers Section The Customers section of your OWL Portal, allows you to create and manage customers, and contact information. Main Page: view a full list of your customers, containing their Customer ID, Customer Name, Account #, and Service Address. The search tool enables you to quickly find a specific customer, by entering either their Customer ID, Name, Account #, or Zip. The +Add Customers button, allows you to enter new customers into your portal, by creating a Customer ID and Name, along with filling in the Billing and Service Addresses, Tank information, and adding any Notes needed about the account, or for the technician. Clicking on a Customer ID enables you to view the entire customer’s information, including Billing and Service Addresses, Tank, Radio ID, Last Reading, and Last Fill-Up. Clicking on a Service Address enables you to edit the current Service Address, view or add a Tank and Fill-Up, and adjust or view Invoices. 8 Add Customer The Add Customer page, allows you to enter new customers into your portal. To access this page, click a Customer ID, listed on the main page of the Customers section. You can create a Customer ID and Name, then fill in the Billing and Service Addresses, Tank information, and add any Notes needed about the account, tank, or for the technician. If you are using a metered radio, make sure to check the box at the bottom of Step 2: Service Address. When done entering information, click Save at the bottom of the page. 9 Customer Details The Customer Details page, allows you to view each customer’s information. To access this page, click a Customer ID, listed on the main page of the Customers section. You can view or edit the Customer Details and Billing Address. If you edit the information make sure to click Save, on the right side underneath Billing Address. You can add another service address to this account by clicking on +Add Service Address. The customer’s Service Address, Tank, Radio ID, Last Reading, and Last FillUp are also visible at the bottom of the page. 10 Service Address Details The Service Address Details page, allows you to view the details of each customer’s service address. To access this page, click on Service Address, listed on the main page of the Customers section. You can view or edit the Service Address information, Notes, Account Balance, and Rates. You can also view or add a Tank and Fill-Up, and adjust or view Invoices, by clicking on each tab located to the right of the edit service address tab. If you edit the information, make sure to click Save at the bottom of the page. 11 Radio Management Section The Radio Management section of your OWL Portal, allows you to manage radios, and check provisioned status. Main Page: view any alerts and a full list of your radios, containing the Radio ID, Customer ID-Name, Service Address, Last Reading, Provisioned status, and Days to Empty. The search tool enables you to quickly find a specific radio, by entering the Radio or Customer ID. To view all radios with fill levels above a specified amount, type < followed by the value. For example, if you want to view all fill levels above 30% you would type <30 in the search bar. Clicking on a Radio ID, enables you to view the radio details, such as the Provisioned Date and Time, Network ID, Billing Enabled Date and Time, Last Reading Date, Receiver URL, and a list of the recorded Readings. Clicking on a Customer ID enables you to view the entire customer’s information, including Billing and Service Addresses, Tank, Radio ID, Last Reading, and Last Fill-Up. Clicking on a Service Address enables you to edit the current Service Address, view or add a Tank and Fill-Up, and adjust or view Invoices. 12 Radio Detail The Radio Detail page allows you to view the details of each radio. To access this page, click a Radio ID, listed on the main page, of the Radio Management section. You can view the Radio ID, Provisioned Date, Network ID, Billing Enabled Dare, Last Reading Date, and the Receiver URL, located in the top left corner of the page. Under Readings you can view the date, time, and reading (tank level) which is recorded every day, once the radio is activated. If you wish to delete a specific Reading, click the Delete button, to the right of each reading you want to delete. 13 Graphing The graphing feature is located at the bottom of the Radio Detail page, under the readings. The graph displays the Readings of the radio, from date of activation to present date. The blue dots on the graph line represent each reading from the radio. By moving your mouse over the circles you can view the date and reading. In order to zoom in on a specific date, move the scroll bars underneath the graph, either left or right, to narrow down the dates. 14 Reporting Section The Reporting section of your OWL Portal, allows you to view and export tank level and fill-up statistics. Alerts: send a daily email when the system detects anomalous data: missing fill-up, test data or stuck dial. To setup Alert, enter in the information and requirements, then click “Save Settings.” Tank Levels, Quiet Radios, and Generate Invoices: generate instantly, by filling in the requirements and clicking “Generate Now,” to view a list of customers matching the specific requirements. Tank Levels and Quiet Radios: setup to have reports sent out to a selected email address daily or weekly, by filling in the specific information, and clicking Schedule Report. 15 Mapping Section The Mapping section of your OWL Portal, allows you to view a map of provisioned tanks and levels. Main Page: displays a map, with pins representing all the radio locations. A list of all the radios, containing the customer names and fill level from their last reading, are listed along the left side of the screen. Holding the mouse over each of the different pins on the map will show the customer name. Clicking one of the pins on the map will bring up a box listing the Customers Name, Customer ID, Service Address, a Details button that brings you to the Customers Details, and the Last Reading. Zooming in on a specific location of the map, will show only the customer names located inside that enlarged area. The names will be displayed in the list along the left side of the page. 16 Provisioning Your Radios 1) It’s time to provision the radio to the customer. Log into your dealer portal (refer to page 7 if needed.) 2) On the dashboard of your portal, locate the Customers section in the upper left side, and click on it. 3) The Customers page opens. Click +Add Customer. If you have already entered customers prior to this, select the customer you want to provision the radio to and click on the Customer ID. Then skip over instructions # 4-7, and continue on at instruction #8. 17 Provisioning Your Radios 4) Complete the information for the customer, adding any notes needed about the account, or for the technician. IMPORTANT: Be sure to enter a Customer ID number and service address. Both of these are important because they allow provisioned radios to be paired with their accounts. 5) If a metered radio is being used, mark that box with a check at the bottom of the Service Address step. 18 Provisioning Your Radios 6) After you have filled in all of the customer information, click Save. 7) The Customer Details page opens, where you should see “Customer Added: Customer ID #### added successfully” in the top left corner of the page. 19 Provisioning Your Radios 8) Confirm that all of the information is correct, if it is, click Provision Radio, at the bottom of the page, under radio ID. If you need to correct a mistake in the Customer or Billing Address, you can edit it, then click Save. If you need to edit the Service Address, click on it, edit, then click Save. 9) This opens the Provision Radio page. Enter in the radio ID and click Provision. 20 Provisioning Your Radios 10) A confirmation page opens, listing the customer ID, service address, tank capacity, and the radio ID that you are about to provision. Complete the provisioning by checking the box that confirms agreement to begin charging your account for this radio. Click Confirm. 11) The Customer Details page opens, where you are able to see the new provisioned radio at the bottom of the page under radio ID. 21 Provisioning Your Radios 12) If you are satisfied that the information is correct, click Save. 13) Once you click Save, you will be brought back to the Customers page. To enter more new customer accounts click +Add Customers and repeat instructions #4-13. To select existing accounts, click on the Customer ID and proceed from #8. 22 Provisioning Your Radios 14) If you want to review the radios that you have already provisioned, click Radio Management on the dashboard. 15) The Radio Management page opens where you can view all the radio ID’s, along with the customer accounts they are provisioned to. Now that you have completed provisioning the radios, you are ready to begin using OWL, and discovering its many capabilities. 23 Frequently Asked Questions 1) When activating the radio, can I use a different magnet then the one supplied? Yes. As long as the magnet is the same strength, or larger. 2) When confirming radio activation, why isn’t my radio visible in the MTU ID column? If the radio isn’t visible, repeat holding the magnet on the specified area for 10 seconds. If the problem persists, try using a larger magnet to activate it. 3) Do I need to continually check the radio values in the Latest Data Received page, after activation? No. As long as the radio is visible, and the value is greater than 16 when activated, you don’t need to continually check, unless a problem persists. 6) Can I enter new customers into the portal before activating the radio? Yes. Once the radio is activated, click on the Customer ID you want to provision with, then start on #8 in Provisioning Radios Instructions. 7) If I make a mistake entering customer information in the portal, can I change it? You can always edit the customer information by clicking on the Customer ID, Radio ID, or Service Address, then changing the information. Make sure to click Save, before exiting. 24 Safety Note *SAFETY NOTE: Your wall-mounted OWL radio transmitter is easy to install and activate. However, you should be aware that your wall-mounted OWL radio is not yet certified under Underwriters Laboratories (UL) Standard 913 as “Intrinsically Safe”. This means that it is not designed to prevent it from becoming an ignition source for any flammable vapors that reach its components. DO NOT install this OWL radio transmitter in a location that is within 5 feet of flammable gas source. The transmitter MUST be installed a MINIMUM of 5 feet or more from gas source. Failure to comply with this installation instruction could result in an explosion and fire, causing serious personal injury, death or property damage. 25 Index Activation ............................................................................ 3, 4, 5, 13, 24 Add..................................................................................... 8, 9, 10, 17, 19 Address .........................................6, 8, 9, 10, 11, 12, 16, 18, 20, 21, 24 Confirm ................................................................................. 1, 2, 3, 4, 21 Customer ........................ 7, 8, 9, 10, 11, 12, 17, 18, 19, 20, 22, 23, 24 Dashboard ..................................................................................... 6, 7, 17 ID .............................................................3, 4, 5, 8, 9, 12, 16, 17, 20, 21 Installation ............................................................................................. 1,2 Level .............................................................................................. 7, 15, 16 Manage ........................................................................................... 7, 8, 12 Map ..................................................................................................... 7, 16 New ................................................................................................. 8, 9, 21 Password ................................................................................................... 6 Portal ...................................................................... 6, 7, 8, 12, 15, 16, 17 Provisioning ..............................................17, 18, 19, 20, 21, 22, 23, 24 Radios ............................................................ 5, 7, 12, 16, 21, 23, 24, 25 Reading ....................................................................................................16 Receiver ............................................................................................ 3, 4, 5 Safety ........................................................................................................25 Save ............................................................................................ 15, 19, 22 Sensor................................................................................................ 1, 2, 5 Status ................................................................................................... 7, 12 Transmit ............................................................................................... 2, 3 Username .................................................................................................. 6 Value .......................................................................................................... 5 26