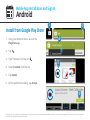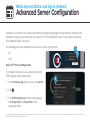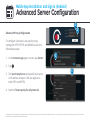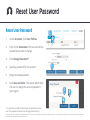
1
Administrator Manual
For Convene 3.8.x (Web), Convene 4.0.1082 (Android), Convene 4.0.10928 (iPad)
Manual Version: 20141218R1
Table of Contents
Mobile App Installation and Sign In...............3
Folder and File Permissions..............................27
iPad...............................................................3
Grant Permissions.......................................27
Android........................................................8
Revoke Permissions....................................28
Accessing the Portal...........................................13
Audit Trail.............................................................29
Manage User Accounts......................................14
System Administration ....................................30
Create User Accounts.................................14
License.........................................................34
Enable / Disable User Accounts................15
Meeting Types.............................................35
Manage Users from an LDAP Server........15
System Key...................................................36
Reset User Password..................................16
Erase Mobile App Data...............................17
Manage Roles and Permissions.......................18
User Roles and Permissions......................18
Meeting Roles and Permissions................20
Manage Groups...................................................24
Create a Group............................................24
Add Members..............................................25
Remove Members.......................................26
© Copyright 2014. Azeus Systems Ltd. All rights reserved. This user manual may not be reproduced or distributed in whole or in part without prior permission from Azeus Systems Ltd. The content
of this manual is intended for informational use only.
Mobile App Installation and Sign In
iPad
Install from Appstore
1
2
1. Using your iPad or iPhone, launch the
App Store application.
2. Search for Azeus Convene.
3.Install Azeus Convene.
3
© Copyright 2014. Azeus Systems Ltd. All rights reserved. This user manual may not be reproduced or distributed in whole or in part without prior permission from Azeus Systems Ltd. The content
of this manual is intended for informational use only.
Mobile App Installation and Sign In (iPad)
Advanced Server Configuration
Convene can connect to Convene Portal behind a firewall by opening the required ports directly in the
firewall or using a proxy server that has support for HTTP and SOCKS version 5.
The following ports are required by Convene to connect to the portal:
•
80
•
443
1
iPad Proxy Configuration
HTTP Proxy Configuration
To allow Convene to use a proxy server with HTTP
support, configure the iPad network settings by
following these steps:
1.Launch iPad Settings.
2.Tap Wi-Fi.
3.Tap
to open the Wi-Fi settings.
2
3
© Copyright 2014. Azeus Systems Ltd. All rights reserved. This user manual may not be reproduced or distributed in whole or in part without prior permission from Azeus Systems Ltd. The content
of this manual is intended for informational use only.
Mobile App Installation and Sign In (iPad)
Advanced Server Configuration
4. Go to the Manual tab under the HTTP
PROXY section and configure the following
parameters:
Parameter
Values
Server
required, either host name
or IP address
Port
required, proxy server
listening port
If the proxy server specified requires
authentication, slide the Authentication on and
specify the Username and Password on the
respective fields.
4
© Copyright 2014. Azeus Systems Ltd. All rights reserved. This user manual may not be reproduced or distributed in whole or in part without prior permission from Azeus Systems Ltd. The content
of this manual is intended for informational use only.
Mobile App Installation and Sign In (iPad)
Advanced Server Configuration
SOCKS Proxy Configuration
1
To configure Convene to use a proxy server with
SOCKS version 5 support, follow these steps:
1. In the Convene sign in screen, tap Server.
2
2.Tap Edit.
3.Tap
on the server your want to configure.
3
4.Tap Advanced.
4. Under the SOCKS Proxy Settings section, fillup the fields using values from your system
administrator.
4
5
© Copyright 2014. Azeus Systems Ltd. All rights reserved. This user manual may not be reproduced or distributed in whole or in part without prior permission from Azeus Systems Ltd. The content
of this manual is intended for informational use only.
Mobile App Installation and Sign In (iPad)
Sign in to the Convene App
1. On your mobile device,
tap the Convene icon.
2
2. (Optional) Specify the server to be used.
a) To add an enterprise server, tap Add Server from the Server dropdown.
b) On the Server Settings window, specify the Server Address and tap Done.
c)
If multiple servers have been added, the next time you sign in, just tap Server and choose from the drop-down list which server to use for the current session.
3. Enter your Username or Email and password.
4.Tap Sign in.
2a
2b
3
4
© Copyright 2014. Azeus Systems Ltd. All rights reserved. This user manual may not be reproduced or distributed in whole or in part without prior permission from Azeus Systems Ltd. The content
of this manual is intended for informational use only.
Mobile App Installation and Sign In
Android
Install from Google Play Store
1
2
3
1. Using your Android device, launch the
Play Store app.
2. Tap
.
3. Type “Convene” and tap on
.
4.Select Convene from the list.
4
5.Tap Install.
6. On the permissions dialog, tap Accept.
5
© Copyright 2014. Azeus Systems Ltd. All rights reserved. This user manual may not be reproduced or distributed in whole or in part without prior permission from Azeus Systems Ltd. The content
of this manual is intended for informational use only.
Mobile App Installation and Sign In (Android)
Advanced Server Configuration
Convene can connect to Convene Portal behind a firewall by opening the required ports directly in the
firewall or using a proxy server that has support for HTTP and SOCKS version 5 (Convene for Android
also supports SOCKS version 4).
The following ports are required by Convene to connect to the portal:
•
80
•
443
1
2
Basic HTTP Proxy Configuration
To configure Convene to use a proxy server with
HTTP support, follow these steps:
1. In the Convene app sign in screen, tap Server.
2.Tap
3
.
3.Tick Use Proxy Server check box and specify
the Proxy Host and Proxy Port on the
respective fields.
© Copyright 2014. Azeus Systems Ltd. All rights reserved. This user manual may not be reproduced or distributed in whole or in part without prior permission from Azeus Systems Ltd. The content
of this manual is intended for informational use only.
Mobile App Installation and Sign In (Android)
Advanced Server Configuration
1
Advanced Proxy Configuration
2
To configure Convene to use specific proxy
settings for HTTP, HTTPS and SOCKS version 4/5,
follow these steps:
1. In the Convene app sign in screen, tap Server.
2.Tap
3
.
3.Tick Use Proxy Server and specify host name
or IP address and port. This also applies to
both HTTP and HTTPS.
4
4. Switch off Same proxy for all protocols.
© Copyright 2014. Azeus Systems Ltd. All rights reserved. This user manual may not be reproduced or distributed in whole or in part without prior permission from Azeus Systems Ltd. The content
of this manual is intended for informational use only.
Mobile App Installation and Sign In (Android)
Advanced Server Configuration
5. For each protocol, the user can configure the following parameters:
Parameter
Values
Host
required, either host name or IP address
Port
required, proxy host listening port
6
5
6. If the proxy host specified requires authentication, tick the Requires
Authentication check box and configure the following parameters:
Parameter
Values
Username
optional, only if authentication is needed
Password
optional, only if authentication is needed
7
Note for SOCKS protocol:
•
•
If Username is not specified, or if specified with the corresponding Password, SOCKS version 5 protocol will be used.
If Username is specified without a Password, SOCKS version 4 protocol will be used.
7. Tap Save.
© Copyright 2014. Azeus Systems Ltd. All rights reserved. This user manual may not be reproduced or distributed in whole or in part without prior permission from Azeus Systems Ltd. The content
of this manual is intended for informational use only.
Mobile App Installation and Sign In (Android)
Sign in to the Convene App
1. On your mobile device,
tap the Convene icon.
2
2. Specify the server to be used.
a) To add an enterprise server, tap Add Enterprise Server from the Server dropdown.
b) On the Server Settings window, specify the Server Address and tap Save.
c)
If multiple servers have been added, the next time you sign in, just tap Server and choose from the drop-down list which server to use for the current session.
3
4
2a
2b
3. Enter your Username or Email and password.
4.Tap Sign in.
© Copyright 2014. Azeus Systems Ltd. All rights reserved. This user manual may not be reproduced or distributed in whole or in part without prior permission from Azeus Systems Ltd. The content
of this manual is intended for informational use only.
Accessing the Portal
Introduction
The Convene web portal is a web-based
application where you can change system settings,
audit security logs, and perform administrative
functions such as meeting management and user
accounts management.
Accessing the Portal
You can access the portal using your PC’s web
browser. Please contact your administrator for the
web address to use.
© Copyright 2014. Azeus Systems Ltd. All rights reserved. This user manual may not be reproduced or distributed in whole or in part without prior permission from Azeus Systems Ltd. The content
of this manual is intended for informational use only.
Create User Accounts
Create User Accounts
1.
Click on the Accounts tab.
2.Click Add.
3.
1
On the New User Profile form, specify the appropriate fields. Please refer to the section
User Roles and Permission for information
about the Role field.
2
3
4.Click Save and Close.
4
© Copyright 2014. Azeus Systems Ltd. All rights reserved. This user manual may not be reproduced or distributed in whole or in part without prior permission from Azeus Systems Ltd. The content
of this manual is intended for informational use only.
Enable/Disable User Accounts
Enable / Disable User Accounts
1.
2. Select the accounts you want to enable/
disable.
3.
1
Click on Accounts.
2
Click the Enable/Disable button.
3
Manage Users from an LDAP
Server
Accounts imported from an LDAP (Lightweight
Directory Access Protocol) are disabled by default.
To enable them:
1.
Click on Accounts.
2.
Select the accounts you want to enable.
3.
Click the Enable button.
1
2
3
© Copyright 2014. Azeus Systems Ltd. All rights reserved. This user manual may not be reproduced or distributed in whole or in part without prior permission from Azeus Systems Ltd. The content
of this manual is intended for informational use only.
Reset User Password
Reset User Password
1.Under Accounts, click User Profiles.
2.
1
2
Click on the Username of the account whose password you want to change.
3.Click Change Password.*
4.
Specify a password for the account.
5.
Retype the new password.
6. Click Save and Close. The system will prompt the user to change the account password upon sign in.
3
4
5
6
* For users that use ADFS authentication, this method cannot be
used. The password should be reset through Active Directory.
© Copyright 2014. Azeus Systems Ltd. All rights reserved. This user manual may not be reproduced or distributed in whole or in part without prior permission from Azeus Systems Ltd. The content
of this manual is intended for informational use only.
Erase Mobile App Data
In case a device is lost or compromised,
administrators can erase data on the device of a
specified user.
1
1.Under Accounts, click on the Username
of the user account whose mobile data you
want to erase.
2.Click Erase Convene App Data.
3.Click OK.
2
© Copyright 2014. Azeus Systems Ltd. All rights reserved. This user manual may not be reproduced or distributed in whole or in part without prior permission from Azeus Systems Ltd. The content
of this manual is intended for informational use only.
User Roles and Permission
User Roles and Permissions
Convene maintains three user types with different levels of access. The table below shows the
operations that can be performed by each type of user.
General User
Administrator
Yes
Yes
No
Yes
Yes*
Yes
Meeting Management
Schedule/create meeting
Document Management
Manage org-level folders
Set file and folder permission
A General User can only manage a file or folder’s access permissions if the user is granted administrative rights to that specific file or folder.
Administrative rights to files or folders can only be granted a user who has administrative access to the same file or folder.
1
© Copyright 2014. Azeus Systems Ltd. All rights reserved. This user manual may not be reproduced or distributed in whole or in part without prior permission from Azeus Systems Ltd. The content
of this manual is intended for informational use only.
User Roles and Permission
General User
Administrator
Manage accounts
No
Yes
Manage groups
No
Yes
Maintain corporate structure
No
Yes
View audit logs
No
Yes
Maintain meeting types
No
Yes
Maintain system settings
No
Yes
System Administration
© Copyright 2014. Azeus Systems Ltd. All rights reserved. This user manual may not be reproduced or distributed in whole or in part without prior permission from Azeus Systems Ltd. The content
of this manual is intended for informational use only.
Meeting Roles and Permissions
Default Roles and Permissions
Convene has a number of built-in roles and permissions to help you get started right away. However,
these roles can be customised as appropriate for your organisation.
CHAIRPERSON
The Chairperson role is intended for the user who will facilitate the meeting. A user with this role has all
the permissions for the meeting:
•
Manage meeting details, status and
notifications
•
Manage agenda and meeting files
•
Manage participants
•
Start and end meeting
•
Download meeting files to desktop
•
Export meeting pack
•
Add shared annotations
•
Add private annotations
•
Assign presenter role during meeting
•
Upload and manage meeting minutes
•
Read all participants’ private annotations
•
Edit all participants’ shared text notes after
meeting
© Copyright 2014. Azeus Systems Ltd. All rights reserved. This user manual may not be reproduced or distributed in whole or in part without prior permission from Azeus Systems Ltd. The content
of this manual is intended for informational use only.
Meeting Roles and Permissions
SECRETARY
The secretary role has, by default, the same permissions as the Chairperson.
PARTICIPANT
A meeting participant can do the following:
•
Download meeting files to desktop
•
Add shared annotations
•
Add private annotations
MEETING ORGANISER
By default, the Meeting Organiser is the user who scheduled the meeting, but other users may also
be added as Meeting Organisers. Meeting Organiser(s) have the same permissions as the Chairperson
except for the following:
•
Read all participants’ private annotations
•
Edit all participants’ shared text notes after meetings
© Copyright 2014. Azeus Systems Ltd. All rights reserved. This user manual may not be reproduced or distributed in whole or in part without prior permission from Azeus Systems Ltd. The content
of this manual is intended for informational use only.
Meeting Roles and Permissions
Although Convene provides a number of built-in meeting roles, you can customise these roles to reflect
the roles and responsibilities within your organisation.
Add a Meeting Role
1
2
1.Click System Admin.
2. Go to Meeting Roles tab.
3
3.Click Add New Meeting Role.
4. Enter the name of the new role.
5. Specify what the role can do in a meeting by
marking the corresponding checkboxes of
function rights listed.
6.Click Save and Close.
4
5
6
© Copyright 2014. Azeus Systems Ltd. All rights reserved. This user manual may not be reproduced or distributed in whole or in part without prior permission from Azeus Systems Ltd. The content
of this manual is intended for informational use only.
Meeting Roles and Permissions
Edit an Existing Meeting Role
1.Click System Admin.
2. Go to Meeting Roles tab.
3
1
2
4
3. Select a meeting role from the list.
4.
To change what an existing role can
do in a meeting, mark or unmark the
corresponding checkboxes of function
rights listed.
5.Click Save and Close.
5
© Copyright 2014. Azeus Systems Ltd. All rights reserved. This user manual may not be reproduced or distributed in whole or in part without prior permission from Azeus Systems Ltd. The content
of this manual is intended for informational use only.
Manage Groups
1
Convene supports multiple boards and
committees to facilitate meeting management and
access permissions.
Create a New Group
2
1. After logging in to the portal, click Accounts.
2. Under Groups, click Add.
3. Specify the Group Name.
3
4.Click Save and Close.
4
© Copyright 2014. Azeus Systems Ltd. All rights reserved. This user manual may not be reproduced or distributed in whole or in part without prior permission from Azeus Systems Ltd. The content
of this manual is intended for informational use only.
Manage Groups
Add Members
1
2
1. In the Accounts tab, click Groups.
3
2. Click the group to which you wish to add members.
3. Click the Members tab
4
4.Click Add.
5. Select the members you wish to add.
6.Click Add.
5
6
© Copyright 2014. Azeus Systems Ltd. All rights reserved. This user manual may not be reproduced or distributed in whole or in part without prior permission from Azeus Systems Ltd. The content
of this manual is intended for informational use only.
Manage Groups
Remove Members
1
2
1. In the Accounts tab, click Groups.
2. Click the group to which you wish to add members.
3. Click the Members tab.
4. Select the members you wish to delete.
4
3
5
5.Click Delete.
© Copyright 2014. Azeus Systems Ltd. All rights reserved. This user manual may not be reproduced or distributed in whole or in part without prior permission from Azeus Systems Ltd. The content
of this manual is intended for informational use only.
Folders and File Permissions
Grant Permissions
Permissions can be managed by users who
are administrators of the board, committee or
organisation’s library.
1
2
1.Under Document Library, right click on the
file or folder whose permissions you want to
change.
1
2.Click Get Info.
To grant permissions:
1.
Under Security and Permissions, click +.
2.
Select permission options.
2
3
3.Click Add.
© Copyright 2014. Azeus Systems Ltd. All rights reserved. This user manual may not be reproduced or distributed in whole or in part without prior permission from Azeus Systems Ltd. The content
of this manual is intended for informational use only.
Folders and File Permissions
Revoke Permissions
To revoke permissions:
1.Click x on the user whose permission you want to revoke.
1
© Copyright 2014. Azeus Systems Ltd. All rights reserved. This user manual may not be reproduced or distributed in whole or in part without prior permission from Azeus Systems Ltd. The content
of this manual is intended for informational use only.
Audit Trail
Audit Trail
The Convene web portal’s audit trail lets you track the activities being performed within the system. To
access the audit trail:
1.
Go to Audit Trail.
2.
Select the audit trail category you wish to view: Sign In, Documents, Permission, User Profile.
Category
Description
Sign In
Sign Ins, both successes and failures
Documents
Operations on the files and folders:
Download, Insert (new), Delete, Move, New version
Permission
Permissions granted (Insert) or revoked (Delete)
User Profile
Operations on account records
© Copyright 2014. Azeus Systems Ltd. All rights reserved. This user manual may not be reproduced or distributed in whole or in part without prior permission from Azeus Systems Ltd. The content
of this manual is intended for informational use only.
System Administration
Convene lets you configure how the system behaves through the System Admin screen.
1.
Go to System Admin tab. Under Settings, you will see the following options.
Setting
Description
General
Server ID
Read only field used for debugging
Company Name*
Name of your organisation - this text also appears at the upper
right hand side of the portal.
Documents
Maximum File Size for Uploads (MB)*
Maximum size of each uploaded document
© Copyright 2014. Azeus Systems Ltd. All rights reserved. This user manual may not be reproduced or distributed in whole or in part without prior permission from Azeus Systems Ltd. The content
of this manual is intended for informational use only.
System Administration
Meeting Schedule
Meetings will be closed after [ ]
hours of the scheduled date and time.
After the specified period, the meeting will become read-only. If
blank, then meetings will never be closed.
Enable publishing of meetings*
Allows the meeting scheduler to preview the meeting details
before publishing the meeting details to the participants
Send meeting summary*
Send a Meeting Summary file via email to participants of a
meeting
Agenda Cover Sheet Default
Setting*
Allows the mobile app to insert cover pages for agenda items that
have no meeting files
Send email notification to
participants when meeting
starts*
Automatically send email to participants informing them that the
meeting they were invited to is about to start
© Copyright 2014. Azeus Systems Ltd. All rights reserved. This user manual may not be reproduced or distributed in whole or in part without prior permission from Azeus Systems Ltd. The content
of this manual is intended for informational use only.
System Administration
Meeting Schedule
Meeting Cover Template
Allows the organiser to select a file that will be used as the cover
for meeting files
Agenda Cover Template
Allows the organiser to select a file that will be used as the cover
for the meeting agenda
Standard Participant Groups
Allows meeting organisers to group participants when scheduling
meetings; however, this has no bearing on permissions and is
simply an organisational tool
Security Services
Activate Security Services
Lets you activate the security services or displays the current
status if already activated;
Password Expiry
Number of days before passwords expire; when expired, user
accounts must provide new passwords when they sign in
Sign-In Retry Limit
Related user account will be disabled and related user offline
data will be deleted from the app after retry limit
© Copyright 2014. Azeus Systems Ltd. All rights reserved. This user manual may not be reproduced or distributed in whole or in part without prior permission from Azeus Systems Ltd. The content
of this manual is intended for informational use only.
System Administration
Password Policy
Minimum password length
Sets the minimum number of characters required in a password
Minimum number of letters
Sets the minimum number of letters required in a password
Minimum number of digits
Sets the minimum number of digits or numerals required in a password
Allow special characters
Whether to allow special characters such as ^, &, *, etc.
Disallow reuse of old passwords
Whether to allow users to reuse the last, last 2, last 3, and so on
password
Client Devices
Enable automatic sign out after [
] minutes
Set the session timeout in minutes
Auto-delete meeting information
on sign out
If enabled, cached files will be deleted from the user’s mobile device
upon sign out or session timeout; offline access will also be disallowed
© Copyright 2014. Azeus Systems Ltd. All rights reserved. This user manual may not be reproduced or distributed in whole or in part without prior permission from Azeus Systems Ltd. The content
of this manual is intended for informational use only.
Manage License
*License management is only applicable to the on-premise version of Convene.
Check License Information
1.
Go to System Admin.
2.
Click on the License tab.
1
2
4
Remove License
3.
To remove the license, click Remove
License.
3
Request a License
4. Click the Request License button. It will
launch your mail client with a message
template that you can send to the
Convene team.
© Copyright 2014. Azeus Systems Ltd. All rights reserved. This user manual may not be reproduced or distributed in whole or in part without prior permission from Azeus Systems Ltd. The content
of this manual is intended for informational use only.
Meeting Types
1
Meeting types allow participants and organisers
to easily identify the type of meetings and filter
meetings by type.
Add a Meeting Type
2
1.Under System Admin, go to Meeting types tab.
2.Click Add Meeting Type.
3
3.Enter Description.
4
4.Click Save and Close.
Delete Meeting Types
1
1. Tick the Meeting Types you wish to delete.
2.Click Delete Meeting Types.
2
© Copyright 2014. Azeus Systems Ltd. All rights reserved. This user manual may not be reproduced or distributed in whole or in part without prior permission from Azeus Systems Ltd. The content
of this manual is intended for informational use only.
System Key
System Key
This section is only available if you opted to keep the system key separately (as opposed to storing it
in the server.
Safeguard the System Key
The system key is very important because it allows unprecedented access to the service. The system
key is able to decrypt user keys, which can be used to decrypt file keys, and thus lets the system key
holder access the contents of any document in the Convene repository.
It should be stored on a protected workstation with not just software-related security mechanisms,
but also physical security mechanisms.
© Copyright 2014. Azeus Systems Ltd. All rights reserved. This user manual may not be reproduced or distributed in whole or in part without prior permission from Azeus Systems Ltd. The content
of this manual is intended for informational use only.
System Key
Start the Service with the
System Key
1.
Sign in as administrator.
2.
Go to System Admin.
3.Under Security Services, click Activate.
4.
Locate the private key file provided to you
during installation.