1
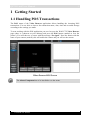
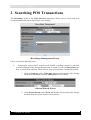
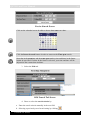
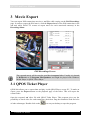
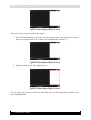
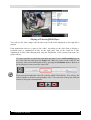
Serial Port POS User & Installation Manual QPOS Link Version 4.1 Series 1 QPOS Link User Manual 2 Contents CONTENTS .................................................................................................................................................................................................................. 2 PREFACE ..................................................................................................................................................................................................................... 3 INTRODUCTION ....................................................................................................................................................................................................... 4 1 GETTING STARTED .................................................................................................................................................................................... 5 1.1 HANDLING POS TRANSACTIONS .................................................................................................................................................................... 5 1.2 INITIATING TRANSACTION .............................................................................................................................................................................. 6 1.2.1 Low/High Bandwidth Mode ................................................................................................................................................................... 7 1.2.2 Snapshots ................................................................................................................................................................................................. 7 1.2.3 Digital Zoom ........................................................................................................................................................................................... 7 1.2.4 Full Screen Mode .................................................................................................................................................................................... 8 2 SEARCHING POS TRANSACTIONS ........................................................................................................................................................ 9 2.1 3 HANDLING POS RECORDINGS ...................................................................................................................................................................... 12 MOVIE EXPORT ......................................................................................................................................................................................... 14 3.1 QPOS TICKET PLAYER .................................................................................................................................................................................. 14 Version 4.9 Series QPOS Link User Manual 3 Preface This document This manual is intended for administrators and operators of a WebCCTV/GuardNVR Video Recorder who want to use the POS (Point Of Sale) component and is applicable for WebCCTV/GuardNVR software version 4.5.0.0 and higher. This manual is applicable for both WebCCTV and GuardNVR Video Servers. Therefore WebCCTV can be replaced by GuardNVR at all times. Safety Notices Please observe all safety notes and instructions carefully when using this product. Liability The information in this publication is believed to be accurate in all respects. Quadrox assumes no responsibility for incidental or consequential damages incurred directly or indirectly from errors, omissions or discrepancies in connection with the furnishing, performance or use of this manual. The information contained herein is subject to change without notice. Revisions or new editions to this publication may be issued to incorporate such changes. All rights reserved. Under the copyright laws, no part of this manual can be reproduced in any form without written permission of Quadrox. Legal considerations Please check your local regional laws and regulations before using WebCCTV for surveillance purposes. Camera surveillance may be prohibited by laws, which may vary from country to country. Trademark Acknowledgments Quadrox, WebCCTV, GuardNVR Internet Explorer, Windows are registered trademarks of the respective holders. Support Services Should you require any technical assistance, please contact your installer. If your questions cannot be answered immediately, your installer will forward your queries through the appropriate channels to ensure a fast response. Version 4.9 Series QPOS Link User Manual 4 Introduction WebCCTV is a unique digital video surveillance solution, which combines three major functions in one Network Video Recorder (NVR) or Digital Video Recorder (DVR): local digital recording, multiplexing and simultaneous transmission of the video via existing networks (TCP/IP). To a standard WebCCTV, up to 20 cameras can be permanently recorded while multiple operators at different locations on the network are accessing the WebCCTV device. Being a networked device, WebCCTV utilizes two basic principles of the Internet/Intranet technology: WebCCTV works over the TCP/IP network protocol, which provides maximum connectivity. This means that the existing computer network infrastructure can be used eliminating extra installation expenses. WebCCTV uses a web-based user interface to view live images, recordings, etc. More specific it uses Microsoft Internet Explorer. Remote and Local Monitoring To remotely monitor the connected cameras, the WebCCTV uses Web Browser technology. To locally monitor video, the WebCCTV also provides a local interface via a PC monitor directly connected to the WebCCTV. This local interface allows an operator to see live video from the connected cameras without the need for additional client computers on a network. Serial Port POS is the WebCCTV alarm component which allows transformation of the POS printer transactions into WebCCTV alarms. In other words: when the ticket is printed by the POS terminal, the alarm is triggered within the WebCCTV system, so you are able to observe all transactions and recordings which are recorded based on the incoming transaction data into the WebCCTV system. To configure this system you need to perform the following steps: Connect the POS printer you want to control by means of WebCCTV to the serial port (COM port) of any computer in your network. Install and configure the Remote POS Monitor application on this computer. Install and configure the Alarm Component on the WebCCTV server. After all configurations Remote POS Monitor will capture the transactions which come from the POS printer connected to the COM port and send it to the WebCCTV server. The Alarm Component, which is installed on the WebCCTV server, will generate the alarm. Version 4.9 Series QPOS Link User Manual 5 1 Getting Started 1.1 Handling POS Transactions The POS menu of the Video Browser application allows handling the incoming POS transactions. You are able to observe the transaction name, date, time and recorded footage according to the settings you made. To start working with the POS application you need to open the WebCCTV Video Browser page (there is a shortcut on your desktop) and press the POS button (marked as 1 on the picture). You will then see a screen with the message ‘No signal’. Press the button with the name of your camera (mark 2), this will enable the camera and you will see the stream. Video Browser POS Screen The Alarm Component has to be installed to see the menu. Version 4.9 Series QPOS Link User Manual 6 1.2 Initiating Transaction To be able to see the transactions in the Video Browser with the ticket and line feed displayed together with Live video, you need to do the following: a) Locate the machine with the POS software and start to make the transaction – you will see the line items appear in the right bottom field next to the Live image. b) Finish the transaction by printing a ticket on the POS printer. You will then see the complete ticket displayed in the right upper field next to the Live image together with all the line items of the ticket on the bottom field. You can generate as many transactions as you want. The following sections are described: Low/High Bandwidth mode Snapshots Digital Zoom Full Screen Mode Version 4.9 Series QPOS Link User Manual 7 1.2.1 Low/High Bandwidth Mode Low/High bandwidth mode allows you to decide if you want to have streaming video that consumes more or less bandwidth. You have the following options: High Bandwidth Mode (Default) – High Bandwidth mode is preferably used on local computers (when the WebCCTV client is located on the same machine as the WebCCTV server), in local area networks or with high-speed Internet connections. Use the High ( ) button to enable high bandwidth mode. Low Bandwidth Mode – Low bandwidth mode is mostly used in medium- or slowspeed LAN or Internet connections. When Low Bandwidth mode is enabled, the frame rate and the resolution of the images are reduced. This produces a reduced bandwidth usage for streaming video. Use the Low ( ) button to enable low bandwidth mode. 1.2.2 Snapshots This WebCCTV feature gives you the opportunity to take snapshots. To create a snapshot, follow the steps below: 1. Choose the frame you want to save and click the button with the camera symbol ( ). 2. Choose the desired location for storing images and click the Save button. Snapshots are saved in .JPEG format. 1.2.3 Digital Zoom The Digital Zoom functionality is very useful when there are small details in the scene, but the camera does not support optical zoom which means there is no option to visually enlarge those objects. In order to use the Digital Zoom functionality, follow the steps below: 1. Click on the video window in order to set a focus point. 2. Use the scroll wheel to zoom the image in and out (a magnifying glass is shown). 3. When partially or totally zoomed in, click on any point of the video screen in order to centralize the video window on this point. This also resets the focus point for further zooming in and out. You cannot use the Digital Zoom functionality if your mouse does not have a scroll wheel. Version 4.9 Series QPOS Link User Manual 8 1.2.4 Full Screen Mode Full screen mode allows you to visualize video by using the full screen. When going to full screen the activity line and camera buttons are hidden by default. You can unhide them by clicking the icon. Full Screen mode is not the same as pressing F11 in Internet Explorer. To enter the full screen mode, click the icon. To leave the full screen mode, click the the keyboard. icon at the right top corner or press any key on Full Screen Mode Version 4.9 Series QPOS Link User Manual 9 2 Searching POS Transactions The Recordings menu of the Video Browser application allows you to search and view recorded footage and export clips of this video footage. Recordings Management Screen Please execute the following steps: Selecting the time period is needed for all possible recording requests as you need to search amongst all the footage that has been recorded. To select a time period, you have to specify time and date. There are two ways of specifying a certain time period: 1. Using a From date and a Time span interval: all recorded video footage between the From date plus the Time period will be shown. Interval Search Screen 2. Using Precise Search with a From and To date: all recorded video footage between these two points in time will be shown. Version 4.9 Series QPOS Link User Manual Precise Search Screen Click on the calendar icon to be able to choose the From or To date. Click the Interval search button in order to return to the Time span search. Note that in the From/To and the Time span modes, time and dates in the future cannot be specified. If a date in the future is selected, your time and date will be adjusted to the current date and time. 3. Select the POS tab. POS Search Tab Screen 4. Enter or select the search criteria by: a. Enter the search criteria manually in the text field b. Selecting a previously saved search string by clicking Version 4.9 Series 10 QPOS Link User Manual If you want to save your search criteria to the saved search strings, click saved search name and search criteria and click Save. 11 . Enter a The search string is now added to the saved search strings. To manage all saved searches, go to 2.1 Saved Searches. Creating a search string or search criteria is Google alike. Please read below which options are available: A search string is by default considered to be a set of separate words that are searched in an AND way. Search results will include the tickets that contain all words, but not necessarily in that order. Typing the word “AND” is not needed. Search is not case sensitive. Phrase search – a set of words that should be searched exactly in that order can be put inside quotation marks: “”. E.g: “Bicky Burger” Word exclusions – a word that should not appear in the ticket should be preceded by a minus sign: OR searches – to display results that contain either of two search terms, the user can put the word OR (capitalized) between the terms. Only the words or phrases directly left and right of OR will be considered. Other words will be searched in an AND connection. The requirements for space (or the absence thereof) are supported. 5. Select/Deselect the POS sources on which you want to search (Optional). To show all the POS Sources, click the Show POS sources button. 6. Click the Search button. 7. For a new POS transaction recordings search, click the New Search button. Click on the camera buttons to see the recordings associated with the ticket that is highlighted in the right pane. All cameras that are configured to write recordings for this ticket have a light blue button. The active shown camera button is bright blue. To navigate through all the found tickets, use the arrows in the right pane. Version 4.9 Series QPOS Link User Manual 12 Navigation Buttons in Ticket Playback Screen When no tickets are found for the requested period, you will be automatically reverted to the main recordings page. 2.1 Handling POS Recordings To facilitate POS Transaction searches in the Recordings menu of the Video Browser, search strings can be created. Saved Searches Screen To create a search string, perform the following steps: Enter a Name Enter the Search Criteria Version 4.9 Series QPOS Link User Manual 13 Creating search criteria is Google alike. Please read below which options are available: A search string is by default considered to be a set of separate words that are search in an AND way. Search results will include the tickets that contain all words, but not necessarily in that order. Typing the word “AND” is not needed. Search is not case sensitive. Phrase search – a set of words that should be searched exactly in that order can be put inside quotation marks: “”. E.g: “Bicky Burger” Word exclusions – a word that should not appear in the ticket should be preceded by a minus sign: OR searches – to display results that contain either of two search terms, the user can put the word OR (capitalized) in-between the terms. Only the words or phrases directly left and right of OR will be considered. Other words will be searched in an AND connection. The requirements for space (or the absence thereof) are supported. Click Add. Click Edit to change the search criteria of a saved search. Click Delete to delete a saved search. Version 4.9 Series QPOS Link User Manual 14 3 Movie Export You can export POS transactions movies to .asf files while staying on the POS Recordings page. In order to export the POS movie, click the Export button of the POS transaction event and wait while WebCCTV creates an export movie for each associated camera(s) in the Recordings Menu. POS Recordings Screen The exported movie will be saved to your Movies Export folder. Usually it is located in D:\Movies or C:\Program Files\Quadrox and might be played with Windows Media Player or QPOS Ticket Player. 3.1 QPOS Ticket Player QPOS link allows you to export data and play it with QPOS Player on any PC. To make an export, press the Export button on the playback page of the ticket. This will export the current ticket. Open the exported .asf video file with QPOS Ticket Player. This program gives you the possibility to check video for each transaction, check how long the transaction took and a lot of other advantages. Double click on the Version 4.9 Series icon on your desktop to open the program. QPOS Link User Manual 15 QPOS Ticket Player Main Screen There are 2 ways to open the file in the player: 1. Press the folder button on the panes (see the picture below) and navigate to the place where you exported the movie. Choose the wanted.asf file and play it. QPOS Ticket Player Main Screen 2. Pull the .asf file to the zone marked in red. QPOS Ticket Player Main Screen The file will open and you will see the first slide and text from the ticket in subtitle zone. Press the Play button. Version 4.9 Series QPOS Link User Manual 16 Playing a Ticket in QPOS Player You will see the video image with the line items of the ticket displayed on the right like a playlist. Each transaction refers to a (part of the) video. According to the video that is playing, a particular item is emphasized in blue on the right pane. Part of the scroll bar is also emphasized in blue, thus showing how long the transaction of the current item took (see picture above). You also can make an export for more than one ticket. Locate the Recordings page in the Video Browser and open the Export tab. Make an export of the video for the necessary time period and download it by pressing the Download button. Browse to the location you want to store the export file. Then open the downloaded video file with the QPOS Ticket Player. You will see the tickets together with their corresponding video. You can move among the different tickets by using the control buttons: Version 4.9 Series


![[MANUAL] WebCCTV User Manual 4.4.0.0](http://vs1.manualzilla.com/store/data/005886634_1-9e25e0c8c7fa6f72c2b69bbb4cc67aa8-150x150.png)


![[MANUAL] WebCCTV Installation Manual 4.4.0.0](http://vs1.manualzilla.com/store/data/005935803_1-1275fe61ae4b5b7c0ce4f62506e594f6-150x150.png)
![[MANUAL] GuardNVR Installation Manual 4.4.0.0](http://vs1.manualzilla.com/store/data/005799040_1-22ffd5d438f0b0c95843f8ff9431bc2d-150x150.png)