1
SuperDoctor 5
User's Guide
Version 1.2d
The information in this USER’S MANUAL has been carefully reviewed and is believed to be accurate. The
vendor assumes no responsibility for any inaccuracies that may be contained in this document, makes
no commitment to update or to keep current the information in this manual, or to notify any person
organization of the updates. Please Note: For the most up-to-date version of this manual, please see our
web site at www.supermicro.com.
Super Micro Computer, Inc. (“Supermicro”) reserves the right to make changes to the product described
in this manual at any time and without notice. This product, including software, if any, and
documentation may not, in whole or in part, be copied, photocopied, reproduced, translated or reduced
to any medium or machine without prior written consent.
IN NO EVENT WILL SUPERMICRO BE LIABLE FOR DIRECT, INDIRECT, SPECIAL, INCIDENTAL, SPECULATIVE
OR CONSEQUENTIAL DAMAGES ARISING FROM THE USE OR INABILITY TO USETHIS PRODUCT OR
DOCUMENTATION, EVEN IF ADVISED OF THE POSSIBILITY OF SUCHDAMAGES. IN PARTICULAR,
SUPERMICRO SHALL NOT HAVE LIABILITY FOR ANY HARDWARE,SOFTWARE, OR DATA STORED OR USED
WITH THE PRODUCT, INCLUDING THE COSTS OFREPAIRING, REPLACING, INTEGRATING, INSTALLING OR
RECOVERING SUCH HARDWARE,SOFTWARE, OR DATA.
Any disputes arising between manufacturer and customer shall be governed by the laws of Santa Clara
County in the State of California, USA. The State of California, County of Santa Clara shall be the
exclusive venue for the resolution of any such disputes. Super Micro's total liability for all claims will not
exceed the price paid for the hardware product.
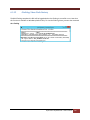
FCC Statement: This equipment has been tested and found to comply with the limits for a Class A digital
device pursuant to Part 15 of the FCC Rules. These limits are designed to provide reasonable protection
against harmful interference when the equipment is operated in a commercial environment. This
equipment generates, uses, and can radiate radio frequency energy and, if not installed and used in
accordance with the manufacturer’s instruction manual, may cause harmful interference with radio
communications. Operation of this equipment in a residential area is likely to cause harmful interference,
in which case you will be required to correct the interference at your own expense.
California Best Management Practices Regulations for Perchlorate Materials: This Perchlorate warning
applies only to products containing CR (Manganese Dioxide) Lithium coin cells. Perchlorate Materialspecial handling may apply. See http://www.dtsc.ca.gov/hazardouswaste/perchlorate/ for further
details.
Manual Revision 1.2d
Release Date: September 1, 2014
Unless you request and receive written permission from Super Micro Computer, Inc., you may not copy
any part of this document.
Supermicro SuperDoctor 5 User’s Guide
2
Information in this document is subject to change without notice. Other products and companies
referred to herein are trademarks or registered trademarks of their respective companies or mark
holders.
Copyright © 2014 by Super Micro Computer, Inc.
All rights reserved.
Printed in the United States of America
Supermicro SuperDoctor 5 User’s Guide
3
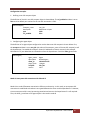
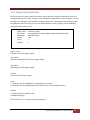
Revision History
Date
Rev
Description
Jul-18-2013
1.0
1. Initial document.
Aug-23-2013
1.1
1. Fixed typos.
2. Added more system information types.
3. Added power control functions.
4. Added BIOS flashing functions.
5. Added system tray support on system desktop.
Nov-15-2013
1.2
1. Added user-defined threshold functions.
2. Added support for completing SD5 installation without restarting
the Windows operating system.
3. Changed default install folder.
4. Changed variables in the silent mode installation file.
Feb-7-2014
1.2a
1. Changed some figures.
Mar-7-2014
1.2b
1.
2.
3.
4.
Apr-14-2014
1.2c
1. Changed document layout and Supermicro logo.
Sep-1-2014
1.2d
1.
2.
3.
4.
Added “Appendix C Updating Configuration”.
Changed SD5 system requirements.
Changed default user name and password.
Changed some figures.
Changed SSM full name to Supermicro Server Manager.
Changed mail title in E-mail Alert.
Added RHEL 7 into SD5 system requirements.
Added more system information types.
Supermicro SuperDoctor 5 User’s Guide
4
Supermicro SuperDoctor 5 User’s Guide
5
Contents
Part 1
1
2
SuperDoctor 5 Overview ..................................................................................................................... 11
1.1
Key Features..................................................................................................................... 11
1.2
Minimum System Requirements ..................................................................................... 13
1.3
Default TCP/UDP Ports..................................................................................................... 13
Setting Up SD5 .................................................................................................................................... 14
2.1
Installing SD5.................................................................................................................... 14
2.1.1
Windows Installation ........................................................................................................ 14
2.1.2
Linux Installation ............................................................................................................... 20
2.1.3
Silent Mode Installation .................................................................................................... 26
2.1.4
Tips for Deploying a Large Number of SD5s ..................................................................... 30
2.2
Verifying the Installation .................................................................................................. 31
2.3
Manually Controlling SD5 Service .................................................................................... 31
2.4
Uninstalling SD5 ............................................................................................................... 32
2.4.1
Uninstalling in Windows ................................................................................................... 32
2.4.2
Uninstalling in Linux .......................................................................................................... 35
2.4.3
Silent Mode Uninstall........................................................................................................ 36
Part 2
3
Background ....................................................................................................................... 10
SuperDoctor 5 ................................................................................................................... 37
SuperDoctor 5 Configurations ............................................................................................................ 38
3.1
Working Concept ............................................................................................................. 38
3.2
Connection Modes ........................................................................................................... 39
3.3
Configuration Overview ................................................................................................... 44
3.3.1
Agent Object Definition .................................................................................................... 45
3.3.2
Acceptor Object Definition ............................................................................................... 46
3.3.3
Keystore Object Definition................................................................................................ 47
3.3.4
Plug-in Object Definition................................................................................................... 48
3.3.5
Action Object Definition ................................................................................................... 49
3.4
Built-in Plug-ins and Actions ............................................................................................ 50
3.4.1
admin plug-in (admin_plugin)........................................................................................... 50
3.4.2
echo plug-in (echo_plugin) ............................................................................................... 57
3.4.3
executable plug-in (executable_plugin)............................................................................ 58
Supermicro SuperDoctor 5 User’s Guide
6
4
5
3.4.4
healthinfo plug-in (healthinfo_plugin).............................................................................. 59
3.4.5
power plug-in (power_plugin) .......................................................................................... 65
3.4.6
systeminfo plug-in (systeminfo_plugin) ........................................................................... 67
3.4.7
smart plug-in (smart_plugin) ............................................................................................ 71
3.4.8
bios log plug-in (bios_log_plugin) ..................................................................................... 73
3.4.9
memory plug-in (memory_health_plugin) ....................................................................... 74
3.4.10
storage plug-in (storage_health_plugin) .......................................................................... 76
3.4.11
LSI RAID plug-in (lsiraid_plugin) ........................................................................................ 77
3.4.12
notification plug-in (notification_plugin) ......................................................................... 79
SD5 Web.............................................................................................................................................. 82
4.1
SD5 Web Login ................................................................................................................. 82
4.2
Health Information .......................................................................................................... 83
4.3
System Information.......................................................................................................... 87
4.4
Report .............................................................................................................................. 88
4.5
SD5 Web Configuration.................................................................................................... 89
4.5.1
Alert Configuration ........................................................................................................... 89
4.5.2
Monitored Item................................................................................................................. 91
4.5.3
Password Setting............................................................................................................... 93
4.5.4
Flash BIOS ......................................................................................................................... 95
4.6
RAID.................................................................................................................................. 97
4.7
Power Control ................................................................................................................ 101
SNMP Extension ................................................................................................................................ 103
5.1
Setting Up the SNMP Service on Windows .................................................................... 103
5.1.1
Preparation ..................................................................................................................... 103
5.1.2
Configuring the SNMP Service ........................................................................................ 104
5.1.3
Verifying the SNMP Service ............................................................................................ 105
5.2
Setting Up the SNMP Service on Linux.......................................................................... 105
5.2.1
Preparation ..................................................................................................................... 105
5.2.2
Configuring the SNMP Service ........................................................................................ 105
5.2.3
Verifying the SNMP Service ............................................................................................ 106
5.3
Supermicro MIB ............................................................................................................. 107
Supermicro SuperDoctor 5 User’s Guide
7
6
SuperDoctor 5 Command Line Program ........................................................................................... 109
6.1
7
SDC Commands .............................................................................................................. 109
6.1.1
–h: Display sdc command arguments ............................................................................. 109
6.1.2
–d: Dump SNMP messages ............................................................................................. 109
6.1.3
–e: Display all monitored items and their status ............................................................ 110
6.1.4
–f: Write SNMP messages to a specified file .................................................................. 111
6.1.5
–i: Display all monitored items and their status repeatedly........................................... 112
6.1.6
–ia: Import alert configuration ....................................................................................... 113
6.1.7
–r: Reset the chassis intrusion ........................................................................................ 114
6.1.8
–rd: Detect the monitored items again .......................................................................... 114
6.1.9
–v: Display sdc version information ................................................................................ 114
6.1.10
–reboot: Reboot the System ........................................................................................... 116
6.1.11
–shutdown: Shutdown the System ................................................................................. 116
6.1.12
–abort: About the shutdown or reboot command ......................................................... 116
6.1.13
–dt: Delay seconds to run power command................................................................... 117
6.1.14
–flash: Flash BIOS ............................................................................................................ 117
6.1.15
–flashlog: Show flash history .......................................................................................... 118
6.1.16
–et: Export threshold configuration ............................................................................... 119
6.1.17
–it: Import threshold configuration ................................................................................ 120
6.1.18
–rt: Reset threshold to default settings .......................................................................... 121
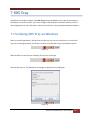
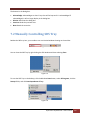
SD5 Tray ............................................................................................................................................ 122
7.1
Verifying SD5 Tray on Windows ..................................................................................... 122
7.2
Manually Controlling SD5 Tray ...................................................................................... 123
Part 3
Advanced Topics ............................................................................................................. 124
8
9
SSM Utilities ...................................................................................................................................... 125
8.1
Using ChangeJVM to Change a Java VM ........................................................................ 125
8.2
Using Change_cert_pwd to Change Certificate Password............................................. 127
SSM Certification............................................................................................................................... 128
Part 4
Appendices...................................................................................................................... 129
A
Log Settings ...................................................................................................................................... 130
B
Third-Party Software ......................................................................................................................... 131
Supermicro SuperDoctor 5 User’s Guide
8
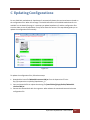
C
Updating Configurations ................................................................................................................... 132
Contacting Supermicro ............................................................................................................................. 133
Supermicro SuperDoctor 5 User’s Guide
9
Part 1 Background
Supermicro SuperDoctor 5 User’s Guide
10
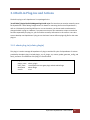
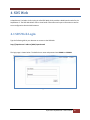
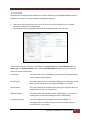
1 SuperDoctor 5 Overview
SuperDoctor 5 (SD5) is an agent system that runs on monitored hosts designed by Supermicro to provide
local system health and information. SD5 supports a Web-based interface program and a command line
interface program for server management.
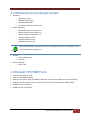
1.1 Key Features
Supports monitoring, control, and management functions.
o Hardware Monitoring: fan speed, temperature, voltage, chassis intrusion, redundant power
failure, power consumption, disk health, raid health, and memory health.
o 21 Types of system information: BIOS, Baseboard, Chassis, Computer System, Disk Drives,
FRU, Memory, Network, Printer, Processor, System Slot, IPMI, Power Supply, Account,
Operating System, Process, Service, Share, Time Zone, OEM Strings, and System Cfg Options.
Provides SNMP extensions for network management system.
Easy to use Web-based and command line interfaces.
Notifications sent via email and SNMP traps.
Easy to customize:
o Pluggable hardware and software monitoring plug-ins.
o Compatible with Nagios plug-ins.
Supports Windows and Linux platforms.
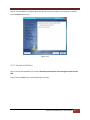
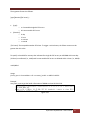
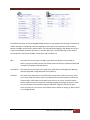
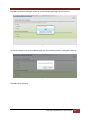
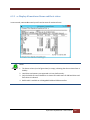
Figure 1-1: SD5 Web-based Console
Supermicro SuperDoctor 5 User’s Guide
11
Notes:
1. Monitoring memory health by SuperDoctor 5 is only available on Linux platforms. This
function is not available on Supermicro desktop motherboards. Besides, not all
Supermicro servers support the function of monitoring memory health. Please refer to
the Supermicro web site for an up-to-date list of supported products.
2. Monitoring SMART health supports non-RAID internal hard disks and does not support
USB hard disks and flash disks. To use this function, install the smartctl utility program
first.
3. Monitoring RAID health is available on LSI MegaRAID 2108 and 2208 controllers. LSI
MegaRAID 2008, LSI Fusion-MPT based and Intel Rapid Storage Technology controllers
are not supported.
4. The system information is platform dependent. Types include Desktop Monitor, Floppy,
Keyboard, Port Connector, Parallel Port, Pointing Device, Serial Port, Computer
Summary, Startup Command, and Video Controller, which are supported on Windows
platforms only.
5. BIOS flashing is supported on Windows platforms only. This function is available on
Supermicro motherboards newer than H8, X8, and X9 series. Please refer to the
Supermicro web site for an up-to-date list of supported products.
6. The system tray function is supported on Windows platforms only.
Supermicro SuperDoctor 5 User’s Guide
12
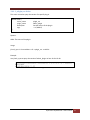
1.2 Minimum System Requirements
Hardware
o Supermicro servers
o 200 MB free disk space
o 64 MB available RAM
o An Ethernet network interface card
Operating System
o Red Hat Enterprise Linux Server 5.x
o Red Hat Enterprise Linux Server 6.x
o Red Hat Enterprise Linux Server 7.x
o SUSE Linux Enterprise 11.x
o Windows 2008 Server R2
o Windows 2012 Server R2
Note that SuperDoctor 5 might be run on the operating systems not in the support list but
not fully validated by Supermicro.
Browser
o Internet Explorer 8.x
o Firefox 3.x
Screen resolution
o 1024 x 768
1.3 Default TCP/UDP Ports
Binds TCP port 8181 for HTTP
Binds TCP port 8444 for HTTPS
Binds TCP ports 5333, 5666, and 5999 for NRPE (See 3.2 Connection Modes for more information)
Binds for internal communications TCP port 7777 and a free TCP port between 31000-32999
SNMP GET sent on UDP 161
SNMP Trap sent on UDP 162
Supermicro SuperDoctor 5 User’s Guide
13
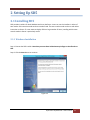
2 Setting Up SD5
2.1 Installing SD5
SD5 provides installers for both Windows and Linux platforms. A user can run the installers in either of
two modes: GUI interactive mode and text-console mode. The text-console mode can be run with either
interaction or silence. If a user wants to deploy SD5 to a large number of hosts, installing with the textconsole mode in silence is particularly useful.
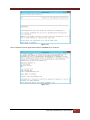
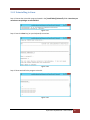
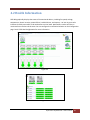
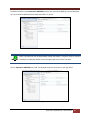
2.1.1 Windows Installation
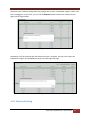
Step 1: Execute the SD5 installer. Note that you must have Administrator privileges to install and run
SD5.
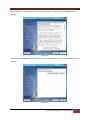
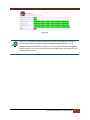
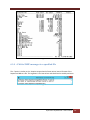
Step 2: Click the Next button to continue.
Figure 2-1
Supermicro SuperDoctor 5 User’s Guide
14
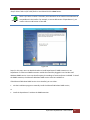
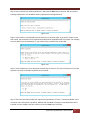
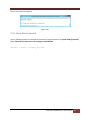
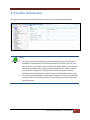
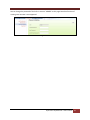
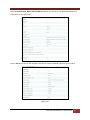
Step 3: Select the “I accept the terms of the License Agreement” option and click the Next button to
continue.
Figure 2-2
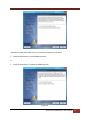
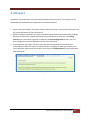
Step 4: Click the Choose button to select a directory to install SuperDoctor 5 and click the Next button to
continue.
Figure 2-3
Supermicro SuperDoctor 5 User’s Guide
15
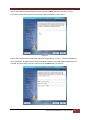
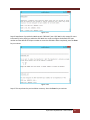
Step 5: Select “Built-in (JRE 1.6.0)”built-in Java VM and click the Next button.
Note: If you select "Choose a Java VM", the architecture of the selected Java VM must be
compatible with the installer. For example, to use an x86 version of SuperDoctor 5, you
need to select an x86 version of Java VM.
Figure 2-4
Step 6: In this step, users can decide whether to install SuperDoctor 5 SNMP extension or not.
SuperDoctor 5 contains an SNMP extension module that should be plugged in into the Microsoft
Windows SNMP service. Users can therefore query the readings of monitored items via SNMP. To install
the SNMP extension, the Microsoft Windows SNMP service must be installed first.
If the Microsoft Windows SNMP service is not installed, you can either:
exit the installation program to manually install the Microsoft Windows SNMP service,
or
install the SuperDoctor 5 without the SNMP extension.
Supermicro SuperDoctor 5 User’s Guide
16
Figure 2-5
If the Microsoft Windows SNMP service is installed and started, you can either
install the SuperDoctor 5 and the SNMP extension,
or
install the SuperDoctor 5 without the SNMP extension.
Figure 2-6
Supermicro SuperDoctor 5 User’s Guide
17
Step 7: Select Yes to use the default key stores and click the Next button to continue. For more
information on how the keystores are used, see 9 SSM Certification in this manual.
Figure 2-7
Step 8: Three communication modes are supported in SuperDoctor 5. See 3.2 Connection Modes for
more information. By default, Mode B (SSL) and Mode C (Keypair) are enabled when SuperDoctor 5 is
installed. You can configure the port numbers. Click the Next button to continue.
Figure 2-8
Supermicro SuperDoctor 5 User’s Guide
18
Step 9: SuperDoctor 5 provides the Web console “SD5 Web” (see “4 SD5 Web” in this manual for more
information). Select Yes to enable the SD5 Web. You can also configure the default HTTP port number
and the default HTTPS port number to access the SD5 Web. When completed, click the Next button to
continue.
Figure 2-9
Step 10: Click the Install button to install the SuperDoctor 5 software on your computer.
Figure 2-10
Supermicro SuperDoctor 5 User’s Guide
19
Step 11: The installation is complete. Note that you do not need to reboot your computer to use SD5.
Click the Done button to exit.
Figure 2-11
2.1.2 Linux Installation
Step 1: Execute the SuperDoctor 5 installer. Note that you must have root privileges to install and run
SD5.
Step 2: Press the Enter key (on your keyboard) to continue.
Supermicro SuperDoctor 5 User’s Guide
20
Figure 2-12
Step 3: Accept the license agreement and press the Enter key to continue.
Figure 2-13
Supermicro SuperDoctor 5 User’s Guide
21
Step 4: Enter a directory to install SuperDoctor 5 and press the Enter key to continue. We recommend
installing SuperDoctor 5 to the default folder (/opt/Supermicro/SuperDoctor5).
Figure 2-14
Step 5: Use the built-in Java VM and press the Enter key to continue. Note: If you select "Choose a Java
VM" option, the architecture of the selected Java VM must be compatible with the installer. For example,
to use an x86 version of SuperDoctor 5, you need to select an x86 version of Java VM.
Figure 2-15
Step 6: Use the default key stores and press the Enter key to continue. For more information on how the
keystores are used, see 9 SSM Certification in this manual.
Figure 2-16
Step 7: Three communication modes are supported in SuperDoctor 5. See 3.2 Connection Modes in this
manual for more information. By default, Mode B (SSL) and Mode C (Keypair) are enabled when SD5 is
installed. You can configure the port numbers. Press the Enter key to continue.
Supermicro SuperDoctor 5 User’s Guide
22
Figure 2-17
Step 8: SuperDoctor 5 provides the Web console “SD5 Web” (see 4 SD5 Web in this manual for more
information). Select 1 (Yes) to enable the SD5 Web. You can also configure the default HTTP port
number and the default HTTPS port number to access the SD5 Web. When completed, press the Enter
key to continue.
Figure 2-18
Step 9: This step shows the pre-installation summary. Press the Enter key to continue.
Supermicro SuperDoctor 5 User’s Guide
23
Figure 2-19
Step 10: Press the Enter key to install the SuperDoctor 5 software on your computer.
Figure 2-20
Step 11: The installation is complete. Press the Enter key to exit the installer. Note that you do not
need to reboot your computer to use SD5.
Figure 2-21
Supermicro SuperDoctor 5 User’s Guide
24
Step 12: SuperDoctor 5 contains an SNMP extension module that can be plugged in to the default Linux
SNMP service. The last step shows how to manually configure the default Linux SNMP service to enable
the SuperDoctor 5 SNMP extension. To install the SNMP extension, the default Linux SNMP service must
be installed first. The figure below shows the steps to manually plug the SuperDoctor 5 SNMP extension
in to the default Linux SNMP service.
Figure 2-22
Supermicro SuperDoctor 5 User’s Guide
25
2.1.3 Silent Mode Installation
Silent mode installation provides a way to install SuperDoctor 5 without the interaction with users. This
is particularly useful when users want to deploy the SuperDoctor 5 to a large number of hosts. To use
silent mode installation, a property file that contains the necessary SuperDoctor 5 installation settings
must be provided.
Step 1: Prepare a property file for silent mode installation. All configuration options required by the
SuperDoctor 5 installer are included in the property file. The example below shows how SuperDoctor 5
is installed on a Linux platform.
# This file was built by the Replay feature of InstallAnywhere.
# It contains variables that were set by Panels or Consoles.
#Choose Install Folder
# e.g., C:\\Program Files\\Supermicro\\SuperDoctor5
#
/opt/Supermicro/SuperDoctor5
#--------------------USER_INSTALL_DIR=/opt/Supermicro/SuperDoctor5
#Choose Install Feature
#--------------------CHOSEN_INSTALL_FEATURE_LIST=SuperDoctor5
#Choose a Java VM
#---------------------USE_DEFAULT_JVM=Yes
#INSTALLED_JVM_PATH=/usr/java/jdk1.6.0_43/jre/bin/java
#---------------------#Setup a keystore
#---------------------USE_DEFAULT_KEYSTORE=Yes
#AGENT_PRIVATE_KEYSTORE_PATH=/opt/agent.auth
#AGENT_PUBLIC_KEYSTORE_PATH=/opt/agent.trust
#USE_AGENT_DEFAULT_KEYSTORE_PASSWORD=Yes
#AGENT_KEYSTORE_PASSWORD=your-keystore-password
#Setup SNMP on Agent side
#---------------------# Install SNMP extension
USE_AGENT_SNMP_EXTENSION=No
#Setup Agent connection ports
#---------------------AGENT_ALLOW_IP=127.0.0.1
AGENT_NO_SSL_PORT=5333
AGENT_SSL_PORT=5666
AGENT_KEYPAIR_PORT=5999
#Setup Agent Web
#---------------------USE_AGENT_WEB=Yes
AGENT_WEB_HTTP_PORT=8181
AGENT_WEB_HTTPS_PORT=8444
### End of file
Supermicro SuperDoctor 5 User’s Guide
26
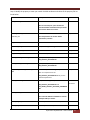
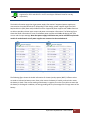
Step 2: Modify the property to meet your needs. Possible attributes and values of the property file are
listed below.
Attribute
Description
USER_INSTALL_DIR
Install folder
Option
Note: It's necessary for you to choose the
same install folder each time when you install
each of these features on a host.
CHOSEN_INSTALL_
Install features
FEATURE_LIST
Note: Keep features in one line and be
separated by a comma.
USE_DEFAULT_JVM
Uses default Java VM
INSTALLED_JVM_PATH
JVM path if USE_DEFAULT_JVM=No
USE_AGENT_SNMP_EXTENSION
Installs SNMP extension
No | Yes
USE_DEFAULT_KEYSTORE
Uses default key store
Yes | No
AGENT_PRIVATE_KEYSTORE_PATH
Agent private key store path if
USE_DEFAULT_KEYSTORE=No
AGENT_PUBLIC_KEYSTORE_PATH
Agent public key store path if
USE_DEFAULT_KEYSTORE=No
USE_AGENT_DEFAULT_KEYSTORE_PASSW
ORD
Uses default password for agent key store.
AGENT_KEYSTORE_PASSWORD
The password for agent key store if
Yes | No
Yes | No
Note: It’s required to set the
USE_DEFAULT_KEYSTORE=No when you use
customized password.
USE_DEFAULT_KEYSTORE=No and
USE_AGENT_DEFAULT_KEYSTORE_PASSWORD
=No
AGENT_ALLOW_IP
SuperDoctor5
Yourpassword
Allows connections to Internet addresses
Note: Internet addresses should be in one line
and separated by a comma.
AGENT_NO_SSL_PORT
Binds TCP ports for connection with plain text
5333
AGENT_SSL_PORT
Binds TCP ports for Anonymous SSL connection
5666
Supermicro SuperDoctor 5 User’s Guide
27
AGENT_KEYPAIR_PORT
Binds TCP ports for SSL connection with a public
key infrastructure
5999
USE_AGENT_WEB
Enables SD5 Web
Yes | No
AGENT_WEB_HTTP_PORT
SD5 Web listen port
8181
AGENT_WEB_HTTPS_PORT
SD5 Web secure listen port
8444
Step 3: Begin the silent mode installation.
For Windows platforms:
SuperDoctor5Installer.exe –i silent –f [property_file_name]
For Linux platforms:
./SuperDoctor5Installer.bin –i silent –f [property_file_name]
Note that there is no error message shown on the console in silent mode. Once the installation is
completed, an SD5_InstallLog.log file is generated in the [install folder] folder. This file contains
installation log data that can be used for debugging purposes.
You can open the following log files to check whether SuperDoctor 5 is installed successfully. Note that
these steps are optional and meant for troubleshooting only.
Step 4: Check SD5_InstallResult.log file to make sure SuperDoctor 5 is properly installed. Note that no
error messages are shown on the console in silent mode. Once the installation is complete, the
SD5_InstallResult.log file is generated in the [install folder] folder. The following SD5_InstallResult.log
file shows that the SuperDoctor 5 is properly installed.
Installation Result: Success
If a previous version of SuperDoctor 5 is detected during the installation process, the log file is shown
like this:
Installation Time: Tue May 15 09:58:53 CST 2012
Detect previous: 'YES'
Installation Result: Success
With the installation log data, you can start troubleshooting.
Step 5: Check SD5_InstallLog.log. The SD5_InstallLog.log file is generated in the [install folder] folder.
This file contains installation log data that can be used for debugging installation process. The following
SD5_InstallResult.log file shows an example that guides you to check SD5_InstallLog.log file.
Supermicro SuperDoctor 5 User’s Guide
28
Installation Result: Failed
Root Cause: Installation Process Failed
Please open SD5_InstallLog.log to check "WARNING" or "ERROR" keywords and see if there
are problems.
After opening the SD5_InstallLog.log, you are able to see warnings or errors in the log file.
....
Summary
------Installation: Successful
1885 Successes
5 Warnings
0 NonFatalErrors
0 FatalErrors
Note that all warnings and errors are logged in the file for reference.
Supermicro SuperDoctor 5 User’s Guide
29
2.1.4 Tips for Deploying a Large Number of SD5s
Suppose that you are going to deploy the SuperDoctor 5 to a cluster containing 100 Supermicro servers.
You can run the SuperDoctor 5 installer in silent mode to automate the installation process. Please
follow these steps:
Step 1: Prepare the SuperDoctor 5 installation program.
Step 2: Prepare a silent mode installation file that will be used by the SuperDoctor 5 installer. Please
refer to 2.1.3 Silent Mode Installation to prepare the silent mode installation file.
Step 3: Put the SuperDoctor 5 installation program and the silent mode installation file in a shared folder
that can be accessed by the 100 Supermicro servers via the network (e.g., use NFS). Alternatively, you
can establish an environment so that the 100 Supermicro servers can download the files using the wget
program (e.g., put the files in a folder managed by a web server).
Step 4: Write a Linux shell script to install the SuperDoctor 5. The example below shows how
SuperDoctor 5 is installed in the /opt folder on a Linux box:
cd /opt
echo "Delete the old SuperDoctor 5 Installer if there is one"
rm ./SuperDoctor5Installer*.bin
echo "Try to uninstall SuperDoctor 5"
/opt/Supermicro/SuperDoctor5/Uninstall/Uninstall -i silent
echo "Delete /opt/Supermicro/SuperDoctor5 folder"
rm -rf /opt/Supermicro/SuperDoctor5
echo "Download the new SuperDoctor 5 Installer"
wget http://your-server.com:8080/SuperDoctor5Installer_5.0.0.bin
echo "Download the silent mode configuration file "
wget http://your-server.com:8080/installer_agent.properties
echo "Install SuperDoctor 5"
chmod +x SuperDoctor5Installer*.bin
./SuperDoctor5Installer_5.0.0.bin -i silent -f installer_agent.properties
echo "Check SuperDoctor 5 service status"
service sd5 status
Step 5: Deploy the script to each of the servers and then run it to install SuperDoctor 5.
Supermicro SuperDoctor 5 User’s Guide
30
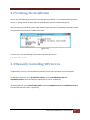
2.2 Verifying the Installation
You can use the following commands to check whether SuperDoctor 5 is installed successfully and the
service is running. Note that these steps are optional and meant for troubleshooting only.
After restarting your Windows system, open a DOS prompt and enter the following commands to make
sure the SD5 service has been installed and started.
Figure 2-23
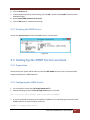
For Linux users, use the following commands to check the SD5 service:
# service sd5 status
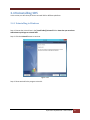
2.3 Manually Controlling SD5 Service
If SuperDoctor 5 service is not automatically started, you can start and stop the service manually.
For Windows platforms: In the [install folder] folder, execute startSD5Service.bat and
stopSD5Service.bat to start and stop the SuperDoctor 5 service, respectively.
For Linux platforms: In the [install folder] folder, execute startSD5Service.sh and stopSD5Service.sh to
start and stop the SD5 service, respectively.
Supermicro SuperDoctor 5 User’s Guide
31
2.4 Uninstalling SD5
In this section, we will show you how to uninstall SD5 on different platforms.
2.4.1 Uninstalling in Windows
Step 1: Execute the Uninstall.exe in the [install folder]\Uninstall folder. Note that you must have
Administrator privileges to uninstall SD5.
Step 2: Click the Uninstall button to continue.
Figure 2-24
Step 3: Please wait while the program uninstalls.
Supermicro SuperDoctor 5 User’s Guide
32
Figure 2-25
Step 4: When the uninstall is complete, click the Done button to exit the uninstaller.
Figure 2-26
Supermicro SuperDoctor 5 User’s Guide
33
Note: SuperDoctor 5 and Super Doctor III share the same drivers on Windows platforms.
Uninstalling Super Doctor III will remove the shared drivers and damage the SuperDoctor 5.
Please do not install both applications on the same host.
Supermicro SuperDoctor 5 User’s Guide
34
2.4.2 Uninstalling in Linux
Step 1: Execute the Uninstaller program located in the [install folder]\Uninstall\ folder. Note that you
must have root privileges to uninstall SD5.
Figure 2-27
Step 2: Press the Enter key (on your keyboard) to continue.
Figure 2-28
Step 3: Please wait while the program uninstalls.
Figure 2-29
Supermicro SuperDoctor 5 User’s Guide
35
Step 4: The uninstall is complete.
Figure 2-30
2.4.3 Silent Mode Uninstall
Use the following argument to execute the Uninstaller program located in the [install folder]\Uninstall\
folder. Note that you must have root privileges to uninstall SD5.
Uninstall -i silent -f [property_file_name]
Supermicro SuperDoctor 5 User’s Guide
36
Part 2 SuperDoctor 5
Supermicro SuperDoctor 5 User’s Guide
37
3 SuperDoctor 5 Configurations
SuperDoctor 5 needs to be installed on a host to provide in-band management functions. You can
customize the SuperDoctor 5 by modifying its configuration file, which is the agent.cfg file located in the
[install folder] folder. Note that you need to manually restart the SuperDoctor 5 after editing
configurations. To restart the service of SuperDoctor 5, refer to 2.3 Manually Controlling SD5 Service. In
most situations, you use a SuperDoctor 5 once it is installed without modifying its configurations. This
chapter introduces the working concepts of the SuperDoctor 5 and the configuration objects it uses.
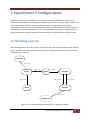
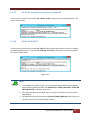
3.1 Working Concept
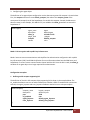
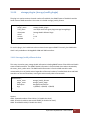
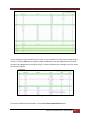
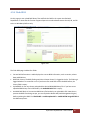
When the SuperDoctor 5 is started, it listens to the TCP/IP ports and waits for requests sent by the SSM
Server, SSM Web, and SSM CLI. SuperDoctor 5 supports five configuration objects, which control how
the SuperDoctor 5 functions.
Java class
class_name
plugin_path
Plugin
acceptor
Agent
plugin_name
Acceptor
agent_keystore
Action
trust_keystore
Keystore
keystore_file
Keystore file
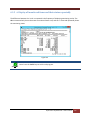
Figure 3-1: The relationships among SuperDoctor 5 configuration objects
Supermicro SuperDoctor 5 User’s Guide
38
Agent: An agent object represents the SuperDoctor 5 application, which contains attributes such as
agent_name, description, and version. Only one agent object can be defined in the configuration
file. By connecting the agent object to acceptor objects, you can define the port number and the
connection type (SSL or Non-SSL) that the SuperDoctor 5 should support.
Acceptor: An acceptor object contains an Internet address, a TCP port number, a connection type
(SSL or Non-SSL), and key stores. An acceptor is enabled only when it is connected to an agent
object. An agent object can have more than one acceptor object to provide multiple connection
channels.
Keystore: When SSL is enabled in an acceptor object, you need to provide keystores to the acceptor
to create an SSL connection. A keystore object is used to indicate the location of a keystore on the
disk.
Plug-in: Similar to the SSM Server, the SuperDoctor 5 applies a plug-in architecture and relies on
plug-ins to provide management functions. The primary function of a plug-in object is to tell the
SuperDoctor 5 which plug-in main program should be invoked when a request is dispatched to the
plug-in.
Action: A SuperDoctor 5 plug-in can provide multiple functions that can be called by clients (i.e. the
SSM Server, SSM Web, and SSM CLI). An action object is used to export one function of a plug-in to
the clients. A plug-in without defining any action object is useless because it cannot be invoked by
the clients.
3.2 Connection Modes
SuperDoctor 5 supports three connection modes: plain text with allowed IP, anonymous SSL connection
with allowed IP, and SSL connection with a public key infrastructure.
Mode A: Plain text with allowed IP
Mode A provides the best transmission efficiency because data is transmitted as plain text without
encryption between the client and the SuperDoctor 5. To prevent unauthorized access to the
SuperDoctor 5, a connection can be established only if the request comes from an Internet address
listed on the allow_ip attribute of the agent object.
Supermicro SuperDoctor 5 User’s Guide
39
Configuration example:
1. Defining a non-SSL acceptor object
The definition of a built-in non-SSL acceptor object is shown below. The ssl_enabled attribute is set to
false and the default port number for the non-SSL connection is 5333.
define acceptor {
acceptor_name
description
port
ssl_enabled
}
non_SSL
default non ssl port
5333
false
2. Configuring the agent object
The definition of an agent object configured to use the above non-SSL acceptor is shown below. First,
the acceptor attribute is set to non_SSL (the value of the acceptor_name of the non-SSL acceptor) to tell
the SuperDoctor 5 to enable this acceptor. Second, IP addresses or domain names (in this example,
192.168.12.175.) are added that are allowed to access the SuperDoctor 5 with the allow_ip attribute.
define agent{
agent_name
description
allow_ip
plugin_path
acceptor
version
Agent
Default Agent
192.168.12.175
./plugins
non_SSL
1.0.0
}
Mode B: Anonymous SSL connection with allowed IP
Mode B is a trade-off between transmission efficiency and security. In this mode, an anonymous SSL
connection is established so that data is encrypted between the client and the SuperDoctor 5. However,
since an anonymous SSL is used, preventing unauthorized access to the SuperDoctor 5 is still required.
Thus, the allow_ip attribute of an agent object is also used in mode B.
Supermicro SuperDoctor 5 User’s Guide
40
Configuration example:
1. Defining an anonymous SSL acceptor
The definition of a built-in anonymous SSL acceptor object is shown below. The ssl_enabled attribute is
set to true and the default port number is 5666. For establishing anonymous SSL connections, the
agent_keystore attribute needs to be set to a keystore object, which is used to encrypt data.
define acceptor {
acceptor_name
description
port
ssl_enabled
agent_keystore
}
default_acceptor
default ssl port
5666
true
default_agent_keystore
2. Defining a keystore object
The definition of a built-in keystore object is shown below. The keystore contains a SuperDoctor 5
private key for encryption. The default keystore is located in the [install folder]\certificates\agent.auth
file. See 9 SSM Certification for more information on how to generate new keystores.
define keystore{
keystore_name
description
keystore_file
keystore_password
}
default_agent_keystore
keystore
./certificates/agent.auth
<your-keystore-password>
Supermicro SuperDoctor 5 User’s Guide
41
3. Configuring the agent object
The definition of an agent object configured to use the above anonymous SSL acceptor is shown below.
First, the acceptor attribute is set to default_acceptor (the value of the acceptor_name of the
anonymous SSL acceptor) to tell the SuperDoctor 5 to enable this acceptor. Second, IP addresses or
domain names (in this example, 192.168.12.175.) are added to the allow_ip attribute to access the
SuperDoctor 5.
define agent{
agent_name
description
allow_ip
plugin_path
acceptor
version
Agent
Default Agent
192.168.12.175
./plugins
default_acceptor
1.0.0
}
Mode C: SSL encryption with a public key infrastructure
Mode C ensures secure communications and simplifies the authentication configuration with a public
key infrastructure (PKI). See 9 SSM Certification for more information about how the SSM Server and
SuperDoctor 5 create a secure communication channel with the PKI. Since the PKI is used, the allow_ip
attribute of an agent object is no longer required for authentication.
Configuration examples:
1. Defining an SSL acceptor supporting PKI
The definition of a built-in SSL acceptor object supporting PKI is shown in the example below. The
ssl_enabled attribute is set to true and the default port number is 5999. To establish SSL connections
with PKI, the agent_keystore and trust_keystore attributes need to be set to a keystore object.
define acceptor{
acceptor_name
description
port
ssl_enabled
agent_keystore
trust_keystore
}
keypair_acceptor
default ssl port
5999
true
default_agent_keystore
default_trust_keystore
Supermicro SuperDoctor 5 User’s Guide
42
2. Defining two keystore objects
The definitions of two built-in keystore objects for supporting PKI are shown in the examples below. The
default_agent_keystore contains an SD5 private key for encryption and the default_trust_keystore
contains a client’s public key for decryption.
define keystore{
keystore_name
description
keystore_file
keystore_password
}
default_agent_keystore
keystore
./certificates/agent.auth
<your-keystore-password>
define keystore{
keystore_name
description
keystore_file
keystore_password
}
default_trust_keystore
truststore
./certificates/agent.trust
<your-keystore-password>
3. Configuring the agent object
The definition of an agent object configured to use the above SSL acceptor is shown in the example
below. All you need to do is to set the acceptor attribute to keypair_acceptor (the value of the
acceptor_name of the SSL acceptor with PKI) so that the SuperDoctor 5 can enable this acceptor. The
allow_ip attribute is not used in this connection mode.
define agent{
agent_name
description
allow_ip
plugin_path
acceptor
version
Agent
Default Agent
./plugins
keypair_acceptor
1.0.0
}
Supermicro SuperDoctor 5 User’s Guide
43
Note: By default, only modes B and C are enabled. To enable mode A, please modify the agent object
configuration and append no_SSL to the acceptor attribute.
define agent{
…
acceptor
}
3.3
default_acceptor, keypair_acceptor, no_SSL
Configuration Overview
Two kinds of configuration files are used by an SD5:
agent.cfg: This is the main configuration file of an SD5. Three objects are defined in this file: Agent,
Acceptor, and Keystore.
plugin.cfg: This file is used to define SuperDoctor 5 plug-ins and their exported actions. The plug-ins
located in the same plug-in path specified in the plugin_path attribute of an agent object should
define one plugin.cfg file so that the SuperDoctor 5 can discover how many plug-ins and actions are
supported. A subfolder of a plug-in path can define its own plugin.cfg file. This file can also be
packaged in the same jar file containing the Java bytecode that implements a plug-in.
Note: Multiple plug-ins can be defined in one jar file and the SuperDoctor 5 will determine how many
plug-ins are available according to the content of the plugin.cfg file.
The five object definitions are explained in the following sections.
Supermicro SuperDoctor 5 User’s Guide
44
3.3.1 Agent Object Definition
An agent object represents one SuperDoctor 5 program. It includes the information of the agent name,
plug-in path and supporting connection modes.
define agent{
agent_name
description
allow_ip
plugin_path
acceptor
version
}
Agent
Default Agent
192.168.10.55, ssm.supermicro.com, 127.0.0.1
./plugins
default_acceptor, keypair_acceptor
1.0.0
agent_name*
The name of the agent object.
description
The description of the agent object.
allow_ip*
The IP addresses or host names allowed to connect to the Agent are defined here. Multiple values
should be separated by a comma. This attribute works if a non-SSL or anonymous SSL connection is used.
plugin_path*
The root folder where the plug-ins are located.
acceptor*
The acceptors that are supported by the Agent. Multiple values should be separated by a comma.
Version
The version of the Agent.
(*indicates a required attribute)
Supermicro SuperDoctor 5 User’s Guide
45
3.3.2 Acceptor Object Definition
An acceptor object is used to define the acceptable ways for it to connect to its clients. By defining
various Acceptor objects, the SuperDoctor 5 can support different kinds of connection methods at the
same time.
define acceptor{
acceptor_name
description
address
port
ssl_enabled
agent_keystore
trust_keystore
}
keypair_acceptor
default ssl port
*
5999
true
default_agent_keystore
default_trust_keystore
acceptor_name*
The name of the acceptor object.
description
The description of the acceptor object.
address
The IP address where the acceptor should receive connections from. If a host has more than one
network interface card, the SuperDoctor 5 can be configured with this attribute to accept connections
from particular IP addresses bound to the network interface cards. The acceptor will forward connection
requests from all network interface cards if this attribute is not declared or if its value is an asterisk.
port*
The port number the acceptor should listen to.
ssl_enabled*
Enables or disables SSL when a connection is established.
agent_keystore
The private key used by the acceptor. This attribute is required if connection modes B and C are used.
trust_keystore
The public key of SuperDoctor 5 clients. This attribute is required if the third connection mode is used.
(The asterisk mark “*” indicates a required attribute.)
Supermicro SuperDoctor 5 User’s Guide
46
3.3.3 Keystore Object Definition
A keystore object is used to describe the name and the path (i.e., location) of a keystore as well as the
password to access it. This object is applicable if the SSL connection is supported by a SuperDoctor 5.
See 3.2 Connection Modes in this manual for more information.
define keystore{
keystore_name
description
keystore_file
keystore_password
}
default_agent_keystore
A keystore for storing agent's public/private key
./certificates/agent.auth
<your-keystore-password>
keystore_name*
The name of the keystore object.
description*
The description of the keystore object.
keystore_file*
The full file name (including path) of the keystore.
keystore_password*
The password used to open the keystore.
(The asterisk mark “*” indicates a required attribute.)
Supermicro SuperDoctor 5 User’s Guide
47
3.3.4 Plug-in Object Definition
The primary goal of a plug-in object is to indicate a Java class that implements monitoring, control, or
management functions. Usually, a plug-in is only activated by a SuperDoctor 5 when a request is sent to
the plug-in. By setting the active attribute of a plug-in object to 1, a SuperDoctor 5 proactively invokes
the preload function of the plug-in every time the SuperDoctor 5 starts. A plug-in can be disabled by
setting the enable attribute to 0.
define plugin {
plugin_name
class_name
description
version
active
enabled
}
healthinfo_plugin
com.supermicro.ssm.agent.plugin.healthinfo.HealthInfoPlugin
HealthInfo Plugin
1.0.0
1
1
plug-in_name*
A unique name of the plug-in object.
class_name*
The Java implementation class of the plug-in object.
description*
The description of the plug-in object.
version*
The version of the plug-in object.
active
1: The plug-in will be loaded when the SuperDoctor 5 is started.
0: The plug-in will not be loaded when the SuperDoctor 5 is started. (Default value.)
enabled
1: Enable the plug-in. (Default value.)
0: Disable the plug-in.
(The asterisk mark “*” indicates a required attribute.)
Supermicro SuperDoctor 5 User’s Guide
48
3.3.5 Action Object Definition
An action object defines the exported function and arguments provided by a plug-in.
define action {
action_name
plugin_name
description
args
max_instance
}
healthinfoitemnumber
healthinfo_plugin
Return the number of health monitored items
-mn $ARG1$
0
action_name*
The name of the action object. The action name is the name to be invoked by SuperDoctor 5 clients. For
example, when using jcheck_nrpe to connect to a SuperDoctor 5, this attribute is provided with the –c
argument of jcheck_nrpe.
plugin_name*
The name of the plug-in object implemented by this action. Every action belongs to one and only one
plug-in.
description*
The description of the action object.
args
The arguments required by the action. For example, when using jcheck_nrpe to connect to a
SuperDoctor 5, this attribute is provided with the –a argument of jcheck_nrpe.
max_instance
The maximum number of concurrent clients allowed to invoke the action. This attribute is used to
prevent a SuperDoctor 5 from being overloaded due to burst requests for an action. This attribute could
be omitted if concurrent access constraint to an action is not necessary.
(The asterisk mark “*” indicates a required attribute.)
Supermicro SuperDoctor 5 User’s Guide
49
3.4 Built-in Plug-ins and Actions
The built-in plug-ins of a SuperDoctor 5 are packaged in the
[install folder]\plugins\builtin\SSMAgentPlugin-build.xx.jar file. Note that you need to manually restart
the SuperDoctor 5 after editing configurations. For details on restarting the service of SuperDoctor 5,
refer to 2.3 Manually Controlling SD5 Service. In most situations, you do not need to understand or
change the built-in plug-ins. However, if you want to write your own automation scripts to invoke the
functions exported by the plug-ins, you can find the necessary information in this section. Users who
want to develop new SuperDoctor 5 plug-ins can also learn how to define a plugin.cfg file for their own
plug-ins.
3.4.1 admin plug-in (admin_plugin)
This plug-in is used to manage all SuperDoctor 5 plug-ins and the life cycle of a SuperDoctor 5. Actions
provided by the admin plug-in include plugin_ver, all_plugin_ver, restart, update, generate_config, and
fetch_username. The definition of the plug-in is shown below.
define plugin {
plugin_name
class_name
description
version
}
admin_plugin
com.supermicro.ssm.agent.plugin.admin.AdminPlugin
Admin Plugin
1.0.0
Supermicro SuperDoctor 5 User’s Guide
50
3.4.1.1 plugin_ver Action
This action is used to query the version of a specific plug-in.
define action {
action_name
plugin_name
description
args
}
plugin_ver
admin_plugin
Get the version of the plug-in
-v -n $ARG1$
Options:
ARG1: The name of the plug-in.
Usage:
jcheck_nrpe -H <host address> -dk -c plugin_ver -a <ARG1>
Example:
Use jcheck_nrpe to query the version of admin_plugin on host 10.134.12.18.
Figure 3-2
Supermicro SuperDoctor 5 User’s Guide
51
3.4.1.2 all_plugin_ver Action
This action is used to query the versions of all plug-ins.
define action {
action_name
plugin_name
description
args
}
all_plugin_ver
admin_plugin
Get versions of all plug-ins
-v
Options:
None.
Usage:
jcheck_nrpe -H <host address> -dk -c all_plugin_ver
Example:
Use jcheck_nrpe to inquire the versions of all plug-ins on host 10.134.12.18.
Figure 3-3
Supermicro SuperDoctor 5 User’s Guide
52
3.4.1.3 restart Action
This action is used to restart a SuperDoctor 5.
define action {
action_name
plugin_name
description
args
}
restart
admin_plugin
Restart Agent
-s
Options:
None.
Usage:
jcheck_nrpe -H <host address> -dk -c restart
Example:
Use jcheck_nrpe to restart SuperDoctor 5 on host 10.134.12.18.
Figure 3-4
Supermicro SuperDoctor 5 User’s Guide
53
3.4.1.4 update Action
This action is used to update a SuperDoctor 5. The definition of this action is shown below.
define action {
action_name
plugin_name
description
args
}
update
admin_plugin
Update Agent
-u $ARG1$
Options:
ARG1: The update site containing the latest version of a SuperDoctor 5.
Note:
If the version of the installed SuperDoctor 5 is earlier than the latest version available on the update site,
the action will be performed.
Usage:
jcheck_nrpe -H <host address> -dk -c update –a <ARG1>
Example:
Use jcheck_nrpe to update the SuperDoctor 5 on host 10.134.12.18.
Figure 3-5
If the program does not need to be updated, a message “Nothing to update” appears (see the figure
below).
Figure 3-6
Supermicro SuperDoctor 5 User’s Guide
54
3.4.1.5 generate_config Action
This action is used to generate service object definitions for a particular plug-in. The definition of this
action is shown below.
define action {
action_name
plugin_name
description
args
}
generate_config
admin_plugin
Generate configurations
-H $ARG1$ --args $ARG2$ -check_ipmi $ARG3$
Options:
ARG1: The IP address of the agent-managed host.
ARG2: The name of the configuration object(s). Valid values include ALL, ping_host, and each of the
plug-in names. Multiple values are separated by a comma.
ARG3: true: Generate IPMI related object definitions as well.
false: Do not generate IPMI related object definitions.
Usage:
jcheck_nrpe -H <host address> -dk -c generate_config –a <ARG1>!<ARG2>!<ARG3> -plus
Example:
Use jcheck_nrpe to generate object definitions on host 10.134.12.18.
Supermicro SuperDoctor 5 User’s Guide
55
Figure 3-7
Supermicro SuperDoctor 5 User’s Guide
56
3.4.2 echo plug-in (echo_plugin)
This plug-in is used for testing purposes. The definition of this plug-in is shown below.
define plugin {
plugin_name
class_name
description
version
}
echo_plugin
com.supermicro.ssm.agent.plugin.echo.EchoPlugin
Echo Plugin
1.0.0
3.4.2.1echo Action
This action is used to return the same message received by a SuperDoctor 5 back to the client.
define action {
action_name
plugin_name
description
args
}
echo
echo_plugin
Echo
--text $ARG1$
Options:
ARG1: The input message.
Usage:
jcheck_nrpe -H <host address> -dk –c echo –a <ARG1>
Example:
Use jcheck_nrpe to echo a message.
Figure 3-8
Supermicro SuperDoctor 5 User’s Guide
57
3.4.3 executable plug-in (executable_plugin)
This plug-in is designed to execute external programs or scripts. By using this plug-in, users can extend
the functions of a SuperDoctor 5 without writing new SuperDoctor 5 Java plug-ins. The definition of this
plug-in is shown below.
define plugin {
plugin_name
class_name
description
version
}
executable_plugin
com.supermicro.ssm.agent.plugin.executable.ExecutablePlugin
Executable Plugin
1.0.0
3.4.3.1 executable Action
This action is used to execute an external program.
define action {
action_name
plugin_name
description
args
}
executable
executable_plugin
Execute an external command
--executable $ARG1$ --args $ARG2$ --timeout $ARG3$
Options:
ARG1: The file name of the external program.
ARG2: The arguments for the external program. Multiple values should be separated by a space, such as
“arg1 arg2 arg3”.
ARG3: The time in seconds the plug-in should wait for the external program to complete its execution.
The default value is 60.
Usage:
jcheck_nrpe -H <host address> -dk –c executable –a <ARG1>!<ARG2>!<ARG3>
Supermicro SuperDoctor 5 User’s Guide
58
Example:
Use jcheck_nrpe to execute an echo program on host 10.134.12.18.
Figure 3-9
3.4.4 healthinfo plug-in (healthinfo_plugin)
This plug-in is used to check the health of all monitored items. Six actions are included:
health_item_num, health_reading, health_compare, health_def, health_all, and reset_switch. They are
used to get the number of monitored items, query readings of monitored items, check health status
with user-defined thresholds, retrieve definitions of monitored items, check health status using default
thresholds, and reset chassis intrusion, respectively. The definition of this plug-in is shown below.
define plugin {
plugin_name
healthinfo_plugin
class_name
com.supermicro.ssm.agent.plugin.healthinfo2.HealthInfoPlugin2
description
HealthInfo Plugin
version
1.0.0
active
1
}
3.4.4.1 health_item_num Action
This action is used to get the number of monitored items.
define action {
action_name
plugin_name
description
args
}
health_item_num
healthinfo_plugin
Get the number of health monitored items
-mn $ARG1$
Supermicro SuperDoctor 5 User’s Guide
59
Options:
ARG1: Types of monitored items. The valid values are:
a: all monitored items
f: fan
v: voltage
s: switch
c: circuit
Usage:
jcheck_nrpe -H <host> -dk –c health_item_num –a <ARG1>
Example:
Use jcheck_nrpe to get the count of all monitored items on host 192.168.12.18.
Figure 3-10
Supermicro SuperDoctor 5 User’s Guide
60
3.4.4.2 health_reading Action
This action is used to get the reading of a specific monitored item.
define action {
action_name
plugin_name
description
args
}
health_reading
healthinfo_plugin
Get reading of a health monitored item
$ARG1$ -t $ARG2$ -n $ARG3$
Options:
ARG1: -csv: Display the result in CSV format
ARG2: Types of monitored items. The valid values are:
a: all monitored items
f: fan
v: voltage
s: switch
c: circuit
ARG3: The index of a monitored item (begins with 0)
Usage:
jcheck_nrpe -H <host> -dk –c health_reading –a <ARG1>!<ARG2>!<ARG3>
Example:
Use jcheck_nrpe to get the reading of the first fan on host 10.134.12.18.
Figure 3-11
Supermicro SuperDoctor 5 User’s Guide
61
3.4.4.3 health_compare Action
Check the health status of a specific monitored item with user-defined thresholds.
define action {
action_name
plugin_name
description
args
}
health_compare
healthinfo_plugin
Get and compare reading of a health monitored item with high/low limits
$ARG1$ -t $ARG2$ -n $ARG3$ -high $ARG4$ -low $ARG5$
Options:
ARG1: -csv: Display the results in CSV format
ARG2: Types of monitored items. The valid values are:
a: all monitored items
f: fan
v: voltage
s: switch
c: circuit
ARG3: The index of a monitored item (begins with 0).
ARG4: The high limit.
ARG5: The low limit.
Usage:
jcheck_nrpe -H <host address> -dk –c health_compare –a <ARG1>!<ARG2>!<ARG3>!<ARG4>!<ARG5>
Example:
Use jcheck_nrpe to check the health status of the first voltage on host 10.134.12.18 with a user-defined
high limit of 1350 mV and low limit of 900 mV.
Figure 3-12
Supermicro SuperDoctor 5 User’s Guide
62
3.4.4.4 health_def Action
This action is used to retrieve the definitions of all monitored items. The generated definitions are used
by SSM Web to generate the default monitoring services of an agent-managed host.
define action {
action_name
plugin_name
description
args
}
health_def
healthinfo_plugin
Get the definitions of all health monitored items
-d $ARG1$ -f $ARG2$
Options:
ARG1: The IP address of an agent-managed host.
ARG2: 1: Filter inactive items;
0: Do not filter inactive items.
Usage:
jcheck_nrpe -H <host address> -dk –c health_def –a <ARG1>!<ARG2>
Example:
Use jcheck_nrpe to get the definitions of all monitored items on host 10.134.12.18.
Figure 3-13
Supermicro SuperDoctor 5 User’s Guide
63
3.4.4.5 health_all Action
Check the health status of all monitored items with default thresholds.
define action {
action_name
health_all
plugin_name
healthinfo_plugin
description Get readings of all monitored items and compare with default high/low limits
args
-a -x $ARG1$ -f $ARG2$
}
Options:
ARG1: The index of monitored items to be excluded. Multiple values are separated by a comma.
ARG2: 1: Filter inactive items;
0: Do not filter inactive items.
Usage:
jcheck_nrpe -H <host address> -dk –c health_all –a <ARG1>!<ARG2>
Example:
Use jcheck_nrpe to check the health status of all monitored items on host 192.168.12.18 with default
thresholds.
Figure 3-14
Supermicro SuperDoctor 5 User’s Guide
64
3.4.4.6 reset_switch Action
Clear a chassis intrusion flag. The definition of this action is shown below.
define action {
action_name
plugin_name
description
args
}
reset_switch
healthinfo_plugin
Clear the trigger created by switch
-reset
Options:
None.
Usage:
jcheck_nrpe -H <host address> -dk –c reset_switch
Example:
Use jcheck_nrpe to reset the chassis intrusion flag on host 10.134.12.18.
Figure 3-15
3.4.5 power plug-in (power_plugin)
This plug-in is used to support power control functions such as power off, reboot, and shutdown. The
definition of this plug-in is shown below.
define plugin {
plugin_name
class_name
description
version
}
power_plugin
com.supermicro.ssm.agent.plugin.powercontrol.PowerControlPlugin
Power Plugin
1.0.0
Supermicro SuperDoctor 5 User’s Guide
65
3.4.5.1 powercontrol Action
This action implements power off, reboot, and shutdown functions.
define action {
action_name
plugin_name
description
args
version
}
powercontrol
power_plugin
Power control the local machine
-t $ARG1$ -d $ARG2$
1.0.0
Options:
ARG1: Types of power control functions. The valid values are:
0: Abort. This argument is not recommended for use.
1: Power off. This argument is not recommended for use.
2: Reboot.
3: Shutdown.
ARG2: The number of seconds to wait before the power control command takes effect.
Usage:
jcheck_nrpe -H <host address> -dk –c powercontrol –a <ARG1>!<ARG2>
Example:
Use jcheck_nrpe to reboot host 10.134.12.34 after 10 seconds.
Figure 3-16
Supermicro SuperDoctor 5 User’s Guide
66
3.4.6 systeminfo plug-in (systeminfo_plugin)
This plug-in is used to query local system information. Two actions are included: systeminfo for getting
all system information items and systeminfo_item for getting one specific system information item. The
definition of this plug-in is shown below.
define plugin {
plugin_name
class_name
description
version
}
systeminfo_plugin
com.supermicro.ssm.agent.plugin.systeminfo.SystemInfoPlugin
SystemInfo Plugin
1.0.0
3.4.6.1 systeminfo Action
This action is used to query software and hardware information such as the OS version, CPU model,
physical memory, printer, services, and so on.
define action {
action_name
plugin_name
description
max_instance
}
systeminfo
systeminfo_plugin
Get system information of local machine
1
Options:
None.
Usage:
jcheck_nrpe -H <host address> -dk –c systeminfo
Example:
Use jcheck_nrpe to get system information on host 10.134.12.18.
Supermicro SuperDoctor 5 User’s Guide
67
Figure 3-17
3.4.6.2 systeminfo_item Action
This action is used to query one specific system information item.
define action {
action_name
plugin_name
description
args
max_instance
}
systeminfo_item
systeminfo_plugin
Get specific system information of a local machine
-i $ARG1$
1
Supermicro SuperDoctor 5 User’s Guide
68
Options:
ARG1: Types of system information items include:
Options:
ARG1:
0:
account
1:
baseboard
2:
bios
3:
cd rom
4:
chassis
5:
computer system
6:
disk
7:
floppy
8:
keyboard
9:
logical disk
10:
logical memory
11:
memory
12:
desktop monitor
13:
network
14:
os
15:
processor
16:
process
17:
port connector
18:
pointing device
19:
parallel port
20:
printer
21:
service
23:
share
24:
serial port
25:
system slot
26:
computer summary
27:
time zone
28:
video controller
30:
ipmi
34:
startup command
35:
fru
36:
oem strings
37:
system cfg options
38:
power supply
Usage:
jcheck_nrpe -H <host address> -dk –c systeminfo_item –a <ARG1>
Example:
Use jcheck_nrpe to get user accounts on host 10.134.12.18.
Supermicro SuperDoctor 5 User’s Guide
69
Figure 3-18
Supermicro SuperDoctor 5 User’s Guide
70
3.4.7 smart plug-in (smart_plugin)
This plug-in is used to monitor the total number and health information of hard drives. Two actions are
included: smart_check_cache, and storage_health_cache.
define plugin {
plugin_name
class_name
description
active
version
}
smart_plugin
com.supermicro.ssm.agent.plugin.smarthd.SMARTHDPlugin
SMART HD Plugin
1
1.0.0
To use this plug-in, the hard drives to be monitored must support SMART.
3.4.7.1 smart_check_cache Action
This action is used to actively collect hard drive health information and save the information to a cache
file every 3600 seconds (1 hour).
define action {
action_name
plugin_name
description
version
check_interval
}
smart_check_cache
smart_plugin
S.M.A.R.T. HDD Check(s) Cache
1.0.0
3600
Options:
None.
Usage:
The action is designed to automatically run periodically for maintaining a hard drive cache to increase
the performance of the hard drive monitoring function.
Supermicro SuperDoctor 5 User’s Guide
71
3.4.7.2 storage_health_cache Action
This action queries hard drive health information from the hard drive cache maintained by the
smart_check_cache action. Regardless of the total number of installed hard drives on the monitored
host, running this action usually takes a few seconds.
define action {
action_name
plugin_name
description
args
}
storage_health_cache
smart_plugin
Storage Action
-q $ARG1$ -s $ARG2$ -cache 1
Options:
ARG1: Expected numbers of hard drives (-1: Disable the check).
ARG2: Check the hard drive status with SMART (0: Disable the check).
Usage:
jcheck_nrpe -H <host address> -dk –c storage_health_cache –a <ARG1>!<ARG2>
Example:
Use jcheck_nrpe to get the health information of hard drives from the hard drive cache on host
192.168.12.104.
Figure 3-20
Supermicro SuperDoctor 5 User’s Guide
72
3.4.8 bios log plug-in (bios_log_plugin)
This plug-in is used to get BIOS event logs. The bios_log_num action retrieves BIOS event logs every 5
minutes. The definition of this plug-in is shown below.
define plugin {
plugin_name
class_name
description
active
version
}
bios_log_plugin
com.supermicro.ssm.agent.plugin.bioslog.BiosLogPlugin
BIOS Log Check Plugin
1
1.0.0
Note that this plug-in applies to hosts running Linux operating systems only.
3.4.8.1 bios_log_num Action
This action is used to read BIOS event logs every 300 seconds (5 minutes).
define action {
action_name
plugin_name
description
args
version
check_interval
}
bios_log_num
bios_log_plugin
BIOS Log Check(s)
-t $ARG1$ -d $ARG2$
1.0.0
300
Options:
None.
Usage:
The action is designed to run automatically and periodically for retrieving BIOS event logs.
Supermicro SuperDoctor 5 User’s Guide
73
3.4.9 memory plug-in (memory_health_plugin)
This plug-in is used to monitor memory health information by counting CECC and UECC error events. It
can also monitor the total number of DIMMs installed on the host under monitoring. One action is
included: memory_health for getting memory health information. The definition of this plug-in is shown
below.
define plugin {
plugin_name
memory_health_plugin
class_name
com.supermicro.ssm.agent.plugin.memory.PhysicalMemPlugin
description
Memory Check Plugin
version
1.0.0
}
Note that this plug-in applies to hosts running Linux operating systems only.
3.4.9.1 memory_health Action
This action is used to monitor memory health information.
define action {
action_name
plugin_name
description
args
version
}
memory_health
memory_health_plugin
CECC/UECC Checks for Physical Memory
-nm $ARG1$ -c $ARG2$
1.0.0
Options:
ARG1: Expected number of DIMMs (-1: Disable the check).
ARG2: The threshold for CECC and UECC.
Supermicro SuperDoctor 5 User’s Guide
74
The argument format is as follows:
[type+*duration+*fail count+,….
[type]:
o
o
[duration]:
o
o
o
o
m: Correctable single bit ECC errors.
M: Uncorrectable ECC errors.
d: day
h: hour
m: minute
s: second
[fail count]: The acceptable number of failures. To trigger a critical status, the failure counts must be
greater than this value.
To specify a threshold for memory that indicates four single bit ECC errors per 1GB RAM within one day
(24 hours) are allowed (i.e., m1d4) and 0 uncorrectable ECC errors are allowed within 1 hour (i.e., M1h0):
m1d4,M1h0
Usage:
jcheck_nrpe -H <host address> -dk –c memory_health –a <ARG1>!<ARG2>
Example:
Use jcheck_nrpe to get the health information of DIMMs on host 10.134.12.18.
Figure 3-21
Supermicro SuperDoctor 5 User’s Guide
75
3.4.10
storage plug-in (storage_health_plugin)
The plug-in is used to monitor the total number of hard disks, the SMART status of hard disks and the
health status of RAID controllers. One action is included: storage_health_allinone.
define plugin {
plugin_name
class_name
description
active
version
enabled
}
storage_health_plugin
com.supermicro.ssm.agent.plugin.storage.StoragePlugin
Storage Health Allinone Plugin
1
1.0.0
1
To use this plug-in, the hard drives to be monitored must support SMART. Currently, the RAID health
check is only available on LSI MegaRAID 2108 and 2208 controllers.
3.4.10.1 storage_health_allinone Action
This action is used to query storage health information including SMART status of hard disks and health
status of RAID controllers. The SMART health information is from the hard drive cache maintained by
the smart_check_cache action. The RAID health information is from the RAID controller cache
maintained by the raid_health action. Regardless of the total number of installed hard drives and RAID
controllers on the monitored host, running this action usually takes a few seconds.
define action {
action_name
plugin_name
description
args
}
storage_health_allinone
storage_health_plugin
Storage Allinone Action
-q $ARG1$ -s $ARG2$ -r $ARG3$
Options:
ARG1: Expected numbers of hard drives (-1: Disable the check).
ARG2: Check the hard drive status with SMART (0: Disable the check).
ARG3: Check RAID health (0: Disable the check).
Supermicro SuperDoctor 5 User’s Guide
76
Usage:
jcheck_nrpe -H <host address> -dk –c storage_health_allinone –a <ARG1>!<ARG2>!<ARG3>
Example:
Use jcheck_nrpe to get the storage health information on host 10.134.14.104.
Figure 3-22
3.4.11
LSI RAID plug-in (lsiraid_plugin)
This plug-in is used to monitor the health of RAID controllers. Two actions are included: raid_health and
lsiraid_check_cache.
define plugin {
plugin_name
class_name
description
active
version
enabled
}
lsiraid_plugin
com.supermicro.ssm.agent.plugin.raid.LSIRaidPlugin
LSI RAID Plugin
1
1.0.0
1
Supermicro SuperDoctor 5 User’s Guide
77
3.4.11.1 raid_health Action
This action is used to query RAID health information using cache data maintained by lsiraid_check_cache
action. Regardless of the total number of installed RAID controllers and hard drives combined to RAID on
the monitored host, running this action usually takes a few seconds.
define action {
action_name
plugin_name
description
args
varsion
}
raid_health
lsiraid_plugin
Raid Action
-cache 1
1.0.0
Options:
None.
Usage:
jcheck_nrpe -H <host address> -dk –c raid_health –a cache 1
Example:
Use jcheck_nrpe to get the health information of RAID controllers on host 10.134.14.104.
Figure 3-23
Supermicro SuperDoctor 5 User’s Guide
78
3.4.11.2 lsiraid_check_cache Action
This action is used to actively collect the health information of RAID controllers and save the information
to a cache file every 180 seconds (or 3 minutes).
define action {
action_name
plugin_name
description
version
check_interval
enabled
}
lsiraid_check_cache
lsiraid_plugin
LSI RAID Check(s) Cache
1.0.0
180
1
Options:
None.
Usage:
The action is designed to automatically run periodically for maintaining a RAID cache to increase the
performance of the RAID monitoring function.
3.4.12
notification plug-in (notification_plugin)
This notification plug-in is used to monitor its configuration file, polling.properties, located in the [install
folder]\config folder. The notification behavior of SuperDoctor 5 depends on the polling.properties file
of polling setting, and notification methods. Once the file is changed, the notification behavior will be
changed. See 4.5.1 Alert Configuration for more information. The definition of this plug-in is shown
below.
define plugin {
plugin_name
notification_plugin
class_name
com.supermicro.ssm.agent.plugin.notification.NotificationPlugin
description
Notification plugin
active
1
version
1.0.0
enabled
1
}
Supermicro SuperDoctor 5 User’s Guide
79
3.4.12.1 change_alerts action
This action is used to notify the changes of polling.properties. SuperDoctor 5 then will send notifications
by the definition the polling.properties.
define action {
action_name
plugin_name
args
description
}
change_alerts
notification_plugin
-send
Alert Configuration Changes
Options:
None.
Usage:
jcheck_nrpe -H <host address> -dk –c change_alerts
3.4.12.2 start_filewatcher action
This action is used to start a file watcher to monitor polling.properties every second.
define action {
action_name
plugin_name
args
description
check_interval
}
start_filewatcher
notification_plugin
-start
Start File Watcher
1
Options:
None.
Usage:
jcheck_nrpe -H <host address> -dk –c start_filewatcher
Supermicro SuperDoctor 5 User’s Guide
80
3.4.12.3 stop_filewatcher action
This action is used to stop the file watcher to monitor polling.properties.
define action {
action_name
plugin_name
args
description
}
stop_filewatcher
notification_plugin
-stop
Stop File Watcher
Options:
None.
Usage:
jcheck_nrpe -H <host address> -dk –c stop_filewatcher
Supermicro SuperDoctor 5 User’s Guide
81
4 SD5 Web
A SuperDoctor 5 includes a built-in plug-in called SD5 Web, which provides a Web-based console for the
SuperDoctor 5. The SD5 Web allows users to view health information and system information as well as
to set configuration data via Web browsers.
4.1 SD5 Web Login
Type the following URL in your browser to connect to the SD5 Web:
http://[SuperDoctor 5 address]:8181/SuperDoctor5
The login page is shown below. The default user name and password are ADMIN and ADMIN.
Figure 4-1
Supermicro SuperDoctor 5 User’s Guide
82
4.2 Health Information
SD5 Web graphically displays the status of the monitored devices, including fan speed, voltage,
temperature, chassis intrusion, power failure, hard disk drives, and memory . An item in green color
indicates a healthy state while a red one denotes a critical state. Notifications can be sent when a
monitored item reaches critical status. You can configure the notification behavior on the Configuration
page. See 4.5 SD5 Web Configuration for more information.
Figure 4-2
Figure 4-3
Supermicro SuperDoctor 5 User’s Guide
83
Note: Hard drives and memory are supported on Linux platforms only. The default
argument for CECC and UECC is 1 time in one day per 1GB and 0 times in one day,
respectively.
The health information page also shows power supply information if supported power supplies are
connected to the motherboard via I2C. Depending on their design, power supplies might have Field
Replaceable Unit (FRU) Data and/or PMBus functions. Supported power supplies with PMBus functions
are able to provide real time input current and power consumption information. The following figure
shows the health information of a set of redundant power supplies with PMBus displaying the input
current and the input wattage. Note that power supply information may not be available on particular
models of motherboards even if power supplies are connected to the motherboards.
Figure 4-4
The following figure shows the health information of a battery backup power (BBP®). Different colors
are used to indicate the battery state. Green color means the battery is healthy, and red color means
the battery is dead. If the current reading of the battery is negative, the color turns yellow to warn that
the battery is discharged. In addition, the energy reading tells the percentage of the charge status of the
battery.
Supermicro SuperDoctor 5 User’s Guide
84
Figure 4-5
The health information of the LSI MegaRAID RAID controller is also supported on the page. The health of
a RAID controller is a combined status that depends on the states of its components such as battery
backup unit (BBU), virtual drives, and hard disks. If all components belonging to the adapter are OK, the
status of the adapter shows OK. Otherwise, it could be Warning or Critical depending on the states of
the components. Valid states for BBU, virtual drives and hard disks are:
BBU
This shows the current status of a BBU. Valid values are OK (OK), Critical (could be
absent, charge time failed, capacity info failed, status info failed, or properties failed) and
Unknown (incomplete command output).
Virtual drive
This shows the current status of a virtual drive. Valid values are OK (Optimal), Warning
(Partially Degraded or Degraded) and Critical (Offline).
Hard disk
This shows some attributes of a hard disk such as port status, media error count, other
error count, predictive failure count, last predictive failure event sequence number and
firmware state. Valid values are OK (port status is active, no errors, and the firmware
state is equal to online or hotspare or unconfigured good), Warning (port status is active,
no errors, and the firmware state is equal to rebuild or copyback ) and Critical (port
status is inactive or errors exist or the firmware state is offline or missing or jbod or failed
or unconfigured bad).
Supermicro SuperDoctor 5 User’s Guide
85
Figure 4-6
Note: Only LSI MegaRAID 2108 and 2208 RAID controllers are supported currently on
both Windows and Linux platforms. Other LSI MegaRAID RAID controllers (i.e. LSI
MegaRAID 2008 and 2308 RAID controllers) are not fully tested and Non-LSI MegaRAID
RAID controllers (i.e. LSI Fusion-MPT based and Intel Rapid Storage Technology) are not
supported in this version.
Supermicro SuperDoctor 5 User’s Guide
86
4.3 System Information
The system information provided by the SD5 Web is similar to that provided by the SSM Web.
Figure 4-7
Notes:
1. The system information contents are platform dependent. Particular information
available on a Windows host may not be presented on a Linux host, and vice versa.
Also, Linux does not support all types of system information objects in the same way
that Windows supports them. Types including Desktop Monitor, Floppy, Keyboard,
Port Connector, Parallel Port, Pointing Device, Serial Port, Computer Summary,
Startup Command, and Video Controller are supported on Windows platforms only.
2. The Current Clock Speed (MHz) in the Processor category is read from the DMI table.
It may not reflect the real time data when you check the current clock speed under
operating systems.
Supermicro SuperDoctor 5 User’s Guide
87
4.4 Report
SuperDoctor 5 provides three CSV (Comma Separated Values) format reports. These reports can be
downloaded and viewed with CSV supported tools like Microsoft Excel.
System Information Report: This report contains information shown in the System Info function. See
4.3 System Information for more information.
Health Information Log Report: This report includes the historical data of monitored item readings.
Readings of selected (i.e. enabled) monitored items will be written to a file only if the Polling
Interval value is set and the Log option is enabled in the Alert Configuration function. See 4.5.1
Alert Configuration and 4.5.2 Monitored Item for more information.
Event Log Report: This report contains events that represent problems and recoveries with
monitored items. When the status of a monitored item is changed, an event log is written to the
Event Log Report. Note that to write events to the log file, the Polling Interval on the Configuration
page must be set.
Figure 4-8
Supermicro SuperDoctor 5 User’s Guide
88
4.5 SD5 Web Configuration
This page includes four submenus: Alert Configuration, Monitored Item, Password Setting and Flash
BIOS.
4.5.1 Alert Configuration
On this page you can configure the SD5 Web notification methods. Four methods are supported: Log,
Email, SNMP Trap and System Tray. The meanings of each argument are illustrated below:
Enabled Pooling: SuperDoctor 5 periodically checks the health status of monitored items if pooling
is enabled. No alert is sent if pooling is disabled.
Polling Interval: Determines how frequently in seconds the SD5 Web should check the health status
of monitored items. The minimum value is 3 seconds.
Log: Keeps alerts in a log file named “log.txt[yyyy-mm-dd-sequence]” located in the [install folder]
folder. The file is split into two files once its size becomes greater than 10 MB. The total number of
log files to be kept can be configured by setting the “backup files to keep around” argument.
E-mail Alert: Sends alerts via e-mail. To use this function, you need to set recipients, an e-mail
server address and a port number as well as a sender’s e-mail address. Check SSL or TLS if the email server uses secure connections. If the e-mail server requires authentication, you will need to
set up an account and password to log in to the e-mail server. Multiple recipients must be separated
by a comma.
SNMP Trap: Sends alerts with SNMP traps. Multiple recipients are separated by a comma.
System Tray Popup Alert: Sends alerts to local desktop. Note that the function is only available on
Windows platform. For more information on using the SD5 Tray program to receive alerts, please
refer to 7 SD5 Tray.
Supermicro SuperDoctor 5 User’s Guide
89
Figure 4-9
Note: On Linux platforms, you may need to add the host name and the IP address to the
/etc/hosts file if SNMP traps cannot be sent.
The E-mail message format is defined by the following attributes:
Mail title:
o Item 1: the type of an alert ("Problem ", "Recovery ")
o Item 2: the name of the monitored item
o Item 3: the status of the monitored item ("OK", "Warning", “Critical”, or "Unknown")
o Item 4: the time of an alert in date time format
o Item 5: the host name and host address which sent out an alert
Mail body:
o Item 6: the output message about the status of the monitored item
For example, the subject line of an e-mail alert shows "Problem: RAID Adapter 0(Supermicro SMC2108) Virtual Drive 0 is WARNING at 2012/3/12 13:50:13 from softlab1(192.168.12.30)" and the mail body of
an e-mail alert shows "RAID Adapter 0(Supermicro SMC2108) - Virtual Drive 0(RAID5, 500GB) is
Degraded".
Notes:
1. A problem alert will be sent while the status of the monitored item is non-OK (i.e.,
WARNING, UNKNOWN or CRITICAL) from the initial or is from an OK state to a nonOK state or is from a non-OK state to another non-OK state.
2. A recovery alert will be sent while the status of the monitored item is from a non-OK
Supermicro SuperDoctor 5 User’s Guide
90
state to an OK state.
The SNMP Trap description if defined by the following attributes:
Item 1: the type of an alert ("Problem", "Recovery")
Item 2: the name of the monitored item
Item 3: the status of the monitored item ("OK", "Warning", “Critical”, or "Unknown")
Item 4: the time of an alert in date time format
Item 5: the output message about the status of the monitored item
For example, the description of an SNMP trap shows "Problem: RAID Adapter 0(Supermicro SMC2108) Virtual Drive 0 is WARNING at 2012/3/12 13:50:13. Virtual Drive 0(RAID5, 500GB) is Degraded".
4.5.2 Monitored Item
On this page, you can decide if an item should be monitored or not. You can also change both the high
and low limits of an item. All possible monitored items are listed. When the SuperDoctor 5 is first started,
it detects unplugged monitored items and disables them automatically. Thus, the first time you see this
page, some items may be already disabled.
Supermicro SuperDoctor 5 User’s Guide
91
Figure 4-10
You can change the high and low limits of an item, or you can deselect an item if you no longer wish to
monitor it. Click the Save button to apply changes immediately. A row with high/low limits in invalid
format will be highlighted (see the figure below). To view the detailed error message, move the mouse
over the warning icon.
Figure 4-11
To restore the default threshold values, click the Set to factory default limits button.
Supermicro SuperDoctor 5 User’s Guide
92
Sometimes your hardware configurations may change, such as when a new power supply is used or new
fans are plugged in. In such cases, you can click the Redetect button to detect the monitored items
again (see the figure below).
Figure 4-12
SuperDoctor 5 will be restarted after the detection process is complete, and you have to log in the
SuperDoctor 5 again. Click the OK button to go to the SD5 login web page.
Figure 4-13
4.5.3 Password Setting
Supermicro SuperDoctor 5 User’s Guide
93
You can change the password of the built-in account “ADMIN” on this page. Note that function of
creating new accounts is not supported.
Figure 4-14
Supermicro SuperDoctor 5 User’s Guide
94
4.5.4 Flash BIOS
On this page you can upload BIOS binary files and flash the BIOS in the system installed with
SuperDoctor 5. Note that this function supports Supermicro motherboards newer than H8, X8, and X9
series on Windows platforms only.
Figure 4-15
The Flash BIOS page includes four fields:
Current BIOS information: A table displays the current BIOS information, such as version, release
date and ROM size.
BIOS flash history: The BIOS flashing activities via Super Doctor 5 is logged in the list. The flashing is
logged whether it is successful or not. If you have never used SD5 to flash the BIOS before, the
history field is empty.
Upload BIOS: A user can choose and upload the desired ROM BIOS binary file. If you have never
uploaded BIOS binary files in SD5 before, the Available BIOS field is empty.
Available BIOS block: A list contains BIOS binary files backed up or uploaded in SD5. Note that to
prevent the BIOS from being corrupt, you are required to disable ME (Intel Management Engine)
before updating the BIOS. Find disable ME or enable update ME or enable ME FW Image RE-flash in
the BIOS setup menu.
Supermicro SuperDoctor 5 User’s Guide
95
Select a BIOS to start flashing. A warning message shows up to remind you of not removing the AC
power or turning off the computer until the BIOS is completely flashed (see the figure below).
Figure 4-16
Later another warning message shows up to remind you of rebooting the system for the changes to take
effect (see the figure below).
Figure 4-17
The original BIOS will be backed up in the [install folder]\BIOS\rom folder if the BIOS is flashed
successfully.
Supermicro SuperDoctor 5 User’s Guide
96
4.6 RAID
The RAID tab will be shown while SuperDoctor 5 detects whether the LSI MegaRAID RAID Controller is
available in the system. The layout of RAID is divided into two parts:
Tree Area: A tree structure serves as a menu for users to get more information, such as RAID
controllers, virtual drives, and hard disks.
Content Area: shows the detailed information of the selected node in the Tree Area.
Figure 4-18
There are five main (virtual) nodes in one adapter: the Drive Group node, Virtual Drive(s) node, the
Drives node, the Global Hot Spares node, and the Unconfigured Drives node. These five virtual tree
nodes are used for classification:
Drive Group
This node comprises all virtual drives, (physical) drive, and dedicated hot
spares belong to the drive group.
Virtual Drives
This node comprises all virtual drives belonging to the drive group. Virtual
drives are the volumes that are configured as RAID 0, 1, 5 and 10.
Physical Drives
This node comprises all hard disks of the drive group. A physical drive is a
hard disk used as a part of a virtual drive.
Global Hot Spares
This node comprises all global hot spares of the adapter. A hot spare is a
hard disk that can replace a failed physical drive automatically.
Unconfigured Drives
This node comprises all unconfigured drives of the adapter. An
unconfigured drive is a hard disk that has not been used as a part of a
virtual drives or as a hot spare.
Supermicro SuperDoctor 5 User’s Guide
97
The RAID Controller named Supermicro SMC2208 contains one virtual drive (RAID 0), one hard disk (Slot
0), one virtual drive (RAID 50) and six hard disks (Slot 1~5, Slot 8).
Figure 4-19
Note: The RAID tree will not automatically refresh periodically. It requires users to refresh it
manually by clicking the Refresh icon in the upper right corner of the Tree Area.
Click on Supermicro SMC2208 tree node. The detailed properties are shown on the right panel.
Figure 4-20
Supermicro SuperDoctor 5 User’s Guide
98
Click the Virtual Drive 0, RAID 0, 464.729 GB tree node on the left panel. The detailed properties of a
virtual drive on the right panel.
Figure 4-21
Click on Slot 4 tree node on the left panel, and you can view the detailed properties of a hard disk.
Figure 4-22
Supermicro SuperDoctor 5 User’s Guide
99
Note: Only LSI MegaRAID 2108 and 2208 RAID controllers are currently supported on both
Windows and Linux platforms. Other LSI MegaRAID RAID controllers (i.e. LSI MegaRAID 2008
and 2308 RAID controllers) are not fully tested and Non-LSI MegaRAID RAID controllers (i.e.
LSI Fusion-MPT based and Intel Rapid Storage Technology) are not supported in this version.
Supermicro SuperDoctor 5 User’s Guide
100
4.7 Power Control
The Power Control allows users remotely turn off the system via Graceful Power Control or Power
Control.
Figure 4-23
Graceful Power Control: SD5 Web allows a user to reboot or shut down the system within 60
seconds. On the system console, a message shows up to remind the user of saving the working files.
Before the system is rebooted or shut down, it's allowed to cancel the action either locally or
remotely.
Power Control: SD5 Web allows a user to reboot or shut down the system right away. The system
will reboot or shut down without any warning messages. Note that the action cannot be cancelled.
To execute a Graceful Power Control, select Reboot, and then click the Submit button. A dialog box
shows up for confirmation.
Figure 4-24
Supermicro SuperDoctor 5 User’s Guide
101
Click OK. A countdown dialog box shows up, and the rebooting will begin 60 seconds later.
Figure 4-25
To execute a Power Control, select Reboot radio and click the Submit button. A dialog box shows up.
Figure 4-26
Click OK to start rebooting.
Supermicro SuperDoctor 5 User’s Guide
102
5 SNMP Extension
SuperDoctor 5 provides a program called SuperDoctor 5 SNMP Extension, which allows users to get
health information via Simple Network Management Protocol (SNMP). To use this function, you have to
install the operating system’s built-in SNMP service in advance. In Windows, the Microsoft Windows
implementation of SNMP has to be installed. In Linux, the Net-SNMP package is most commonly used.
SuperDoctor 5 SNMP Extension can then be integrated into the operating system’s built-in SNMP service
to provide Supermicro proprietary management information bases (MIBs).
5.1 Setting Up the SNMP Service on Windows
5.1.1 Preparation
Please follow these steps to install the SNMP service:
For Windows 2000/Windows XP/Windows 2003:
1.
2.
3.
4.
5.
6.
Open the Control Panel.
Open Add/Remove Programs.
Open Add/Remove Windows Components.
Open Management and Monitoring Tools in the Components List.
Check Simple Network Management Protocol.
Click Next to begin the installation.
For Windows 2008:
1.
2.
3.
4.
5.
6.
Open the Control Panel.
Click Programs.
Click Turn Windows features on or off.
Click Add Features.
Check SNMP Services from the list.
Click Install to begin the installation.
Supermicro SuperDoctor 5 User’s Guide
103
5.1.2 Configuring the SNMP Service
1.
2.
3.
4.
Open the Control Panel.
Click Administrative Tools.
Click Services.
Select the SNMP Service.
Figure 5-1
5. Double-click the SNMP Service, and the SNMP Service Properties (Local Computer) dialog box
appears.
Figure 5-2
Supermicro SuperDoctor 5 User’s Guide
104
6. Click the Security tab
7. In the Accepted community names setting, click the Add… button to add a public community with
READ ONLY rights.
8. Select Accept SNMP packets from any host.
9. Click the OK button to complete the settings.
5.1.3 Verifying the SNMP Service
You can use sc query snmp to check the SNMP service in console mode.
Figure 5-3
5.2 Setting Up the SNMP Service on Linux
5.2.1 Preparation
Please contact your system administrator to install the NET-SNMP service on your Linux boxes before
using the SuperDoctor 5 SNMP extension.
5.2.2 Configuring the SNMP Service
1. Use a text editor to open the /etc/snmp/snmpd.conf file.
2. Add the following line into the Pass through control section of the file:
pass .1.3.6.1.4.1.10876 [install folder]/libs/native/snmpagent
3. If you are using Red Hat Enterprise Linux (RHEL) 5.x platforms, use the following command to allow
SNMP extensions to access hardware resources:
setsebool -P snmpd_disable_trans=1
Supermicro SuperDoctor 5 User’s Guide
105
For RHEL 6.x users, edit the /etc/selinux/config file and replace "SELINUX=enforcing" with
"SELINUX=disabled". Save the /ect/selinux/config file and reboot the system.
4. Use the following command to restart the SNMP service:
service snmpd restart
5. Use an SNMP client to walk through the Supermicro MIB tree (i.e., the .1.3.6.1.4.1.10876 OID tree).
If it fails to get any data from .1.3.6.1.4.1.10876, compare the sample snmpd.conf file below to your
snmpd.conf file and check if something is configured wrong.
com2sec notConfigUser default
public
group notConfigGroup v1
notConfigUser
group notConfigGroup v2c
notConfigUser
view
allview included
access notConfigGroup "" any
.1
noauth exact allview none none
syslocation Unknown (edit /etc/snmp/snmpd.conf)
syscontact Root <root@localhost> (configure /etc/snmp/snmp.local.conf)
pass .1.3.6.1.4.1.10876 /opt/Supermicro/SuperDoctor5/libs/native/snmpagent
5.2.3 Verifying the SNMP Service
For Linux users, use this command to check SNMP service:
service snmpd status
Supermicro SuperDoctor 5 User’s Guide
106
5.3 Supermicro MIB
The Supermicro MIB subtree begins from .1.3.6.1.4.1.10876. Please find a file named SSM_MIB.zip on
your SuperDoctor 5 CD to get detailed SNMP MIB/OID information.
The MIB zip file includes 5 files:
SUPERMICRO-SMI.my: The file contains Supermicro MIB information used by SuperDoctor® and
SSM.
SUPERMICRO-HEALTH-MIB.my: The file contains HEALTH MIB module used by SuperDoctor® and
SSM.
SUPERMICRO-SSM-MIB.my: The file contains SSM MIB module used by SuperDoctor 5.
xtree.txt: The file represents HEALTH and SSM module structure in tree structure format.
xiden.txt: The file represents HEALTH and SSM module structure in identifier format.
A screenshot generated by the snmpwalk program of the NET-SNMP libraries on Linux platforms is
shown below.
snmpwalk -v 1 localhost -c public .1.3.6.1.4.1.10876
Figure 5-4
Supermicro SuperDoctor 5 User’s Guide
107
The figure below shows how the snmpwalk program of the NET-SNMP libraries using Supermicro MIBs
is run on Linux platform.
snmpwalk -v 1 localhost -c public .1.3.6.1.4.1.10876
Figure 5-5
Supermicro SuperDoctor 5 User’s Guide
108
6 SuperDoctor 5 Command Line Program
SuperDoctor 5 provides a command line interface program sdc, which displays health information in text
mode.
6.1 SDC Commands
The sdc program is located in the [install folder] folder. This file is named sdc.bat for Windows
platforms and sdc.sh for Linux platforms.
6.1.1 –h: Display sdc command arguments
In text console, execute sdc –h and you will see the sdc supported arguments.
Figure 6-1
6.1.2 –d: Dump SNMP messages
The –d option displays the internal formats of the Supermicro MIBs. This argument is for debugging
purposes and should not be used by end users.
Supermicro SuperDoctor 5 User’s Guide
109
6.1.3 –e: Display all monitored items and their status
In text console, execute sdc –e and you will see the status of monitored items
Figure 6-2
Notes:
1. The Status column (see the figure above) is empty, indicating that the monitored item is
healthy.
2. Hard drives and memory are supported on Linux platforms only.
3. Only the health of internal hard drive is shown. No health status of USB hard drives and
flash drives is indicated.
4. RAID health is available on LSI MegaRAID 2108 and 2208 controllers.
Supermicro SuperDoctor 5 User’s Guide
110
Figure 6-3
6.1.4 –f: Write SNMP messages to a specified file
The –f option is similar to the –d option except that the former writes internal formats of the
Supermicro MIBs to a file. This argument is for internal use and should not be used by end users.
Figure 6-4
Supermicro SuperDoctor 5 User’s Guide
111
6.1.5 –i: Display all monitored items and their status repeatedly
The difference between the -i and -e commands is the frequency of displaying monitoring results. The
sdc –e command only shows the status of monitored items once, and the –i command repeatedly shows
the monitoring status.
Figure 6-5
Note: Press the Ctrl+C keys to exit the sdc program.
Supermicro SuperDoctor 5 User’s Guide
112
6.1.6 –ia: Import alert configuration
The –ia argument is provided to import alert configuration data for SuperDoctor 5 without a web
console. To execute the command sdc –ia, a property file that contains the necessary alert settings is
required.
Modify alertcfg.properties.template located in the
[install folder]\config folder to suit your needs. Possible attributes and values of the property file are
shown below. Note that the attributes and options are case insensitive.
Attribute
polling
pollinginterval
log
maxbackupindex
mail
to
from
smtp
port
encryption
authentic
username
password
trap
trapreceiver
tray
Description
Enables Pooling
The interval in seconds between checks for the health
status of monitored items if Polling=true
Note: Minimal value is 3.
Enables logging if polling=true
Backup files to keep around if log=true
Enables email alerts if polling=true
Recipients if mail=true
Note: Multiple values are separated by a comma.
Sender’s email if mail=true
SMTP server if mail=true
Port if mail=true
Connection security if mail=true
SMTP authentication if mail=true
Username (SMTP authentication) if mail=true
Password (SMTP authentication) if mail=true
Enable trap alerts if polling=true
Trap receivers if trap=true
Note: Format: IP:port; Multiple values are separated by a
comma.
Enable system tray if polling=true
Option
true | false
true | false
true | false
None|SSL|TLS
true | false
true | false
true | false
In text console, execute sdc –ia [property_file_name] and you will see the import status of the alert
configuration file.
Supermicro SuperDoctor 5 User’s Guide
113
Figure 6-6
6.1.7 –r: Reset the chassis intrusion
In text console, execute the command sdc –r to reset the chassis intrusion flag. The result is shown
below:
Figure 6-7
6.1.8 –rd: Detect the monitored items again
Sometimes your hardware configurations may change, such as a new power supply being used or new
fans being plugged in. In these cases, you can execute the command sdc –rd to detect the monitored
items again. The sdc program will start re-detecting and wait for the SuperDoctor 5 to restart.
Figure 6-8
6.1.9 –v: Display sdc version information
The –v argument shows the sdc version information. In the prompt, enter the command sdc –v.
Supermicro SuperDoctor 5 User’s Guide
114
In text console, execute the command sdc –v to show the version of the sdc. The result is shown below:
Figure 6-9
Supermicro SuperDoctor 5 User’s Guide
115
6.1.10
–reboot: Reboot the System
In a text console, execute the command sdc –reboot to immediately reboot the system. The result is
shown below:
Figure 6-10
6.1.11
–shutdown: Shutdown the System
In a text console, execute the command sdc –shutdown to immediately shut down the system. The
result is shown below:
Figure 6-11
6.1.12
–abort: About the shutdown or reboot command
In a text console, execute the command sdc –abort to immediately cancel the shutdown or reboot
command. The result is shown below:
Figure 6-12
Supermicro SuperDoctor 5 User’s Guide
116
6.1.13
–dt: Delay seconds to run power command
In a text console, execute the command sdc –reboot –dt 60 to reboot the system 60 seconds later. The
result is shown below:
Figure 6-13
6.1.14
–flash: Flash BIOS
In a text console, execute the command sdc –flash to flash the BIOS. Note that this function is available
on Windows platforms only. To execute the command sdc –flash, a BIOS binary file must be provided.
The result is shown below:
Figure 6-14
Notes:
1. To avoid BIOS from being corrupt, you are required to disable ME (Intel Management
Engine) before updating the BIOS. Find disable ME or enable update ME or enable ME
FW Image RE-flash in the BIOS setup menu.
2. The command cannot be cancelled. Once you enter the command, the system starts
BIOS flashing.
3. The BIOS binary file will be copied into the [install folder]\BIOS\rom folder so that you
are able to see the file via the SD5 Web interface.
Supermicro SuperDoctor 5 User’s Guide
117
6.1.15
–flashlog: Show flash history
The BIOS flashing completed via SD5 will be logged whether the flashing is successful or not. Note that
this function is available on Windows platforms only. To view the flashing history, execute the command
sdc –flashlog.
Figure 6-15
Supermicro SuperDoctor 5 User’s Guide
118
6.1.16
–et: Export threshold configuration
In text console, execute the command sdc –et to export thresholds (high/low limits) of all monitored
items.
Figure 6-16
Open thresholdConfig.csv located in the [install folder] folder, you can see the details of monitored
items, such as name, high limit, and low limit.
Figure 6-17
Supermicro SuperDoctor 5 User’s Guide
119
6.1.17
–it: Import threshold configuration
The –it argument is provided to import threshold configuration data (high/low limits) for SuperDoctor 5
without a web console. To execute the command sdc –it, it is required to have a cvs (Comma-separated
values) file containing the threshold. Note that to have the cvs file, execute –et to export threshold
configuration in advance.
Modify thresholdConfig.csv located in the [install folder] folder to suit your needs. Note that you can
only decide if an item should be monitored (column: IsMonitored) and to change the threshold (column:
HighLimit and LowLimit) of an item.
Figure 6-18
In text console, execute sdcs –it [csv_file_name] and you will see the import status of the threshold
configuration file:
Supermicro SuperDoctor 5 User’s Guide
120
Figure 6-19
6.1.18
–rt: Reset threshold to default settings
In text console, execute the command sdc –rt to reset thresholds (high/low limits) to manufacture
default settings.
Figure 6-20
Supermicro SuperDoctor 5 User’s Guide
121
7 SD5 Tray
SuperDoctor 5 provides a program called SD5 Tray allowing the Windows user to get alert messages on
the desktop. To use this function, you have to configure SD5 notification methods in advance, see 4.5.1
Alert Configuration for more information. Note that this function is only available on Windows platforms.
7.1 Verifying SD5 Tray on Windows
When you install SuperDoctor 5, SD5 will insert an SD5 tray icon into your system tray. To see the SD5
tray icon (see the figure below), use the same account you install SD5 to log on the Windows system.
Figure 7-1
When the SD5 Tray receives alert messages, the tray icon will change.
Figure 7-2
Click the SD5 tray icon. The detailed alert messages are displayed in the dialog box.
Figure 7-3
Supermicro SuperDoctor 5 User’s Guide
122
The buttons in the dialog box:
Acknowledge: Acknowledges an alert. Every alert will be kept until it is acknowledged. If
acknowledged, it will no longer display in the dialog box.
Dismiss: Minimizes the dialog box.
Previous: Reads the previous alert.
Next: Reads the next alert.
7.2 Manually Controlling SD5 Tray
Besides the SD5 tray icon, you are able to see a minimized window showing on the task bar.
Figure 7-4
You can close the SD5 Tray by right-clicking the SD5 window and then selecting Close.
Figure 7-5
To start the SD5 Tray on the desktop, click the Windows Start button, select All Programs, click the
Startup folder, and click Start SuperDoctor 5 Tray.
Figure 7-6
Supermicro SuperDoctor 5 User’s Guide
123
Part 3 Advanced Topics
Supermicro SuperDoctor 5 User’s Guide
124
8 SSM Utilities
Two Supermicro Server Manager (SSM) utility applications, changejvm and change_cert_pwd, are
provided to change Java VM and to assign the password used in the agent key store used by SD5. This
chapter shows you how to use the utilities.
8.1 Using ChangeJVM to Change a Java VM
When users install SuperDoctor 5, they can choose the kind of Java VM to be used. The utility
changejvm located in the [install folder]\tools folder can be used to change a Java VM.
Usage:
changejvm [-p <arg>] [-h | --help ] [-j <arg>]
Options:
-p
The root folder of SD5. The argument is optional and the default value is [install folder].
*-j
The kind of Java VM to be used, e.g., /usr/java/jdk1.6.0.35/jre/bin/java
-h, --help
Shows the help menu.
(*indicates a required attribute)
The following figure shows how the command
changejvm.bat –j C:\Java\jre1.6.0_01\bin\java.exe –p "C:\Program Files\Supermicro\SuperDoctor5"
is used to change to another version of Java VM (JRE 1.6.0_01).
Figure 8-1
Supermicro SuperDoctor 5 User’s Guide
125
The following figure shows how the command changejvm.bat –j "C:\Program
Files\Supermicro\SuperDoctor5\jre\bin\java.exe" –p "C:\Program Files\ Supermicro\SuperDoctor5" is
used to change to the built-in Java VM of SD5. The built-in Java VM (JRE 1.6.0_43) is located in the
[install folder]\jre\bin folder.
Figure 8-2
Notes:
1. You need to stop the SuperDoctor 5 service before changing Java VM if SuperDoctor 5 is
still running.
2. You need to manually restart the SuperDoctor 5 service after changing Java VM.
3. The architecture of Java VM you selected must suit the installation program. For
example, to use an x86 version of SD5, you need to install an x86 version of Java VM
first.
4. It's recommend that you use the latest version of JRE 6 in SD5. Only Oracle JRE 6 update
29 and JRE 6 update 43 are currently tested on both Windows and Linux platforms.
Other Oracle JRE (i.e. JRE 7) and Non-Oracle Java VM (i.e. OpenJDK) are not supported in
this version.
Supermicro SuperDoctor 5 User’s Guide
126
8.2 Using Change_cert_pwd to Change Certificate
Password
When you create customized certification with the SSMCertificate program, you can reassign the
certificate password to be used in SD5. The utility change_cert_pwd located in the [install folder]\tools
folder can be used to change the certificate password defined in the agent.cfg.
Usage:
change_cert_pwd [-p <arg>] [-h | --help ] [-s <arg>]
Options:
*-p
The password to be encoded in agent.cfg.
-s
The root folder of SD5, e.g., /opt/Supermicro/SuperDoctor5. The argument is optional and
the default value is SD5_HOME.
-h, --help
Shows the help menu.
(*indicates a required attribute)
The following figure shows how the command change_cert_pwd.bat –p 123456 –s ..\ is used to change
the password in agent.cfg used by SD5.
Figure 8-3
Note that you need to restart SD5 service for the new certificate password to take effect.
Supermicro SuperDoctor 5 User’s Guide
127
9 SSM Certification
When server-side applications (i.e. SSM Server, SSM Web, and SSM CLI) communicate with a
SuperDoctor 5, the communication channel can be configured to use Secure Sockets Layer (SSL). SSM
supports secure communications with SSL and a public key infrastructure (PKI). A built-in key pair shared
by the SSM Server, SSM Web, and SSM CLI and a key pair for the SuperDoctor 5 are included in the SSM
installation program. By default, SSM uses the built-in key pairs to establish an SSL channel for
communications.
Figure 9-1
As shown above, the SSM Server and SuperDoctor 5 use two key stores to preserve their key pairs and
the trusted client’s public keys, respectively (Note that the SSM Server, SSM Web, and SSM CLI use the
same Server Trust Store and Server Key Store to establish secure communication channels with the
SuperDoctor 5.) For the SSM Server, the Server Key Store contains an SSM Server private key. For the
SuperDoctor 5, the Agent Key Store contains a SuperDoctor 5 private key. The Agent Trust Store
contains SSM Server public keys. To ensure secure communications, the SSM Server uses the
SuperDoctor 5’s public key to encipher messages and sends the enciphered messages to the
SuperDoctor 5. The enciphered messages can only be deciphered with the SuperDoctor 5’s private key,
which is safely kept by the SuperDoctor 5. When the SuperDoctor 5 sends messages back to the SSM
Server, it uses the SSM Server’s public key to encipher the messages that are then deciphered by the
SSM Server with its own private key. Even if the messages are sniffed by hackers, they cannot
understand the enciphered messages.
Note that you do not need to manually replace the built-in key pairs if you install the SuperDoctor 5 only.
For more information on replacing the default key pairs by using the SSM Certificate program, please
refer to 12 SSM Certification in SSM User’s Guide.
Supermicro SuperDoctor 5 User’s Guide
128
Part 4 Appendices
Supermicro SuperDoctor 5 User’s Guide
129
A Log Settings
SuperDoctor 5 uses a log file to record runtime information and errors. By default, SD5 backs up 10
copies of 1 log file when it reaches a maximum size of 8 MB. The backup files are sequentially numbered.
For instance, backup files are named sd5.log.1, sd5.log.2, sd5.log.3, and so on. You can change the
maximum log file size and maximum number of backup copies.
Configure log properties of SuperDoctor 5:
1. Stop the SuperDoctor 5 Service. Please refer to 2.3 Manually Controlling SD5 Service for more
information.
2. Find log4j.properties located in [install folder]\config and open it with a text editor.
3. Find the content that contains this line:
log4j.appender.LOGFILE.MaxFileSize=8000KB
Modify the word 8000KB to an appropriate value. Allowable units are KB, MB and GB. This line may
be commented out if no file size constraint is to be applied.
4. Find the content that contains this line: log4j.appender.LOGFILE.MaxBackupIndex=10
Modify the keyword 10 to an appropriate value.
5. Save the file and restart the SuperDoctor 5 service.
Supermicro SuperDoctor 5 User’s Guide
130
B Third-Party Software
The open source libraries used by SD5 are listed below:
Library
Antlr
Apache commons
cglib
com4j
Ehcache
JACOB
JavaMail (mail.jar)
jcommon
jetty
JFreeChart
Java Native Access
Joda Time
jQuery
json-simple
gson
Log4J
Quartz
Smiparser
SLF4J
SNMP4J
Spring framework
Wicket
xstream
xml-apis
xerces XML parser
License
BSD
Apache License
Apache License
MIT
Apache License
LGPL
CDDL
LGPL
Apache License, Eclipse Public License
LGPL
LGPL
Apache License
MIT
Apache License
Apache License
Apache License
Apache License
Apache License
MIT
Apache License
Apache License
Apache License
BSD
Apache License
Apache License
Supermicro SuperDoctor 5 User’s Guide
131
C Updating Configurations
For non-IPMI SKU motherboards, SuperDoctor 5 automatically detects the monitored sensors based on
the configuration files. When the message “The health information of the XXXXX motherboard is not
available” on the Heath Info page, it is necessary to update SuperDoctor 5 and the configuration files
since the older version of SuperDoctor 5 may fail to detect the sensors. The steps below guides you to
update the configuration files manually.
Figure C-1
To update the configuration files, follow these steps:
1. Download the latest file TMHealth2-resource-XXX.jar from the Supermicro FTP site:
ftp://ftp.supermicro.com/utility/SuperDoctor_5/.
2. Copy and paste this file to replace the existing file [install folder]/plugin/builtin/TMHealth2resource-XXX.jar.
3. Execute the command sdc with the argument -rd to redetect the monitored items with the new
configuration file.
Supermicro SuperDoctor 5 User’s Guide
132
Contacting Supermicro
Headquarters
Address:
Tel:
Fax:
Email:
Web Site:
Europe
Address:
Tel:
Fax:
Email:
Super Micro Computer, Inc.
980 Rock Ave.
San Jose, CA 95131 U.S.A.
+1 (408) 503-8000
+1 (408) 503-8008
[email protected] (General Information)
[email protected] (Technical Support)
www.supermicro.com
Super Micro Computer B.V.
Het Sterrenbeeld 28, 5215 ML
's-Hertogenbosch, The Netherlands
+31 (0) 73-6400390
+31 (0) 73-6416525
[email protected] (General Information)
[email protected] (Technical Support)
[email protected] (Customer Support)
Asia-Pacific
Address:
Super Micro Computer, Inc.
3F, No. 150, Jian 1st Rd.
Zhonghe Dist., New Taipei City 23511
Taiwan (R.O.C)
Tel:
+886-(2) 8226-3990
Fax:
+886-(2) 8226-3992
Web Site:
www.supermicro.com.tw
Technical Support:
Email:
[email protected]
Tel:
+886-(2)-8226-3990
Supermicro SuperDoctor 5 User’s Guide
133
This page is intentionally left blank
Supermicro SuperDoctor 5 User’s Guide
134