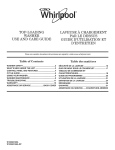
1
Safety Instructions
qU
Operating
......
2,3
Instructions
GLD6900 Series
PDW7000 Series
Careand Cleaning.........
ii,12
CL
LU
LD
ControlPanel and Settings.../4-6
Loading PlaceSettings........ii
Loading the Racks ............
10
Using the Dishwasher
........
6-9
Troubleshooting
Tips .. 12-14
Consumer Support
Consumer Support .............
Warrantg
....................
16
15
Z
0
Write the model and serial
numbers here:
Model #
Serial #
You can find them on the tub wall
just inside the dooE
165D4700P351
49-55052
04-07 JR
IMPORTANT SAFETY INFORMATION.
READ ALL INSTRUCTIONS BEFORE USING -SAVE THESE INSTRUCTIONS
WARNING!
For your safety, the information in this manual must be followed to minimize the risk of fire
or explosion, electric shock, and to prevent property damage, personal injury, or death.
WARNING!
f
_,l'_
_
WATER
HEATER
SAFETY
Under certain conditions, hgdrogen gas mag be produced in o water heater that has not been used
for two weeks or more. HYDROGEN GAS IS EXPLOSIVE.
If the hot water has not been used for two weeks or more, prevent the possibility of damage or injury
by turning on all hot water faucets and allow them to run for several minutes. Do this before using ang
electrical appliance which is connected to the hot water system. This simple procedure will allow any builtup hgdrogen gas to escape.Sincethe gas is flammable, do not smoke or use an open flame or appliance
during this process.
%
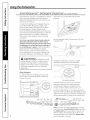
PROPERINSTALLATION AND MAINTENANCE
This dishwasher must be properly installed and located in accordance with the Installation
Instructions before it is used. lf gou did not receive on Installation Instructions sheet with
gout dishwasher, gou can receive one 8g visiting our website at www.geappliances.ca.
• Connect to a grounded metal, permanent wiring
sgstem; or run an equipment-grounding
conductor with the circuit conductors and
connect to the equipment-grounding terminal
or lead of the appliance.
• Improper connection of the equipment-grounding
conductor can result in a risk of electric shock.
Checkwith a qualified electrician or service
representative if you are in doubt whether the
appliance is properly grounded.
• Dispose of discarded appliances and shipping
or packing material properly.
• Do not attempt to repair or replace any part
of your dishwasher unless it is specifically
recommended in this manual. All other servicing
should be referred to a qualified technician.
• To minimize the possibility of electric shock,
disconnect this appliance from the power supply
before attempting any maintenance.
NOTE:Turning the dishwasher off does not
disconnect the appliance from the power supply.
We recommend having a qualified technician
serviceyour appliance.
CAUTION: Toprevent
minor
injurg
orpropertg
damage
• Contents washed in Anti-bacterial mode, if
available, may be hot to the touch. Use care
before handling.
• Using a detergent that is
not specifically designed
for dishwashers will cause
the dishwasher to fill with
suds.
• If your dishwasher is connected to a
wall switch, ensure that the switch is
on prior to use.
• On dishwashers with electronic controls,
if you choose to tum the wall switch
off between wash cgcles, allow 5-10
seconds after turning the switch on before
touching START/RESET
to allow the control
to boot.
• Non-Dishware Items: Do not wash items such
as electronic air cleaner filters, furnace filters and
paint brushes in your dishwasher Damage to
dishwasher and discoloration or staining of
dishwasher mag result.
• Close supervision is necessarg if this appliance
is used bg or near children.
• Load light, plastic items so theg will not
become dislodged and drop to the bottom
of the dishwasher-theg might come into
contact with the heating element and be
damaged.
Ak WARNING! RISK OF CHILD ENTRAPMENT
PROPERDISPOSAL OF THE DISHWASHER
Junked or abandoned dishwashers are
dangerous...even if they will sit for '_justa
few days." If you are getting rid of your old
dishwasher, please follow the instructions below
to help prevent accidents.
Before You Throw Awag Your Old
Dishwasher:
• Take off the door of the washing compartment
or remove the door latch keeper (as shown).
Door latch keeper
WARNING!
When using gour dishwasher,
including the following:
follow basic precautions,
• Use this appliance only for its intended purpose
as described in this Owner's Manual.
• Do not operate your dishwasher unless all
enclosure panels are properly in place.
• Use only powder, tabs, liquid detergents or rinse
agents recommended for use in a dishwasher and
keep them out of the reach of children. Cascade®,
Cascade®Complete and Electrasol ®Automatic
Dishwashing Detergents,and Jet-Drg ®and
Cascade Crystal Clear_ rinse agents have been
approved for use in all GE dishwashers.
• Do not tamper with controls.
• Do not abuse, sit on or stand on the door or dish
rack of the dishwasher
• Locate sharp items so that they are not likely
to damage the door seal.
• Load sharp knives with the handles up to reduce
the risk of cut-type injuries.
• Do not wash plastic items unless marked
dishwasher safe or the equivalent. For plastic
items not so marked, check the manufacturer's
recommendations.
• Do not allow children to play around dishwasher
when opening or closing door due to the possibility
of small fingers being pinched in door
• Do not discard a dishwasher without first removing
the door of the washing compartment or the door
latch.
• Do not store or use combustible materials, gasoline
or other flammable vapors and liquids in the
vicinity of this or any other appliance.
• Do not allow children to play with, on or inside this
appliance or any discarded appliance.
• Do not touch the heating element during or
immediately after use.
READAND FOLLOW THIS SAFETYINFORMATION
CAREFULLY.
SAVE THESE INSTRUCTIONS
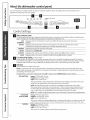
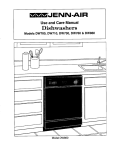
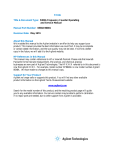
About the dishwasher control panel.
You can locate your model number on the tub wall just inside the doon Throughout this manual, features and
appearance may vary from your model.
llmli
®
®
S_N_NG W_SHt_
SE.SEUR LAW_E
_
®
_RWNG _NmZEe
S_C_A_E sANms_
o
C_E_N
P_O_E
_Smar_Di$oense
_eW_ETE_GENr
_ANqUANT
QdletPower
!i
4
OPTIONS
El
....
II
FI
Control Settings
H
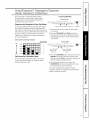
Status Indicator Lights
TheStatusdisplautells Uouwhat'shappeningwhilethe dishwasheris in operationand mauflash,indicatinga malfunction(see
page6).Thelightswill come ONindicatingthe sequenceof operationthe dishwasherisin.
LOW Displauedwhenthe SmartDispense
TM needsto be refilledwith liquidor gel automaticdishwasher
DETERGENTdetergent.
SENSING Displayedwhilethe ExtraClean
TM Sensor
is measuringthe amountof soiland temperatureof wateE
Thedishwasherwill adjustthe selectedcycleto achieveoptimalperformance.
WASHING Displayedduringprewashand mainwash periods.
DRYING DisplayedduringHEATED
DRY.
SANITIZED Displayedwhencycle hasmet sanitizationconditions.LightremainsONuntildoor isopened.
CLEAN Displayedwheno wash cycleiscomplete.Thelightwill remainONuntildoor is opened.
_
Time
Remaining
(onsomeminutesremaininguntilthe
models)
Duringoperation,
theDisplag
displayshowsthe
cycleiscomplete.Thedisplaymay adjustthe remaining
time whilethe Sensinglightis on.Thetime displayedat the startof eachcyclemay changefrom the factory settingasthe unit
customizesitselfto homeuse.Duringa delaystart, the displaywill showhoursof time remaininguntilthe cyclestarts.
_,l
Selections
Pressthe pad for the desiredwash chicle.
NOTE:All cgde times and water usageinformation contained in the following section are approximate values only.
Actual resultswill depend on several factors,including but not limited to, inlet temperature, household water pressure
and turbidity of the wash water.
The light above or next to the selectedpad will be ON to indicate which WASHCYCLEhas been selected.
ANTI-BACTERIA
Heavg 33.3 I(8,8 gal,),105 min.
Medium 28.41(7.5gal.),95 min.
Light 23.81(6.3gal.),85 min.
This cgcle raises the water temperature in the final rinseto sanitizegour dishware.The cgde
length will varg depending on the temperature of your inlet water.
NOTE:The Anti-Bacteria cgde ismonitored for sanitization requirements. If the cgcle is
interrupted during or after the main wash portion or if the incoming water temperature is so
low that adequate water heating cannot be achieved,the sanitizingconditions mag not be
met. In these cases,the sanitizedlight will not illuminate at the end of the cgde.
NOTE:NSF-certifiedresidential dishwashersare not intended for licensedfood establishments.
COOKWARE
{POTS & PANS)
Heovg 37.91(i0.0 gal.),80 min.
Medium 33.3 l(&8 gal.),70 min.
Light 28,4I(7,5 gal.),60 rain.
This cgcle is meant for heavily soileddishes or cookware with dried-on or baked-on soils.This
cgcle mag not remove burned-on foods. Everydag dishes are safe to be used in this cgcle.
NORMAL
Heovg 335 I(8.8 gal.),70 min.
Medium 28.4I(7.5 gal.),60 min,
Light 18.9I(5.0 gal.),50 rain.
This cgcle is for medium/heavily soiled dishes and glassware.
SPEED CYCLE
(on some models
CHINA
28.41(7.5gal.),35 min,
This cycle is for everyday dishes and glassware.
28.41(7.5gal.),35 min.
This cycle is for lightly soiled china and crystal.
GLASSES
(on some models
RINSE ONLY
28.41(7.5gaL),35 min.
This cycle is specifically designed for glasses.
9.51(2.5 gal.), 10 min.
For rinsing partial loads that will be washed later Do not use detergent with this cycle.
NOTE:TheCHINA (somemodels) selectoris a toggle pad; toggle the pad until the desired cycle is indicated.
NOTE:This dishwasher is equipped with a Cleongensor" with automatic temperature control, therefore,cgcle
length and time mog varg depending on soil and temperature conditions.
NOTE:Onlg the Anti-Bacteria cgcle has been designedto meet the requirements of Section 6, NSF184 for soil
removal and sanitization effioocg.
D
Options
The light above the selected pad will be ON to indicate which OPTION has been selected,
PREWASH
(on some models)
For use with heavily soiled and/or dried-on, baked-on soils. This option MUST be
selected PRIORto starting the cycle, This option adds 16 minutes to the cycle time,
NOTE:Cannot be selected with RINSEONLY cycle,
HEAT DRY
Light OFF
Shuts off the drying heat option. Dishes air dry naturally and energy is saved. For
faster air dry, you can prop the door open after the CLEAN light illuminates.
HEAT DRY
Light ON
Turns the heater on for fast drying. This will extend the time to your wash cycle by 8
minutes for the SPEEDCYCLEand 30 minutes for all other cycles. NOTE: Cannot be
selected with RINSEONLY cycle.
LOCK
You con tack the controls to prevent ang selections from being mode. Or gou con tack
the controls after gou hove started a cgcle.
Children cannot accidentallg start dishwasher bbl touching pods with this option
selected.
To unlock the dishwasher controls, touch and hold the HEAT DRY pad for 3 seconds.
The light above the LOCKpad will turn off. To lock the dishwasher, touch and hold the
HEAT DRY pad for 3 seconds. The light above the LOCK pad will turn on.
ADDED HEAT or
EXTRAHOT WASH
(on some models)
DELAY HOURS
RESET
When selected, the cycle will run longer with heating elements on to improve both
wash and dry performance,
NOTE: Cannot be selected with RINSE ONLY cycle.
You can delay the start of a wash cycle for up to 9 hours. Touch the DELAYpad to
choose the number of hours you want to delay the start of the cycle; then touch
START/RESET.
The machine will count down and start automatically at the correct time.
Touching START/RESETclsecond time will cancel the DELAYSTARTselection. NOTE:
If you forget to fully close the door, a reminder signal will beep until you do so.
To change a cycle after washing starts, touch the START/RESETpad to cancel the
cycle. The START/RESETlight will flash while the water is pumped out if needed. This
takes approximately 90 seconds. When the light stops flashing, the dishwasher
can be reprogrammed and restarted.
About the dishwasher control panel.
m Start
Closethe dishwasherdoor and selectthecycleand
desiredenhancements.
Touchthe START/RESET
padto
beginthe cycle.Waterfill begins,and approximately60
secondslaterthe washaction begins.
NOTE:Thedishwasherremembersyour lastcycleso
you don'thaveto reprogrameachtime.Whenthe
dishwasherdoor isfully closed,the controlpanellights
willdisplaythe last settingsyouselected.
m
Clean
If youdon'twant to changeany of the settings,simply
touchthe START/RESET
pad to beginthe cycle.
If the door isclosed,the indicatorlightswillturn
off ifthe START/RESET
pad isnot selectedwithintwo
minutes.Toactivatethe display,open and closethe door
or pressany pad.
Also,if a powerfailureoccurs,NORMALand HEATDRV
willautomaticallybe programmed.Hakeany new
selectionsand touch theSTART/RESET
pad to begin
the cycle.
The CLEANlightis illuminatedwhen a wash cycle is
complete. The lightwillstag ONuntilthe door is opened
and then closed and latched or when a pad is pressed
with the door closed.Youcan turn offthe CLEANlight
by pressing any pad when the door is latched.
Flashing display lights.
Status Indicator Lights
What It Means
START/RESET
Cyclehasbeeninterruptedby pressingtheSTART/RESET
pad.Lightwill stop
flashingafterthe dishwasherautomaticallydrainsout thewaten
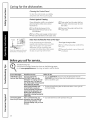
Using the dishwasher.
Check the Water Temperature
Theenteringwater shouldbeat least49°C(120°F)and
not morethan 65°C(150°F)foreffectivecleaningand to
preventdishdamage.Checkthe water temperaturewith
a candy or meatthermometenTurnon the hotwater
faucetnearestthe dishwasher,placethethermometerin
a glassand letthe water run continuouslyintothe glass
untilthetemperaturestopsrising.
Use Rinse Agent
Rinseagents remove spots and prevent new filmbuildup on your dishes, glasses, flatware, cookware and plastic.
Filling the Dispenser
The rinse agent dispenser holds 100 ml (5.5ft.oz.)of rinse agent. Under normal
conditions,this will lastapproximatelyone month.Try to keepit full, but do not overfill.
E] Makesurethe dishwasherdoorisfully open.
r-2-]Turnthe dispensercapto the leftand lift it out.
[]
Add rinseagentuntilthe indicatorwindow looksfull.
[]
Cleanup any spilledrinseagentwith a dampcloth.
E] Replacethe dispensercap.
window
Indicoto/
Dispensercop
RinseAid Setting
Theamountof rinseagentreleasedintothe final washcan be adjusted.Thefactory
settingis atthe midpoint.If thereare ringsof calcium(hardwater)spotson dishes,try a
highersetting.If you seefoam in the dishwasher,movethe indicatorto a lowersetting.
Toadjust thesetting
Removethe dispensercap;thenturn the adjustercounterclockwise
to increasethe
amountof rinseagent,clockwiseto reducethe amount of rinseagent.
Dish Preparation Prior to Loading
• Noprerinsingof normalfood soilis required.
• Scrapeoff hard soils,includingbones,toothpicks,skins
and seeds.
• Removelargequantitiesof any remainingfood.
• Removeleafy vegetables,meattrimmingsand
excessiveamountsof greaseor oil.
• Removeacidicfoodsoilsthat can discolorstainless
steel.
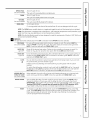
Manual Detergent Dispenser
Yourdishwashercomesequippedwith a manualdispenser
and,on somemodels,an automaticliquiddishwasher
detergentdispenser(SmartDispenseTM).
Youcan useeither
of these dispensers, but don't use both at the same time.
SmartDispense
Forheavilgsoiledloads,usea bit moredetergent.Forwater
temperaturesabove60°C(140%),usea bit lessdetergent.
Medium
Soft
Soft
Medium
Hard
Extremelg
Hard
TM
Manual Detergent
Dispenser
Thecoverof the mainwashsectionwillopen duringthe
washcgcle.If gou are usingSmartDispense
TM, leavethe
coverof the mainwashsectiondispenseropenbefore
startingthe cgcle.
Forheavilysoiledloads,usethe Potsand Pansor HeavyWash
eyrie.
DONOTUSEHANDDISHDETERGENT
Youmag usepowder,liquid,gel or tabletsin the manual
dispensenIt isimportantto keeppowdereddetergentsand
tabletsfreshand drg sotheg don'tloseeffectiveness.
Therefore,do not put detergentintothe manualdispenser
untilgou are readgto wash dishes.
Filling Manual Detergent Dispenser
Theamountof detergentto usedependson whethergour
water ishard or soft.With hardwater,gou needextra
detergent.With softwater,gou needlessdetergent.
Protectgourdishesand dishwasherbg contactinggour
water departmentandaskinghow hard gourwater is.
Twelveor moregrainsis extremelghardwater.A water
softenerisrecommended.Withoutit, limecan build up in
thewater valve,which couldstickwhileopen and cause
flooding.Toomuchdetergentwith softwater cancausea
permanentcloudinessof glassware,calledetching.
Usethe informationin the tablebelowasa guideto
determinethe amount of automaticdishwasherdetergent
to placein the dispenser.
Youmagusepowder,liquid,gel
or tabletsin this dispenser.
Whenusingautomaticdishwashingdetergenttablets,
simplgplaceonetablet in the mainwash sectionand close
thecover.
Number
of Grains
Detergent
Cups to Fill
Less than 4
Fillcup to soft line (1/3 full)
4 to 8
Fill cup to medium soft line (2/3 full)
8 to 12
Fillcup to medium hard line
(completelg full)
Greater
than 12
Fill both main wash cup
and pre wash cup
NOTE:Usinga detergentthat isnot specificallydesigned
for dishwasherswill causethe dishwasherto fillwith suds.
Duringoperation,thesesudswillspilloutof the dishwasher
vents,coveringthekitchenfloorand makingthefloorwet.
Becausesomangdetergentcontainerslookalike,storethe
dishwasherdetergentin a separatespacefrom all other
cleaners.Showangonewho mag usethe dishwasherthe
correctdetergentand whereit isstored.
Whiletherewillbe no lastingdamageto the dishwasher,
gour disheswill not getcleanusinga dishwashing
detergentthat isnot formulatedto workwith dishwashers.
Using the dishwasher.
SmartDispense
TMDetergent
Dispenser Con
somemodelsl
This dishwasher may have a SmartDispense feature
which automatically dispenses liquid automatic
dishwasher detergent into each cycle based on soil
level and water hardness.
TM
To utilize the SmartDispense'" Detergent Dispenser,
it must first be filled. Although any liquid or gel
automatic dishwashing detergent can be used in
the SmartDispense'"system, all liquid or gel
automatic dishwashing detergents are not the same.
Most automatic dishwashing detergents are chlorine
bleach-based (such as Cascade_ or ElectrasoP)
while others contain enzymes (such as Cascade
Complete%
Do not mix any chlorine bleacMbased automatic
dishwashing detergent with any dishwashing
detergent containing enzymes as this could cause
the detergents to congeal and lead to blockage of
the SmartDispense T"sgstem. Checkthe detergent
label to determine if the detergent is chlorine
bleach-based or one that contains enzymes. It is
recommended that the same type of detergent be
used when refilling your SmartDispensd" system.
Setthe door at a comfortable angle to fill the
dispenser,
Aim the detergent bottle at the opening in the door
and begin to fill.
\
CAUTIONI. Absolutely do not add
The dispenser will hold 1.11(40 fL oz.)of liquid
dishwasher detergent (standard size bottle).
powder detergent, tablets or any liquid soap or
detergent normally used for washing hands or
dishes in a sink. Only use liquid or gel detergent
specifically designed for use in an automatic
dishwashe[
Filling Dispenser
To open the dispenser for filling, push down and
turn the blue cap counterclockwise until the cap
is loose. Lift cap off.
Turn clockwise until tight.
When full, replace the cap and turn clockwise
until tight to ensure that no water enters the
SmartDispensd" dispenser.If residue is left on
the door, it will be washed off in the next cycle.
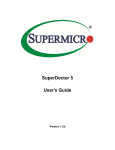
An indicator light will turn on to notify you when the
dispenser needsto be filled again. After filling, the light
will not turn off until the door is closed.A full dispenser
will last approximately 1 month for the average user.
o
SENSING WAS.ING
S_S_U_
LAWC_
•
DRYING
S_CHA_
•
S_ITIZEp
SANmS_
•
CLEAN
P_O_R_
..... _
"_"_....
QuietPower4
D_S
e_'}S e
_
OPtions
Light will turn on
when it is time to refill.
....
NOTE:If you are not using SmartDispensd" and you
want to turn the LOW DETERGENTLEDlight off, press
the ADDED HEATpad 5 times within 3 seconds. You
will hear 3 beeps,then the light will go off. You can
turn the light back on by pressing the ADDED HEAT
pad 5 times within 3 seconds.
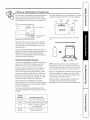
SmartDispense :MDetergent Dispenser
Water Hardness Calibration
Prior to the first use, the dishwasher needs to
be calibrated for water hardness. Pleasefollow
directions below to calibrate the dishwasher to
the hardness of gour tap water.
Control Calibration
Control
Panel
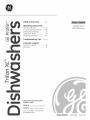
Determine the Hardness of Your Tap Water
In the bag containing these instructions, gou should
find a water hardness test strip package. Readthe
instructions on the package, remove the test strip and
follow the instructions to determine the hardness level
of gour tap water. You will use this information to
calibrate gour dishwasher to dispense the optimal
amount of detergent.
Pressat the same time for 3 seconds.
Displag
1. Closeand latch the door (lights on, dishwasher
not running).
2. Pressthe COOKWAREand DELAYpads at the
same time for 3 seconds.The displag will show a
number 1 to 5.This is the water hardness value
currentlg set.
Water hardnesstest strip indication
Value to Enter
into Dishwasher
SOETOREDI I I I I
1REDI
I I I
HARD
I I
I I
I I
I I
Panel
1
2
2 RED
_
3
3 RED
_
4-
4 RED
_
5
Set Control to Calibration
Control
Mode
From the standby mode (dishwasher not running
a cycle and the panel lights on),enter the water
hardness selection mode.
pad to lower
the value,
pad to raise the
value.
3. Pressthe COOKWAREpad to raise the value or the
NORMALpad to lower the value. Setthe water
hardness value (1 to 5) to the number determined
with the test strip and table at left.
4. Once the water hardness is set, press the
START/RESET
pad to save the setting and return
the dishwasher to normal operation.
You should recalibrate the dispenser if water
conditions change, for example, if a water softener
sgstem is added or removed.
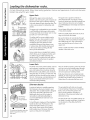
Loading the dishwasher racks.
For best dishwashing results, follow these loading guidelines. Features and appearance
baskets may vary from your model.
of racks and silverware
Upper Rack
Although the upper rack is primarily for
glasses,cups and saucers, pots and pans can
be placed in this rack for effective cleaning.
Cups and glassesfit best along the sides.This
is also a secure place for dishwasher-safe
plastics.
The upper rack is good for all kinds of
odd-shaped utensils. Saucepans,mixing
bowls and other items should be placed face
down. Fold-down tines {on some models)
provide flexibility for extra-large and hard-tofit items.
The upper rack is adjustable Ion some models
to add flexibility in loading your dishwashen
Tolower, push tabs in and lower rack. To raise,
just pull up on rack until it snaps.
Secure larger dishwasher-safe plastics over
2 tines when possible.
The utility shelf{on some models) may be
placed in the up or down position to add
flexibility. A wine gloss holder {on some
models)secures wine glasses for best
washability. Becausewine glasses come
in various sizes,after loading, slowly push
in the rack to make sure they will clear
the top of the dishwashe_
Be sure that items do not protrude through
the bottom of the rack and block rotation of
the middle spray arm. This could result in
poor wash performance for items in the
upper rack.
Make sure small plastic items are secure so
they can't fall onto the heate_
Checkto make sure that no items will block
rotation of the wash arms.
Some models have an Angled Rack System,
which allows you to angle your dishes,such
as coffee mugs, for better cleaning and
quicker drying. To position the tines, pull the
leverforward, drop the tines into position
and release the leve_
Lower Rack
The lower rack is best used for plates, saucers
and cookware. Large items such as broiler
pans and baking racks should go along the
left-hand side. Load platters, pots and bowls
along the sides,in corners or in the back. The
soiled side of items should face the center of
the rack. If necessary, oversized glassesand
mugs can be placed in the lower rack to
maximize loading flexibility.
V
,q
Silverware
Don't let anbJ
item extend
through
t
bottom.
t
Toremove end baskets, grasp the
basket at opposite comers and
slideapart.
10
Also,be careful not to let a portion of an item
such as a pot or dish handle extend through
the bottom rack. This could block the wash
arm and cause poor washing results.
Fold-down tines (on some models)provide
flexibility for extra-large and hard-to-fit items.
The tines may be left in the up position or
folded down to customize the lower rack.
Basket
A variety of options is available regarding
the three-piece silverware basket in your
dishwasheEThe complete basket is designed
to fit on the right side of the lower rack.
Additionally, each end of the basket is
removable to add loading flexibility to
accommodate flatware and lower rack
capacity needs.
To load flatware, simply push the adjustable
handle to either side. Put flatware in the
basket with knife handles up to protect
your hands. Placespoons in the basket
with handles down. Mix knives,forks and
spoons so they don't nest togetheE
The provided lids with slots can be used
to avoid nesting of silverware. Small plastic
items, such as measuring spoons and
lids for small containers, should go in
the bottom of the silverware basket with
silverware on top.
The lids of both end and middle baskets can
be closed to contain small items. Long items
can be placed on the utility shelf in the
upper rack.
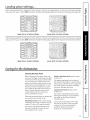
Loading place settings...
Follow these guidelines for loading 10 place settings. Features and appearance of racks and silverware baskets
mo_] vorg from gout model. NOTE:Silverware should be individuollg loaded into the slots on the silverware basket lid.
Upper Rack--lO
place
settings
Lower Rack--lO
place
settings
Follow these guidelines for loading 12 place settings. Features and appearance of racks and silverware baskets
may vorL] from your model. NOTE:Silverware should be individualkj boded into the slots on the silverware basket lid.
Upper
Rack--12
place
settings
Lower Rack--12
place settings
Caring for the dishwasher.
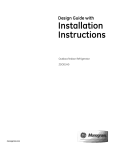
Cleaning the Door Panel
Before cleaning the front panel, make sure
gou know what type of panel you have. Refer
to the last two letters of your model numbec
You can locate your model number on the
left-hand tub wall just inside the dooc If your
model number ends with BB,WW, CC,SAor
BG,then you have a Painted Door panel. If
your model number ends with SS,then you
have a Stainless Steel Door panel. If your
model number ends with CS,then you
have a CleanSteel Door panel.
Follow the instructions below for cleaning the
door panel for your specific model.
Pointed Door Panel (model numbers ending
in BB-bJock, WW-white, CC-bisque, SA-silver
metallic, GS-silver or BG-graphite metallic)
Use a clean, soft, lightly dampened cloth,
then dry thoroughly. You may also use a
good appliance wax or polish.
Stainless Steel Door Panel (model numbers
ending in SS)
The stainless steel panels can be cleaned
with StainlessSteelMagic or a similar product
using a clean, soft cloth. Do not use appliance
wax, polish, bleach or products containing
chlorine on StainlessSteel doors.
CleanSteel Door Panel (model numbers
ending in CS)
Use a clean, soft, lightly dampened cloth,
then dry thoroughlg. Do not use appliance
wax, polish or any chemical agent on
CleanSteel doors.
Do not wipe the dishwasher with a soiled
dish cloth or wet towel. These mug leave
a residue. Do not use scouring pads or
powdered cleaners because these
products can scratch the finish.
11
Caring for the dishwasher.
Cleaning the Control Panel
To clean the control panel, use a lightly
dampened cloth. Then dry thoroughly.
Protect Against Freezing
If your dishwasher is left in an unheated
place during the winter, ask a service
technician to:
H-] Cut off electrical power to the
dishwasher Remove fuses or trip
circuit breaker
r_ Drain water from the water inlet line
and water valve. (Usea pan to catch
the water)
E] Reconnect the water inlet line to the
water valve.
r-2-iTurn offthe water supply and disconnect
the water inlet line from the water valve.
Does Vour Dishwasher Have an Air Gap?
Air gap
An air gap protects your dishwasher
against water backing up into it if a drain
clogs. The air gap is not a part of the
dishwasher It is not covered by your
warranty. Not a!l plumbing codes require
air gaps, so you may not have one.
The air gap is easy to clean.
m Turn off the dishwasher and lift off the
cover.
[]Remove the plastic cap and clean with
a toothpick.
Before you call for service...
Troubleshooting Tips
Save time and money! Review the charts on the following pages,
_
or visit www.geappliances.ca.
Error Messages
Possible Causes
You may not need to call for service.
What To Do
START/RESET
status
You have pressed the
• Pressthe START/RESET
padonceto start thedishwasherPressthe
indicator light flashing START/RESET
pad while the
START/RESET
pad a secondtime whenthe dishwasheris runningonlyif you
dishwasher is running. This will
wish to cancel the cycle.
cancelthe cycle.The light will
stop flashingafter the dishwasher
drains (about90 seconds).
Powerto the dishwasherwas
• Thelightwill stopflashingafterthe dishwasherdrains.A newcyclewill
turned offwhile a cyclewas
start automatically.
runningand powerhasjust been
restoredto the dishwasher.The
blinkinglights indicate that the
dishwasherisdrainingthe potential
water inside.
Dishwasher BEEPS This is a reminderthat gout
• Closeand latchthe door after openingit mid-cycle.
onceevery 30 seconds dishwasher door has been left
openduring operation.It will
continuebeeping until you close
the door.
12
Error Messages
Possible Causes
Beeping at the end
of the cycle
This is normal. The dishwasher • Toturn off the doublebeepindicator(orre-activateit if it was previously
will beep twice at the end of the
turned off), press the HEATDRYpad 5 times within 3 seconds.
cycle
A triple beep will soundto indicate the end-of-cycle beep option
has beenturned on or off.
Low Detergentlight
is ON
SmartDispense"haslessthan
10cycles worth of detergent
left in the dishwasher
• Fillthe SmartDispense"reservoirwith liquiddetergent.Afterfillingthe
reservoir,the LOWDETERGENT
lightwillturn OFFoncethe dooris closed.
If you are notusingthe SmartDispensefeature,turn off the lowdetergent
light by pressingtheADDEDHEATpad 5 timeswithin 3 seconds.
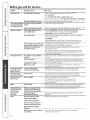
Problem
Possible Causes
What To Do
Dishesand flatware
not clean
Low inletwater temperature
Spotsand filming
on glassesand
flatware
What To Do
TM
• Hakesureinletwater temperatureis correct(seepage 8).Turnon the hot
water faucetnearestthe dishwasher,letrun untilthe water temperature
stopsrising.Thenstartthe dishwasherandturn off thefaucet.Thisinsures
the enteringwater ishot.
Water pressureis temporarily low • Turnon a faucet. Iswater comingout moreslowlythan usual?If so,wait
untilpressureisnormalbeforeusingyourdishwasher.
Air gap or disposerisclogged
• Cleanthe air gap or flushthe disposer.
Improper rack loading
• Hakesurelargedishwaredoesnot blockthe detergentdispenseror the
wash arms.Seethe Loadingthedishwasherrockssection.
No air gap or high drain loop
• Verifythat you havean air gap or a highdrain loop.Referto the
InstallationInstructions.
Extremelyhard water
Lowinlet water temperature
Overloadingthe dishwasher
•
•
•
•
•
Improperloading
Oldor damp powderdetergent
Rinseagent dispenserempty
Userinseagentsto removespotsand preventnewfilm buildup.
Hakesurewater temperatureis at least49°C(120°F).
Loaddishwasheras shownin the LoadingPlaceSettingssection.
Hakesuredetergentisfresh.
If water is extremelyhard,a softenermay be required.
Toolittle detergent
Cloudinesson
glassware
Combinationof softwater and
too much detergent
Water temperature entering
the dishwasherexceeds
65°C(150°F)
Sudsin the tub
Correctdetergent
wasn't used
Thisis calledetchingand ispermanent.Topreventthisfrom happening,
uselessdetergentif you havesoftwater.Washglasswareinthe shortest
cyclethat willget it clean.Recalibrate
the SmartDispense"systemif you
are usingit (seepage% Donot usethe manualdetergentdispenserand
the SmartDispense"at the sametime.
• Thiscouldbe etching.Lowerthe water heatertemperature.
• Useonlyautomaticdishwasherdetergentsto avoidsudsing.Cascade®and
ElectrasoPAutomaticDishwashingDetergentshavebeenapprovedfor use
in all GEdishwashers.
•
Rinseagent was spilled
Detergentplacedin manual
detergent dispenserand
SmartDispense"dispenser
Toremovesudsfrom the tub, openthe dishwasherand letsudsdissipate.
Closeand latchthe dishwashenPumpout water by touchingthe
START/RESET
padonce;then 30 secondslater,touch the
START/RESET
padagain.Repeatif necessary.
• Alwayswipeup rinseagentspillsimmediately.
• UseSmartDispenseor the manualdetergentdispenser,but not both.
TM
Detergent left in
dispenser cups
Dishesare blocking the
detergent cup or
SmartDispense" outlet
• Repositionthe dishes,so the water from the lowerspray arm can
flush the detergent cup or the outlet on the SmartDispense"system.
Seethe Loadingthe dishwashersection.
Water in the
SmartDispense_"
dispenser
Cap not tightened after
filling the dispenser
• Use a turkey baster to remove as much water as possiblefrom the
SmartDispense
T''dispenserand refill it as normal. Be sureto tighten
the cap fully to prevent water from entering the dispenser.
Blackorgrag
marks on dishes
Aluminum utensilshave
rubbedagainst dishes
• Removemarkswith a mild,abrasivecleane_
13
Before you call for service...
Problem
Possible Causes
What To Do
Dishesdon't dry
Low inletwater temperature
•
•
•
•
Rinseagent dispenseris empty
ControlpanelrespondedDoor latch may not be properly
to inputsbutdishwasher seated
neverfilled with water
Stainedtub interior
Dishwasherwon't run
Water valve may be turned off
Sometomato-basedfoods con
causereddishstains
Hakesureinletwatertemperatureisat least49oc(120OF).
SelectHEATDRY.
UseHOTSTART,
HOTWASHor ADDEDHEAToptions.
Selecta highercgcle,suchasANTI-BACTERIA,
SANIWASHor COOKWARE
• Checkthe rinseagentdispenserand fill asrequired.
• Hakesurethe door isfirmlg closed.
• Hakesurewatervalve(usuallylocatedunderthe sink)isturnedon.
• Useof the RINSEONLYcycleafter addingthe dishto the load
candecreasethe levelof staining.GErecommendsCascade®
PlasticBoosterto helpremovethesetypesof stains.
Teaor coffeestains
• Removethe stainbg hand,usinga solutionof 120ml (1/2cup)bleach
and 3 cupswarm water.
A WARNING
Beforecleaninginterior,wait at least20 minutesafter a cgcleforthe
heatingelementsto cooldown.Failureto do so can resultin burns.
An overallyellow or brownfilm can • A specialfilter in the water supplylineisthe only wagto correct
be causedby iron depositsin water this problem.Contacta water softenercompan9.
White film on insidesurface• GErecommendsrinseagentsto helppreventhardwater mineral
hard water minerals
depositsfrom forming.
Rundishwasherwith citricacidto removemineraldeposits.Citricacid
(Partnumber:WDSSX151)
canbe orderedthroughGEParts.Seeback
coverfor orderinginformation.
Fuseisblown or circuit breaker
• Replacefuseor resetcircuitbreakenRemoveany otherappliancesfrom
is tripped
the circuit.
Poweristurned off
• Insomeinstallations,the powerto the dishwasheris providedthrougha
wall switch,often locatednextto the disposerswitch.Hakesureit ison.
Control panel is locked
• Unlockcontrolpanel.Seepage S.
Rebootyour control
• Turnoff powerto the dishwasher(circuitbreakeror wall switch)for
30 seconds;thenturn backon.
Control panel lights Time too long between
go off when gou're
touching of selected pads
setting controls
Water standing in
This is normal
the bottom of the tub
• Eachpad must be touched within 30 secondsof the others.
To relight, touch ang pad again,or unlock and relatch door.
Water won't pump
out of the tub
Drain is clogged
• If gou havean air gap,cleanit. Seepage 12.
• If thedishwasherdrainsintoa disposer,rundisposerclear.
• Checkto seeif gour kitchensinkis drainingwell.If not, gou
magneeda plumber.
Steam
Thisis normal
Sanitizedlight does
not illuminate at the
endof the cycle
(Anti-Bacteria
cycleonly)
Thedoor was openedand the
cyclewas interrupted during
or after the mainwash portion
Theincomingwater
temperature was too low
• Warm,moistair comesthroughthe vent bg the door latchduring drging
and whenwater isbeingpumpedout. Thisisnecessargfor drging.
• Donot interruptthecycleanytimeduringor after mainwash.
Noise
Normal operatingsounds
Detergentcup opening
• A small amount of clean water around the outlet on the tub
bottom at the back of the tub keepsthe water seal lubricated.
• Raisethewater heatertemperatureto between49°Cand 60°C(120°F
and 140°F).
• Theseare all normal.Noaction isrequired.
Water enteringdishwasher
Themotor stopsand starts at
varioustimes during the cycle
Drain pump soundsduring
pump out
Rattling dishes when the spray
arm rotates
14
• Hake suredishesare properlg loaded.Seethe Loadingthe
dishwasherrackssection.
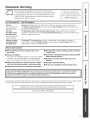
Dishwasher Warranty.
or an authorized CustomerCare®technician.Toscheduleservice,
All warranty serviceprovided by our FactoryServiceCenters,
on-line,24 hoursa day, visit us at www.geappliances.caor call
1.800.561.3344.Pleasehave serial number and model number
availablewhen callingfor service.
For The Period Of:
Staple your receipt here.
Proof of the original purchase
date is needed to obtain service
under the warranty.
We Will Replace:
One Year
From the dote of the
original purchase
Any part of the dishwasher which fails due to a defect in materials or workmanship. During
this limited one-year warranty, we will also provide, free of charge, all labor and related service
to replace the defective part.
Five Years
(for Profile models
PDW7000 series)
From the date of the
original purchase
The dishwasher racks or the electronic control module, if they should fail due to a defect in
materials or workmanship. During this five-year limited warranty, you will be responsible for any
labor or in-home service costs.
Lifetime of Product
(for Profile models
PDW7000 series)
The PermaTuf ®tub or door liner, if it fails to contain water due to a defect in materials or
workmanship. During this limited warranty, we will also provide, free of charge, all labor and
related service to replace the defective part.
What Is Not Covered:
• Service trips to your home to teach you how to use
the product.
• Damage to the product caused by accident, fire, floods
or acts of God.
• Improper installation.
If you have an installation problem, contact your dealer
or installer. You are responsible for providing adequate
electrical, exhausting and other connecting facilities.
• Incidental or consequential damage caused by possible
defects with this appliance.
• Failure of the product if it is abused, misused, or used for
other than the intended purpose or used commercially.
• Damage caused after delivery.
• Cleaning or servicing of the air gap device in the
drain line.
• Product not accessible to provide required service.
• Replacementof house fuses or resetting of circuit breakers.
EXCLUSION OF IMPLIED WARRANTIES--Vour sole and exclusive remedy is product repair as provided in this Limited
Warranty. Any implied warranties, including the implied warranties of merchantability
or fitness for a particular
purpose, are limited to one year or the shortest period allowed by law.
This warranty is extended to the original purchaser and any succeedingowner for products purchased for home use within Canada.
In home warranty servicewill be provided in areaswhere it is availableand deemedreasonableby Mobe to provide.
I
I
WARRANTOR IS NOT RESPONSIBLE FOR CONSEQUENTIAL DAMAGES.
Warrantor:
I
iVlABE CANADA INC.
15
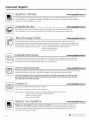
Consumer Support.
!
Have a question or need assistance with your appliance? Try the GEAppliance Website 24 hours a day,
Appliance
www.geappliances.ca
any day of the year!Websites
For greater convenience and faster service, you can now download
Owner's Manuals,
order parts or even schedule service on-line.
ScheduleService
www.geappliances.ca
Expert repair serviceis only one step away from your dooEGet on-line and scheduleyour service at
your convenience24 hours any day of the year! Or call 1.800.561.3344during normal businesshours.
Real Life Design Studio
www.geappliances.ca
We support the UniversalDesign concept-products, services and environments that can be used by
people of all ages, sizesand capabilities. We recognize the need to design for a wide range of physical and
mental abilities and impairments. Fordetails of Universal Design applications, including kitchen design ideas
for people with disabilities, please contact: Director, Consumer Relations, Mabe Canada Inc
Suite 310, 1 Factory Lane
Moncton, N.B.EIC 9M3
Extended
Warranties
www.geappliances.ca
Purchase an extended warranty and learn about special discounts that are available while your warranty
is still in effect. You can purchase it on-line anytime, or call 1.888.261.2133during normal business hours.
Consumer Home Serviceswill still be there after your warranty expires.
Ports and Accessories
www.geappliances.ca
Individuals qualified to service their own appliances can have parts or accessoriessent directly to their homes.
Order on-line, 24 hours every day, or by phone at 1.800.661.1616during normal businesshours,
Instructions contained in this manual cover procedures to be performed by any user. Other servicing
generally should be referred to qualified service personnel Caution must be exercised, since improper
servicing may cause unsafe operation.
Contact Us
www.geappliances.ca
If you are not satisfied with the service you received:
FIRST,contact the people who serviced your appliance.
NEXT, if you are still not pleased, write all the details (including your phone number) to:
Director, Consumer Relations, Mabe Canada Inc
Suite 310, 1 Factory Lane
Moncton, N.B. EIC 9M3
Register Your Appliance
www.geappliances.ca
Register your new appliance on-line--at your convenience! Timely product registration will allow for
enhanced communication and prompt service under the terms of your warranty, should the need arise.
You may also mail in the pre-printed registration card included in the packing material, or detach and
use the form in this Owner's Manual.
16
....
Printed in the United States
.....
Printed on Recycled Paper