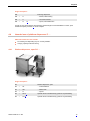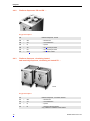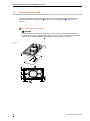
1
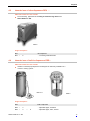
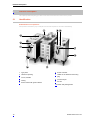
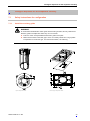
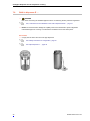
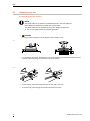
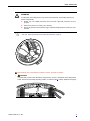
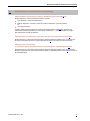
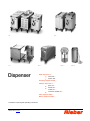
RR … PO … WE … REU … ERR-V Pipe dispenser R … round, RR … square, RE … Exchange dispenser WE … Platform dispenser P … open, PO … closed, PG … cooled, PK … convection-heated, PU … Ultra dispenser REU … Built-in dispenser ERR … Translation of the Original Operating Instructions Issue: 2014-11-18 ERE-H Contents Rieber Professional. Our solutions provide you with quality and safety and are top of the range when it comes to energy efficiency and profitability. Contents 1 Revision index ................................................................................................................................................. 4 2 Important information ..................................................................................................................................... 4 3 4 5 6 7 2.1 Use of this guide ................................................................................................................................................ 4 2.2 Representation conventions in the text .............................................................................................................. 5 2.3 Structure of safety instructions ........................................................................................................................... 5 General safety instructions ............................................................................................................................ 6 3.1 Principles ........................................................................................................................................................... 6 3.2 On use of electrical appliances .......................................................................................................................... 6 3.3 Operator's duties ................................................................................................................................................ 7 3.4 Personnel qualification ....................................................................................................................................... 8 3.5 Provide protective equipment for personnel ....................................................................................................... 8 3.6 Appliance-specific safety instructions ................................................................................................................. 9 3.7 Note the product identification and ensure its preservation .............................................................................. 11 3.8 Instructions on behaviour in an emergency ...................................................................................................... 11 Purpose .......................................................................................................................................................... 12 4.1 Intended use of dispensers, general ................................................................................................................ 12 4.2 Intended use of pipe dispensers R… ............................................................................................................... 13 4.3 Intended use of exchange dispensers WE … .................................................................................................. 14 4.4 Intended use of platform dispensers P … ........................................................................................................ 15 4.5 Intended use of ultra dispensers REU … ......................................................................................................... 17 4.6 Intended use of built-in dispensers ERR…....................................................................................................... 17 Product description....................................................................................................................................... 18 5.1 Identification ..................................................................................................................................................... 18 5.2 Functionality ..................................................................................................................................................... 19 Before first use .............................................................................................................................................. 21 6.1 Transport ......................................................................................................................................................... 21 6.2 Instructions for the installation of the built-in dispenser ERR … ....................................................................... 21 Configure dispenser for the respective crockery ....................................................................................... 23 7.1 2 Safety instructions for configuration ................................................................................................................. 23 7.2 Pipe dispenser R … ......................................................................................................................................... 26 7.3 Exchange dispenser WE … ............................................................................................................................. 28 7.4 Platform dispenser P ... .................................................................................................................................... 30 7.5 Ultra dispenser REU … .................................................................................................................................... 31 7.6 Built-in dispenser E …...................................................................................................................................... 32 Rieber GmbH & Co. KG Contents 8 9 Use ................................................................................................................................................................. 33 8.1 Safety instructions on use ................................................................................................................................ 33 8.2 Instructions for use ........................................................................................................................................... 34 Cleaning, Inspection ..................................................................................................................................... 36 9.1 Safety instructions for cleaning, Inspection ...................................................................................................... 36 9.2 Inspect , clean appliance, and keep it dry, ready for operation ......................................................................... 38 10 Fault - What now? ......................................................................................................................................... 40 11 Warranty and liability .................................................................................................................................... 42 12 Excerpt from EC Declarations of Conformity ............................................................................................. 43 13 Register .......................................................................................................................................................... 44 14 Contact address ............................................................................................................................................ 44 Rieber GmbH & Co. KG 3 Revision index 1 Revision index Revision Change 2011-01-04 First issue 2012-03-22 Safety instructions before use, pages 19 and 21, page 31 2012-09-12 b/w print; Pictures 2014-01-24 Configuring … 2014-05-30 Register, Ultra dispenser 2014-11-18 Änderungswunsch VDE 2 Important information 2.1 Use of this guide This user guide contains important information for the safe and correct use of the product. IMPORTANT Protect yourself from dangers and prevent damage to your product. ► It is essential that you read the user guide before using the product for the first time. ► Keep the guide in a safe place and pass it on to any future user. Our customers often express the wish to have one compact guide instead of a number of different guides for these product variants, which have similar functions. Should you notice a deficit, please let us know immediately without hesitation. With your help, we will try to get even better. Please add your notes here: 4 Rieber GmbH & Co. KG Important information 2.2 Representation conventions in the text Listings are represented in this way. Instructions on certain actions are represented in this way. ▌ The result of the action is represented in this way. See ‘. . . ’ cross-references are represented in this way. NOTE indicates potential damage to property without any personal injury. Failure to follow these instructions may cause damage to property. User tip ► Useful information or tip. 2.3 Structure of safety instructions The signal words DANGER - WARNING - CAUTION classify the possible degree of risk of bodily injury in an actual situation. Injuries can be prevented by adhering to the specified rules of conduct. The warning triangle symbol indicates a "General Danger". DANGER indicates imminent danger. Failure to follow these warning instructions will result in serious bodily injury or even death. WARNING indicates a potentially hazardous situation. Failure to follow these warning instructions may cause serious bodily injury or even death. CAUTION indicates a potentially harmful situation. Failure to follow these warnings may cause minor bodily injury. Rieber GmbH & Co. KG 5 General safety instructions 3 General safety instructions This chapter provides information about residual risks and hazards despite compliance with the intended use of the device. We have provided a list of all generally valid safety instructions which must be followed. In the following section, safety information relating to a particular operation or situation is placed before the appropriate operation step or description of the situation. The information provided here such as ‘Basic rules of conduct’, ‘Operator's obligations’ etc. only refers to the legally required observance of requirements such as the Workplaces Ordinance (ArbStättV) according to German law. 3.1 Principles Even though this product corresponds to the state of the art and is in compliance with the accepted technical safety rules, hazards may occur. 3.2 Only use the product in perfect condition, observing the instructions contained in this user guide. As far as possible, ensure that the product is safely integrated into its environment in all phases of the product life. Refrain from modifying and altering the product. On use of electrical appliances Safety instructions according to EN 60745-1: # Work area Keep your work area clean and tidy. A messy or unlit work area can cause accidents. Keep children and other persons at a distance when using the product. # Electrical safety 6 The appliance may only be connected to a correctly installed grounded power outlet with RCD residual current protective device. The plug on the unit must fit in the socket. Do not modify the plug in any way. Never use an adapter in combination with earthed appliances. Using an unmodified plug and a suitable socket will reduce the risk of an electric shock. Avoid bodily contact with earthed surfaces such as pipes, heating units, cookers and refrigerators. The risk of an electric shock is greater when your body is earthed. Keep the appliance away from rain or damp. Allowing water to get into an electric appliance will increase the risk of electric shock. Do not misuse the cable by using it to remove the plug from the socket. Always remove whilst holding onto the plug. Keep the cable away from heat, oil, sharp edges or the moving parts of other appliances. Using damaged or tangled cables increases the risk of electric shock. When working with an appliance outdoors, only use extension cables which are permitted for outdoor use. Using an extension cable suitable for outdoor use reduces the risk of electric shock. Risk of fireas a result of heat build-ups possible. Unwind the cable from the cable drum to prevent a possible heat build-up and/or cable fire. The coupling must have splash protection, must be made of rubber or be rubber-coated. The cable cross-section must be at least 1.5 mm2. Rieber GmbH & Co. KG General safety instructions # Safety guidelines for persons Be attentive and pay attention to what you are doing, act rationally when working with an electrical appliance. Do not use the appliance when tired or under the influence of drugs, alcohol or medication. Just one moment of inattention whilst using the appliance can result in serious injury. Make sure the appliance cannot be switched on unintentionally. Double check that the main switch is in the "OFF" position before inserting the plug in the socket. Connecting the appliance to the power supply while it is switched on can cause an accident. # Careful handling and use of electrical appliances Never use an electrical appliance with a faulty switch. An electrical appliance which can no longer be switched on or off is dangerous and must be repaired. Keep unused electrical appliances in places where children are not able to reach them. Do not allow the appliance to be used by persons who are not familiar with it or persons who are not familiar with this user guide. Electrical appliances are dangerous when in the hands of inexperienced persons. Treat the device with care. Check that moving parts are functioning properly and do not block; check whether parts are broken or damaged and impairing the functioning of the device. Have any damaged parts repaired before using the appliance. Many accidents are caused by poorly-maintained electrical appliances. Use electrical appliances, accessories etc. in accordance with these guidelines and in a manner that is specified for this particular appliance type. When using the appliance, please take into account the working conditions and the work being carried out. Using electrical appliances for other uses than that intended can lead to hazardous situations. # Service 3.3 Only have the device repaired by qualified and authorised staff. Only use original spare parts. In this way you can ensure that the appliance remains safe. Operator's duties # Operator The operator is the person who operates the device himself for business or commercial purposes or allows its use by a third party and during its operation bears legal responsibility for protection of the user, personnel or third parties. # Operator's obligations The appliance is used in commercial applications. For this reason, the operator of the appliance must meet all legal duties relating to work safety. In addition to the safety instructions in this guide, the safety, accident prevention and environmental protection regulation applying to the application of the appliance must be complied with. In particular, the following shall apply: The operator must familiarise himself with the applicable occupational health and safety regulations and, in addition, carry out a risk assessment to determine any hazards associated with the specific operating conditions at the place of use of the device. He must implement these in the form of operating instructions for operation of the device. During the whole service lift of the appliance, the operator must verify if the operator's operating instructions reflect the current versions of the applicable regulations. If necessary, the operator must update the operating instructions accordingly. The operator must define and assign the responsibilities for installation, operation, repair, maintenance and cleaning clearly. Rieber GmbH & Co. KG 7 General safety instructions The operator must ensure that all employees who use the device have read and understood these instructions. In addition, the operator must train the personnel and inform them of the hazards involved at regular intervals. The operator must provide the personnel with the necessary protective equipment and make sure that they wear it. In addition, the operator must ensure that the appliance is always in a perfect technical condition. For this reason, the following shall apply: 3.4 The operator must ensure that the maintenance intervals defined in this guide are obeyed. The operator must have all safety equipment be checked regularly for completeness and proper function. The operator must ensure that the required media connections are available. The operator must ensure that structural safety measures are performed. Personnel qualification Safe operation requires certain technical skills and personal qualification of each person. 3.5 Organisational responsibility is borne by the ‘work supervisor’. According to EN 50110-1 a work supervisor is ‘a person who is appointed to take direct responsibility for the performance of work. If necessary, this responsibility can be assigned partly to other persons. [...] The designated representative must instruct all persons involved in the work on all hazards which may not be obvious for them’. The work may only be performed by ‘instructed persons’ who have been trained accordingly. Training, instructions must be repeated, proper understanding must be verified (ideally by way of an appropriate test). Only ‘Qualified Staff’ is allowed to carry out repair work. According to IEC 60204-1, skilled workers are 'People who, due to their relevant training and experience, are able to recognize risks and avoid potential hazards.' Electrical work may only be carried out by trained and experienced electricians. Persons trained in electrical engineering are only admissible under the direction and supervision of a qualified electrical engineer. Provide protective equipment for personnel Ensure that the personnel wears the personal protective equipment appropriate to the relevant situation. Wear sturdy shoes to prevent injuries during transport and/or displacement of the appliance. Wear protective gloves for protection against handburns when using the heatable appliance. The temperature of the parts can be ≥ 110 °C. 8 Rieber GmbH & Co. KG General safety instructions 3.6 Appliance-specific safety instructions This chapter provides you with general product-specific safety information. In the following section, additional safety information relating to a particular operation or situation is placed before the appropriate operation step or description of the situation. 3.6.1 3.6.2 Safety and monitoring devices A heatable device is protected against overheating. In the case of a defective control, the maximum admissible temperature is kept. An electrical appliance has a rocker switch with a green indicator which is illuminated when the device is switched on. Danger of electric shock WARNING Danger of electric shock. Water penetration increases the risk of an electric shock. ► Never direct a water jet onto the device. ► Protect the appliance from moisture. WARNING Danger of electric shock. Risk of death. ► Before each use, inspect the product, the connecting plug and electric cable for any visible signs of damage. A damaged mains cable must be replaced by a qualified electrician. ► Only connect to a socket with series-connected residual current operated device (RCD) with a tripping current of 30 mA. ► Have electrical work carried out by the manufacturer, its customer service or a qualified electrician only. ► The appliance must be disconnected from the power supply during cleaning or maintenance and when replacing parts. Also see ‘On use of electrical appliances’, page 6 3.6.3 Risk of burns and risk of fire when using heatable dispensers WARNING ≥ 110°C Risk of burns within the heatable dispenser; for instance during troubleshooting, configuration. When doing work inside the appliance next to the heating, users may burn their hands and arms on hot surfaces. ► Allow the device to cool down. Wear protective gloves. ► Keep combustible materials away from the product. Rieber GmbH & Co. KG 9 General safety instructions 3.6.4 High mechanical forces impact the dispenser WARNING Incorrect configuration and/or human error can result in various injuries. A dispenser configured for special requirements cannot be loaded with parts that are not designed for this purpose. The diameter of the pieces of crockery may be inadmissibly smaller, which may cause the parts to tip over. There may be parts with higher weight which, as a result, fall below the serving height and cause inadmissible and dangerous gripping into the dispenser. Broken pieces of crockery may obstruct the guide . Human error, like inadmissible manipulation on the blocked stack or gripping into the pipe, may have the effect that a dangerous tension is suddenly triggered and pieces of crockery bounce up. Dangers like shearing, bruises on the hands and arms and dangers as result of ejected parts flying into the face may occur. High forces are effective. The spring preload is up to approx. 700 N (70 kg). For the platform dispenser P, forces may be higher. ► Install the dispenser correctly. ► Only use the dispenser for parts arranged for that purpose. Take organisational measures to prevent any risk of confusion. ► Only remove parts at serving height. Do not grip into the dispenser. ► In case of malfunction, lock the dispenser immediately. Eliminate the fault or have it removed according to instructions. Serving height ‘Configure dispenser for the respective crockery’, Page 23 ‘Fault - What now?’, page 40 10 WARNING Do not grip into the shearing and bruising zones. Rieber GmbH & Co. KG General safety instructions 3.6.5 3.6.6 3.7 3.8 Dangers during transport and due to unstable position CAUTION Only move mobile appliance on a level surface. Push appliance. This ensures good visibility and direct access to the casters with brakes. Wear sturdy shoes to avoid injuries. WARNING Prevent involuntary moving of the appliance. Prevent the appliance from rolling away accidentally using the two parking brakes. Only place the appliance on level surfaces. ATTENTION Note the permissible step height, maximum 4 mm, otherwise the casters might be damaged. Remove accessories and transport them separately. Warnings against use of the appliance by children This appliance can be used by children aged 14 and over and by persons with reduced physical, sensory or mental capabilities or lack of experience and/or knowledge, if they are supervised or if they have been instructed in safe use of the appliance and have understood the resulting risks. Children must not play with the appliance. Cleaning and user maintenance may not be carried out by children without supervision. Note the product identification and ensure its preservation The type plate bears the legally required product data. User tip The manufacturer Rieber advises the operator to carry out further internal measures if necessary. This includes the statutory duty of the operator to fulfil its organisational responsibility. To prevent any danger of confusion regarding the dispensers, an additional identification is recommended. Instructions on behaviour in an emergency In an emergency always interrupt the power connection immediately, by disconnecting the electrical connector. First aid in case of crushing, burns or electric shock: Inform yourself on this before commissioning the appliance. Store the emergency equipment, including the relevant instructions, at a readily accessible place near the place of use. Make yourself familiar with the instructions. User tip ► Inform yourself in detail taking the company-internal instructions as a reference. ► We recommend that half-yearly emergency training sessions should be carried out. Rieber GmbH & Co. KG 11 Purpose 4 Purpose This chapter describes the intended use and contains warnings against misuse, for your safety. 4.1 Intended use of dispensers, general # General intentions of use include: For mobile service in the catering, hotel, and food processing industry; also suitable for the care and school catering sectors. For keeping stacked parts neutral, cold or warm. Configure dispenser for the respective parts to be stacked. Shape, weight and stacking height remain the same. Only use the dispenser configured in this way for that purpose. Only move and park mobile appliances on a level surface. Any change of springs may only be carried out by skilled personnel that have been appropriately instructed. In the case of a removablebuilt-in stacking part , for instance with the pipe dispenser and Ultra dispenser, only use the appliance with the part designed for that purpose. Only use original parts of the manufacturer. If necessary, take organisational measures to prevent mixing up the dispensers. To prevent injuries as a result of human error, any use in public and/or in the case of self-service is only admissible under supervision. A ground fault circuit interrupter with a trigger current of 30mA is to be supplied upstream by the customer. Connect electrical device to a mains socket that can be disconnected. Comply with the technical data for the appliance. Observe the information on the type plate. For use only by appropriately trained and suitable operating personnel. # Prevent foreseeable misuse and abuse: 12 Never operate the appliance unsupervised. Plastic baskets are not suitable forheatable dispensers. Not intended for private use at home. Do not lean against or sit on the appliance. Keep any combustible or explosive fluids away from heatable appliances. Otherwise a fire or explosion may arise. Heated units may only be used for heating crockery. Do not use to heat up a room. Rieber GmbH & Co. KG Purpose Do not use this appliance with poor floor conditions. ▌ We are not able to rule out the possibility of marks appearing on the floor due to friction with casters or the formation of scratches due to split cracks in the casters, for example. ▌ 4.2 We are not able to rule out the possibility that the casters may be damaged or become unusable due to swelling or sharp edges on the floor. This appliance may only be moved manually, machine-supported moving is not permitted. Intended use of pipe dispensers R… # General intentions of use include: 4.2.1 For stacking identical stackable plates. Plates, bowls or cups can be stacked. Carrying capacity per pipe maximum 75 kg Pipe dispenser, round RRc… is designed for round parts RRV - H RR … # Type description RRV – L2 RRV – H1 RR … RR … R R ― Pipe dispenser R R ― … round R R V ― R R V ― R R ― H … heated, static heating R R ― U … convection-heated R R ― R R ― 1 … with 1x adjustable pipe, unheated … with adjustable pipe. Desired plate diameter divided by 3fixable guide bars. 1 … number of pipes L … version with ventilation slots. For pre-cooling plates etc. in refrigerated and deep-freeze rooms For RRV 190-320: from Ø 190 mm to Ø 320 mm. Rieber GmbH & Co. KG 13 Purpose 4.2.2 Pipe dispenser, square RE… is designed fordifferent shapes of crockery REH - 2 R… # Type description R R Pipe dispenser E R H R U R 4.3 … square … heated, static heating ― … convection-heated 2 … number of pipes Intended use of exchange dispensers WE … # General intentions of use include: 14 6 exchange rods can be distributed across 18 holes. Adaptable for crockery of different sizes. Carrying capacity maximum 150 kg WE-H WE-Q 1/1 R… R… Rieber GmbH & Co. KG Purpose # Type description: WE Exchange dispenser WE ― H … heated, static heating WE ― U … convection-heated WE ― Q 1/1 … square, individual device For WE-H-750: special design with extremely reduced length for flush installation in niches, push handle with impact protection, 2 corner bumpers 4.4 Intended use of platform dispensers P … # General intentions of use include: 4.4.1 For stacking and dispensing trays or crockery baskets. Carrying capacity maximum 200 kg Platform dispenser, open PO … # Type description: PO Platform dispenser, open PO ― SV … food distribution PO ― GN … Gastronorm PO ― Q … square PO ― SV1/1 Special version with lateral tray guide for tray destacking PO ― TA1/1 Special version with lateral tray guide for tray destacking Rieber GmbH & Co. KG 15 Purpose 4.4.2 Platform dispensers PG and PK … # Type description: PG 4.4.3 Platform dispenser, closed PG ― GN … Gastronorm PG ― SV … food distribution PG ― Q … square PG ― 4S … for 4 cloches per level PG ― 6S … for 6 cloches per level PK ― Q1/1 … convection-cooled Platform dispenser, circulating-heated and meal tray dispenser, circulating air-heated PU … PU-M # Type description: PU 16 Platform dispenser, convection-heated PU ― GN … Gastronorm PU ― SV … food distribution PU ― Q … square PU ― M … stainless steel hinged lid; only suitable for stainless steel baskets Rieber GmbH & Co. KG Purpose 4.5 Intended use of ultra dispensers REU … # General intentions of use include: For the stacking, preparation and heating of heat/ultra-large bowls from Rieber GmbH Co. KG. REU-P # Type description: REU REU ― 4.6 Ultra dispenser P … for heating heat/ultra bowls Intended use of built-in dispensers ERR… # General intentions of use include: Heated or unheated pipe dispensers are designed for stationary installation in a counter or serving system. ERR-V-H ERR-V # Type description: ERR Built-in dispenser ERR ― V ERR ― V Rieber GmbH & Co. KG … adjustable pipes, unheated ― H … adjustable pipes, static, heated 17 Product description 5 Product description This chapter provides everything you need to know about the structure and function of this product. 5.1 Identification # Identification of components: Here parts are mentioned by way of example which are then important for an easier understanding. 1 Type plate 6 Power controller 2 Handle for pushing 7 3 Cover, lockable Holder for the electrical connecting plug 4 Casing 8 Corner bumper 5 Rocker switch with green indicator 9 Air vent 10 Caster with parking brake 18 Rieber GmbH & Co. KG Product description 5.2 Functionality The parts to be stacked are tared with tension springs. The spring characteristic curve corresponds to the mass of the parts to be stacked. The spring characteristic ensures that balance is maintained from the stacked crockery to the last item of the stack. Springs Ranges of spring S1 Spring range, pre-tensioned mm S2 Spring range, loaded mm sh Spring deflexion mm F0 Inner preloading N F1 Spring force, pre-tensioned N F2 Spring force, loaded N Forces A centric force absorption is important. Disruptions like tilting and any resulting jamming are thus prevented. For the pipe dispenser R, the configuration is 3x 120 ° distributed tension springs. For the platform dispenser P… , the configuration is 3x tension springs arranged in a row; thus, if needed, use without the centrally arranged springs. Serving height defines the range of the removal of stacked pieces. This is located above the casing edge. The protruding number of pieces of crockery depends on the device type. Rieber GmbH & Co. KG 19 Product description 5.2.1 Technical data Chromium-nickel steel housing. Adjustment of uniform serving height by attaching and unhooking the tension springs. 4 corner bumpers. Galvanised casters in accordance with DIN 18867, Part8. Wheel diameter 125 mm 2 swivel casters and 2 swivel casters with brakes, anti-static tires. Electrical unit is equipped with pull-out spiral cable 2.5 m with earthed connector and dummy socket outlet, rocker switch with green indicator as ON/OFF switch, thermostat controller (continuous control) , 1N AC 230V 50/60Hz. Ambient conditions +5°C to+40°C. Double-walled body, insulated. R 134a refrigerant for cooling unit. Emission sound pressure level closed 52.0 dB(A), Emission sound pressure level open 61.5 dB(A). The underside of the device is designed with openings. A drawer is optionally available, to hold thebreakable cockery and cover. Protection class IPX5 in accordance with DIN EN 60529 (protection against jet water from any angle). Type Unladen weight Maximum payload RRV – H 55 kg 150 kg RRV – L2 44 kg 150 kg RRV – H1 40kg 120 kg REH - 2 56 kg 150 kg WE 59 kg 150 kg PO 53 kg 200 kg PG 65 kg 200 kg PK 140 kg 110 kg PU 86 kg 130 kg REU 75 kg 140 kg ERR 16 kg 85 kg Details: see rating plate, catalogue, http://www.rieber.de 20 Rieber GmbH & Co. KG Before first use 6 Before first use This chapter provides knowledge of the preparatory activities before use. 6.1 Transport 6.1.1 Check/handle any transport damage Immediately after delivery, visually check the appliance for any transport damage. Document any potential transport damage on the consignment note in the presence of the haulage contractor, and have the damage confirmed by the haulage contractor (with signature). Decide whether to keep the appliance and report damage with the consignment note or reject the appliance. ▌ 6.1.2 This procedure ensures proper loss adjustment. Unpack and check the scope of the delivery Open the transport packaging at the positions provided for this purpose. Do not tear or cut. Check the scope of delivery. Remove any packaging remnants. NOTE Protective foils or heat-sensitive objects on/in the heatable appliance can damage the appliance during heating. ► Ensure that there is no protective foil on/in the appliance. 6.1.3 Dispose of packaging material 6.2 Dispose of packaging material in a proper and environmentally compatible manner. Instructions for the installation of the built-in dispenser ERR … Observe the fire protection regulations WARNING! ≥ 110°C Risk of fire regarding heatable appliance when not adhering to the fire protection regulations. ► In direct proximity to a wall, partition walls, kitchen furniture, decorative cladding, etc., it is recommended that these are made from non-combustible material, failing which they must be clad with suitable, non-combustible, heat-insulating material. ► Observe the fire protection regulations. ► Fluff may cause a fire. Make sure there is no fluff. Observe the fire protection regulations. Get information from the local authorities. Rieber GmbH & Co. KG 21 Before first use Applicable electrical regulations must be observed WARNING Danger of electric shock. Applicable electrical regulations must be observed. ► Have electrical work carried out by the manufacturer, its customer service or a qualified electrician only. ► Only operate the appliance with a power socket that can be disconnected. Install a ground fault circuit interrupter with a trigger current of 30 mA upstream. Connect the appliance to a power socket with protective contact. Also see ‘On use of electrical appliances’, page 6 NOTE Do not bend and/or damage the capillary tube for the thermostat to prevent significant material damage from occurring. Is located in the insulation hose for the switch panel. # Mounting dimensions Dimensions D1: 280 / 320 mm H1: 680 / 780 mm Hole formoun ting: ≥ 356 mm Control Control panel Contact our Customer Service if you need further technical details. 22 Rieber GmbH & Co. KG Configure dispenser for the respective crockery 7 Configure dispenser for the respective crockery 7.1 Safety instructions for configuration 7.1.1 Install the crockery guide WARNING An eccentrical load distribution and/or guide causes a tilting moment; this may obstruct and block the guide in the dispenser. Risks may occur as a result. ► Ensure a centric evenly distributed load and/or guide of the parts. ► Make sure that there is acircular gap to even out crockery tolerances. The gap width is dependent on the device type. For relevant information, see following. Pipe dispenser RR ... Rieber GmbH & Co. KG Exchange dispenser WE … 23 Configure dispenser for the respective crockery 7.1.2 Adjust dispenser to the weight of the crockery WARNING Risk of injury in the case of lowered serving height below the casing lower edge. Danger of shearing and bruising of fingers and hands. An eccentric load distribution and/or spring configuration puts a higher strain on one side of the guide; it may obstruct and block it, which may cause risks. ► As a matter of principle, select an evenly distributed spring configuration. ► When using the pipe dispenser, ensure the same spring force distribution of 3x 120°. Loosen not required springs with a distribution of 3x 120°. ► With the Ultra dispenser, please ensure effective spring forces next to the external guides; for instance, release the 2 springs close to the centre towards the bottom. ► With the platform dispenser, ensure effective spring forces next to the external guides; for instance if there are 7 springs, release the 2 springs close to the centre towards the bottom. ► Hang out springs that are not required downwards; keep top position. ► Ensure that the serving height of the crockery does not fall below the casing lower edge. Only the serving of the parts at serving height is admissible. Serving height WARNING An incorrectly mounted spring may loosen during operation. Risks may occur as a result. ► Any change of springs may only be carried out by skilled personnel that have been appropriately instructed. ► When using the pipe dispenser, make sure that the open side of the springs is on top. ► When using the platform dispenser, ensure that the spring that is not required is only hung out downwards;do not dismantle. ► With the Ultra dispenser, please ensure that the springs only hang out downwards when not in use; do not dismantle. 24 Rieber GmbH & Co. KG Configure dispenser for the respective crockery Stapler RR … Stapler REU … Stapler P… Rieber GmbH & Co. KG 25 Configure dispenser for the respective crockery 7.2 Pipe dispenser R … Adjusting the guide of the crockery WARNING Fix the guide bars onto the same bottom hole. Adjust the load distribution and/or guide of the parts centrically and/or evenly. Make sure there is a circular gap between the guide bar and plates of approx. 5 to 10 mm to even out crockery tolerances. Loosen 3x guide bars. For this, slightly press the centre of the bars and loosen the spring clamps. Lift upand position the 3x guide bars. Secure the settings. Fix the spring clamps to complete the process. Dispenser RR … 26 Rieber GmbH & Co. KG Configure dispenser for the respective crockery Adjust the dispenser to the weight of the crockery WARNING Only remove crockery at serving height. Application tip The spring requirements can be as certained approximately by way of calculation. ► The stacking height is approximately 700 mm. Stack the parts. ► Determine the weight of the crockery. ► For calculation: The maximum tensile force of a spring is 43 N (kg). For 16 tension springs, this amounts to 688 N (68.8 kg). Berechnen Sie den speziellen Bedarf. Alternatively: Insert approx. 20x pieces of crockery into the pipe. ▌ The spring settings are optimal when approx.3 to 6x pieces of crockery project over the pipe edge. Rieber GmbH & Co. KG 27 Configure dispenser for the respective crockery 7.3 Exchange dispenser WE … The dispenser platform can be divided. 6 exchange rods can be inserted in 18 possible holes. The holes are distributed in accordance with the most common plate diameters (200, 220, 240, 260, 280 mm). Adjusting the guide of the crockery WARNING Avoid eccentrical load distribution and/or tilting moment. Fix bars. Adjust the load distribution and/or guide of the parts centrically and/or evenly. Make sure there is a circular gap between the guide bar (1) and plates of approx. 10 to 20 mm to even out crockery tolerances. Dispenser WE … 28 Rieber GmbH & Co. KG Configure dispenser for the respective crockery Adjust the dispenser to the weight of the crockery WARNING Incorrectly installed springs can loosen during operation. Risks may occur as a result of tilting right down to blocking of the guide. ► Ensure that the springs only hang out downwards when not required; do not dismantle. Dispenser WE … WARNING Only remove crockery at serving height. Application tip The spring requirements can be determined approximately by way of calculation. ► The stacking height is approximately 700mm. Stack the parts. ► Determine the weight of the crockery. ► For calculation: The maximum tensile force of a spring is 43 N (4.3 kg). For 24 tension springs, this amounts to 1032 N (103.2 kg). Calculation of special requirements. Alternatively: Place the empty pipe on a level surface. Insert approximately 60x pieces of crockery. ▌ Spring settings are optimal when approximately 3 to 6x pieces of crockery project over the pipe edge. If more plates project, remove the springs again. If too few plates project, install springs. After adjusting the pipes, reinsert them carefully into the dispenser. Rieber GmbH & Co. KG 29 Configure dispenser for the respective crockery 7.4 Platform dispenser P ... User tip Platform dispensers are configured by the manufacturer to a specific application if necessary. Criteria are for instance the shape of the parts, part weight, stacking height and serving height. ► Only change the settings a little. Bear in mind that changes can cause hazards. ► Contact the manufacturer Rieber GmbH & Co.KG. for conversion purposes. Here you will also receive the optimal spring module for your application. Adjust the dispenser to the weight of the crockery WARNING An incorrect configuration can cause hazards. ► Centrical force absorption. Do not load eccentrically. ► Distribute the springs evenly. ► Only hang out the springs downwards when they are not required. Dispenser P… 30 WARNING Keep cover and/or safety guard closed. Rieber GmbH & Co. KG Configure dispenser for the respective crockery 7.5 Ultra dispenser REU … Adjust the dispenser to the weight of the crockery WARNING Only remove crockery at serving height. User tip For each dispenser pipe, 2x2 symmetrically arranged springs are not attached by the manufacturer. By being thus adapted to the intended use of the thermal/ultrasized dishes, the Ultra dispenser is already ready for use. ► With the Ultra dispenser, please ensure effective spring forces next to the external guides; for instance, release the 2 springs close to the centre towards the bottom. ► Hang out springs that are not required downwards; maintain top position. heat/ultralarge bowl Dispenser REU … Serving height Rieber GmbH & Co. KG 31 Configure dispenser for the respective crockery 7.6 Built-in dispenser E … WARNING Risk of fire concerning the heatable appliance when not observing the fire protection regulations. See ,‘Instructions for the installation of the built-in dispenser ERR …’ page 21 NOTE. Do not bend and/or damage the capillary tube for the thermostat to prevent significant material damage from occurring. Is located in the insulation hose for the switch panel. # Procedure Comply with the same rules as for the pipe dispenser. See ‘Safety instructions for configuration’, page 23 See ‘Pipe dispenser R …, page 26 32 Rieber GmbH & Co. KG Use 8 Use 8.1 Safety instructions on use Adhere to the guidelines for operation Inspect the appliance for visible damage before each use. A damaged mains cable must be replaced by a qualified electrician. The appliance must be disconnected from the power supply during cleaning or maintenance and when replacing parts. For the electrical appliance,a ground fault circuit interrupter of 30 mA is supplied upstream by the customer. Connect the appliance to a power socket that can be disconnected. The dispenser is configured to the parts to be stacked. The dispenser is only used for this purpose. There is no risk of confusion. To prevent injuries as a result of human error, any use in public and/or in the case of self-service is only admissible under supervision. Ensure that the temperature of the thermostatic regulator cannot be adjusted accidentally. Only use in dry rooms in the building. Only operate the appliance with adequate lighting. Prevent the appliance from rolling away accidentally using the two parking brakes. Prevent disruptions like crockery breakage. Bear in mind that also a small piece like a broken piece of crockery can obstruct or block the guide in the appliance. Risks may occur as a result. WARNING Only remove parts at serving height. Do not grip into the dispenser. Rieber GmbH & Co. KG 33 Use 8.2 Instructions for use # Loading dispenser with crockery NOTE The plastic basket is not suitable for heatable dispensers; This also applies for plastic baskets of standard commercial dish-washer quality. The plastic basket may be damaged and may also damage the dispenser. ► Do not use aplastic basket for heatable dispensers. WARNING Do not grip into the dispenser. Fill the dispenser with crockery evenly. To complete the procedure, closewith the cover. Press the flat cover downwards together with the crockery until it locks into place and twist to secure the position. To open the lid, press downwards and open the lock with your thumb. To close the lid, press strongly downwards until it locks into place. RR … REU … 34 Rieber GmbH & Co. KG Use # Switch on and temper dispenser electrical appliance. Applies to both heatable and coolable appliances. Press the rocker switch with the green indicator. ▌ The product is ready for operation in position I (ON); The indicator light is illuminated. WARNING Risk of burns and risk of fire within the heatable dispenser. Set the required temperature on the power controller. Estimate the heating/cooling time until the temperature is reached realistically. ▌ Option heatable: infinitely heatable from +35 °C to 110 °C ▌ Option coolable: infinitely coolable from room temperature to +2 °C; only concerns platform dispensers PK-Q...convection-cooled. ▌ Ultra stapler REU: infinitely heatable from +35 °C to 140 °C. The warming-up time from room temperature up to 120 °C with a full load of ultra-sized dishes is approximately 2.5 hours. # Removing crockery Only remove the lid directly before portioning. WARNING Do not grip into the dispenser. Remove crockery at serving height. In case of malfunction, lock the dispenser immediately. Serving height ‘Fault - What now?’, page 40 # Switch off dispenser electrical appliance Switch off dispenser electrical appliance at the rocker switch. Pull connector plug and insert into the mounting bracket for holding the electrical connector plug . ▌ The product is switched off in position O (OFF). The indicator will be off. # Clean dispenser if necessary See next chapter Rieber GmbH & Co. KG 35 Cleaning, Inspection 9 Cleaning, Inspection Inspection: Measures for the determination and evaluation of the actual state of a unit. 9.1 Safety instructions for cleaning, Inspection Avoid dangers due to electricity; concerns electrically powered dispensers. DANGER Danger of electric shock. Risk of death. ► Disconnect the appliance from the mains; disconnect the power supply unit. ► Never direct a jet of water at electrical components such as heater, controller or ventilation grille. ► Check the appliance and connection cable for any damage. ► Do not use a steam cleaning unit to clean electrical appliances. Doing so may allow moisture to get into the electrical system and cause a short circuit. ► Have electrical appliances inspected by a qualified electrician every six months 1. Avoid dangers due to hot parts or areas; concerns heatable dispensers. WARNING ≥ 110°C Risk of burns inside the heatable dispenser. You can burn your hands and arms on hot surfaces. ► Where possible wear protective gloves. ► Allow the appliance to cool down first. Prevent the risks of fire; concerns heatable and coolable dispensers. WARNING ≥ 110°C Risk of fire caused by fluff. Combustible materials like fluff in the ventilation zone can cause heat build-up and thus a fire. ► Keep the area adjacent to the heatable dispenser like ventilation grille on the coolable dispenser clean. 1 Source: DGUV Regulation 3. Electrical Systems and Equipment 36 Rieber GmbH & Co. KG Cleaning, Inspection Prevent risks when dealing with refrigerants; concerns coolable dispensers. CAUTION In the caseof humanerror in dealing with refrigerant R 134a, eye irritation and cardiovascular disorders are possible. Work on the cooling unit should only be carried out by authorised skilled personnel like a refrigeration specialist or a member of the Rieber Customer Service. Application tip The cooling unit may lose refrigerant. The loss of refrigerant may cause a reduced cooling performance right down to material damage. ► The manufacturer recommends an annual control. ► Contact a refrigeration specialist or the Rieber Customer Service. Observe the product labelling. WARNING Missing or damaged product identification can make human error more likely. ► Inspect the product identification for completeness and legibility. Contact ‘Sales & Service’ if necessary. ‘Note the product identification and ensure its preservation’, page 11 # Choose the correct cleaning method. ATTENTION Improper cleaning can damage surfaces and even render the device unusable. ► Do not scratch the surface with sharp-edgedobjects. Do not use sponges with a scratchy surface or steel wool or a steel brush. ► Do not use abrasive or aggressive cleaners, likefor instance baking oven spray. ► Do not mix standard cleaning agents; do not produce your own cleaning agent. ► Avoid extended exposure of stainless steel to liquid containing salt, as this can lead to surface discolouration and corrosion. ► Avoid direct, extended contact of stainless steel with corroding iron parts, i.e. kitchen sponge made of steel. Rieber GmbH & Co. KG 37 Cleaning, Inspection 9.2 Inspect , clean appliance, and keep it dry, ready for operation # Clean and service stainless steel parts. NOTE Improper cleaning can damage the surfaces of the device. ► Clean the appliance with a mild detergent diluted in hot water. After cleaning, rub surfaces dry with a soft cloth. User tip ► We recommend Rieber cleaning agent for stainless steel for cleaning stainless steel. ▌ It is an especially tough yet gentle cleaner, produces a dazzling shine, cleans and protects in one. # Clean and service plastic parts. NOTE Improper cleaning can cause damage to the surface. ► Clean the appliance with a mild detergent diluted in hot water. After cleaning, rub surfaces dry with a soft cloth. # Remove dirt from the inside the casing. 38 WARNING Risk of fire caused by fluff. Keepheatable dispenser and ventilation grille on the coolable dispenser clean. If necessary, clean with a hand brush, cloth or brush or vacuum cleaner. Rieber GmbH & Co. KG Cleaning, Inspection # If necessary, inspect and clean stacking unit. WARNING Only remove the empty stacking unit if the lifting device is in the top end position. Inspect. Watch outforpossible pieces of broken crockery, in particular in the areas of the crockery guides. # Clean casters NOTE Cleaning the casters incorrectly can damage them. Never clean the casters with a steam-jet blower, as this may cause lubricating grease to escape from the wheel bearings. ► Clean the casters with a hot, mild detergent diluted in water. After cleaning, rub surfaces dry with a soft cloth. # Keep ready for next use in dry condition. Dry the appliance. Allow residual moisture to escape. Store appliance at room temperature. Rieber GmbH & Co. KG 39 Fault - What now? 10 Fault - What now? DANGER Danger of electric shock. Dangerous electrical voltage. ► A damaged mains cable must be replaced by a qualified electrician. ► Do not use defective appliance; remove immediately. ► Have all electrical repairs carried out by an authorised electrician only. ► The appliance must be disconnected from the power supply during cleaning or maintenance and when replacing parts. Fault Possible cause Possible remedy When loading, the crockery falls below the ‘serving height’. Crockery not designed for this purpose. Parts are heavier. Load dispenser with the intended parts. Configure dispenser. # Operating staff Repair Connection line or connector plug damaged. Rocker switch defective. Mechanical forceful impact; appliance defective Built-in dispenser heats too much. Capillary tube for the thermostat bent and/or damaged. WARNING Do not touch or move the appliance. Disconnect appliance from the mains; for this, switch off on the fuse/switch box provided by the customer. Repair # # Casters / brakes defective Replace caster Overheating protection has tripped Crockery is not moved up Lifting device blocked. Piece of crockery got jammed in the springs. Wrong parts Qualified electrician Repair # Indicator lit up but appliance does not heat up Qualified electrician Specialist for mechanic´s work Repair # Qualified electrician WARNING Secure lifting device against bouncing up. Remove crockery carefully piece by piece. # User See following page 40 Rieber GmbH & Co. KG Fault - What now? WARNING A malfunction of the lifting device may cause various hazards. The blocking device may loosen unexpectedly. ► Please only use skilled personnel that have been especially instructed for this purpose. ► Remove the pieces of crockery very carefully. ► Secure the position with a massive object. Whereas stable position securing is to be ensured. Also see, ‘High mechanical forces impact the dispenser’, page 10 If the blocking unit is activated for unknown reason, proceed as follows: WARNING In a particularly unclear case, release the spring tension. For this, carefully lift up the lifting device a little. Secure the somewhat projecting position, for instance with 2 profiles. Separate the springs. Rieber GmbH & Co. KG 41 Warranty and liability Customer service, spare parts IMPORTANT Customer services needs information about the type and number of the appliance. If you have a fault you cannot remedy yourself, please get in touch with your Rieber partner or Rieber central customer services. # Disposing of your product Your appliance is made of high-quality material which can be reused / recycled. For disposal, disconnect an electrical appliance from the mains. Unplug the mains plug. Cut off the cable directly at the casing. Dispose of this product correctly via your local waste disposal company. WARNING Persons with impaired sensory and intellectual faculties may be locked in. ► When disposing of the appliance, destroy the locks on the lid of the Ultra dispenser. 11 Warranty and liability Any liability and warranty of the manufacturer is excluded when the information and instructions contained in the user manual are not observed and the product is not used according to the intended purpose, See chapter "Designated purpose of use" modifications and functional changes are carried out, no original spare parts are used. The "Sales and delivery terms and conditions" of Rieber GmbH & Co. KG shall apply for all warranty claims made against the manufacturer. The following wearing parts are not included in the warranty: 42 Caster, caster with brake, anti-shock wedge Rieber GmbH & Co. KG Excerpt from EC Declarations of Conformity 12 Excerpt from EC Declarations of Conformity # EC Declaration of Conformity according to EC Machinery Directive 2006/42/EC Rieber GmbH & Co. KG hereby declares that the products Pipe dispenser, convection-heated RR-U Platform dispenser, convection-cooled PK; Platform dispenser, convection-heated PU Ultra dispenser REU complies with the basic requirements of the EC Machinery Directive 2006/42/EC, Appendix II A, harmonised standards (DIN EN ISO 12100: Safety of Machinery ― General principles for design ― Risk assessment and risk minimisation # EC Declaration of Conformity in accordance with the Low-Voltage Directive 2014/35/EC Rieber GmbH & Co. KG hereby declares that the dispenser electrical appliance is in conformity with the basic requirements of the Low-Voltage Directive 2014/35/EC in terms of its electrical design. # EC Declaration of Conformity in accordance with the European Directive on Electromagnetic compatibility 2014/30/EC Rieber GmbH & Co. KG hereby declares that the dispenser electrical appliance is in conformity with the basic requirements of the European Electromagnetic Compatibility Directive 2014/30/EC in terms of its electrical designs. Rieber GmbH & Co. KG 43 Register 13 Register Adjust dispenser to the weight of the crockery ...... 24 Type description................................................ 13 Air vent .................................................................. 18 Pipe dispenser, square RE ................................... 14 Blocking system .................................................... 41 Type description................................................ 14 Built-in dispenser E Plastic basket........................................................ 34 Install dispenser on crockery............................. 32 Platform dispenser P......................................... 1, 15 Built-in dispenser ERR ...................................... 1, 17 Adjust the dispenser to the weight of the crockery ........................................................ 30 Type description................................................ 17 Built-in pipe ........................................................... 29 Capillary tube for the thermostat ............... 22, 32, 40 Clean casters ........................................................ 39 Clean stacking unit................................................ 39 Corner bumper ...................................................... 18 Exchange dispenser WE................................... 1, 14 Adjust the dispenser to the weight of the crockery ........................................................ 29 Platform dispenser PG, PK ................................... 16 Platform dispenser, circulating -heated ................. 16 Platform dispenser, circulating -heated PU ........... 16 Type description................................................ 16 Platform dispenser, open Type description................................................ 16 Platform dispenser, open PO ................................ 15 Type description................................................ 15 Adjusting the guide of the crockery ................... 28 Power controller .............................................. 18, 35 Type description................................................ 15 Protection class .................................................... 20 Exchange rod ........................................................ 28 Refrigerant ...................................................... 20, 37 Forces ....................................................... 10, 19, 41 Removing crockery ............................................... 35 Functionality .......................................................... 19 Rocker switch with a green indicator................. 9, 18 Guide bar Serving height ......................... 19, 24, 27, 29, 31, 40 Exchange dispenser ......................................... 28 Spring characteristic curve.................................... 19 Pipe dispenser .................................................. 26 Springs................................................ 24, 29, 40, 41 Guide blocked ....................................................... 10 Assessing requirements .............................. 27, 29 Heatable dispenser ........................................... 9, 35 Ranges of spring ............................................... 19 Install the crockery guide ...................................... 23 Spring tension ................................................... 41 Installation for the built-in dispenser ERR switch off ............................................................... 35 Installation ................................................... 21, 32 switch on ............................................................... 35 Lifting device ......................................................... 40 Swivel casters with brakes .................................... 20 Loading dispenser with crockery ........................... 34 temper................................................................... 35 Meal tray dispenser, circulating air-heated PU...... 16 Tension spring ................................................ 19, 20 Overheating protection .......................................... 40 Type plate ............................................................. 18 Pipe dispenser R............................................... 1, 13 Ultra dispenser REU ......................................... 1, 17 Adjust the dispenser to the weight of the crockery ........................................................ 27 Adjust the dispenser to the weight of the crockery ........................................................ 31 Adjusting the guide of the crockery ................... 26 Install dispenser on crockery ............................ 31 Pipe dispenser, round RR ..................................... 13 Type description................................................ 17 14 Contact address Rieber GmbH & Co. KG Hoffmannstraße 44 D72770 Reutlingen, Germany Phone +49 (0) 7121 518-0 44 Phone +49 (0) 7121 518-0 FAX +49 (0) 7121 518-302 Email [email protected] www.rieber.de Rieber GmbH & Co. KG