1
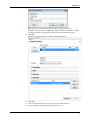
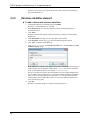
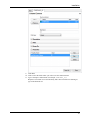
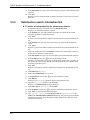
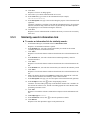
TIBCO Spotfire® Lead Discovery 4.5
Installation Manual
Important Information
SOME TIBCO SOFTWARE EMBEDS OR BUNDLES OTHER TIBCO SOFTWARE. USE OF SUCH
EMBEDDED OR BUNDLED TIBCO SOFTWARE IS SOLELY TO ENABLE THE FUNCTIONALITY
(OR PROVIDE LIMITED ADD-ON FUNCTIONALITY) OF THE LICENSED TIBCO SOFTWARE.
THE EMBEDDED OR BUNDLED SOFTWARE IS NOT LICENSED TO BE USED OR ACCESSED
BY ANY OTHER TIBCO SOFTWARE OR FOR ANY OTHER PURPOSE.
USE OF TIBCO SOFTWARE AND THIS DOCUMENT IS SUBJECT TO THE TERMS AND
CONDITIONS OF A LICENSE AGREEMENT FOUND IN EITHER A SEPARATELY EXECUTED
SOFTWARE LICENSE AGREEMENT, OR, IF THERE IS NO SUCH SEPARATE AGREEMENT,
THE CLICKWRAP END USER LICENSE AGREEMENT WHICH IS DISPLAYED DURING
DOWNLOAD OR INSTALLATION OF THE SOFTWARE (AND WHICH IS DUPLICATED IN
LICENSE_TIBCOSPOTFIRELEADDISCOVERY.PDF) OR IF THERE IS NO SUCH SOFTWARE
LICENSE AGREEMENT OR CLICKWRAP END USER LICENSE AGREEMENT, THE LICENSE(S)
LOCATED IN THE “LICENSE” FILE(S) OF THE SOFTWARE. USE OF THIS DOCUMENT IS
SUBJECT TO THOSE TERMS AND CONDITIONS, AND YOUR USE HEREOF SHALL
CONSTITUTE ACCEPTANCE OF AND AN AGREEMENT TO BE BOUND BY THE SAME.
This document contains confidential information that is subject to U.S. and international copyright laws
and treaties. No part of this document may be reproduced in any form without the written authorization of
TIBCO Software Inc.
TIBCO and Spotfire are either registered trademarks or trademarks of TIBCO Software Inc. and/or
subsidiaries of TIBCO Software Inc. in the United States and/or other countries. All other product and
company names and marks mentioned in this document are the property of their respective owners and are
mentioned for identification purposes only. This software may be available on multiple operating systems.
However, not all operating system platforms for a specific software version are released at the same time.
Please see the readme.txt file for the availability of this software version on a specific operating system
platform.
THIS DOCUMENT IS PROVIDED “AS IS” WITHOUT WARRANTY OF ANY KIND, EITHER
EXPRESS OR IMPLIED, INCLUDING, BUT NOT LIMITED TO, THE IMPLIED WARRANTIES OF
MERCHANTABILITY, FITNESS FOR A PARTICULAR PURPOSE, OR NON-INFRINGEMENT.
THIS DOCUMENT COULD INCLUDE TECHNICAL INACCURACIES OR TYPOGRAPHICAL
ERRORS. CHANGES ARE PERIODICALLY ADDED TO THE INFORMATION HEREIN; THESE
CHANGES WILL BE INCORPORATED IN NEW EDITIONS OF THIS DOCUMENT. TIBCO
SOFTWARE INC. MAY MAKE IMPROVEMENTS AND/OR CHANGES IN THE PRODUCT(S)
AND/OR THE PROGRAM(S) DESCRIBED IN THIS DOCUMENT AT ANY TIME.
Copyright © 1996- 2012 TIBCO Software Inc. ALL RIGHTS RESERVED.
THE CONTENTS OF THIS DOCUMENT MAY BE MODIFIED AND/OR QUALIFIED, DIRECTLY
OR INDIRECTLY, BY OTHER DOCUMENTATION WHICH ACCOMPANIES THIS SOFTWARE,
INCLUDING BUT NOT LIMITED TO ANY RELEASE NOTES AND "READ ME" FILES.
TIBCO Spotfire is covered by U.S. Patent No. 6,014,661 and U.S. Patent No. 7, 216,116.
Other patent(s) pending. TIBCO Software Inc. Confidential Information
Table of Contents
1
1.1
2
2.1
2.2
2.3
2.4
3
3.1
3.2
3.3
3.4
3.5
3.6
INTRODUCTION ........................................................................................................ 1
Prerequisites ..................................................................................................................................... 1
INSTALLATION ......................................................................................................... 2
Installation Overview ......................................................................................................................... 2
Deploying the Distribution Package .................................................................................................. 2
Setting up Licenses ........................................................................................................................... 3
Web Player Considerations............................................................................................................... 4
CONFIGURATION ..................................................................................................... 5
Prerequisites ..................................................................................................................................... 5
Configuration Overview ..................................................................................................................... 7
Defining column elements ................................................................................................................. 8
Creating filter elements ................................................................................................................... 14
Creating information links ................................................................................................................ 17
Verifying the configuration............................................................................................................... 27
4
TESTING THE INSTALLATION .............................................................................. 28
5
APPENDIX ............................................................................................................... 30
iii
Introduction
1
Introduction
This manual explains how to install and set up the TIBCO Spotfire® Lead Discovery modules
at your site. These modules provide the following extensions to the TIBCO Spotfire core
functionality:
• Ability to open an SDFile and view its fields in the table visualization, including the
molecular structures.
• Ability to export data to an SDFile.
• Use the Structure Viewer to view the structures, create, export, and import ID lists.
Note: The Structure Viewer is not available in the Web Player.
• Search on structures using the similarity and substructure search algorithms of the
supported chemistry cartridges. See http://support.spotfire.com/sr.asp for more
information about system requirements for TIBCO Spotfire Lead Discovery.
1.1
Prerequisites
This Installation Manual explains the steps required to deploy and set up TIBCO Spotfire Lead
Discovery, based on the assumption that you have previously performed the following tasks:
1. Installed the TIBCO Spotfire Server at your site.
2. Deployed the core Distribution Package and Installation Documentation to the TIBCO
Spotfire Server.
3. Installed one or more of the supported structure renderers on the client computers. See
http://support.spotfire.com/sr.asp for more information about supported renderers and
editors.
Tip: Tasks 1 and 2 are explained in detail in the TIBCO Spotfire® Deployment and
Administration Manual.
1
TIBCO Spotfire Lead Discovery 4.5 – Installation Manual
2
2.1
Installation
Installation Overview
The actual features and functionality of TIBCO Spotfire Lead Discovery are contained in the
software packages. These packages are bundled into a distribution which is deployed on the
TIBCO Spotfire Server.
When the end users start Spotfire on their computers, they will log into the Spotfire Server and
download the deployment locally, automatically downloading any newer or added packages.
Depending on the licenses that are enabled for each user, varying features may appear in each
user's application.
There are some initial steps you must perform when deploying Spotfire Lead Discovery on a
Spotfire Server. These are:
1. Deploying the distribution package.
2. Setting up licenses.
3. Configuring information links.
4. Verifying the configuration.
Please follow the instructions in this manual carefully.
2.2
Deploying the Distribution Package
Note: For additional details on deploying new packages, refer to the TIBCO® Spotfire®
Deployment and Administration Manual.
► Deploying the extension package to the server:
1.
2.
3.
4.
Select the Environment to which you want to deploy Lead Discovery.
Note: The Environment you select must have a functioning TIBCO Spotfire
deployment.
5.
Click the Add button.
Response: An Add to Deployment dialog appears.
6.
Click the Browse button.
Response: A File Upload dialog appears.
Browse to the LeadDiscovery.spk file you want to include in the deployment. (The
LeadDiscovery.spk is included in the downloaded zip file.)
7.
8.
9.
2
Open the Administration Console located at http://spotserver/spotfire/administration
(where spotserver is the name of one of your spotfire servers) in a web browser
Log in as a Spotfire Admin.
Select the tab Deployment.
Click OK in the Add to Deployment dialog to upload and add the file to the
distribution.
Response: The list of packages is updated with the contents of the file.
Click the Validate button in the lower left corner to make sure the deployment is not
damaged or corrupted in any way.
Installation
10. Click the Save button in the lower left corner to save and publish the deployment.
Response: The Save Deployment dialog appears.
11. Enter a version number and a description for the deployment, for instance, 4.5.0 and
TIBCO Spotfire with Lead Discovery and click the OK button.
2.3
Setting up Licenses
All Spotfire Lead Discovery users must have certain license functions enabled in order to use
the all new functionalities like viewing structures, opening SDFiles, exporting data to SDFiles
and conducting a structure search. If you are using anonymous/preconfigured authentication,
then the preconfigured single user that has been set up must have these license functions.
You can configure licenses from the TIBCO Spotfire Administration Manager.
At present, these are the license functions that are relevant for Spotfire Lead Discovery:
• Access to Extensions - this license function is needed in order to use any extension to
TIBCO Spotfire.
• Accord - this license function is needed for a user to be able to change the settings for
chemical structures in the Spotfire visualizations using the Accord Chemistry Control
renderer.
• ChemDraw - this license function is needed for a user to be able to change the settings
for chemical structures in the Spotfire visualizations using the ChemDraw renderer and
editor.
• ChemIQ - this license function is needed for a user to be able to change the settings
for chemical structures in the Spotfire visualizations using the ChemIQ renderer.
• ChemistryViewer - this license function is needed to open the Structure Viewer from
the menu and toolbar in new analyses.
• ExportToSDF - this license function is needed for a user to be able to reach the
Export to SDFile functionality from a Spotfire table visualization.
• Marvin - this license function is needed for a user to be able to change the settings for
chemical structures in the Spotfire visualizations using the MarvinSketch renderer and
editor.
• SDFParser - this license function is needed to open an SDFile in a new analysis.
• StructureSearch - this license function is needed to reach the structure search
functionality.
• Symyx® Draw (MDL) - this license function is needed for a user to be able to change
the settings for chemical structures in the Spotfire visualizations using the Symyx®
Draw (MDL) renderer and editor.
► To Configure License Functions:
1.
2.
3.
4.
5.
Start TIBCO Spotfire and log in as an administrator.
Select Tools > Administration Manager.
Select the Groups and Licenses tab.
Click on the Licenses tab in the right hand pane.
For each group of users that will use Spotfire Lead Discovery, click the Edit button,
select the check boxes for the above mentioned license functions and click OK.
3
TIBCO Spotfire Lead Discovery 4.5 – Installation Manual
2.4
Web Player Considerations
If TIBCO Spotfire for Lead Discovery is going to be used by Spotfire Web Player users, you
also need some preparations to the Spotfire Web Player server.
1. Use the upgrade tool to upgrade the Web Player server with the new packages. See the
TIBCO Spotfire Web Player Installation Manual, chapter “Deploying Extensions and
Upgrades” for more information.
2. Make sure that at least one of the supported renderers is installed on the Web Player
server, and test that rendering of chemical structures is working. Using TIBCO
Spotfire Lead Discovery with the TIBCO Spotfire Web Player requires the use of a
renderer that supports the Operating System the Web Player runs on. Check the system
requirements for the renderer before installing. For renderer system requirements,
please refer to the respective renderer provider.
4
Installation
3
Configuration
In order to be able to search for structures and also to connect to large structure databases
through the tools of TIBCO Spotfire Lead Discovery, it is necessary to set up information
links and filters with a set of specific properties using the Information Designer. Please follow
the instructions below carefully to ensure that all functionality will be available.
Note: Make sure that one or more of the supported structure data sources are installed at your
site. The current release of Spotfire Lead Discovery supports a number of different Oracle
cartridges. See http://support.spotfire.com/sr.asp for more information about the supported
cartridges.
Tip: For more information about creating and configuring information links, refer to the
following sections of the TIBCO Spotfire - User's Manual: “Information Links”, “Data
Sources”, “Folders”, “Column Elements”, “Filter Elements”.
3.1
Prerequisites
Before you start configuring the information links for Spotfire Lead Discovery, you need to
have completed the following tasks:
1.
Setting up the data sources.
Enter the information required to connect to the structure databases through the Data
Source tab in Information Designer.
The Connection URL template for an Oracle JDBC driver is as follows:
jdbc:oracle:thin:@<host>:<port>:databaseName=<database>
For an Oracle DataDirect driver, the template to use is:
jdbc:tibcosoftwareinc:oracle://<host>:<port1521>;SID=<sid>
Add your own host name, port number and database name to the specified locations.
The chemistry cartridges require the following settings in the Data Source tab, under
Connection initialization:
•
•
•
•
For Symyx® Direct (MDL): select cdcaux.ctenvinit(‘schema.dbname’) from dual.
(Replace ‘schema.dbname’ with the name of your schema and database).
For Accord: select 1 from dual.
For JCHEM: select 1 from dual.
For ChemXtra: select 1 from dual.
Tip: For more details about data sources in TIBCO Spotfire, refer to section “Data
Sources” of the TIBCO Spotfire - User's Manual.
Note: To configure the information links for Spotfire Lead Discovery successfully and
to be able to view and search structures, you need to know the columns in the database
tables which store the following information:
•
•
Chemical structures.
Unique identifiers of the structures.
5
TIBCO Spotfire Lead Discovery 4.5 – Installation Manual
2.
3.
Creating folders for storing elements and set permissions.
Information links, and the elements that are used for creating them, are stored in the
library. Different groups of users can be given different levels of access to data by
specifying what permission level each user group should have for each folder in the
library.
Create a new folder for the elements required for configuring the information links for
Spotfire Lead Discovery, or add the elements to an existing folder.
Tip: For more details about folders in the TIBCO Spotfire library, refer to section
“Folders” of the TIBCO Spotfire - User's Manual.
Combining tables by creating joins.
If you want to work with data from different database tables, you first need to create
joins.
Tip: For more details about joins in TIBCO Spotfire, refer to section “Joins” of the
TIBCO Spotfire - User's Manual.
6
Installation
3.2
Configuration Overview
To configure Spotfire Lead Discovery, you must define a coherent set of elements:
1.
•
•
•
Define column elements from the columns of the database tables which return:
Chemical structures.
Unique identifiers of the structures.
Similarity scores for chemical structures.
2.
•
•
Create filter elements to be used for each search algorithm:
Substructure search filter.
Similarity search filter.
These filter elements correspond to the WHERE-statements in the resulting SQL used
to retrieve the results from a search.
3.
•
•
•
Create information links:
Information link to use for retrieving structures based on the list of identifiers.
Information link to use for substructure search.
Information link to use for similarity search.
The information links needed for a structure search always come in pairs of one
retrieve link and one structure search link. These two information links must have a
matching prefix on their defined properties.
The definition of the elements, including specification of certain properties and prompts, is
required to make the search and retrieve functionality in TIBCO Spotfire for Lead Discovery
work. Read more about this in the following chapters.
The resulting tree structure in the library should look something like this:
All these configurations are performed using the Information Designer tool. See the following
chapters for details.
► To reach the Information Designer:
1.
Select Tools > Information Designer.
Response: The Information Designer is opened.
7
TIBCO Spotfire Lead Discovery 4.5 – Installation Manual
3.3
Defining column elements
Define the column elements to use when creating the required information links:
Column containing:
Property name:
Property value:
Chemical structures
ContentType
chemical/x-mdl-molfile
chemical/x-mdl-chime
chemical/x-daylight-smiles
Unique identifiers of the structures
<prefix>.Column
ID
Similarity scores for chemical
structures
<prefix>.Column
SimilarityScore.
Details for defining these column elements follow below.
3.3.1
Chemical structures element
The information below is an example of how to set up the column element containing chemical
structures for a Symyx® Direct (MDL) cartridge, creating a molfile structure column. If you are
using another cartridge or another MIME type, the expressions entered will be different. See the
documentation from your cartridge provider for more information about valid expressions.
► To add a column with chemical structures:
1.
2.
3.
4.
5.
6.
7.
8.
9.
8
In Information Designer, click New and select Column.
Response: A Column Element tab is opened.
In the Data Sources tree, select the column (leaf node) containing chemical structures.
Click Add >.
Response: The selected element is added to the Source columns list on the Column
Element tab.
If you are accessing a Symyx® MDL cartridge, type the following in the Expression
field:
molfile(%1)
If you are accessing an IDBS ChemXtra cartridge, type the following in the
Expression field:
CONVERT_MOLECULE(%1, IDBS_MOLECULE.SMILES)
Comment: For other cartridges, leave %1 in the expression field and proceed to the
next step. If you want to convert the column to other MIME types, please see the
documentation from the cartridge provider for more information.
Select Clob as the Data type of the column element.
Comment: For other cartridges this element may be of the Blob data type. See the
documentation from your cartridge provider for details on what data type your data
source or the expression used returns. The Information Designer automatically
displays the returned data type from the data source when you add a single column to
the column element tab but it is not updated as you add an expression.
In the Description field, type your own description of the column.
to show the column properties controls.
In the Properties section, click
Click Add… to add the column property.
Type ContentType for the Property name and chemical/x-mdl-molfile
for the Value in the Add Column Property dialog:
Installation
Note: No prefix is allowed for the property name of the structure column.
Comment: The value must be a MIME type string as defined in the table above. Make
sure that the content type matches the output from the expression defined above.
10. Click OK.
Response: The column property is displayed in the properties list.
11. Click Save.
12. Click to select the folder where you wish to save the column element.
13. Type a descriptive column name (for example, MOLFILE).
9
TIBCO Spotfire Lead Discovery 4.5 – Installation Manual
Response: The column is saved in the library and is shown with an icon denoting its
type in the Elements tree.
3.3.2
Structure identifier element
► To add a column with structure identifiers:
1.
2.
3.
4.
5.
6.
7.
8.
10
In Information Designer, click New and select Column.
Response: A Column Element tab is opened.
In the Data Sources tree, select the column (leaf node) containing identifiers of
chemical structures.
Click Add >.
Response: The selected element is added to the Source columns list on the Column
Element tab.
In the Description field, type your own description of the column.
to show the column properties controls.
In the Properties section, click
Click Add… to add the column property.
Type <prefix>.Column for the Property Name and ID for the Value in the Add
Column Property dialog:
Note: While the second part of the property name is pre-defined and you must assign it
without changes (for the identifier column, this is Column), you can use an arbitrary
prefix for the element properties (for example, LeadDiscovery).
One set of elements (as shown in the Configuration Overview chapter) should always
use one and the same property prefix. If you want to configure alternative information
links you can create more than one set of elements (e.g., to set up information links
running against different data tables). However, each set of elements should always
use its own property prefix.
Click OK.
Response: The column property is displayed in the properties list.
Installation
9. Click Save.
10. Click to select the folder where you wish to save the column element.
11. Type a descriptive column name (for example, COMPOUND_ID).
Response: The column is saved in the library and is shown with an icon denoting its
type in the Elements tree.
11
TIBCO Spotfire Lead Discovery 4.5 – Installation Manual
3.3.3
Similarity score element
The information below is an example of how to set up the similarity score column element for a
Symyx® Direct (MDL) cartridge. If you are using another cartridge the expressions entered
will be different. See the table below this step instruction or the documentation from your
cartridge provider for more information about valid expressions.
► To add a column with similarity score values:
1.
4.
5.
In Information Designer, click New and select Column.
Response: A Column Element tab is opened.
In the Data Sources tree, select the column (leaf node) containing chemical structures
indexed by the cartridge.
Click Add >.
Response: The selected element is added to the Source columns list on the Column
Element tab.
In the Description field, type your own description of the column.
Type the following expression in the Expression field:
molsim(%1, ?structure, ?similarity_type)
where molsim is the Symyx® Direct (MDL) similarity search operator extracting
similarity values for chemical structures, structure is the parameter for the
query structure, and similarity_type is the parameter for the similarity search
type.
Comment: See the table below for a description of the search expressions to use on
other cartridges.
6.
Select Real as the Data type of the column element.
7.
8.
9.
In the Properties section, click
to show the column properties controls.
Click Add… to add the column property.
Type <prefix>.Column for the Property Name and SimilarityScore for the
Value in the Add Column Property dialog:
2.
3.
Note: While the second part of the property name is pre-defined and you must assign it
without changes (for the similarity score column, this is Column), you can use an
arbitrary prefix for the element properties (for example, LeadDiscovery).
One set of elements (as shown in the Configuration Overview chapter) should always
use one and the same property prefix. If you want to configure alternative information
links you can create more than one set of elements (e.g., to set up information links
running against different data tables). However, each set of elements should always
use its own property prefix.
10. Click OK.
Response: The column property is displayed in the properties list.
12
Installation
11. Click Save.
12. Click to select the folder where you wish to save the column element.
13. Type a descriptive column name (for example, MOLSIM).
Response: The column is saved in the library and is shown with an icon denoting its
type in the Elements tree.
Cartridge
Expression
Symyx® Direct Cartridge
(MDL)
molsim(%1,?structure,?similarity_type)
Accelrys Accord Chemistry
Cartridge
ChemistryMatches(%1, sssConst.MatchTanimoto,
?structure)*100
ChemAxxon JChem Oracle
Cartridge
(1- jchem.jc_dissimilarity(%1,
jchem.jcf.molconvert(?structure, 'smiles:au')))*100
IDBS ChemXtra Cartridge
SIM(%1, ?structure, IDBS_MOLECULE.TANIMOTO,
IDBS_MOLECULE.DELETE_HANDLE) * 100
13
TIBCO Spotfire Lead Discovery 4.5 – Installation Manual
3.4
Creating filter elements
Create filter elements with descriptive names to be applied when creating information links:
1. Substructure search filter
2. Similarity search filter
The information below is an example of how to set up the filter elements for a Symyx® Direct
(MDL) cartridge. If you are using another cartridge the expressions entered will be different.
See the tables below each step instruction or the documentation from your cartridge provider
for more information about valid expressions (WHERE-statements).
3.4.1
Substructure search filter
► To create a substructure search filter:
1.
2.
3.
4.
5.
14
In Information Designer, click New and select Filter.
Response: A Filter Element tab is opened.
In the Data Sources tree, select the column containing chemical structures indexed by
the cartridge, to use in the filter condition.
Click Add >.
Response: The selected column is added to the Source columns list on the Filter
Element tab.
Define the following filter condition in the Expression field:
sss(%1, ?structure)=1
where sss is the Symyx® Direct (MDL) substructure search operator, and
structure is the parameter for the query structure.
Comment: See the table below for a description of the search expressions to use on
other cartridges.
In the Description field, type your own description of the filter.
Installation
6.
7.
8.
9.
3.4.2
Click Save.
Response: The Save As dialog is displayed.
Click to select the folder where you wish to save the filter element.
Type a descriptive filter name (for example, SubstructureFilter).
Click Save.
Response: The filter element is saved in the library.
Cartridge
Search expression
Symyx® Direct Cartridge (MDL)
sss(%1, ?structure)=1
Accelrys Accord Chemistry Cartridge
ChemistryMatches(%1, sssConst.MatchSub,
?structure) = 1
ChemAxxon JChem Oracle Cartridge
jchem.jc_compare(%1, ?structure, 't:s
stereoSearch:n')=1
IDBS ChemXtra Cartridge
SSS(%1, ?structure,
IDBS_MOLECULE.IGNORE_STEREO) = 1
Similarity search filter
► To create a similarity search filter:
1.
In Information Designer, click New and select Filter.
Response: A Filter Element tab is opened.
2. In the Data Sources tree, select the column containing chemical structures indexed by
the cartridge to use in the filter condition.
3. Click Add >.
Response: The selected column is added to the Source columns list on the Filter
Element tab.
4. Define the following filter condition in the Expression field:
molsim(%1,?structure,?similarity_type) BETWEEN
?similarity_lower AND ?similarity_upper
where molsim is the Symyx® Direct (MDL) similarity search operator extracting
similarity values for chemical structures, structure is the parameter for the query
structure, similarity_type is the parameter for the similarity search type,
similarity_lower is the parameter for the lower limit of the similarity rate range,
and similarity_upper is the parameter for the upper limit of the similarity rate
range.
Comment: See the table below for a description of the search expressions to use on
other cartridges.
15
TIBCO Spotfire Lead Discovery 4.5 – Installation Manual
5.
6.
7.
8.
9.
16
In the Description field, type your own description of the filter.
Click Save.
Response: The Save As dialog is displayed.
Click to select the folder where you wish to save the filter element.
Type the filter name (for example, SimilarityFilter).
Click Save.
Response: The filter element is saved in the library.
Cartridge
Search expression
Symyx® Direct Cartridge
(MDL)
molsim(%1,?structure,?similarity_type) BETWEEN
?similarity_lower AND ?similarity_upper
Accelrys Accord Chemistry
Cartridge
ChemistryMatches(%1, sssConst.MatchTanimoto,
?structure)*100 BETWEEN ?similarity_lower AND
?similarity_upper
ChemAxxon JChem Oracle
Cartridge
(1- jchem.jc_dissimilarity(%1,
jchem.jcf.molconvert(?structure, 'smiles:au')))*100
BETWEEN ?similarity_lower AND ?similarity_upper
IDBS ChemXtra Cartridge
SIM(%1, ?structure , IDBS_MOLECULE.TANIMOTO,
IDBS_MOLECULE.DELETE_HANDLE) * 100 between
?similarity_lower and ?similarity_upper
Installation
3.5
Creating information links
Three information links are needed to use the structure search functionality:
1. An information link to use for retrieving structures based on the list of identifiers.
2. An information link to use for substructure search.
3. An information link to use for similarity search.
3.5.1
Retrieve information link
► To create an information link for retrieving structures:
Note: You must always create this information link. If you want to apply both similarity search
and substructure search then this information link can be used as the retrieve link for both
search types, provided that all three information links use the same property prefix.
1. In Information Designer, click New and select Information Link.
Response: An Information Link tab is opened.
2. In the Elements tree, select the column element that you created for the column
containing identifiers of chemical structures.
3. Click Add >.
Response: The selected element is added to the Elements list on the Information Link
tab.
4. In the Elements tree, select the column element that you created for the column
containing chemical structures.
5. Click Add >.
Response: The selected element is added to the Elements list on the Information Link
tab.
Tip: In this information link, you can also add other columns from the database. These
columns will be displayed when you choose to create a new data table from a list of
search results.
6. Make sure that the check box in the Retrieve column of the Elements list is selected
for both elements.
7. In the Description field, type your own description of the information link (optional).
to show the prompting controls.
In the Prompts section, click
Click Add.
Comment: If you have included more columns than the required ones, the Add
Column dialog is displayed. In that case, select the identifier column and click OK.
Response: The identifier column is added to the Prompts list on the Information Link
tab.
10. Set Prompt Type to Values.
11. Make sure that Mandatory box is cleared.
8.
9.
12. In the Properties section, click
to show the information link properties controls.
13. Click Add… to add the information link property.
14. Type <prefix>.Retrieve for the Property name and Structure for the
Value in the Add Information Link Property dialog. This property specifies that the
information link will be shown among the available links in the Configure Structure
Connection dialog.
17
TIBCO Spotfire Lead Discovery 4.5 – Installation Manual
Note: While the second part of the property name is pre-defined and you must assign it
without changes (for the structure retrieval link, this is Retrieve), you can use an
arbitrary prefix for the element properties (for example, LeadDiscovery).
One set of elements (as shown in the Configuration Overview chapter) should always
use one and the same property prefix. If you want to configure alternative information
links you can create more than one set of elements (e.g., to set up information links
running against different data tables). However, each set of elements should always
use its own property prefix.
15. Click OK.
Response: The link property is displayed in the properties list.
18
Installation
16. Click Save.
Response: The Save As dialog appears.
17. Select where you want the information link to be saved.
18. In the Name field, type a name for the information link (for example, Structures).
19
TIBCO Spotfire Lead Discovery 4.5 – Installation Manual
19. In the Description field, type some text describing the purpose of the information link
(optional).
20. Click Save.
Response: The new information link is added to the library. It can now be accessed by
other users.
3.5.2
Substructure search information link
► To create an information link for substructure search:
1.
2.
3.
4.
5.
6.
7.
In Information Designer, click New and select Information Link.
Response: An Information Link tab is opened.
In the Elements tree, select the column element that you created for the column
containing identifiers of chemical structures.
Click Add >.
Response: The selected element is added to the Elements list on the Information Link
tab.
In the Elements tree, select the filter element that you created for the substructure
search.
Click Add >.
Response: The selected element is added to the Elements list on the Information Link
tab.
Make sure that the check box in the Retrieve column of the Elements list is selected
for the structure identifier column element.
In the Description field, type your own description of the information link (optional).
to show the prompting controls.
In the Prompts section, click
Comment: You must add a prompt step on the identifier column. This is needed to be
able to limit the search to a list, instead of searching against the entire database when
performing a structure search.
9. Click Add.
Response: The identifier column is added to the Prompts list on the Information Link
tab.
10. Set Prompt Type to Values.
11. Make sure that Mandatory box is cleared.
8.
12. In the Parameters section, click
to show the parameters controls.
13. Click Refresh.
Response: The structure parameter appears in the parameters list.
14. Select the structure parameter and click Edit….
Response: The Edit Parameter dialog is displayed.
15. Set the Data type to Undefined and click OK.
16. In the Properties section, click
to show the information link properties controls.
17. Click Add… to add the information link property.
18. Type <prefix>.Search for the Property Name and Substructure for the
Value in the Add Information Link Property dialog. This property specifies that the
information link will be shown among the available Substructure search links in the
Structure Search dialog.
20
Installation
Note: While the second part of the property name is pre-defined and you must assign it
without changes (for the substructure search link, this is Search), you can use an
arbitrary prefix for the element properties (for example, LeadDiscovery).
One set of elements (as shown in the Configuration Overview chapter) should always
use one and the same property prefix. If you want to configure alternative information
links you can create more than one set of elements (e.g., to set up information links
running against different data tables). However, each set of elements should always
use its own property prefix.
19. Click OK.
Response: The link property is displayed in the properties list.
21
TIBCO Spotfire Lead Discovery 4.5 – Installation Manual
22
Installation
20. Click Save.
Response: The Save As dialog appears.
21. Select where you want the information link to be saved.
22. In the Name field, type a name for the information link (for example,
SubstructureSearch).
23. In the Description field, type some text describing the purpose of the information link
(optional).
Comment: It might be a good idea to note that this information link is to be used in the
Structure Search tool only, and not to retrieve any data directly into TIBCO Spotfire
(this might help to avoid confusion among the end users).
24. Click Save.
Response: The new information link is added to the library. It can now be accessed by
other users.
3.5.3
Similarity search information link
► To create an information link for similarity search:
1.
2.
3.
4.
5.
6.
7.
8.
9.
In Information Designer, click New and select Information Link.
Response: An Information Link tab is opened.
In the Elements tree, select the column element that you created for the column
containing identifiers of chemical structures.
Click Add >.
Response: The selected element is added to the Elements list on the Information Link
tab.
In the Elements tree, select the column element containing similarity values for
chemical structures.
Click Add >.
Response: The selected element is added to the Elements list on the Information Link
tab.
In the Elements tree, select the filter element that you created for the similarity search.
Click Add >.
Response: The selected element is added to the Elements list on the Information Link
tab.
Make sure that the check box in the Retrieve column of the Elements list is selected
for the structure identifiers and similarity values column elements.
In the Description field, type your own description of the information link (optional).
to show the prompting controls.
10. In the Prompts section, click
Comment: You must add a prompt step on the identifier column. This is needed to be
able to limit the search to a list, instead of searching against the entire database when
performing a structure search.
11. Click Add.
Response: The identifier column is added to the Prompts list on the Information Link
tab.
12. Set Prompt Type to Values.
13. In the Parameters section, click
to show the parameters controls.
14. Click Refresh.
Response: Four filter parameters appear in the parameters list:
23
TIBCO Spotfire Lead Discovery 4.5 – Installation Manual
15.
16.
17.
18.
19.
20.
Comment: In this example, a Symyx® (MDL) cartridge has been used. For other
cartridges some of the parameters above may be missing.
Select the similarity_lower parameter and click Edit.
Response: The Edit Parameter dialog is displayed.
Set the Data type to Integer and click OK.
Select the similarity_upper parameter and click Edit.
Response: The Edit Parameter dialog is displayed.
Set the Data type to Integer and click OK.
Select the structure parameter and click Edit.
Response: The Edit Parameter dialog is displayed.
Set the Data type to Undefined and click OK.
21. In the Properties section, click
to show the information link properties controls.
22. Click Add to add the information link property.
23. Type <prefix>.Search for the Property name and Similarity for the Value
in the Add Information Link Property dialog. This property specifies that the
information link will be shown among the available Similarity search links in the
Structure Search dialog.
Note: While the second part of the property name is pre-defined and you must assign it
without changes (for the similarity search link, this is Search), you can use an
arbitrary prefix for the element properties (for example, LeadDiscovery).
One set of elements (as shown in the Configuration Overview chapter) should always
use one and the same property prefix. If you want to configure alternative information
links you can create more than one set of elements (e.g., to set up information links
running against different data tables). However, each set of elements should always
use its own property prefix.
24. Click OK.
Response: The link property is displayed in the properties list.
25. Again, click Add to add another information link property.
26. Type LeadDiscovery.StructureSearch.ParameterType for the
Property name and the expression corresponding to the chosen cartridge found in the
table below, for the Value. This property ensures that the correct Parameters dialog in
the Structure Search is available for the chosen cartridge.
24
Installation
Cartridge
Value expression
Symyx® Direct
Cartridge (MDL)
LeadDiscovery.SymyxDirect.SimilaritySearch
Accelrys Accord
Chemistry Cartridge
LeadDiscovery.Accord.SimilaritySearch
ChemAxxon JChem
Oracle Cartridge
LeadDiscovery.JChem.SimilaritySearch
IDBS ChemXtra
Cartridge
LeadDiscovery.ChemXtra.SimilaritySearch
Note: If you do not perform steps 25 and 26 in this list, a default Parameters dialog is
used.
27. Click OK.
Response: The link property is displayed in the properties list.
25
TIBCO Spotfire Lead Discovery 4.5 – Installation Manual
26
Installation
28. Click Save.
Response: The Save As dialog appears.
29. Select where you want the information link to be saved.
30. In the Name field, type a name for the information link (for example,
SimilaritySearch).
31. In the Description field, type some text describing the purpose of the information link
(optional).
Comment: It might be a good idea to note that this information link is to be used in the
Structure Search tool only, and not to retrieve any data directly into TIBCO Spotfire
(this might help to avoid confusion among the end users).
32. Click Save.
Response: The new information link is added to the library. It can now be accessed by
other users.
3.6
Verifying the configuration
In the Elements tree, you should now observe the created elements (columns, filters, and
information links). For example:
27
TIBCO Spotfire Lead Discovery 4.5 – Installation Manual
4
Testing the Installation
Perform the following procedures to verify that your installation of Spotfire Lead Discovery
works as intended.
► To open an SDFile:
1.
2.
Click on the Open button on the toolbar, or select File > Open....
Browse to the SDFile of interest and click Open.
Response: You will see the table containing the fields of the SDFile, including
structures.
► To export data from a visualization:
1.
2.
3.
4.
5.
6.
7.
Right-click on a table with structures and select Export to SDFile....
Select whether to export all rows, marked rows or filtered rows only:
All rows - export every row in the data table regardless of filtering.
Marked rows - export the marked rows only.
Filtered rows - export the rows remaining after filtering only.
Select the column containing structures from the drop-down list.
Comment: The SDFile format supports only one structure per record. You may select
any column in the table that contains structures. The first column containing structures
will be displayed as the default choice.
Use the Add, Remove, and Remove All buttons to select the columns to be exported
with the structure.
Use the Move Up and Move Down buttons to specify the order of columns in the
SDFile.
Click OK.
In the Save As dialog, specify a filename and where you want to save the file and click
Save.
► To reach the Structure Viewer:
1.
Select a table visualization that contains structures.
Comment: If you have not previously opened the visualization with structures, the
Structure Viewer button and the corresponding menu item may be inactive.
2.
.
Click on the Structure Viewer button on the toolbar,
Comment: You can also select View > Structure Viewer from the menu.
Response: The Configure Structure Connection dialog is displayed.
Select the columns in the analysis containing molecular structures and identifiers.
(You can also select to retrieve the structures from an information link.)
Note: TIBCO Spotfire Lead Discovery expects the ID column to uniquely identify a
structure, so that no two structures have the same value of ID. If several structures
have the same value in the ID column, only one of them will be shown in the Structure
Viewer. To indicate this, the shown structure will be marked as “ambiguous”.
Click OK.
Response: The Structure Viewer is displayed.
Mark or highlight compounds in a visualization.
Response: When there are no marked rows, the structure from the currently
highlighted row in the data table is displayed in the Structure Viewer pane of the
Structure Viewer, and its identifier is displayed in the List Content pane. When there
are marked rows, the structures from the marked rows are displayed in the Structure
Viewer pane and their identifiers are displayed in the List Content pane. When you
3.
4.
5.
28
Testing the Installation
highlight a marked row, its corresponding identifier and structure will be highlighted
in the Structure Viewer and List Content panes.
► To search for compounds in the structure database:
1.
In the Structure Viewer or in a table visualization with structures, click to activate the
compound on which you want to base the search.
2. Right-click on the structure and select Structure Search… from the pop-up menu.
Comment: You can also select Tools > Structure Search… from the main menu.
Response: The Structure Search dialog is displayed.
3. Select one of the alternatives under Search for.
4. If the Parameters... button becomes available, click on it to edit the parameters
available for the selected search method.
Comment: If you select Similarity search, you must enter a threshold value in the
Similarity Search Parameters dialog. The higher the threshold, the shorter the hit
list.
5. If you want to import a structure from a file, click Import Structure….
Response: The Open dialog appears. Select the file you want to import and click
Open. The structure from the file will be displayed in the Structure Search dialog.
6. If required, click Edit….
Response: Your selected structure editor is launched. (If you have access to more than
one editor, you can select which one to use.) Edit the structure and click the OK button
(for ChemDraw) or the Transfer button (for Symyx® Draw (MDL)). Please refer to
the documentation of your current structure editor for more details.
7. Select the information link to use for the search in the Search in drop-down list.
8. If required, limit the search to the current list of identifiers.
Comment: This option is only available when performing the search from the Structure
Viewer and when any list except for the Marked Rows list is selected in the Lists dropdown of the Structure Viewer. When you start a structure search from a table
visualization without activating the Structure Viewer, or, if the Marked Rows list is
selected, the Data Source option will be the only option presented in the Limit search
to drop-down.
9. Specify the name for the resulting list.
10. Click OK.
Response: Structures in the database that match the search criteria are displayed in the
Structure Viewer (Structure Viewer pane). A new ID list is added and displayed in the
List Content Pane.
► To change the renderer used to display structures in the
Structure Viewer:
1.
2.
3.
In the Structure Viewer pane of the Structure Viewer panel or popover, right-click on
the structure.
Select Renderer.
Select the renderer to use.
Comment: You can only switch renderer if you have more than one of the supported
renderers installed on your machine.
29
TIBCO Spotfire Lead Discovery 4.5 – Installation Manual
5
Appendix
Below is an example of what the resulting SQL from the specified information links might look
like:
Similarity search on Symyx® (MDL) data source:
SELECT
I1."CDBREGNO" AS "CDBREGNO",
molsim(I1."CTAB",
?structure,
?similarity_type) AS "SIMSCORE"
FROM
"ISIS"."ISISRC2D_MOL" I1
WHERE
(molsim(I1."CTAB", ?structure, ?similarity_type) BETWEEN
?similarity_lower
AND ?similarity_upper)
AND <conditions>
Retrieve links:
SELECT
I1."CDBREGNO" AS "CDBREGNO",
molfile(I1."CTAB") AS "MOLFILE"
FROM
"ISIS"."ISISRC2D_MOL" I1
WHERE
<conditions>
Substructure search:
SELECT
I1."CDBREGNO" AS "CDBREGNO"
FROM
"ISIS"."ISISRC2D_MOL" I1
WHERE
(sss(I1."CTAB",
?structure) =1)
AND <conditions>
30


![User`s Manual: SNPStudio_v1.0 [pdf, English]](http://vs1.manualzilla.com/store/data/005994529_1-ff784ef2ce6185976f248556b2f20223-150x150.png)