1
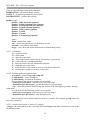
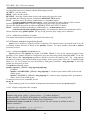
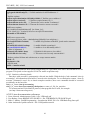
ELF2
Router/bridge
User’s manual
Software release 2.25
ELF2-REE, –RE, –RV User’s manual
© PARABEL, ltd
ALL RIGHTS RESERVED
ELF2 ROUTER/BRIDGE USER’S MANUAL
RELEASE 1.11, MAY 2005
PARABEL LIMITED
P.O. BOX 126
NOVOSIBIRSK-90
RUSSIAN FEDERATION
Web: eng.parabel.inc.ru
Email: [email protected]
Phone: +7-3832-138707
Fax: +7-9139139603
3
ELF2-REE, –RE, –RV User’s manual
Attention! It is not recommended to use the multiplexer on physical
lines without lightning protectors.
4
ELF2-REE, –RE, –RV User’s manual
CONTENTS
FIGURES......................................................................................................................................................7
TABLES........................................................................................................................................................7
1. Introduction..............................................................................................................................................8
2. Specifications..........................................................................................................................................12
2.1. General..............................................................................................................................................12
2.2. E1a, E1b ports parameters ................................................................................................................12
2.3. V.35 port parameters ........................................................................................................................12
2.4. Console port parameters (RS232).....................................................................................................12
2.5. Ethernet port parameters...................................................................................................................12
3. Installation of the router .......................................................................................................................13
3.1. Front Panel Controls, Connectors, and Indicators of ELF2-REE, ELF2-RE ...................................13
3.2. Front Panel Controls, Connectors, and Indicators of ELF2-RV.......................................................14
3.3. Sockets description ...........................................................................................................................15
4. Physical ports configuring ....................................................................................................................18
4.1. Console attaching..............................................................................................................................18
4.2. The main configuration menu...........................................................................................................18
4.3. General settings ................................................................................................................................19
4.4. E1a port configuration ......................................................................................................................19
4.5. E1b port configuration......................................................................................................................19
4.6. V.35 port configuration ....................................................................................................................20
4.7. Testing modes E1 .............................................................................................................................20
5. Monitoring the router ports..................................................................................................................22
5.1. Monitoring E1 ports..........................................................................................................................22
5.2. Monitoring V.35 port........................................................................................................................22
6. Functional description...........................................................................................................................23
6.1. Terminal E1 mode ............................................................................................................................23
6.2. Drop-insert mode ..............................................................................................................................24
6.3. CRC4 handling .................................................................................................................................25
6.4. CAS signaling...................................................................................................................................25
7. The router software ...............................................................................................................................26
7.1. Introduction.......................................................................................................................................26
7.2. Linux system features on the ELF platform .....................................................................................26
7.3. Command string................................................................................................................................26
7.4. Communication interfaces ................................................................................................................26
7.5. Boot loader........................................................................................................................................27
7.5.1. Boot loader console ...................................................................................................................27
7.5.2. Boot loader parameters .............................................................................................................27
7.5.3. Boot loader service commands..................................................................................................27
7.5.4. Upgrading router firmware .......................................................................................................28
8. Router delivery.......................................................................................................................................29
9. Packaging................................................................................................................................................29
5
ELF2-REE, –RE, –RV User’s manual
Appendix A. Linux configuration handbook ..........................................................................................30
A.1. Version of the Linux package..........................................................................................................31
A.2. Linux command line ........................................................................................................................32
A.3. Command interpreter (shell)............................................................................................................33
A.4. joe text editor ...................................................................................................................................33
A.5. Password for remote access (passwd)..............................................................................................33
A.6. File system navigation (pwd, ls, cd) ................................................................................................33
A.7. Collection of system information (procfs).......................................................................................34
A.8. Starting and deleting processes (ps, kill) .........................................................................................34
A.9. Remote access to system (telnet, ftp, tftp) .......................................................................................34
A.9.1. telnet ..........................................................................................................................................34
A.9.2. ftp...............................................................................................................................................34
A.9.3. tftp..............................................................................................................................................34
A.10. Software restart (reboot) ................................................................................................................35
A.11. Changing system time (date и rdate) .............................................................................................35
A.12. System messages service (syslogd) ...............................................................................................35
A.13. Restoring the default router config (clearflash) .............................................................................35
A.14. Saving current configuration to the remote server (backup) .........................................................35
A.15. Saving current configuration to the flash memory (writeflash).....................................................36
A.16. WAN interfaces configuration (sethdlc)........................................................................................36
A.17. Configuring IP interfaces (ifconfig) ..............................................................................................36
A.18. Interface statistics (ifshow, ifclear)................................................................................................37
A.19. VLAN interface configuration (vconfig).......................................................................................37
A.20. Bridge control (brctl) .....................................................................................................................37
A.21. Route table management (route)....................................................................................................38
A.22. Dynamic routing RIP (routed) .......................................................................................................38
A.23. Filtering and NAT service (iptables) .............................................................................................38
A.23.1. Commands...............................................................................................................................39
A.23.2. Defining packet recognition rules ...........................................................................................39
A.23.3. Actions when packet is detected (-j option).............................................................................39
A.23.4. Additional possibilities of iptables ..........................................................................................40
A.24. Remote statistics acquisition (ipcad) .............................................................................................40
A.24.1. Configuring iptables for ipcad service....................................................................................40
A.24.2. Simple configuration file example...........................................................................................40
A.24.3. Statistics collecting details ......................................................................................................41
A.XX. Linux documentation references..................................................................................................41
6
ELF2-REE, –RE, –RV User’s manual
FIGURES
Figure 1. ELF2-RE, -REE structure ..............................................................................................................9
Figure 2. ELF2-RV structure.........................................................................................................................9
Figure 3. Drop-insert mode connection .......................................................................................................10
Figure 4. The front panel of ELF2-REE (-RE)............................................................................................13
Figure 5. The rear panel of ELF2-REE (-RE) .............................................................................................13
Figure 6. The front panel of ELF2-RV........................................................................................................14
Figure 7. The rear panel of ELF2-RV .........................................................................................................14
Figure 8. The main menu of the mcfg program...........................................................................................18
Figure 9. Lloop mode ..................................................................................................................................20
Figure 10. Rloop mode ................................................................................................................................21
Figure 11. E1 slave synchronization............................................................................................................23
Figure 12. E1 master synchronization .........................................................................................................23
Figure 13. Drop-insert switching.................................................................................................................24
Figure 14. Drop-insert mode........................................................................................................................24
TABLES
Table 1. ELF2-RXX router modifications.....................................................................................................8
Table 2. Ethernet socket ..............................................................................................................................15
Table 3. Socket E1A ....................................................................................................................................15
Table 4. Socket E1B ....................................................................................................................................15
Table 5. Socket V.35 (DTE mode) ..............................................................................................................16
Table 6. Socket V.35 (DCE mode)..............................................................................................................17
Table 7. Console socket...............................................................................................................................17
Table 8. E1 status description......................................................................................................................22
7
ELF2-REE, –RE, –RV User’s manual
1. Introduction
ELF2-Rxx can be used through the primary E1 channels as IP router, bridge or firewall. The possible
router modifications are listed in the Table 1.
Part number
Interfaces
Functions
ELF2-RV
ELF2-RE
ELF2-REE
Ethernet 10/100, V35 DTE/DCE
Ethernet 10/100, E1 framed/unframed
Ethernet 10/100, 2xE1 framed/unframed/
drop-insert
IP router, bridge, firewall
IP router, bridge, firewall
IP router, bridge, firewall
Table 1. ELF2-RXX router modifications
As distinct from competitive products, the ELF2 router has the following advantages:
• The second E1 port availability, which can be used for drop-insert schemes and daisy chain
connections
• The extended capabilities of CAS signalization in timeslot 16
• The router is based on the Linux kernel, a well-proved system in telecom applications
• Modular software gives additional flexibility in many applications
The functional scheme of the router is presented in Figure 1 and Figure 2.
In terminal E1 mode of ELF2-REE (-RE) port E1A and Ethernet are used for data transmission.
Port E1B is not used. The input signal of the E1A port sent into de-framer A, where it is processed
according to ITU recommendations G.703 and G.704. The given (extracted) timeslots with data are sent
to HDLC controller and then to the processor.
In the inverse direction, data is transmitted back to HDLC controller from the processor. Data from
HDLC controller is pushed through TDM switch to the E1A framer, where E1 cycle structure is formed.
Port E1A can function in unframed or framed modes. In the first case when the data transmitted, the
whole E1 stream at 2048 kilobits per second is used. Timeslots 0 and 16 are included. In the second case
wanted (appropriate) timeslots can be chosen for the data transmission. The chosen timeslots form the
united data channel with data rate Nx64 Kbit/s, where N=1..30. Timeslot 0 is used for G.704
synchronization.
In the drop-insert mode of ELF2-REE port Ethernet and port E1A are used for data transmission as
before, however, port E1B is used for non-data timeslots routing. Framed E1 mode should be set for both
E1 ports. Presence of the second E1B port enables connections like shown in the Figure 3. The router is
connected between PBX and central office equipment.
8
ELF2-REE, –RE, –RV User’s manual
Port
E1A
Framer A
Ethernet
10/100
Relay (*)
TDM
switch
Port
E1B (*)
Framer B
(*)
HDLC
controller
(hdlc0)
CPU
Console
RS232
* - ELF2-REE only
Figure 1. ELF2-RE, -REE structure
Ethernet
10/100
Port
V.35
HDLC
controller
(hdlc0)
CPU
Console
RS232
Figure 2. ELF2-RV structure
9
ELF2-REE, –RE, –RV User’s manual
voice
voice + data
E1B
E1A
PBX
ELF-2REE
Figure 3. Drop-insert mode connection
In the output stream E1A non-data timeslots will be filled by corresponding timeslots from the input
stream E1B. Data timeslots will be extracted by multiplexer from the input stream E1A. Non-data
timeslots from the input stream E1A will be routed to the output stream E1B. E1A and E1B ports are not
symmetrical, data is received and transmitted through E1A port only. Port E1B is used only for voice
timeslots.
Port V.35 in the ELF2-RV router can be set for DTE or DCE modes.
Bypass Relay is intended for direct switching E1A and E1B ports in case of power failure. If the relay
is turned off, the E1A receiver is connected to the E1B transmitter, the E1B receiver is connected to the
E1A transmitter. So, in the drop-insert mode E1 line will function even without electric power. Relay also
can be used for E1 port isolation from line.
Router software is based on the Linux system and provides the following functions (package version
2.20):
WAN protocols:
• Synchronous PPP
• Cisco HDLC
• Frame Relay
• IP over PPP, CHDLC, FR
• WAN bridging (in the CHDLC mode)
Ethernet:
• Several IP addresses on the one interface
• Remote IP address changing
• IEEE 802.1Q access point (VLAN)
• 802.1Q transparent bridging
• Up to 4094 VLAN on the one interface
IP routing:
• Static routing: by IP destination, by TOS field, by IP filter labels
• RIPv1 (RFC1058)
• RIPv2 (RFC1723)
• RIP md5 authentication
• OSPF (RFC2328)
• BGP4 (RFC1771)
QOS support:
10
ELF2-REE, –RE, –RV User’s manual
•
•
•
Priority queues
Traffic shaping
Packets classification by protocols, port numbers, TOS and other features
Remote statistics (IP accounting):
• Traffic classification with help of IP filter
• Statistics output in the text form (rsh)
• Netflow protocol support (Cisco compatible)
Bridge:
• STP support (IEEE 802.1D)
• Local traffic filtering
• Transparent VLAN packets transmitting through WAN interfaces
• Transparent IP, IPX, NetBEUI packets transmitting through WAN interfaces
• Compatibility with Cisco bridges on WAN interfaces
• Bridge groups of interfaces support
• Concurrent routing and bridging
IP filter:
• Chains of rules
• Packet classification by IP addresses, protocols, TCP/UDP ports
NAT:
• Source and destination addresses translation
• Pre-routing and port-routing translation
• masquerading support
Other services:
• ping
• traceroute
• NTP client
Router management:
• Console RS232
• Telnet
• ftp server
• tftp server and client
Configuration storing:
• flash memory
• remote tftp server
Software upgrade:
• TFTP
11
ELF2-REE, –RE, –RV User’s manual
2. Specifications
2.1. General
Parameter
dimensions
weight (without power source)
power consumption
ambient temperature
storage temperature
humidity
power voltage (on DC socket)
Value
140x110x35 mm
0.35 kg
5w
от +5°С до +45°С
от -40°С до +70°С
80% or less
15V +- 20%
2.2. E1a, E1b ports parameters
Parameter
socket type
line type
impulse voltage
data rate
coding
signal attenuation, (E1a)
signal attenuation, (E1b)
standarts
impulse form
jitter
frame structure
Value
RJ45, 8 pins
symmetrical twisted pair, 120 Ohm
3 V +- 10%
2048 kbit/s +- 50 ppm
AMI/HDB3
-40 дб
-6 дб
ITU G.703, G.704, G.706, G.732, G.823
rec. G.703
rec. G.823
rec. G.704
2.3. V.35 port parameters
Parameter
socket type
mode
data rate, kbit/s
electrical parameters of signals
105-107, 109
electrical parameters of signals
103, 104, 113-115
coding
Value
26 pin DB type
synchronous
Nx64
rec. ITU V.28
rec. ITU V.35
NRZ
2.4. Console port parameters (RS232)
Parameter
mode
data rate, kbit/s
flow control
electrical parameters of signals
Value
asynchronous, 8N1
38400
no
rec. ITU V.28
2.5. Ethernet port parameters
Parameter
socket type
line type
data rate, Mbit/s
standarts
Modes of operation
Value
RJ45, 8 pins
STP
10/100
IEEE 802.3
Autonegotiation
12
ELF2-REE, –RE, –RV User’s manual
3. Installation of the router
3.1. Front Panel Controls, Connectors, and Indicators of ELF2-REE, ELF2-RE
There are following controls on the front panel:
• Reset button
• Power led
• Ethernet 100 Mbit led
• Ethernet2 link led*
• Ethernet link led
• E1 led, port a (E1-a)
• E1 led, port b (E1-b) **
• E3 led *
• Console socket RJ-11
Figure 4. The front panel of ELF2-REE (-RE)
There are following sockets on rear panel:
• Twisted pair Ethernet socket RJ-45
• Twisted pair Ethernet socket RJ-45, channel 2 *
• Port V.35 socket (26-contacts, DB type) *
• E1A socket RJ-45
• E1B socket RJ-45 **
• DC input socket
Figure 5. The rear panel of ELF2-REE (-RE)
* is not used for this router modification, plugs are installed
** only for ELF2-REE
13
ELF2-REE, –RE, –RV User’s manual
3.2. Front Panel Controls, Connectors, and Indicators of ELF2-RV
Figure 6. The front panel of ELF2-RV
There are following sockets on the rear panel of ELF2-RV:
• Twisted pair Ethernet socket RJ-45
• Console socket RJ-11
• Port V.35 socket (26-contacts, DB type)
• Reset button
• Ethernet link led
• Power led
• DC input socket
Figure 7. The rear panel of ELF2-RV
14
ELF2-REE, –RE, –RV User’s manual
3.3. Sockets description
Contact
1
2
3
4
5
6
7
8
Net
TX+
TXRX+
RX-
Table 2. Ethernet socket
Contact
1
2
3
4
5
6
7
8
Net
RX+
RXTX+
TX+
GND
GND
Table 3. Socket E1A
Contact
1
2
3
4
5
6
7
8
Net
RX+
RXTX+
TX+
GND
GND
Table 4. Socket E1B
15
ELF2-REE, –RE, –RV User’s manual
Contact
1
2
3
4
5
6
7
8
9
10
11
12
13
14
15
16
17
18
19
20
21
22
23
24
25
26
Net
GND
Direction
RTS
CTS
DTR
GND
CD
GND
RxCa
RxCb
TxCa
TxCb
RxDb
RxDa
GND
output
input
output
TxDa
TxDb
input
input
input
input
input
input
input
output
output
Table 5. Socket V.35 (DTE mode)
Note: IC-V35-DTE cable should be used in DTE mode
16
ELF2-REE, –RE, –RV User’s manual
Contact
1
2
3
4
5
6
7
8
9
10
11
12
13
14
15
16
17
18
19
20
21
22
23
24
25
26
Net
GND
Direction
CTS
RTS
CD
GND
DTR
GND
output
input
output
TxCa
TxCb
TxDb
TxDa
GND
input
input
input
input
RxDa
RxDb
RxCa
RxCb
TxCa
TxCb
output
output
output
output
output
output
input
Table 6. Socket V.35 (DCE mode)
Note: IC-V35-DCE cable should be used in DCE mode
Contact
1
2
3
4
5
6
Net
RXD
TXD
GND
GND
Direction
input
output
Table 7. Console socket
17
ELF2-REE, –RE, –RV User’s manual
4. Physical ports configuring
4.1. Console attaching
The console port is connected to the serial port of PC by adapter cable RJ-11 ÅÆ DB-9. Router
is controlled by terminal program with parameters: 38400, 8b, 1s, np, flow control=off (use Teraterm, for
example).
4.2. The main configuration menu
To configure parameters of physical ports (E1a, E1b, V35) it is necessary to start mcfg utility.
Type in the command string:
# mcfg [ENTER]
The router is configured by modification of parameters in hierarchical menus. After configuration
completing, settings can be saved to file. Physical ports configuration is stored in the file
/etc/elf/mcfg30.cfg.
Attention! To restore the configuration after rebooting, it is necessary to write /etc directory to the
flash memory (writeflash command).
Screen is divided into two parts.
There is the following information in the upper screen part:
• Software release number
• Firmware release number
• The main configuration settings and line status
The following menu is resided in the lower screen part (Figure 8).
ELF2-REEV monitor, v1.13 08/04/2005, Updates: http://parabel.inc.ru/
Firmware: ELF2-REEV (2*E1, V.35){0x0}, Revision: 0x2
E1/A is LongHaul, E1/B is ShortHaul, Drop-Insert=Off, Swap=Off, DTE=Off
E1/A Cfg: Framing=On , MultiFraming=On , Line code=HDB3, Clock=Internal
E1/A status: LOS=On , LOF=On , LOM=On , LOC=Off, RAIS=Off, FrErr=0/0
E1/B status: LOS=On , LOF=On , LOM=On , LOC=Off, RAIS=Off, FrErr=0/0
V35 status: DTR(CD)=Off, RTS(CTS)=Off
1 3 5 7 9 1 3 5 7 9 1 3 5 7 9 1
Timeslots E1/A: ###############.###########....
1. Configuration >>
3. Test >>
9. Reset
Figure 8. The main menu of the mcfg program
To choose a submenu, press keys 1-9.
To abandon submenu, press key 0.
Other keys are ignored.
18
ELF2-REE, –RE, –RV User’s manual
4.3. General settings
The given settings are related to the ELF2-REE router modification.
Configuration/Common/Relay – turn on or turn off the bypass relay. When turned off, the output E1a
signal is connected to the input E1b signal, and the input E1a signal is connected to the output E1b signal.
When turned on, E1a and E1b signals are connected to the ports of the router.
Configuration/Common/Drop-insert – turn on or turn off the drop-insert mode. If the drop-insert mode
is off, the router is works as interface converter between ports E1a and Ethernet, port E1b is not used. If
drop-insert mode is on, data stream is received from Ethernet port and transmitted through the E1a port.
Data timeslots are defined in the E1a port submenu. Non-data timeslots from the E1a port are routed to
the E1b port.
Configuration/Common/Swap A/B – swap E1a and E1b sockets. In the state mode “On” ports E1a and
E1b are exchanged, that is equivalent to cable swapping in E1a and E1b sockets. In this case data
transmission goes through port E1b.
4.4. E1a port configuration
The following settings are related to the ELF2-RE and ELF2-REE router modifications.
Configuration/E1/Framing – turn on framed mode of the E1a port. In the framed mode bit stream is
formatted according to the recommendation ITU G.704. Data is encapsulated to the defined E1 timeslots
with data rate Nx64 kbit/s (N is number of used timeslots). Timeslot 0 is used for synchronization
anyway.
In the unframed mode data is encapsulated to the unformatted G.703 stream with the fixed data
rate of 2048 kbit/s.
Configuration/E1/MultiFraming – turn on or turn off CAS multiframe in timeslot 16. The multiframe
generation is used only for compatibility with some telephone equipment. This mode doesn’t impact on
the data transmission capabilities of the router.
Configuration/E1/Line code – line code settings (AMI or HDB3).
Configuration/E1/Clock source – line synchronization setting. Line – synchronize with received E1a
signal (slave). Internal – synchronize with internal clock source (master).
Configuration/E1/Timeslots – define timeslots used for data transmission (data timeslots are marked
with # symbol).
Configuration/E1/ts16 ABCD – hex digit 0..f, which is specifies ABCD bits in CAS multiframe. ABCD
bits, defined here, are inserted in the timeslot 16 if it is not used for data transmission.
Configuration/E1/CRC4 – turn on or turn off CRC4 generation in the transmit direction
4.5. E1b port configuration
The following settings are related to the ELF2-REE router modification.
19
ELF2-REE, –RE, –RV User’s manual
E1b port is used only in drop-insert mode. There are no special configuration options for this port.
While enabled, E1b works in the framed mode and synchronized with line (slave). Line coding
(AMI/HDB3) and timeslots settings are the same for both port E1b and port E1a.
4.6. V.35 port configuration
The following settings apply to the ELF2-RV router modification.
Configuration/V35/DTE – turn on or turn off DTE mode of the V.35 port. In DTE mode data
synchronization signals (TxC, RxC) are inputs and they are formed by external equipment. DTE mode
can be used for connecting modem or multiplexer to V.35 port. If DTE mode is turned off,
synchronization signals TxC and RxC are outputs and they are formed by the router.
Configuration/V35/Inverse clock – inverse data synchronization signal RxC (DCE mode only). This
option is used for attaching non-standard equipment. Usually this option is off.
Configuration/V35/Baud – port clock rate in DCE mode (bits/s).
4.7. Testing modes E1
The following settings are related to the ELF2-RE and ELF2-REE router modifications.
Test/E1/Lloop – turn on internal loopback on the corresponding E1 port (Figure 9).
E1
Tx
Rx
Figure 9. Lloop mode
20
ELF2-REE, –RE, –RV User’s manual
Test/E1/Rloop – turn on remote loopback on the corresponding E1 port (Figure 10).
E1
Tx
Rx
Figure 10. Rloop mode
Test/E1/TAOS – send all ones (alarm signal) to E1 port
Test/E1/Freq – measure and print E1 carrier frequency relative to internal oscillator
21
ELF2-REE, –RE, –RV User’s manual
5. Monitoring the router ports
5.1. Monitoring E1 ports
Status of E1 ports is presented in the E1 status string in the screen head.
Status fields legend is presented in the Table 8.
Field
LOS
Meaning
Loss Of Signal
LOF
Loss Of Frame
LOM
Loss Of Multiframe
LOC
Loss Of CRC4
FrErr
Frame Errors
Values
On
Off
On
Off
On
Off
On
Off
XX/YYYY
Comment
No E1 signal carrier
E1 signal present, no alarm
No G.704 frame detected
G.704 frame present
CAS multiframe absent
CAS multiframe present
CRC4 frame absent
CRC4 frame present
XX – 8 bit counter of frame errors
YYYY – 16 bit counter of CRC4 errors
Table 8. E1 status description
Notes:
1. LOF, LOM, LOC are not errors for the unframed mode
2. To refresh the status Space Bar should be pressed on a keyboard
3. To reset error counters Test/E1_A/Freq menu of the corresponding E1 port should be chosen
5.2. Monitoring V.35 port
V.35 port status is presented in the V.35 status string in the screen head, for example:
V35 status: CTS:down CD:down RTS:up DTR:up
22
ELF2-REE, –RE, –RV User’s manual
6. Functional description
6.1. Terminal E1 mode
If Configuration/Common/Drop-insert is off, the router works in the terminal E1 mode. In this
mode data is encapsulated to E1a stream. Data stream in E1a port is considered as a synchronous bit
stream. E1b port is not used.
In the terminal mode E1a port can be set in the unframed mode (Configuration/E1/Framing: off)
with the data rate of 2048 kbit/s. In the framed mode (Configuration/E1/Framing: on) data rate is Nx64
kbit/s, where N – number of data timeslots.
In the terminal E1 mode, router is E1 equipment with internal synchronization (E1 master) or line
synchronization (E1 slave).
ELF2
E1A
RxC
TxC
HDLC
Figure 11. E1 slave synchronization
ELF2
E1A
RxC
TxC
Figure 12. E1 master synchronization
23
HDLC
ELF2-REE, –RE, –RV User’s manual
6.2. Drop-insert mode
If Configuration/Common/Drop-insert is on, the router works in drop-insert mode. In this case
both E1 ports are used. Timeslots switching scheme is shown in the Figure 13.
E1a RX
1
2 3 4 5 6 ● ● 31
1 2 3 4
5 6 ● ● 31
E1b TX
1 2 3 4
5 6 ● ● 31
E1a TX
HDLC
E1b RX
1
2 3 4 5 6 ● ● 31
HDLC
Figure 13. Drop-insert switching
E1a and E1b ports are set in the drop-insert mode. Timeslots 2,3,4 are used for data transmission
as shown in this example. In the «E1a -> E1b» direction E1 stream passes without changes. Data
timeslots are extracted from E1 stream and pushed to the HDLC controller. In the «E1b -> E1a» direction
timeslots 2,3,4, coming from E1b port are ignored. Instead of them the router inserts HDLC data. Other ts
let be passed through without changes.
Synchronization scheme in the drop-insert mode is depicted in Figure 14.
ELF2
E1A
RxC
TxC
E1B
Figure 14. Drop-insert mode
24
HDLC
ELF2-REE, –RE, –RV User’s manual
6.3. CRC4 handling
When receiving, CRC4 is checked in both E1a and E1b streams, no matter what port mode is. The
result of CRC4 comparison is shown in the port status field (LOC). Invalid CRC4 in the input E1 stream
doesn’t affect the frame synchronization.
When transmitting, CRC4 is calculated for E1a port if corresponding mode is set
(Configuration/E1/CRC4: on). As E1b output stream is equivalent to the input E1a stream, port CRC4
is not calculated for the E1b port. For this reason CRC4 on E1b output is calculated with the equipment,
attached to the E1a input.
6.4. CAS signaling
The router is able to form CAS super-frame in timeslot 16 with fixed ABCD bits. CAS
signalization is used by some telephone protocols, like R2. For correct work of telephone switches and
PBX, attached to the common E1 channel with router, data timeslots must be accompanied by the neutral
state code in timeslot 16. The neutral state code should correspond to the given telephone protocol. To
turn on CAS super-frame, Configuration/E1/MultiFraming menu should be set into “on”. ABCD bits
code is defined in the Configuration/E1/ts16 ABCD menu.
In the interface converter mode ABCD bits are formed in timeslot 16 for channels 1-15, 17-31. In
the drop-insert mode ABCD bits are formed only for data channels. For other channels ABCD bits are
passed through without changes, i.e. they are formed by equipment, attached to the E1b port.
Anyway CAS signalization is formed with the router only if timeslot 16 is not used for data
transmission. Otherwise CAS super-frame and ABCD bits will be absent in E1 framing.
CAS super-frame and ABCD bits are not used for receiving. In the drop-insert mode CAS
signaling is passed from the E1a port to E1b port transparently.
If router is set to the drop-insert mode and telephone equipment uses common channel signaling,
CAS super-frame must be turned off (Configuration/E1/MultiFraming:off).
25
ELF2-REE, –RE, –RV User’s manual
7. The router software
7.1. Introduction
Router software is based on the Linux kernel (version 2.4.22) and memory file system (RAMFS).
Router is configured by several ways – console, telnet or ftp. Configuration is written in the set of text
files resided in the file system. After configuration user can save settings in the flash memory.
7.2. Linux system features on the ELF platform
The root file system of the router is RAM disk. The initial RAM disk image is unpacked from
flash memory while system is starting. After unpacking and system starting, configuration of Linux is
restored from text files resided in the /etc directory. The first command file, interpreted by system is
/etc/rc.sh, which contains main starting parameters.
When configuration is stored in flash memory, the following operations are executed:
1. Files from /etc directory are packed to .tar archive
2. Archive is compressed by gzip utility
3. The obtained compressed file is written to the flash memory by /usr/sbin/flash utility
To simplify configuration saving, writeflash script can be used. It executes operations 1-3 automatically.
Restoring of the configuration is made by reverse order.
Memory size which is available for configuration data is restricted by the whole flash memory size (4
Mbytes) and by memory used for Linux image (kernel and ram disk).
The /usr/sbin/flash utility has the following parameters:
flash [r|w] filename
where
r – reading option, configuration data is read from flash memory to the file called filename;
w – writing option, configuration data from the file filename is written to the flash memory
On system starting and for restoring configuration, flash utility has special mode. In this mode flash
utility can be started instead of init process. For this reason it is necessary to put init=/usr/sbin/flash
substring into the command string of Linux system. If this substring is absent, default configuration is
loaded.
Attention! While upgrading router firmware, current configuration can be lost. To save configuration,
it should be read by flash utility to the temporary file and send this file to the external TFTP server. To
edit configuration files joe text editor can be used in console or telnet session.
7.3. Command string
Command string is defined in the boot monitor menu. Command string passes start parameters to the
Linux kernel. Command string must have the following format:
root=/dev/ram0 rw ramdisk_size=6000 init=/usr/sbin/flash
where:
root parameter defines root file system;
ramdisk_size parameter defines size of file system image (Kbytes);
init parameter gives init process name;
7.4. Communication interfaces
To see interface list, ifconfig command should be typed without parameters.
The following interfaces are present in the system:
eth0 – corresponds to Ethernet 10/100
26
ELF2-REE, –RE, –RV User’s manual
hdlc0 – corresponds to E1A port or V.35 (for ELF2-RV).
Driver of HDLC interface is developed as module and resided in the file /lib/modules/2.4.22/m860hdlc.o.
7.5. Boot loader
After switching on, boot loader takes device control. By default, boot loader starts router/bridge software.
Boot process can be interrupted by user – just press any key in the console window. You will see boot
loader command prompt. In this mode some parameters of the boot loader can be configured.
Boot loader has the following functions:
• Router flash memory programming
• Memory tests and dump
• Ethernet tests (ARP, PING)
Parameters of the boot loader are structured in the menu system (press <h>, <Enter> to list current menu).
Parameters of the boot loader can be saved in the flash memory.
7.5.1. Boot loader console
Attach console cable to PC serial port and start terminal program with parameters: baud 38400, 8 bit, no
parity, flow control = off.
7.5.2. Boot loader parameters
In the opt menu, some parameters of the boot loader can be configured. The main parameters are listed:
myip - boot loader IP address
servip - TFTP server IP address
gwip - в gateway IP address
mask - network mask
file - image file name
loadptr – memory address for image file loading, should be 0x200000
jumpptr – address for Linux kernel starting, should be 0x200000
bootstr – Linux command string, see 7.3.
list – print values of boot loader parameters
flags – go to flags menu
The flags must be set to following values:
verbose mode
off
standalone tftp server
on
enable auto load after startup
on
enable auto jump after startup
on
enable auto fflash after startup
off
copy vxstr to ram
off
watchdog timer
off
update – save parameters in the flash memory
7.5.3. Boot loader service commands
pings – go to ICMP echo server mode. ELF2 can be pinged from other network station.
bootp – execute BOOTP request
arp – resolve server IP address (send ARP request)
mdump – dump memory region
27
ELF2-REE, –RE, –RV User’s manual
mfill – fill memory region
mtest – testing memory region
fflash – flash memory programming (file, myip, servip, mask, gwip must be configured first).
Other commands are intended for factory testing.
7.5.4. Upgrading router firmware
To write the new software release, should be done the following steps:
• Start TFTP server program on PC and enable reading access to some folder in the PC filesystem.
• Copy to this folder image.bin file with router software image
• Attach console and Ethernet cables to router
• Start terminal program on PC and set com port parameters: 34800, 8 bit, 1 stop, no parity.
• Restart router (reboot command).
• Stop boot process (press any key in the terminal). After that router is in the boot loader mode.
• If needed, change boot loader IP address and net mask (opt menu of boot loader).
• Programming starts with fflash command:
boot> fflash<CR>
28
ELF2-REE, –RE, –RV User’s manual
8. Router delivery
Router is shipped with the following accessories:
• Router – 1
• Console cable (RJ11-DB9) – 1
• CD disk with documentation – 1
The following accessories can be shipped separately:
• Power source AC 220V
• Power source DC 36..72В
• V.35 cable IC-V35-DTE
• V.35 cable IC-V35-DCE
9. Packaging
Router is packaged to a carton box with dimensions 26x21x6.5 cm.
29
ELF2-REE, –RE, –RV User’s manual
Appendix A. Linux configuration handbook
This handbook presents commands description and configuration examples of the ELF2 router
system.
30
ELF2-REE, –RE, –RV User’s manual
A.1. Version of the Linux package
Kernel and package versions are listed in the console dump while router is starting. The example of
console dump is shown below. Software versions are in bold type.
Motorola PPC860 boot monitor
Version 1.81, Jun 29 2004
CPU 50 MHz, memory 32 Mbytes
Press any key to interrupt boot sequence...
1
Copying 3159844 bytes from flash
Linux package found at 200000
Kernel size 785k (compressed)
Ramdisk size 2297k (compressed)
Decompressing kernel...ok
Linux version 2.4.22 (root@L6-1-521-1) (gcc version 3.2.2 20030217 (Yellow Dog L
inux 3.0 3.2.2-2a_1)) #105 Fri Aug 13 17:08:19 NOVST 2004
On node 0 totalpages: 8192
zone(0): 8192 pages.
zone(1): 0 pages.
zone(2): 0 pages.
Kernel command line: root=/dev/ram rw ramdisk_size=7000 init=/usr/sbin/flash
Decrementer Frequency = 184320000/60
Calibrating delay loop... 48.84 BogoMIPS
Memory: 28160k available (1388k kernel code, 440k data, 84k init, 0k highmem)
Dentry cache hash table entries: 4096 (order: 3, 32768 bytes)
Inode cache hash table entries: 2048 (order: 2, 16384 bytes)
Mount cache hash table entries: 512 (order: 0, 4096 bytes)
Buffer cache hash table entries: 1024 (order: 0, 4096 bytes)
Page-cache hash table entries: 8192 (order: 3, 32768 bytes)
POSIX conformance testing by UNIFIX
Linux NET4.0 for Linux 2.4
Based upon Swansea University Computer Society NET3.039
Initializing RT netlink socket
Starting kswapd
CPM UART driver version 0.04
ttyS0 at 0x0280 is on SMC1 using BRG1
pty: 256 Unix98 ptys configured
Generic RTC Driver v1.07
DLCI driver v0.35, 4 Jan 1997, [email protected].
eth0: FEC ENET Version 0.2, FEC irq 9, MII irq 10, addr ce:3d:fa:01:00:1b
RAMDISK driver initialized: 16 RAM disks of 7000K size 1024 blocksize
loop: loaded (max 8 devices)
PPP generic driver version 2.4.2
PPP Deflate Compression module registered
Cronyx Ltd, Synchronous PPP and CISCO HDLC (c) 1994
Linux port (c) 1998 Building Number Three Ltd & Jan "Yenya" Kasprzak.
HDLC support module revision 1.14
NET4: Linux TCP/IP 1.0 for NET4.0
IP Protocols: ICMP, UDP, TCP, IGMP
IP: routing cache hash table of 512 buckets, 4Kbytes
31
ELF2-REE, –RE, –RV User’s manual
TCP: Hash tables configured (established 2048 bind 4096)
IPv4 over IPv4 tunneling driver
ip_conntrack version 2.1 (256 buckets, 2048 max) - 292 bytes per conntrack
ip_tables: (C) 2000-2002 Netfilter core team
NET4: Unix domain sockets 1.0/SMP for Linux NET4.0.
NET4: Ethernet Bridge 008 for NET4.0
X.25 for Linux. Version 0.2 for Linux 2.1.15
NET4: LAPB for Linux. Version 0.01 for NET4.0
802.1Q VLAN Support v1.8 Ben Greear <[email protected]>
All bugs added by David S. Miller <[email protected]>
RAMDISK: Compressed image found at block 0
Freeing initrd memory: 2297k freed
VFS: Mounted root (ext2 filesystem).
Freeing unused kernel memory: 84k init
Reading flash ... 30248 config data read
init started: BusyBox v0.60.5 (2004.03.03-19:25+0000) multi-call
********************************
Elf linux image release 2.20
13/08/04
********************************
/etc/rc.sh: configuring loopback interface
/etc/rc.sh: configuring ethernet interface
/etc/rc.sh: loading firmware
/etc/rc.sh: loading spi driver
Using /lib/modules/2.4.22/spi.o
/etc/rc.sh: loading hdlc driver
Using /lib/modules/2.4.22/m860hdlc.o
/etc/rc.sh: configuring E1 multiplexor
/etc/rc.sh: configuring hdlc stack
/etc/rc.sh: configuring hdlc interface
BusyBox v0.60.5 (2004.03.04-14:03+0000) Built-in shell (ash)
Enter 'help' for a list of built-in commands.
#
Kernel version is shown in /proc/version file also (use command ‘cat /proc/version’).
Package version is shown in the /etc/rc.sh file.
A.2. Linux command line
After starting the system, user can configure the router by command line. Command can be entered in the
console or be done remotely with help of telnet protocol. For navigating in the command string, cursor
keys ← → can be used, and Delete, Backspace keys for characters deletion. History of commands can be
invoked by cursor keys ↑↓. To accelerate typing Tab key can be used for guessing commands.
Most of commands have embedded help, it can be launched with –-help switch, for example,
ls -- help
will print ls command rules.
32
ELF2-REE, –RE, –RV User’s manual
A.3. Command interpreter (shell)
One of A shell derivatives is used as router command interpreter. In particular, shell enables to develop
command scripts, which can be used as new commands. The shell command language includes operators
of conditions, cycle, branch and so on. Shell is described in [3]. The example of shell script is /etc/rc.sh
file, used for system initialization. Scripts can be edited by joe program. It is recommended to save new
scripts in the /etc directory, because it can be saved in the flash memory.
A.4. joe text editor
To edit text files and command scripts joe editor can be used.
Enter in the command line:
joe <file_name>
In the editor screen type ^K H to call help window (symbol ^ corresponds Ctrl key).
Text navigation
←↑→↓ - move cursor on the screen
^K U – jump to file beginning
^K V - jump to file end
Exit from editor
^C – exit without file saving
^K X - exit with file saving
Search text
^K F – search text fragment
^L – search next
Working with blocks
^K B – mark block start
^K K – mark block end
^K M – move block
^K C – copy block
^K W – write block to the file
^K Y – delete block
A.5. Password for remote access (passwd)
The password for remote access can be changed by passwd command. By default, user name/password is
root/root. If password is lost, passwd command can be started in the console. Access to console is not
restricted. All information about passwords is encrypted and stored in the file /etc/passwd.
A.6. File system navigation (pwd, ls, cd)
To navigate file system the following commands can be used:
pwd – print the current directory name
ls – print current directory file list
cd – change current directory
The main directories are:
/ - root
/bin, /usr/sbin, /usr/bin – utilities
/etc – configuration files and scripts
/lib – shared libraries
/dev – special device files, used by drivers
/proc – text files with system information
33
ELF2-REE, –RE, –RV User’s manual
A.7. Collection of system information (procfs)
Virtual file system procfs contains information about current router state. Most of information is
presented in text form and can be listed by cat or more commands.
/proc/cmdline – router boot string, passed from boot monitor
/proc/cpuinfo – CPU information
/proc/kmsg – kernel messages
/proc/meminfo – memory usage information
/proc/modules – list of loaded modules
/proc/loadavg – CPU usage during last 1, 5 and 15 minutes
/proc/uptime – the time since last restart and idle processor seconds
A.8. Starting and deleting processes (ps, kill)
To print current process list, ps command can be used. Each process has name and PID - unique
identifier. The process can be stopped by command kill PID or killall PROCNAME by name. With the
usage of kill command some background services can be stopped – for example, syslogd or routed.
Scripts, created by user, can be started as processes. To do this, add & symbol at the end of command
line, when starting script.
A.9. Remote access to system (telnet, ftp, tftp)
For remoting router configuration some network protocols can be used. By default, router has telnet and
ftp servers started. To upload or download configuration tftp client can be used also. ftp and telnet
sessions are initiated by remote hosts (clients). tftp session is initiated in the router side. ftp and telnet
access is protected by password. Configuration of the ftp and telnet services is defined in the
/etc/xinetd.d directory.
A.9.1. telnet
/etc/xinetd.d/telnet - configuration file
/usr/sbin/in.telnetd – telnet server executable file
To disable the service, the following parameter is set into the configuration file:
disable = yes
The changes in the configuration file take effect after rebooting router or restarting xinetd.
A.9.2. ftp
/etc/xinetd.d/ftpd – configuration file
/usr/sbin/in.ftpd – ftp server executable file
To disable the service, the following parameter is set into the configuration file:
disable = yes
The changes in the configuration file take effect after rebooting router or restarting xinetd.
A.9.3. tftp
tftp command has the following parameters:
tftp [OPTION] HOST
where HOST – ip address of tftp server, which will receive file.
Options is following:
-g - download file from the remote server
-p – upload file to the remote server
-l FILE - local file name
-r FILE – remote file name
Note: before starting tftp command, start tftp server on the PC host
34
ELF2-REE, –RE, –RV User’s manual
A.10. Software restart (reboot)
To restart the router without hardware reset, reboot command is used.
Note that configuration is not saved to the flash memory automatically.
A.11. Changing system time (date и rdate)
To see current system time, date command is used without parameters. Time setup is made by date
command with –s switch:
date –s MMDDhhmmYYYY
where
MM – the month (digit)
DD – date
hh – hour
mm – minutes
YYYY – year
For example,
date –s 081815352004
will set time to August 18 of 2004, time 15:35.
After rebooting the system time is not restored. For this reason, it is more suitable to use rdate command
for remote time request from NTP server.
rdate [–s] HOST
where,
HOST – ip address of remote NTP server
-s – set time (without –s switch, just print time)
A.12. System messages service (syslogd)
syslogd command starts system messages service. By default, messages are printed to the router console
and are not archived. syslogd service can redirect messages to the /var/log/messages file or to the remote
server with syslogd service. In the first case file must be periodically cleared to escape router memory
overflow.
Options:
-O FILE – use alternative file for messages
-m NUM – time stamp interval in the messages file (minutes)
-R HOST[:PORT] - redirect messages to the remote host with syslogd service (use –r switch to
enable remote messages accepting).
Example:
To redirect messages to host 192.168.1.1 the given below command should be executed:
syslogd –R 192.168.1.1
A.13. Restoring the default router config (clearflash)
Script clearflash erases flash memory with router configuration (/etc directory content). After router
reboot, system will restore default configuration.
A.14. Saving current configuration to the remote server (backup)
backup command send current /etc directory content to the remote host with tftp service (tftp server for
Windows is enclosed on CD).
Usage:
backup <HOSTIP>
where
HOSTIP – IP address of the remote host
35
ELF2-REE, –RE, –RV User’s manual
Note: server must be started with write enable switch.
A.15. Saving current configuration to the flash memory (writeflash)
writeflash command saves current /etc directory content to the flash memory. After rebooting
configuration will be automatically restored.
Usage:
writeflash
A.16. WAN interfaces configuration (sethdlc)
WAN interfaces have some special features. The connection type is point to point. Interface
configuration consist of three parts – physical layer configuration (timeslots, bit rate, etc.), channel layer
configuration (protocol and parameters) and IP layer configuration (address, routes). Physical layer
configuration is done with help of mcfg utility and it has been decryped earlier. Channel layer is
configured with sethdlc command.
sethdlc [interface] [protocol]
where
interface – interface name, hdlc0 or hdlc1
protocol – channel layer protocol, can have the following values:
hdlc – IP packets are encapsulated to hdlc packets without headers (raw hdlc)
cisco [interval val] [timeout val] [ether] – IP packets encapsulated to Cisco HDLC
fr – frame-relay protocol
ppp – synchronous PPP, without authentication
Example:
sethdlc hdlc0 cisco ether
Parameters of Cisco HDLC protocol:
interval – keepalive packets period (seconds), default is 10
timeout – timeout for keepalive acknowledge (seconds)
ether – set interface to bridge mode, compatible with Cisco bridge protocol
A.17. Configuring IP interfaces (ifconfig)
Assigning and removing IP addresses on the data transmission interfaces is made with ifconfig
command.
ifconfig without parameters prints the interfaces list with IP addresses, net masks and some other
parameters. It prints interface statistics also.
For address assignment the following syntax should be used:
ifconfig <interface> [address] [options]
where,
interface – interface name (eth0, hdlc1 и т.д.)
address – interface IP address (for example, 100.0.0.1)
Options:
[netmask <address>] – set IP mask
[broadcast <address>] – set broadcast address
[pointopoint <address>] – set peer address for point to point connections
[up | down] – turn on/turn off interface
Example:
ifconfig eth0 192.168.1.1 netmask 255.255.255.0
36
ELF2-REE, –RE, –RV User’s manual
Detailed information about interface configuration is presented in [1].
A.18. Interface statistics (ifshow, ifclear)
Interface statistics consists of transmitted and received packets counters, counters of fixed errors.
For Ethernet interface statistics can be displayed with ifconfig eth0 command.
More detailed statistics for hdlc interfaces is presented by script:
ifshow <ifname>
where ifname – hdlc0 or hdlc1.
To clear statistics counters use script:
ifclear <ifname>
A.19. VLAN interface configuration (vconfig)
vconfig command is used for configuring vlan (IEEE802.1Q) interfaces. Virtual interfaces presently are
supported only for Ethernet eth0.
Usage:
add <ifname> <vlan_id> - add virtual interface with vlan_id to physical interface ifname (eth0
only). The virtual interface name can be seen as eth0.vlan_id, where vlan_id – decimal number 0..4095.
rem <vlan_name> - remove virtual interface with vlan_name
Example:
vconfig add eth0 45
ifconfig eth0.45 192.168.45.1 netmask 255.255.255.0
A.20. Bridge control (brctl)
brctl command is used to add or remove bridge to system, bridge interfaces assignment and bridge
monitoring. The router interfaces, included to bridge, are combined to bridge group. Interfaces in the
bridge group are not available for routing directly. Data transmission between bridged interfaces is going
with bridge protocols. Routing can be used between bridge group and other interfaces, not included to this
group. Bridge group acts as virtual interface and can have own IP address and mask.
Detailed information about bridge and STP protocol is presented in [2].
Usage:
brctl <command> [parameters]
The commands are following:
addbr <brname> – add new bridge to system with brname. The name can be arbitrary, for
example, br0 or br1. This name can be used for IP assignment with ifconfig command.
delbr <brname> - remove bridge brname
addif <brname> <ifname> - add physical interface ifname to bridge group brname.
delif <brname> <ifname> - remove physical interface ifname from bridge group brname.
stp <on|off> - turn (on) / turn (off) Spanning Tree protocol (STP) support. STP avoids loops in
the net topology and chooses the best routes.
show – lists known bridges to console
showmacs <brname> - lists MAC addresses, detected in the bridge segment
showstp <brname> - lists STP statistics for bridge
After the bridge is added to the system, the new IP address can be assigned for it by ifconfig command.
.
37
ELF2-REE, –RE, –RV User’s manual
Note:
If WAN interfaces (hdlc0, hdlc1) are attached to the bridge, Cisco HDLC protocol is
recommended to be used for channel layer. Usage of PPP and Frame relay was not tested in bridge mode.
Presented here is the example of bridge configuration and assignment IP address for it:
brctl addbr br0
brctl addif br0 eth0
brctl addif br0 hdlc0
brctl stp on
ifconfig br0 192.168.1.54 netmask 255.255.255.0
A.21. Route table management (route)
By using of of route command one can add or delete routes from route table. route without parameters
lists all known routes in the system.
Usage:
add [-net | -host ] IP [netmask NM] [gw GW] [metric N] [dev IF] – add route
del [-net | -host ] IP [netmask NM] [gw GW] [metric N] [dev IF] – remove route
where,
IP – ip address of target network or host. In case of network route, netmask parameter must be
defined also.
NM – net mask, for example 255.255.255.0.
For default route the key word default can be used instead of IP and NM.
GW – gateway IP address (if necessary)
metric N – route metric, where N – decimal number 0..15. Metric is used by dynamic routing
service and it should correspond to the number of intermediate IP hosts to target subnet (host). Directly
accessible nets should have metric 0.
IF – interface name for this route (eth0, hdlc0, etc.).
Examples:
route add default gw 100.0.0.1
route add –net 192.168.1.0 netmask 255.255.255.0 gw 100.0.0.1
Detailed information about route table is presented in [1].
A.22. Dynamic routing RIP (routed)
routed command starts background service of dynamic routing, compatible with RIP protocol (RFC1058). The router starts sending messages with its own route table to neighbor gateways. The best route is
chosen on the basis of route tables from other gateways and their metrics. To check RIP presence on the
other host, command is used:
ripquery HOSTIP
A.23. Filtering and NAT service (iptables)
Configuration of the embedded packet filter is made with the help of iptables command. Filter is
configured by defining rules for target packet recognizing and actions for management of this packet. The
rules are grouped in chains. Chains are organized to tables. The main tables are nat and filter.
There are the following chains in the filter table:
INPUT - all packets with IP destination of this router
FORWARD – all forwarded packets
OUTPUT – all packets, generated by router itself
38
ELF2-REE, –RE, –RV User’s manual
There are the following chains in the nat table:
PREROUTING – the packets before routing
OUTPUT – all packets, generated by router itself
POSTROUTING – packets after routing
iptables usage:
iptables –[AD] chain rule [options]
iptables –I chain [rulenum] rule [options]
iptables –R chain rulenum rule [options]
iptables –D chain rulenum [options]
iptables –[LFZ] [chain] [options]
iptables –N chain
iptables –X chain
iptables –P chain target [options]
where,
chain – name of the chain
rule – packet recognition rule, see definition of rules
rulenum – rule number in the chain
target – with –P switch means default action (default chain policy)
A.23.1. Commands
-N – create the chain
-X – delete chain
-A – add rule to the chain
-D – delete rule from the chain (specify rule number or properties)
-R – remove the rule with known number
-I – insert rule before the rule with number rulenum
-L – dump all rules of the chain
-F – delete all rules in the chain (if chain is not defined, delete all)
-Z – clear packets counters in all rules of the chain
A.23.2. Defining packet recognition rules
-p protocol – protocol (tcp, udp, icmp, all)
-s addr/[mask] – source IP address
-d addr/[mask] – destination IP address
For tcp protocol the following options are acceptable:
--source-port port[:port] – tcp source port (or ports range)
--destination-port port[:port] – tcp destination port (or ports range)
--syn – detect all packets with SYN flag and cleared ACK, FIN flags (tcp packets, starting
connection)
For udp protocol the following options are acceptable:
--source-port port[:port]– udp source port (or ports range)
--destination-port port[:port] – udp destination port
Most of options can be defined with inversion («!» symbol). For example, -p !tcp means all
protocols, except tcp.
A.23.3. Actions when packet is detected (-j option)
-j target – the action when packet is detected. The field target mean other chain name or one of the
predefined actions.
39
ELF2-REE, –RE, –RV User’s manual
For table filter actions are defined with the following keywords:
ACCEPT – pass the packet
DROP – throw out the packet
RETURN – abort the current chain of rules and return to the previous chain
For table nat, the following actions are defined (POSTROUTING chain):
SNAT – translate source IP address, additionally use --to-source option
--to-source ipaddr[-ipaddr][:port-port] – after translation the source address will be chosen
from the ipaddr-ipaddr range. For tcp or udp protocols ports range can be indicated.
Here are the following actions for table nat (PREROUTING and OUTPUT chains):
DNAT – translate destination IP address, additionally use --to-destination option
--to-destination ipaddr[-ipaddr][:port-port] – the destination address after translation will be
chosen from the range ipaddr-ipaddr. For tcp or udp protocols ports range can be indicated.
A.23.4. Additional possibilities of iptables
The detailed description of iptables is presented in document [4].
A.24. Remote statistics acquisition (ipcad)
ipcad service enables to organize statistics collecting. The statistics data is presented in the Cisco IP
accounting format. Statistics is based on the iptables counters. To export statistics data rsh or netflow
protocols are used.
A.24.1. Configuring iptables for ipcad service
Ipcad interacts with iptables by means of ULOG. ULOG is one of the internal program Linux
interfaces. First, iptables should be configured to pass the interesting traffic through ULOG. To do this
ULOG action with –ulog-nlgroup parameter should be used in the iptables rules. The –ulog-nlgroup
parameter is used to point out the netlink group number for the given packet. There are 32 netlink groups
(from 1 to 32). For example, to pass the packet to fifth group, parameter --ulog-nlgroup 5 is used. By
default, the first group is used.
The iptables command syntax:
iptables [options] –j ULOG –ulog-nlgroup [nlgroup]
Examples:
iptables -A FORWARD -j ULOG --ulog-nlgroup 2 – means to pass transit traffic to the second
netlink group.
iptables -A OUTPUT -j ULOG --ulog-nlgroup 32 – means to pass outgoing traffic, generated by
router, to the 32-th netlink group.
To start ipcad service the command is used:
ipcad –d
While starting, ipcad service obtains configuration information from the /etc/ipcad.conf file.
A.24.2. Simple configuration file example
capture-ports disable; /*This mode is compatible with the cisco ip accounting format Netflow.*/
#interface ulog group <group> [, group <group> ...] [ netflow-disabled ];
#netflow-disable – by default, all interfaces are included to the Netflow accounting. With
#help of this option Netflow can be disables for given interfaces
interface ulog group 2, group 32; /* ULOG is used. The same groups are defined as ones in
iptables command */
# aggregate <ip>/<masklen> strip <maskbits> ;
# Collect statistics for given subnetworks
40
ELF2-REE, –RE, –RV User’s manual
#(<ip>/<masklen>) AND (<maskbits>).
aggregate 0.0.0.0/0 strip 32; /* Collect statistics for all IP addresses */
# Netflow options
netflow export destination 192.168.0.1 9996; /* Netflow server address */
netflow export version 5;
/* NetFlow export format{1|5}.*/
netflow timeout active 30; /* Timeout for active stream, in minutes*/
netflow timeout inactive 15; /* Timeout for inactive stream, seconds*/
#RSH server options
#rsh {enable|yes|on|disable|no|off} [at <listen_ip>];
#If "at <listen_ip>" is missed, rsh server accepts all connections
rsh enable at 192.168.0.2;
#RSH server access rules
#rsh [<user>@]<host_addr> {admin|backup|[default]|view-only|deny} ;
rsh [email protected] admin;
/* enable all operations with table, ipcad can be started or
stopped */
rsh [email protected] backup;
/* enable all table operations*/
rsh [email protected];
/* enable to view and modify table */
/* Order is important! */
rsh [email protected] deny;
/* Disable for this user to view table*/
rsh 192.168.0.1 view-only;
/* This users can view only current table*/
# Reduce packets lifetime and rsh timeout, to escape remote attacks
rsh ttl = 3;
rsh timeout = 30;
# PID file path
pidfile = /tmp/ipcad.pid;
Note: Detailed information about ipcad configuration file is presented in the native documentation for the
program. This ipcad version supports ULOG for traffic acquisition only.
A.24.3. Statistics collecting details
Data base with accounts is permanently collected into buffer. With the help of rsh command “clear ip
accounting”, all information from buffer is moved to the checkpoint. To see checkpoint content, “show ip
account” command is used. So, to obtain complete statistics, these two commands should be executed
periodically on the host side:
rsh ip_of_router clear ip accounting
rsh ip_of_router show ip accounting checkpoint >> name_of_file_for_statistics
To account statistics with Netflow protocol, ehnt program can be used, for example.
(see http://ehnt.sourceforge.net/).
A.XX. Linux documentation references
1. Linux Network Administrators Guide // file: LDP/nag2.pdf
2. Uwe Bohme. Linux BRIDGE-STP-HOWTO // file: LDP/BRIDGE-STP-HOWTO.pdf
3. Mike G. Mikkey. BASH Programming – Introduction HOW-TO// file: LDP/Bash-Prog-Intro.pdf
4. Oskar Andrasson. Iptables tutorial // file: LDP/iptables-tutorial.
41
ELF2-REE, –RE, –RV User’s manual
42