1
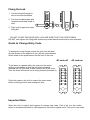
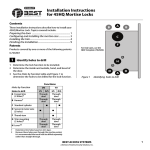
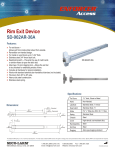
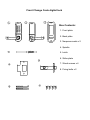
Front Change Code digital lock
Box Contents:
1. Front plate
2. Back plate
3. Neoprene seals x 2
4. Spindle
5. Latch
6. Strike plate
7. Wood screws x 4
8. Fixing bolts x 2
Tools Required
Power Drill
10mm, 12mm, 15mm & 25mm drill bits
Philips screwdriver
Hammer/mallet
Chisel 25mm
Stanley knife
Adhensive tape, pencil, bradawl, tape measure
Installation
Check the hand of your door
Your door is right handed if,
viewed from outside, the hinges
are on the right.
RIGHT HA ND
LE FT HAND
OUTSIDE
Apply the template
1. Tape the template to the door.
Make sure that you fold it along
the appropriate line. depending
on the backset of the latch (60mm).
2. Mark and drill two 10mm, one 12mm
and 14mm holes.
3. Mark a central point on the “centre
line of latch” on the door edge.
4. Drill a 25mm hole x 85mm deep.
5. Insert the latch into the hole, and
draw around the face plate.
6. Remove the latch and cut a 3mm
rebate so that the face plate will fit
flush with the door.
7. Secure the latch with the wood screws.
Fitting the strike plate
Position the strike plate on the door so that it lines up with the flat of the
latchbolt. NOT THE PLUNGER.
Make the inner and outer edges of the strike plate and cut a 1mm rebate so that
it fits flush with the surface of the door frame.
Drill or cut a recess for latchbolt.
Fit the strike plate using only one wood screw at first to ensure that it is positioned
accurately. The latch bolt and not the plunger, should enter the aperture easily, and be held
without too much “play”. When satisfied secure the strike with the second screw.
N . B . The plunger beside the latchbolt
deadlocks the latchbolt and protects it
against manipulation . IT MUST NOT
enter the strike plate aperture when the
PL UN G ER
Latch
the door is closed
Spring loaded Spindle installation
1. The split is loaded with spring
which ensures the split line is
in line to the centre line of the
latch
Split line of ratch
2. The spring can be used for door
thickness 35-60mm.
3. The spring installed must be
inserted to the end of the
front plate.
Front plate
Fixing the lock
1. Cut the fixing bolt length to
suit for the door thickness.
2. Put front and back plate with
neoprene seals and install to
door.
3. Tight up the upper and lower
fixing but.
DO NOT CLOSE THE DOOR UNTIL YOU ARE SURE THAT THE CODE WORKS
DO NOT over tighten the fixing bolts as this may cause distortion and lead to poor operation
Guide to Change Entry Code
To change the code simple remove the lock from the door.
On the reverse of the digital lock you will see screw buttons
Which relate to the push buttons on the front of the lock.
All
code off
所有密码关闭
All
code on
所有密码开启
To set about to operate within the code turn the screw
relating to the button so that the dot is facing inward
(towards the F)if you wish to take a button out of the code,
Turn the screw so that the dot is facing outward (towards G)
Check the code on the lock to ensure the code works
before re-fitting the lock and closing the door.
Important Note:
When the lock is coded, and required to change new code, First of all, turn the coded
button in clockwise direction by 180 degrees to cancel the original code. Then set to new code.