1
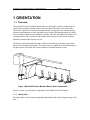
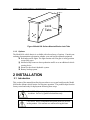
Installation and Operations Manual — Model 890 Series TABLE OF CONTENTS MODEL 890 SERIES SURFACE MOUNTED VEHICLE BARRICADE INSTALLATION MANUAL B&B ARMR Corporate Office & Tech Support: 2009 Chenault Drive Carrollton, TX 75006 Suite 114 Phone: (972) 385-7899 Toll Free: (800) 367-0387 Fax: (972) 385-9887 E-mail: [email protected] [email protected] www.bb-armr.com MADE IN THE USA 5 Installation and Operations Manual — Model 890 Series TABLE OF CONTENTS INTRODUCTION Welcome! Congratulations on your purchase of a B&B ARMR vehicle barrier. In addition to providing detailed operating instructions, this manual describes how to install, maintain, and troubleshoot your vehicle barrier. If you require additional assistance with any aspect of your vehicle barrier's installation or operation, please contact us. With years of experience in all aspects of perimeter security and related disciplines, our products are used throughout the world to control access and to protect people, equipment, and facilities. We offer a broad range of vehicle barrier and related security services: Turnkey installations Routine barrier preventative maintenance or emergency repairs (including work on non-B&B ARMR products) Spare or replacement parts Custom designs or special installations Equipment upgrades (modernize your old equipment with state-of-the-art hydraulics and control systems) Ancillary security equipment such as security guard enclosures, card readers, security lighting, and many other security related products. Technical support via telephone and possible on site support with advanced scheduling. Safety How to Contact Us B&B ARMR works with an extensive list of value added resellers to best support our customers. Our resellers offer not only our superior products, but provide excellent support. If you should need advanced assistance with your vehicle barrier or would like further information on any physical security applications please contact us at: Corporate/Tech Support: B&B ARMR 2009 Chenault Drive Suite 114 Carrollton, TX 75006 USA Telephone: (972) 385-7899 Toll Free: (800) 367-0387 Fax: (972) 385-9887 E-mail: [email protected] [email protected] 5 Installation and Operations Manual — Model 890 Series TABLE OF CONTENTS Table of Contents 1 ORIENTATION ................................................................................................... 4 1.1 Overview .......................................................................................................................................... 4 1.1.1 Attack plate ............................................................................................................................. 4 1.1.2 Buttress ................................................................................................................................... 5 1.1.3 Base Plate ............................................................................................................................... 5 1.1.4 Hinge shims ............................................................................................................................ 5 1.1.5 Brace Arms ............................................................................................................................. 5 1.1.6 Traffic Control Gate ............................................................................................................... 5 1.1.7 Cabinet Lock Tabs .................................................................................................................. 5 1.1.8 Options ................................................................................................................................... 6 2 INSTALLATION .................................................................................................. 6 2.1 Introduction ...................................................................................................................................... 6 2.2 Site Preparation ............................................................................................................................... 7 2.3 Component Inspection ...................................................................................................................... 9 2.4 Physical Installation......................................................................................................................... 9 2.5 Pre-Operation .................................................................................................................................11 2.5.1 Hydraulic Fluid Check ...........................................................................................................11 2.5.2 Electrical Hook-up .................................................................................................................11 2.5.3 Control Hook-up ....................................................................................................................11 2.5.4 Pump Pressure Relief Valve Adjustment ...............................................................................11 2.5.5 Flow Control Valve Adjustment ............................................................................................13 2.5.6 Hydraulic Circuits..................................................................................................................13 2.5.7 Pre-Operation Checklist.........................................................................................................13 3 TROUBLESHOOTING ..................................................................................... 14 3.1 Model 890 Troubleshooting Guide..................................................................................................14 3.2 Hydraulic Pumping Unit .................................................................................................................14 3.3 Electrical Control Unit ...................................................................................................................15 4 WARRANTY ........................................................................................................ 16 5 APPENDIX.......................................................................................................... 17 5.1 Electrical Schematic with Mega Arm ..............................................................................................17 5.2 Electrical Schematic without Mega Arm .........................................................................................18 5.3 Hydraulic Diagram .........................................................................................................................19 5.4 Standard Wire Gage Chart .............................................................................................................20 5 Installation and Operations Manual — Model 890 Series TABLE OF CONTENTS 1 ORIENTATION 1.1 Overview The model 890 surface mounted vehicle barrier is designed to contain a medium speed vehicle impact and prevent that vehicle from entering a restricted access control area. The barrier consists of a bolt down foundation frame, raising plate with locking linkage, and associated hardware to allow the plate to move from a horizontal position to a raised, secure position with the aid of a hydraulic cylinder. The unit is designed for bolting to an existing concrete slab or roadway, and includes all necessary accesses for the required hydraulic conduits and electrical services. The barrier is provided with safety pins, which are used during servicing to prevent the barrier from accidentally lowering. The safety locks are contained in a locked housing so the plate can be locked into the secure position for extended periods of time. Figure 1 Model 890 Surface Mounted Barrier Basic Components Figure 1 orients you to the basic components of the Model 890 vehicle barrier: 1.1.1 Attack plate The attack plate is the structural component that transfers the vehicle impact energy to the base. 5 Installation and Operations Manual — Model 890 Series ORIENTATION DANGER: This vehicle barrier is made of extremely heavy metal. Extreme care should be given to ensure all personnel are clear of the product during operation. 1.1.2 Buttress The buttress houses the hydraulic and electric components that drive the attack plate. The top cover can be unscrewed and lifted off for maintenance. The side cover is held on with optional padlocks. DANGER: High voltage electrical components are located in cabinet. Service by qualified technicians only. CAUTION: Hydraulic linkages are located in cabinet. Do not operate barrier with cabinet door open. 1.1.3 Base Plate The base plate is bolted to the concrete surface to hold the barrier in position during impact. 1.1.4 Hinge shims Hinge shims are provided and required to be installed during assembly to provide a smooth hinge surface. 1.1.5 Brace Arms The power brace arms are engineered to structurally transfer the impact energy to the base plate. 1.1.6 Traffic Control Gate The included traffic control gate cycles with the barrier to give a visual and physical sign the barrier is in the up or down position. This arm is positioned in front of the gate and does not rise until the gate is fully open, and it closes before the gate starts to close. The barrier gate is installed in the field. 1.1.7 Cabinet Lock Tabs Cabinet lock tabs are located on the bottom outside edges of the cabinet door. Locks are customer supplied. 5 Installation and Operations Manual — Model 890 Series ORIENTATION Lock Tabs Figure 2 Model 890 Surface Mounted Barrier Lock Tabs 1.1.8 Options The Model 890 vehicle barrier is available with a broad array of options. Consult your ordering documentation to determine whether your unit has the optional equipment. Red/amber traffic lights. The light remains red if the gate is in any position except fully open. Infrared safety beams to detect pedestrian traffic or as an additional vehicle sensing device. Heater for the electric/hydraulic system. Battery backup system. 2 INSTALLATION 2.1 Introduction This section of the manual describes the procedure to set-up and configures the Model 890 Surface Mount vehicle barrier for first-time operation. The product ships from the factory tested and ready for deployment following these steps. DANGER: High voltage electrical components are located in cabinet. Service by qualified technicians only. CAUTION: Heavy components and pinch points are present in this product. Use extreme care when servicing this unit. 6 Installation and Operations Manual — Model 890 Series INSTALLATION NOTE: The hydraulic hoses are constructed with JIC fittings to allow removal and installation without sealant. Care should be used when disconnecting the pressure side of the hose to insure the pressure has been released prior to disconnecting the fitting. The pressure can be relieved by activating the down control button and visually watching the cylinder close. If the hydraulic cylinder does not fully close, the hose is still under pressure and must not be serviced until the directional control valve has been manually released and the cylinder can be verified to be in a fully released position and the attack plate in the lower position. Prior to working on unit in UP position, insert supplied Safety Lock Pin to ensure attack plate does not move inadvertently. 2.2 Site Preparation The 890 Surface Mount Barrier’s performance is influenced by the surrounding mounting surface conditions and grade. Please consult with B&B ARMR Technical Support if there are questions in regards to the installation site conditions. The following lists some requirements and recommendations related to site choice and preparation: 1. The barrier requires a level surface to operate on. Slight inclines from attack side are acceptable, but inclines left and right may degrade barrier operational performance when opening and closing. The site needs to be level side to side within .25” prior to barrier installation. 2. Installation of electric heat cables in the installation slab keeps snow and ice from accumulating on the barrier. 3. Install the 890 on a concrete slab with a minimum thickness of eight inches (8”). Attach the barrier to the concrete slab using 3/4” x 6” long corrosion resistant steel studs with a tensile strength greater than 7800 PSI. The studs are required to stick out of the concrete a minimum of 1.25”. For anchor location placement, refer to the 890 anchor detail drawing. We recommend the use of at least 70% of the anchor points distributed evenly across the base frame. The anchors may be match drilled and installed after barrier is in place to eliminate possible misalignment. 4. Install barrier in area that has adequate drainage. Barrier’s operational performance when opening and closing may be affected when there is inadequate drainage. 5. Surface of concrete should be completely clean and free of dirt, rocks, and other debris. 7 Installation and Operations Manual — Model 890 Series INSTALLATION Figure 3 Model 890 Surface Mounted Barrier Bolt Pattern 8 Installation and Operations Manual — Model 890 Series INSTALLATION 2.3 Component Inspection Your model 890 Surface Mount vehicle barrier is shipped from the factory with the following standard components (See table). It is recommended these items are inspected upon receipt to ensure installation and deployment time is minimized. Refer to shipping documents for other optional items that may have been included. Please contact B&B ARMR support if any items are missing or damaged. Item Number 1 2 3 4 5 6 7 Part Number Description Quantity Main Assembly XPIN-91594A325 Safety Lock pin Gate Arm Assembly Gate Arm Pole Assembly 0890-3101 Hinge Shim Plates 0890-9001 User Manual Manual Lift Bar 1 1 1 1 5 (1 per hinge) 1 1 2.4 Physical Installation Installation of the 890 barrier should be completed by a qualified technician. Please contact B&B ARMR Technical Support if assistance is required. The following outlines the physical installation procedure: 1. Verify site preparation is complete. Anchors may be match drilled at assembly to the pad. 2. Lift unit with fork lift or crane ensuring adequate support so base plate does not bend or warp during movement. 3. If optional heater kits have been purchased, ensure they are mounted correctly. 4. It is recommended that the safety lock pin is installed in the barrier at anytime during installation when attack plate is in the raised position. Safety Pin Figure 4 Safety Lock Pin Location 9 Installation and Operations Manual — Model 890 Series INSTALLATION 5. Position Hinge Shim Plates under hinge areas prior to setting barrier. Set barrier and assure base plate is level. Verify attack plate lays flat on concrete pad when in down position. Hinge Shims Figure 5 Hinge Shim Plate Installation 6. If anchors have not been pre-installed, match drill and install anchors to conform to recommendations in the site preparation section of this manual. 7. Torque anchor nuts to 100 ft-lbs minimum and ensure barrier is rigidly secured to concrete pad. Verify base plate and attack plate are level. 8. Install gate arm assembly kit to side of buttress as shown in figure 6. Mounting bolts are installed from inside the buttress. Gate arm Assembly Figure 6 Gate Arm Installation 10 Installation and Operations Manual — Model 890 Series INSTALLATION 9. Verify all mounting hardware is tight and barrier is not warped or twisted. 2.5 Pre-Operation 2.5.1 Hydraulic Fluid Check Prior to initial operation, exchange breather plug and shipping plug in hydraulic reservoir. The product is normally shipped from the factory ready for deployment. In some situations the fluids have been drained to accommodate shipping methods. Prior to electrical hook-up, verify the hydraulic fluid levels. If required, add hydraulic fluid. We recommend using environmentally safe oil Mobil EAL 224 or equivalent. 2.5.2 Electrical Hook-up The hydraulic pumping unit is a complete assembly which not only contains the mechanical components, but also the electrical components and logic necessary to make the unit operate. The electrical components are located in a metal box which includes a motor starter, motor overload protector, and the necessary logic to control the barrier. Do not power the unit until all traffic and pedestrians have been cleared from harms way. Please refer to the appropriate wiring diagram that matches your specific product. The wiring diagrams are located in the appendix. 2.5.3 Control Hook-up This barrier is remotely controlled by standard dry contact signals. Please refer to system documentation for control interface. 2.5.4 Pump Pressure Relief Valve Adjustment CATION: Incorrect adjustment of the pressure relief valve will cause the motor and valves to overheat resulting in permanent damage. Adjustment by qualified technician only. The hydraulic pump can be tuned to your specific installation by adjusting the pressure relief valve on the hydraulic pump. The pumps are adjusted at the factory based on normal and expected conditions and this adjustment should not be necessary when you receive your product. However, some factors can influence the performance and may require field adjustment. Care must be used not to fully remove the pressure relief valve assembly. 11 Installation and Operations Manual — Model 890 Series INSTALLATION Normally the pump is set on the low or conservative side of the normal operating range. Therefore, any field adjustments require the turning in of the pressure relief valve by turning the screw clockwise. There are two ways of adjusting the pressure relief valve: The first method is to use an electrical amp meter and adjust the pressure switch until the relief opens at the FLA (full load amps) rating found on the side of the motor. The second method is to adjust the pressure switch so the plate just starts to move as the motor is running. The pressure switch is built into the hydraulic pump under a hex shaped cap near the top of the pump (see figure 7). The hex cover is removed by turning counter clockwise exposing a hex lock nut and an allen head set screw. The hex nut must be turned counter clockwise to allow for the adjustments of the allen screw. The allen screw controls the pressure relief and can be turned counter clockwise to lower the pressure and clockwise to raise the pressure. The screw should be turned slowly to achieve the desired relief setting using either the meter or movement procedure. After the relief is set, hold the allen screw stationary and tighten the lock nut. Check the operating system to confirm that the motor does not exceed the FLA rating. Motor side Adjustable relief valve Reservoir Motor side Motor side Fill Cap Reservoir Reservoir Figure 7: Pump and Reservoir 12 Installation and Operations Manual — Model 890 Series 2.5.5 INSTALLATION Flow Control Valve Adjustment The speed of operation can be controlled by adjusting the flow control valve (see figure 8). This is adjusted in the factory and shouldn’t require field adjustment. The flow control valve is mounted to the cylinder and restricts the down speed only. The proper speed can best be determined by watching the motion of the plate. Figure 8: Hydraulic layout 2.5.6 Hydraulic Circuits The hydraulic hoses are constructed with JIC fittings to allow removal and installation without sealant. Care should be used when disconnecting the pressure side of the hose to insure the pressure has been released prior to disconnecting the fitting. Pressure should be released by shifting the directional control valve manually with the power off. 2.5.7 Pre-Operation Checklist Before operating the Model 890 vehicle barrier, go through the checklist below and verify that each of these steps has been completed. CAUTION: For your safety, complete each of these steps before operating the barrier! Verify pad site is flat. Verify unit has hydraulic fluid to recommended level. Verify control unit is plugged in and cable is routed clear of barrier operation. Verify area is clear of personnel and other obstructions. Ensure supplied power matches product requirements. Verify electrical hookups are completed per electrical wiring diagram matching particular product. It is recommended the unit be cycled 4 complete cycles prior to vehicle traffic. 13 Installation and Operations Manual — Model 890 Series TROUBLESHOOTING 3 TROUBLESHOOTING The table below provides guidance on identifying and correcting any problems with your Model 890 Series vehicle barrier. If you encounter problems that you cannot fix, contact B&B ARMR and we will gladly work with you to correct them. 3.1 Model 890 Troubleshooting Guide Symptom Barrier does not open Barrier does not close Barrier makes noise during operation Hydraulic unit is excessively hot Barrier moves too slowly Traffic indicator light does not change Actions Check power Check overload protector Control unit contacts Check that safeties are clear Check power Check overload protector Check that safeties are clear Check push button operation Check that barrier is not moving too fast Check that cooling fan on motor is working Check that the cover is on properly Check that the limit switch is turning the motor off, and/or motor is off when barrier is not moving. Check the heater element Check that heater element is working Check flow control valve Check proper limit switch operation Check bulbs 3.2 Hydraulic Pumping Unit This device should only be operated and maintained by qualified individuals with experience. These units should not be serviced with vehicle or pedestrian traffic in the vicinity. After being serviced, all required safety tests must be completed before it is returned to operation. The hydraulic pumping unit is designed to operate a double acting hydraulic system, which requires relatively low pressure and low flow. The electric motor is connected directly to a gear hydraulic pump, which operates only when a signal command is given to operate the cylinder. The oil from the pump is drawn through a filter and directed into a speed control valve, which monitors the operational speed of the vehicle barrier. The pumping unit is designed to operate continuously with very little maintenance. The unit is equipped with a heater to ensure proper operating conditions. B&B ARMR recommends the use of environmentally friendly oil such as Mobil EAL 224 in all of our 14 Installation and Operations Manual — Model 890 Series TROUBLESHOOTING hydraulic systems. The oil should be replaced whenever it appears to contain contaminates such as water or dirt. All applications vary due to site conditions and temperature, so the amount and type of contamination will need to be monitored at each site. The oil should be replaced whenever a hydraulic part is replaced due to a mechanical failure, or there is a failure of the heating element. 3.3 Electrical Control Unit The hydraulic pumping unit is a complete assembly containing all electrical components and logic necessary to operate the unit. The electrical components are mounted in a metal box, which include a motor starter, motor overload protector, and a programmable logic controller (PLC). The program installed in the PLC will vary based on the barrier style and application. If the controller should require replacing, please be sure to specify the model, location and type of application. The control circuit box has a switch mounted externally to turn off power to the barrier. The switch should be turned off any time the unit is serviced. Do not restore power to the unit until all traffic and pedestrians have been cleared from the area. 15 Installation and Operations Manual — Model 890 Series TROUBLESHOOTING 4 WARRANTY B&B-ARMR warranties for a period of one year, after delivery F.O.B. plant, unless otherwise specified by Supplier, from failure of operation in ordinary use and against defects due to faulty material or workmanship. Any defective equipment in the Barrier shall be returned to the factory, at Supplier’s option, for repair or replacement, and Supplier assumes no responsibility for service at any consumer site. Supplier is in no event responsible for any labor costs under the warranty. Subject to the above limitation, all service, parts, and replacements necessary to maintain the equipment as warranted shall be furnished by the end user. Supplier shall not have any liability under these specifications, other than for repair or replacement as described above for equipment malfunction or equipment failure of any kind, caused for any reason, including, but not limited to unauthorized repairs, improper installation, installation not performed by Supplier personnel, nor by Supplier authorized personnel, failure to perform manufacturer’s suggested routine maintenance, modifications, misuse, accident, catastrophe, neglect, natural disaster, act of God or if at any time the power supplied to any part of the Security Barrier falls short or exceeds the rate of tolerance for the equipment. The exclusive remedy for breach of any warranty by Supplier shall be the repair or replacement at supplier’s option, of any defects in the equipment. IN NO EVENT SHALL THE SUPPLIER OF SECURITY BARRIER BE LIABLE FOR CONSEQUENTIAL OR SPECIAL DAMAGES OR ANY KIND OF DAMAGES TO ANYONE. Except as provided herein, Supplier makes no warranties or representations to consumer or to anyone else and consumer hereby waives all liability against Supplier as well as any other person for the design, manufacture, sale, installation, and/or servicing of the Security Barrier. THE FOREGOING WARRANTIES ARE IN LIEU OF ALL OTHER WARRANTIES EXPRESS OR IMPLIED, INCLUDING THE IMPLIED WARRANTY OF MERCHANTABILITY AND FITNESS FOR A PARTICULAR PURPOSE. NO OTHER WARRANTIES EXIST. Any modification or alteration by anyone other than B&B-ARMR will render the warranty herein as null and void. 16 Installation and Operations Manual — Model 890 Series 5 APPENDIX 5.1 Electrical Schematic with Mega Arm APPENDIX 17 Installation and Operations Manual — Model 890 Series 5.2 Electrical Schematic without Mega Arm APPENDIX 18 Installation and Operations Manual — Model 890 Series 5.3 Hydraulic Diagram APPENDIX 19 Installation and Operations Manual — Model 890 Series APPENDIX 20 5.4 Standard Wire Gage Chart 1 Ǿ Power Wiring HP 1/2 1/2 1/2 1 1 1 1 1/2 1 1/2 1 1/2 2 2 3 3 Voltage Wire Amps Gage 115 V 12 7.5 A.AC 10 8 6 208 V 12 3.9 A.AC 10 8 6 230 V 12 3.7 A.AC 10 8 6 115 V 12 12 A.AC 10 8 6 208 V 12 6.4 A.AC 10 8 6 230 V 12 6 A.AC 10 8 6 115 V 12 15 A.AC 10 8 6 208 V 12 8.3 A.AC 10 8 6 230 V 12 7.5 A.AC 10 8 6 208 V 12 13.2 A.AC 10 8 6 230 V 12 12 A.AC 10 8 6 208 V 12 18.7 A.AC 10 8 6 230 V 12 17 A.AC 10 8 6 mm2 3.309 5.261 8.366 13.302 3.309 5.261 8.366 13.302 3.309 5.261 8.366 13.302 3.309 5.261 8.366 13.302 3.309 5.261 8.366 13.302 3.309 5.261 8.366 13.302 3.309 5.261 8.366 13.302 3.309 5.261 8.366 13.302 3.309 5.261 8.366 13.302 3.309 5.261 8.366 13.302 3.309 5.261 8.366 13.302 3.309 5.261 8.366 13.302 3.309 5.261 8.366 13.302 3 Ǿ Power Wiring Max Distance 70 110 180 290 250 390 630 1010 290 470 750 1190 50 70 120 200 160 260 420 680 200 310 500 800 40 60 100 160 130 210 340 540 160 260 410 660 80 140 220 350 100 170 270 430 60 100 160 250 70 120 190 310 HP 1/2 1/2 1/2 1 1 1 1 1/2 1 1/2 1 1/2 2 2 2 Voltage Wire Amps Gage 208 V 12 2 A.AC 10 8 6 230 V 12 2 A.AC 10 8 6 460 V 12 1 A.AC 10 8 6 208 V 12 3.5 A.AC 10 8 6 230 V 12 3.2 A.AC 10 8 6 460 V 12 1.6 A.AC 10 8 6 208 V 12 6.2 A.AC 10 8 6 230 V 12 5.6 A.AC 10 8 6 460 V 12 2.8 A.AC 10 8 6 208 V 12 6.2 A.AC 10 8 6 230 V 12 5.6 A.AC 10 8 6 460 V 12 2.8 A.AC 10 8 6 mm2 3.309 5.261 8.366 13.302 3.309 5.261 8.366 13.302 3.309 5.261 8.366 13.302 3.309 5.261 8.366 13.302 3.309 5.261 8.366 13.302 3.309 5.261 8.366 13.302 3.309 5.261 8.366 13.302 3.309 5.261 8.366 13.302 3.309 5.261 8.366 13.302 3.309 5.261 8.366 13.302 3.309 5.261 8.366 13.302 3.309 5.261 8.366 13.302 3 Ǿ Power Wiring (Continued) Max Distance 400 630 1010 1610 450 730 1160 1850 1830 2920 4650 7410 270 430 690 1100 330 520 830 1330 1320 2100 3350 5330 170 270 430 690 210 330 530 850 840 1340 2140 3420 80 140 220 350 100 170 270 430 140 230 370 590 Voltage Amps 208 V 7.8 A.AC HP 3 230 V 7.4 A.AC 3 460 V 3.7 A.AC 3 208 V 15 A.AC 5 230 V 13.2 A.AC 5 460 V 6.6 A.AC 5 Voltage 24 24 24 24 24 V V V V V Wire Gage 12 10 8 6 12 10 8 6 12 10 8 6 12 10 8 6 12 10 8 6 12 10 8 6 mm2 3.309 5.261 8.366 13.302 3.309 5.261 8.366 13.302 3.309 5.261 8.366 13.302 3.309 5.261 8.366 13.302 3.309 5.261 8.366 13.302 3.309 5.261 8.366 13.302 Max Distance 140 220 360 570 160 260 420 670 660 1060 1690 2690 80 140 220 350 100 170 270 430 140 230 370 590 Control Wiring Wire Max Voltage 2 Gage mm Distance (ft) Drop 28 0.081 450 6V 26 0.129 710 6V 24 0.205 1140 6V 20 0.518 2890 6V 18 0.823 4600 6V Notes 1 2 3 Maximum distance is measured from Power Source to Operator. Maximum distance for controls is measured from Operator to Pushbutton or Other device. If distance to power Source is greater than value shown use a higher voltage or three phase unit or contact utility company for a service feeder. 4 If distance to Remote Control device is greater than 2000ft use a range extender device. 5 Power Tabels are based on stranded copper wires and allows up to 2% voltage drop. 6 Control Table is based on stranded copper wires and allows up to 25% Connect Power per local codes. 7 8 9 10 11 Connect Power per local codes. Run Power and Control wiring seperately. Ampere rating is motor full load; Startup up current may be higher. 250 VA Allowed for Controls & Heater 0.1 Amps for control current, these may vary for different models.