1
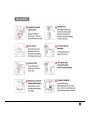
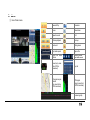
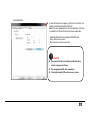
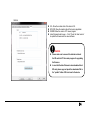
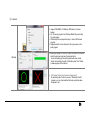
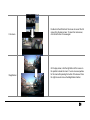
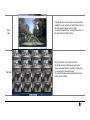
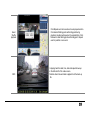
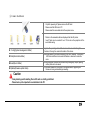
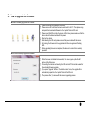
Before you use Thank you for purchasing Janus V2HD. This manual explains how to Install and use the device. Please read the information below before using the device to avoid the discomfort in using the device. Notice Please understand there might be some error in describing and editing this manual. Can be changed without any notice to improve product performance. User’s Manual rev.01 2 Contents Caution for the safety 4 5. Installing the product 10 Caution to SD the card 5 6. Description of Product usage 13 1. About Product 6 7. Install the viewer program in PC 16 2. Configuration of product 7 8. Menu 19 3. Name of each part 8 9. How to upgrade 30 4. Specification 9 3 Caution for the safety 3 to 5 minutes or more after the first time, or insert the SD memory format create a file system check and SD memory recording begins. Therefore, do not remove the SD memory or turn off the device during operation. Do not operate the device during driving for the safe driving. Do not put the device to excessive shock or dust(The device can be damaged or it can cause the fire and the electric shock) Do not clean the device with the liquid or the the volatility chemical.(It may cause the damage, fire or electric shock on the device) Please avoid the excess tinted or a special glass to the windshield. (The video may be distorted or GPS reception can be interfered) Leaving or operating the device under the high temperature for the long time can cause the malfunction or defectiveness of the device. Please make sure to remove the SD card only after you turn off the device to protect the SD card from being damaged) If there are some dirty on the lens or the windshield, they cause the poor video quality. Please do not disassemble modify the device.(It causes the defectiveness and it will void the warranty). Protect the device from the drop and the impact . The time can be reset in case that the device is not be used for the long time. When GPS signal is locked, it is to be automatically set by the live time. The power is to be automatically shut down in case the power voltage is less than 11.7V to protect the battery of the car. When 13V power comes, the normal operation restarts. 4 Caution to the SD card 1. The SD Card is a consumable item. Its read/write characteristics has a lifetime. The recording, prolonged use may not be periodic management is required a. Please prepare for a spare SD card against the case when SD card defectiveness happens. b. Please prepare for a spare SD card against the car accident. 2. In the car accident, please save the recorded data of SD card to your computer because the accident data can be erased due to the overwriting. 3. Please do not remove SD memory in power-on and recording. a. Recorded images may be lost. b. The defectiveness happens or the life of the SD memory may be reduced 4. If some data except the viewer program and recorded data in SD card, they are to be automatically removed to increase stability. 5. Please format SD card on your PC on a regular basis twice a month to keep the maintenance. a. The dive format function in the viewer program is recommended. b. Please download the SD formatter program on http://www.sdcard.org to check the SD card. c. MLC Type, Class 10 for this device is to be recommended. 6. SD card is the consumable item. a. There is the life time for writing & reading and Record error can happen in using the device in high temperature for the long time. b. Please understand that the maker are not responsible for the record error due to the past life SD card. c. Warranty for the bundle SD card is 6 months since your purchasing date. 7. 3 to 5 minutes or more after the first time, or insert the SD memory format create a file system check and SD memory recording begins. If SD card is removed on creating data, the record operation cannot be made. 5 1. About Product Smart W DR Clear video quality, WDR Support Smart HD 720P/30fps Both internal view cam & Front view cam Smart Recovery SD card Auto recovery function Smart Information Voice guide- to inform the condition of the device Smart W i-Fi Transfer one image per each event through Wi-Fi to PC server. Smart Security High bright security LED Smart Saving Support constant power discharge protection function Power Off-11.7V, Power On – 13V 6 2. Configuration of the product 7 3. Name of Each part 8 4. Specification Janus V2HD Image sensor Audio Input Video compression Audio compression Recording resolution Recording Speed Emergency/External Emergency button G-Sensor Voice guide(speaker) GPS Record media Lens Viewer Power Operation temperature Humidity Weight Dimension (W x D x H) Front view camera : WDR 1M pixel Internal view camera : WDR 1M pixel Built-in Mic H.264 ADPCM Front view camera : 720P(1280*720) Internal view camera : 720P(1280*720) Max 30fps/Each Channel Event record by the emergency button Event record by the external impact Alarm and voce to inform the condition of the device For connecting with E-Google map(Built-in) SD card (Basic: 16GB, Maximum: 128GB) Recommend spec : Over MLC Class 10, Operation termperature : Over 85°C Front view camera : About 130° wide angle lens Internal view camera : About 130° wide angle lens Windows XP/ VISTA/ 7/ 8-32Bit/ 64Bit DC 12V ~ 24V -20°~70°C(Storage temperature: -20° ~ 90°C) 10~95% 60(W) x 112(D) x 42(H)mm 9 5. Installing the product Caution in installing the product Once installed, it is not easy to move the adhesive bracket to other position on a windshield or a rear window. Please install the device not to obscure the field of vision of driving. Please preferably install this device away from other electronic products such as navigation. Installation First, please make the position on the front of rearview mirror and set the device on the middle of top of location windshield by the camera with keeping it horizontally. 10 11 Caution about how to use the SD card Do not use the SD card of this device for other purpose. It is to be automatically removed in this device. Due to the SD card compatibility, please purchase the genuine. Please remove the SD card after powering off the device and checking out REC LED power-off. (SD card might be damaged). Please use a SD card having the specification over MLC Class 10 and operation temperature over 85 °C Warranty period of SD card is 6 months, except the bundle SD card, we are not responsible for its AS - How to insert theSD card If the SD card is not properly fitted, the recording cannot start. Please push the SD card until you hear a “click” sound. 3 to 5 minutes or more after the first time, or insert the SD memory format create a file system check and SD memory recording begin When “Recording starts” voice guide comes up, the device starts recording. 12 6 . Description of Product Use Pow er ON Pow er OFF G PS Emergency - After installing powering on this device, all LEDs start flickering. Recording starts with “Recording starts” voice guide and powering on REC LED. In disconnecting with an external GPS, GPS LED Powers off. - When the device is disconnected with the power, REC LED powers off. - GPS LED starts flickering then if 3D reception status comes, GPS LED keeps bright. When the emergency button shortly pressed, “emergency” recording starts. - 13 Record mode Normal - Impact Parking - Motion - Once powering on the device, the normal recording starts. Security LED is to flick once for 1 sec. If some impact is applied to the moment of car accident, the built-in sensor defects it and make the device recording “Impact” event model with flickering REC LED. After the end of the event record mode, the normal recording automatically restarts. If G-sensor does not detect any motion in stopping or parking in case of checking the parking mode, the device automatically is to enter into the parking mode after 5 minutes. Recording with 10FPS to extend the recording time. Security LED is to flick once for 1 sec Normal recording automatically is to restarts once the vehicle moves. If the motion is detected in 3 meter in front of the vehicle in the parking mode, motion mode recording is to start.(This can be influenced with the circumstance and light). After the end of the motion recording, the parking mode restart. 14 Voice guide Start the normal recoding Complete the system Overwrite GPS connected Abnormal recording Changing the parking mode to the normal recording For mat the SD card No inserting SD card Defective SD card Recover SD card’s file system Normal FW update Fail updating FW - Start recording The system is to be shut down. Recording does not have enough available. Please check overwriting setting. GPS is connected. Video is not being entered. - Driving mode to start recording. Safe driving. - On formatting the SD card. Please wait. No SD card On formatting the SD card. Please wait. Reboot because of the damaged SD card. Please replace the SD card if this occurrence continues. Firmware update in process, please do not power off. Firmware update process has been terminated. 15 7 . Installing the view er p rogram in PC Caution Over CPU-Dual 2.4 G , Over RA M-2G and Over VG A 512M as PC sp ecification are required for playing back the Full HD. In the low sp ec PC, th e recorded data cannot be properly played back. ① In a SD card to be used at the first time or a formatted one, the viewer program is not installed. ② First, please insert a SD card into the device and power on device. ③ Recording time can be different in accordance with a SD storage capacity. Please do not power off the device for 3~5minutes to create the data file system(after normal booting with flickering all LEDs, recording start with turning on REC LED). ④ Please take out SD card and insert it in PC. ⑤ Please execute “Viewer.exe” file in PC. ⑥ Please click “Yes(Y)” in “User account control” menu. 16 ⑦ Please choose “Automatic installation” and click “Next”. ⑧ If the network is connected, “the latest version confirmation” window about the firmware and viewer program pops up. If you want to upgrade them, please click ”Upgrade”. If the network is not connected, Janus V2HD viewer program runs. 17 ⑨ When the installation is completed, Janus V2HD viewer program automatically runs and Janus V2HD viewer program icon is to be created on PC. ⑩ Open a file- when you click “Open” in the viewer, please choose one removal Disk then click “confirm” 18 8. Menu ① Icon of basic menu Reverse/Play Panorama Pause Draw Lanes Repeat a event Print 1 frame playback Back-up next event Setting menu Play back speed Open a file Adjust the audio volume Switching screen, Black white screen Speed (only case that a GPS is connected) Play list E-Google map on internet (only case that a GPS connected). GPS signal bar(only case that a GPS connected) G-sensor graph 19 ② Setting a. System Resolution - Front view camera : HD(720P) & (450P) - Internal view camera : HD(720P) & (450P) Normal /Event – Adjust the frame per a second. Above items are related with the data size and SD memory storage space. Audio- Recorded with voice or not. Overwrite- In checking “use”, when the SD memory card is full, it will automatically overwrite only the normal mode data saved on to the SD card from the beginning. In checking “Not use”, it will not record after writing the last data in SD card. Standard time zone : Setting the appropriate time for each country Auto Reboot -Set the auto reboot once daily for keeping the stable operation Km/Miles- Choose Kilometers or Miles on viewer. 20 Event Event-Emergency/Impact /Over speed /Sudden deceleration /Sudden acceleration/parking/motion Event recording time - Record after the event : Set the time for recording the data by set FPS after the event. Impact - Adjust the sensitivity of the impact(G-Sensor). Over Speed setting – Set the over speed to activate the event. Storage of the event – Set each proportion of Normal folder and event folder. Caution If the device is powered on after changing the proportion of event folder, SD card is always formatted automatically. Please note this point and please back up the important recorded data in advance. 21 User’s settings Vehicle Info- Input the kind of vehicle. Deriver info-Input the driver’s name. License plate no.- Input the license plate number. User’s info: User’s ID- Input ID in the main screen.(Default : admin). Password- Set the password to log in. (Default-No password). LBP: Low battery protection function to adjust the power voltage. Setting time- In case that an external GPS is connected, a user can sets manually set the time. Caution This menu is for the private information. Please keep this information from the disclosure. In case of forgetting the password, you never log and watch the recorded data at all in the viewer program. 22 Removable Disk In case that some errors happen in SD card, this function is for restoring or formatting the data of SD card. Before this work, please back up the recorded data in SD card in preparation for the worst case to lose the recorded data. - Select the drive where is installed with the SD card. - Select the function you want. - Drive format remove all recorded data.. Caution The speed of the SD card declines significantly when used for a long period of time. The management of SD card is important. Check and format the SD card once every a week . 23 Version OS – Show the creation date of the device’s OS. S/W VER- Show the creation date of the device’s application. VIEWER-Show the version of PC viewer program. Latest firmware/Latest viewer – Click “Check the latest version” to update the firmware and the viewer software. Caution Please make sure to connect the internet and insert the SD card into PC then make progress for upgrading the firmware. In case that the latest firmware is downloaded without SD card, please copy and paste the downloaded file in the “update” folder of SD card used in the device. 24 ③ Functions a. Image (JPEG, BMP), AVI Backup, JDR backup, G-sensor backup. b. AVI file can be played in the Windows Media Player and other AV media player. c. JDR backup file can played back only in Janus V2HD viewer program. d. Image backup file can be showed in the image viewer or the paint program. Backup e. Backing up image, AVI and JDR- Select the time of the recorded data to be back up and press the back-up button f. In case of backing up the audio together with video, check “Audio” and nominate the path of data then press “Next” button to make progress of the back-up. g. . AVI backup function can be used to tamper-proof By selecting “open” button to execute “ Watermark Proofer” program, you can check whether the back-up data has been tampered or not. 25 Full screen Magnification Double click the left button of the mouse to convert the full screen from the main screen. To return the main screen, click the left button of mouse again. On the play screen, click the right button of the mouse on the position to make the zoom. You can move everywhere for the zoom after pressing the button of the mouse. Press the right mouse to remove the Magnification function. 26 Click Draw a lane icon as above to pop up screen, adjust the line to match lane. Select “Draw lane” on the load and click Apply button to start. To cancel “Draw the lane”, unselect Draw lane on the load and click “Apply” button. Draw Lane . Thumbnail Click ‘Panorama’ icon as above to start. 16 divided screens will show up, each screen shows individual frame in sequence. Double click on one screen to show full screen. To cancel Panorama mode, click Restore screen button as red marked. 27 Event Shuffle playback OSD Click Repeat event icon as above to setup repeat section. Click desired Starting point and Ending point during playback, playback will repeat on the selected time. Click Release to clear Starting point and Ending point. Repeat event is possible in one event. In playing back the data, time, date and speed shows up in the bottom left of the video screen. Notation about time and date is applied to all the back-up file. 28 ④ Folder in the SD card Config(System management folder) Data(Normal data folder) Event(Event folder) Update(firmware update folder) Only after powering off, please remove the SD card. Please insert that SD card in PC. Please select the removable disk in the explorer menu. Folders in the removable disk are displayed like the left picture. “event” folder can be created if over 10% is set as the proportion of the event data saving. - Log.txt: The operating status of the device is to be saved in the log file. - Version.ini: Saving the version information of the device - Recorded data is to be saved. According to SD card’ capacity, the quantity JDR folder is different and create the folders in advance to make the room. - Event(over speed, sudden start, sudden stop, emergency, impact, parking, motion) data are to be saved. - If the latest firmware is to be saved in the update folder, upgrading the firmware is being automatically proceeding. . Caution - Freely deleting and formatting files in SD card are strictly prohibited. - Please back up the important recorded data in the PC. 29 9. How to upgrade the firmware How to manually upgrade the firmware ① Please disconnect the power with the device. ② Please remove SD card from the device and insert it into PC. Then please copy and paste the downloaded firmware to the “update” folder in SD card. ③ Please insert that SD card into the device. At this time, please make sure that the device should be disconnected with the power. ④ Start up the vehicle. ⑤ After inserting the SD card, please connect the power cable with the device. ⑥ On booting, the firmware is to be upgraded with the voice guide and flashing LED. ⑦ When upgrading firmware is completed, the device is to reboot then normally operates. How to automatically upgrade the firmware ① When the viewer is installed and executed, the menu pops up like the left picture at the first screen. ② Connecting the internet and inserting the SD card into PC should be needed for the automatic firmware upgrade. ③ If you press “Upgrade” button in “the latest version” menu, the upgrade file is automatically copied into the “update” folder of the SD card. ④ The process after ③ is same with the manual upgrading process. 30 10. Wi-Fi ①FTP Server - ID : No use - Password : No use - IP Address : IP Address of PC sever to where the image is transferred. ②UPLOAD - Event Only : When this is checked, only image of event data is to be transferred. If this is not checked, each one image of each data is to be transferred to the PC server. - Start Time : The time for transferring of the data after booting. Not to transfer the data for the period to be set because it is regarded that the set Wi-Fi AP is near a vehicle in the first booting. ③ WLAN - Network Name(SSID) : Set a name of wireless AP to be accessed. - Network Key : Set a password of wireless AP - Auth Mode : Set a auth mode of AP. Choose one among OPEN, WPAPSK and WPA2PSK. - Encryption Type : Choose one among TKIP and AES. 31 32