1
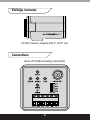
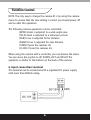
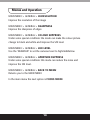
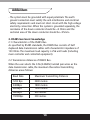
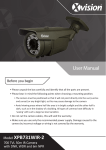
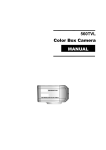
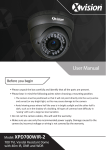
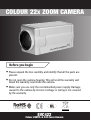
COLOUR 22x ZOOM CAMERA
Before you begin
• Please unpack the box carefully and identify that all the parts are
present.
• Do not open the camera housing. This will void the warranty and
break the warranty seal inside the camera.
• Make sure you use only the recommended power supply. Damage
caused to the camera by incorrect voltage or wiring is not covered
by the warranty.
EVC422
EVC300D
Colour Colour
480TVLDome
& 22XCamera
Zoom Camera
Package Contents
EVC422 Camera complete with 2° to 60° Lens
Connections
Back of EVC422 showing connections
2
WARNING
WARNING: Thank you for buying the colour video camera. Before
operating, please be sure of camera model and that you
have the recommended power supply.
To prevent shock and fire hazard, do not expose the unit
to rain or moisture.
Please take notice of the ‘dangerous voltage’ symbol to
avoid serious accident or injury.
Warning: This equipment has been tested and found to comply with
the guidelines for a Class A digital device, pursuant to part 15 of the
FCC rules. These guidelines are designed to provide reasonable
protection against harmful interference when the equipment is
operated in a commercial environment. This equipment generates
radio frequency energy and, if not installed and used in accordance
with the manual, may cause harmful interference to radio
communications. Take care when operating this equipment in a
residential area as it may cause interference with other electrical
equipment.
Caution: Any unauthorised changes or modifications in construction
of this device could void the warranty.
3
Function Control
1. Button Functions
TELE
NEAR
MENU
FAR
WIDE
a) TELE- This button allows you to ‘zoom in’ on the picture;
use the arrow
b) WIDE- This button allows you to ‘zoom out’ on the picture;
use the arrow
c) NEAR, FAR- These buttons are used for manual focusing;
use the arrow for ‘NEAR’ and the arrow for ‘FAR’
d) MENU- This button displays the menu;
please refer to pages 7-16 for details
2. Video Signal Output terminal (BNC, VOUT)
The output of this port is 1.0Vp-p, 75Ohms standard video level
3. Lamp for power supply
When the power is on, the lamp will illuminate.
4
Function Control
4. Function for line control (hard wired controller)
5. RS485 connection terminal
Use the RS485 port to connect the camera to a keyboard controller
and control it. The camera is compatible with eight different
protocols.
The protocol and baud rate can be changed by using the dip switches
on the rear of the camera. See the following examples to change the
protocol settings:
5
Function Control
NOTE: The only way to change the camera ID is by using the camera
menu. To ensure that the new setting is correct you should power off
and on after this operation.
The following camera operations can be controlled:
(WIDE) Zoom is adjusted to a wide angle view
(TELE) Zoom is adjusted to a telescopic picture
(FAR) Focus is adjusted for far distance
(NEAR) Focus is adjusted for near distance
(OPEN) Opens the cameras Iris
(CLOSE) Closes the cameras Iris
When using the camera with a controller, you can browse the menu.
You can move the joystick to UP, DOWN, LEFT and RIGHT. The
operation is similar to the buttons on the back of the camera.
6. Input connection terminal
This terminal can be connected with a regulated DC power supply
with more than 800mA rating.
6
Menus and Operation
How to set up functions
Functions can be set up using the 5 buttons on the camera rear panel
TELE
NEAR
MENU
FAR
WIDE
Press ‘MENU’ button to enter options in the menu control screen.
Press 'MENU'’ button to return.
Under main menu mode, press ‘TELE’ ‘ ‘ ‘WIDE’ ‘ ‘ for each sub
menu; press ‘NEAR’ ‘ ‘ ‘FAR’ ‘ ‘ to enter sub menu mode.
Under sub menu mode press ‘TELE’ ‘ ‘ ‘WIDE’ ‘ ‘ to choose the
the required settings; press ‘NEAR’ ‘
‘ ‘FAR’ ‘
‘ to change the
value.
In the sub menu press the ‘MENU’ key to return to the main menu at
any time.
Press ‘MENU’ button for about 3 seconds to enter.
7
Menus and Operation
The menu contains the MAIN MENU and sub menus.
The MAIN MENU displays 10 camera settings which can be selected.
MAIN MENU
INITIAL SET
LENS INITIALISE
LENS AUTO INIT
GENERAL
FOCUS MODE
BACKLIGHT
OFF
PRIVACY
WBC MODE
AE MODE
ANTI COLOUR ROLLING
FLICKERLESS
EXEC
5K
SEL
ZMTR
OFF
AUTO
AI
OFF
OFF
The selected category will blink.
MAIN MENU > INITIAL SET
Reset the current general settings to the default settings.
MAIN MENU > LENS INITIALISE
Calibrates the lens.
MAIN MENU > LENS AUTO INIT
Calibrates the lens automatically for 5m, 10m, 15m and 20m.
8
Menus and Operation
MAIN MENU > GENERAL
The GENERAL menu includes the following sub options:
GENERAL
CAMERA ID
MIRROR
HI RESOLUTION
SHARPNESS
COLOUR SUPPRESS
LUX LEVEL
APERTURE SUPPRESS
BACK TO MENU
001
OFF
OFF
OFF
OFF
LOW
OFF
<--
MAIN MENU > GENERAL > CAMERA ID
Displays the camera ID. The camera ID can be set from 001 to 255 by
using the ‘NEAR/FAR’ buttons.
MAIN MENU > GENERAL > MIRROR
The video out put from the camera can be reversed (mirror image)
using this function.
9
Menus and Operation
MAIN MENU > GENERAL > HI-RESOLUTION
Improve the resolution of the image
MAIN MENU > GENERAL > SHARPNESS
Improve the sharpness of edges
MAIN MENU > GENERAL > COLOUR SUPPRESS
Under some special conditions the mode can make the colour picture
change to black and white and improve the S/N level.
MAIN MENU > GENERAL > LUX LEVEL
Use the ‘NEAR/FAR’ to set the cameras level to high/middle/low
MAIN MENU > GENERAL > APERTURE SUPPRESS
Under some special conditions this mode can reduce the noise and
improve the S/N level.
MAIN MENU > GENERAL > BACK TO MENU
Returns you to the MAIN MENU
In the main menu the next option is FOCUS MODE
10
Menus and Operation
MAIN MENU > FOCUS MENU
The FOCUS MENU includes the following sub options:
FOCUS MENU
FOCUS MODE
ZMTR
RUNTIME
005
SENSITIVITY
NORM
NEAR FCS LIMIT
002
W/T
50cm/1m
BACK TO MENU
<--
MAIN MENU > FOCUS MENU > FOCUS MODE
>NORM
This mode will enable the iris to focus continuously. If you do not
want the iris to focus continuously, then use the Interval Focusing
setting or the Zoom Focusing setting, which will prolong the life of
the iris.
>INTV
AF Interval Time- Using the ‘NEAR/FAR’ controls you can set interval
the time that the camera focuses between from 0 and 120 seconds.
>ZMTR
The lens will focus every time the zoom is adjusted.
>MANU- Choose the mode, after exiting the menu adjust the focus
by using the ‘ NEAR/FAR’ controls.
MAIN MENU > FOCUS MENU > RUNTIME
Using the ‘NEAR/FAR’ controls you can set the time speed at which
the camera zooms between 0 and 120 seconds.
11
Menus and Operation
MAIN MENU > FOCUS MENU > SENSITIVITY
This enables you to adjust the sensitivity of auto focusing.
MAIN MENU > FOCUS MENU > NEAR FOCUS LIMIT
It is possible to set the camera to focus on objects as close to 1cm
from the lens. In this mode the camera is optimised for close up
viewing only. This limit (W/T) can be set at up to 10 metres. Please
the table below for settings.
MAIN MENU > FOCUS > W/T
The near focus limit selected will be shown here.
MAIN MENU > FOCUS > BACK TO MENU
Returns you to the MAIN MENU
In the main menu the next option is BACKLIGHT
MAIN MENU > BACKLIGHT
BACKLIGHT MODE SEL
BACKLIGHT MODE
OFF
BACK TO MENU
<-AE MODE MUST BE AE
Backlight compensation ON/OFF switch. If the object you wish to
view is poorly lit because of a bright background, set the ‘BACKLIGHT
MODE’ to ‘ON’ to compensate. This function may not operate if the
object is too small when compared to the area of the background.
12
Menus and Operation
MAIN MENU > BACKLIGHT > SENS GAIN
To set the sensitivity of the back light use the ‘NEAR/FAR’ controls to
set the gain between 0 and 255.
MAIN MENU > BACKLIGHT > AREA MODE
(The area you wish to watch clearly should be selected as shown below).
AREA1- The middle window
AREA2- The down one-third window
AREA3- The left, middle window
AREA4- The right, middle window
AREA5- The up one-third window
MAIN MENU > BACKLIGHT > BACK TO MENU
Takes you back to the MAIN MENU where the next item is PRIVACY
MAIN MENU >PRIVACY
MASK SET
MASK NUMBER
(1-8)
001
MASK SET
OFF
H. START POSITION
H. END POSITION
V. START POSITION
V. END POSITION
MASK COLOUR
HOLD
BACK TO MENU
<-MUST OPERATE ON MANU FCS
13
Menus and Operation
MAIN MENU > PRIVACY > MASK NUMBER
Eight areas can be set:
MASK SET
H. START POSITION
H. END POSITION
V. START POSITION
V. END POSITION
MASK COLOUR
Hold GREY, WHIT, BLAC, RED, ORAN, YELL, GREE, BLUE, PURP
MAIN MENU > PRIVACY > BACK TO MENU
Takes you back to the MAIN MENU where the next item is WBC MODE
MUST OPERATE ON MANU FCS
MAIN MENU > WBC MODE
WBC MODE
WBC MODE
AUTO
BACK TO MENU
<-ANTI-COLOR MUST BE OFF
MAIN MENU > WBC MODE > PUSH
Will auto adjust the white balance whenever the zoom or focus
buttons are pressed.
MAIN MENU > WBC MODE > MANU
WBCADJ- Allows you to manually adjust the white balance.
MAIN MENU > WBC MODE > INDO
Set colour temperature to about 3200K, recommended when using
the camera indoors.
14
Menus and Operation
MAIN MENU > WBC MODE > FLUO
Set colour temperature to about 4700K, recommended when using
the camera under fluorescent lighting.
MAIN MENU > WBC MODE > OUTD
Set colour temperature to about 9500K, recommended when using
the camera outdoors.
MAIN MENU > WBC MODE > AUTO
Automatically adjusts colour according to the light available
MAIN MENU > WBC MODE > BACK TO MENU
Takes you back to the MAIN MENU where the next item is AE MODE
ANTI-COLOUR MUST BE OFF
MAIN MENU >AE MODE
AE MODE
AE MODE
AI
BACK TO MENU
<-FLICKERLESS MUST BE OFF
MAIN MENU > AE MODE > AE
MAIN MENU > AE MODE > AI
MAIN MENU > AE MODE > MANU
MAIN MENU > AE MODE > SHUTTER
Shutter speed can be changed: 1/50 (1/60), 1/120(1/100), 1/250,
1/500, 1/1K, 1/2K, 1/4K, 1/10K, 1/100K IRIS
Iris can be adjusted: CLOSE: F1.6-F16
15
Menus and Operation
MAIN MENU > AE MODE > AGC
Gain can be adjusted: 5dB/13dB/22dB/30dB
MAIN MENU > AE MODE >BACK TO MENU
Takes you back to the MAIN MENU where the next item is ANTI
COLOUR ROLLING - FLICKERLESS MUST BE OFF
MAIN MENU > ANTI COLOUR ROLLING
When using the camera in artificial light the frequency of the light
can sometimes cause colour rolling on CCTV cameras. Turning this
feature on and adjusting the flickerless control can help to prevent
this.
MAIN MENU > FLICKERLESS
You can choose NORM, LLFL, FIXS and OFF
MAIN MENU > EXIT
Takes you out of the menu mode
16
Specifications
Model:
EVC422
Image Sensor:
Sony 1/4” Super HAD CCD
TV System:
PAL
DSP:
IXC1
Resolution:
480TVL
Minimum Illumination:
0.5 Lux
Audio
No
Operating voltage:
12V DC 800mA
Suggested Power Supply
12V DC 1250mA
Mounting
Wall/Ceiling
Lens Viewing Angle
2° to 60°
IR Nightvision:
No
Weatherproofing
Optional
Dimensions
60 x 61 x 111.5mm (WxHxD)
17
Addendum
Appendix
1. Lightning proof and surge signal proof
The product uses TVS lightning proof technology to prevent damage
from a lightning strike below 1500W and impulse surge signals. It is
also necessary to take note of the following precautions to ensure
electrical safety for all applications.
- Keep the communication cables at least 50 metres away from high
voltage equipment or cables.
- Position outdoor cabling under the eaves wherever possible.
- In an open area shield the cables in a steel conduit and attach a
single point ground to it. The use of trolley wire is not
recommended in such circumstances.
- Extra strong lightning proof equipment must be installed in the
event of a thunderstorm or if unit is located in close proximity to a
high voltage electrical substation.
- Ensure the building has the necessary lightning proof measures in
place before designing the system and choosing your cable runs.
Run any cables in accordance with national and industrial
standards.
18
Addendum
- The system must be grounded with equal potentials. The earth
ground connection must satisfy the anti-interference and electrical
safety requirements and must not short circuit with the high voltage
electricity connection. When the system is grounded separately, the
resistance of the down conductor should be <4 Ohms and the
sectional area of the down conductor should be <25mm2.
2. RS485 bus basic knowledge
2.1 Characteristics of the RS485 BusAs specified by RS485 standards, the RS485 Bus consists of half
duplexed data transmission cables with characteristic impedance of
120 Ohms. The maximum load capacity is 256 unit loads (including
main controller and controlled equipment).
2.2 Transmission distances of RS485 BusWhen the user selects the 0.56 (24AWG) twisted pair wires as the
data transmission cable, the maximum theoretical transmitting
distances areas follows:
Baud Rate
Maximum Transmitting Distance
1200 Bps
2400Bps
4800Bps
9600Bps
19200Bps
2400 metres
1800 metres
1200 metres
800 metres
200 metres
19
Addendum
If the user selects thinner cables or installs the camera in an
environment with strong electromagnetic interference, or connects
lots of equipment to the RS485 Bus, the maximum transmitting
distance will be decreased. To increase the maximum transmitting
distance do the opposite.
2.3 Connection and termination resistorThe RS485 standards require a daisy chain connection between the
equipment. There must be termination resistors with 120 Ohms
impedance at both ends of the connection. (refer to Figure 37). Please
refer to Figure 38 for simple connection. ‘D’ should exceed 7 metres.
20
Addendum
2.4 Problems in practical connectionIn special circumstances it may be necessary to adopt a star
configuration to achieve the best connection. the termination
resistors must be connected to the two items of equipment that are
farthest away from each other, such as items 1 and 15 in Figure 39.
As the star configuration does not conform to the RS485 standards,
problems such as signal reflections and lower anti-interference
performance may arise when the connecting cables are too long. The
reliability of the control signals is decreased and the camera may not
respond. It may respond intermittently or operate continuously
without stopping (refer to Figure 40).
21
Addendum
22
23
TECHNICAL SUPPORT:
For Technical Support please contact your local distributor.
LIMITED WARRANTY:
This product is supplied with a limited 1 Year warranty. The Warranty
excludes products that have been misused, (including accidental
damage) and damage caused by normal wear and tear. In the unlikely
event that you encounter a problem with this product, it should be
returned to the place of purchase.
24