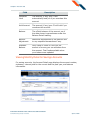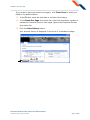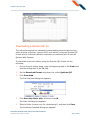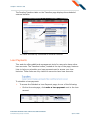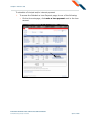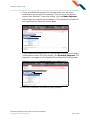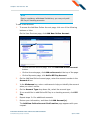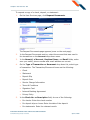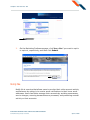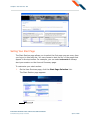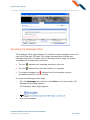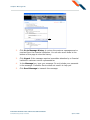
1
Internet Banking Basic
Services User’s Manual
April 1, 2010
Version 3.22
2
© 2001 - 2010 FIRST DATA CORPORATION
All Rights Reserved.
Printed in U.S.A.
This document contains confidential and proprietary information of First Data
Corporation. You may not disclose, copy or use any portion of these materials
for any purpose without the express written consent of First Data Corporation.
All trademarks, service marks, and trade names referenced in this material
are the property of their respective owners.
Periodic revisions to this manual are issued to reflect technical changes and
enhancements to the System, and to ensure that all information contained
herein remains current and accurate.
3
Revision Guide: April 1, 2010
Topic Updated
Description of Change
Toolbar screen shot on
page 94
The Toolbar screen shot has been updated.
Transfers page screen
shot on page 97
The Transfers page screen shot has been updated.
Confirmation page
screen shot on page 97
The Confirmation page screen shot has been updated.
Transfer Summary page
screen shot on page 98
The Transfer Summary page screen shot has been
updated.
Transfers page screen
shot on page 99
The Transfers page screen shot has been updated.
Transfers page screen
shot on page 100
The Transfers page screen shot has been updated.
Transfer Detail page
The Transfer Detail page screen shot has been updated.
screen shot on page 101
Transfers page screen
shot on page 101
The Transfers page screen shot has been updated.
Transfer Edit page
The Transfer Edit page screen shot has been updated.
screen shot on page 102
Confirm Transfer
The Confirm Transfer Instructions page screen shot has
Instructions page screen been added.
shot on page 102
Scheduled Transfer
Updated page screen
shot on page 103
The Scheduled Transfer Updated page screen shot has
been added.
Transfers page screen
shot on page 104
The Transfers page screen shot has been updated.
Transfer Delete page
The Transfer Delete page screen shot has been updated.
screen shot on page 104
INTERNET BANKING BASIC SERVICES USER’S MANUAL
Confidential and proprietary to First Data
April 1, 2010
Revision Guide: April 1, 2010
Topic Updated
Transfers page screen
shot on page 105
4
Description of Change
The Transfers page screen shot has been updated.
View History page
The View History page screen shot has been updated.
screen shot on page 106
Transfer History page
The Transfer History page screen shot has been updated.
screen shot on page 106
Transfer History Detail
page screen shot on
page 107
The Transfer History Detail page screen shot has been
updated.
Transfers page screen
shot on page 108
The Transfers page screen shot has been updated.
User Services page
The User Services page screen shot has been updated.
screen shot on page 109
User Services/Account
Services page screen
shot on page 110
The User Services/Account Services page screen shot
has been updated.
User Services
Agreement page screen
shot on page 111
The User Services Agreement page screen shot has been
updated.
Add External Account
page screen shot on
page 112
The Add External Account page screen shot has been
updated.
Confirmation page
The Confirmation page screen shot has been updated.
screen shot on page 112
Final Confirmation page The Final Confirmation page screen shot has been
screen shot on page 113 updated.
Entering an External
Account Transfer
Request at an FI in
Mexico section on
page 114
The Entering an External Account Transfer Request at an
FI in Mexico section has been added/
User Services/Account
Services page screen
shot on page 120
The User Services/Account Services page screen shot
has been updated.
INTERNET BANKING BASIC SERVICES USER’S MANUAL
Confidential and proprietary to First Data
April 1, 2010
Revision Guide: April 1, 2010
Topic Updated
Transfers page screen
shot on page 121
5
Description of Change
The Transfers page screen shot has been updated.
Confirmation page
The Confirmation page screen shot has been added.
screen shot on page 122
Transfer Scheduled
The Transfer Scheduled Successfully page screen shot
Successfully page
has been added.
screen shot on page 122
Transfers page screen
shot on page 123
The Transfers page screen shot has been added.
Accounts/Loans page
The Accounts/Loans page screen shot has been added.
screen shot on page 123
Transfers page toolbar
The Transfers page toolbar screen shot has been added.
screen shot on page 124
Loan Account Detail
page screen shot on
page 124
The Loan Account Detail page screen shot has been
added.
Schedule Loan Payment
page screen shot on
page 126
The Schedule Loan Payment page screen shot has been
updated.
Confirmation page
The Confirmation page screen shot has been updated.
screen shot on page 126
Payment Scheduled
The Payment Scheduled Successfully page screen shot
Successfully page
has been updated.
screen shot on page 127
Accounts page screen
shot on page 128
The Accounts page screen shot has been added.
Transfers page screen
shot on page 129
The Transfers page screen shot has been added.
Loan Account Detail
page screen shot on
page 129
The Loan Account Detail page screen shot has been
added.
Schedule a Loan
Payment page screen
shot on page 131
The Schedule a Loan Payment page screen shot has been
updated.
INTERNET BANKING BASIC SERVICES USER’S MANUAL
Confidential and proprietary to First Data
April 1, 2010
Revision Guide: April 1, 2010
Topic Updated
6
Description of Change
Make Payment page
The Make Payment page screen shot has been updated.
screen shot on page 132
Transfer Confirmation
page screen shot on
page 132
The Transfer Confirmation page screen shot has been
udpated.
Payment Scheduled
The Payment Scheduled Successfully page screen shot
Successfully page
has been updated.
screen shot on page 133
INTERNET BANKING BASIC SERVICES USER’S MANUAL
Confidential and proprietary to First Data
April 1, 2010
7
Table of Contents
Chapter 1: General Information 9
What’s in this Chapter 9
Basic Services 9
Access to Internet Banking 13
Security 16
Frequently Ask Questions 18
Chapter 2: Quick Start 22
What’s in this Chapter 22
Logging On 22
Automated Passcode Reset 22
Security Verification 27
Navigation 28
Online Tips 32
Frequently Asked Questions 32
Chapter 3: Accounts Tab 34
What’s in this Chapter 34
Navigating the Accounts Tab 34
Account Summary 35
Account Detail 36
Account Statements 48
Account Statements with the Electronic-only Statement Delivery
Account History using Filtered History Search 56
Check Register 82
Account Transfers 87
Frequently Asked Questions 88
Chapter 4: Transfers Tab 94
What’s in this Chapter 94
Navigating the Transfers Tab 94
Scheduling a New Transfer 95
Pending Transfers 99
Transfer History 105
External Transfers 107
Loan Payments 123
Principal and Interest Loan Payments
Frequently Asked Questions 133
Chapter 5: User Services Tab 135
What’s in this Chapter 135
Navigating the User Services Tab
53
127
135
INTERNET BANKING BASIC SERVICES USER’S MANUAL
Confidential and proprietary to First Data
April 1, 2010
Table of Contents
8
Add/View Account Services 138
Add New Online Account 143
Adding an External Transfer Account Request 145
Changing Account Nicknames 150
Changing Your Address Information 151
Updating your Email Address 153
E-Statements Only 155
Remove an Account 157
Requesting a Stop Payment 160
Requesting Documents 165
Reordering Checks 167
Buying Savings Bonds 169
Changing Your Access ID 173
Changing Your Passcode 178
Changing Security Verification Question 180
Marketing Preferences 182
Notify Me 183
Setting Your Start Page 187
Customizing Your List Sorting 188
Updating your Quick History 191
Transaction Categories 193
Sending a Secure Message 199
Obtaining FI Contact Information 202
Frequently Asked Questions 203
Chapter 6: Messages Tab 206
What’s in this Chapter 206
Introduction 206
Navigating the Messages Tab 206
Accessing Unread Messages 207
Accessing the Messages Inbox 208
Accessing Sent Messages 209
Sending New Messages 210
Viewing Messages 213
Replying to a Message 215
Deleting Messages 218
Frequently Asked Questions 220
Chapter 7: Glossary
221
INTERNET BANKING BASIC SERVICES USER’S MANUAL
Confidential and proprietary to First Data
April 1, 2010
Chapter 1
9
General Information
What’s in this Chapter
The Internet Banking system is the secure online web site that allows users to
manage their accounts online. This manual covers the basic retail services
offered, which are organized under four tabs: Accounts, Transfers, User
Services, and Messages.
Note
The number of tabs you see depends on the services your
financial institution has granted to you. The Payments tab is
present by default, but you cannot use it until you sign up for
Online Bill Pay with your financial institution. If you have Cash
Management services, you will also see a Cash Management
tab. Refer to the FXWeb Online Bill Pay User’s Manual and the
FXWeb Cash Management User’s Manual for more information.
If your financial institution offers the fx Finance Center
Services, all users will see the Finance Center tab.
Basic Services
Accounts Tab
Users can manage their online accounts using the Accounts tab. Depending on
the services your financial institution offers, users have access to the following
features:
■
■
■
View detailed account information, monthly statements, and transaction
histories.
Transfer money between online accounts.
Download transaction histories into personal finance software, such as
Microsoft® Money and Quicken® or spreadsheets, such as Microsoft®
Excel or Lotus 1-2-3.
■
View loan rates and loan payoff details.
■
View credit card transaction histories.
■
View check or statement images online.
INTERNET BANKING BASIC SERVICES USER’S MANUAL
Confidential and proprietary to First Data
April 1, 2010
Chapter 1: General Information
10
The Account Summary page—the main Accounts page—lists all available
online financial accounts, including the account balance and the date this
balance was obtained.
Refer to Chapter 3, Accounts Tab, for more information.
Transfers Tab
Users can schedule account-to-account funds transfers using the Transfers
Tab. Depending on the services your financial institution offers, users have
access to the following features:
■
View and schedule account-to-account funds transfers.
■
View and schedule account-to-external account transfers.
■
View and print transfers histories.
■
Pay loan or credit card bills online.
The Transfers Pending page allows users to view their pending
account-to-account funds transfers.
INTERNET BANKING BASIC SERVICES USER’S MANUAL
Confidential and proprietary to First Data
April 1, 2010
Chapter 1: General Information
11
Refer to Chapter 4, Transfers Tab, for more information.
User Services Tab
Users can access a variety of links to help manage their online accounts using
the User Services tab. Depending on the services your financial institution
offers, users have access to the following features:
■
Add new online accounts or services.
■
Change passcodes and security verification question/answer.
■
Update address information.
■
Set an account to a “No View” state.
■
Reorder checks.
■
Order copies of documents, such as cancelled checks, disclosure forms,
and loan agreements.
■
Request stop payments.
■
Customize a user’s session.
■
Order savings bonds.
■
■
Send questions or comments to the financial institution through encrypted
messaging.
Look up contact information for the financial institution including
addresses, phone numbers, fax numbers, or a map to the central location.
INTERNET BANKING BASIC SERVICES USER’S MANUAL
Confidential and proprietary to First Data
April 1, 2010
Chapter 1: General Information
12
The main User Services page appears as follows.
Refer to Chapter 5, User Services Tab, for more information.
Messages Tab
Users can read notifications from the financial institution concerning their
accounts using the Messages tab. These messages can include answers to
emailed questions, responses to requests for technical help, or messages
generated automatically by the system, such as rescheduling a transfer due to
insufficient funds. Users have access to the following services:
■
Read notifications from the Financial Institution.
■
Send secure—encrypted—messages to the Financial Institution.
■
■
Reply to received messages or broadcast messages from your financial
institution, or reply to system-generated alerts.
Send attachments with your messages (if offered by your financial
institution).
INTERNET BANKING BASIC SERVICES USER’S MANUAL
Confidential and proprietary to First Data
April 1, 2010
Chapter 1: General Information
13
The main Messages Tab appears as follows.
Refer to Chapter 6, Messages Tab, for more information.
Access to Internet Banking
Online Activation
Before you can use Internet Banking, you must enroll online or in-person with
your financial institution and set up a checking account. The online enrollment
form has Online Help for customers filling out U.S. and non-U.S. addresses,
joint accounts, access ID, passcode, and validation question/answer. Once you
have enrolled, you will be notified by email when you can use your account.
For financial institutions that provide a Real Time connections, you will be able
to use your new online accounts immediately, because your application is
automatically processed by the system. Please check with your financial
institution if this is possible.
Access IDs
Access IDs are used to identify your account on the system. Depending on
your financial institution, you will either be assigned an access ID, or you will
be able to create your own when you apply online. Your access ID must meet
the following restrictions.
INTERNET BANKING BASIC SERVICES USER’S MANUAL
Confidential and proprietary to First Data
April 1, 2010
Chapter 1: General Information
14
Your access ID:
■
Must be between 5 and 20 characters long.
■
May contain both letters and numbers.
■
Must be unique (no other user can have the same access ID).
■
■
■
Cannot contain a leading space, trailing space, or multiple consecutive
spaces.
Cannot contain non-printable ASCII characters, such as CTRL-C, etc.
Is case-sensitive (for example, “New York” and “new york” are two
different IDs).
If you happen to choose an access ID that is already taken, you will be offered
another suggestion.
Passcodes
Passcodes ensure that your financial information is safe and secure. When a
user creates or changes a passcode, the system subjects it to a passcode
cracker program to ensure that the passcode meets basic security standards.
Your passcode must meet the following restrictions.
Your passcode:
■
Must be at least six or more characters long (contact your financial
institution for details). The maximum number is 28 characters.
■
Must contain at least one numeric and one alpha character.
■
Must not based on any personal information you have provided to us.
■
Is not case-sensitive (for example, “New York1” and “new york1” are the
same) and can contain special characters (for example, @ # $ ^ &, etc.).
The passcode you choose is not visible on the online application, so even the
person reviewing the application at your financial institution cannot learn the
passcode. For instructions and examples of creating a valid passcode, refer to
Chapter 5, User Services Tab for more information.
INTERNET BANKING BASIC SERVICES USER’S MANUAL
Confidential and proprietary to First Data
April 1, 2010
Chapter 1: General Information
15
When to change passcodes
Users are encouraged to change their passcode online every 90 days although
this is not enforced by the system. If you forget your passcode, you have
several options to reset your passcode, depending on the services your
financial institution offers its customers/members. The first option is to call
your financial institution’s Customer Service to reset your passcode. They will
verify your identity and assign to you a new, temporary passcode that will
expire in 30 days. Once online, the system forces you to immediately change
the temporary passcode again to keep it secure.
The second option is to use the Automated Passcode Reset feature to reset
your own passcode. The Automated Passcode Reset feature requires that you
have a valid email address and a security verification question and answer on
file on the system. The process will take you through various pages that will
validate your identity, and then present a page to reset your passcode. Once
you have created a new passcode, a secure email will be sent to your home
email address with a passcode reset confirmation code and a link that points
to the login page. You will be required to enter the passcode reset
confirmation code after logging on to the system with your new passcode.
Customers should not disclose their passcodes
Guard your passcode closely. You should not disclose the passcode to anyone,
not even to employees of your financial institution. Customer Service should
not ask for or receive your passcode. If anyone attempts to obtain it, or if you
have reason to believe that the security of a passcode has been compromised,
you should contact a supervisor at your financial institution immediately.
Note
Access IDs are case-sensitive. Thus, “johndoe” and
“JOHNDOE” are two different access IDs. Passcodes are not
case-sensitive. Thus, “apples1” and “APPLES1” are the same.
Security Verification Question and Answer
The Security Verification Question and Answer is used by your financial
institution and the system to identify users in the event that they forget their
access ID or passcode. Normally, the security verification question is set when
enrolling online. Users who do not have a security verification question and
answer on file can set it on the User Services page.
INTERNET BANKING BASIC SERVICES USER’S MANUAL
Confidential and proprietary to First Data
April 1, 2010
Chapter 1: General Information
16
Three Strikes and 10-Minute Time-Out
3-Strikes
If a passcode is entered incorrectly three times in a row, your online account
is disabled. The fourth attempt will fail. You can restore access by calling your
financial institution’s Customer Service department and verifying that you
were the person making the repeated login attempts.
10-minute Time-out
All sessions are locked after 10 minutes of inactivity to protect you if you
leave your computer unattended while logged on. You can quickly and easily
resume your session by re-entering your passcode.
Security
Cookies
A cookie is a very small text file sent by a web server and stored on a browser
so that it can be read back later. Cookies are a basic way for a server to
identify a user (cookies actually identify the computer the user is using at the
time). Cookies are used for many things from personalizing start up pages to
facilitating Internet purchases.
Myths about cookies
Some myths about cookies include the following:
■
Cookies can’t “read” information about you from your hard drive; thus,
they cannot be used to “steal” information about you.
■
Cookies don’t carry viruses.
■
Cookies aren’t programs that can perform functions on your computer.
Cookies do perform a very important function when users are online
conducting their transactions.
Cookies allow multiple processing
When a user logs onto the system, a cookie enables the system to process
multiple transactions during the session without the user having to provide an
access ID and passcode for each individual transaction.
INTERNET BANKING BASIC SERVICES USER’S MANUAL
Confidential and proprietary to First Data
April 1, 2010
Chapter 1: General Information
17
Renewing cookies
When a user logs off—or after 10-minutes—the cookie is no longer accepted
and must be renewed by re-entering the passcode. A new cookie is used for
each session. That way, no one can use a prior cookie to access a user’s
account.
Digital Signature Authentication
The public key that the Internet Banking (IB) Processing Center provides to
the user’s Internet browser comes with a digital signature that has been
certified by a third party. This process ensures that the transmission actually
originated from IB Processing Center and that the message contents were not
modified during the transmission of data between the two endpoints.
SSL Encryption
In addition to login security, the system uses Secure Socket Layer (SSL)
encryption technology for everything users do in the system. This technology
is automatically activated by an Internet browser when it connects to the
system.
Note
An Internet browser indicates when it enters a secure session
by changing the appearance of a small icon, such as a key or
padlock, at the bottom of the screen.
Mozilla Firefox has
; Microsoft Internet Explorer has
.
Also, the URL will read: “https://”.
SSL protocol secures transmissions in three ways:
■
■
Only the intended recipient can read the message. Since all
information is encrypted during transit, it would appear as meaningless
symbols even if intercepted.
No one can tamper with messages in transit. Since the message is
encrypted, adding or attempting to change information would make the
entire communication unreadable.
INTERNET BANKING BASIC SERVICES USER’S MANUAL
Confidential and proprietary to First Data
April 1, 2010
Chapter 1: General Information
■
18
No one can pose as the Data Center. No intruder can send a message
posing as the Processing center, your financial institution, or another
customer. Only messages encrypted with the correct key can be decrypted
and read by the recipient.
Public key Cryptosystem
During the secured session, all communications are encrypted using the Public
Key Cryptosystem based on the public/private key pair concept. A public key
is provided to a user’s Internet browser and is used to encrypt all information
sent from the user’s PC. A private key at the Processing Center (IB Processing
Center) decodes the message and verifies the sender. All communications
between a user and IB Processing Center are encrypted with these two keys.
Certification
In addition, servers at IB Processing Center have been certified by a
Certification Authority that will ensure that the user is actually connecting to
the system, instead of someone pretending to be at the IB Processing Center.
Note
Users are required to use an Internet browser that supports
128-bit key lengths. The latest Internet browsers support
these security measures. The Certificate Authorities’ keys are
up-to-date on these browsers.
Frequently Ask Questions
Q: What type of security do you offer?
A: We have designed a distributed security network that ensures protection
throughout the process. Distributed security means that rather than relying
on one security measure we rely on several. Among those we use are
authentication, encryption, and automatic time-outs.
All sessions are encrypted. That means your passcode and all the information
relating to you and your accounts employ some of the strongest forms of
cryptography that are commercially available for use over the Internet. If for
any reason your secure session ends, your session terminates automatically.
INTERNET BANKING BASIC SERVICES USER’S MANUAL
Confidential and proprietary to First Data
April 1, 2010
Chapter 1: General Information
19
When information is sent via the Internet, the information is broken down into
separate packages—called packets—before leaving your computer. These
packets are reassembled when they reach IB Processing Center. Since millions
of packets are sent over the Internet at any given moment, it would be
extremely difficult for a hacker to find all those relating to you.
Your name and full account number are never sent over the Internet. So even
if someone intercepts a transmission, the information he/she obtains won’t be
useful.
Q: What is encryption?
A: Encryption is the process of turning meaningful words and numbers into a
coded language. Software programs can essentially turn your account
information into gibberish that can only be understood by you and your
financial institution.
Q: How does encryption work?
A: Everything that travels through cyberspace during your session becomes a
string of unrecognizable numbers before entering the Internet. Only system
computers and your Internet browser understand the mathematical formulas
that turn your banking session into numeric code, and then back to
meaningful information.
Q: How do I know if my banking session is encrypted?
A: Your banking session is encrypted when a key appears in the lower right
corner of your screen in Mozilla Firefox
, and when a lock appears in the
lower right corner of your screen in Microsoft Internet Explorer
. If it is
not a secure session, the key will be broken in Netscape or there will be no
lock in Explorer. If for someone reason your secure session ends, your
banking session terminates. You will also see the URL address with “https://”.
This indicates the site is secure.
Q: What type of encryption do I need?
A: We require you to use 128-bit (domestic or U.S. grade) encryption if
possible, which is available on the latest versions of the Mozilla Firefox and
Internet Explorer browsers.
INTERNET BANKING BASIC SERVICES USER’S MANUAL
Confidential and proprietary to First Data
April 1, 2010
Chapter 1: General Information
20
Q: What security measures are taken to prevent sensitive information
from being intercepted online?
A: From the moment account information leaves your computer to the time it
enters computers at the Internet Banking Processing Center, we take
numerous steps to keep information secure in cyberspace.
All sessions are encrypted. That means your passcode and all information
relating to you and your accounts employ some of the strongest forms of
cryptography that are commercially available for use over the Internet. If for
any reason your secure session ends, your session terminates automatically.
When information is sent via the Internet, the information is broken down into
separate packages, called packets, before leaving your computer. These
packets are reassembled when they reach the Internet Banking Processing
Center. Since millions of packets are sent over the Internet at any given
moment, it would be extremely difficult for a hacker to find all those relating
to you.
Your name and full account number are never sent over the Internet. So even
if someone intercepts a transmission, the information he/she obtains won’t be
useful.
Q: How do I know that I am on a secure Internet site?
A: There are several ways to check that a site is secure. Look at the site
address; if it begins with “https”, it is secure. Another way to check is to see if
you have a padlock graphic at the bottom of your browser window.
Double-click on this item to get more detailed security information.
Q: How often do I have to change my passcode?
A: Change your passcode as often or seldom as you like. However, we
strongly suggest that you change your passcode immediately if you suspect it
has been compromised. To change your passcode, go to User Services by
clicking the User Services tab in the top toolbar.
Q: How do I exit securely?
A: To exit securely:
1.
Click the LOGOFF link at the top of the screen.
◆
2.
Your financial institution’s home page appears.
Close your browser.
INTERNET BANKING BASIC SERVICES USER’S MANUAL
Confidential and proprietary to First Data
April 1, 2010
Chapter 1: General Information
21
Q: What can I do to maximize security on this site?
A: You are responsible for securing your information while it is on your
computer. Here are some things you can do.
◆
◆
◆
◆
◆
Choose a good passcode that is hard to guess. Your online
passcode and access ID authenticates you when you begin a session.
Keep your passcode safe. Memorize your passcode. Do not share it
with anyone (including customer service or your financial institution)
The best passcode is useless if it is written on a note attached to your
computer.
Look at your last login. Make sure no one else has accessed your
account.
Change your passcode regularly. The beginning of a session is a
good time to do this.
Exit securely. You may not always be at your personal computer at
home. If you forget to do so, the system will automatically sign you
off after 10 minutes of inactivity. This will prevent anyone from
pressing the Back button to view your account information. (See the
previous FAQ, “How do I exit securely?”)
Q: Why is a secure messaging necessary?
A: It is necessary to keep your personal and account information private.
However, even in a secure message, never share your passcode.
INTERNET BANKING BASIC SERVICES USER’S MANUAL
Confidential and proprietary to First Data
April 1, 2010
Chapter 2
22
Quick Start
What’s in this Chapter
The system provides a simple interface to manage your online accounts, pay
your bills, transfer money, or send messages to your financial institution. This
chapter presents basic information to navigate this web site.
Logging On
The logon procedure is necessary to identify authorized users of the service
and tells the system which accounts to display.
To log on to your account:
1.
Go to your financial institution’s web site. Find and click the link. It may
be at the top, side, or bottom of the webpage.
The Login page appears.
2.
In the Access ID box, type your access ID, and the press the Tab key.
3.
In the Passcode box, type your passcode, and click Log In.
The web site appears.
Note
If a passcode is entered incorrectly three times in a row, your
access is disabled. The fourth attempt will fail. You can restore
access by calling your financial institution’s Customer Service
department and verifying that you were the person making
the repeated login attempts.
Automated Passcode Reset
The Automated Passcode Reset feature allows online users who have
forgotten their passcodes to automatically reset them by clicking a link on the
Login module.
To use this feature, the following prerequisites must be met:
■
■
Your financial institution must offer this feature to its customers or
members. If your financial institution does not offer this service, you must
contact your financial institution to have your passcode reset for you.
Your financial institution should have the feature turned on for you.
INTERNET BANKING BASIC SERVICES USER’S MANUAL
Confidential and proprietary to First Data
April 1, 2010
Chapter 2: Quick Start
■
■
23
You must have a valid email address on file.
You must have a security verification question and answer on file. If you do
not have a security question and/or answer set in the system or if you are
not sure, you can go to the User Services page to change it.
The Passcode Reset process involves entering security information to ensure
that a passcode has not been reset by hackers. You must have your access ID,
social security (or tax ID) number and an account number ready to verify your
account.
To reset your passcode using the Auto Passcode Reset feature:
1.
If you forget your passcode when logging on to the system, click the
Forget Your Passcode? link.
The Account Validation page appears.
Note
For financial institutions (FIs) using Automated Passcode
Reset, the Problems Logging In? link takes you to the same
Account Validation page. For FIs not offering this service, the
Problems Logging In? link directs the user to the Send A
Message page.
INTERNET BANKING BASIC SERVICES USER’S MANUAL
Confidential and proprietary to First Data
April 1, 2010
Chapter 2: Quick Start
2.
24
On the Account Validation page, enter your access ID, social security
number (or tax ID number), an account number, and then click Submit.
You will be allowed three (3) unsuccessful attempts, after which you
must contact your financial institution to have your passcode reset.
If your account information was correct, the Verification Question page
appears.
3.
On the Verification Question page, enter the answer to your Security
Question in the Security Answer box, and then click Submit.
The Reset Your Passcode page appears.
4.
On the Reset Your Passcode page, enter a new passcode in the
Passcode box, re-enter it in the Verify Passcode box, and then click
Submit.
The Passcode Reset Confirmation page appears.
INTERNET BANKING BASIC SERVICES USER’S MANUAL
Confidential and proprietary to First Data
April 1, 2010
Chapter 2: Quick Start
5.
25
On the Passcode Reset Confirmation page, confirm your email address on
the page, and then click Done.
A confirmation page appears.
You will receive a confirmation email that contains a Passcode Reset
Confirmation code and a link to the Passcode Reset Confirmation page.
INTERNET BANKING BASIC SERVICES USER’S MANUAL
Confidential and proprietary to First Data
April 1, 2010
Chapter 2: Quick Start
6.
26
Open your Passcode Reset Confirmation email message, record your
Passcode Reset Confirmation code, and then click the link in the email
message.
The Login page appears.
7.
On the Login page, enter your access ID, new passcode, and then click
Log In.
The Passcode reset Confirmation page appears.
8.
On the Passcode Reset Confirmation page, enter your Passcode Reset
Confirmation code, and then click Submit.
INTERNET BANKING BASIC SERVICES USER’S MANUAL
Confidential and proprietary to First Data
April 1, 2010
Chapter 2: Quick Start
27
Your default page Start Page appears. You have successfully changed
your passcode.
Note
If you do not have an email address, security verification
question and answer on file, you will see the Automated
Passcode Security Requirements page each time after logging
on to the system. You can also change your email address on
this page.
Security Verification
If there is no activity on your session for 10 minutes, the session is locked to
prevent someone else from using your account. When you try to continue
working, a Security Verification page will appear.
To access your account after a session lockout:
1.
In the Passcode box, type your passcode, and then click the Enter
button to continue.
INTERNET BANKING BASIC SERVICES USER’S MANUAL
Confidential and proprietary to First Data
April 1, 2010
Chapter 2: Quick Start
2.
28
If you have finished, click Exit to end the session. This will prevent
someone else from accessing your online account.
Navigation
Tabs
Basic retail services are organized under four tabs: Accounts, Transfers, User
Services, and Messages. The number of tabs you see depends on the services
your financial institution provides you. The Payments and Transfers tabs are
present by default, but you cannot use them until you sign up for the services
at your financial institution.
To use a service, click the appropriate tab:
■
■
Accounts tab. Manage your accounts by viewing account balances,
statements, and histories; transfer funds between your own online
accounts; download data into a spreadsheet; and view and print check
images.
Transfers tab. Move money between your online accounts or between
your online accounts and accounts at another financial institution.
INTERNET BANKING BASIC SERVICES USER’S MANUAL
Confidential and proprietary to First Data
April 1, 2010
Chapter 2: Quick Start
■
■
29
User Services tab. Request stop payments on checks, reorder checks,
change your passcode, change your security verification question/answer,
update your address information, set an account to “No View” status,
update user preferences, request documents, order savings bonds, use
secure file transfer, and request assistance from Customer Service at your
financial institution.
Messages tab. Read notifications and send secure messages to your
financial institution.
Note
If you have Cash Management services, you will also see a
Cash Management tab. See the FXWeb Online Bill Pay User’s
Manual and the FXWeb Cash Management User’s Manual for
more information.
Help
General and context-specific online help is available on every page. General
Help provides an overview of the features and functions of this financial
website. Context-specific Help provides information for the page that you are
looking at.
To access General Help on any topic:
■
Click the Help link located above the tabs.
To access context-specific help from any page:
■
Click Help to view help explaining the specific page that you are viewing.
INTERNET BANKING BASIC SERVICES USER’S MANUAL
Confidential and proprietary to First Data
April 1, 2010
Chapter 2: Quick Start
30
Customer Service
If you have any general questions, problems, or comments about your
accounts or this site, you can use secure messaging to contact Customer
Service at your financial institution. Because the message is encrypted, you
can discuss your financial information securely.
Note
Never tell your passcode to anyone. Customer Service does
not need it to help you.
To send a secure message to your financial institution’s Customer Service:
1.
Click the Messages tab.
2.
On the Messages page, click Contact Us.
The Send a Message page appears.
3.
On the Regarding drop-down menu, select the account that you are
inquiring about, or select "Other" if it concerns some other issue. This
field is required.
4.
On the Category drop-down menu, select the message type. This field is
required and helps the system transmit the message to the responsible
customer service representative at the financial institution.
INTERNET BANKING BASIC SERVICES USER’S MANUAL
Confidential and proprietary to First Data
April 1, 2010
Chapter 2: Quick Start
31
5.
In the Subject box, type a few words to identify your message. This field
is required and has a maximum length of 40 characters.
6.
Click Urgent if the message requires immediate attention by a financial
institution customer service representative.
7.
In the Message box, type your message. Do not include your passcode
in the message. Customer Service does not need it to help you.
8.
Click Send.
Your message is sent to your financial institution.
Exiting
It is important to log out correctly to protect your account. If you step away
from your computer while you are logged on, someone could see, or even
change, your confidential information.
To completely exit from your session:
1.
Click the Log Off link at the top of the page.
The Exit page appears.
2.
You will be taken to your financial institution’s Web site.
Your financial institution’s Web site appears
3.
Close your web browser to clear your session information from the
browser’s memory.
INTERNET BANKING BASIC SERVICES USER’S MANUAL
Confidential and proprietary to First Data
April 1, 2010
Chapter 2: Quick Start
32
Online Tips
Here are some tips that can assist you in managing your accounts online:
■
■
■
■
Your access ID is case sensitive (for example, “iluvmyFI” and “iluvmyfi” are
two separate IDs). If you get an error message when trying to log on,
check the Caps Lock key on your keyboard. Your passcode, on the other
hand, is not case-sensitive.
If you have important messages, you will see an URGENT MESSAGES link
in red in the upper right corner of your page. Please read all messages
as soon as possible. This is how we communicate with you if there is a
problem with any Internet account activity you have scheduled.
If you cannot see the whole page, use the scroll bars at the bottom and
right sides of the page.
Click the Accounts tab to display all of your online accounts. The “As Of”
date reflects the balance at the end of that business day and indicates the
latest date of transactions reflected in your account history.
Click the Detail link to display a summary of your account information
(interest rate, accrued interest, and so forth) and the last 30 days history on
the account.
■
You can assign nicknames to your accounts for easy reference, set the
default page that first appears after you log in, and choose the default
sorting for certain information. Click the User Services tab to make these
changes.
Frequently Asked Questions
Q: Why do I have a red message notice on my page?
A: If you have any unread urgent messages, an Urgent Messages link appears
on every page. Clicking this link takes you to the Messages page.
Q: How can I change the size of the text in a table?
A: The tables are designed to show as much text as possible on a single page.
Whether you can change the size of the text depends on your browser. Try
following your browser's directions for increasing text size (this should be
found in your browser’s help).
INTERNET BANKING BASIC SERVICES USER’S MANUAL
Confidential and proprietary to First Data
April 1, 2010
Chapter 2: Quick Start
33
Q: Can I change my default to display a different page when I log on?
A: Yes. You can select the section that appears first by changing your user
preferences in the User Services section.
Q: Can I change my access ID?
A: Yes. Your access ID is unique to your account, but it can be changed.
Q: Can I have more than one name on my account?
A: Call your financial institution to verify that this is allowed. For example, you
could use “John or Diane” as your first name and “Doe” as your last name.
Both of you will see the entire history for the shared accounts as well as the
bills you pay jointly. However, you will not be able to tell who was responsible
for a given transaction.
Q: Can I use any browser for online banking?
A: You may use any browser that supports the SSL (Secure Socket Layer)
protocol. Most popular browsers support this security feature. We also require
your using a 128-bit encryption browser. Internet Explorer and Mozilla Firefox
both offer this free upgrade. We recommend this to maintain our high security
level.
Q: Is the data displayed on the inquiry pages current?
A: The data displayed is obtained directly from your financial institution’s
current databases via a daily file transmission. For security reasons, the IB
Processing Center does not have a direct connection to the financial
institution’s system.
Q: What accounts can I access online?
A: Personal checking, savings, CD, IRA, loans, and credit cards may all be
accessed through the system.
INTERNET BANKING BASIC SERVICES USER’S MANUAL
Confidential and proprietary to First Data
April 1, 2010
Chapter 3
34
Accounts Tab
What’s in this Chapter
Using this Web site, you can manage all of your accounts on the Accounts Tab.
This chapter provides information and procedures to manage your accounts.
Navigating the Accounts Tab
In general, users will use the Accounts tab more than any other page to view
and manage their online accounts. You can choose to have your session
automatically open to the accounts tab by setting the Start Page on the User
Services tab, if desired.
At the top of each Accounts page, you can navigate to the other Accounts
pages using the drop-down lists.
Real-Time Internet Interface
If your financial institution uses a Real Time Internet interface, you may not
see all of the information shown in the illustrations in this chapter. Some of
the information in the Accounts section cannot be updated continually. That
causes some information to be missing. Your financial institution may choose
not to display any or all of the following, because they are not Real Time
features.
■
History
■
Statements
■
■
Xpress Balance including Xpress, Xpress Available Balance, and Unposted
Xpress Transactions
Ledger Balance including Ledger and Ledger Available Balance.
INTERNET BANKING BASIC SERVICES USER’S MANUAL
Confidential and proprietary to First Data
April 1, 2010
Chapter 3: Accounts Tab
35
Note
If the Xpress and Ledger balances are not shown, they are
replaced with a Real Time balance.
Account Summary
The Account Summary page is the starting page on the Accounts tab, and
provides an overview of a user’s online accounts. Users can sort an account
list by account name, account number, or account balance by clicking the
arrow next to each column heading if more than one account exists. If you are
on another page, click the Accounts tab.
The following information is provided for each account.
Field
Accounts
Description
The account type (for example, checking,
savings, share, share draft, IRA, CDs, credit
card, or loan, etc.).
INTERNET BANKING BASIC SERVICES USER’S MANUAL
Confidential and proprietary to First Data
April 1, 2010
Chapter 3: Accounts Tab
36
Field
Description
Owner
The owner of the account. For joint checking
accounts, only one name will appear if each
account owner has a separate file at your
financial institution.
Account #
The account number.
Balance
The account’s current balance (calculated by
taking the most recent update from your
financial institution and adjusting it to include
any recent Internet transactions).
As Of
The date for which the balance is accurate;
that is, the date of the last known transaction
and/or balance update from your financial
institution.
Make a
Selection
Links to detailed information for each account
(details, transaction history, and monthly
statement) and a link to transfer funds
between your online accounts. For loan
accounts, a “make loan payment” link is
available.
Account Detail
The Account Detail page shows specific information related to the online
account. It has four parts: Account Detail, Balance Detail, buttons for
statements, histories, and transfers and a Quick History. The Quick History
section displays the last 20 transactions to the account if any. The information
shown depends upon your financial institution’s service offerings.
To view the account detail:
1.
On the Account Summary page, click the detail link under Make a
Selection for the account you would like to view.
The Account Detail page appears
2.
View the information.
INTERNET BANKING BASIC SERVICES USER’S MANUAL
Confidential and proprietary to First Data
April 1, 2010
Chapter 3: Accounts Tab
37
Viewing Monthly Detail for Checking Accounts
Depending on the account type, the Monthly Detail displays different
information for the account. For checking accounts, the Account Detail page
displays the account number, nickname, and balance. If your financial
institution offers interest-bearing checking accounts, you will see the latest
interest information.
INTERNET BANKING BASIC SERVICES USER’S MANUAL
Confidential and proprietary to First Data
April 1, 2010
Chapter 3: Accounts Tab
38
The monthly detail provides the following information for checking accounts.
Field
Description
Account
Owner
The owner of this account on record at the
financial institution (FI).
Account
Nickname
A name that you give to your account for
easy identification.
Account Type
What type of account this is (for example,
checking, share draft).
Account
Number
The account number.
Product
The product name offered by your FI.
Date Opened
The date the account was opened if your FI
chooses to display this field.
INTERNET BANKING BASIC SERVICES USER’S MANUAL
Confidential and proprietary to First Data
April 1, 2010
Chapter 3: Accounts Tab
Field
39
Description
Overdraft
Limit
The amount, if any, your FI will
automatically lend you if you overdraw this
account.
Hold Amount
The amount (if any) your FI will hold if you
overdraw this account.
Balance
The official balance of the account, as of
the date shown in parentheses under the
Balance Detail heading.
Balance
Adjustment
Additional adjustments to the balance due
to any unposted transactions if any.
Available
Balance
Only visible if there is a limit on the
amount of money you can withdraw from
the account. Total funds available when
your balance was updated.
Viewing Monthly Detail for Savings Accounts
For saving accounts, the Account Detail page displays the account number,
nickname, interest paid for the current and the past year, and balance
information.
INTERNET BANKING BASIC SERVICES USER’S MANUAL
Confidential and proprietary to First Data
April 1, 2010
Chapter 3: Accounts Tab
40
The monthly detail provides the following information for savings accounts.
Field
Description
Account
Owner
The owner of this account on record at the
financial institution.
Account
Nickname
A name that you give to your account for easy
identification.
Account Type
What type of account this is (savings, share
draft, etc.).
Account
Number
The account number.
Product
The product name offered by your FI.
Date Opened
The date the account was opened if your FI
chooses to display this field.
Interest
Accrued, Not
Yet Paid
The interest the account has earned that has
not yet been paid into the account, if any.
Interest Paid
This Year
The interest that has been credited to the
account so far this year, if any.
Rate (ITR)
Current interest rate for this account if your FI
chooses to display this field
Overdraft
Limit
The amount, if any, your financial institution
will automatically lend you if you overdraw
this account.
Hold Amount
The amount, if any, your financial institution
will hold if you overdraw this account.
Balance
The official balance of the account as of the
date shown in parentheses under the Balance
Detail heading.
Balance
Adjustment
Additional adjustments to the balance due to
any unposted transactions, if any.
INTERNET BANKING BASIC SERVICES USER’S MANUAL
Confidential and proprietary to First Data
April 1, 2010
Chapter 3: Accounts Tab
41
Field
Available
Balance
Description
Only visible if there is a limit on the amount of
money you can withdraw from the account.
Total funds available when your balance was
updated.
Viewing Monthly Detail for Loan Accounts
For loan accounts, the Account Detail page displays the account nickname,
number, loan and payment details, maturity date, interest paid, interest rates,
and balance information.
The monthly detail provides the following information for loan accounts.
Field
Description
Account
Owner
The owner of this account on record at the
financial institution.
Account
Nickname
A name that you give to your account for
easy identification.
Account Type
What type of account this is, such as loan.
Account
Number
The account number.
INTERNET BANKING BASIC SERVICES USER’S MANUAL
Confidential and proprietary to First Data
April 1, 2010
Chapter 3: Accounts Tab
Field
42
Description
Date Opened
The date the account was opened.
Credit Limit
The credit limit on any loan advances, if
any.
Original Loan
Amount
The original loan amount.
Amount to
Payoff
The remaining payment amount.
Amount of
Next
Payment
The amount of the next payment.
Date of Next
Payment
The date due for the next payment.
Maturity Date
The date the loan will be paid off.
Interest
Accrued, Not
Yet Paid
The interest the account is due but has not
yet been paid into the account.
Interest Paid
This Year
The interest that has been paid to the
account so far this year.
Interest Paid
Last Year
The interest that has been paid to the
account last year.
Interest Rate
(ITR)
Current interest rate for this account.
Balance
The official balance of the account as of the
date shown in parentheses under the
Balance Detail heading.
Available
Balance
Only visible if there is a limit on the amount
of money you can withdraw from the
account. Total funds available when your
balance was updated.
INTERNET BANKING BASIC SERVICES USER’S MANUAL
Confidential and proprietary to First Data
April 1, 2010
Chapter 3: Accounts Tab
43
Viewing Monthly Detail for Certificate of Deposit Accounts
For certificate of deposit (CD) accounts, the Account Detail page displays the
account nickname, number, maturity date, interest rate, and balance
information.
The monthly detail provides the following information for certificate of deposit
(CD) accounts.
Field
Description
Account
Owner
The owner of this account on record at the
financial institution.
Account
Nickname
A name that you give to your account for
easy identification.
Account Type
What type of account this is, such as CD.
Account
Number
The account number.
Product
The product name if displayed by your
financial institution.
INTERNET BANKING BASIC SERVICES USER’S MANUAL
Confidential and proprietary to First Data
April 1, 2010
Chapter 3: Accounts Tab
44
Field
Description
Maturity Date
The ending date of a time deposit, such as
a certificate of deposit, at which all
principal and accrued interest is due to the
accountholder.
Interest Rate
(ITR)
Current interest rate for this account.
Balance
The official balance of the account as of the
date shown in parentheses under the
Balance Detail heading.
Viewing Monthly Detail for Individual Retirement Accounts
For individual retirement accounts (IRA) accounts, the Account Detail page
displays the account nickname, number, maturity date, interest rate, and
balance information.
INTERNET BANKING BASIC SERVICES USER’S MANUAL
Confidential and proprietary to First Data
April 1, 2010
Chapter 3: Accounts Tab
45
The monthly detail provides the following information for an individual
retirement account (IRA).
Field
Description
Account
Owner
The owner of this account on record at the
financial institution.
Account
Nickname
A name that you give to your account for
easy identification.
Account Type
What type of account this is (for example,
IRA).
Account
Number
The account number.
Product
The product name if displayed by your
financial institution.
Maturity Date
The ending date of a time deposit, such as
an IRA, at which all principal and accrued
interest is due to the accountholder.
Interest Rate
(ITR)
Current interest rate for this account.
Balance
The official balance of the account, as of
the date shown in parentheses under the
Balance Detail heading.
Viewing Monthly Detail for Credit Card Accounts
For credit card accounts, the Account Detail page displays the account
nickname, number, payment details, amounts past due if any, interest paid,
interest rates, and balance information.
INTERNET BANKING BASIC SERVICES USER’S MANUAL
Confidential and proprietary to First Data
April 1, 2010
Chapter 3: Accounts Tab
46
The monthly detail provides the following information for credit card accounts.
Field
Description
Account
Owner
The owner of this account on record at the
financial institution.
Account
Nickname
A name that you give to your account for
easy identification.
Account Type
What type of account this is, such as CC.
Account
Number
The account number.
Date Opened
The date the account was opened.
Credit Limit
The credit limit for the card.
Amount to
Payoff
The remaining payment amount.
Amount of
Next
Payment
The amount of the next payment.
INTERNET BANKING BASIC SERVICES USER’S MANUAL
Confidential and proprietary to First Data
April 1, 2010
Chapter 3: Accounts Tab
Field
47
Description
Date of Next
Payment
The date due for the next payment.
Amount of
PAST DUE
The amount of any past due payments if
any.
Months PAST
DUE
The number of months a payment was
past due if any.
Interest
Accrued, Not
Yet Paid
The interest the account is due but has not
yet been paid into the account.
Interest Paid
This Year
The interest that has been paid to the
account so far this year.
Interest Paid
Last Year
The interest that has been paid to the
account last year.
Balance
The official balance of the account, as of
the date shown in parentheses under the
Balance Detail heading.
Available
Balance
Only visible if there is a limit on the
amount of money you can withdraw from
the account. Total funds available when
your balance was updated.
Viewing Unposted Balance Detail
If you have made any recent Internet transactions that your financial
institution has not yet posted to the ledger balance, you will also see the
following items under Balance Detail.
■
■
Unposted Xpress Transactions: Total Internet transactions made with
this account that have not yet posted to your financial institution.
Xpress Available Balance: The amount currently available for Internet
transfers and payments. available balance adjusted by unposted
transactions.
INTERNET BANKING BASIC SERVICES USER’S MANUAL
Confidential and proprietary to First Data
April 1, 2010
Chapter 3: Accounts Tab
48
Viewing Quick History
A Quick History appears at the bottom of the Account Detail page and shows
the transaction history covering the last 20 items cleared (if any). You can set
the number of transactions displayed at the bottom of the page, or on the
User Services, Quick History page.
Account Statements
The system allows users to easily access their monthly statements. All online
statements present the exact same information as your paper statements
received in the mail. Users have the capability to view, save, or print an
account statement.
INTERNET BANKING BASIC SERVICES USER’S MANUAL
Confidential and proprietary to First Data
April 1, 2010
Chapter 3: Accounts Tab
49
Viewing an Account Statement
To view an account’s monthly statement:
1.
On the Account Detail page, click the View Statement button.
A form for selecting the statement date appears.
2.
In the Statement to Retrieve field, select the date to include in the
statement. We hold up to two years of records, since you have signed up.
Note
The search is set to “Match Closest,” which finds the statement
closest to the date you entered. To find the statement ending
in the month you entered above, click the radio button to the
right of “Match Specified Month” instead.
3.
Click the Find button.
The appropriate monthly statement appears.
INTERNET BANKING BASIC SERVICES USER’S MANUAL
Confidential and proprietary to First Data
April 1, 2010
Chapter 3: Accounts Tab
50
Note
Your financial institution may have a different setup for their
statements. You may be taken to an external site to access
your statements, or may access a statement in HTML format.
INTERNET BANKING BASIC SERVICES USER’S MANUAL
Confidential and proprietary to First Data
April 1, 2010
Chapter 3: Accounts Tab
51
Saving Monthly Statements
Users can save their monthly statements to a hard disk on their PCs by
clicking the Save Statement to File button. The account statement file is
labeled “stmtMMYY.txt,” where MM is the month and YY is the year of the
account statement.
To save monthly statements:
1.
On the Accounts Statements page, click Save Statement to File.
2.
On the File Download dialog box, click Save.
INTERNET BANKING BASIC SERVICES USER’S MANUAL
Confidential and proprietary to First Data
April 1, 2010
Chapter 3: Accounts Tab
3.
52
On the Save As dialog box, locate a folder to save your file, and then
click Save.
The account statement is saved to your folder on your PC. You can view
the file with Notepad or a word processor.
Printing Monthly Statements
Users can easily print an account statement from the Account Statement
page. The minimum requirement is that a printer is connected to the user’s
PC, and that your Internet-browser is Javascript-enabled.
To print a monthly statement, click Print this page. The account statement is
sent to your printer.
INTERNET BANKING BASIC SERVICES USER’S MANUAL
Confidential and proprietary to First Data
April 1, 2010
Chapter 3: Accounts Tab
53
Account Statements with the Electronic-only Statement Delivery
Electronic-only statement delivery provides exactly the same information as
your monthly statements, except that it is delivered online instead of through
the mail. If your financial institution offers e-statements, you can opt-in to
have your statements delivered in electronic-only format. Once you opt-in for
the service, you will no longer receive paper statements in the mail.
For those who opt for e-statement delivery on the enrollment form, you will
receive an email notification at your home email account when your accounts
statements are viewable online. You can always opt-out of e-statements if you
prefer receiving paper statements in the mail.
To opt-in for electronic-only statements:
1.
On the Accounts Statement page, click Electronic Only Statement
Delivery.
The e-statements disclosure page appears.
2.
On the E-statement Disclosure page, read the E-statement disclosure
and click Accept or Accept and Print to continue the Opt-in Process.
Note
Your financial institution’s disclosure may be different than the
one shown below.
INTERNET BANKING BASIC SERVICES USER’S MANUAL
Confidential and proprietary to First Data
April 1, 2010
Chapter 3: Accounts Tab
3.
54
On the Electronic Statement Delivery Request page, enter your email
address, and click one of the following buttons:
◆
◆
Submit for this Account. You will opt-in for e-statement delivery for
that specific account.
Submit for All Accounts. You will opt-in for e-statement delivery for
all existing accounts.
INTERNET BANKING BASIC SERVICES USER’S MANUAL
Confidential and proprietary to First Data
April 1, 2010
Chapter 3: Accounts Tab
55
Opting-out of Electronic-only Statement Delivery
You may opt-out of the electronic-only statement delivery service at any time,
after which you will receive paper statements in the mail at the next
statement cycle. On Account Statement Search page, you will see the Opt-out
buttons at the bottom of the page.
To opt-out of electronic-only statement delivery:
1.
On the Accounts Statement page, click one of the following buttons:
◆
◆
Opt Out for this Account. You will opt-out for e-statement delivery
for that specific account.
Opt Out for All Accounts. You will opt-out for e-statement delivery
for all existing accounts.
A confirmation page appears stating that you will no longer receive paper
account statements in the mail.
2.
On the Electronic Statement Delivery Cancellation Request page, click
Accept to opt-out of the electronic-only statement delivery service.
An opt-out confirmation page appears stating that you will receive your
paper statements in the mail at the next statement cycle.
INTERNET BANKING BASIC SERVICES USER’S MANUAL
Confidential and proprietary to First Data
April 1, 2010
Chapter 3: Accounts Tab
56
Account History using Filtered History Search
The Account History system allows users to view up to two years (depending
on your financial institution) of histories items since signing up for the service.
The Filtered History Search searches the database for the desired information
based on search criteria that you set on the Account History page.
Note
Some download formats may not support a filtered history
download.
Users can run a search query based on any combination of the following
criteria.
Field
Description
Transaction
Type
Searche for all transactions, checks only,
credits only, or debits only.
Date Range
Search for all transactions that occurred in
a given date range. Users can search for
transactions that occurred on a single date
by entering the date (mm/dd/yyyy) in the
“From” field and leaving the “To” field
blank.
INTERNET BANKING BASIC SERVICES USER’S MANUAL
Confidential and proprietary to First Data
April 1, 2010
Chapter 3: Accounts Tab
Field
Check #
Range
57
Description
Search for all checks in a given check
number range. Users can search for a
single check number by entering the
number in the “From” field and leaving the
“To” field blank.
Amount Range Search for any transactions in a given
dollar amount range. Users can search for
a single dollar amount by entering the
amount in the “From” field and leaving the
“To” field blank.
Sort
Sort a history results by ascending or
descending values, either by date,
description, or amount.
Items per
Page
Set the number of transactions viewable
on each page. This feature is not necessary
when downloading a transaction history.
Check Range
Search for check items in a given check
number range.
Amount Range Search for transactions in a given amount
range.
Searching Account Transaction History using Filtered History
Search
The Filtered History search engine allows you to find a specific transaction
history based on your search criteria.
To search for an account transaction history:
1.
On the Account Summary page, click the history link under Make a
Selection for the account you would like to view.
The Account History page appears.
INTERNET BANKING BASIC SERVICES USER’S MANUAL
Confidential and proprietary to First Data
April 1, 2010
Chapter 3: Accounts Tab
58
2.
On the Account History page, select the account from which to create
your history on the Account drop-down menu.
3.
On the Transaction type drop-down list, select the type of transactions
that you want to search for. The options are the following:
◆
All transactions
◆
Checks only
◆
Credits only
◆
Debits only
4.
In the Date Range boxes, enter the beginning date of your history date
range in the From box. The format is mm/dd/yyyy. The default is set for
one month.
5.
In the To box, enter the ending date of your history date range. The
format is mm/dd/yyyy. The default date is set to today's date.
Note
If you want to search only transactions for a single date, leave
the To box blank.
6.
In the Check # Range boxes, enter the starting number of your history
check range in the From box.
7.
In the To box, enter the ending check number of your history check
range.
If you want to search for a single check, leave the To box blank.
8.
In the Amount Range boxes, enter the starting amount of your history
range in the From box.
9.
In the To box, enter the ending amount of your history range.
If you want to search for a single amount, leave the To box blank.
10. In the Sort By drop-down list, click the sort order for your history. You
have the option to sort by date, description or amount in ascending or
descending order. The options are:
◆
Date Descending
◆
Date Ascending
◆
Description Descending
◆
Description Ascending
◆
Amount Descending
◆
Amount Ascending
INTERNET BANKING BASIC SERVICES USER’S MANUAL
Confidential and proprietary to First Data
April 1, 2010
Chapter 3: Accounts Tab
59
If you want to start your search over again, click Clear Form to reset your
fields to the default values.
11. In the To box, enter the last date to include in the history.
12. In the Items Per Page drop-down list, select the maximum number of
transaction items to show on each page. Ignore the Download Format
drop-down list.
13. Click the View History button.
Your account history is displayed in the form of a checkbook ledger.
INTERNET BANKING BASIC SERVICES USER’S MANUAL
Confidential and proprietary to First Data
April 1, 2010
Chapter 3: Accounts Tab
60
INTERNET BANKING BASIC SERVICES USER’S MANUAL
Confidential and proprietary to First Data
April 1, 2010
Chapter 3: Accounts Tab
61
Field
Description
Post Date
The date the transaction was processed.
Description
The type of transaction. Transactions marked
as “Unposted” are recent Internet transactions
that have not yet posted. Until they post,
these transactions modify only your Xpress
Balance, not your Ledger Balance. The
following are common transactions:
■
■
■
Daily Ledger Balance. The official
balance received from your financial
institution.
CHECK #. Cleared check. Click an
underlined check number to see an
image of the check. (Not available to all
accounts.)
Others. Each financial institution has its
own descriptions for other items in the
history (for example, INTEREST
PAYMENT, ATM SERVICE CHARGE,
PAYROLL EMPLOYER INC, VISA CHECK).
Contact Customer Service at your
financial institution for help interpreting
these descriptions. Click the User
Services tab for contact information.
Credit/Deposit Deposits into the account.
Debit/
Withdrawal
Funds taken out of the account.
Xpress
Balance
The account’s running balance, including
recent Internet transactions.
Ledger
Balance
The official balance recorded at your financial
institution on the date shown.
Viewing Check Images
If your financial institution supports check imaging, you can view any images
of any cleared check by clicking a link on your Account History page or on the
Account Detail Quick History.
INTERNET BANKING BASIC SERVICES USER’S MANUAL
Confidential and proprietary to First Data
April 1, 2010
Chapter 3: Accounts Tab
62
To view a cleared check:
1.
Open your account history.
2.
In the Description column, click the check number link that you want to
view.
The front and back images of your check appear in the browser window.
INTERNET BANKING BASIC SERVICES USER’S MANUAL
Confidential and proprietary to First Data
April 1, 2010
Chapter 3: Accounts Tab
63
Downloading a Transaction History
The system allows users to download account information from the Web site
to a spreadsheet or a personal finance program, such as Quicken® or
Microsoft® Money. These files can be downloaded onto a PC or directly into
your personal finance software depending on the file formats. If downloading
to your PC, remember that the file is not encrypted.
For file downloads to personal finance software, you cannot use the Filtered
History Search. In this case, you must enter the account, date ranges and the
download format.
The following download formats are available on the system. Note: Your
financial institution may not offer all of these features.
Field
QuickBooks
Web
Connect
Description
The QuickBooks Web Connect feature
allows you to access your account history
and download this information directly into
your QuickBooks software on your PC. Your
downloaded transactions will be reconciled
against any transactions already entered in
your account register. QuickBooks Web
Connect also automatically matches any
transactions you have entered in your
register to eliminate duplicate download
entries.
Intuit officially offers Web Connect support
for the most current version of QuickBooks
plus the two previous versions. The file
format has the extension “.qbo”.
INTERNET BANKING BASIC SERVICES USER’S MANUAL
Confidential and proprietary to First Data
April 1, 2010
Chapter 3: Accounts Tab
Field
Quicken Web
Connect
64
Description
The Quicken Web Connect feature allows
you to access your account history and
download this information directly into
your Quicken software on your PC. Your
downloaded transactions will be reconciled
against any transactions already entered in
your account register. Quicken Web
Connect also automatically matches any
transactions you have entered in your
register to eliminate duplicate download
entries.
Intuit officially offers Web Connect support
for the most current version of Quicken
plus the two previous versions. The file
format has the extension “.qfx”.
Quicken QIF
A Quicken Interchange Format (QIF) file is
a non-proprietary ASCII text file that is
used to transfer data between different
financial programs or from a financial Web
site to your financial program, such as
Quicken. Quicken will not reconcile the
downloaded transactions in the QIF file
against the transactions already entered in
your account register.
The file format has the extension “.qif” and
is generally used with older versions of
Quicken software (i.e., you must download
the file to your computer, and then
manually import the file to Quicken).
INTERNET BANKING BASIC SERVICES USER’S MANUAL
Confidential and proprietary to First Data
April 1, 2010
Chapter 3: Accounts Tab
Field
Microsoft
Money Active
Statement
65
Description
An Active Statement is a Microsoft
OFX-formatted file containing transaction
information that is exported from a
financial Web site and automatically
imported into current versions of Microsoft
Money.
Your downloaded transactions will be
reconciled against any transactions already
entered in your account register. Active
Statement also automatically matches any
transactions you have already entered in
your register to eliminate duplicate
download entries.
Microsoft
Money OFX
The Open Financial Exchange (OFX) format
is used for importing transaction
information from a financial or brokerage
Web site to your personal finance manager
software (for example, Microsoft Money).
Microsoft Money will not reconcile the
downloaded transactions in the OFX file
against the transactions already entered in
your account register.
The file format has the extension “.ofx”
and is generally used with older versions of
Microsoft Money (i.e, you must download
the file to your computer, and then
manually import the file to Microsoft
Money).
Fixed Length
Check
A Fixed Length Check file is an ASCII text
file that organizes its values in fixed length
fields with no line returns. This file format
has the extension “.flc” and can be used to
download to a spreadsheet.
INTERNET BANKING BASIC SERVICES USER’S MANUAL
Confidential and proprietary to First Data
April 1, 2010
Chapter 3: Accounts Tab
Field
66
Description
Comma-Separ A comma-separated file is an ASCII text
ated
file that organizes its values in columns so
that each column value is separated by a
comma from the next column's value. Each
row starts a new line. This file format has
the extension “.csv” and can be used to
download to a spreadsheet.
Tab-Separated A tab-separated file is an ASCII text file
that organizes its values in columns so that
each column value is separated by a TAB
from the next column's value. Each row
starts a new line. This file format has the
extension “.tsv” and can be used to
download to a spreadsheet.
Downloading History
To download an account transaction history:
1.
On the Account History page, enter the beginning date in the From field
and the ending date in the To field. The default is the last 30 days.
2.
Ignore the following fields: Check # Range, Amount Range, Sort By,
Items Per Page.
3.
On the Download Format dropdown list, select the download format of
your account history.
INTERNET BANKING BASIC SERVICES USER’S MANUAL
Confidential and proprietary to First Data
April 1, 2010
Chapter 3: Accounts Tab
4.
67
Click Download. If you are downloading to QuickBooks, Quicken, or
Microsoft Money, you can click the respective icon.
The next section will present procedures to download specific file types.
Downloading a Comma Separated file into Microsoft Excel
To download your account history using the comma separated file format, do
the following:
1.
On the Account History page, enter the beginning date in the From field
and the ending date in the To field.
2.
On the Download Format drop-down list, select Comma Separated
(default).
3.
Click Download.
The file Download dialog box appears.
INTERNET BANKING BASIC SERVICES USER’S MANUAL
Confidential and proprietary to First Data
April 1, 2010
Chapter 3: Accounts Tab
4.
68
On the File Download dialog, click Save.
The Save As dialog box appears.
5.
Select a folder to save your file (download.csv), and then click Save.
The Download Complete dialog box appears.
INTERNET BANKING BASIC SERVICES USER’S MANUAL
Confidential and proprietary to First Data
April 1, 2010
Chapter 3: Accounts Tab
6.
69
On the Download Complete dialog box, click Close.
Note
The download procedures for Tab Separated, Fixed Length
Check, Quicken QIF, and Microsoft Money files are identical to
the download procedure for comma separated files. The only
difference is the file names. For comma separated files, the
file is download.csv; for tab separated files, download.tsv; for
fixed length check files, download.flc; for Quicken QIF files,
download.qif; and for Microsoft Money files, download.ofx.
Viewing your Account History in Microsoft Excel
To view your account history in Microsoft® Excel, do the following:
1.
Open Microsoft Excel.
2.
On the File menu, click Open. The Open dialog box appears.
INTERNET BANKING BASIC SERVICES USER’S MANUAL
Confidential and proprietary to First Data
April 1, 2010
Chapter 3: Accounts Tab
70
3.
On the Files of type dropdown list, select All Files (*.*).
4.
Locate the folder that contains download.csv, and then double-click
download.csv. Microsoft Excel opens with your account history. You may
need to readjust the column widths to view all the information.
You have successfully opened the file in Microsoft Excel.
Downloading a Tab Separated file into Microsoft Excel
Follow steps 1–6 in Downloading a Comma Separated file into Microsoft
Excel, except that in the Download Format field, select Tab Separated.
Your file will be called download.tsv.
INTERNET BANKING BASIC SERVICES USER’S MANUAL
Confidential and proprietary to First Data
April 1, 2010
Chapter 3: Accounts Tab
71
Viewing your Account History in Microsoft Excel
To view your account history in Microsoft Excel, do the following:
1.
Open Microsoft Excel.
2.
On the File menu, click Open.
The Open dialog box appears.
3.
In the Files of type drop-down list, select All Files (*.*).
4.
Locate the folder that contains download.tsv, and then double-click
download.tsv.
The Text Import Wizard dialog box appears.
5.
On the Text Import Wizard dialog box, click Next >.
6.
Click Next > again, and then click Finish.
Microsoft Excel opens with your account history. You may need to
readjust the column widths to view all the information..
INTERNET BANKING BASIC SERVICES USER’S MANUAL
Confidential and proprietary to First Data
April 1, 2010
Chapter 3: Accounts Tab
72
Downloading a Quicken QIF file
The instructions below are intended for downloading account histories into
older versions of Quicken (version 2003, and earlier) using the Quicken QIF
format and for financial institution customers or members who do not use
Quicken Web Connect.
To download an account history using the Quicken QIF format, do the
following:
1.
On the Account History page, enter the beginning date in the From field
and the ending date in the To field.
2.
On the Download Format drop-down list, select Quicken QIF.
3.
Click Download.
The File Download dialog box appears.
4.
Click Save this file to disk, and then click OK.
The Save As dialog box appears.
5.
Select a folder to save your file (download.qif), and then click Save.
The Download Complete dialog box appears.
INTERNET BANKING BASIC SERVICES USER’S MANUAL
Confidential and proprietary to First Data
April 1, 2010
Chapter 3: Accounts Tab
6.
73
On the Download Complete dialog box, click Close.
Viewing your account History in older versions of Quicken
To import the account history (download.qif) into older versions of Quicken
(version 2000, and earlier), do the following:
1.
Open Quicken.
2.
On the File menu, point to Import, and then click QIF File.
The QIF Import dialog box appears.
3.
On the QIF Import dialog box, click Browse to locate your file
(download.qif), and then double-click download.qif. Click OK to
download.
The Quicken for Windows dialog box appears informing you that the file
import was successful.
4.
Click OK.
INTERNET BANKING BASIC SERVICES USER’S MANUAL
Confidential and proprietary to First Data
April 1, 2010
Chapter 3: Accounts Tab
5.
74
To access your account history in Quicken, click the Checking link.
The Checking Account page appears with the downloaded items at the
bottom of the page.
6.
To import the downloaded history into Quicken, click Accept All.
7.
Click Done.
INTERNET BANKING BASIC SERVICES USER’S MANUAL
Confidential and proprietary to First Data
April 1, 2010
Chapter 3: Accounts Tab
75
The downloaded transactions will appear in your checking register.
Downloading a Microsoft Money OFX file
For older versions of Microsoft Money (version 2003 or earlier) that do not
support Active Statement, users can download their account history using the
Microsoft OFX file format.
Follow steps 1–6 in Downloading a Quicken QIF file in this chapter. In the
Download Format field, select Money. Your file will be called download.ofx.
To import the account history into Microsoft Money, do the following:
1.
Open Microsoft Money.
2.
On the File menu, click Import.
The Import dialog box appears.
3.
Locate the folder where download.ofx resides. Click download.ofx, and
then click Import.
4.
On the Microsoft Money dialog box, click OK.
The Statements page appears.
Note
Microsoft Money also accepts Quicken QIF files.
5.
To view the downloaded history file, click the Checking link.
INTERNET BANKING BASIC SERVICES USER’S MANUAL
Confidential and proprietary to First Data
April 1, 2010
Chapter 3: Accounts Tab
6.
76
To add the account history to your register, click Done.
Downloading an Active Statement Format file into Microsoft
Money
The Microsoft® Money Active Statement format allows users to download
their account history file, and then immediately import the file into Microsoft
Money. If you have a current version of Microsoft Money, you can import your
account history directly. If you have an older version of Microsoft Money, you
must use the Money download option, save the file to your computer, and
then open the file in Microsoft Money. Refer to Downloading a Microsoft
Money OFX file in this chapter.
To download an account history using the Active Statement format into
Microsoft Money, do the following:
1.
On the Account History page, enter the dates in the From and To fields.
2.
Click the Money icon.
The Microsoft Money dialog box appears. It asks if you would like to start
Money now.
3.
Click Yes to start Microsoft Money.
4.
On the Choose a Money Account dialog box, select a Money account
name on the drop-down list, or click New to create an account, then click
Next.
INTERNET BANKING BASIC SERVICES USER’S MANUAL
Confidential and proprietary to First Data
April 1, 2010
Chapter 3: Accounts Tab
77
5.
Enter your financial institution’s name in the Held at field, and then click
Next.
6.
Select the account type, and then click Next.
7.
In the Name field, enter an account name (for example, “My Checking”,
“Business Checking”, etc.), and then click Next.
INTERNET BANKING BASIC SERVICES USER’S MANUAL
Confidential and proprietary to First Data
April 1, 2010
Chapter 3: Accounts Tab
78
8.
Enter the account number, and then click Next.
9.
Enter the opening balance for the account, select the currency, and then
click Finish.
Microsoft Money opens with the Imported Completed dialog.
INTERNET BANKING BASIC SERVICES USER’S MANUAL
Confidential and proprietary to First Data
April 1, 2010
Chapter 3: Accounts Tab
79
10. On the Import Completed dialog box, click OK, and then click your
checking link to open your account.
Microsoft Money opens with your downloaded information.
INTERNET BANKING BASIC SERVICES USER’S MANUAL
Confidential and proprietary to First Data
April 1, 2010
Chapter 3: Accounts Tab
80
Downloading into Quicken Using Quicken Web Connect
The Quicken® Web Connect feature allows users to download their account
history file, and then immediately import the file into a recent version of
Quicken (current version plus two previous versions). If you have a current
version of Quicken, you can import your account history directly. If you have
an older version of Quicken (version 2000, and earlier), you must use the
Quicken QIF download option, save the file to your computer, and then open
the file in Quicken.
Note
Quicken® WebConnect requires a registration or service fee
(to Intuit) from all financial institutions using the service.
Intuit will support the latest version of Quicken plus the
previous two versions. Not all financial institutions offer this
service.
To download an account history into Quicken using Quicken® Web Connect:
1.
On the Account History page, enter the dates in the From and To fields.
2.
Click the Quicken icon.
INTERNET BANKING BASIC SERVICES USER’S MANUAL
Confidential and proprietary to First Data
April 1, 2010
Chapter 3: Accounts Tab
81
The Quicken opens and begins importing your file. After the file is
processed and downloaded, Quicken will automatically open the
appropriate account register.
Downloading into QuickBooks using QuickBooks Web
Connect
Like Quicken® Web Connect, users can download their account history
directly into their QuickBooks accounts. QuickBooks Web Connect exports
your information and automatically imports it directly into your QuickBooks
software (i.e., you do not need to manually save the file to your computer,
and then import it into QuickBooks).
By using QuickBooks Web Connect, your downloaded transactions will be
reconciled against any transactions already entered in your account register.
QuickBooks Web Connect also automatically matches any transactions that
you have already entered in your register to eliminate duplicate download
entries. Intuit officially offers Web Connect support for the most current
version of QuickBooks plus the two previous versions.
Note
QuickBooks Web Connect downloads do not support a Filtered
History Search. You can only set the date ranges for your
account history.
To download your account history into QuickBooks using QuickBooks Web
Connect:
1.
Click the Accounts tab.
The Account Summary page appears.
2.
In the Make a Selection column, click the account's history link.
The History page appears.
3.
In the Account drop-down list, select the account from which to create
your history.
4.
In the From Date Range box, enter the starting date of your account
history.
5.
In the To Date Range box, enter the ending date of your account history.
INTERNET BANKING BASIC SERVICES USER’S MANUAL
Confidential and proprietary to First Data
April 1, 2010
Chapter 3: Accounts Tab
82
6.
Ignore the Items Per Page field. This drop-down list is not used with
downloads.
7.
Click the QuickBooks icon.
The Save As dialog box opens automatically.
8.
On the Save As dialog box, click Save.
9.
On the Download complete dialog box, click Open.
QuickBooks opens with a dialog box indicating that QuickBooks has
received new transaction data.
10. On the QuickBooks dialog box, click Import new transactions now,
and then click OK.
You should see your transaction information in the “Items Received from
Financial Institution” section.
11. In the Items Received from Financial Institution section, click View.
The downloaded items appear on the Match Transactions page.
12. To record unmatched transactions into the register, select the transaction
in the Quick Statement section (lower half of the page), and then click
Add to Register.
If prompted, add the Payee name to your list.
13. Click the Account drop-down list, assign a specific account to the
transaction, and then click Record.
14. Repeat the last three steps for each unmatched transaction.
When you have completed recording the unmatched transactions, you
will have successfully entered your transactions into your QuickBooks
software.
Check Register
Check Register allows you to assign, configure, and modify categories to your
transactions. Each transaction provides a box to enter a brief description or
memo and a drop-down menu to assign a category. By assigning a category
to a transaction, you can generate specialized Income versus Expense reports
based on the transaction category type.
INTERNET BANKING BASIC SERVICES USER’S MANUAL
Confidential and proprietary to First Data
April 1, 2010
Chapter 3: Accounts Tab
83
Note
Some financial institutions may not offer this feature.
INTERNET BANKING BASIC SERVICES USER’S MANUAL
Confidential and proprietary to First Data
April 1, 2010
Chapter 3: Accounts Tab
84
Assigning a Category
The Check Register feature provides a box to enter a brief description or
memo of your transaction as well as a drop-down menu of categories that you
can select for your transaction. The description and category fields appear on
your Quick History on the Account Detail page and on your Account History.
You can also create new categories or edit existing categories to suit your
needs.
To assign a category to a transaction:
1.
On the Account Summary page, click the detail link under Make a
Selection for the account you would like to view.
The Account Detail page appears
2.
In the blank box, enter a brief description or memo of the transaction.
You can enter up to 31 characters maximum. This field is optional.
3.
On the drop-down list, select a category for the transaction. If you would
like to add a category, select ADD A CATEGORY.
4.
Repeat for any of the other transactions present, and then click Save
Changes.
INTERNET BANKING BASIC SERVICES USER’S MANUAL
Confidential and proprietary to First Data
April 1, 2010
Chapter 3: Accounts Tab
85
A confirmation message appears in red above the Quick History section.
You have successfully entered your transaction description and category.
For information on viewing, updating, and removing your categories,
refer to chapter 5, User Services Tab.
INTERNET BANKING BASIC SERVICES USER’S MANUAL
Confidential and proprietary to First Data
April 1, 2010
Chapter 3: Accounts Tab
86
Hiding your Categories
If you would like to hide your categories, you can simply click the button, and
the page will no longer display your descriptions and categories.
To hide your categories:
1.
On the Account Summary page, click the detail link under Make a
Selection for the account you would like to view.
2.
Click Hide Description/Category.
INTERNET BANKING BASIC SERVICES USER’S MANUAL
Confidential and proprietary to First Data
April 1, 2010
Chapter 3: Accounts Tab
87
The Account Detail page appears without the Description and Category
fields.
You have successfully hidden your descriptions and categories.
Account Transfers
Account transfers move funds between your online accounts that are listed in
the Account Summary table. For example, if you have multiple checking or
share draft accounts, you can transfer money from one account to the other.
To make an account-to-account transfers, do one of the following:
■
In the Make a Selection column in the Accounts Summary table, click the
transfer from/to link on the same line as one of the accounts involved in
the transfer.
The Transfer Funds page appears. Refer to Chapter 4, Transfers Tab, for
instructions.
INTERNET BANKING BASIC SERVICES USER’S MANUAL
Confidential and proprietary to First Data
April 1, 2010
Chapter 3: Accounts Tab
88
Frequently Asked Questions
Account Summary FAQs
Q: Do I have to log out completely before switching accounts?
A: No. To switch accounts, carry out the following procedure:
1.
On the left-hand drop-down menu, select the account you want to work
with next.
2.
On the right-hand drop-down menu, select the page you want to view,
and then click Go.
Q: What is the triangle next to Account #?
A: The triangle indicates how the table is sorted. Click the column title to sort
your account list by account type, owner, number, or balance.
INTERNET BANKING BASIC SERVICES USER’S MANUAL
Confidential and proprietary to First Data
April 1, 2010
Chapter 3: Accounts Tab
89
Account Detail FAQs
Q: What is the difference between history and detail?
A: History and detail are defined as follows:
■
■
History. This shows the account's transaction history covering a given
date range within the last two years since you signed up.
Detail. This shows detailed information about the account including
account owner, account type, account number, interest paid, hold amount,
ledger balance, and account history for the last month.
Q: What is the difference between the Xpress balance and the Ledger
balance?
A: They are defined as follows:
■
■
Xpress Balance. The account's running balance, including recent Internet
transactions.
Ledger Balance. The official financial institution's balance recorded on the
date shown. The differences between the two balances are created by any
Internet transactions that have been sent to your financial institution but
have not yet posted.
Q: Why does my financial institution show a balance that is different
from what I can view on my Internet account from home?
A: Your financial institution may not have updated the balance from your
Internet transactions yet.
Q: Why is my balance sometimes a day behind?
A: This depends on how often your financial institution updates the Internet
transaction information.
Q: From which balance can I make online payments?
A: For Online Bill Pay, use the Available Balance. This balance takes into
consideration any Internet transactions you have made. The system checks
this balance for sufficient funds before making payments.
INTERNET BANKING BASIC SERVICES USER’S MANUAL
Confidential and proprietary to First Data
April 1, 2010
Chapter 3: Accounts Tab
90
Account Statement FAQs
Q: How can I increase the size of the text in my statement?
A: Change your browser's font settings.
■
In Mozilla Firefox:
◆
On the File menu, click Preferences.
◆
On the Appearance menu, click Font.
◆
◆
■
Select a larger fixed width font. Make sure the Use my default fonts
option is selected.
Click the OK button.
In Internet Explorer:
◆
On the View menu, click Font Size.
◆
Choose a larger font size.
Account History FAQs
Q: How can I adjust my page to view all history without having to
scroll?
A: If you are using Internet Explorer as your browser, click View, select Text
Size, and choose the font size most appropriate for viewing.
If you are using Mozilla Firefox as your browser, click View and choose
Increase Font or Decrease Font.
Q: There is an “Unposted” on my Account History page. What is it?
A: An “Unposted” entry is created for all Internet transactions (for example,
an online bill payment or a transfer), which will reconcile the next business
day.
Q: What page do I have to be on to download into Quicken or
Microsoft Money?
A: You must be on the Account History page. Once you have logged on, click
the Accounts tab. Find the account you want to download. Under Make a
Selection, click the history link.
INTERNET BANKING BASIC SERVICES USER’S MANUAL
Confidential and proprietary to First Data
April 1, 2010
Chapter 3: Accounts Tab
91
Q: How can I download my account activity into Quicken or Microsoft
Money?
A: On the Account History page, choose the dates and format you wish to
download.
Q: Can I upload FROM Quicken?
A: No. The history is generated from your activities on this site.
Q: How do I download into a spreadsheet like Microsoft®Excel?
A: You must be on the Account History page.
◆
Choose either the comma separated or the tab separated format.
◆
Save as download.cvs.
◆
Open your spreadsheet.
◆
Open the downloaded file.
Q: Can I download to Quicken®Quickbooks?
A: Yes. QuickBooks downloads are possible for financial institutions who have
signed up for QuickBooks Web Connect. If you do not see QuickBooks Web
Connect as a download option on the Download Format list, then your
financial institution does not offer this feature.
Quicken Downloads FAQs
Q: How do I open my account history in my Personal Financial
Manager program?
A: If you are running Windows, make sure the file extension is visible. Look
for download.qif or download.ofx. Select File, click Import, and then, click
OK to load the data into your program. If your financial institution offers
Quicken Web Connect or Active Statement Format, you can download your
account history directly into your personal financial manager program.
INTERNET BANKING BASIC SERVICES USER’S MANUAL
Confidential and proprietary to First Data
April 1, 2010
Chapter 3: Accounts Tab
92
Q: Why does Quicken ask for my passcode?
A: If you are receiving a message that requests a passcode, then you are
attempting to download your account information from the Quicken Web site.
In order to download into Quicken, you will need to log on to your Internet
account with your financial institution and follow the steps available on the
help page. Click the HELP icon to open help for the page you are viewing. You
can also refer to the instructions above.
Q: Why does Quicken ask for my access ID and passcode when I click
on download history?
A: If you are receiving this message, make sure you are using the latest
version of your browser.
Q: Why can’t I access my account through Quicken and pay my bills
through Quicken?
A: You will not be able to access your account or pay bills through Quicken,
because it is all done online through your account with your financial
institution. You will first need to sign up for a checking or share draft account
through your financial institution. Once your account is set up, you can enroll
online. Once you have online access, you can pay bills and download your
transaction history, including bill payments, into Quicken to reconcile your
account.
Q: Why does Quicken not recognize the checks that I hand entered
when using “Quicken Web Connect” through my financial institution's
Web site?
A: Quicken is guaranteed to recognize only the information you have
previously downloaded. If the checks you have hand-written have cleared
your account, they will be included in your history download to your check
register.
Q: How can I download to Quicken without opening a browser?
A: Use the following steps:
1.
Go into Quicken and click the ONLINE CENTER tab on the right.
Your account list will appear.
2.
Select the account you want to update.
INTERNET BANKING BASIC SERVICES USER’S MANUAL
Confidential and proprietary to First Data
April 1, 2010
Chapter 3: Accounts Tab
3.
93
Click the UPDATE/SEND button.
Your financial institution’s home page will appear in Quicken.
4.
Log on and download with Web Connect like you normally would.
Q: Why does Quicken put everything in the memo field when I
download?
A: Make sure you have the latest version of Quicken, and use the new Web
Connect feature (if your financial institution offers it). With Web Connect,
Quicken will put the information in the correct fields.
Q: Why does Quicken give me a message telling me I have no
transactions to download?
A: Either you have already downloaded the most current data, or there is no
account history to download yet.
Q: What do I do when I go into my account to download my history,
and I don’t have an option for Web Connect?
A: Contact your financial institution.
INTERNET BANKING BASIC SERVICES USER’S MANUAL
Confidential and proprietary to First Data
April 1, 2010
Chapter 4
94
Transfers Tab
What’s in this Chapter
This chapter presents information to transfer money from any accounts
internal to your financial institution, such as from one checking account to
another, or transfers from an internal account to an external account at
another financial institution (or vice versa).
Navigating the Transfers Tab
The Transfers tab allows users to schedule online account-to-account
transfers, view pending transfers and transfer histories.
To reach the Transfers tab:
1.
Click the Transfers tab in the top toolbar.
Note
If you do not have transfer privileges, contact your financial
institution to sign up for it.
The Transfers screen appears.
2.
Move to the appropriate screen by clicking one of the following links at
the top of the page.
◆
◆
◆
Schedule Transfer. Click this link to schedule or view an Internet
account-to-account transfer.
Schedule Loan Payment. If you have any loan accounts at your
financial institution, click this link to make a loan payment.
History. Click this link to view a list of past transfers. You can view
the account-to-account transfer history for specific accounts or all
accounts during any period of time up to the last two years since you
signed up for this financial website.
INTERNET BANKING BASIC SERVICES USER’S MANUAL
Confidential and proprietary to First Data
April 1, 2010
Chapter 4: Transfers Tab
◆
95
Add External Transfer Account. Click this link to add an account at
another financial institution. You can schedule transfers to or from the
external account.
Scheduling a New Transfer
You can schedule an account-to-account transfer using the “Schedule a
Transfer” module on the Transfer page. The Schedule a Transfer module allows
you to make a one-time transfer or a recurrning transfer with fixed or variable
amounts.
To schedule a new account transfer:
1.
Click the Transfers tab.
The main Transfers page appears.
2.
In the Schedule Transfer module, select the account from which to
move funds on the From Account drop-down list.
3.
On the To Account drop-down list, select the account to receive the
funds.
4.
In the Transfer Description field, type a brief note about the reason for
the transfer. This memo appears in your account transfer detail. The field
has a maximum length of 127 characters.
5.
In the Amount field, type the dollar amount of the transfer. You do not
need to enter the “$” symbol.
6.
In the Frequency list, click how often the transfer occurs:
One Time
One-time only event. Transfers
are not rescheduled
automatically.
Fixed Recurring
Transfers are automatically
rescheduled for the same dollar
amount each time.
Variable Recurring
Transfers are automatically
rescheduled, but you must enter
a new dollar amount each time.
INTERNET BANKING BASIC SERVICES USER’S MANUAL
Confidential and proprietary to First Data
April 1, 2010
Chapter 4: Transfers Tab
Occasional
7.
96
Transfers are not automatically
rescheduled, but the transfer
remains on the Pending Transfers
table.
In the Period list, click how often a recurring transfer occurs. The
possible options are:
Once
Use this period if you checked the One
Time box or if you selected
Occasional as the Frequency.
Weekly
Every week on (or near) the same day
of the week you scheduled the first
payment.
Every To
Weeks
Every other week on (or near) the
same day of the week you scheduled
the first payment.
Monthly
Every month on (or near) the same
day of the week you scheduled the first
payment
Every Two
Months
Every other month on (or near) the
same day of the week you scheduled
the first payment
Quarterly
Every three months on (or near) the
same day of the week you scheduled
the first payment.
Twice a Year Every six months on (or near) the
same day of the week you scheduled
the first payment.
Yearly
8.
Every 12 months on (or near) the
same day of the week you scheduled
the first payment
In the Scheduled Transfer Date field, type the date you want the
transfer to take place (MM/DD/YYYY), or click the calendar icon to select
a date. Transfers scheduled for the same business day and before the
cut-off time are processed immediately.
INTERNET BANKING BASIC SERVICES USER’S MANUAL
Confidential and proprietary to First Data
April 1, 2010
Chapter 4: Transfers Tab
9.
97
Click the Transfer button.
A confirmation page appears.
10. On the Confirmation page, verify the transfer, and then click Schedule
Transfer.
A summary of your transfer appears on the page.
INTERNET BANKING BASIC SERVICES USER’S MANUAL
Confidential and proprietary to First Data
April 1, 2010
Chapter 4: Transfers Tab
98
11. Click Done to return to the main Transfers page.
You have successfully scheduled a transfer.
INTERNET BANKING BASIC SERVICES USER’S MANUAL
Confidential and proprietary to First Data
April 1, 2010
Chapter 4: Transfers Tab
99
Pending Transfers
Pending transfers are any transfers that are scheduled to occur at a given
date in the future. Any transfers set as “Occasional” will also appear on the
Pending Transfers table although they are not automatically rescheduled.
Viewing the Pending Transfers Table
To view all pending transfers, click on the Transfers tab. The Pending
Transfers module on the Transfers page displays a table containing all
pending transfers.
The Pending transfers table shows all pending scheduled transfers. The
following information is provided about each transfer.
Heading
Description
Transfer
Displays the From and To accounts.
Description
Amount
The dollar amount of the transfer. You can sort
the table by Amount by clicking the Up or Down
arrow if more than one transfer is present.
Date
The date the payment is transferred. You can sort
the table by Date by clicking the Up or Down
arrow.
INTERNET BANKING BASIC SERVICES USER’S MANUAL
Confidential and proprietary to First Data
April 1, 2010
Chapter 4: Transfers Tab
100
Viewing a Transfer Detail
The Transfer Detail page provides basic information about any pending
transfer. Pending transfers can be any transfers scheduled at a future date; or
transfers with a variable amount that is scheduled at a recurring date.
Transfers with zero amounts may indicate that an occasional transfer
occurred; the user is required to enter an amount and date for the next
transfer.
To view a transfer in the Pending Transfers table, in the Pending Transfers
module, click the account link.
INTERNET BANKING BASIC SERVICES USER’S MANUAL
Confidential and proprietary to First Data
April 1, 2010
Chapter 4: Transfers Tab
101
The Transfer Detail page appears.
Editing a Pending Transfer
Users can edit or change an existing pending transfer and schedule it for
processing.
To edit a transfer in the Pending Transfers table:
1.
In the Date column, click the Edit link or click the account link.
The Transfer Edit page appears.
INTERNET BANKING BASIC SERVICES USER’S MANUAL
Confidential and proprietary to First Data
April 1, 2010
Chapter 4: Transfers Tab
102
2.
Change any information you want to change. For example, if you want to
unschedule a transfer, remove the date in the Scheduled Transfer Date
field.
3.
Click Update Transfer.
A Confirm Transfer Instructions page appears.
4.
Confirm the changes and click Submit Changes.
A Scheduled Transfer Updated page appears.
INTERNET BANKING BASIC SERVICES USER’S MANUAL
Confidential and proprietary to First Data
April 1, 2010
Chapter 4: Transfers Tab
5.
103
Click Done to return to the Transfers page.
INTERNET BANKING BASIC SERVICES USER’S MANUAL
Confidential and proprietary to First Data
April 1, 2010
Chapter 4: Transfers Tab
104
Deleting a Pending Transfer
Users can delete any pending transfers on the Pending Transfers Table. If you
accidently delete a transfer, you can schedule a new transfer by clicking the
Schedule A Transfer link.
To delete a transfer in the Pending Transfer table:
1.
In the Date column, click Cancel.
The Transfer Delete page appears.
2.
Verify the transfer, and then click the Delete Transfer button.
A “Transfer Successfully Deleted” message appears. You have
successfully deleted a pending transfer.
INTERNET BANKING BASIC SERVICES USER’S MANUAL
Confidential and proprietary to First Data
April 1, 2010
Chapter 4: Transfers Tab
105
Transfer History
The system allows users to view any transfer histories that occurred in the
last two years (depending on the FI) since the user signed up for this financial
website. Any transfer made more than two years ago will not be retained in
the system.
Viewing Transfer History
To view a transfer history:
1.
From the main Transfers page, click the View Transfer History link.
The View History page appears.
2.
Enter the account information and dates you want to include in the
history:
◆
Transfer From: Select the account the funds were transferred from.
◆
Transfer To: Select the account the funds were transferred to.
◆
◆
From: Type the first day to include in the history (MM/DD/YYYY) or
click the calendar icon.
To: Type the last day to include in the history (MM/DD/YYYY) or click
the calendar icon.
INTERNET BANKING BASIC SERVICES USER’S MANUAL
Confidential and proprietary to First Data
April 1, 2010
Chapter 4: Transfers Tab
3.
106
Click View History.
The Transfer History page appears.
4.
Click an account link to view the transfer details.
The Transfer History Detail page appears.
INTERNET BANKING BASIC SERVICES USER’S MANUAL
Confidential and proprietary to First Data
April 1, 2010
Chapter 4: Transfers Tab
5.
107
Click Done to return to the main Transfers page.
You have successfully accessed your Transfers History.
External Transfers
External Transfers is an account management tool that gives you the power to
transfer funds between your online account and an external account at
another financial institution: one-time, future-dated, or recurring.
In addition to internal transfers (transfers between your online accounts), you
can transfer funds in a number of new ways:
■
Transfers between personal account(s) and personal account(s) of other
users at your financial institution.
You can transfer funds between your personal account(s) and the
personal account(s) of other users at your financial institution. For
example, you can transfer funds from a checking account to a relative’s
checking account who also banks at your financial institution.
■
Transfers between personal account(s) to personal account(s) of other
users at other (for example, external) financial institutions.
You can transfer funds between your personal account(s) and to the
personal account(s) of other users at a different financial institution. For
example, parents can transfer funds from a checking account to the
savings account of their son who is attending college in another state.
INTERNET BANKING BASIC SERVICES USER’S MANUAL
Confidential and proprietary to First Data
April 1, 2010
Chapter 4: Transfers Tab
108
How are External Accounts Established?
The External Transfers feature is a simple and convenient money
management tool to set up your external accounts and schedule transfers.
The approval process is designed to quickly and securely set up all external
accounts.
Before approving an external account request—particularly a “transfer from”
account—your financial institution takes steps to verify the ownership of the
external account. Typically, this will be accomplished by receiving a voided
check, deposit slip, or account statement for the account.
The general flow for approving accounts is as follows:
1.
The customer enters an external account request. Using the “Add
an External Account” page, you can enter an external transfer account
request, and then click the Submit button. The system enters the request
as a pending External Account request and displays it on the User
Services Add/View Account Services page.
2.
Your Financial Institution reviews and approves the account in
FXIM. Once the request has been entered, a representative at your
financial institution reviews and approves your external transfer account
request. Upon approval, the system sends you an in-session confirmation
message stating that your external transfer account has been accepted.
You can view the message by clicking the Messages Tab.
3.
The external transfer is ready for scheduling. Once the external
account has been approved, you can schedule an external transfer by
accessing the account on the Schedule a Transfer page’s drop-down
menu.
Entering an External Account Transfer Request
The External Transfer approval process allows you to easily enter a new
account request from a single page. You can access the page by means of
links and buttons to the Add External Account page.
To enter an External Transfer Account request:
1.
Click one of three links or buttons to access the page.
◆
On the main Transfers page, click Add External Transfer Account.
INTERNET BANKING BASIC SERVICES USER’S MANUAL
Confidential and proprietary to First Data
April 1, 2010
Chapter 4: Transfers Tab
◆
109
On the User Services page, click the Add External Transfer
Account link.
INTERNET BANKING BASIC SERVICES USER’S MANUAL
Confidential and proprietary to First Data
April 1, 2010
Chapter 4: Transfers Tab
◆
110
On the User Services/Account Services page, click Add External
Account.
The User Services External Transfer Service Agreement page appears.
INTERNET BANKING BASIC SERVICES USER’S MANUAL
Confidential and proprietary to First Data
April 1, 2010
Chapter 4: Transfers Tab
2.
111
Read the Agreement page, and then click the Accept button (located at
the bottom of the page) to continue. Note: Your Agreement page may
look different than what is presented below.
INTERNET BANKING BASIC SERVICES USER’S MANUAL
Confidential and proprietary to First Data
April 1, 2010
Chapter 4: Transfers Tab
3.
112
On the Add External Transfer Account page, enter the account
information, click the type of transfer in the Allow Transfer TO This
Account or Allow Transfer FROM This Account box, and then click
Submit.
A confirmation page appears.
4.
On the Confirmation page, review the information, and then click Submit
to continue.
The Final Confirmation page appears.
INTERNET BANKING BASIC SERVICES USER’S MANUAL
Confidential and proprietary to First Data
April 1, 2010
Chapter 4: Transfers Tab
5.
113
On the Final Confirmation page, print out the page, sign it, and then mail
it to your FI for authorization. (Some financial institutions may not
require you to sign the application.)
You have successfully submitted an external transfer account request.
INTERNET BANKING BASIC SERVICES USER’S MANUAL
Confidential and proprietary to First Data
April 1, 2010
Chapter 4: Transfers Tab
114
Entering an External Account Transfer Request at an FI in
Mexico
The External Transfer approval process allows you to easily enter a new
Mexico account request from a single page. You can access the page by
means of links and buttons to the Add External Account page.
To enter an External Transfer Account request:
1.
Click one of three links or buttons to access the page.
◆
◆
On the main Transfers page, click Add External Transfer Account.
On the User Services page, click the Add External Transfer
Account link.
INTERNET BANKING BASIC SERVICES USER’S MANUAL
Confidential and proprietary to First Data
April 1, 2010
Chapter 4: Transfers Tab
◆
115
On the User Services/Account Services page, click Add External
Account.
The User Services External Transfer Service Agreement page appears.
INTERNET BANKING BASIC SERVICES USER’S MANUAL
Confidential and proprietary to First Data
April 1, 2010
Chapter 4: Transfers Tab
2.
116
Read the Agreement page, and then click the Accept button (located at
the bottom of the page) to continue. Note: Your Agreement page may
look different than what is presented below.
INTERNET BANKING BASIC SERVICES USER’S MANUAL
Confidential and proprietary to First Data
April 1, 2010
Chapter 4: Transfers Tab
3.
117
On the Add External Transfer Account page, click on click here to
request an external transfer account to a financial institution in Mexico .
A second Add External Transfer Account page appears.
4.
On the Financial Institution Name box, enter the name of the financial
institution in Mexico, such as "Banamex", "Bancomer", etc.
5.
In the CLABE Account # box, enter the receiving account number. This
account number is 18 digits in length with the first 3 digits being the ABM
(bank routing) number.
6.
In the Account Owner box, enter the name of the owner of the account.
7.
In the Account Nickname box, enter the account nickname if any.
8.
In the address boxes, enter the account owner's address information.
◆
Account Owner Street Address.
◆
Account Owner City.
◆
Account Owner State/Province.
◆
Account Owner Postal Code.
INTERNET BANKING BASIC SERVICES USER’S MANUAL
Confidential and proprietary to First Data
April 1, 2010
Chapter 4: Transfers Tab
9.
118
Click Submit.
A confirmation page appears.
10. On the Confirmation page, review the information, and then click Submit
to continue.
The Final Confirmation page appears.
INTERNET BANKING BASIC SERVICES USER’S MANUAL
Confidential and proprietary to First Data
April 1, 2010
Chapter 4: Transfers Tab
119
11. On the Final Confirmation page, print out the page, sign it, and then mail
it to your FI for authorization. (Some financial institutions may not
require you to sign the application.)
You have successfully submitted an external transfer Mexico account
request.
INTERNET BANKING BASIC SERVICES USER’S MANUAL
Confidential and proprietary to First Data
April 1, 2010
Chapter 4: Transfers Tab
120
Tracking the External Account Approval Process
You can track the progress of your pending external account requests on the
User Services/Account Services page. All pending external account requests
appear at the bottom of the page until the FI approves them. Once the
account has been approved, you will receive notification that the account is
now active. It will appear on the Transfer page and on the Account Services
page.
Scheduling an External Transfer
Once an external transfer account has been activated, the external account
appears on the Schedule Transfer page’s drop-down list. The drop-down list
displays either the bank name or the external account nickname and the
account type “External”. From this page, you can schedule a transfer to or
from an external account.
To schedule a transfers to or from an external account:
1.
On the main Transfers page and in the Schedule Transfer module, select
an account on the From Accounts drop-down list.
2.
Select an external account on the To Account drop-down list.
3.
In the Transfer Description field, type a brief note about the reason for
the transfer. This memo appears in your account transfer detail. The field
has a maximum length of 127 characters.
INTERNET BANKING BASIC SERVICES USER’S MANUAL
Confidential and proprietary to First Data
April 1, 2010
Chapter 4: Transfers Tab
121
4.
In the Amount field, type the dollar amount of the transfer. You do not
need to enter the “$” symbol.
5.
In the Frequency list, click how often the transfer occurs.In the Period
list, click how often a recurring transfer occurs.
6.
In the Scheduled Transfer Date field, type the date you want the
transfer to take place (MM/DD/YYYY), or click the calendar icon to select
a date. Transfers scheduled for the same business day and before the
cut-off time are processed immediately.
7.
Click the Transfer button.
A confirmation page appears.
INTERNET BANKING BASIC SERVICES USER’S MANUAL
Confidential and proprietary to First Data
April 1, 2010
Chapter 4: Transfers Tab
8.
122
On the Confirmation page, verify the transfer, and then click Schedule
Transfer.
The Transfer Scheduled Successfully page appears. The estimated
settlement time frames are displayed to the user at the bottom of the
page.
9.
Click Done to return to the main Transfers page.
INTERNET BANKING BASIC SERVICES USER’S MANUAL
Confidential and proprietary to First Data
April 1, 2010
Chapter 4: Transfers Tab
123
The Pending Transfers table on the Transfers page displays the scheduled
external transfer.
You have successfully scheduled an external transfer.
Loan Payments
This web site offers additional management tools for users who have online
loan accounts. The Transfers toolbar, located at the top of the page, features
links to help you schedule your loan payments and to access your loan
histories. These links are only visible to users who have loan accounts.
To schedule a loan payment:
1.
To access the Schedule a Loan Payment page, do one of the following:
◆
On the Accounts page, click make a loan payment next to the loan
account
INTERNET BANKING BASIC SERVICES USER’S MANUAL
Confidential and proprietary to First Data
April 1, 2010
Chapter 4: Transfers Tab
◆
◆
124
On the Transfers page, click Schedule Loan Payment.
On the Loan Account Detail page, click the Make Loan Payment
button.
2.
On the Schedule Loan Payment page, select the originating account that
you want to moves funds on the From Account drop-down list.
3.
On the To Loan drop-down list, select the destination account for your
loan payment.
4.
In the Transfer Description box, enter a brief description for the
transaction. The field has a maximum length of 127 characters. This
description serves as a reminder to yourself about the transactions; it is
not sent to your financial institution and does not appear on the account
statement.
5.
Click the Click here to specify interest amount button if you want
your payment amount to be applied to your loan's principal only.
6.
On the Frequency drop-down list, select the frequency of the payment.
This field tells the system if the payment should be rescheduled and if
the payment involves a fixed or variable dollar amount or due date. The
possible options are:
One Time
One-time only event. Transfers
are not rescheduled
automatically.
Fixed Recurring
Transfers are automatically
rescheduled for the same dollar
amount each time.
Variable Recurring
Transfers are automatically
rescheduled, but you must enter
a new dollar amount each time.
INTERNET BANKING BASIC SERVICES USER’S MANUAL
Confidential and proprietary to First Data
April 1, 2010
Chapter 4: Transfers Tab
Occasional
7.
125
Transfers are not automatically
rescheduled, but the transfer
remains on the Pending Transfers
table.
On the Period drop-down list, select the period of the payment. The
period tells the system how often to reschedule the payment. The
possible options are:
Once
Use this period if you checked the One
Time box or if you selected occasional
as the frequency.
Weekly
Every week on or near the same day of
the week you scheduled the first
payment.
Every To
Weeks
Every other week on or near the same
day of the week you scheduled the first
payment.
Monthly
Every month on or near the same day
of the week you scheduled the first
payment
Every Two
Months
Every other month on or near the
same day of the week you scheduled
the first payment
Quarterly
Every three months on or near the
same day of the week you scheduled
the first payment.
Twice a Year Every six months on or near the same
day of the week you scheduled the first
payment.
Yearly
8.
Every 12 months on or near the same
day of the week you scheduled the first
payment
In the Scheduled Payment Date box, enter the date when the payment
will be processed (MM/DD/YYYY). Today's date is the default date. Note:
The loan payment's due date is displayed next to this field.
INTERNET BANKING BASIC SERVICES USER’S MANUAL
Confidential and proprietary to First Data
April 1, 2010
Chapter 4: Transfers Tab
9.
126
Click Make Payment.
The Confirmation page appears.
10. On the Confirmation page, verify the information and click Schedule
Transfer.
The Payment Scheduled Successfully page appears.
INTERNET BANKING BASIC SERVICES USER’S MANUAL
Confidential and proprietary to First Data
April 1, 2010
Chapter 4: Transfers Tab
127
11. Review the payment information, and click Done.
You have successfully scheduled a loan payment.
Principal and Interest Loan Payments
Financial institutions configured for Principal and/or Interest payments will
have a special button for users to press on the Schedule a Loan Payment
page. The page will open with a Principal and Interest Amount fields for your
users to specify when entering their loan payments. Users have the option to
pay specific amounts for each loan payment’s principal, interest, or both if
they desire.
Note
Depending on the services offered, your financial institution
may allow regular loan payments (principal plus interest),
principal-only, interest-only, or principal and/or interest
payments. Please contact your financial institution for details.
INTERNET BANKING BASIC SERVICES USER’S MANUAL
Confidential and proprietary to First Data
April 1, 2010
Chapter 4: Transfers Tab
128
To schedule a Principal and/or interest payment:
1.
To access the Schedule a Loan Payment page, do one of the following:
◆
On the Accounts page, click make a loan payment next to the loan
account
INTERNET BANKING BASIC SERVICES USER’S MANUAL
Confidential and proprietary to First Data
April 1, 2010
Chapter 4: Transfers Tab
◆
◆
129
On the Transfers page, click Schedule a Loan Payment.
On the Loan Account Detail page, click the Make Loan Payment
button.
2.
On the Schedule a Loan Payment page, select the originating account
that you want to moves funds on the From Account drop-down list.
3.
On the To Loan drop-down list, select the destination account for your
loan payment.
INTERNET BANKING BASIC SERVICES USER’S MANUAL
Confidential and proprietary to First Data
April 1, 2010
Chapter 4: Transfers Tab
130
4.
In the Transfer Description box, enter a brief description for the
transaction. The field has a maximum length of 127 characters. This
description serves as a reminder to yourself about the transactions; it is
not sent to your financial institution and does not appear on the account
statement.
5.
In the Amount to be applied to Interest box, enter the dollar amount
of your payment. For example, you can use any of the following formats:
100, 100.00, or $100.
6.
On the Frequency drop-down list, select the frequency of the payment.
This field tells the system if the payment should be rescheduled, and if
the payment involves a fixed or variable dollar amount or due date. The
possible options are:
Field
7.
Description
One Time
Payments are not automatically rescheduled and will
only appear on the Transfer/Loan Payment History
page.
Fixed
Recurring
Payments are automatically rescheduled for the
same dollar amount each time.
Variable
Recurring
Payments are automatically rescheduled, but you
must enter a new dollar amount each time.
Occasional
Payments are not automatically rescheduled, but the
transfer remains on the Transfers/Loan Payments
Pending page.
On the Period drop-down list, select the period of the payment. The
period tells the system how often to reschedule the payment. The
possible options are as follows.
Field
Description
Once
Use this period if you checked the One Time box
or if you selected Occasional as the Frequency.
Weekly
Every week on (or near) the same day of the week
you scheduled the first payment.
Every Two
Weeks
Every other week on (or near) the same day of the
week you scheduled the first payment.
INTERNET BANKING BASIC SERVICES USER’S MANUAL
Confidential and proprietary to First Data
April 1, 2010
Chapter 4: Transfers Tab
131
Field
Description
Monthly
Every month on (or near) the same day of the
week you scheduled the first payment.
Every Two
Months
Every other month on (or near) the same day of
the week you scheduled the first payment.
Quarterly
Every three months on (or near) the same day of
the week you scheduled the first payment.
Twice a Year
Every six months on (or near) the same day of the
week you scheduled the first payment.
Yearly
Every 12 months on (or near) the same day of the
week you scheduled the first payment.
8.
In the Scheduled Payment Date box, enter the date when the payment
will be processed (mm/dd/yyyy). Today's date is the default date. Note:
The loan payment's due date is displayed next to this field.
9.
Click Make Payment.
10. One of two possible results occurs:
INTERNET BANKING BASIC SERVICES USER’S MANUAL
Confidential and proprietary to First Data
April 1, 2010
Chapter 4: Transfers Tab
◆
◆
132
If you scheduled the payment for the same day, you will see a
confirmation screen with the message, "Are you sure you want to
perform this transfer?" From this screen, click the Make Payment
button again to complete the transaction. The payment is recorded on
the Transfers/Loan Payment History page.
If you scheduled the payment for a future date, you will see a Transfer
Confirmation screen. From this screen, click Schedule Payment. The
payment is recorded on the Transfers/Loan Payments Pending page.
The Payment Scheduled Successfully page appears.
INTERNET BANKING BASIC SERVICES USER’S MANUAL
Confidential and proprietary to First Data
April 1, 2010
Chapter 4: Transfers Tab
133
11. Click the Done button to return to the Transfers page.
You have successfully scheduled a loan payment.
12. Review the pending payment transfer information, and continue on with
additional loan payments, transfers, etc, or log off.
Frequently Asked Questions
Q: If I have a problem transferring funds, how do I report it?
A: When a problem occurs with a transfer, write down the Transfer ID number
appearing on the Transfer Confirmation page, and refer to it when you report
the problem by secure email to your financial institution. Click the Messages
tab, and then click the CONTACT US link to report the problem to your
financial institution.
Q: Can I transfer money from one account to another account?
A: Yes, if both accounts are accessible online. Click the Transfers tab, and look
for the Schedule Transfer module on the page. Fill in the account, description,
amount, frequency, and period information, and click the TRANSFER button to
schedule the transfer.
INTERNET BANKING BASIC SERVICES USER’S MANUAL
Confidential and proprietary to First Data
April 1, 2010
Chapter 4: Transfers Tab
134
Q: Can I transfer money online to my parent's account?
A: Yes, if your financial institution offers External Transfers. You can enter an
external transfer account request for your parent’s account (if they use
another financial institution) on the Add External Transfers Account page. Your
financial institution will review and approve the request, and notify by an
in-session alert that you can open on the Messages tab.
Q: When I schedule a transfer, are these changes reflected
immediately in my balance?
A: Yes, the debit transfers are reflected immediately on the Account Detail
page as an unposted transaction. The posted transactions will be displayed
when your financial institution updates the online transfers.
Q: How soon after a transaction is performed will it appear on the
system?
A: This varies according to the type of transaction. Transactions are not
instantaneous. However, debit transactions will show up immediately as an
unposted transaction and will affect your available balance. Most transactions
will be processed on the same banking day, and your regular balance will be
updated.
INTERNET BANKING BASIC SERVICES USER’S MANUAL
Confidential and proprietary to First Data
April 1, 2010
Chapter 5
135
User Services Tab
What’s in this Chapter
This chapter covers a suite of account management tools available on the
User Services tab. These tools allow users to customer, manage, and update
their accounts.
Navigating the User Services Tab
The User Services page provides a one-stop location to manage your online
accounts. The page contains links to various online services, such as sending
a secure message to your financial institution, changing your passcode,
requesting documentation or transaction items, updating your contact
information, reordering your current checks, and requesting stop payments.
Note
Your financial institution may not offer all of these features.
To access User Services:
■
Click the User Services tab.
The Services List page appears.
INTERNET BANKING BASIC SERVICES USER’S MANUAL
Confidential and proprietary to First Data
April 1, 2010
Chapter 5: User Services Tab
136
Manage
Account Links
Description
Add/View Account Add, edit or remove online accounts.
Services
Add New Online
Account
Add a new online account.
Add External
Transfer Account
Enter an external transfer account request.
Account
Nicknames
Edit your account nicknames.
Change Address
Information
Change your contact information at your financial
institution.
Update Email
Address
Update your email address, so that any change to
sensitive information (for example, passcode
changes) is sent to you via a notification email.
E-Statements
Only
If your financial institution offers E-statements,
this service allows you to receive only the
electronic form of your monthly statement on the
system. The paper form, which is identical to the
electronic form, will no longer be mailed to you.
Remove Online
Account
Set any of your accounts to a “No View” state. The
account will no longer be viewable online but
balances, histories, and statements, if any, will
continue to process.
Other Service
Requests Links
Description
Stop Payment
Request a stop payment of a check, electronic
payment, or recurring draft on your financial
institution. This is not for Online Bill Pay.
Request
Documents
Request copies of statements or checks.
INTERNET BANKING BASIC SERVICES USER’S MANUAL
Confidential and proprietary to First Data
April 1, 2010
Chapter 5: User Services Tab
137
Other Service
Requests Links
Description
Reorder Checks
Reorder your current checks from your financial
institution. For security reasons, your checks must
have the same name, address, and style as your
last order.
Buy Savings
Bonds
Purchase savings bonds online.
Security
Settings
Description
Change Passcode
Change the passcode you use to log on to this web
site.
Change Security
Verification
Questions
Change your security verification questions and/or
answers on the system.
User
Preferences
Links
Description
Notify Me
Notify Me is a feature that allows you to receive
external email notifications (i.e., email sent to
your home email address) whenever an in-session
alert is generated on specific transaction account
activity. If you do not see the link, your financial
institution does not offer this service.
Start Page
Selection
Set the start page for your online session. The
start page is the first page that appears after you
log on.
List Sorting
Set how the accounts are sorted on your pages.
Quick History
Set the number of recent transactions and the
time range for the transactions seen on the
Account Detail page.
Transaction
Categories
Set, edit or remove transaction categories.
INTERNET BANKING BASIC SERVICES USER’S MANUAL
Confidential and proprietary to First Data
April 1, 2010
Chapter 5: User Services Tab
138
User
Preferences
Links
Adjust Font Size
Description
Adjust the size of the font displayed on the screen.
Contact Us
Links
Send a Secure
Message
Description
Send an encrypted message to Customer Service
at your financial institution.
Find addresses, phone numbers, and directions to
Contact
your financial institution.
Information for
FundsXpress
Financial Network
Live Chat
Communicate one-on-one with a person at your
financial institution.
Add/View Account Services
The Account Services page provides a suite of account management tools that
users can use to add new accounts, edit existing accounts, and remove access
to current online accounts.
INTERNET BANKING BASIC SERVICES USER’S MANUAL
Confidential and proprietary to First Data
April 1, 2010
Chapter 5: User Services Tab
139
The Account Services page shows all current accounts with the following
information.
Column
Heading
Description
Account #
The account number of the account.
Account Type
The type of account.
Account Name
The user-assigned account nickname, or the
account owner name.
Services
The current services that are assigned to the
account.
Make a Selection
The functions that users can utilize to edit account
nicknames or add services to an account if
available. Also, users can remove access to online
accounts.
Pending Online
Accounts
Below the account information, users can see a
table of outstanding pending accounts, if any, that
require activation/approval by the financial
institution.
Editing an Account
The Account Services Edit page provides an editable account nickname field
as well as buttons to upgrade services. The following information is provided.
Column
Heading
Description
Account Owner
The official name of the account holder on the
system.
Account Type
The type of account.
Account Number
The account number.
Services
The current services that are assigned to the
account.
INTERNET BANKING BASIC SERVICES USER’S MANUAL
Confidential and proprietary to First Data
April 1, 2010
Chapter 5: User Services Tab
140
Column
Heading
Account
Nickname
Description
The nickname given to the account by the user
Available Services The additional online services available on the
account. If the account already has access to all
available online services, the message, “This
account has no additional services available”
appears.
To edit an online account or service:
1.
On the User Services page, click Add/View Account Services.
2.
In the “Make A Selection” column, click edit.
The Account Services Detail page appears.
INTERNET BANKING BASIC SERVICES USER’S MANUAL
Confidential and proprietary to First Data
April 1, 2010
Chapter 5: User Services Tab
141
3.
In the Account Nickname box, enter or change the account nickname.
4.
For available services, click the button listed if you would like to add an
online service to your account.
5.
Click Submit.
The account nickname is updated immediately. The account service
request is sent to the financial institution for processing.
INTERNET BANKING BASIC SERVICES USER’S MANUAL
Confidential and proprietary to First Data
April 1, 2010
Chapter 5: User Services Tab
142
Enabling Access
The Account Services page allows you to re-enable online access to an
account you have previously removed from your online account list. When you
re-enable an account, you will see the current online services assigned to the
account, as well as any additional services that may be available for the
account, such as Bill Pay.
To enable an account for use:
1.
Click the User Services tab, and then click Account Services.
The Account Services page appears.
2.
In the Make a Selection column, click enable access.
A Confirmation page appears with your request.
3.
On the Confirmation page, verify the account that you would like to
re-enable for online access. Select the Bill Pay service if you want to
request Bill Pay services on a checking account.
4.
Click Submit.
A final confirmation page appears.
INTERNET BANKING BASIC SERVICES USER’S MANUAL
Confidential and proprietary to First Data
April 1, 2010
Chapter 5: User Services Tab
5.
143
Click Done to return to the Account Services main page.
Your request for Online Bill Pay will be processed by your financial
institution.
Add New Online Account
The Add New Online Account page provides an easy method to add an account
for online access. An account must already exist at your financial institution
prior to requesting online access.
INTERNET BANKING BASIC SERVICES USER’S MANUAL
Confidential and proprietary to First Data
April 1, 2010
Chapter 5: User Services Tab
144
Note
Due to regulatory withdrawal limitations, you may only add
Bill Pay to checking accounts.
To add a new account:
1.
To access the Add New Online Account page, click one of the following
buttons or links:
On the User Services page, click Add New Online Account.
◆
On the Account Services page, click the Add New Online Account
button.
◆
On the Accounts page, click Add an Account at the top of the page.
◆
On the Payments page, click Add a Bill Pay Account.
2.
On the Add New Online Account page, enter the account number in the
Account # box.
3.
In the Nickname box, enter a nickname to help you identify the account
when you view it online.
4.
On the Account Type drop-down list, select the account type.
5.
If you would like to add Online Bill Pay to a checking account, click Bill
Pay.
6.
Repeat steps 2-4 for additional accounts.
7.
Review your information, and then click Add Account(s).
The Add New Online Account Confirmation page appears with your
request.
INTERNET BANKING BASIC SERVICES USER’S MANUAL
Confidential and proprietary to First Data
April 1, 2010
Chapter 5: User Services Tab
8.
145
On the Confirmation page, click Submit.
Your request will be reviewed and processed by the financial institution.
Adding an External Transfer Account Request
External Transfers is an account management tool that gives you the power to
transfer funds between your online account and an external account at
another financial institution: one-time, future-dated, or recurring.
INTERNET BANKING BASIC SERVICES USER’S MANUAL
Confidential and proprietary to First Data
April 1, 2010
Chapter 5: User Services Tab
146
Depending on your financial institution’s offerings, you can make the following
types of transfers:
■
■
■
Standard Internal Transfers. Transfer funds between your personal
account(s) and the personal account(s) of other users at your financial
institution. For example, you can transfer funds from an online checking
account to an online savings account.
Restricted Internal Transfers (for example, “transfer to” only).
Transfer funds between your personal account(s) and to the personal
account(s) of other users at your financial institution. For example, you
can transfer funds from a checking account to the checking account of a
relative who also banks at your financial institution.
Standard External Transfers. Transfer funds between your personal
account(s) at your institution and your personal account(s) held at a
different financial institution.
How are External Accounts Approved?
The External Transfers feature is a simple and convenient management tool to
set up your external accounts and schedule transfers. The approval process is
designed to quickly and securely set up all external accounts.
Before approving an external account request — particularly a transfer from
account — your financial institution takes steps to verify the ownership of the
external account. Typically, this will be accomplished by receiving a voided
check, deposit slip, or account statement for the account.
The general flow for approving accounts is as follows.
1.
You enter an external account request.
Using the Add an External Account page, you can enter an external
transfer account request, and then click the Submit button. The system
enters the request as a pending External Account request and displays it
on the User Services Add/View Account Services page.
2.
Your Financial Institution reviews and approves the account.
Once the request has been entered, a representative at your financial
institution reviews and approves your external transfer account request.
Upon approval, the system sends you an in-session confirmation
message stating that your external transfer account has been accepted.
You can view the message by clicking the Messages Tab.
INTERNET BANKING BASIC SERVICES USER’S MANUAL
Confidential and proprietary to First Data
April 1, 2010
Chapter 5: User Services Tab
3.
147
The external transfer is ready for scheduling.
Once the external account has been approved, you can schedule an
external transfer by accessing the account on the Schedule Transfer
page’s drop-down menu.
Entering an External Account Transfer Request
TheExternal Transfer approval process allows you to easily enter a new
account request from a single page. You can access the page by means of
links and buttons to the Add External Account page.
To enter an External Transfer Account request:
1.
On the User Services page, click Add External Account.
The Add External Account page appears.
2.
Read the Agreement page, and then click the Accept button (located at
the bottom of the page which is not shown) to continue.
Note
Your Agreement page may look different than what is
presented below.
INTERNET BANKING BASIC SERVICES USER’S MANUAL
Confidential and proprietary to First Data
April 1, 2010
Chapter 5: User Services Tab
3.
148
In the Add External Account page, enter account information, click the
type of transfer in the Allow Transfer TO This Account or Allow
Transfer FROM This Account box, and then click Submit.
A confirmation page appears.
INTERNET BANKING BASIC SERVICES USER’S MANUAL
Confidential and proprietary to First Data
April 1, 2010
Chapter 5: User Services Tab
4.
149
On the Confirmation page, review the information, and then click Submit
to continue.
The Final Confirmation page appears.
5.
In this example, print the page, and then send the copy to your financial
institution with a voided check.
You have successfully submitted an external transfer account request.
INTERNET BANKING BASIC SERVICES USER’S MANUAL
Confidential and proprietary to First Data
April 1, 2010
Chapter 5: User Services Tab
150
Tracking the External Account Approval Process
You can track the progress of your pending external account requests on the
User Services Account Services page. All pending external account requests
appear at the bottom of the page and appear on the page until the FI
approves them. You will receive a message alert that your external account
have been approved by your financial institution.
Changing Account Nicknames
The Account Nicknames page allows you to name your accounts, making them
easier to recognize in lists and drop-down menus. For example, if you have
one checking account you pay bills from, you can name the account “Bill Pay”
to identify it.
INTERNET BANKING BASIC SERVICES USER’S MANUAL
Confidential and proprietary to First Data
April 1, 2010
Chapter 5: User Services Tab
151
To assign an account nickname:
1.
On the User Services page, click Account Nicknames.
2.
In the Nickname box, enter a nickname for the account. The current
nickname is listed in the box as a default.
3.
Click the Update Nicknames button to save your changes.
The User Services page appears. Your account will now be displayed by
nickname in addition to account number.
Changing Your Address Information
The Change Address Information page allows users to update their contact
information with the financial institution. If you have more than one online
account, you can apply this change of address to a specific account or to all of
your accounts.
INTERNET BANKING BASIC SERVICES USER’S MANUAL
Confidential and proprietary to First Data
April 1, 2010
Chapter 5: User Services Tab
152
To change your address information:
1.
On the User Services page, click the Change Address Information
link.
The Change Address Information page appears.
2.
Change old or incorrect information by using the Backspace key to delete
the old text,and then type in the new information. You can change the
following fields:
◆
Name
◆
Address
◆
City
◆
State
◆
Zip Code
◆
Country
◆
Day Phone
◆
Evening Phone
◆
Fax
◆
Email
Note
If you entered a new email address, you will change your
email address on record at your financial institution. An “Email
Address Change” confirmation message will be sent to your
old and new email addresses as a security precaution.
INTERNET BANKING BASIC SERVICES USER’S MANUAL
Confidential and proprietary to First Data
April 1, 2010
Chapter 5: User Services Tab
3.
Under This change applies to the following accounts, do one of the
following:
◆
◆
4.
153
Click the checkbox if your address change applies to all of your
accounts. This is the default option.
In the text box, enter the account(s) to which you want to apply the
address change. For example, “12345, 22211100”.
Click the Submit button.
A Confirmation Message appears. Your updated contact information is
sent to Customer Service at your financial institution.
Updating your Email Address
Users who change sensitive information, such as their passcodes or security
verification question/answer, receive an email notification that summarizes
the changes that took place. This ensures that only authorized account
holders made the changes.
Many financial institutions will present an Email Reminder that users will see
at login. You can choose to update the email at that time, or update it at a
later date.
INTERNET BANKING BASIC SERVICES USER’S MANUAL
Confidential and proprietary to First Data
April 1, 2010
Chapter 5: User Services Tab
154
To update your email address:
1.
On the User Services page, click the Update Email Address link.
2.
On the Update Email Address page, enter your email address in the
Email address box.
3.
In the Verify email address box, re-enter your email address.
4.
Click Submit to save your changes.
Your email address has been successfully changed. You will receive a
notification of this change at your new and old email address.
INTERNET BANKING BASIC SERVICES USER’S MANUAL
Confidential and proprietary to First Data
April 1, 2010
Chapter 5: User Services Tab
155
E-Statements Only
For financial institutions that offer the service, Internet electronic statements
(e-statements) provide exactly the same information as your monthly paper
statements from your financial institution. An email message will inform you
each month when your statement is available online. Statements will remain
online for 24 months on our secure web site and may be downloaded or
printed for permanent retention.
If you select Electronic-only Statement Delivery but change your mind at a
later time, you can opt-out of electronic-only statements and receive paper
statements from your financial institution at the next statement cycle.
To opt-in for e-statements:
1.
On the User Services page, click E-Statements Only.
The Account Statement page appears.
2.
At the bottom of the page, click Electronic Only Statement Delivery.
An E-Statement Disclosures page appears.
INTERNET BANKING BASIC SERVICES USER’S MANUAL
Confidential and proprietary to First Data
April 1, 2010
Chapter 5: User Services Tab
3.
156
Read the Disclosure page, and then do one of the following:
◆
◆
◆
Accept. To opt-in for the service.
Accept and Print. To opt-in for the service, and print out the
disclosure.
Cancel. To not opt-in at this time.
INTERNET BANKING BASIC SERVICES USER’S MANUAL
Confidential and proprietary to First Data
April 1, 2010
Chapter 5: User Services Tab
4.
157
On the E-Statements Request page, verify that your email address is
correct. If not, you can change it on this page. Do one of the following:
◆
◆
Click Submit for this Account to apply e-statement delivery to the
account listed on the page.
Click Submit for All Accounts to apply e-statement delivery to all of
your online accounts.
The Account Statements page appears with a confirmation of your
e-statement request.
Remove an Account
This function allows you to remove an account from your online account list.
When you remove an account, it will no longer be displayed online and can no
longer be used for any online transactions.
Any transactions that are assigned to the account at the time online access is
removed that have not already begun processing will be unscheduled and will
not be processed.
All scheduled transfers and bill payments assigned to the account that have
not begun processing will be unscheduled and will not be processed. All
affected transactions will be displayed on the “Remove Access” confirmation
page. You can go to the Pending Transfers page (click the Transfers tab) and/
or the Pending Payments page (click the Payments tab) to re-assign another
account to any affected transaction.
INTERNET BANKING BASIC SERVICES USER’S MANUAL
Confidential and proprietary to First Data
April 1, 2010
Chapter 5: User Services Tab
158
Note
If this account is the only account with Online Bill Payment
services, all access to Bill Pay will be removed.
Once you remove online access to an account, you can always re-enabled the
account for online access at a later date.
To remove access to an account:
1.
On the User Services page, click the Remove Online Account link.
The Add/View Account Services page appears.
2.
Under Make a Selection, click remove access next to the account you
want to change.
A confirmation page appears.
INTERNET BANKING BASIC SERVICES USER’S MANUAL
Confidential and proprietary to First Data
April 1, 2010
Chapter 5: User Services Tab
159
3.
Review the account information and any pending or scheduled
transactions that may be affected by your request. You can also print the
page for your records by clicking the Print button on your browser.
4.
Click Submit to remove online access to the account.
A confirmation page appears.
5.
Click Return to Account Services.
The Account Services page appears.
INTERNET BANKING BASIC SERVICES USER’S MANUAL
Confidential and proprietary to First Data
April 1, 2010
Chapter 5: User Services Tab
6.
The account that is no longer viewable online is marked with a
account cannot be used with any online transactions.
160
. The
Requesting a Stop Payment
The Stop Payment feature allows you to stop any payments that your have
made by check, recurring draft, or electronic payment by completing and
submitting the online Stop Payment form. Your financial institution may
require an additional fee for the Stop Payment feature. Please contact your
financial institution for more information.
INTERNET BANKING BASIC SERVICES USER’S MANUAL
Confidential and proprietary to First Data
April 1, 2010
Chapter 5: User Services Tab
161
Warning!
The Stop Payment feature is not for Online Bill Pay. To stop an
online bill payment, click the Payments tab in the top tool bar
and delete or unschedule the pending payment.
Some financial institutions require the user to read the Stop Payment
Disclosure form prior to completing the Stop Payment Request form. Please
read the disclosure form carefully.
Some financial institutions require the user to print and sign a copy of the
Disclosure form and mail it to the financial institution before the request for
stop payment can become permanent. Follow the instructions as you
complete the request for Stop Payment process and be sure to mail in the
signed Disclosure form if this is required.
To request a stop payment:
1.
On the User Services page, click the Stop Payment link.
The Stop Payment page appears.
2.
In the Your Information section, review the name, daytime phone
number, and email address at the top of the form. Change any incorrect
information.
3.
In the Payment to Stop section, select the account from which the
payment was made from the Account drop-down list.
INTERNET BANKING BASIC SERVICES USER’S MANUAL
Confidential and proprietary to First Data
April 1, 2010
Chapter 5: User Services Tab
162
4.
In the Payment Date field, type the date on the check or payment. The
format is mm/dd/yyyy (for example, 01/12/2007). This box is optional.
5.
From the Type of Payment drop-down list, select the payment type.
The options are the following:
6.
◆
Check
◆
Electronic Payment
◆
Recurring Draft
In the Check Number to Stop box, enter the check number of the
payment that you want to stop if the payment was made by check. This
information is required if you have selected “Check” as the payment
type.
◆
◆
If you are stopping a range of checks, enter the starting check
number in the first box, and then enter the ending check number in
the second box. Both boxes are required if you want to stop a range
of checks.
If you are stopping an electronic payment or recurring draft, the
Check Number to Stop box is not required.
7.
In the Payee Name box, enter the payee’s name.
8.
In the Amount box, enter the amount of the payment. To ensure we
stop the correct payment, the amount must be the exact dollar amount
of the payment. If you are stopping an electronic payment or recurring
draft, this box is required.
9.
On the Reason Stopped drop-down list select the reason you are
requesting the stop payment. The options are the following:
◆
Cancelled Service or Contract
◆
Dissatisfied
◆
Lost or Stolen Blank Check(s)
◆
Lost or Stolen Completed Check(s)
◆
Other
10. In the Payment Replacement Information section, do one of the following.
◆
◆
◆
If you haven’t replaced the payment (for example, you wouldn’t need
to replace a blank check), skip this section.
If you have replaced the payment (for example, if a check you sent
was lost in the mail and you sent a second one):
From the Type of Payment drop-down list, select the type of
payment.
INTERNET BANKING BASIC SERVICES USER’S MANUAL
Confidential and proprietary to First Data
April 1, 2010
Chapter 5: User Services Tab
◆
◆
163
In the Check/Payment Number box, enter the check number of a
replacement check. If this is a Recurring Draft or Electronic Payment
you may leave this box blank.
In the Date box, enter the date you wrote or issued the replacement
payment. This information is optional.
11. If the Disclosure form must be printed, signed and sent to your financial
institution, follow the Disclosure instructions to print and mail the
Disclosure form.
12. Click the Submit Stop Payment Request button.
The Stop Payment Confirmation page appears.
INTERNET BANKING BASIC SERVICES USER’S MANUAL
Confidential and proprietary to First Data
April 1, 2010
Chapter 5: User Services Tab
164
13. On the Stop Payment Confirmation page, review the stop payment
information for accuracy and then click Submit Stop Payment
Request. If you want to correct any information, click Back and then
re-enter your information.
The Online Stop Payment Request page appears.
14. On the Online Stop Payment Request page note the request confirmation
number and then click Return to User Servcies.
Your stop payment request has been submitted for processing.
INTERNET BANKING BASIC SERVICES USER’S MANUAL
Confidential and proprietary to First Data
April 1, 2010
Chapter 5: User Services Tab
165
Requesting Documents
The Request Documents page allows users to request copies of transaction
items (for example, cancelled checks) or documents (for example, Service
Charge Information) filed at their financial institution.
Note
Please read the disclosure before submitting your request.
There may be additional fees for this request. Please contact
your financial institution for more details.
INTERNET BANKING BASIC SERVICES USER’S MANUAL
Confidential and proprietary to First Data
April 1, 2010
Chapter 5: User Services Tab
166
To request a copy of a check, deposit, or statement:
1.
On the User Services page, click Request Documents.
The Request Documents page appears (seen on the next page).
2.
In the Request Documents section, select the account that was used in
the transaction on the Account drop-down menu.
3.
In the Name(s) of Account, Daytime Phone, and Email fields, make
sure your name, phone number and email address are correct.
4.
On the Type of Transaction or Document drop-down list, select type
of transaction. The Transaction/Document items are the following:
5.
◆
Check
◆
Statement
◆
Deposit Slip
◆
Deposit Item
◆
Service Charge Information
◆
Terms & Conditions
◆
Signature Card
◆
Internet Banking Agreement
◆
Privacy Policy
In the Check No. or Description field, do one of the following:
◆
For checks: Enter the check number.
◆
For deposit slips or items: Enter the date of the deposit.
◆
For statements: Enter the relevant month.
INTERNET BANKING BASIC SERVICES USER’S MANUAL
Confidential and proprietary to First Data
April 1, 2010
Chapter 5: User Services Tab
6.
7.
In the Amount field, do one of the following:
◆
For checks or deposit slips, enter the amount.
◆
For other items, leave this blank.
In the Send Requested Item to section, do one of the following:
◆
◆
8.
167
To receive the item in the mail, make sure the address is correct, and
delete the fax number if one is listed.
To receive the item by fax, delete the address and make sure the Fax
Number field is filled in.
Read the disclosure at the bottom of the page, and then click the Order
Documents button.
Your request will be processed by your financial institution.
Reordering Checks
The Reorder Checks page allows users to reorder checks with the same style
and contact information as their last order. For security reasons, you must
contact your financial institution’s Customer Service directly to order checks
with a new style, or to change the address, phone number, or driver’s license
number printed on them.
INTERNET BANKING BASIC SERVICES USER’S MANUAL
Confidential and proprietary to First Data
April 1, 2010
Chapter 5: User Services Tab
168
Note
Financial institutions that offer access to a secure site, such as
Deluxe’s One for the Internet, allow their users to change
contact information and check styles for all reorders.
To reorder checks:
1.
On the User Services page, click Reorder Checks.
2.
On the Account drop-down menu, click the account used with the
checks.
3.
In the Ordered by and Daytime Phone fields, change the date to order
by and the daytime phone if necessary. Changing this information does
not affect what is printed on the checks.
4.
In the Starting Check Number field, enter the number to start your
new check series (usually the number printed on your last check plus
one).
5.
In the Number of Boxes field, enter the number of boxes of checks you
need.
6.
Click the Submit Order button.
If you are normally charged for new checks, that fee is debited from your
account. Your checks are sent to the same address as your last order,
usually arriving in 7 to 10 business days.
INTERNET BANKING BASIC SERVICES USER’S MANUAL
Confidential and proprietary to First Data
April 1, 2010
Chapter 5: User Services Tab
169
Note
Some financial institutions provide a direct link to a check
printer’s web site. The check printer’s site is not affiliated with
this website.
Buying Savings Bonds
The Buy Savings Bonds page allows users to purchase savings bonds online.
The purchase price is debited from the account the user selects, and the
bonds are mailed to the address the user enters on this page.
INTERNET BANKING BASIC SERVICES USER’S MANUAL
Confidential and proprietary to First Data
April 1, 2010
Chapter 5: User Services Tab
170
To purchase savings bonds:
1.
On the User Services page, click Buy Savings Bonds.
The Savings Bond Order Form page appears.
2.
On the Savings Bond Order Form page, select the account to debit for the
purchase price of the savings bonds in the Account to debit from
drop-down menu.
3.
In Section 1, enter the bond owner's name and social security or
taxpayer number in each field respectively.
4.
In Section 2, enter the person’s name if the bonds should be mailed in
care of someone other than the owner.
5.
In Section 3, enter the address to list on the bond in section 3. You can
use a street address or a P.O. Box. The bonds are mailed to this address.
INTERNET BANKING BASIC SERVICES USER’S MANUAL
Confidential and proprietary to First Data
April 1, 2010
Chapter 5: User Services Tab
171
6.
In Section 4, enter the name of a co-owner or beneficiary if necessary.
7.
In section 5, click EE bonds or I bonds, and then enter the number of
each denomination to purchase.
8.
Click the Verify Bond Order button.
The Please Verify This Information page appears.
INTERNET BANKING BASIC SERVICES USER’S MANUAL
Confidential and proprietary to First Data
April 1, 2010
Chapter 5: User Services Tab
9.
172
Review the information. If it's incorrect or incomplete, click the Edit
Bond Order button to return to the order form. If the information is
correct, click the Send Bond Order button to complete your order.
Note
To print a copy of your order for yourself, use your browser’s
Print option before completing your order.
INTERNET BANKING BASIC SERVICES USER’S MANUAL
Confidential and proprietary to First Data
April 1, 2010
Chapter 5: User Services Tab
173
Changing Your Access ID
The Change Access ID page allows users to change their access IDs at any
time. Your access ID must contain from 2 to 20 characters, cannot contain
your tax ID/Social Security Number or account number, and cannot have been
used by your FI for any other customer. It can contain a combination of alpha,
numeric, or special characters.
To change your accesss ID:
1.
On the User Services page, click the Change Access ID link.
The Change Access ID page appears.
2.
On the Change Access ID page, enter your new access ID in the New
Access ID field.
INTERNET BANKING BASIC SERVICES USER’S MANUAL
Confidential and proprietary to First Data
April 1, 2010
Chapter 5: User Services Tab
174
3.
In the Confirm New Access ID field, retype your new access ID.
4.
Click on the Change Access ID button.
The Access ID Change Confirmation page appears.
5.
Click on the Submit button to confirm the change.
The Change Access ID page appears stating your new access ID, and
informing you that an email has been sent to you advising you of the
change.
INTERNET BANKING BASIC SERVICES USER’S MANUAL
Confidential and proprietary to First Data
April 1, 2010
Chapter 5: User Services Tab
175
If you would rather choose a new access ID from a list of available IDs, do the
following.
1.
On the User Services page, click the Change Access ID link.
The Change Access ID page appears.
2.
On the Change Access ID page, select the link in the “To choose from a
list of available Acess IDs, click here” statement at the bottom of the
page.
The Access ID/Available Access IDs page appears.
INTERNET BANKING BASIC SERVICES USER’S MANUAL
Confidential and proprietary to First Data
April 1, 2010
Chapter 5: User Services Tab
176
3.
Choose one of the available IDs by clicking on it, or enter your own
access IDs in the New Access ID field.
4.
In the Confirm New Access ID field, retype your new access ID.
5.
Click on the Change Access ID button.
The Access ID Change Confirmation page appears.
INTERNET BANKING BASIC SERVICES USER’S MANUAL
Confidential and proprietary to First Data
April 1, 2010
Chapter 5: User Services Tab
6.
177
Click on the Submit button to confirm the change.
The Change Access ID page appears stating your new access ID, and
informing you that an email has been sent to you advising you of the
change.
If you attempt to change your access ID to something containing personal
sensitive/banking information, the error screen appears warning you that your
new access ID contains sensitive/personal information. You will have to select
a different ID.
INTERNET BANKING BASIC SERVICES USER’S MANUAL
Confidential and proprietary to First Data
April 1, 2010
Chapter 5: User Services Tab
178
If your access ID contains personal sensitive/banking information, such as
your social security number or account number, you will be forced to change it
when you attempt to login in to FxWeb.
1.
You have attempted to log in, and the Change Access ID Security
Warning! page appears.
2.
You can ask to be reminded to change your access ID at a later time
(predetermined by your FI) by clicking on the Remind Me Later button,
if you have not already exceeded your “remind me later” limit.
You will be directed back to your default start screen.
3.
Or, you can change your access ID at this time.
Return to To change your accesss ID: for changing your access ID.
Changing Your Passcode
The Change Passcode page allows users to change their passcodes at any
time. Your passcode must contain a minimum of seven characters with, at
least, one number and one alphanumeric character. It must not be based on
any information you gave on your enrollment form and must not be similar to
your old passcode.
To change your passcode:
1.
On the User Services page, click the Change Passcode link.
The Change Passcode page appears.
INTERNET BANKING BASIC SERVICES USER’S MANUAL
Confidential and proprietary to First Data
April 1, 2010
Chapter 5: User Services Tab
179
2.
On the Change Passcode page, type your old passcode in the Old
Passcode field.
3.
In the New Passcode field, type your new passcode.
4.
In the Confirm New Passcode field, retype your new passcode.
5.
Click the Change Passcode button.
The Change Passcode Confirmation page appears. Remember to use your
new passcode the next time you log on.
Passcode Tips
Here are some passcode tips to increase your security online:
■
■
Passcodes with numbers and symbols as well as letters are more secure.
Longer passcodes are more secure. (Minimum number is six or seven
characters–contact your FI for details; maximum number is 28
characters.)
INTERNET BANKING BASIC SERVICES USER’S MANUAL
Confidential and proprietary to First Data
April 1, 2010
Chapter 5: User Services Tab
180
For example, choose a word that is easy for you to remember, for example,
the word “applesauce”. Replace letters with characters or symbols. Ideas
include:
■
Replace “to” and “too” with “2”
■
Replace “and” with “&”
■
Replace “for” with “4”
■
Replace “is” with “=”
Using “applesauce:”
■
Replace any “a” with “@”: “@pples@uce”
■
Replace any “e” with “3”: “@ppl3s@uc3”
Changing Security Verification Question
The Security Verification Question and Answer is used by a financial institution
and the system to identify users in the event that they forget their access ID
or passcode. Normally, the security verification question is set when enrolling
online for banking service. Users who do not have a security verification
question and answer on file can set it on the User Services page.
To change your security verification question and answer:
1.
On the User Services page, click Change Security Verification
Question.
The Security Verification Question page appears.
INTERNET BANKING BASIC SERVICES USER’S MANUAL
Confidential and proprietary to First Data
April 1, 2010
Chapter 5: User Services Tab
2.
181
On the Security Verification Question page, review your current question
and answer, and then click Edit to change it.
The Change Security Verification Question page appears.
3.
4.
On the Security Verification Question drop-down list, select a
question. Some possible questions are as follows (your financial
institution may offer different questions).
◆
Company where you had your first job?
◆
Name of your first grade teacher?
◆
Your mother’s date of birth (mm/dd)?
◆
Your father’s date of birth (mm/dd)?
◆
Your father’s middle name?
◆
Your mother’s maiden name?
In the Answer box, enter the answer to the question you selected, and
then click Submit.
A confirmation page appears.
You have successfully changed your security verification question and/or
answer. This security verification question/answer does not expire, but
should be changed if you feel it has been compromised in any way.
INTERNET BANKING BASIC SERVICES USER’S MANUAL
Confidential and proprietary to First Data
April 1, 2010
Chapter 5: User Services Tab
182
Note
Some financial institutions require that their customers or
members answer more than one security verifiction question.
Simply repeat the above steps for the other questions.
Marketing Preferences
The Marketing Preferences page allows you to opt-in or opt-out of any
marketing messages from your financial institution. The marketing messages
give timely information about the state of your account and includes
information that could be helpful in using your online account.
To configure your marketing preferences:
1.
On the User Services page, click the Marketing Preferences link.
INTERNET BANKING BASIC SERVICES USER’S MANUAL
Confidential and proprietary to First Data
April 1, 2010
Chapter 5: User Services Tab
2.
183
On the Marketing Preferences page, click Yes or No if you want to opt-in
or opt-out, respectively, and then click Submit.
Notify Me
Notify Me is a service that allows users to monitor their online account activity
and balances by opting-in to receive email notifications to their home email
addresses. Users can better manage their accounts by avoiding unnecessary
service charges, ensuring transactions are processed, and preventing unusual
activity on their accounts.
INTERNET BANKING BASIC SERVICES USER’S MANUAL
Confidential and proprietary to First Data
April 1, 2010
Chapter 5: User Services Tab
184
You have the option to receive an email notification whenever any of the
following alerts are sent to your online inbox on the Messages tab.
■
Transaction-related messages (Bill Pay, transfers, ACH, wires, external
transfers).
■
Service-related alerts (for example, Bill Pay added/removed).
■
Secure messages from your financial institution.
■
Account-related activity (for example, balances go above or below a
specified amount, deposits made over a specified amount).
To configure your email notifications:
1.
On the User Services page, click Notify Me.
The Notify Me page appears.
2.
On the Notify Me page, click Update Email Address to change your
current home email address if necessary. You will receive an email at
your old and new email addresses to confirm the address change.
3.
For Messaging Alerts listed under “Notify Me When”, click Yes if you
would like to receive email notifications of a transaction-related event or
Customer Service messages.
4.
Click Add New Account Activity Alerts to monitor your accounts.
The Add Account Activity Alert page appears.
INTERNET BANKING BASIC SERVICES USER’S MANUAL
Confidential and proprietary to First Data
April 1, 2010
Chapter 5: User Services Tab
185
5.
On the Add Account Activity Alert page (seen below), click the accounts
that you want to monitor.
6.
Click Select next to the account activities you want to activate. The
following options are available:
Alert
Description
Account Overdrawn Receive an email alert when the account has
been overdrawn.
Balance > $
Enter a balance amount (dddd.cc, where
d=dollars, c=cents). The system sends you an
email when the account’s balance is above the
amount entered.
Balance < $
Enter a balance amount (dddd.cc, where
d=dollars, c=cents). The system sends you an
email when the account’s balance is below the
amount entered.
Check #(s) Cleared Enter individual check numbers (for example,
101, several check numbers (for example, 101,
102, 103), or a range of numbers (for example,
103-4, 1100-200).
INTERNET BANKING BASIC SERVICES USER’S MANUAL
Confidential and proprietary to First Data
April 1, 2010
Chapter 5: User Services Tab
186
Alert
Description
Deposit Made > $
Enter a deposit amount (dddd.cc, where
d=dollars, c=cents). The system sends you an
email when a deposit over the amount entered is
made on the account.
Transaction > $
Enter a transaction amount (dddd.cc, where
d=dollars, c=cents). The system sends you an
email when a transaction over the amount
entered is made on the account.
New Online
Statement
Available
Receive an email alert when a new online
statement is available for you to view. This
feature applies to financial institutions that do
not offer the electronic statements service.
7.
Click Submit to save your changes.
The Notify Me page appears with the number of accounts selected. You
have successfully added your email notifications. You will receive email
notifying of messages, transaction-related, or account-related events.
8.
To change a balance amount, check number, deposit amount, or
transaction amount, click edit. To delete an email notification, click
delete next to the account activity. The change takes effect immediately.
You will receive an email notification of your account activity.
INTERNET BANKING BASIC SERVICES USER’S MANUAL
Confidential and proprietary to First Data
April 1, 2010
Chapter 5: User Services Tab
187
Setting Your Start Page
The Start Section page allows you to select the first page you see every time
you log on to this web site. You can choose to start on any of the pages that
appear in the top toolbar. For example, you can select accounts to always
start your session on the Account Summary page.
To customize your start section:
1.
On the User Services page, click the Start Page Selection link.
The Start Section page appears.
INTERNET BANKING BASIC SERVICES USER’S MANUAL
Confidential and proprietary to First Data
April 1, 2010
Chapter 5: User Services Tab
188
2.
On the Section drop-down list, select the page that will appear every
time you log on to the system.
3.
Click the Update button to save your selection.
A brief Confirmation Message page appear with your change.You will see
the selected page the next time you log on to the system.
Customizing Your List Sorting
The List Sorting page allows you to select the default sorting methods for lists,
tables, and histories on this site. You will still be able to re-sort the lists by
clicking a column name on the page displaying the list. Customers at financial
institutions using the CheckFree Bill Payments system will not be able to sort
the payments page.
INTERNET BANKING BASIC SERVICES USER’S MANUAL
Confidential and proprietary to First Data
April 1, 2010
Chapter 5: User Services Tab
189
To change the way a list is initially sorted:
1.
On the User Services page, click List Sorting.
2.
Under List Name/page, find the name of the page to work with. You can
set the following pages:
3.
◆
Account Summary
◆
Account History
◆
Pending Payments (Good Funds FIs only)
◆
Payment History (Good Funds FIs only)
To sort the Account Summary page, select the sort item in the drop-down
list. To restore the default sorting methods, select No Change. The
options are:
◆
No Change
◆
Account Available Balance
◆
Account Balance
◆
Account Name
◆
Account Number
◆
Owner Name
Note
Users with more than 20 accounts are able to narrow the
account list by searching on either the Account Name, Account
Number, or Owner Name fields.
INTERNET BANKING BASIC SERVICES USER’S MANUAL
Confidential and proprietary to First Data
April 1, 2010
Chapter 5: User Services Tab
4.
5.
6.
190
To sort the Account History page, select the sort item in the drop-down
list. To restore the default sorting methods, select No Change. The
options are:
◆
No Change
◆
By Transaction Description
◆
By Date
To sort the Pending Payments page, select the sort item in the drop-down
list. To restore the default sorting methods, select No Change. The
options are:
◆
No Change
◆
By Date Descending
◆
By Date Ascending
◆
By Payee Name
To sort the Payment History page, select the sort item in the drop-down
list. To restore the default sorting methods, select No Change. The
options are:
◆
No Change
◆
By Date Descending
◆
By Date Ascending
◆
By Payee Name
Note
Customers who have Bill Payments and Cash Management will
also see additional list sorting options for these pages.
7.
To update and save your selection, click the Update button.
INTERNET BANKING BASIC SERVICES USER’S MANUAL
Confidential and proprietary to First Data
April 1, 2010
Chapter 5: User Services Tab
191
Updating your Quick History
The Quick History page displays the last 20 transactions. You can update the
number of items displayed and the date range of your transactions displayed
on the Quick History page.
To update your Quick History:
1.
On the User Services page, click Quick History.
A Confirmation Message page appears. You have successfully updated
your sorting configurations.
INTERNET BANKING BASIC SERVICES USER’S MANUAL
Confidential and proprietary to First Data
April 1, 2010
Chapter 5: User Services Tab
2.
3.
4.
192
On the Number of Items Displayed drop-down list, select a number.
Options are:
◆
10
◆
20 (default)
◆
50
◆
100
◆
250
◆
All
On the Reporting Period drop-down list, select the date range of your
transactions. Options are:
◆
Last 30 days (default)
◆
Last 60 days
◆
Last 90 days
Click Update.
The confirmation page appears briefly and then the system takes you to
the User Services page.
You have successfully updated your Quick History.
INTERNET BANKING BASIC SERVICES USER’S MANUAL
Confidential and proprietary to First Data
April 1, 2010
Chapter 5: User Services Tab
193
Transaction Categories
If your financial institution offers the Check Register service, you can view,
update and delete your transaction categories from the User Services page.
Transaction categories are descriptions and labels that you assign to each
category, so that you can generated Income and Expense reports on the
system.
Updating your Transaction Categories
To update your transaction categories:
1.
On the User Services page, click Transaction Categories.
INTERNET BANKING BASIC SERVICES USER’S MANUAL
Confidential and proprietary to First Data
April 1, 2010
Chapter 5: User Services Tab
194
2.
On the Transaction Categories page, look over your categories. If you
want to update a category, click the category link.
3.
On the Edit Transaction Category page, change the type on the
Category Type drop-down list.
4.
In the Category Name box, change the name.
5.
In the Category Description box, enter a description of your category.
6.
Click Save Changes.
INTERNET BANKING BASIC SERVICES USER’S MANUAL
Confidential and proprietary to First Data
April 1, 2010
Chapter 5: User Services Tab
195
A confirmation page appears.
You have successfully edited a transaction category.
Adding a Transaction Category
If you require additional transaction categories other than those listed, you
can add any number of transaction categories to suit your needs.
INTERNET BANKING BASIC SERVICES USER’S MANUAL
Confidential and proprietary to First Data
April 1, 2010
Chapter 5: User Services Tab
196
To add a new transaction category:
1.
On the User Services page, click Transaction Categories.
2.
On the Transaction Categories page, look over your categories. If you
want to update a category, click Add new Transaction Category.
3.
On the Category Type drop-down list, select a new category type.
4.
In the Category Name box, enter a category name.
5.
In the Category Description box, enter a brief description of the
category.
6.
Click Save & Return to add your category, or Save & Add Another
Category to add more categories.
The confirmation message appears on the Transaction Categories page.
INTERNET BANKING BASIC SERVICES USER’S MANUAL
Confidential and proprietary to First Data
April 1, 2010
Chapter 5: User Services Tab
197
You have successfully added a new transaction category.
Deleting a New Transaction Category
You can delete any transaction category when no longer needed. Once you
delete a category, transactions will no longer have the category assigned to
them. You must reassign a new category to the item.
To delete a transaction category:
1.
On the User Services page, click Transaction Categories.
INTERNET BANKING BASIC SERVICES USER’S MANUAL
Confidential and proprietary to First Data
April 1, 2010
Chapter 5: User Services Tab
198
2.
On the Transaction Categories page, look over your categories. Click
the check boxes next to the categories you want to remove, and then
click Delete Selected Categories.
3.
On the Confirmation page, review your category, and then click Delete
Selected Categories.
INTERNET BANKING BASIC SERVICES USER’S MANUAL
Confidential and proprietary to First Data
April 1, 2010
Chapter 5: User Services Tab
199
A confirmation message appears at the top of the page.
You have successfull deleted a transaction category.
Sending a Secure Message
The Send a Message page allows users to send an encrypted message to
Customer Service at their financial institution. Because a message is
transmitted securely before it is sent, users can confidently inquire about
sensitive information, such as account numbers or balances. However, users
should never reveal their passcodes. Customer Service does not need it to
help the user.
To send a secure message:
1.
On the User Services page, click Send a Secure Message.
The Send a Message page appears.
INTERNET BANKING BASIC SERVICES USER’S MANUAL
Confidential and proprietary to First Data
April 1, 2010
Chapter 5: User Services Tab
200
2.
On the Regarding drop-down menu, select the account that you are
inquiring about, or select "Other" if it concerns some other issue. This
field is required.
3.
On the Category drop-down menu, select the message type. This field is
required and helps the system transmit the message to the responsible
customer service representative at the financial institution.
4.
In the Subject box, type a few words to identify your message. This field
is required and has a maximum length of 40 characters.
5.
Click Urgent if the message requires immediate attention by a financial
institution customer service representative.
6.
In the Message box, type your message. Do not include your passcode
in the message; Customer Service does not need it to help you.
7.
To attach a file to the message (if your financial institution offers this
service), do the following:
◆
Click Attach File to attach a file no larger than 5 MB. Some file types
(.exe, .bat, .com, .sys) are not allowed. If you have secure file
transfer privileges, the maximum file size will be 20 MB.
INTERNET BANKING BASIC SERVICES USER’S MANUAL
Confidential and proprietary to First Data
April 1, 2010
Chapter 5: User Services Tab
◆
201
Click Browse to find and attach the file to the message. Click
Confirm to send the message with the attachment.
The user has successfully sent a message with an attachment.
INTERNET BANKING BASIC SERVICES USER’S MANUAL
Confidential and proprietary to First Data
April 1, 2010
Chapter 5: User Services Tab
202
Obtaining FI Contact Information
To view information about your financial institution’s contact information:
1.
On the User Services page, click Contact Information for <FI>, where
<FI> will list the name of your financial institution.
2.
The page shows the contact information for your financial institution
(Some financial institutions offer an additional “Locate a Branch” link that
displays branch hours and address information.):
3.
Click Return to Services List.
INTERNET BANKING BASIC SERVICES USER’S MANUAL
Confidential and proprietary to First Data
April 1, 2010
Chapter 5: User Services Tab
203
Frequently Asked Questions
General
Q: What are user services?
A: User services allow you to request many standard financial services,
including reordering checks, requesting stop payments, updating contact
information, and ordering copies of documents, such as cancelled checks,
disclosure forms, and loan agreements.
You can also send questions or comments to your financial institution through
encrypted message, change your passcode, and look up contact information
for your financial institution, including addresses, phone numbers, and fax
numbers.
Q: Can I default to a different page when I log on rather than going
straight to payments?
A: Yes, you can select which section you want to view first. Go to the User
Services tab and click User Preferences. Select Start Section. Use the
drop-down menu to choose which section will appear first when you log on.
Managing Your Account
Q: How do I change my address?
A: Click the User Services tab and select Change Address Information.
This information will be sent to your financial institution via a secure message
to change your address for all of your accounts.
Q: If I change my address on the site, will it change the address on
my account at my financial institution?
A: No, changing your address on the system will send a secure message to
your financial institution notifying them of the requested change.
Q: Why does it say “Information Received” when I change my
address, and not “Address Updated”?
A: The address change information you have entered does not automatically
change your address. This information is sent via secure messaging to your
financial institution. They will make the change.
INTERNET BANKING BASIC SERVICES USER’S MANUAL
Confidential and proprietary to First Data
April 1, 2010
Chapter 5: User Services Tab
204
Q: How do I change my passcode?
A: Click the User Services tab and select Change Passcode to change your
passcode.
Q: How often do I have to change my passcode?
A: Changing your passcode is at your discretion. If you feel that your
passcode has been compromised, immediately contact your financial
institution. At any other time, you can change the passcode in the User
Services tab.
Q: Why can't I change my passcode without getting an error
message?
A: The passcode you entered does not pass our security check. In order to
maintain tight security you must choose a passcode that is at least seven
characters long, is unique, and cannot easily be deciphered.
Q: What do I do if I forget my passcode?
A: If your financial institution offers the Automated Passcode Reset feature,
click the Forget Your Passcode? link on the login module. If your financial
institution does not offer this service, call your financial institution to reset
your passcode. They will assign you a new temporary passcode. As soon as
you use it to log on, you will be required to change it again to ensure security.
Accessing Banking Services
Q: How do I reorder checks?
A: Click the User Services tab, and then click Reorder Checks. For security
reasons, you can only reorder checks with the same style and address as your
current checks.
Q: Can I specify if I want a different check style when I reorder
checks on the Internet?
A: No. To change the check style, contact your financial institution directly.
Q: How do I send an message to my financial institution?
A: Just click the Send a Secure Message link on the User Services tab.
INTERNET BANKING BASIC SERVICES USER’S MANUAL
Confidential and proprietary to First Data
April 1, 2010
Chapter 5: User Services Tab
205
Q: Can I change my access ID?
A: No. Your access ID is unique to your account and cannot be changed.
Q: What type of files can be used with Secure File Transfer?
A: You may only send text files using Secure File Transfers.
Contacting Your Financial Institution
Q: How do I report a problem?
A: For most problems, click the User Services tab, and then click Send a
Secure Message. Describe your problem in the message and send it to your
financial institution.
INTERNET BANKING BASIC SERVICES USER’S MANUAL
Confidential and proprietary to First Data
April 1, 2010
Chapter 6
206
Messages Tab
What’s in this Chapter
This chapter presents procedures to send secure messages to your financial
institution and to reply to any alert or broadcast message sent to your Unread
Messages box.
Introduction
The Messages tab allows users to read messages from their financial
institution and to send secure messages to Customer Service in the event of a
problem. The Messages tab is also used to keep you informed of activity in
your accounts. You will be notified when scheduled payments have been
made, and when changes have been made in your account. For example, you
will receive confirmation every time your passcode is changed or funds are
transferred between your accounts. You will also be notified if there were
insufficient funds in your account to make a scheduled payment, or if any
other problems occur with a bill payment.
Because the messaging system is secure and encrypted, you can send your
account number in the body of the message. But please do not send your
passcode, Customer Service does not need it to assist you.
Navigating the Messages Tab
The Messages tab allows users to securely communicate with their financial
institution concerning topics related to their online accounts. The Unread
Messages page is the main page for the Messages tab. Once you are in the
Messages tab, you can reach these pages by clicking the appropriate link in
the toolbar:
■
■
■
■
Messages Inbox. Contains links to all the messages that you have
received, read, and have not yet deleted.
Unread Messages. Contains links to new messages that you have not
read yet.
Sent Messages. Contains links to view all sent messages from the past
120 days.
Contact Us. Contains information such as phone number and address of
your financial institution.
INTERNET BANKING BASIC SERVICES USER’S MANUAL
Confidential and proprietary to First Data
April 1, 2010
Chapter 6: Messages Tab
207
To reach the Messages tab click the Messages tab. The Unread Messages
page appears.
.
If any urgent messages are waiting for you when you log in, a red Urgent
Messages link appears on every page until you read the message. Click the
Urgent Messages link to open the Messages tab.
Accessing Unread Messages
On the system, the Unread Messages page displays all the messages received
but not opened by the user. By default, if users have any unread messages,
they will immediately be directed to the Unread Messages page upon clicking
the Messages tab.
■
The Date-Time column will indicate the date and time of the most recent
message in a message history.
■
Urgent message will be indicated by the urgent message icon
■
All messages (read or unread) will be deleted after 120 days.
.
To access the Unread Messages page:
■
Click the Messages tab, or click the Unread Messages link on the top
toolbar.
The Unread Messages page appears by default, if you have any unread
messages.
INTERNET BANKING BASIC SERVICES USER’S MANUAL
Confidential and proprietary to First Data
April 1, 2010
Chapter 6: Messages Tab
208
Accessing the Messages Inbox
The Messages Inbox page displays all read and unread messages sent to the
user within the past 120 days. The system automatically removes any
message older than 120 days. On the “Messages Inbox” page, all unread
messages will be displayed in bold font.
■
The icon
indicates this message was sent to the user.
■
The icon
indicates the user has replied to a message.
■
The urgent message icon
indicates that the messages requires
immediate attention from the reader.
To access the Messages Inbox page:
1.
Click the Messages tab, and then click Inbox on the top toolbar. The
Messages Inbox page appears.
The Messages Inbox page appears.
2.
View your messages.
INTERNET BANKING BASIC SERVICES USER’S MANUAL
Confidential and proprietary to First Data
April 1, 2010
Chapter 6: Messages Tab
209
Accessing Sent Messages
The Sent Messages page displays all messages that were sent to the FI in the
last 120 days by the user. After 120 days, all messages will be deleted. The
“Sent Messages” page lists any service requests sent by the user. The
Date-Time column will indicate the data-time of the most recent message in a
message history.
Urgent messages will be indicated by the urgent message icon
.
To access the Sent Messages page:
1.
Click the Messages tab, and then click the Sent Messages link at the
top toolbar.
The Sent Messages page appears.
2.
View your messages.
INTERNET BANKING BASIC SERVICES USER’S MANUAL
Confidential and proprietary to First Data
April 1, 2010
Chapter 6: Messages Tab
210
Sending New Messages
All users can send a secure message to the financial institution by clicking one
of the following links:
■
■
■
■
■
■
The Contact Us link on the Messages tab toolbar.
The Send a Secure Message link under the Contact Us section of User
Services tab.
Any Service request link under the Other Service Requests section of
User Services tab (for example, Address Change, stop payment, reorder
checks, commercial services, order documents).
The Send a Secure Message to <FI NAME> link on any error page.
The Problems logging in? link on Login Error page (if the FI is not set up
for Automated Passcode Reset).
The Secure File Transfer link on the User Services page if offering the
service.
The user can now send attachments to the financial institution by clicking the
Attach File link. The maximum attachment size is 5 MB. Certain file types .exe, .com, .bat, .sys. If the user has Secure File Transfer privileges, the
maximum attachment size is 20 MB.
INTERNET BANKING BASIC SERVICES USER’S MANUAL
Confidential and proprietary to First Data
April 1, 2010
Chapter 6: Messages Tab
211
To send a secure message:
1.
Log onto the system, and then click the Messages tab.
2.
Click the Contact Us link on the top toolbar.
The Send a Message page appears.
3.
On the Regarding drop-down menu, select the account that you are
inquiring about, or select Other if it concerns some other issue. This field
is required.
4.
On the Category drop-down menu, select the message type. This field is
required and helps the system transmit the message to the responsible
customer service representative at the financial institution.
5.
In the Subject box, type a few words to identify your message. This field
is required and has a maximum length of 40 characters.
6.
Click Urgent if the message requires immediate attention by a financial
institution customer service representative.
7.
In the Message box, type your message. Do not include your passcode
in the message; Customer Service does not need it to help you.
8.
To attach a file to the message (if your financial institution offers the
service), do the following:
◆
Click Attach File to attach a file no larger than 5 MB. File types with
.exe, .bat, .com, .sys are not allowed. If the user has secure file
transfer privileges, the maximum file size will be 20 MB.
INTERNET BANKING BASIC SERVICES USER’S MANUAL
Confidential and proprietary to First Data
April 1, 2010
Chapter 6: Messages Tab
◆
212
Click Browse to find and attach the file to the message. Click
Confirm to send the message with the attachment.
The user has successfully sent a message with an attachment.
9.
To send the message without an attachment, click Send Message to
transmit the message.
INTERNET BANKING BASIC SERVICES USER’S MANUAL
Confidential and proprietary to First Data
April 1, 2010
Chapter 6: Messages Tab
213
10. On the Confirmation page, review the message, and then click Confirm
to send the message.
The Secure Message Sent page appears. The user has successfully sent a
secure message to the financial institution.
Viewing Messages
All users can view a message from the Unread Messages page, the Sent
Messages page, or from the Messages Inbox page by clicking the subject line
of the message. If the message is the lastest part of an existing message
history, all previous messages will appear at the bottom of the page.
To read a message:
1.
In the Subject column, click the message link you want to read.
The Message page appears.
INTERNET BANKING BASIC SERVICES USER’S MANUAL
Confidential and proprietary to First Data
April 1, 2010
Chapter 6: Messages Tab
2.
214
View the message.
The user has successfully accessed the message.
3.
If your financial institution sent an attachment, click the attachment link
to open or download the attached file.
4.
Click Save.
INTERNET BANKING BASIC SERVICES USER’S MANUAL
Confidential and proprietary to First Data
April 1, 2010
Chapter 6: Messages Tab
5.
215
In the Save In drop-down menu, select the folder, and then click Save.
The file gets downloaded to your computer. You have successfully
downloaded your attachment.
Replying to a Message
Users can now reply to a message by clicking the Reply button on the View
Message page. The original or previous message(s) will be included in the
reply in the Message History section. With the Messaging system, users can
reply to any broadcast and system-generated messages in addition to direct
communication from the financial institution.
To reply to a message:
1.
On the Message page, click the Reply button at the top of the page.
The Reply to a Message page appears.
INTERNET BANKING BASIC SERVICES USER’S MANUAL
Confidential and proprietary to First Data
April 1, 2010
Chapter 6: Messages Tab
216
2.
Click Go to Message History to review the previous messages sent or
received from the financial institution. You can also scroll down to the
bottom of the page to view the history.
3.
Click Urgent if the message requires immediate attention by a financial
institution customer service representative.
4.
In the Message box, type your message. Do not include your passcode
in the message. Customer Service does not need it to help you.
5.
Click Send Message to transmit the message.
INTERNET BANKING BASIC SERVICES USER’S MANUAL
Confidential and proprietary to First Data
April 1, 2010
Chapter 6: Messages Tab
6.
217
On the Confirmation page, review the message, and then click Confirm
to send the message.
You have successfully replied to a message.
INTERNET BANKING BASIC SERVICES USER’S MANUAL
Confidential and proprietary to First Data
April 1, 2010
Chapter 6: Messages Tab
218
Deleting Messages
All users can delete unwanted messages from the system by using any of the
following methods:
■
■
On the Message page, click the Delete Message button.
On the Unread Messages, Messages Inbox, or Sent Messages page, click
the checkbox next to the messages to be deleted, and then click Delete
Selected Messages.
Note
The system will automatically delete all messages older than
120 days.
To delete a message:
1.
Open a message, read it, and then click the Delete Message button at
the top of the page.
A confirmation page appears briefly on the page, then the Messages
Inbox appears. The message is immediately deleted.
2.
Or, click the checkbox next to the messages you want to delete on the
Unread Messages, Message Inbox, or the Sent Message pages, and then
click Delete Selected Messages.
The Confirmation page appears.
INTERNET BANKING BASIC SERVICES USER’S MANUAL
Confidential and proprietary to First Data
April 1, 2010
Chapter 6: Messages Tab
3.
219
Click the message link to verify that this is the message to delete, and
then click Delete.
A Confirmation page appears briefly on the page. The message is
immediately deleted.
You have successfully deleted your message.
INTERNET BANKING BASIC SERVICES USER’S MANUAL
Confidential and proprietary to First Data
April 1, 2010
Chapter 6: Messages Tab
220
Frequently Asked Questions
Q: Why is a secure messaging necessary?
A: The information you are sending is sensitive. A secure message ensures
that your information will stay confidential. However, never send your
passcode. Customer Service does not need it to help you.
Q: How do I read a message from my financial institution?
A: While logged onto this site, click the messages tab, and then click the
message you wish to read in the list.
Q: How do I send a secure message?
A: On the Messages tab, click the Contact Us link.
INTERNET BANKING BASIC SERVICES USER’S MANUAL
Confidential and proprietary to First Data
April 1, 2010
Chapter 7
221
Glossary
Account Detail
A page with more detailed information about the account, including a history
of transactions made with the account in the past month
Account Number
Many companies, such as credit card companies, utilities, and magazines,
assign their customers an account number. This number usually appears
somewhere on your bill from them. If you have a credit card, for example,
your account number would be your credit card number.
It is very important that you fill in this number when making a payment to a
company that uses them, so the payee knows whose account to credit. Many
companies require their customers to write their account number on paper
checks as well.
If you don't have an account number with the payee (for example, if you are
making a payment to a relative), we suggest that you enter your name into
the account number space. You may enter up to 25 characters.
Account Statement
The account's monthly statement. You can view or print statements for any
month since you signed up for this online service. The system holds up to two
years of information since the current date up to the date when you signed up
for this online service.
Account Summary Table
A table showing all of your online accounts by type and number that allows
you to click a link to see the Account Detail, Account Statement, or Account
History for a specific account.
Account Transfer
Moves funds from the selected account into another Internet account.
INTERNET BANKING BASIC SERVICES USER’S MANUAL
Confidential and proprietary to First Data
April 1, 2010
Chapter 7: Glossary
222
Account View
A User Services feature that allows an online user to disable any viewable
accounts (i.e., set the account to a “No View” state). The account is still active
for balance, history, or statements updates but can no longer be viewed or
used for an online transactions on the system.
Accounts
The account type (Example: checking, savings, or loan)
As Of
The date for which the balance is accurate; that is, the date of the last known
transaction and/or balance update.
Automated Passcode Reset
This feature allows a user to reset his or her passcode if forgotten. The
process will take the internet banking (IB) user through a number of
validation pages to verify the user. After the validation process, the IB user
can enter a new passcode. A passcode reset confirmation email is sent to the
user’s home email address. The user is directed to record the passcode reset
confirmation code and enter it on the Passcode Reset Confirmation page after
logging on to the system.
Balance
The account's current balance, calculated by taking the most recent update
from your financial institution and adjusting it to include any recent Internet
transactions.
Browser
The program that allows you to surf the Internet. Mozilla Firefox and Microsoft
Internet Explorer are two popular web browsers.
Button
Click the graphic to execute a command.
INTERNET BANKING BASIC SERVICES USER’S MANUAL
Confidential and proprietary to First Data
April 1, 2010
Chapter 7: Glossary
223
Click
Press and release the mouse button once. (If your mouse has more than one
button, “click” usually means press and release the left mouse button.)
Contextual Help
Help for the current page
Daily Ledger Balance
The official balance received from your financial institution during the daily
update.
Electronic Payment
Made directly through your financial institution
Error Message
Information that helps Customer Service advise you about an unexpected
computer event.
External Transfers
External Transfers is an enhancement to the existing internal transfer service.
This service allows retail customers to transfer funds between their online
accounts and an external account at another financial institution.
Field
Give information by typing the requested information in the blank.
Internet Banking
The web site interface for financial services.
General Help
A Help summary of online services.
INTERNET BANKING BASIC SERVICES USER’S MANUAL
Confidential and proprietary to First Data
April 1, 2010
Chapter 7: Glossary
224
ID No. (Pending Payments page)
We assign a different ID number to each payment you make. We can then use
that number to track any payments you have questions or concerns about.
Internet Transfer
Moves funds from the selected account into another Internet account.
Ledger Balance
The official balance recorded on the date shown. Note: If you made any
Internet transactions, this balance may be different from the same day's
Xpress Balance because they might not have completed processing until the
next day.
Link
Clicking on a link makes another page appear.
Log Off
A way of exiting that properly disconnects you from the online system.
Log On
A way of letting the system know who you are and what your privileges are.
Make a Selection
Links to detailed information for each account (details, transaction history,
and monthly statement) and a link to a transfer form.
Nonsensitive Message
A message that may be read by others.
INTERNET BANKING BASIC SERVICES USER’S MANUAL
Confidential and proprietary to First Data
April 1, 2010
Chapter 7: Glossary
225
Online Bill Pay
A service that allows you to set up payments to just about anyone. You select
the person or company to make a payment to, and the payments system will
withdraw the money from your account and send the payee a paper check or
an electronic payment. You can schedule payments in advance. You can even
set up payments to reschedule themselves automatically.
Owner
The owner of the account. For joint checking accounts, only one name will
appear if each account owner has a separate file at your financial institution.
Payee
The person, business, or organization to which you make a payment
Payment Made Online
Made through this Web site.
Privileges
A way of controlling who has access to services.
Quick Balance
Shows the current Internet balances of each account.
Quick Links
A way to go from Internet Banking to Loan Services and back.
Scroll
Moving up and down or right to left to see all of the information on the page.
Often done by clicking the mouse in a special bar on the side or bottom of the
page.
Security Key Certificate
Your browser must have a current security key certificate to connect securely
to the system.
INTERNET BANKING BASIC SERVICES USER’S MANUAL
Confidential and proprietary to First Data
April 1, 2010
Chapter 7: Glossary
226
Sensitive Message
A message that needs to be kept secret.
Specific Help
Help for the current page.
Toolbar
The menu of services located below the tabs.
Transaction History
The account's transaction history covering any date range within the last two
years.
Transfer Description
Briefly note the reason for the transfer. This memo appears in your Internet
account history.
Transfer ID
The transfer's confirmation number. Refer to the number if you have any
questions or problems with the transfer.
Urgent Message
Messages that we think are important for you to read as soon as possible. For
example, if the server will be down for an hour for an upgrade.
INTERNET BANKING BASIC SERVICES USER’S MANUAL
Confidential and proprietary to First Data
April 1, 2010