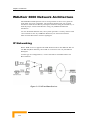
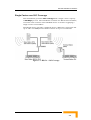
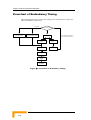
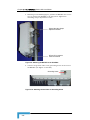
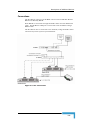
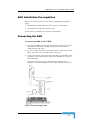
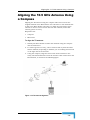
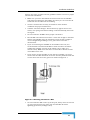
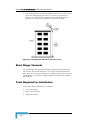
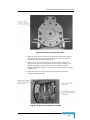
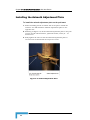
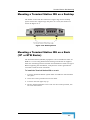
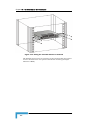
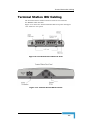
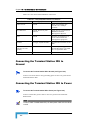
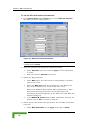
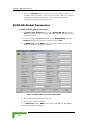
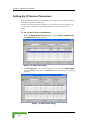
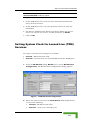
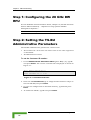
1
WALKair™ 3000 System Manual S/W Version 4.0 April 2005 P/N 213981 Error! No text of specified style in document.Error! No text of specified style in document. WALKair 3000 Version 3.0 System Manual ii Legal Rights Legal Rights © Copyright 2005 Alvarion Ltd. All rights reserved. The material contained herein is proprietary, privileged, and confidential and owned by Alvarion or its third party licensors. No disclosure thereof shall be made to third parties without the express written permission of Alvarion Ltd. Alvarion Ltd. reserves the right to alter the equipment specifications and descriptions in this publication without prior notice. No part of this publication shall be deemed to be part of any contract or warranty unless specifically incorporated by reference into such contract or warranty. Trade Names Alvarion®, BreezeCOM®, WALKair®, WALKnet®, BreezeNET®, BreezeACCESS®, BreezeMANAGE™, BreezeLINK®, BreezeCONFIG™, BreezeMAX™, AlvariSTAR™, MGW™, eMGW™, WAVEXpress™, MicroXpress™, WAVEXchange™, WAVEView™, GSM Network in a Box and TurboWAVE™ and/or other products and/or services referenced here in are either registered trademarks, trademarks or service marks of Alvarion Ltd. All other names are or may be the trademarks of their respective owners. Statement of Conditions The information contained in this manual is subject to change without notice. Alvarion Ltd. shall not be liable for errors contained herein or for incidental or consequential damages in connection with the furnishing, performance, or use of this manual or equipment supplied with it. Warranties and Disclaimers All Alvarion Ltd. (“Alvarion”) products purchased from Alvarion or through any of Alvarion’s authorized resellers are subject to the following warranty and product liability terms and conditions. i Legal Rights Exclusive Warranty (a) Alvarion warrants that the Product hardware it supplies and the tangible media on which any software is installed, under normal use and conditions, will be free from significant defects in materials and workmanship for a period of fourteen (14) months from the date of shipment of a given Product to Purchaser (the “Warranty Period”). Alvarion will, at its sole option and as Purchaser’s sole remedy, repair or replace any defective Product in accordance with Alvarion’ standard R&R procedure. (b) With respect to the Firmware, Alvarion warrants the correct functionality according to the attached documentation, for a period of fourteen (14) month from invoice date (the "Warranty Period")". During the Warranty Period, Alvarion may release to its Customers firmware updates, which include additional performance improvements and/or bug fixes, upon availability (the “Warranty”). Bug fixes, temporary patches and/or workarounds may be supplied as Firmware updates. Additional hardware, if required, to install or use Firmware updates must be purchased by the Customer. Alvarion will be obligated to support solely the two (2) most recent Software major releases. ALVARION SHALL NOT BE LIABLE UNDER THIS WARRANTY IF ITS TESTING AND EXAMINATION DISCLOSE THAT THE ALLEGED DEFECT IN THE PRODUCT DOES NOT EXIST OR WAS CAUSED BY PURCHASER’S OR ANY THIRD PERSON'S MISUSE, NEGLIGENCE, IMPROPER INSTALLATION OR IMPROPER TESTING, UNAUTHORIZED ATTEMPTS TO REPAIR, OR ANY OTHER CAUSE BEYOND THE RANGE OF THE INTENDED USE, OR BY ACCIDENT, FIRE, LIGHTNING OR OTHER HAZARD. WALKair 3000 Version 3.0 System Manual ii Legal Rights Disclaimer (a) The Software is sold on an "AS IS" basis. Alvarion, its affiliates or its licensors MAKE NO WARRANTIES, WHATSOEVER, WHETHER EXPRESS OR IMPLIED, WITH RESPECT TO THE SOFTWARE AND THE ACCOMPANYING DOCUMENTATION. ALVARION SPECIFICALLY DISCLAIMS ALL IMPLIED WARRANTIES OF MERCHANTABILITY AND FITNESS FOR A PARTICULAR PURPOSE AND NON-INFRINGEMENT WITH RESPECT TO THE SOFTWARE. UNITS OF PRODUCT (INCLUDING ALL THE SOFTWARE) DELIVERED TO PURCHASER HEREUNDER ARE NOT FAULT TOLERANT AND ARE NOT DESIGNED, MANUFACTURED OR INTENDED FOR USE OR RESALE IN APPLICATIONS WHERE THE FAILURE, MALFUNCTION OR INACCURACY OF PRODUCTS CARRIES A RISK OF DEATH OR BODILY INJURY OR SEVERE PHYSICAL OR ENVIRONMENTAL DAMAGE (“HIGH RISK ACTIVITIES”). HIGH RISK ACTIVITIES MAY INCLUDE, BUT ARE NOT LIMITED TO, USE AS PART OF ON LINE CONTROL SYSTEMS IN HAZARDOUS ENVIRONMENTS REQUIRING FAIL SAFE PERFORMANCE, SUCH AS IN THE OPERATION OF NUCLEAR FACILITIES, AIRCRAFT NAVIGATION OR COMMUNICATION SYSTEMS, AIR TRAFFIC CONTROL, LIFE SUPPORT MACHINES, WEAPONS SYSTEMS OR OTHER APPLICATIONS REPRESENTING A SIMILAR DEGREE OF POTENTIAL HAZARD. ALVARION SPECIFICALLY DISCLAIMS ANY EXPRESS OR IMPLIED WARRANTY OF FITNESS FOR HIGH RISK ACTIVITIES. (b) PURCHASER’S SOLE REMEDY FOR BREACH OF THE EXPRESS WARRANTIES ABOVE SHALL BE REPLACEMENT OR REFUND OF THE PURCHASE PRICE AS SPECIFIED ABOVE, AT ALVARION’S OPTION. TO THE FULLEST EXTENT ALLOWED BY LAW, THE WARRANTIES AND REMEDIES SET FORTH IN THIS AGREEMENT ARE EXCLUSIVE AND IN LIEU OF ALL OTHER WARRANTIES OR CONDITIONS, EXPRESS OR IMPLIED, EITHER IN FACT OR BY OPERATION OF LAW, STATUTORY OR OTHERWISE, INCLUDING BUT NOT LIMITED TO WARRANTIES, TERMS OR CONDITIONS OF MERCHANTABILITY, FITNESS FOR A PARTICULAR PURPOSE, SATISFACTORY QUALITY, CORRESPONDENCE WITH DESCRIPTION, NON INFRINGEMENT, AND ACCURACY OF INFORMATION GENERATED. ALL OF WHICH ARE EXPRESSLY DISCLAIMED. ALVARION’ WARRANTIES HEREIN RUN ONLY TO PURCHASER, AND ARE NOT EXTENDED TO ANY THIRD PARTIES. ALVARION NEITHER ASSUMES NOR AUTHORIZES ANY OTHER PERSON TO ASSUME FOR IT ANY OTHER LIABILITY IN CONNECTION WITH THE SALE, INSTALLATION, MAINTENANCE OR USE OF ITS PRODUCTS. iii Legal Rights Limitation of Liability (a) ALVARION SHALL NOT BE LIABLE TO THE PURCHASER OR TO ANY THIRD PARTY, FOR ANY LOSS OF PROFITS, LOSS OF USE, INTERRUPTION OF BUSINESS OR FOR ANY INDIRECT, SPECIAL, INCIDENTAL, PUNITIVE OR CONSEQUENTIAL DAMAGES OF ANY KIND, WHETHER ARISING UNDER BREACH OF CONTRACT, TORT (INCLUDING NEGLIGENCE), STRICT LIABILITY OR OTHERWISE AND WHETHER BASED ON THIS AGREEMENT OR OTHERWISE, EVEN IF ADVISED OF THE POSSIBILITY OF SUCH DAMAGES. (b) TO THE EXTENT PERMITTED BY APPLICABLE LAW, IN NO EVENT SHALL THE LIABILITY FOR DAMAGES HEREUNDER OF ALVARION OR ITS EMPLOYEES OR AGENTS EXCEED THE PURCHASE PRICE PAID FOR THE PRODUCT BY PURCHASER, NOR SHALL THE AGGREGATE LIABILITY FOR DAMAGES TO ALL PARTIES REGARDING ANY PRODUCT EXCEED THE PURCHASE PRICE PAID FOR THAT PRODUCT BY THAT PARTY (EXCEPT IN THE CASE OF A BREACH OF A PARTY’S CONFIDENTIALITY OBLIGATIONS). Electronic Emission Notices This device complies with Part 15 of the FCC rules, ETSI 300 328, UL, UL/C, TUV/GS, and CE. Operation is subject to the following two conditions: This device may not cause harmful interference. This device must accept any interference received, including interference that may cause undesired operation. WALKair 3000 Version 3.0 System Manual iv Legal Rights FCC Radio Frequency Interference Statement This equipment has been tested and found to comply with the limits for a class A digital device, pursuant to Part 15 of the FCC rules. These limits are designed to provide reasonable protection against harmful interference when the equipment is operated in a commercial environment. This equipment generates, uses, and can radiate radio frequency energy and, if not installed and used in accordance with the instruction manual, may cause harmful interference to radio communications. Operation of this equipment in a residential area is likely to cause harmful interference in which case the user will be required to correct the interference at his own expense. v Important Notice Important Notice This user manual is delivered subject to the following conditions and restrictions: This manual contains proprietary information belonging to Alvarion Ltd. Such information is supplied solely for the purpose of assisting properly authorized users of the respective Alvarion products. No part of its contents may be used for any other purpose, disclosed to any person or firm or reproduced by any means, electronic and mechanical, without the express prior written permission of Alvarion Ltd. The text and graphics are for the purpose of illustration and reference only. The specifications on which they are based are subject to change without notice. The software described in this document is furnished under a license. The software may be used or copied only in accordance with the terms of that license. Information in this document is subject to change without notice. Corporate and individual names and data used in examples herein are fictitious unless otherwise noted. Alvarion Ltd. reserves the right to alter the equipment specifications and descriptions in this publication without prior notice. No part of this publication shall be deemed to be part of any contract or warranty unless specifically incorporated by reference into such contract or warranty. The information contained herein is merely descriptive in nature, and does not constitute an offer for the sale of the product described herein. Any changes or modifications of equipment, including opening of the equipment not expressly approved by Alvarion Ltd. will void equipment warranty and any repair thereafter shall be charged for. It could also void the user’s authority to operate the equipment. WALKair 3000 Version 3.0 System Manual vi Contents WALKair™ 3000 System Description WALKair™ 3000 Installation Guide WALKair™ 3000 Commissioning Guide WALKair™ 3000 System Description ii ii WALKair 3000 System Description About This Guide This guide introduces and describes the WALKair 3000 system. It includes a description of the WALKair 3000 system architecture, system features and services, and network management. It also provides tabulated WALKair 3000 system specifications and a physical description of the outdoor and indoor hardware units and interfaces. About This Guide This page left intentionally blank. iv iv WALKair 3000 System Description Contents Chapter 1 - Introduction.......................................................................... 1-1 Overview ............................................................................................................ 1-2 Features ....................................................................................................... 1-3 New Features in Version 4.0 ........................................................................... 1-4 WALKair 3000 Cellular Architecture ....................................................................... 1-5 WALKair 3000 Network Architecture ...................................................................... 1-6 IP Networking ............................................................................................... 1-6 SDH/PDH Networking..................................................................................... 1-7 IP/UMTS Backhauling ..................................................................................... 1-7 Access Method .................................................................................................... 1-8 End-to-End QoS................................................................................................... 1-8 WALKair Applications ........................................................................................... 1-9 Business Customers ....................................................................................... 1-9 SE/ME Business Customers ..................................................................... 1-9 Multi-Dwelling Units ............................................................................... 1-10 Next Generation Cellular (UMTS) Backhauling................................................. 1-11 Chapter 2 - System Description ............................................................... 2-1 Overview of System Architecture........................................................................... 2-2 System Equipment............................................................................................... 2-3 Base Station Equipment ....................................................................................... 2-4 BS Indoor Units ............................................................................................. 2-4 BS-SA Description..................................................................................... 2-4 IF-MUX II .................................................................................................. 2-5 IF-MUX 4 .................................................................................................. 2-5 E1 Switch.................................................................................................. 2-7 BS-ODU Description ....................................................................................... 2-7 TS Equipment...................................................................................................... 2-8 TS-BU ........................................................................................................... 2-8 TS-ODU ........................................................................................................ 2-9 System Management Methods ............................................................................ 2-10 LCI Management ......................................................................................... 2-10 Contents Remote LCI Management .........................................................................2-11 NMS ........................................................................................................... 2-11 Chapter 3 - WALKair 3000 Operator Benefits..........................................3-1 WALKair 3000 Entry Points ................................................................................... 3-2 WALKair 3000 BS-SA Solutions ............................................................................. 3-4 BS-SA Entry Points......................................................................................... 3-4 One Carrier per Sector ...............................................................................3-4 Single Carrier over 180º Coverage ..............................................................3-5 Two Carriers per Sector Capacity Upgrade .................................................3-6 Up to Four Carriers per Sector Capacity Upgrade.......................................3-7 Alvarix Integrated Solution ................................................................................... 3-8 Overview ...................................................................................................... 3-8 Alvarix Features and Benefits.......................................................................... 3-8 Alvarix Range of Services ............................................................................... 3-9 IF-MUX 4 Alvarix Implementation.................................................................. 3-11 Redundancy...................................................................................................... 3-12 ODU Redundancy ........................................................................................ 3-13 IDU Redundancy ......................................................................................... 3-13 Flowchart of Redundancy Timing .................................................................. 3-14 Chapter 4 - WALKair 3000 Services .........................................................4-1 Overview ............................................................................................................ 4-2 IP Services over WALKair 3000 ............................................................................. 4-2 Ethernet Modes in WALKair 3000 .................................................................... 4-2 Security and VLANs........................................................................................ 4-3 IP Flow Mechanism........................................................................................ 4-5 WALKair 3000 End to End QoS ............................................................................. 4-7 Background................................................................................................... 4-7 QoS Implementation in WALKair 3000 ............................................................. 4-8 Class of Service (CoS) Definitions.................................................................... 4-9 Examples of IP SLA Scenarios ..................................................................4-10 Service Definition Structure .......................................................................... 4-11 Service Hierarchy Structure Per TS................................................................ 4-12 DBA QoS over the Air................................................................................... 4-13 IP Traffic and End-to-End QoS............................................................................ 4-13 Description of End-to-End QoS...................................................................... 4-14 In the Uplink Path: ..................................................................................4-14 In the Downlink Path: ..............................................................................4-16 E1 Services ....................................................................................................... 4-16 Leased Line Services (SDH/PDH Backbone).................................................... 4-17 TDM Clock .................................................................................................. 4-17 vi vi WALKair 3000 System Description Contents E1 Modes in WALKair 3000 ........................................................................... 4-18 E1 Alarms ................................................................................................... 4-18 Chapter 5 - Specifications........................................................................ 5-1 WALKair 3000 General Specifications..................................................................... 5-2 Base Station Specifications ................................................................................... 5-7 General......................................................................................................... 5-7 BS-SA Specifications....................................................................................... 5-8 Base Station Radio Frequencies @ 10.5 GHz .................................................. 5-10 Base Station Radio Frequencies @ 26GHz ...................................................... 5-11 Base Station Radio Frequencies @ 28GHz ...................................................... 5-12 Additional BS Devices Specifications .................................................................... 5-13 E1 Switch Specifications ............................................................................... 5-13 Terminal Station Specifications............................................................................ 5-15 General....................................................................................................... 5-15 TS Radio Frequencies @ 10.5 GHz................................................................. 5-16 TS Radio Frequencies @ 26 GHz ................................................................... 5-17 TS Radio Frequencies @ 28 GHz ................................................................... 5-18 BS Antennas...................................................................................................... 5-19 10.5 GHz 60 º Sector Vertical or Horizontal Antenna ....................................... 5-19 10.5 GHz 90 º Sector Horizontal Antenna ....................................................... 5-20 10.5 GHz 90 º Sector Vertical Antenna........................................................... 5-21 26 GHz Base Station Outdoor Unit ................................................................. 5-22 28 GHz Base Station Outdoor Unit ................................................................. 5-22 Terminal Station Indoor Unit......................................................................... 5-24 Terminal Station Rear Panel .................................................................... 5-24 Terminal Station Outdoor Unit....................................................................... 5-25 10.5 GHz Terminal Station Outdoor Unit................................................. 5-25 26 GHz Terminal Station Outdoor Unit.................................................... 5-26 28 GHz Terminal Station Outdoor Unit.................................................... 5-27 vii Contents This page left intentionally blank viii viii WALKair 3000 System Description 1 Chapter 1 - Introduction In This Chapter: WALKair 3000 Cellular Architecture on page 1-4. WALKair 3000 Network Architecture on page 1-6. Access Method on page 1-8. End-to-End QoS on page 1-8. WALKair Network Applications on page 1-9. Chapter 1-Introduction Overview WALKair 3000 is an advanced point-to-multipoint (PMP) broadband wireless access solution, delivering Carrier Class services at upstream and downstream rates of up to 34Mbps. WALKair 3000 provides last mile solutions for small and medium businesses and multi-dwelling and multi-tenant unit (MDU/MTU) applications. In addition, WALKair 3000 provides the optimal solution for next generation cellular backhauling applications. The following figure illustrates WALKair 3000 PMP architecture: a single BS communicating with a number of TSs. 26GHz/28GHz/10.5GHz Figure 1-1. WALKair 3000 PMP Architecture This new system operates in the Operating in the 10.5/26/28 GHz band. It is based on Alvarion’s industry-leading cluster of high spectral efficiency, frequency reuse and dynamic bandwidth allocation technologies. The solution provides the highest coverage capacity available from any broadband wireless access vendor. Innovative technology featuring fiber-optic quality voice and data services for high-speed IP data and Internet applications enables WALKair 3000 to meet the current and future services and capacity requirements of new operators and established carriers in Europe and other regulated markets. As a broadband wireless access solution, WALKair 3000 is ideally suited for developing countries where a lack of infrastructure poses an additional challenge. The WALKair 3000 10.5 GHz and 26 GHz band models can be fully integrated and co-located with the WALKair 1000 system. WALKair 3000 system components can be managed and monitored either locally, through RS232 connection to the BS equipment, or remotely, from the Network Operating Center (NOC) via the WALKnet management (standalone) application. 1-2 1-2 WALKair 3000 System Description Overview Features WALKair 3000 delivers a comprehensive range of product features, ensuring fast, consistent and reliable data and voice services, including: • Single PMP infrastructure used for broad wireless access and for cellular backhauling • Scalable, stackable architecture to meet changing needs • IDU and ODU Redundancy • Supported RF bands – 10.5 GHz, 26 GHz and 28 GHz ETSI, and 26 GHz Chinese (MII) • Data rate and channels • For 14 MHz channels - up to 34 Mbps (upstream and downstream) per Terminal Station (10.5/26/28 GHz) • For 7 MHz channels - up to 16.384 Mbps (upstream and downstream) per Terminal Station (10.5/26/28 GHz) • For 3.5 MHz channels - up to 8.192 Mbps (upstream and downstream) per Terminal Station • Multi-carrier FDD and TDMA system, up to four carriers per sector • Dual modulation, 16QAM and QPSK with automatic switchover • Full end-to-end QoS supporting IP QoS/CoS, QoS using I ETF standard in differential service (diffserv). • Flexible service provisioning combining committed and maximum information rates (CIR/MIR) and support for different classes of SLAs • Customer Premise Equipment (CPE) services: IP (10/100 Base-T), TDM and Leased Lines (8 x E1) • Spectral efficiency - 2.5 bit/sec/hz • Management – in-band and out-of-band (over Ethernet) • SNMP-based management system and powerful network planning tool • Alvarix Solution – provides full integration of WALKair 3000 and WALKair 1000 (10.5 GHz and 26 GHz models) systems 1-3 Chapter 1-Introduction New Features in Version 4.0 • Some port parameters (i.e. duplex mode, E1 Loopback, etc.) and service parameters (i.e. CIR, MIR) can be modified (without deleting and recreating the relevant port or service) • Narrow channel spacing bands: • 26/28 GHz: 7 MHz channel added to the existing 14 MHz channel • 10.5 GHz: 3.5 and 7 MHz channels added to the existing 14 MHz channel; 3.5 MHz channel requires installing the BS IDU and TS IDU devices that support this function • Rx Operation Points can be customized for each TS in order to optimize the link performance • Last error indication – default fault descriptions can be viewed through the WALKnet • Indication of available (free) bandwidth for IP and TDM services in the WALKnet BS-SA View • Sector fault status are propagated to the WALKnet map view in colors (Green, Orange, Red) corresponding to the highest fault for that sector • Auto-save of configuration – changes in configuration are automatically saved every 15 minutes • Auto-backup – configuration file is automatically backed up to TFTP at user defined intervals of 24, 48 or 72 hours. • Redundancy – point-to-multipoint IDU and ODU redundancy. NOTE: Redundancy requires additional equipment for implementation: for IDU redundancy - an E1 switch and a second BS-SA; for ODU redundancy - IF-MUX 4 and a second RFU • IF-MUX 4 – used to implement ODU redundancy, as well as for integrating up to four IDUs for configurations of up to four carriers. The IDUs can be any combination of BS-SA 3000 and BS-BU 1000 units • E1 Switch – used to implement IDU redundancy (E1 and LCI management port) • Simultaneous SW download of all TS – TS software is broadcast from the host BS-SA • In-band management – BS-SA management can also be implemented via the data Port 1-4 1-4 WALKair 3000 System Description WALKair 3000 Cellular Architecture WALKair 3000 Cellular Architecture WALKair 3000 cell based architecture provides a coverage area of three to five miles per cell, the coverage area depending on subscriber density and topographical conditions. Each cell consists of one BS at the cell center and a number of TSs within the BS coverage area. The coverage area is increased by deploying multiple WALKair cells adjacent to each other, as illustrated by the following figure. Figure 1-2. Illustration of Multi-cell Area Coverage The BS, located at the center of the cell, provides traffic to a number of TSs located within the cell. The coverage area of each cell can be divided into segments or sectors. WALKair 3000 supports configurations of up to 1/2/4/6/8 sectors per cell. The supported configurations depend on the frequency range: for example, in the 10.5 GHz range, 90° and 60° sectors are supported, while in the 26/28 GHz range, 180°, 90° and 45° sectors are supported. The sectors do not necessarily have to be evenly distributed. The following figure illustrates a six-sector configuration, in which four of the sectors are 45° each (lower half) and two of the sectors are 90° each. 1-5 Chapter 1-Introduction WALKair 3000 Network Architecture The WALKair 3000 System can be incorporated at the access point of both data and voice networks. On the Base Station side, the system interfaces with the backbone/transport network using E1 Interfaces, or with IP/Layer 2-based backbones using 10/100BaseT Ethernet interfaces. On the Terminal Station side, the system provides a variety of data and voice interfaces for 10/100BaseT Ethernet, E1 and Leased Lines. This section illustrates various topologies. IP Networking ETH – ETH service supports IP traffic flows between the BS and TSs. At the BS-SA (Base Station), the traffic is received at the 10/100 BaseT ETH port. In this type of configuration, a router should be installed before the Base Station. Figure 1-3. VoIP and Data Services 1-6 1-6 WALKair 3000 System Description WALKair 3000 Network Architecture SDH/PDH Networking E1 – E1 service supports TDM connections between the BS and TSs. The services can be configured as full E1 services or fractional E1 services. Figure 1-4: SDH Networks Leased Line Services IP/UMTS Backhauling The UMTS mobile network is based on standardized data communication protocols such IP. WALKair 3000 provides a flexible, highly efficient and robust data-oriented method for UMTS operators to connect their base station traffic to the backbone. Figure 1-5: Next Generation Cellular (UMTS) Backhauling by IP 1-7 Chapter 1-Introduction Access Method At least one Outdoor Unit (ODU) is allocated per sector at the Base Station (BS) site. Each WALKair 3000 Base Station ODU comprises a Multi-Carrier system, which is capable of transmitting and receiving up to four Carriers (using IF-MUX 4) with different center frequencies. The WALKair 3000 access method leverages TDMA (Time Division Multiple Access) technology. Each Carrier can support traffic from up to 64 TSs, where each TS is allocated a transmission time (Burst) in which it communicates with the BS. The BS controls the timing and length of each TS Burst, according to traffic load on this TS. Each TS can handle both TDM and IP traffic. End-to-End QoS WALKair 3000 supports up to 16 IP SLA/Data Service Pipes per TS. Prioritization is implemented according to the customer’s SLA definitions consisting of: • CIR • MIR • Up to 4 CoS levels - 1 to 4 prioritized queues. Platinum, Gold, Silver and Bronze client types Classification and prioritization are performed according to IETF’s DiffServ standard which utilizes the Type Of Service (ToS) bits in the IP header in order to differentiate various CoS traffic types. Strict Priority Queuing ensures an efficient and optimized traffic handling according to the assigned priority. Dynamic Bandwidth Allocation (DBA) provides BW based on actual demand traffic rate and SLA per TS and customer. This ensures fair share to all customers based on their service attributes and their SLA. Unused MIR and CIR BW is shared among active customers. Cell switching based air protocol uses fixed size air cells and ensures a constant delay for high priority data. 1-8 1-8 WALKair 3000 System Description WALKair Applications WALKair Applications WALKair 3000 stackable system was designed to meet the current and future services and capacity requirements of new operators in Europe and other regulated markets. Business Customers Business customers are typically located in independent customer sites over an urban/suburban area. The covered area may be large - several hundred square kilometers, or small - a few square kilometers. The average capacity requirement per customer may vary significantly from one area to another and the number of customer sites and the average capacity per customer are expected to grow significantly within a few years. WALKair 3000 is designed to suit WLL applications for business customers. The system directly connects locations of Small Enterprises (SE) and Medium Enterprises (ME) and Multi-dwelling Units (MDU), providing high quality voice and data services. Figure 1-6: Typical SME/MDU Applications SE/ME Business Customers In SE/ME business applications, the WALKair 3000 Terminal Station is located at the Business premises. It is connected to the customer CPE equipment and provides the following services: • Typical peak rate of up to 4 Mbps for small-enterprises and 25 Mbps for medium-enterprises 1-9 Chapter 1-Introduction • Point-to-multipoint (PMP) delivery at upstream and downstream rates of up to 34 Mbps (for 14 MHz channels). Prioritization according to the customer’s SLAs - committed and maximum information rates (CIR/MIR) • Always On services • SLA and service statistics • High Speed Internet / Intranet / VPN / LAN Interconnect Access • IP/Layer 2 oriented applications: VoIP, Video Conference (IP Multicast), Remote Learning, E-Commerce, Mail Service, WEB Hosting • Application Service Provider (ASP) • Legacy Telephony (2-30 POTS) • Security and Addressing: Access List Control, NAT, DHCP, VPN • Service Integration: Network Management, System administration Multi-Dwelling Units In Multi-Dwelling applications, the WALKair 3000 TS is located in the residential/office buildings (either near the roof or in the cellar). Service from the TS to residents or offices located at the same building is provided through the TS connection to multiplexers, switches or routers. Data applications can be served via the WALKair 3000 TS Ethernet port by connecting to a low cost Ethernet switch which also provides security for MDU customers. A VLAN (Virtual LAN) is defined per each office/resident. Data packets of each VLAN are uniquely identified using a VLAN ID as defined by 802.1Q standard. Each VLAN is a close and secured group, which is protected and distinguished from the other VLANs. Broadcast messages always remain within the VLAN boundaries and cannot be seen by other members on the switch. Thus, customer traffic is secured by the switch within VLAN (Virtual LAN) and prioritized by WALKair 3000 TS according to Diff-Serv standard in order to maintain QoS for VoIP applications. It is then mapped to IP tunnel and carried towards the network using actual VPN, maintaining a secured environment over the air to each customer (office). The MDU application assumes 4-8 business subscribers per building: • Typical peak rate: Per business up to 2Mbps and aggregated up to 4Mbps-8Mbps • Always On services • SLA and service statistics • High Speed Internet / Intranet / VPN / LAN Interconnect Access 1-10 1-10 WALKair 3000 System Description WALKair Applications • IP oriented applications: VoIP, Video Conference, Remote Learning, E-Commerce, Mail Service, WEB Hosting, Entertainment / Multimedia (IP Multicast) • Application Service Provider (ASP) • Legacy Telephony: Per business 2-4 POTS(0.1 Erlang) and aggregated 12-30 Lines (1-3Erlang) • Service Integration: Network Management, System administration • Security and Addressing: Access List Control, NAT, DHCP, VLAN, VPN Next Generation Cellular (UMTS) Backhauling As the next generation of cellular (UMTS-Universal Mobile Telecommunication System) mobile networks is being deployed, it is evident that a sophisticated and efficient backbone system is required. WALKair 3000 supports UMTS mobile network based on IP data communication protocols. NOTE: Support for ATM can be provided using external devices). WALKair 3000 enables UMTS operators to connect their base station traffic (Node-b) to the backbone using a flexible, highly efficient and robust data-oriented system. Figure 1-7: Next Generation Cellular (UMTS) Base Station PMP Feeding 1-11 Chapter 1-Introduction The WALKair 3000 Base Station supports IP/Layer 2 networks by using 10/100BaseT Ethernet interfaces. The WALKair3000 system is ideally suited for IP based UMTS networks. Figure 1-8: IP Next Generation Cellular (UMTS) Backhauling Today the WALKair products are implemented in several mobile networks around the world as backhauling solutions. With some networks extending to hundreds of BTSss connected, mobile operators leverage the advantages of this efficient and secured PMP backbone system. 1-12 1-12 WALKair 3000 System Description 2 Chapter 2 - System Description In This Chapter: Overview of System Architecture on page 2-2. System Equipment on page 2-3. Base Station Equipment on page 2-4. TS Equipment on page 2-8. System Management on page 2-10. Chapter 2-System Description Overview of System Architecture The WALKair 3000 PMP system consists of a Base Station (BS) to which multiple Terminal Stations (TS) are connected via radio channels. On the downlink (from BS to TSs), the digital bitstream containing voice, data and video information is converted at the BS into microwaves that are transmitted to a small antenna at the customer's premises. The microwaves are then reconverted back into a digital bitstream at the TSs and delivered to the end-user. The process is reversed for upstream traffic. The base station receives the microwave signal, converts it into a digital bitstream and routes it through, or 'backhauls' to, the wider network, through which the data or call is delivered to its destination. Figure 2-1. System Architecture The high frequencies (10.5 GHz and above) in which WALKair 3000 operates, require line-of-sight between the base station and customer premise transceivers, hence WALKair 3000 TS and BS RF equipment consisting of the antennas and converters is installed outdoors in a high location (usually on a rooftop). This equipment is referred to ODU (TS-ODU and BS-ODU). The digital interface and control equipment is located indoors in a temperature controlled environment. This equipment is referred to IDU (TS-IDU and BS-IDU). 2-2 2-2 WALKair 3000 System Description System Equipment The ODU and IDUs at each site are interconnected via an IF interface cable. The base station is connected to the wide-area network. At the customer's premises, the signal is delivered to the end-user terminals via Ethernet or E1 interfaces. System Equipment On the BS side, the BS-SA stackable IDU provides E1 and Ethernet connections to the backbone. On the TS side, the TS-BU IDU connects to the service areas. The Base Station ODU (RF unit and antenna) communicates with the terminal stations over-the-air through the Terminal Stations ODU (RFU and antenna). The ODUs and IDUs, on the both BS and TS sides, are interconnected through IF cables. Each Terminal Station provides various Data and Telecom services, such as 10/100 BaseT, E1 and leased lines, using a flexible bandwidth of up to 34 Mbps (depending on the channel width). The Base Station network capacity per sector, 136 Mbps, is allocated as required among the TSs using dynamic bandwidth allocation. The BS-SA and the corresponding TS-BUs are managed through connection to the BS-SA. The connection may be through a local connection to the Local Craft Interface (LCI) port, or remotely from the Network Operating Center (NOC) - through the WALKnet management application (separate application). Figure 2-2: WALKair 3000 System NOTE: For 14 MHz channel, QPSK of 1.2 bps is available. 2-3 Chapter 2-System Description Base Station Equipment The Base Station (BS) equipment consists of indoor (IDU) and outdoor (ODU) equipment that are interconnected through an IF cable. NOTE: The number and type of elements in the indoor and outdoor equipment varies depending on the site topology. BS Indoor Units The following elements may be part of a BS IDU: • BS-SA – provides interface to the backbone and to the RF equipment • IF-MUX 2 – used to implement two carriers per sector configuration • IF-MUX 4 – used to implement configurations of up to four carriers per sector (including Alvarix topology) and ODU redundancy. • E1-Switch – used to implement IDU redundancy BS-SA Description The BS-SA is a stackable, 1U high unit that can be installed in rack, mounted on a wall, or simply placed on a flat surface such as a desk. It provides the following functions: • Connection to 10/100BaseT IP/Layer 2 backbone • Interface to E1 SDH backbone • Base-band to IF signal conversion • Local and remote management capabilities of the BS-SA and the TSs which it hosts. Power is provided by a dedicated -48 VDC power source. Several BS-SA models corresponding to the various frequency bands are available: 10.5 GHz, 26 GHz and 28 GHz. The following figure shows the BS-SA unit. 4 x LEDs IF connection 8 x E1 ports Figure 2-3. BS-SA Front Panel Remote Mng 10/100BaseT LCI Mng 2-4 2-4 WALKair 3000 System Description Base Station Equipment IF-MUX II IF-MUX II is used to implement dual carrier per sector configurations by multiplexing the IF signals from two BS-SA units and feeding them to one RF (outdoor) device. IF MUX multiplexes the Tx signals from the BS-SAs and combines the output signal with a 48V DC signal. The IF and power signals are fed to the RFU via a coaxial cable. In the reverse direction, the IF signal from the RFU is de-multiplexed and fed to both BS-SAs. Figure 2-4. IF-MUX II configuration IF-MUX 4 NOTE: IF-MUX 4 is relevant to all frequency bands from 3.5 GHz (for Alvarix) to 28 GHz. IF-MUX 4 is used to: • Implement configurations of up to four carriers per sector; • Implement ODU redundancy; The IF-MUX 4 front panel contains the IF connections to the BS-SA (3000) and BS-BU (1000). Figure 2-5: IF-MUX 4 Front Panel 2-5 Chapter 2-System Description The IF MUX multiplexes the Tx signals from up to four BS-BUs and BSSA devices and combines the output signal with a 48V DC power supply. The IF signal is sent to the RFU, located near the Antenna, via a coaxial cable. The reverse process applies for Rx signals. Figure 2-6. Example of IF-MUX 4 Configuration The rear-panel contains the RF connection ports, RF redundancy control ports, the power connection and fuse locations. NOTE: All fuses are (TBD) Figure 2-7: IF-MUX 4 Rear Panel 2-6 2-6 WALKair 3000 System Description Base Station Equipment E1 Switch The E1 Switch is used to implement BS-SA redundancy functions. These include: • Switching up to 16 E1 lines from one BS-SA to another. • Monitoring the communication channel between the BU-SA and IFMUX 4 The E1 switch front panel contains all the connections to the backbone and to the BS-SA units. The rear panel contains the power connection only. Figure 2-8: E1 Switch Front Panel For complete information on the E1 switch: This section contains a brief description of the E1 switch. More information is provided in the relevant sections as follows: • Use of E1 switch in IDU redundancy configurations – System Description - Chapter 3 - IDU Redundancy, page 3-13. • E1 Specifications – System Description Chapter 5 - Specifications, E1 Switch Specifications, page 5-13. • E1 Switch Operation and Connections – Installation Manual – Chapter 6 – Base Station IDU, E1 Switch • E1 Switch Pinout - Installation Manual – Appendix B - Pinouts, E1 Switch Pinout BS-ODU Description The BS ODU equipment consists of: • Antennas – provides sector coverage by transmitting/receiving the signals to/from the corresponding TSs • RF devices - perform the IF/RF frequency conversion between the antennas and the IDU for the corresponding sector. • De-MUX – used to implement two-sector per carrier configurations. This is a weather proof unit installed outdoors. Each BS ODU consists of one antenna one RF unit per sector. For example, if there are four sectors, then four ODUs are installed. The antenna provides the coverage for the sector, while the RFU performs the up- down-conversion of the IF/RF signal and amplification/attenuation of the signal. 2-7 Chapter 2-System Description The RF unit is connected to the BS-SA either directly or through a multiplexer – depending on the number of carriers in the site and the number of sectors per carrier. NOTE: WA3000 system supports up to four carriers (BS-SAs, BS-BUs) per sector and up to two sectors (RFUs) per carrier. The model of BS ODU that is supplied depends on the frequency band in which the system will operate. The example shown below is the RFU for the 26 GHz band system. Figure 2-9: 26 GHz Base Station RFU and Horn Antenna NOTE: For 10.5 GHz and 26 GHz systems, the WALKair 3000 BS and TS ODU components are identical to that of the WALKair 1000 BS and TS ODU components, thereby facilitating combined deployment and migration. TS Equipment The TS IDU equipment consists of a TS-BU units. The BS ODU consists of an antenna which transmits/receives the signals to/from the BS and the RF equipment that performs the IF/RF frequency conversion. The ODU and IDU are interconnected through an IF cable. Antennas are chosen based on the desired coverage of potential subscribers, taking into consideration the terrain, interfering objects, antenna azimuth pattern, antenna elevation pattern, and antenna gain. TS-BU The Terminal Station Indoor Unit (IDU) is located at the customer premises in a temperature-controlled environment. The TS-BU performs the following functions: • Provides Ethernet interface • Provides E1 port interfaces 2-8 2-8 WALKair 3000 System Description TS Equipment • Implements the signal base band to IF conversion and provides the IF interface LCI connection E1 interface IF connection 2 x Ethernet ports Figure 2-10: Terminal Station Indoor Unit The Terminal Station Indoor Unit is powered either by a standard DC source (48V) or an AC source. TS-ODU The TS ODU includes the RF Head and antenna and is located on a pole with a clear line of sight to the Outdoor Units of the Base Station. The Terminal Station ODU antenna is attached to the RFU, and is directed toward the Base Station. The IF cable connects the IDU and ODU, supports both the uplink and downlink IF signal, and supplies the ODU with DC power. The TS ODU supplied depends on the frequency band in which the system will operate. The example shown below is supplied for the 26 GHz band. Figure 2-11: Terminal Station Outdoor Unit 2-9 Chapter 2-System Description NOTE: For 10.5 GHz and 26 GHz systems, the WALKair 3000 BS and TS ODU components are identical to that of the WALKair 1000 BS and TS ODU components, thereby facilitating combined deployment and migration. System Management Methods Each BS-SA unit and the TS-BUs under its control may be configured, monitored and managed though a single connecting to the host BS-SA unit. Three management methods are available: • Local Craft Interface (LCI) – provides local, menu-based management of the connected node (BS-SA and hosted TS-BUs) through a local (RS232) connection to the BS-SA LCI port from a computer running a terminal emulation application (i.e. HyperTerminal). • Telnet connection – provides single point, remote menu-based management of the connected node through a remote point-to-point connection to the BS-SA from a computer running terminal emulation application for TCP/IP, such as Telnet. • Network Management System (NMS) – provides SNMP based GUI management of a number of nodes from a central site through WALKnet, a GUI based intuitive application. LCI Management The LCI management application provides complete configuration and maintenance functions via a local RS232 connection. LCI is based on layered, menu driven screens that enable the operator to manage the WALKair 3000 system equipment and telecommunications services. The LCI management functions include: • Configuration Management Radio Link Management Administrative Parameters Services Management • Maintenance Management Version Control Alarm Management System Testing Air Performance Monitoring Modem Management 2-10 2-10 WALKair 3000 System Description System Management Methods WALKair 3000's BS LCI provides remote configuration and maintenance functions for all of its connected TSs, enabling full monitoring and remote control over each of the TSs. Figure 2-12: LCI Terminal Interface The LCI provides accurate up-to-date status information regarding the current active services and resources (telecom and air links) utilized by the network elements. Additionally, the LCI terminal is used to retrieve the information stored in the BS-BU and TS-BU, including hardware/software installation data, configuration data, subscriber data and operating parameters. Remote LCI Management A BS LCI session can also take control over a specific TS's LCI session, thus saving expensive field maintenance. This can also be used for on-line help to a field technician. In order to control a specific TS, the operator has to type the TS Customer ID and Password. The TS operator can resume control over the TS's LCI by pressing any key on its keyboard. The system automatically terminates the remote connection. NMS WA 3000 provides out-of-band SNMP based management that can be operated over an HPOV platform or as a standalone application. The management is implemented by WALKnet, a separate application that can be run on either a NT or UNIX platform. WALKnet provides complete configuration, maintenance and monitoring capabilities. These include: • Remote S/W download to the remote terminals • Automatic failure discovery 2-11 Chapter 2-System Description • Service statistics and performance monitoring • Alarm report to higher level management • Graphical visualization of the NE, zooming functionality • Central SQL database support • User security layers The following figure illustrates remote connection to a BS-SA. The BSSA serves as a Proxy agent, providing management access to each of the corresponding TS-BUs. Terminal Stations SNMP protocol from management system to the Base Station Stackable BS-SA HUB WAN The BS-SA serves as a Proxy Agent for the TS Computer Remote Management Station Figure 2-13. NMS Out-of-Band Management 2-12 2-12 WALKair 3000 System Description 3 Chapter 3 - WALKair 3000 Operator Benefits In This Chapter: This chapter describes WALKair 3000 entry points, and includes the following sections: WALKair 3000 Entry Points Introduction on page 3-2. Alvarix Integrated Solution on page Error! Bookmark not defined.. WALKair 3000 BS-SA Solution on page 3-4. Chapter 3-WALKair 3000 Operator Benefits WALKair 3000 Entry Points Operators in the 10.5 GHz, 26 GHz and 28 GHz markets need to meet existing customer requirements, while at the same time provide scalable and adaptable solutions. Alvarion’s WALKair 3000 system enables operators to supply the most cost-effective entry level for the customer, according to the customer’s current capacity demands and subscriber needs. Each solution can evolve as a pay-as-you-grow modular architecture, providing flexibility for dynamic growth and development as customer and subscriber requirements change. The key to structural flexibility is the adaptation of WALKair BS IDU architecture to the actual technical and business case requirements. In addition, the Base Station architecture can be adapted to a specific deployment evolution phase. WALKair 3000 entry points are designed around two different Base Station Solutions as follows: • WALKair 3000 BS-SA Solution, on page 3-4. • Alvarix Integrated Solution, on page Error! Bookmark not defined.. 3-2 3-2 WALKair 3000 System Description WALKair 3000 Entry Points Figure 3-1: WALKair 3000 Entry Levels 3-3 Chapter 3-WALKair 3000 Operator Benefits WALKair 3000 BS-SA Solutions BS-SA Entry Points One Carrier per Sector This installation provides a single carrier of 34 Mbps per sector. The installation consists of a BS-SA per RFU. The BS-SA device provides a single IP/Layer 2 Ethernet connection and up to 8 E1 and TDM/Leased Lines services for up to 64 terminals. Figure 3-2: BS-SA – One Carrier/Sector 3-4 3-4 WALKair 3000 System Description WALKair 3000 BS-SA Solutions Single Carrier over 180º Coverage This installation provides 180º coverage with a single carrier capacity of 34 Mbps per cell. The installation consists of a BS-SA and two RFUs, each with a 90º antenna. The DE-MUX device is used for supplying a single carrier to both RFUs. The BS-SA device provides a single IP/Layer 2 Ethernet connection and up to 8 E1 and TDM/Leased Lines services for up to 64 terminals. Figure 3-3: BS-SA – 180º Coverage 3-5 Chapter 3-WALKair 3000 Operator Benefits Two Carriers per Sector Capacity Upgrade This solution provides 68 Mbps per sector and supports up to 128 terminals and up to 16 E1 connections. The installation consists of two BS-SAs per sector (RFU). IF-MUX II is used to multiplex the IF signal transmitted from the two BS-SAs and feed the multiplexed signal to the RFU. Each BS-SA device provides a single IP/Layer 2 Ethernet connection and up to 8 E1 and TDM/Leased Lines services for up to 64 terminals. Figure 3-4: BS-SA – Two Carriers/Sector 3-6 3-6 WALKair 3000 System Description WALKair 3000 BS-SA Solutions Up to Four Carriers per Sector Capacity Upgrade This solution supports three to four carriers per sector. This provides up to 136 Mbps per sector and supports up to 256 terminals and up to 32 E1 connections. The installation consists of four BS-SAs per sector (RFU). IF-MUX 4 is used to multiplex the IF signal transmitted from the up to four BS-SAs and feed the multiplexed signal to the RFU. Each BS-SA device provides a single IP/Layer 2 Ethernet connection and up to 8 E1 and TDM/Leased Lines services for up to 64 terminals. NOTE: The LCI connection of one of the BS-SAs is connected to the IF-MUX 4 rear panel COM connection. Figure 3-5: BS-SA – Four Carriers/Sector 3-7 Chapter 3-WALKair 3000 Operator Benefits Alvarix Integrated Solution Overview The Alvarix solution enables combining WALKair 1000 and WALKair 3000 operating in the 10.5 GHz and 26 GHz band, to provide optimal price/performance solution by minimizing both CAPEX and OPEX, thus assuring the operator a rapid Return On Investment (ROI), growth potential and maximized profitability. WALKair 3000 and WALKair 1000 IDUs are connected to the same ODU to provide the operator with better spectrum utilization, a wide range of services and interfaces, and capabilities to enlarge WLL network according to current needs. Both system have the same Network Management application and Radio Planning tool. A combination of WALKair 1000 and 3000 provides a larger variety of CPEs, with better optimization for different types of customers. Combined, WALKair delivers the best combination of: • Service and SLA policies via IP, Frame Relay, ISDN and leased lines. • Higher capacity leveraging spectral efficiency, concentration and higher reuse. • Cost structure, including scalability and various TS types. • System solutions, including Carrier Class management systems and automated network planning. • Future readiness, meeting both current and long term CLEC needs Alvarix Features and Benefits Alvarix incorporates a wide range of features and benefits as follows: • High spectral efficiency (2.5 bits/sec/Hz) in conjunction with high capacity per BS (Up to 1.2 Gbps per cell): Provides high data rates over a minimal bandwidth, thus allowing the carrier and service provider to efficiently utilize the spectrum and to maximize their revenues by deploying less BSs for a given territory. Results in less CAPEX and OPEX spending • Multi-Carrier approach per sector reducing the number of ODUs required: Reduces OPEX & CAPEX by saving the number of required ODUs, roof-top Base Stations and infrastructure 3-8 3-8 WALKair 3000 System Description Alvarix Integrated Solution • Pay-as-you-grow structure: Enables additional carriers/capacity per sector, as and when needed, by adding only Indoor Units components. Secures the investment by enabling gradual upgrading • Modulation scheme: Automatic/Manual dual modulation. (16QAM/QPSK) per Terminal: Increases the system availability and optimizing the coverage Improves the operator’s business model by increasing the number of Station potential customers per BS Saves both the operator’s CAPEX and the OPEX by eliminating the need to deploy new BSs in order to cover remote customers. • Smooth integration and migration between the two product lines (WALKair 1000/3000) integrated under Alvarix) Same ODU and IF components at the TS and BS Same network management (WALKnet) and Frequency Planning (NIR) tools Saves the operator OPEX when integration/migration of both product lines is needed Alvarix Range of Services Table 3-1: Alvarix Range of Services Feature Description Services Data ▪ IP/Layer 2 over Ethernet 10/100 BaseT ▪ Frame Relay ▪ ISDN Quad-BRI Voice ▪ V 5.1 (for voice MUX) over E1 ▪ ISDN Quad-BRI ▪ ISDN PRI Leased line; ▪ E1/Fractional E1 ▪ V 35/X.21 PMP cellular backhauling: ▪ Leased lines over E1 for GPRS/GSM feeding ▪ N x E1 IMA for UMTS (3G) feeding. 3-9 Chapter 3-WALKair 3000 Operator Benefits Table 3-1: Alvarix Range of Services Feature Description Applications Access applications ▪ Next-generation broadband IP/Layer 2 services ▪ Legacy Voice and Data services ▪ Always on services ▪ End-to-end QoS and SLA ▪ Fiber-to-building concept Feeding application: ▪ Licensed frequency bands ▪ Multiple standard interfaces and services ▪ Reliability Access and feeding: ▪ Largest coverage capacity available ▪ Scalability through diversified Terminal Station and modular, flexible Base Station ▪ Availability BER < 10-9, 99.995% ▪ Carrier class service ▪ Comprehensive network management tool Applications Supports diverse segments, applications and multi-services: ▪ Increases opportunities to penetrate new markets and target new customers Converged BWA and Cellular Backhauling Application: ▪ Enables the same BWA PMP infrastructure to be used for both applications increasing the potential businesses and improve the operator’s business model PMP Cellular Feeding: ▪ Enhances cost efficiency compared to PTP and leased lines ▪ Saves CAPEX for site acquisition and backhaul through easy integration into wireless sites of the cellular operator ▪ Increases BWA utilization MDU/MTU Access application: ▪ Improves efficient use of trunk equipment ▪ Enables multiple users to share same Terminal Station, leading to shared initial investment (CAPEX) and improvement of the business model. 3-10 3-10 WALKair 3000 System Description Alvarix Integrated Solution IF-MUX 4 Alvarix Implementation The following figure shows Alvarix implementation (and RFU redundancy) using IF-MUX 4. IF-MUX 4 enables the connections of up to four BS-SAs and BS-BU units in any combination. The following figure shows a configuration of two BS-SAs and one BS-BU 1000, in addition to two RFUs to provide RFU redundancy. NOTE: For clarity, only one BS-BU 1000 unit is shown. If a second BS-BU device is added, its I and R ports will be chained to the first BS-BU and its IF (Tx and Rx) ports connected to the COMMON/Tx and Rx ports on the IF-MUX 4 front panel. Figure 3-6. Example of Alvarix implementation using IF-MUX 4 3-11 Chapter 3-WALKair 3000 Operator Benefits Redundancy WALKair 3000 provides both RFU and BS-SA E1 Telecom interface redundancy support. As shown in Figure 3-7, RFU redundancy is achieved by connecting two RFUs to the IF-MUX 4; BS-SA E1 and management redundancy is achieved by connecting two BS-SAs to an E1 Switch. RFU redundancy information is transmitted by interconnecting the E1 and IF-MUX 4 management connections. Redundancy is enabled through the WALKnet. Figure 3-7. Example of Redundancy Implementation 3-12 3-12 WALKair 3000 System Description Redundancy ODU Redundancy ODU redundancy is implemented by connecting two ODUs (each consisting of an RFU and antenna) to an IF-MUX 4 unit. Switching is done at the output of the IF MUX. Redundancy is enabled or disabled through the WALKnet: • Automatic Redundancy Mode – if air link communication in the entire sector is lost for more than 5 sec, the ODUs are automatically switched and the standby ODU activated. If upon switching, air link communication is still not detected for 5 min, the ODUs are switched again. The procedure is repeated (switching every 5 seconds) until air link communication is detected. • Manual Mode – upon NMS request. The user can manually choose the active RFU. The system will remain in manual mode, that is ODUs will not be automatically switched, until the mode is changed to Automatic. WALKnet alarms - in the event that a redundant BS RFU is activated, all Terminal Stations in its sector will automatically recover and service will be re-established. An alarm is sent to the NMS, indicating that the redundancy was activated. IDU Redundancy IDU redundancy is implemented by connecting the backbone and management connections of two BS-SAs to an E1 Switch and connecting the switch outputs to the backbone. During normal operation, only the Master BS-SA is activated and its interfaces continuously monitored by the IDU through the COM connection. Redundancy is automatically triggered under any of the following conditions: • Communication lost on Eth port for more than 30 sec • Airlinks down for all terminals for more than 2 minutes • Communication of redundant BS-SA with the Master (BS-SA) lost for more than 5 sec In the event that a redundant BS-SA is activated, an alarm is sent to the WALKnet, indicating that IDU redundancy was activated. NOTE: When IDU redundancy is triggered, the switchover to the standby unit is performed. Once the failed BS-SA is replaced, redundancy must be reconfigured through the management. 3-13 Chapter 3-WALKair 3000 Operator Benefits Flowchart of Redundancy Timing The following flowchart shows the timing and conditions for ODU and IDU redundancy switchover. IDU failure Check system status Ethernet port down for more than 30 sec Com to Master BS-SA is lost for more than 5 sec * On condition that system is up for more than 5 minutes All links down* 2 min 5 sec IDU switch over ODU switch over Links are up Replace failed BS-SA Reconfigure redundancy Figure 3-8. Flowchart of Redundancy Timing 3-14 3-14 WALKair 3000 System Description 4 Chapter 4 - WALKair 3000 Services In This Chapter: IP Services over WALKair 3000 on page 4-2. WALKair 3000 and End-to-End QoS on page 4-7. IP Traffic and End-to-End QoS on page 4-13. E1 Services on page 4-16. Chapter 4-WALKair 3000 Services Overview WALKair 3000 provides the following types of services: • IP/Layer 2 services including the full range of data and voice services • TDM services including leased line CBR (AAL1) and legacy telephony services via TDM PCM or serial bit stream traffic (Full leased line or fractional E1). End-to-end QoS is implemented for both IP/Layer 2 and TDM services. IEEE's 802.1Q standard VLAN implementation is used to group clients (networks) belonging to the same TS according to their SLA agreements, optimizing the used bandwidth and providing security between clients. The DiffServ mechanism is used to differentiate between CoS in the SLAs. IP Services over WALKair 3000 WALKair 3000 is specifically designed to deliver end-to-end QoS required for all IP/Layer 2-based applications including fast Internet and voice services. The following sections provide a detailed description of the IP/Layer 2 data service concept of the WALKair 3000 system. In addition, the sections describe the WALKair 3000 IP/Layer 2 and QoS service implementation by explaining the end-to-end IP data flow with its associated QoS. Ethernet Modes in WALKair 3000 • Port Type: Crossed on the TS/ Crossed on the BS • Speed (configurable): 10BaseT/100BaseT • Duplex (configurable): Full/Half duplex • Speed and Duplex Auto-detection (configurable) • Tagging (configurable on TS): Tagged/Untagged on TS, Always tagged on BS 4-2 4-2 WALKair 3000 System Description IP Services over WALKair 3000 Security and VLANs WALKair 3000 uses VLAN 802.1Q mechanism to allocated each client (client) a dedicated VLAN with its associated IP subnet. This establishes complete separation and security established between clients connected to the same TS. Figure 4-1: IP Network Concept IP traffic from the CPE side is mapped from its specific VLAN and IP subnet to a specific IP path toward the backbone, over the airwaves, according the customer SLA, which ensures the required end-to-end QoS. 4-3 Chapter 4-WALKair 3000 Services As illustrate by the following figure, each TS can be configured with up to 16 Service Level Agreements (SLAs) and each client (network) is configured with one of the 16 SLAs configured to the TS. Each SLA in the same TS is associated a different VLAN tag that carries information about the TS ID and VLAN ID. (If there is only one client (network) on a TS, it can work in untagged mode (saving a L2 switch).) Figure 4-2. Configuring SLAs According to VLAN IDs A number of TSs may be configured to common VLAN IDs; however, the TS and BS VLAN ID do not have to be the same. Mapping between the TS and BS VLAN IDs is performed by the WALKaire 3000 system. The SLA definition includes the following information: • Service level attributes – consists of Class of Service (CoS) that defines the number of prioritized queues the client can use, and the required bandwidth characteristics that is defined (defined by CIR and MIR). • Client ID - The customer identification in the associated TS. • Service pipe endpoints – TS ID and TS Port ID to which the client is connected, and the Ethernet port of the BS-SA. • TS VLAN ID - unique VLAN ID (802.1q standard) assigned to each SLA per TS. This value is used by the TS to differentiate traffic belonging to different SLAs. • BS VLAN ID - unique VLAN ID (802.1q standard) per BS, which is used by the BS to differentiate traffic belonging to different SLAs, and to perform the forwarding decision to the proper TS to which the client is connected. 4-4 4-4 WALKair 3000 System Description IP Services over WALKair 3000 IP Flow Mechanism The following description refers to Figure 4-3 and details the traffic flow in the uplink path. In the downlink path, the opposite process occurs. The IP packet from PC1 (towards the air) has an Ethernet MAC address with the Router as the destination, and an IP address with PC2 as the destination. Either PC1, the VLAN switch (shown in the figure) or a router, optionally tags the IP packets with a VLAN tag (with VLAN ID). The TS Ethernet port may be configured as tagged or untagged. Within the WALKair 3000 system (from the TS, over the air link and at the Base Station end), the IP traffic is always tagged. If the TS Ethernet port is configured as untagged, the TS assigns a VLAN tag with TS VLAN ID. If the VLAN ID was attached to the frame before the TS, the TS sends this tag over the air. In either case, this will be the TS VLAN tag. The TS performs Ethernet bridging at Layer 2. Ethernet traffic destined to hosts which the TS recognizes as residing on the local LAN is not forwarded over the air link. Ethernet traffic destined to any host residing beyond the Base Station, such as PC2, is forwarded over the air link. At the Base Station end, the air cells are received by the BS-SA and are reassembled to 802.1q packets, and the VLAN ID is translated into the BS VLAN ID of the SLA. The packet from the Base Station to the Router has its MAC source address = PC1 its IP source address. The Router transmits the packet, over the Backbone to PC2, based on IP routing rules. 4-5 Chapter 4-WALKair 3000 Services Figure 4-3: IP Traffic flow and QoS in WALKair 3000 4-6 WALKair 3000 System Description WALKair 3000 End to End QoS WALKair 3000 End to End QoS Background Different applications (i.e. voice, data, video) have different requirements from the network. For example, while voice and video applications would require a guaranteed bandwidth and do not suffer packet loss, data based applications can retransmit lost packets. While delay affects voice and video applications, it is not significant in data applications. Since IP networks have unexpected dynamic behavior that cause congestions and packet loses, QoS is required for voice and video applications. QoS is provides set of techniques to manage: • Bandwidth - The perceived width of the pipe • Delay - The perceived length of the pipe • Jitter - The perceived variation in the length • Packet Loss - The perceived leak in the pipe A QoS aware network provides pre-negotiated per-hop behavior (bandwidth allocation and/or latency) and enables the network to optimize resources by servicing applications efficiently without affecting function or performance. This is done by allocating bandwidth according to each SLA. At each output port, packets of different priorities are queued at distinct queues, where lower priority packets are served only if all higher priority queues are empty and low latency and jitter is provided for the highest class. The different IP streams received from each client at the TS are classified, prioritized and shaped according the client’s SLA content. The SLA is based on the following parameters: • CIR – Committed Information Rate • MIR - Maximum Information Rate • Up to 4 CoS levels - an aggregate of up to four prioritized queues that can be configured per client. 4-7 4-7 Chapter 4-WALKair 3000 Services QoS Implementation in WALKair 3000 To enforce the client’s SLA, the TS implements the following mechanisms: • Traffic is classified into SLAs according to the 802.1q VLAN tag. • Traffic is policed to conform to the CIR and MIR defined in the customer’s SLA. • Traffic is further classified according to its DiffServ DSCP value, and sent via 1 to 4 prioritized queues. Each queue is assigned a different priority level according to the traffic type: Queue Priority Traffic Type 3 Voice 2 Video 1 Data 0 Data – Best Effort The number of queues is determined by the CoS level defined in the SLA. Refer to Table 4-1 on page 4-9 for the CoS level profiles and their typical traffic characteristics and applications. Packets that are within CIR are directed to the appropriate queue. Priority level 2 and 3 packets that exceed CIR but are within MIR are discarded, while priority 1 packets are directed to queue 0. Packets that exceed the MIR, are discarded. The packet priority level is identified according to DiffServ standard. To maintain required QoS and small constant delay/jitter (for the highest prioritized traffic), traffic is segmented into fixed-size air cells, and a sophisticated priority queuing algorithm is used, interleaving cells of different prioritized queues before sending them over the air. The following figure illustrates and summarizes the mechanisms used to implement QoS in WALKair 3000 (i.e. SLA, policing, priority queuing algorithms and DBA over the air). Figure 4-4: QoS Implementation in WALKair 3000 WALKair 3000 System Description 4-8 WALKair 3000 End to End QoS Class of Service (CoS) Definitions The WALKair 3000 IP service assigns each client an SLA with one of four possible Classes of Service (CoS). The CoS is defined by the number of queues it supports: four queues for the highest (Platinum) CoS and a single queue for the lowest (Bronze) CoS. The queue are of varying priorities in order to optimize resources for various types of applications. The following table summarizes the CoS and queue types. Table 4-1: CoS Level Profiles Class of Service Traffic Characteristics Goal Applications Platinum (4 prioritized queues) Important multimedia Very low latency, B/W guarantee and limit VoIP Gold (3 prioritized queues) Important applications – interactive, transactional. Predictable traffic Low latency, B/W guaranteed Video conferencing, database and financial transactions. Silver (2 prioritized queues) Important applications – interactive, transactional or informational. Less predictable traffic Medium latency, segregated, B/W guaranteed Video on Demand, HTTP traffic, collaborative applications Bronze (Lowest priority queue – Best Effort) Batch applications, long TCP sessions and everything else High latency, acceptable throughput, limited network impact using remaining bandwidth FTP traffic, application replication, data backup, email and all other traffic. 4-9 4-9 Chapter 4-WALKair 3000 Services Examples of IP SLA Scenarios Figure 4-5, Figure 4-6 and Figure 4-7 show three IP SLA example scenarios: • No TS Local Router installed • TS Local Router installed with different subnet • TS Local Router installed with same subnet Figure 4-5: No TS Local Router Installed (example) Figure 4-6: Different Subnet Behind TS Local Router (example) WALKair 3000 System Description 4-10 WALKair 3000 End to End QoS Figure 4-7: Same Subnet Behind TS Local Router (example) Service Definition Structure Each service definition is composed of: • Client parameters - client identification in the associated TS • SLA parameters - Set of SLA parameters agreed upon between the client and the operator. The actual CoS which is provided by the operator • Service properties - To accomplish system end-to-end service definition As detailed in the following table, IP SLA Parameters consist of a database of 16 IP SLA IDs per TS, where each SLA is defined according to the CIR, MIR and CoS level corresponding to the SLA agreed upon between the client and operator. Table 4-2: SLA Parameters: Parameter Description TS ID The identification of a specific TS (1-64) IP SLA ID The IP SLA index identification (1-16) per TS TS and BS VLAN ID VLAN IDs for TS and BS (flexible for Layer 2 operation) CIR Committed Information Rate MIR Maximum Information Rate CoS Levels Bronze, Silver, Gold and Platinum. Client types identified by the number of prioritized queues allocated (1-4) 4-11 4-11 Chapter 4-WALKair 3000 Services As detailed In the following table, IP SLA properties consist of the SLA definitions and configuration for provisioning the required services to the client. Table 4-3: SLA Properties: Parameter Description Client ID The customer identification in the associated TS IP SLA ID The IP SLA index identification assigned to each client per TS TS Port ID The number of the physical Ethernet 10/100 BaseT port of the associated TS VLAN ID Each SLA is assigned a unique VLAN ID (802.1Q standard), which is used as the mapping identification for the service (flexible for Layer 2 operation) Service Hierarchy Structure Per TS Each TS can support up to 64 clients (networks), where each client is identified by an index ID and a logical name. Thirty-two different SLAs are available: 16 IP SLA/Data service pipes and 16 Leased-Line/TDM SLAs. Each TS supports up to 16 SLAs and each client is associated with one of the available SLAs. To provision a service an SLA is assigned to a specific client residing on a Terminal Station and associated with a specific VLAN. Figure 4-8: Service Hierarchy Per TS WALKair 3000 System Description 4-12 IP Traffic and End-to-End QoS DBA QoS over the Air WALKair 3000 utilizes Dynamic Bandwidth Allocation (DBA) to effectively meet the demands of bursty IP traffic and concentrate the traffic over the available bandwidth. Dynamic bandwidth allocation is performed simultaneously for all of the services associated with the TSs (up to 64) per carrier. DBA characteristics are: • Air bandwidth (34 Mbps) allocation per client on a specific TS changes dynamically. • DBA is based on the actual traffic rate as defined in the SLAs per TS and its clients. • DBA ensures a fair bandwidth share to all clients on the various TSs, based on their service attributes and their SLAs. • Unused MIR, CIR bandwidth is shared among active clients that are assigned to the same carrier. In this scenario, bandwidth granularity is 256Kbps. • Different IP packet lengths ranging from 64 to 1518 Bytes, is fragmented to a fixed air cell size. Cell switching is performed over the air. • To maintain deterministic delay/jitter for the highest prioritized traffic (VoIP) and to keep the required QoS over the air, the following mechanisms are implemented: The DBA per client and TS is performed according to the actual required CIR and MIR as derived from the active SLAs. The packets are segmented to a fixed air cell size. The cells from the different prioritized queues are interleaved before being sent over the air. This is done to ensure that the cells that are arriving from the higher prioritized queues are sent first. In this way, the sophisticated priority queuing algorithm is implemented. IP Traffic and End-to-End QoS In order to provide enhanced IP services all the network should support QoS and the IP backbone should support DiffServ standard. The IP traffic, with its QoS (DiffServ), is forwarded from the BS-SA, via its Ethernet port, directly to the IP backbone. All IP routers at the backbone use the DiffServ information carried by each IP packet to allocate the backbone bandwidth resources while maintaining the required end-to-end QoS. 4-13 4-13 Chapter 4-WALKair 3000 Services Figure 4-9. QoS Implementation in WALKair 3000 Description of End-to-End QoS The following section comprises a detailed step-by-step description of the uplink and downlink IP Traffic and QoS flows, as shown in Figure 4-10. Figure 4-10: IP Traffic and QoS Flow In the Uplink Path: 1. Each client is associated with a unique VLAN with a unique IP subnet within one carrier. The client’s users are connected to the TS Ethernet port via an L2 switch or IP router. WALKair 3000 System Description 4-14 IP Traffic and End-to-End QoS Each client is assigned a specific SLA which reflects the client bandwidth and CoS requirements. The SLA properties are derived from the traffic stream types, bandwidth and CoS level that is needed for the applications used by the client. 2. The client’s VLAN ID is configurable. The client’s VLAN ID tag is unique within the same carrier and serves to identify the client for all forwarding decisions made within the system. The IP packets can be tagged by the client’s hosts or by the TS itself. Therefore, the TS Ethernet port has to be configured to tagged or untagged mode, as required. Figure 4-11: IP Flow NOTE: Referring to the above figure, the first number in brackets after VLAN refers to the TS ID, and the second number refers to the SLA ID. 3. The TS performs the forwarding/filtering decisions, which means that the router spoofing functionality is implemented, as follows: Local IP traffic is filtered. Local host MAC addresses and their associated IP addresses are stored in the TS ARP/LAN tables, along with an indication of which TS port is associated with the client. Non-local IP traffic, is forwarded to the backbone. 4-15 4-15 Chapter 4-WALKair 3000 Services To enforce the client’s SLA, the TS implements the following mechanisms: Policing on the customer’s IP flows in accordance with the MIR and CIR in the customer’s SLA. Classifying the IP traffic by its DiffServ prioritizing the IP traffic to up to 4 prioritized queues, depending on the CoS level, as configured in the client’s SLA. 4. To maintain the required QoS over the air to maintain a constant delay/jitter for the highest prioritized traffic type, the following mechanisms are implemented: Segmentation Sophisticated Priority Queuing Algorithm DBA per client and TS is performed according to the actual required CIR and MIR as derived from the active SLAs. The IP traffic cells are attached over the air by the 3000 Air Header (~2 Bytes) that includes the VLAN ID and packet priority for further forwarding decisions within the BS-SA. In addition, the overhead contains cell order information so that the fragmented IP packet can be reassembled at the BS. 5. Each TS sends its IP data to the BS in a bursty fashion. The bursts are arranged in successive order according to the TS IDs, which range from 1 up to 64 per carrier. The air frame structure carries the following information: Link synchronization DBA mechanism Payload - data cells 6. The air cells are received at the BS-SA and reassembled to IP packets, while the 3000 Air Header is detached. In the Downlink Path: The BS-SA forwards the IP string coming from the backbone to the appropriate TS according to the VLAN BS-SA performs policing, classification and prioritizing functions on the IP traffic flows, similar to those described in step 3. E1 Services E1 is a European digital transmission format devised by the ITU-T and given the name CEPT. The E1 signal format carries data at a rate of 2.048 million bits per second and can carry 32 channels of 64 Kbps each. E1 is a full duplex standard. WALKair 3000 System Description 4-16 E1 Services Leased Line Services (SDH/PDH Backbone) The E1 service supports TDM traffic flows from the Base Station to the Terminal Stations. The BS-SA card maps the E1 channels to Air Time Slots and then the data sent over the air to the TS. The data is then sent over the air to the TS. Each Terminal Station receives the data broadcast transmission of the BS BU. It selects the corresponding Air Time Slots using the framer and passes the traffic to E1 ports. In the Uplink, the Terminal Station receives the traffic over the E1 port and send it to BS over the air. The BU at the Base Station sends the traffic to the E1 card. Figure 4-12. WALKair 3000 Leased Line Services TDM Clock TDM services require clock synchronization. To meet these requirements, all the BS-SA units must be synchronized on one clock source. WALKair 3000 provides Primary and Secondary clock source configuration options. The clock source can be internal clock, or external clock from an E1 port. The TSs receive the clock from the BS via the air link. 4-17 4-17 Chapter 4-WALKair 3000 Services E1 Modes in WALKair 3000 • Framed – No CRC. (Synchronization on double-frame, doesn’t require synchronization on multi-frame) • Framed – CRC. Requires synchronization on mutliframe • Framed – CRC extended. Attempt to synchronize on multi-frame;if failed - attempt to synchronize on double-frame • Unframed. Doesn’t synchronize on time slot 0, synchronizes on clock only. Handles data as continuous 2048Mbps bit stream. E1 Alarms Loss Of Signal LOS Loss Of Frame Alignment LOF Loss Of Multi-Frame Alignment LOMF Alarm Indication Signal (All ‘1’s) AIS Remote Alarm Indication RAI WALKair 3000 System Description 4-18 5 Chapter 5 - Specifications In This Chapter: General specifications of the WALKair 3000 system Specifications of each of the main devices in the WALKair 3000 system. For example, E1, IF-MUX 4, etc. Chapter 5-Specifications WALKair 3000 General Specifications Table 5-1: WALKair 3000 General Specifications Parameter Value ETSI Standards --ETSI TM4 (EN 301 021) --ETSI TM4/2 CEPT/ERC Rec. 14-03 10.5 GHz ETSI ▪ Uplink (TS TX): 10.500250 – 10.649875 GHz ▪ Downlink (BS TX): 10.150250 – 10.299875 GHz 10.5 GHz CEPT ▪ Uplink (TS TX): 10.500500– 10.650000 GHz ▪ Downlink (BS TX): 10.150500 – 10.300000GHz CEPT/ERC T/R 13-02 Annex B 26 GHz --Uplink (TS TX): 25.557 - 26.453GHz --Downlink (BS TX): 24.549 - 25.445GHz 28 GHz --Uplink (TS TX): 28.5565 – 29.4525 GHz --Downlink (BS TX): 27.5485-28.4445 GHz Chinese RF Band Uplink (TS TX): 25,869 - 26,653GHz Downlink (BS TX): 24,619 - 25,403GHz Radio: --General: EN301213-1 (EN 301 021 26GHz) --TDMA: EN301213-3 --Antenna: EN301215-1, EN301215-2 Environmental: --ODU complies with class 4.1E as per ETS 300 019-2-4. --IDU complies with class 3.2 as per ETS 300 019-2-3. Safety: EN 60950:1992 + A1: 1993 + A2: 1993 +A3: 1995+A4: 1997 standard requirements for compliance with Low voltage Directive 72/73/EEC. Harmonics and Flicker: --EN61000-3-2 “Limits of Harmonic Current Emissions (equipment input current <16 A per phase)” --EN61000-3-3 “Limits of Voltage Fluctuations and WALKair 3000 System Description 5-2 WALKair 3000 General Specifications Table 5-1: WALKair 3000 General Specifications Parameter Value Flicker in Low-Voltage Supply Systems for Equipment with Rated Current <16 A” EMC ▪ EN 300 386-2:1997 (EMC Directive 89/336/EEC): ▪ EN 300 385:1998 ▪ EN 300 132:1996 ▪ EN 310 021:1998. Alvarion products with the CE marking comply with the EMC Directive (89/336/EEC). Compliance with this directive implies conformity to the following European Norms: ▪ EN 55022 “Limits and Methods of Measurement of Radio Interference Characteristics of Information Technology Equipment”. Tested to Equipment Class A. ▪ EN 50082-1: 1997 “Electromagnetic Compatibility—Generic Immunity Standard, Part 1, Residential, Commercial, and Light Industry”. Lightning Protection: --EN 61000-4-5 and ETS 300381-1 for outdoor and indoor components --ENV 50142 AC port FCC Class A: WALKair 3000 equipment has been tested and found to comply with the limits for a Class A digital device, pursuant to part 15 of the FCC Rules. These limits are designed to provide reasonable protection against harmful interference when the equipment is operated in a commercial environment. This equipment generates, uses, and can radiate radio frequency energy, and if not installed and used in accordance with the instruction guide, may cause harmful interference to radio communications. Operation of this equipment in a residential area is likely to cause harmful interference, in which case the user will be required to correct the interference at his own expense. Changes or modifications not expressly approved by Alvarion could void the user’s authority to operate the equipment. Use only shielded cables when connecting peripherals to assure that appropriate radio frequency emissions compliance is maintained. 5-3 Chapter 5-Specifications Table 5-1: WALKair 3000 General Specifications Parameter Value Radio Access Method TDMA/FDD Modulation and Coding Technique Dual modulation: 16QAM/QPSK @ Reed Solomon FEC Net Payload 64Kbps to 34 Mbps/16 Mbps down for 16QAM/QPSK per Single User Carrier Bandwidth 14, 7 and 3.5 MHz NOTE: 3.5 MHz bandwidth is supported only for 10.5 GHz band and requires different hardware to be implemented. Channel Spacing 14Mhz channel according to T/R 13-02 Annex B. 10.5 GHz The system supports center frequency resolution of 875kHz 26 GHz The system supports center frequency resolution of 875kHz if it can fit in the RF heads (112MHz x 8 RF heads). 28 GHz The system supports center frequency resolution of 1750 kHz if it can fit in the RF heads (224 MHz x 4 RF heads). Frequency sub-bands 10.5 GHz -- FDD Separation: 350 MHz 26 GHz --112 MHz x 8 RF heads. Sub-band edges on 112 boundaries according to T/R 13-02 Annex B and Chinese bands --FDD separation: 1008MHz according to T/R 13-02 Annex B or 1250MHz in China 28 GHz --224 MHz x 4 RF heads. Sub-band edges on 224 boundaries according to T/R 13-02 Annex B FDD separation: 1008MHz according to T/R 13-02 Annex B Spectral Efficiency --2.5bit/sec/Hz @ 16QAM --1.15bit/sec.Hz @ QPSK Sector Coverage From 50 meters to 10 kilometers depending on the f WALKair 3000 System Description 5-4 WALKair 3000 General Specifications Table 5-1: WALKair 3000 General Specifications Parameter Value frequency Carriers per Sector --1 to 4 carriers @ 1 RFU ODU --Up to 8 carriers @ 2 RFU Carrier Capacity At 14 MHz: ▪ 34 Mbps/16 Mbps for 16 QAM/QPSK. ▪ Terminal Station capacity of 64 Kbps to 34 Mbps/16 Mbps for 16 QAM/QPSK. At 7 MHz: ▪ 16 Mbps/8 Mbps for 16 QAM/QPSK. ▪ Terminal Station capacity of 64 Kbps to 16 Mbps/8 Mbps for 16 QAM/QPSK. At 3.5 MHz : ▪ 8 Mbps/4 Mbps for 16 QAM/QPSK. Terminal Station capacity of 64 Kbps to 4 Mbps/8 Mbps for 16 QAM/QPSK. Frequency Bands and sectors ▪ 10.5 GHz with 60º and 90º sectors ▪ 26 GHz with 45º ,90 and 180º sectors 28 GHz with 45º, 90º and 180º sectors Interfaces Base Station (network side): ▪ Ethernet 10/100 Base T for an IP/Layer 2 backbone ▪ Up to 8 x E1 for an E1 SDH backbone Terminal Station side: ▪ 2 x Ethernet 10/100 Base T ports ▪ Quad E1 Telecom modules - Optional 4 or 8 E1 ports (8 x E1 Telecom module to support 16xE1 per BS-SA is planned for the year 2005) Data rate For 14 MHz channels - up to 34 Mbps (upstream and downstream) per Terminal Station (10.5/26/28 GHz) For 7 MHz channels - up to 16.384 Mbps (upstream and downstream) per Terminal Station (10.5/26/28 GHz) For 3.5 MHz channels - up to 8.192 Mbps (upstream and downstream) per Terminal Station 5-5 Chapter 5-Specifications Number of Terminal Stations per Sector Up to 240 System Capacity per Base Sector --Up to 272 Mbps (8x34 Mbps) @ 112MHz allocation --Up to 408 Mbps (12x34 Mbps) @ 168MHz allocation System Capacity per Base Station --2176Mbps (64x34 Mbps) @ 112MHz allocation Supported Distance --10.5 GHz: up to 10 km at line of sight for 16QAM/QPSK --3264Mbps (96x34 Mbps) @ 168MHz allocation --26 GHz: 3km/5km at line of sight for 16QAM/QPSK --28 GHz: 3km/5km at line of sight for 16QAM/QPSK MBTF --The MTBF of the WALKair 3000 (IDU and ODU) is 200,000 hours (about 25 years). WALKair 3000 System Description 5-6 Base Station Specifications Base Station Specifications General Table 5-2: Base Station General Specifications Parameter BS-SA Value Dimensions: --Width (mm): 220 --Height (mm): 44.5 --Length (mm): 350 --Input Voltage: 48 VDC Antenna (ODU) 26 GHz --Standards: complies with EN 301 215-1 and EN 301 215-2, Type CS1 --Type: Horn antenna --Dimensions (mm): 287x235x40 --Weight (kg): 2.25 --Beamwidth: 450 ( vertical or horizontal) --Beamwidth: 900 ( vertical or horizontal) --Beamwidth: 1800 ( vertical or horizontal) RFU (ODU) 26 GHz --Revision: Rev A --Dimensions (mm): 220 x 270 x 100 --Weight (kg): 7.0 Antenna (ODU) 28 GHz Dimensions (inches) = (18 x 3.5 x 3.5) + (16.5 x 6.25 x 0.55) --Weight (kg): 2.25. --Beamwidth: 450 ( vertical or horizontal) --Beamwidth: 900 or 1800 (vertical or horizontal) RFU (ODU) 28 GHz Dimensions (inches) 6.25 x 16.5 x 1.625 RFU + Antenna (ODU) 28 GHz Weight of RFU/Antenna/Mounting Bracket assembly combined (kg) = 13.2 5-7 Chapter 5-Specifications Table 5-2: Base Station General Specifications Parameter Value Antenna 10.5 GHz Dimensions (mm): 60 º Vertical - 440 x 290 x 150 60 º Horizontal - 440 x 290 x 130 90 º Vertical and Horizontal - 320x100x15 Weight (kg): 60 º (Vertical and Horizontal) = 2.5 Kg 90 º (Vertical and Horizontal) = 1.6 Kg RFU (ODU) 10.5 GHz --NJRC Rev C Dimensions (mm): --3325x270x156 Weight (kg): 10.1 (including mounting kit) BS-SA Specifications Table 5-3: BS-SA Specifications Parameter Value Frequency Bands and sectors: 10.5 GHz with 60º and 90º sectors 26 GHz with 45º , 90º and 180º sectors 28 GHz with 45º, 90º and 180º sectors. Interface – Base Station (network side): Ethernet 10/100 Base T for an IP/Layer 2 backbone Interface – Terminal Station: 2 x Ethernet 10/100 Base T ports Up to 8 x E1 for an E1 SDH backbone Optional 4 or 8 E1 ports (Quad E1 Telecom modules) 8 E1 is planned for the year 2005. Polarization: Up to 4:1 frequency re-use with single and dual polarization Channel spacing: 14 MHz per carrier 7 MHz per carrier (planned for future) 3.5 MHz per carrier (planned for future) Spectral efficiency: Maximal - 2.5 bits/s/Hz. Modulation Scheme: Adaptive and manual dual modulation scheme (16 QAM/QPSK)/Terminal Station Access method: FDD TDMA access method supporting up to 30 Terminal Stations per carrier WALKair 3000 System Description 5-8 Base Station Specifications Table 5-3: BS-SA Specifications Parameter Value Carrier capacity: @ 14 MHz: ▪ 34 Mbps/16 Mbps for 16 QAM/QPSK. ▪ Terminal Station capacity of 64 Kbps to 34 Mbps/16 Mbps for 16 QAM/QPSK. @ 7 MHz (planned for future): ▪ 16 Mbps/8 Mbps for 16 QAM/QPSK. ▪ Terminal Station capacity of 64 Kbps to 16 Mbps/8 Mbps for 16 QAM/QPSK. @ 3.5 MHz (planned for future): ▪ 8 Mbps/4 Mbps for 16 QAM/QPSK. ▪ Terminal Station capacity of 64 Kbps to 8 Mbps/4 Mbps for 16 QAM/QPSK. Sector capacity: Up to 136 Mbps per sector (four carriers, implemented using IF-MUX 4) Table 5-4: BS-SA Services and Interfaces Parameter Value Services: TDM/Leased Lines IP/Layer 2 Interface - Network side: 4 or 8 E1 lines for an E1/SDH backbone Ethernet 10/100 Base T for an IP/Layer 2 backbone. Interface - RF: Supports up to 2 x BS RFUs with DE-MUX for a single sector 5-9 Chapter 5-Specifications Base Station Radio Frequencies @ 10.5 GHz Table 5-5: Base Station Radio Frequencies @ 10.5 GHz Parameter Value Guiding Standard TBD Frequency Band Downlink Uplink 10.5 GHz Etsi 10150.25 to 10299.875 10500.25 to 10649.875 10.5 GHz CEPT 10150.50 to 10300.00 10500.50 to 10650.00 Output Power Nominal 22dBm per carrier Receive Sensitivity @ 14MHZ channel -87dBm (@ BER 10-9) for QPSK -81dBM (@ BER 10-9) for QAM 16 RF Bandwidth 3.5 MHz, 7 MHz, 14 MHz, FDD Separation 350MHz Antenna Coverage 60˚, 90˚ sectors Vertical and Horizontal Antenna Size See Antenna 10.5 GHz on page 5-8 Antenna Gain 18dBi (60˚), 15dBi (90˚) Standard Compliance ETSI EN 301 021 WALKair 3000 System Description 5-10 Base Station Specifications Base Station Radio Frequencies @ 26GHz Table 5-6: Base Station Radio Frequencies 26 GHz Parameter Value Guiding Standard T/R 13-02 Frequency Band Downlink Uplink Band Band Band Band Band Band Band Band 25557 to 25669MHz 25669 to 25781MHz 25781 to 25893MHz 25893 to 26005MHz 26005 to 26007MHz 26117to 26229MHz 26229 to 26341MHz 26341 to 26453MHz Chinese Frequency Bands A: 24549 to 24661 B: 24661 to 24773 C: 24773 to 24885 D: 24885 to 24997 E: 24997 to 25109 F: 25109 to 25221 G: 25221 to 25333 H: 25333 to 25445 Downlink Uplink Band Band Band Band Band Band Band Band 24619 24731 24843 24955 25067 25179 25291 25347 A1: 25869 to 25981 B1: 25981 to 26093 A2: 26093 to 26205 A3: 26205 to 26317 B2: 26317 to 26429 C1: 26429 to 26485 C3: 26541 to 26597 C4: 26597 to 26653 to to to to to to to to 24731MHz 24843MHz 24955MHz 25067MHz 25179MHz 25235MHz 25347MHz 25403MHz Output Power Up to 15dBm per carrier Receive Sensitivity -83.3dBm (@ BER 10-9) for QPSK -77dBM (@ BER 10-9) for QAM 16 RF Bandwidth Multiple 14MHz (1 to 4) Antenna Coverage 4, 8 sectors Antenna Size 20cm diameter horn Antenna Gain 18dBi (45˚), 15.5dBi (90˚),18 dBi (180˚) Standard Compliance EN 301 215-1 and EN 301 215-2, Type CS1 5-11 Chapter 5-Specifications Base Station Radio Frequencies @ 28GHz Table 5-7: Base Station Radio Frequencies 28 GHz Parameter Value Guiding Standard T/R 13-02 Frequency Band Transmit, MHz Receive, MHz A 27548.5 to 27772.5 28556.5 to 28780.5 B 27772.5 to 27996.5 28780.5 to 29004.5 C 27996.5 to 28220.5 29004.5 to 29228.5 D 28220.5 to 28444.5 29228.5 to 29452.5 Output Power Up to 21dBm per carrier Receive Sensitivity -81dBm (@ BER 10-9) for QPSK -75dBm (@ BER 10-9) for QAM 16 RF Bandwidth Multiple 14MHz (1 to 6) Antenna Coverage 45˚, 90˚, 180˚ sectors Antenna Size 45x8.75x8.75cm3 Antenna Gain 24dBi (45˚), 21dBi (90˚), 19dBi (180˚) Standard Compliance EN 301 215-1 and EN 301 215-2, Type CS1 WALKair 3000 System Description 5-12 Additional BS Devices Specifications Additional BS Devices Specifications E1 Switch Specifications Capabilities Redundancy between two BS-SAs, where redundancy is applied to the following elements of each BS-SA: ▪ 16 E1 lines of each BS-SA ▪ BS-SA to IF-MUX 4 communication channel ▪ Reference clock ‘Keep alive’ – messaging mechanism relays specific messages to the standby BS-SA as backup to the Ethernet channel. Interfaces ▪ Input power is 48V input (nominal). ▪ 16 primary 120 Ohm E1 interfaces on two D-sub HD 44pin, one of the connectors includes also reference input clock – connectors are indicated as A ▪ 16 secondary 120 Ohm E1 interfaces on two D-sub HD 44pin, one of the connectors includes also reference input clock – connectors are indicated as B ▪ 16 Network 120ohm E1 interfaces on two D-sub HD 44pin, one of the connectors includes also reference input clock – – connectors are indicated as Network (The switch is from the Network port to the primary or the secondary) ▪ Three RJ45 ports are used for RS232 communication between the two BS-SAs and the IF-MUX 4 ▪ Reference clock input and output. Output clock is derived directly from Input clock LEDs Two bi-color LED’s on the front panel: Status A LED: ▪ Red – No Master message received for 30 sec. ▪ Green – BUSA A is master Status B LED: ▪ Red – No Master message received for 30 sec. ▪ Green – BUSA B is master Connections BS-SA connections - the E1-Switch connects two BS-SAs through 2 8xE1 cables and one RS232 for LCI (per BS-SA). IF-MUX 4 connections – the IF-Mux 4 Ports is connected to the E1-Switch by using a RS232 cable. Network connections – E1 is connected to the network, using two 8xE1 cables and clock in/out for system sync. Environment ▪ Indoor installation (-5o C to 45o C). EMC & Safety ▪ EN60950 EN :1,2,3,4 - safety 5-13 Chapter 5-Specifications standards Mechanics ▪ EN 300386-2 - CE standard. ▪ EN61000-4-1/2/3/4/5 - ESD/EFT/Surges/immunity ▪ ETS300019 - Environmental ▪ Enclosure: ‘Pizza’ box (1U). ▪ All connectors, except 48V inlet, are located on the front panel. ▪ 48V inlet is located on the rear panel. WALKair 3000 System Description 5-14 Terminal Station Specifications Terminal Station Specifications General Table 5-8: Terminal Station General Specifications Parameter Terminal Station (IDU) Value Dimensions: --Width (mm): 220 --Height (mm): 44.5 --Length (mm): 350 Input Voltage: 110/220 VAC or 48 VDC RFU + Antenna (ODU) 10 GHz Antenna (ODU) 26 GHz Dimensions (mm) 260x260x80 Weight (kg): 4.3: Antenna Beam Width: 8º vertical and horizontal --Standards: Complies with EN 301-215-1 and EN 301-215-2, type TS1. --Type: Dish antenna --Dimensions (cm): Standard – 30.5 diameter --Dimensions (cm): High Gain – 61 diameter --Weight (kg): Standard – 7.7 including mount --Weight (kg): High Gain – 12.3 including mount --Polarization: vertical or horizontal RFU (ODU) --Dimensions (mm): 287 x 220 x 90 26 GHz --Weight (kg): 5.8 Kg RFU and Antenna (ODU) --RFU Body (mm): diameter: 82.5, depth: 128 28 GHz --RFU Plate (mm) 205 x 205 --RFU Bracket (mm) 330 x 220 --Dish antenna (cm): 30.5/45.7/61 diameter --Weight of RFU/antenna/mounting bracket combined (kg) = 10.2 (for 30.5 cm antenna) 5-15 Chapter 5-Specifications TS Radio Frequencies @ 10.5 GHz Table 5-9: Terminal Station Radio Frequencies @ 10.5 GHz Parameter Value Guiding Standard TBD Frequency Band Downlink Uplink 10.5 GHz Etsi 10150.25 to 10299.875 10500.25 to 10649.875 10.5 GHz CEPT 10150.50 to 10300.00 10500.50 to 10650.00 Output Power +22dBm for QPSK +20dBm for QAM Receiver Sensitivity @ 14MHZ channel -87dBm (@ BER 10-9) for QPSK -81dBM (@ BER 10-9) for QAM 16 RF Bandwidth 14MHz, 7MHz, 3.5 MHz FDD Separation 350MHz Antenna Size •Integrated RFU & Antenna: 25 x 25 x 3 cm • Flat Microstrip Antenna Antenna Beam Width 8˚ vertical and horizontal Antenna Gain 25dBi Standard Compliance ETSI EN 301 021 WALKair 3000 System Description 5-16 Terminal Station Specifications TS Radio Frequencies @ 26 GHz Table 5-10: Terminal Station Radio Frequencies 26 GHz Parameter Value Guiding Standard T/R 13-02 Frequency Band Downlink Uplink Band Band Band Band Band Band Band Band 24549 24661 24773 24885 24997 25109 25221 25333 A: 25557 to 25669 B: 25669 to 25781 C: 25781 to 25893 D: 25893 to 26005 E: 26005 to 26007 F: 26117to 26229 G: 26229 to 26341 H: 26341 to 26453 to to to to to to to to 24661MHz 24773MHz 24885MHz 24997MHz 25109MHz 25221MHz 25333MHz 25445MHz to to to to to to to to 25981MHz 26093MHz 26205MHz 26317MHz 26429MHz 26485MHz 26597MHz 26653MHz Chinese Frequency Bands Downlink Uplink Band Band Band Band Band Band Band Band 25869 25981 26093 26205 26317 26429 26541 26597 Output Power Dynamic range -20dBm to +15dBm for QPSK Dynamic range -14dBm to +13dBm for QAM Receiver Sensitivity -83.3dBm (@ BER 10-9) for QPSK -77dBM (@ BER 10-9) for QAM 16 @14MHZ channel A1: 24619 to 24731 B1: 24731 to 24843 A2: 24843 to 24955 A3: 24955 to 25067 B2: 25067 to 25179 C1: 25179 to 25235 C3: 25291 to 25347 C4: 25347 to 25403 RF Bandwidth 14MHz, 7MHz Antenna Beam Width 2.5˚ vertical and horizontal Antenna Gain 35dBi, 41dBi Standard Compliance EN 301 215-1 and EN 301 215-2, Type TS1 5-17 Chapter 5-Specifications TS Radio Frequencies @ 28 GHz Table 5-11: Terminal Station Radio Frequencies 28 GHz Parameter Value Guiding Standard T/R 13-02 Frequency Band Transmit, MHz Receive, MHz A planned for the future 28556.5 to 28780.5 27548.5 to 27772.5 28780.5 to 29004.5 27772.5 to 27996.5 29004.5 to 29228.5 27996.5 to 28220.5 29228.5 to 29452.5 28220.5 to 28444.5 B planned for the future C D Output Power Dynamic range -35dBm to +15dBm for QPSK Dynamic range -35dBm to +13dBm for QAM Receiver Sensitivity -82dBm (@ BER 10-9) for QPSK -75dBm (@ BER 10-9) for QAM @14MHZ channel RF Bandwidth 14MHz Antenna Beam Width 1.2˚ to 2.5˚ vertical and horizontal Antenna Gain 34 / 37 / 40 dBi Standard Compliance EN 301 215-1 and EN 301 215-2, Type TS2 WALKair 3000 System Description 5-18 BS Antennas BS Antennas 10.5 GHz 60 º Sector Vertical or Horizontal Antenna The antenna is of the sector type covering an angular area. Up to eight sectors can be serviced by a single BS site using an RFU-antenna couple for each sector. Figure 5-1 and Figure 5-2 below show two views of a 10.5 GHz 60º Vertical or Horizontal sector antenna. Figure 5-1: BS 10.5 GHz 60º V or H Sector Antenna (top) Figure 5-2: BS 10.5 GHz 60º V or H Antenna (bottom)- Vertical shown 5-19 Chapter 5-Specifications 10.5 GHz 90 º Sector Horizontal Antenna The antenna is of the sector type covering an angular area. Up to eight sectors can be serviced by a single BS site using an RFU-antenna couple for each sector. Figure 5-3. 10.5 GHz 90 º Sector Horizontal Antenna WALKair 3000 System Description 5-20 BS Antennas 10.5 GHz 90 º Sector Vertical Antenna Figure 5-4 and Figure 5-5 below show two views of a 10.5 GHz 90º vertical sector antenna. Figure 5-4: BS 10.5 GHz 90º Vertical Sector Antenna (top) Figure 5-5: BS 10.5 GHz 90º Vertical Sector Antenna (bottom) 5-21 Chapter 5-Specifications 26 GHz Base Station Outdoor Unit See also Base Station, on page 5-7, for Base Station specifications. The BS 26 GHz ODU consists of the Radio Frequency Up/Down converter, to which a horn antenna is attached (see Figure 5-6). NOTE: Two types of antennas are available: horn antenna and integrated. Note that the horn antenna protrudes more than the integrated antenna. Figure 5-6: 26 GHz BS ODU with Horn antenna (left) and Integrated antenna (right) 28 GHz Base Station Outdoor Unit See also Base Station, on page 5-7, for Base Station specifications. Figure 5-8 shows side/bottom views of the 28 GHz Base Station ODU. lists cables and connections. WALKair 3000 System Description 5-22 BS Antennas Figure 5-7: : BS 28 GHz ODU – Side and Bottom Views 5-23 Chapter 5-Specifications Terminal Station Indoor Unit Terminal Station Rear Panel Figure 5-8: TS-BU Rear Panel (110/220 VAC option) Figure 5-9: TS-BU Rear Panel (48 VDC option) Table 5-12: Terminal Station LED Indicators LED Location Function PWR (Power) Front Panel Power indicator ETH (Ethernet) Front Panel Ethernet (on-board) interface status EXT (External) Front Panel Outdoor equipment status INT (Internal) Front Panel Indoor equipment status Telecom Interface (port) Front Panel (1 per interface) Interface status NOTE: TS IDU Pin-outs are described in WALKair3000 Installation, Appendix B. WALKair 3000 System Description 5-24 BS Antennas Terminal Station Outdoor Unit The following outdoor units are described: • 10.5 GHz Terminal Station Outdoor Unit • 26 GHz Terminal Station Outdoor Unit • 28 GHz Terminal Station Outdoor Unit 10.5 GHz Terminal Station Outdoor Unit Figure 5-11 below shows a view of the 10.5 GHz Terminal Station Outdoor Unit. Figure 5-10: 10.5 GHz Terminal Station Outdoor Unit 5-25 Chapter 5-Specifications 26 GHz Terminal Station Outdoor Unit See also Terminal Station, on page 5-13, for Terminal Station specifications. The TS ODU is located on a pole, where it has a clear line of sight to the BS ODU associated with the respective sector. It consists of the Radio Frequency Up/Down-converter, to which a directional dish antenna is attached (see Figure 5-12). Figure 5-11: TS ODU General View WALKair 3000 System Description 5-26 BS Antennas 28 GHz Terminal Station Outdoor Unit See also Terminal Station, on page 5-13, for Terminal Station specifications. Figure 5-12: TS ODU 28 GHz – Side View 5-27 WALKair™ 3000 Installation Guide Safety and Environment Requirements WALKair 3000 Installation Guide ii About This Guide The WALKair 3000 Installation Guide provides instructions for the personnel who are responsible for the correct installation of the WALKair 3000 Base Station and Terminal Station equipment. The technical engineer should work according to the workflow presented in this guide (in Chapter 1 - Figure 1-2). Please note that the the WALKair 3000 Site Survey Report is contained in Appendix A, and that the WALkair 3000 equipment pin-outs are listed in Appendix B. About This Guide This page is left intentionally blank. WALKair 3000 Installation Guide iv Contents Chapter 1 - General Installation Instructions ..................1-1 Safety and Environment Requirements .................................................... 1-2 Environmental Requirements ..................................................................... 1-2 Equipment Handling Cautions.................................................................... 1-2 Additional Safety Requirements .................................................................. 1-3 Power and Ground Connection Warnings.................................................... 1-3 General Safety Summary ............................................................................ 1-4 Installation Process Overview ................................................................... 1-5 Chapter 2 - Site Survey and Preparation..........................2-1 Site Survey ............................................................................................... 2-2 Radio Survey .............................................................................................. 2-2 IF Survey .................................................................................................... 2-4 LOS Evaluations......................................................................................... 2-7 Site Preparation...................................................................................... 2-11 Antenna Mast ........................................................................................... 2-12 IF Cable Installation ................................................................................. 2-13 Rack Preparation ...................................................................................... 2-17 Power Distribution and Characteristics..................................................... 2-18 Cable Preparation ..................................................................................... 2-19 Chapter 3 - 10.5 GHz Base Station ODU Installation........3-1 General Guidelines.................................................................................... 3-2 RFU Views and Specifications................................................................... 3-6 Installation Procedure .............................................................................. 3-7 Installation Requirements........................................................................... 3-7 RFU Cable Connections Summary .............................................................. 3-7 Mounting the 10.5 NJRC GHz RFU ............................................................. 3-8 Installing the 10.5 GHz Base Station Antenna .......................................... 3-11 Aligning the Base Station Antenna Using a Compass................................ 3-18 Contents Chapter 4 - 26 GHz Base Station ODU Installation .......... 4-1 General Guidelines....................................................................................4-2 Installation Procedure...............................................................................4-5 Installation Requirements ...........................................................................4-5 Installing the 26 GHz ODU on a Mast..........................................................4-5 Connecting the Cables ..............................................................................4-17 Chapter 5 - 28 GHz Base Station ODU Installation .......... 5-1 General Guidelines....................................................................................5-2 Installation Procedure...............................................................................5-5 Tools Required for Installation.....................................................................5-5 BS-RFU Management Software and Hardware.............................................5-5 Mounting BS 28 GHz ODU on a Mast.........................................................5-6 Installing the Mounting Brackets ................................................................5-7 Setting the Azimuth ....................................................................................5-9 Assembling the 28 GHz BS ODU .................................................................5-9 Adjusting the Elevation .............................................................................5-10 Configuring RF Gain Using Optional BS-RFU Management Software.........5-11 Connecting the Cables ..............................................................................5-15 Chapter 6 - Base Station IDU Installation ....................... 6-1 Overview ...................................................................................................6-2 BS-SA Description.....................................................................................6-2 Views, LEDs and Connections .....................................................................6-3 Ground and Power Connections ..................................................................6-6 Mounting the BS-SA....................................................................................6-6 Descriptions of Additional Devices............................................................6-9 IF-MUX II ....................................................................................................6-9 2-Port Power Feeder ..................................................................................6-10 IF-MUX 4 ..................................................................................................6-11 E1 Switch .................................................................................................6-13 Connections for Various Configurations..................................................6-16 General Instructions .................................................................................6-16 One Carrier per Sector ..............................................................................6-16 Two Carriers per Sector.............................................................................6-17 Up to Four Carriers (BS-SA only) per Sector ..............................................6-18 Alvarix ......................................................................................................6-19 One Carrier per Two Sectors .....................................................................6-20 Redundancy Connections........................................................................6-21 WALKair 3000 Installation Guide vi Contents RFU Redundancy...................................................................................... 6-21 BS-SA E1 Redundancy ............................................................................. 6-22 E1 and RF Redundancy ............................................................................ 6-23 RFU Redundancy in Alvarix ...................................................................... 6-24 Chapter 7 - 10.5 GHz Terminal Station ODU Installation.7-1 Installation Guidelines.............................................................................. 7-2 Short Range Terminal................................................................................. 7-4 10.5 GHZ TS ODU Specifications and Connections ................................... 7-5 Installing and Mounting the 10.5 GHz TS ODU ......................................... 7-5 Antenna Polarization .................................................................................. 7-5 Aligning the 10.5 GHz ODU Using the AAU ............................................. 7-10 AAU Overview ........................................................................................... 7-10 AAU Functionality .................................................................................... 7-10 AAU Specifications.................................................................................... 7-11 AAU Dials and Controls ............................................................................ 7-12 AAU Installation Pre-requisites ................................................................. 7-13 Connecting the AAU ................................................................................. 7-13 Detecting the RSS..................................................................................... 7-14 Aligning the 10.5 GHz Antenna Using a Compass ................................... 7-15 Possible Interferences ............................................................................... 7-16 Chapter 8 - 26 GHz Terminal Station ODU Installation....8-1 Unpacking Guidelines ............................................................................... 8-2 Installation Guidelines.............................................................................. 8-2 Short Range Terminal................................................................................. 8-4 Tools Required for Installation .................................................................... 8-4 Installing a Terminal Station 26 GHz ODU................................................ 8-5 Tools Required............................................................................................ 8-5 Mounting the Terminal Station 26 GHz ODU .............................................. 8-6 Adjusting the Terminal Station 26GHz ODU Antenna ............................... 8-13 Connecting the Cables .............................................................................. 8-16 Inspection and Routine Maintenance ........................................................ 8-18 Terminal Station Antenna Alignment Using the AAU (Fine Tuning) ........ 8-18 Connecting the AAU ................................................................................. 8-18 Setting the AAU and Detecting the RSS .................................................... 8-19 Locating the Optimal RSS ......................................................................... 8-20 Chapter 9 - 28 GHz Terminal Station ODU Installation....9-1 Unpacking Guidelines ............................................................................... 9-2 vii Contents Installation Guidelines..............................................................................9-2 Tools Required for Installation.....................................................................9-5 Installing the TS 28 GHz ODU ...................................................................9-7 Installing the Azimuth Adjustment Plate .....................................................9-8 Installing the Pole Mounting Plate ...............................................................9-9 Attaching the 28 GHz TS ODU to the Elevation Adjustment Plate..............9-10 Installing the ODU/Elevation Assembly on the Pole Mount Assembly........9-11 Adjusting the TS 28 GHz ODU Antenna ....................................................9-12 Adjustment Using Optional TS-RFU Management Software .......................9-16 Connecting the Cables ..............................................................................9-25 Inspection and Maintenance ...................................................................9-27 Chapter 10 - Terminal Station IDU Installation............. 10-1 Terminal Station IDU Mounting ..............................................................10-2 Mounting a Terminal Station IDU on a Wall ..............................................10-2 Mounting a Terminal Station IDU on a Desktop ........................................10-3 Mounting a Terminal Station IDU on a Rack (19" or ETSI Racks) ..............10-3 Terminal Station IDU Cabling .................................................................10-5 Connecting the Terminal Station IDU to Ground .......................................10-6 Connecting the Terminal Station IDU to Power..........................................10-6 Connecting the Terminal Station IDU to the Terminal Station ODU...........10-7 Appendix A - Site Survey Report ........................................ 1 Site Survey Report.......................................................................................2 General Site Data ........................................................................................... 2 Line of Sight Data .......................................................................................... 3 Radio Survey.................................................................................................. 3 Existing Rack Survey ..................................................................................... 4 IF Cable Survey.............................................................................................. 5 Customer Interface......................................................................................... 6 Pole and Tower............................................................................................... 7 General Comments......................................................................................... 7 Appendix B - Pin-Outs........................................................ 1 BS-SA Pin-Out ..............................................................................................2 IF Mux Pin-out .............................................................................................3 TS-BU Pin-Out..............................................................................................4 E1-Switch Pin-Out........................................................................................5 Appendix C - Glossary ........................................................ 1 WALKair 3000 Installation Guide viii 1 Chapter 1 - General Installation Instructions In This Chapter: This chapter includes the safety precautions and an overview of the installation procedure. Chapter 1- General Installation Instructions Safety and Environment Requirements Environmental Requirements The IDU complies with class 3.3 as per ETS 300 019-2-3. The ODU complies with class 4.1E as per ETS 300 019-2-4. Equipment Handling Cautions CAUTION Observe the following equipment handling cautions: • Do not move or ship equipment unless it is properly packed in its original wrapping and shipping containers. • Grounding brackets must always be worn when packing, unpacking, handling, extracting or inserting units carrying the EGB symbol to ensure that the units are not damaged. Figure 1-1: EGB Symbol • Disconnecting the DC power supply cable, powers off the indoor units. • Only WALKair 3000 trained personnel should undertake equipment service and maintenance or operate workstations used to communicate with the system. WALKair 3000 Installation Guide 1-2 Safety and Environment Requirements Additional Safety Requirements Pay attention to the following safety requirements before installing the WALK air 3000 equipment: • The selected sites should be in a stable area free of access movement. • Ensure that the cables and cords are out of the way. • Ensure that the site is comfortable for the users. • Locate the management or LCI device where it can be easily accessed and serviced (front and rear). Power and Ground Connection Warnings CAUTION Observe the following power and ground connection warnings: • Power for the rack-mounted system should come from a totally dedicated circuit breaker; do not plug any other electrical device into an outlet connected to the circuit breaker serving the rack equipment. • All power branch circuits for the system must come from the same circuit breaker panel to avoid power flow in the data cables of the system. • Check the manual rating of all system units and verify that the sum of the ampere ratings do not exceed two thirds of the branch rating. • All branch circuits must have a "third wire" type ground for the branch circuit that only goes to the circuit breaker panel. Conduit ground is unacceptable for any portion of the system. • DC cable shield must be connected to ground on both sides. Provide a secure connection to the unit ground pin. • Make sure that the circuit breakers furnishing power to the system are the correct size to protect the system. • Make sure that all receptacles are wired for three-wire power distribution (line, neutral and ground). • All power receptacles servicing any equipment directly connected to the system must have a single, common grounding point. • The ground wire must be at true ground potential with a resistance (measured at the power panel bus) of 5Ω or less between the bus bar and earth. • Place the equipment within six feet of the electric receptacle and do not use extension cords. 1-3 Chapter 1- General Installation Instructions • When connecting equipment to the DC voltage supplies, ensure correct polarity. • When disconnecting the DC power supply cable from the main distribution power, first disconnect the +/- 48V supply and then disconnect the ground. General Safety Summary CAUTION The following general safety precautions must be observed during all phases of operation, service, and repair of this equipment. Failure to comply with these precautions or with specific warnings elsewhere in this manual could result in personal injury or damage to the equipment. The safety precautions listed below represent warnings of certain dangers of which Alvarion is aware. You, as the user of the product, should follow these warnings and all other safety precautions necessary for the safe operation of the equipment in your operating environment. Grounding the Equipment To minimize shock hazard, the equipment chassis and enclosure must be connected to an electrical earth ground. If the equipment is supplied with a three-conductor AC power cable, the power cable must be plugged into an approved three-contact electrical outlet, with the grounding wire (green/yellow) reliably connected to an electrical ground (safety ground) at the power outlet. The power jack and mating plug of the power cable must meet International Electro technical Commission (IEC) safety standards and local electrical regulatory codes. Fire Precautions Do not operate the equipment in any explosive atmosphere such as in the presence of flammable gases or fumes. Operation of any electrical equipment in such an environment could result in an explosion and cause injury or damage. Servicing the Equipment Operating personnel must not remove equipment covers. Only Factory Authorized Service Personnel or other qualified service personnel may remove equipment covers for internal subassembly or component replacement or any internal adjustment. Service personnel should not replace components with power cable connected. Under certain conditions, dangerous voltages may exist even with the power cable removed. To avoid injuries, such personnel should always disconnect power and discharge circuits before touching components. WALKair 3000 Installation Guide 1-4 Installation Process Overview Substituting Parts or Modifying Equipment Do not install substitute parts or perform any unauthorized modification of the equipment. Contact your local Alvarion representative for service and repair to ensure that safety features are maintained. Installation Process Overview Figure 1-2 illustrates the installation process workflow. Terminal Station Installation Base Station Installation Site Survey and preparation Chapters 3 to 7 Chapter 2 Radio Survey LOS Evaluation Site Evaluation Installing the Base Station ODU 10.5 GHz - Chapter 3 26 GHz - Chapter 4 28 GHz - Chapter 5 Chapters 8 to 11 Installing the Terminal Station ODU 10.5 GHz - Chapter 8 26 GHz - Chapter 9 28 GHz - Chapter 10 Site Preparation Installing the Base Station IDU BS-SA - Chapter 6 Installing the Terminal Station IDU - Chapter 11 Figure 1-2: Installation Process Workflow 1-5 Chapter 1- General Installation Instructions This page left intentionally blank. WALKair 3000 Installation Guide 1-6 2 Chapter 2 - Site Survey and Preparation In This Chapter: This chapter provides a description of the site IF and RF surveys and preparation. Chapter 2- Site Survey and Preparation Site Survey The objectives of the site survey are as follows: • Provide general site data for site engineering • Map the radio interference located at the site • Validate the Line-Of-Site (LOS) conditions • Validate the basic environmental conditions for the proper function of the WALKair 3000 system Radio Survey Required Equipment The equipment required for the radio survey is detailed in Table 2-1. Table 2-1: Radio Survey Equipment Component Requirement/Type Function Band-Pass Filter 10.5/26/28 GHz band; low noise Prevents the RF Amplifier from generating inter-modulation. RF Amplifier Gain: 30dB or 40dB minimum; Noise Figure: 4dB maximum Increases the sensitivity of the spectrum analyzer. Power Cable Supplies DC voltage to the RF Amplifier. Power Supply Supply DC power to the RF amplifier Spectrum Analyzer Up to 29 GHz band Antenna 45° BS antenna for 10.5/26/28 GHz Plotter Measures the frequency response Records the measurement results. WALKair 3000 Installation Guide 2-2 Site Survey Setup NOTE: Where an RF survey is impractical, due to equipment unavailability or other reasons, an IF survey can be performed. The IF survey is performed after the installation. See IF Survey on page 2-4. Figure 2-1 shows the test setup for detecting radio frequency interference. Due to poor sensitivity, the spectrum analyzer is connected to the antenna through a bandpass filter and a low noise RF amplifier. Figure 2-1: Radio Survey Setup RF Survey Procedure To perform an RF Survey 1. When positioning antennas at the BS and TS sites: • A 360º coverage area is required for a BS antenna. • A 180º coverage area is required for the TS antenna. • First capture the proposed operating area of the antenna, and then rotate the antenna through the required 360º. • The polarization of the survey antenna must be the same as the planned polarization. 2. When operating the spectrum analyzer: • Calibrate the spectrum analyzer before use. • Use the Max Hold feature to provide full coverage. • Two images are required for every angle, one with a maximum resolution bandwidth (RBW) of 2MHz and the other with a minimum RBW of 1 KHz. • The sweep time should be 50 ms maximum. • The video bandwidth (VBW) of the spectrum should be set to RBW. • Each image must be measured for at least 5 minutes. 3. When performing the measurement: 2-3 Chapter 2- Site Survey and Preparation • The observation span of the uplink band will be carried out at the BS site and the observation span of the downlink band at the TS site. • Check for additional interference by changing the polarization of the antenna and the RBW. • Frequency band response of the RF amplifier must be set to 10.5 GHz, 26 GHz or 28 GHz according to the system. • The noise level of the spectrum should increase after supplying DC to the amplifier. IF Survey If conditions are unsuitable for an RF survey, it is recommended to perform an IF survey according to the instructions in this section. The IF survey is performed following the installation. Required Equipment The following equipment is required for the IF survey is detailed in the following table. Table 2-2: IF Survey Equipment: Component Requirement/Type Function Spectrum Analyzer Up to 29 GHz band Measures the frequency response Signal Cable Splitter (Order a IF-MUX II from Alvarion) Up to 29 GHz band Mux/Demux of IF signal and DC power feed to RFU. WALKair 3000 Installation Guide 2-4 Site Survey Setup Figure 2-2 shows an IF Survey Setup, for a Base Station on the left, and a Terminal Station on the right. The IF Survey must be performed for Base Stations and for Terminal Stations. Figure 2-2: IF Survey Setup IF Survey Procedure The IF survey is performed and normalized to provide an RF Signal result, using the following equation: RF Signal = IF Signal – [IF Cable and MUX attenuation] + RFU Gain To perform an IF Survey: 1. Set up the equipment as illustrated in Figure 2-2. • The IF-MUX II cables and the RFU cable ends are connected using an N-Type female connector. • Ensure that the DC output of the IF-MUX II is attached to the BS-SA/Terminal Station and not to the Spectrum Analyzer. 2. Measure the IF signal and record it. NOTE: For low power interference, the signal may not be clearly visible because noise added by the receiver reduces the signal to below the spectrum analyzer noise floor. 3. IF Attenuation over the IF Cable and IF-MUX II must be measured and recorded. • For a Base Station with configured IF-MUX II– via the BSSA LCI interface, obtain the combined IF Cable and IF MUX attenuation value as follows: 2-5 Chapter 2- Site Survey and Preparation a. From the LCI Main menu, select option 1- Configuration menu, and then choose option 4 Sector Configuration Parameters menu. The Sector Configuration screen appears. Sector Configuration Menu ---------------------------1. Set Sector Parameters. 2. Get Sector Parameters. b. Select option 2 – Get Sector Parameters to view the current configuration and cable gains in the Tx and Rx path. MPU/L/A> Enter Option No : 2 Mux Type : 2 Port Mux TX Value is 15.00000 Mux Rfu Redundancy is disabled MUX (Rx) & cable Gain is -5.000000. MUX (Tx) & cable Gain is -6.000000. MPU/L/A> Enter Option No : • For a Base Station in which IF-MUX II is not yet configured: • IF MUX attenuation = –4 dB (by default) • IF Cable attenuation = obtain from its data sheet. • Combine the two values to obtain the total IF Cable and IF-MUX II attenuation value. NOTE: The above procedure for a Base Station must be performed after the RFU and antenna parameters are configured. Otherwise, the IF-MUX II attenuation will retain its default value of -4. See also the WALKair 3000 Commissioning Guide, Chapter 2. • For a Terminal Station, the IF-MUX II attenuation is –4 dB, and the IF Cable attenuation can be obtained from its data sheet. Combine the two values to obtain the total IF Cable and MUX attenuation value. 4. Note down the Base Station RF Gain as follows: • For a 26 GHz BS: 40 dB • For a 28 GHz BS: the configured gain • For a 10 GHz BS, 40 dB 5. Note down the Terminal Station RF Gain as follows: • For a 26 GHz TS: 40 dB • For a 28 GHz TS: the configured gain WALKair 3000 Installation Guide 2-6 Site Survey • For a 26 GHz (short range) TS: 23 dB. • For a 10GHz (short range) TS: 40 dB 6. Normalize to calculate the RF Signal as follows: RF Signal = IF Signal – [Cable and MUX attenuation] + RFU Gain LOS Evaluations This section describes the recommended methods for achieving a full line of sight (LOS) and addresses LOS problems that may arise when selecting sites for the WALKair 3000 system installation. Generally, large reflecting surfaces in parallel or partly in the beam, like Metal or glass buildings, moist earth, water and above ground metals (poles and telephone lines), will cause reflections of the radio signal. If you have a clear line-of-sight, the effect of this interference will be minor. NOTE: Avoid installing the ODUs near reflecting objects. Two topologies are covered: • TS sites visible from the BS site • TS sites not visible from the BS site Terminal Stations Visible from Base Stations To estimate LOS: 1. Use one of two methods to find the WALKair 3000 LOS: a. Use a software tool for verifying there are no obstacles within the first-order Fresnel Zone in the selected frequency band between the BS site and the TS site. This tool utilizes a preentered terrain map and 3D calculations. b. Visually identifying a possible obstruction in the LOS, and then determining the distance between the BS site and the obstruction and then the TS site and the obstruction. There are two ways in which these distances can be determined: • Using a GPS receiver. • Using a map. 2. Obtain the first-order Fresnel Zone radius using Fresnel Zone table 3. Roughly estimated the distance between the visibility line and the obstruction. 2-7 Chapter 2- Site Survey and Preparation Imagine an obstruction in the form of the building shown in Figure 2-3. From the TS site antenna, the distance seen between the obstruction and the visibility line (the center of the BS site antenna) is as high (or as wide) as one storey. For a 2.5m high storey, the distance between the visibility line and the building is approximately 2.5 m. Figure 2-3: Fresnel Zone Violation Terminal Stations not Visible from Base Station For WALKair 3000 links that are longer than 3.5 km, it is not possible to estimate the distance between the visibility line and an obstruction since the TS site is not visible from the BS site. To find the WALKair 3000 LOS: 1. Use one of two methods to find the WALKair 3000 LOS: • Using the software tool described in the previous section • Measuring the height of a potential obstruction using an altitude meter 2. Draw the BS and TS sites on a map and find the azimuth between them as shown in Figure 2-4. WALKair 3000 Installation Guide 2-8 Site Survey Figure 2-4: Measuring Azimuth between the BS and TS Using a Map 3. Observe the TS site using a compass and binoculars. A possible obstruction may be identified at this stage as shown in Figure 2-5. Figure 2-5: View from the BS Site 2-9 Chapter 2- Site Survey and Preparation 4. Next, the distances between the obstacle, Terminal site and Base site are measured using either a map or a GPS receiver. Figure 2-6: Measuring Distances Using a Map 5. Calculate the radius of the first-order Fresnel Zone (rF) using the measured distances between the obstacle and the TS and BS (d1 and d2) and the Fresnel table. Figure 2-7: Altitude Measurement 6. Verify that the highest obstruction does not enter the first-order Fresnel Zone as shown in Figure 2-7 using either a GPS receiver or an altimeter. 7. After the values of hO, hB and hT are determined, use the following formula in order to find the maximal height of the obstruction: tan x = (hB − hT ) /(d 1 + d 2)) hM = hT + d 2 × tan x − rF × cos x WALKair 3000 Installation Guide 2-10 Site Preparation NOTE: A worst-case design should be applied to the measurement tolerance when entering the parameters into the formula. • hM is the maximal allowed height of the obstruction. • hB is the BS antenna height above the sea level. • hT is the TS antenna height above the sea level. • rF is the radius of the first-order Fresnel Zone. • Finally, compare hM to the obstruction's height. Example of a Maximal Obstruction Height The distance between the Base site and the Terminal site is 4 km. The obstruction is 300 m from the Terminal site, and the band is 26 GHz. The height of the Base site is 150 m (measured), the height of the Terminal site is 60 m (measured) and the height of the obstruction is 55 m (measured). The radius of the first-order Fresnel Zone is 4 m (calculated). The tolerance of the altitude measurement is 2 m. d 1 = 3700m d 2 = 300m rF = 4m hB = hB − Tolerance = 148m hT = hT + Tolerance = 62m hO = hO + Tolerance = 57 m tan x = (148 − 62) ÷ (3700 + 300) = 0.0215 cos x = 0.99 hM = 60 + 300 × 0.0215 − 4 × 0.99 = 62.45m Where: • hM is the maximal allowed height of obstruction. • hB is the Base antenna height above sea level. • hT is the Terminal antenna height above sea level. • hO is the obstruction's height above sea level. Then hM 〉 hO and the conclusion is that the obstruction does not enter the first-order Fresnel Zone, and does not interfere with the LOS. Site Preparation This section provides a description of the site preparation requirements before the installation of the WALKair 3000 system. This includes: 2-11 Chapter 2- Site Survey and Preparation • Antenna mast installation and grounding • IF cable deployment and connector assembly • Rack preparations before installations • Power supply installation and power cable deployment Antenna Mast This section describes the pre-installation requirements and stability specifications for the antenna mast. Pre-installation Requirements : Verify the following before installing the mast: • That the location of the mast is according to the site plan, as specified by the site survey report. • That the mast is properly grounded • That there is lightning protection prior to installation of the RFU • That there is a safe access to the mast, free of any obstacles or other dangers for installers of the RFU • That there are no power lines near the mast • That the antenna positioned on the pole cannot be crossed by anybody walking on the roof Mechanical Stability of the Pole The following table lists the pole stability required in the installation point for all types of antennas. NOTE: For 26/28 GHz bands, the pole tilt angle should not exceed ± 15% of the minimal beam width of the installed antenna. Table 2-3: Pole Stability Band BS TS 26/28GHz +1.0° +0.4° 10.5GHz +1.4° +1.2° WALKair 3000 Installation Guide 2-12 Site Preparation The following table lists the pole diameter requirements for all bands (Base and Terminal): Table 2-4: Pole Diameter Requirements Band BS TS 10.5 GHz 2"-4" 2"-4" 26 GHz 2"-4" 2"-4" 28 GHz 2"-4" 2"-4" IF Cable Installation General Use a single coaxial cable between the IDU and each RFU unit. For the BS site, the number of IF cables equals the number of sectors into which the BS cell is divided, whereas for the TS site, a single IF Cable is required. NOTE: For redundancy installations, two IF cables should be installed for each sector – one for each RFU. On the ODU side, the IF cable is connected directly to the RFU IF connector at both BS and TS sites. At the BS IDU and TS IDU installations, the IF cable is directly connected to the N-type IF connector, which is mounted on the IDU front panel. 2-13 Chapter 2- Site Survey and Preparation IF Cable Characteristics The IF cable characteristics should match the parameters listed in the following table. Table 2-5: IF Cable Requirements Parameter Details Operating Temperature -40°/+85° Weatherproof UV, waterproof Frequency Range 600MHz – 2000MHz Impedance 50Ω Attenuation *1 For 26GHz/28GHz Tx (1600-1800) MHz 2dB to 20 dB Rx (600-800 MHz) 1 dB to 12dB For 10.5GHz Tx (1000-1150) MHz 2dB to 20 dB Rx (650-800 MHz) 1 dB to 12dB Interface N-Type: male Diameter 3/8" maximum (recommended) *1 The attenuation includes 1dB for the attenuation of the connector assemblies on both sides. Example of Recommended IF Cable Example of the recommended IF cable type and interface are as follows: • IF cable type: One example of an LMR-400 standard outdoor cable is manufactured by Times Microwave Systems. This cable is characterized by its low loss as shown in Table 2-6, which permits a long distance between the ODU and IDU. For further details, see http://www.timesmicrowave.com/. • Interface: N-male, straight interface plug, part number TC400NM and crimp attachment. WALKair 3000 Installation Guide 2-14 Site Preparation Table 2-6: Times Microwave Systems' LMR-400 Cable Attenuation Frequency Attenuation Average Power MHz dB/100ft dB/100m KW 450 MHz 2.7 8.9 0.83 900 MHz 3.9 12.8 0.58 1500 MHz 5.1 16.8 0.44 1800 MHz 5.7 18.6 0.40 2000 MHz 6.0 19.6 0.37 NOTES: • • • When routing the coaxial cable, leave a service loop at the RFU to ensure sufficient length of coaxial cable for replacing a faulty connector, when necessary. Secure the coaxial cable preventing mechanical stress at the RFU connection. Run the coaxial cable to the IDU IF connection. If the coaxial cable requires suspension from the RFU to the building, use a stranded wire to support the coaxial cable weight (the support will prevent a migration of the coaxial cable's inner conductor to the shield). Tools for Crimp Connector Assemble the cable connectors for LMR-400. Use the tools listed in Table 2-7 for the crimp connector. Table 2-7: Required Tools for Crimp Connector (LMR-400) Tool Type Part Number Description Crimp tool HX-4 Crimp handle Deburr tool DBT-01 For "EZ" style connectors Strip tool ST-400EZ For crimp connectors Ground kit GT-S400T Grounding kit NOTES: The N-type connectors of the ODU and IDU must be closed by hand without using any tool. The outdoor connectors should be tightened using sleeves 2-15 Chapter 2- Site Survey and Preparation Short Circuit Test A short circuit test must be performed on the IF cable connectors prior to the sealing and connection of the equipment. Perform a short test for the cable as shown in Figure 2-8 Figure 2-8: IF Cable Testing Labeling IF Connector Label the IF connector as follows: • Label both sides of the IF cable with a non-removable label. • The label must include the cable length attenuation and RFU head details: sector direction, etc. Sealing ODU Connectors It is recommended to seal the ODU connectors using the 3M's cold shrink tube 8426-9 (recommended), which requires no training or special tools. If you are using the 8426-9 cold shrink, leave a 10 cm space as shown in Figure 2-9 to keep the cable flexible. WALKair 3000 Installation Guide 2-16 Site Preparation Figure 2-9: Sealing ODU Connectors NOTES: • • The N-type connectors of the ODU and IDU must be closed by hand without using any tool. The outdoor connectors should be tightened using sleeves Rack Preparation This section describes how to prepare the rack as part of the site preparation process. Pre-installation Requirements Before installation of IDU, verify the following: • Rack overview. • Placement of the rack based on the proposed BU location. • Preparation of the required screws • Grounding point location of each rack • Cable ducting for the following: • IF cable • Power cable • Telecom cables • Patch panel for rack power or telecom interface connections as determined by rack equipment planning. • Ventilation • Power supply. 2-17 Chapter 2- Site Survey and Preparation Base Station Rack Installation Considerations The BS-SA unit is designed for installation in an ETSI or 19" wide rack, on a wall, or on the desktop. Locate the BS-SA unit so it can be easily accessed and serviced. Consider the following when planning the location of the equipment in the rack: • In heterogeneous racks (rack collocation of the WALKair 3000 and some other rack equipment), mount the heaviest units near the bottom of the rack. • Plan the rack space according to the hardware requirements. • Allow for 1U between the BS-SA units in the rack. Terminal Station Rack Installation Considerations The TS IDU is designed for installation in an ETSI or 19" wide rack, on a wall, or on the desktop. For the TS IDU, check that the following requirements are met: • Locate the TS IDU so it can be easily accessed and serviced, where the traffic connections are on the front panel and the power connections and fuse – on the rear. • When AC powered, place the TS IDU within a distance of 3m from the AC main outlet. Rack Grounding of WALKair Equipment All WALKair equipment installed in racks (BS-SA, BS-BU, TS-BU and IF-MUX) must be grounded to the rack: • Each unit has a grounding pin located on its rear panel. • Connect one end of the grounding cable to the grounding pin, and connect the opposite end of the cable to a central ground point on the rack. • The rack must then be connected to the ground of the room or building. • After grounding, you must then verify or test the ground in accordance with local standards. Power Distribution and Characteristics Power Characteristics The power requirements of the IDU are described in the following table. NOTE: IF-MUX II units receives power from the corresponding BS-SAs. WALKair 3000 Installation Guide 2-18 Site Preparation Table 2-8: WALKair Power Requirements Operational Conditions Unit Typical Power (Watts) In rush current Max. Power (Watts) BS-SA -48 VDC @ 25°C with RFU 62 IF-MUX 4 -48 VDC @ 25°C with RFU 90 E1 switch -48 VDC @ 25°C 72 TS IDU 220 VAC with RFU 47 12 A for 5µs 55 Power Feeder -48 VDC @ 25°C 43/RFU 2 A for 10µs/per RFU 48/RFU 50 A for 60µs 120 120 Guidelines for Power Distribution and Grounding Lines When preparing power and grounding cables, pay attention to the following guidelines: • Do not plug any other electrical device into an outlet connected to the circuit breaker serving the TS or BS equipment. • All power branch circuits (BS-IDU, IF-MUX 4, etc.) for the system must come from the same circuit breaker panel to avoid power flow in the data cables of the system. • DC cable shield must be connected to ground on both sides. Provide a secure connection to the unit (BS-SA, IF-MUX 4, E1 Switch or Power Feeder, and TS) ground screw. • The BS IDU earth stub must be connected to the rack ground. • All power receptacles servicing any equipment directly connected to the system must have a single, common grounding point. Cable Preparation Four types of cables are required for both BS and TS WALKair 3000 installations: • Power and grounding cables • Management connections • Traffic cables (E1 and Ethernet cables) • IF cable When preparing cables, observe the following general guidelines: 2-19 Chapter 2- Site Survey and Preparation • AC/DC Power, traffic, IF and management cables should be prepared on-site. • Do not expose cables to moisture or heat. Preparing the Power and Grounding Cables Power for the system must come from a totally dedicated circuit breaker. Table 2-10 and Table 2-11 provide details of the required power and grounding cables for a typical WALKair 3000 installation. Table 2-9: BS Power and Grounding Cables Data Function From To Cable Type /Connector BS-SA Power Feeder ground Rack grounding Unit ground screw 4AWG - BS-SA Power connections PS Unit power (rear) 16-18 AWG** 2-pin IF MUX 4/E1 Switch/Power Feeder –48V Rack power panel Unit power plug (rear) 18 AWG 3-pin D-type *1 Qty Unit 1 1 to 8 *1 The number of cables is the number of IF MUX units/Power Feeders ** Wire insulation, Diameter 1.8-3.1mm.(0.071-0.122") WALKair 3000 Installation Guide 2-20 Site Preparation Table 2-10: TS Power and Grounding Cables Data Function Qty per Unit Cable Type and Connector From To TS IDU ground Rack grounding Unit ground screw 4AWG - 1 TS IDU power Main power outlet Unit power plug Per site AC installation 1 IF MUX 4, E1 Switch, Power Feeder Cord Pin Out An 18-gauge cable is recommended for the -48V power supply cable. Connect the power cord of the device, as illustrated in the following figure. 1. Figure 2-10: Connecting the Power Cord Before testing, verify that the red probe (+) is connected to the red socket on the test meter. Test as follows: 1. Insert the plus probe into the center connection point. 2. Insert the minus probe into left connection point. Observed meter readings should not be lower than -48V. 2-21 Chapter 2- Site Survey and Preparation 2. Figure 2-11: Test Meter Preparing the Traffic Cables When preparing traffic cables, observe the following guidelines: • Do not run traffic cables parallel to AC power cables within less than 10cm of each other. • Do not install traffic cables close to electric motors, power line regulators, relays or power supplies. • Avoid laying traffic cables close to air conditioners, copy machines, water coolers and other equipment that generates power line “noise”. • Do not run traffic cables near equipment that generates radio frequency interference (for example, radio transmitters). Table 2-12 and Table 2-13 supply the details of the applicable traffic cables. Table 2-11: BS Traffic Cables Data Function From To Cable Type and Termination Qty per Unit Ethernet BS-SA Front DDF CAT 5 RJ-45 1 E1 BS-SA Front DDF RJ-45 (120 Ώ) RJ-45 0 to 8 WALKair 3000 Installation Guide 2-22 Site Preparation Location of Traffic Cables When choosing the physical location of the WALKair 3000 equipment, pay attention to the location of the traffic frames and to the traffic cables’ running path. Watch the following guidelines: • Do not install traffic cables close to electric motors, power line regulators, relays, or power supplies. • Avoid laying traffic cables close to air conditioners, copy machines, water coolers, and other similar equipment that generates power line “noise”. Table 2-12: TS Traffic Cables Function From To Cable Type and Connector Qty per Unit Ethernet TS IDU front DDF/ Switchboard CAT 5 RJ-45 2 E1 TS IDU front MDF RJ-45 cable RJ-45 0-8 2-23 3 Chapter 3 - 10.5 GHz Base Station ODU Installation In This Chapter: This chapter describes the 10.5 GHz Base Station RFU and antenna installations. Chapter 3- 10.5 GHz Base Station ODU Installation General Guidelines When installing the Base ODU, the following steps must be performed: • Install the outdoor equipment, including the antenna. • Connect RF and IF cables. • Align the Base antenna (as described in the following section) • Mount the unit. • Ground the ODU. Follow the guidelines below to ensure proper and smooth installation. NOTE: Perform an RF survey at the beginning of an installation project to ensure that the spectrum is clear. Continue performing surveys every so often during the course of installation to ensure that no one is interfering with your spectrum. Location and Orientation • Location: the location of the RFU on the mast, the location and orientation (azimuth) of the antenna, including tilt when applicable, must be determined prior to installation. • Do not install the antenna at the top of the pole: Always leave at least 40 cm space between the top of the pole and the antenna for better lightning protection. • The RFU must always be installed at the rear side of the antenna in order to prevent self-reflections. Figure 3-1: RFU Installation WALKair 3000 Installation Guide 3-2 General Guidelines Clearance around BS Antennas • To avoid frequency reuse problems caused by unwanted reflections, the main lobe of the antenna must be clear of any metallic objects for a range of up to 20 meters. • In order to avoid the need to refer to particular antenna radiation patterns, the following criterion can be used: Clear metallic objects from a zone of up to 90 degrees to the right and left, and 45 degrees above and below, the antenna bore sight, for a distance of at least 20 meters, as shown below: Figure 3-1: RFU Installation: BS Antenna Clearance • Make sure that there are no obstacles located in front of the WALKair antenna, such as masts, transmission equipment from other vendors, or another WALKair antenna. These kinds of obstacles can reflect power from the rear Terminals (which are behind the antenna) directly into the antenna's main beam, which can potentially decrease the Frequency Reuse performance. Alignment • BS Antenna Alignment: Proper alignment of the base antenna in the elevation plane is critical for decreasing the level of interference with neighboring cells. Therefore, be sure to balance the antenna pole before Elevation alignment. We recommend using an electronic level for proper pole balancing. Inter-sector Distance • Inter-sector distance; The minimal distance required between neighboring sectors is 1m, as shown below: 3-3 Chapter 3- 10.5 GHz Base Station ODU Installation Figure 3-2: Distance Between Neighboring Sectors Roof Corner Installation When installing on a roof corner, leave a space of 0.5m above the railing and no less than 15m above the ground, as shown below: Figure 3-3: Installing on a Roof Corner Redundancy Installations For redundancy installation, you can use two kinds of setups, as shown below. NOTE: Before tightening the redundant antenna, verify that the alignment is the same as the original sector. WALKair 3000 Installation Guide 3-4 General Guidelines Figure 3-4: Redundancy Installation Inspection • Before leaving the installation site, check that all the hardware on the mount and antenna is secure. • The antenna should be inspected at least once a year to check its condition and to ensure safe operation and maintenance. Qualified personnel, experienced in antenna installation, must perform this inspection. 3-5 Chapter 3- 10.5 GHz Base Station ODU Installation RFU Views and Specifications The following table shows the physical specifications of the 10.5 GHz BS RFU. Table 3-1: 10.5 GHz Base Station RFU Unit Dimensions RFU Rev C Size (mm) 3325x270x156 Weight (kg.) 10.1 (including mounting kit) Figure 3-14 shows two views of the NJRC 10.5 GHz RFU. Figure 3-5: NJRC 10.5 GHz RFU Views WALKair 3000 Installation Guide 3-6 Installation Procedure Installation Procedure Installation Requirements Table 3-2: 10.5 GHz RFU Installation Requirements Item Pole Parameters 2 to 4 inches in diameter. Packing List Tools required • BS-RFU unit • RF cable • 2 mounting brackets • 4 mounting straps • 8 bolts • Lock washers and flat washers. • 8 mm wrench. • 13 mm wrench RFU Cable Connections Summary The following table lists the RFU cable connections: Table 3-3: 10.5 GHz Base Station RFU Cable Connections Cable From To Connectors Note COAXIAL LMR400 RFU IDU N-Type *Max. Length 150 m Andrew LDF 3/8 RFU Antenna N-Type Length 1m (supplied) Grounding RFU Ground M6 screw diameter * For cable lengths greater than 150m, use a higher quality cable than the LMR400. Total cable attenuation must not exceed 20dB regardless of cable length. 3-7 Chapter 3- 10.5 GHz Base Station ODU Installation Mounting the 10.5 NJRC GHz RFU To install the 10.5 GHz BS-RFU: 1. Referring to Figure 3-15 below, for each of the two mounting brackets, thread two mounting straps through the mounting bracket’s slots. Mounting Strap Mounting Bracket Slot for 4–inch Pole Slot for 3–inch Pole Slot for 2–inch Pole Figure 3-6: Mounting Bracket and Straps Three sets of slots are provided to allow for differences in the diameter of the mast/pole: 2, 3 or 4 inches diameter. WALKair 3000 Installation Guide 3-8 Installation Procedure 2. Locate the eight mounting bolts (four for each bracket). Referring to Figure 3-16, bolt each if the mounting brackets (with straps already in place) to the rear of the BS-RFU Attach Mounting Brackets using the bolts provided Grounding screw – will be used later on Figure 3-7: Mounting Brackets attached to BS-RFU Before attaching the BS-RFU to the pole/mast, note the recommended relative positions of RFU and Antenna on the pole/mast (see Figure 3:17 below). Figure 3-8 Recommended positioning of antenna and BS-RFU 3-9 Chapter 3- 10.5 GHz Base Station ODU Installation 3. Referring to the following figure, position the BS-RFU the correct way up. Attach the BS-RFU to the pole/mast. Tighten the mounting straps’ adjustment screws. Tighten Mounting Straps Adjustment Screws RF and IF Connectors Point Downwards Figure 3-9: Attaching the BS-RFU to the Pole/Mast 4. Connect the ground cable to the grounding screw on the rear of the BS-RFU (see Figure 3-19 below). Grounding Screw Figure 3-10: Attaching Ground Cable to Grounding Screw WALKair 3000 Installation Guide 3-10 Installation Procedure 5. Connect the RF and IF cables on the rear of the BS-RFU (see Figure 3-20 below). IF cable connection RF cable connection Figure 3-11: Attaching RF and IF Cables to the BS-RFU NOTES: • • The IF cable connector must be a certified outdoor connector. The outdoor connectors should be tightened using sleeves. When routing the coaxial cable, leave a service loop at the antenna to provide a sufficient length of cable to allow replacement of a faulty connector, when necessary. Secure the coaxial cable so that there is no mechanical stress at the antenna connection. Follow the superstructure with the coaxial cable to its base, and then to the building. If the coaxial cable requires suspension from the base to the building, use a stranded wire to support the coaxial cable weight (This support will prevent a migration of the cable's inner conductor to the shield.). Installing the 10.5 GHz Base Station Antenna Antenna Specifications Table 3-4-: 10.5 GHz Base Station Antenna Dimensions Antenna Beam width Polarization Size (mm.) Weight (kg.) 600 Vertical 440x290x150 2.2 600 Horizontal 440x290x130 2.5 900 Vertical 360x265x20 1.0 900 Horizontal 340x180x40 1.0 BS 10.5 GHz 90º Sector Antenna This section describes how to install 10.5 GHz 90º sector horizontal and vertical antennas. 3-11 Chapter 3- 10.5 GHz Base Station ODU Installation BS 10.5 GHz 90º Horizontal Antenna The following figure shows a 90º horizontal sector antenna. Figure 3-12: Base Station 90º Horizontal Sector Antenna The following figure shows the assembly for the 90º horizontal sector antenna. Figure 3-13: Base Station 90º Horizontal Sector Antenna Assembly The following figure shows the assembly for the 90º horizontal sector antenna, with parts list. WALKair 3000 Installation Guide 3-12 Installation Procedure Figure 3-14: Base Station 90º Horizontal Sector Antenna Parts List BS 10.5 GHz 90º Vertical Antenna The Base Station10.5 GHz 90º Vertical Antenna is mounted with the MD - 1087 antenna mounting kit. See MD - 1087 Antenna Mounting Kit on page 3-15. The following figures shows below show two views of a 10.5 GHz 90º vertical sector antenna. Figure 3-15: BS 10.5 GHz 90º Vertical Sector Antenna (top) 3-13 Chapter 3- 10.5 GHz Base Station ODU Installation Figure 3-16: BS 10.5 GHz 90º Vertical Sector Antenna (bottom) BS 10.5 GHz 60º Antenna Antenna Views The following figure show two views of a 10.5 GHz 60º V or H sector antenna. Figure 3-17: BS 10.5 GHz 60º V or H Sector Antenna (top) WALKair 3000 Installation Guide 3-14 Installation Procedure Figure 3-18: BS 10.5 GHz 60º V or H Antenna (bottom)- Vertical shown Antenna Mounting Kit Assembly The Base Station10.5 GHz 60º V or H Antenna is mounted with the MD - 1087 antenna mounting kit. See MD - 1087 Antenna Mounting Kit on page 3-15. MD - 1087 Antenna Mounting Kit The MD - 1087 Mounting Kit is used for the following Base Station antennas: • Base Station 10.5 GHz 90º Vertical Antenna • Base Station 10.5 GHz 60º V or H Antenna MD –1087 Parts List The mounting kit (Part No. MD-1087) consists of the following parts (see also Figure 3-28 and Figure 3-29). Table 3-5: Mounting Kit - Part No. MD-1087 Part Ref Quantity U – Bracket 1 1 Grooved Bracket 2 1 Band 2½– 4" diameter 3 2 Flat Washer ¼" 4 12 Spring Washer ¼" 5 8 Nut ¼" 6 8 Screw ¼" 7 4 Safety Pins 8 2 3-15 Chapter 3- 10.5 GHz Base Station ODU Installation Figure 3-19: MD – 0087 Mounting Kit Parts Figure 3-20: MD – 0087 Mounting Kit - Assembled WALKair 3000 Installation Guide 3-16 Installation Procedure MD-1087 Assembly and Mounting See the following figure for full installation instructions of how to assemble the MD-1087 mounting kit and attach it to a Base Station Antenna. Figure 3-21: BS 60º Sector V or H Antenna Installation Instructions 3-17 Chapter 3- 10.5 GHz Base Station ODU Installation Aligning the Base Station Antenna Using a Compass Aligning the BS antenna using the compass takes into account the original azimuth of the Base Station and calculates a new azimuth that is 90o to the Base Station. The idea is to align the outer frame of the antenna so that it is more in line with the new azimuth, which will achieve greater accuracy. Required tools: • Compass • Binoculars To align the Base Station antenna: 1. Identify a reference point on the landscape that is in the direction of the heading of the Base antenna. 2. Depending on whether you are looking from the left or the right side of the antenna, add or subtract 90° to/from the Base Station azimuth. 3. Using the compass, align the outer frame of the antenna to the newly calculated azimuth, so that the flat surface of the antenna faces the reference point identified in step 1. This reference point is 90° to the Base antenna heading, as shown in Figure 2-6 below. Figure 3-22: BS Antenna Alignment - Compass & Reference Point WALKair 3000 Installation Guide 3-18 4 Chapter 4 - 26 GHz Base Station ODU Installation In This Chapter: This chapter describes how to install the 26 GHz ODU. Chapter 4- 26 GHz Base Station ODU Installation General Guidelines When installing the Base ODU, the following steps must be performed: • Install the outdoor equipment, including the antenna. • Connect RF and IF cables. • Align the Base antenna (as described in the following section) • Mount the unit. • Ground the ODU. Follow the guidelines below to ensure proper and smooth installation. NOTE: Perform an RF survey at the beginning of an installation project to ensure that the spectrum is clear. Continue performing surveys every so often during the course of installation to ensure that no one is interfering with your spectrum. Location and Orientation • Location: the location of the RFU on the mast, the location and orientation (azimuth) of the antenna, including tilt when applicable, must be determined prior to installation. • Do not install the antenna at the top of the pole: Always leave at least 40 cm space between the top of the pole and the antenna for better lightning protection. Clearance around BS antennas • To avoid frequency reuse problems caused by unwanted reflections, the main lobe of the antenna must be clear of any metallic objects for a range of up to 20 meters. • In order to avoid the need to refer to particular antenna radiation patterns, the following criterion can be used: Clear metallic objects from a zone of up to 90 degrees to the right and left, and 45 degrees above and below, the antenna bore sight, for a distance of at least 20 meters. • Make sure that there are no obstacles located in front of the WALKair antenna, such as masts, transmission equipment from other vendors, or another WALKair antenna. These kinds of obstacles can reflect power from the rear Terminals (which are behind the antenna) directly into the antenna's main beam, which can potentially decrease the Frequency Reuse performance. WALKair 3000 Installation Guide 4-2 General Guidelines Alignment • BS Antenna Alignment: Proper alignment of the base antenna in the elevation plane is critical for decreasing the level of interference with neighboring cells. Therefore, be sure to balance the antenna pole before Elevation alignment. We recommend using an electronic level for proper pole balancing. Inter-sector Distance • Inter-sector distance; The minimal distance required between neighboring sectors is 1m, as shown below: Figure 4-1: Distance between Neighboring Sectors (view from above) 4-3 Chapter 4- 26 GHz Base Station ODU Installation Roof Corner Installation When installing on a roof corner, leave a space of 0.5 meter above the railing and no less than 15 meters above the ground, as shown below: Figure 4-2: Installing on a Roof Corner Redundancy Installations For a redundancy installation, leave a space of 1m between the two ODUs using one of the two types of installation shown below. NOTE: Before tightening the redundant antenna, verify that the alignment is the same as the original sector. Figure 4-3: Redundancy Installations WALKair 3000 Installation Guide 4-4 Installation Procedure Inspection • Before leaving the installation site, check that all the hardware on the mount and antenna is secure. • The antenna should be inspected at least once a year to check its condition and to ensure safe operation and maintenance. • Qualified personnel, experienced in antenna installation, must perform this inspection. Installation Procedure Installation Requirements The following tools are requried for the RFU installation procedure. • Cross screwdriver • Flat head screwdriver • Adjustable wrench Installing the 26 GHz ODU on a Mast Two types of 26 GHz ODUs are provided: • With a horn antenna • With an integrated antenna Both type of antennas are technically the same. The installation procedures for both types is given in the following sections. Perform the procedure relevant to your ODU type. 26 GHz ODU with a Horn Antenna To install the ODU (RFU and antenna) on the mast: 1. Remove the contents from the box. 2. Remove the paper seal from the RFU/adapter. 3. Remove the plastic wave-guide dust cover from the back surface of the antenna as shown in Figure 4-4. 4-5 Chapter 4- 26 GHz Base Station ODU Installation Figure 4-4: Removing the Plastic Wave Guide 4. Install the antenna shown in Figure 4-5 onto the RFU/adapter. Use the antenna guide pins (2) to align the antenna to the RFU/adapter. Press firmly into place. Figure 4-5: Horn Antenna 5. Fasten the antenna to the RFU/adapter with the 8 screws (size 6/32 or 18 mm), washers and lock-washers provided, as show in Figure 4-6. Figure 4-6: Fastening the Antenna 6. Remove all screws from the brass plate as shown in Figure 4-7. WALKair 3000 Installation Guide 4-6 Installation Procedure Figure 4-7: Removing the Screws from the Brass Plate 7. Remove the bolts, washers, and lock-washers from the mounting bracket as shown in Figure 4-8. Figure 4-8: Mounting Brackets 8. Fasten the elevation adjustment plate to the brass plate, as shown in Figure 4-9. 4-7 Chapter 4- 26 GHz Base Station ODU Installation Figure 4-9: Mounting the Elevation Adjustment Plate 9. Slide two mounting bracket bolts through the mini-elevation plate as is shown in Figure 4-10. Figure 4-10: Mini Elevation Plate 10.Place the mini-elevation plate on top of the elevation plate as shown in Figure 4-11. Ensure that the top surfaces of both plates are aligned parallel to each other. This will provide 0° elevation. WALKair 3000 Installation Guide 4-8 Installation Procedure Figure 4-11: Mini-elevation Plate placed on Elevation Plate 11. Fasten two elevation bolts, spacers, washers and lock-washers in the center holes (#2 and #5) of the mini-elevation plate as shown in Figure 4-12 Figure 4-12: Fastening the Mini-elevation Plate 12. Fasten the remaining elevation bolts, spacers, washers and lock-washers as follows (see Figure 4-13): ♦ Use holes #3 and #4 for right-mounting the RFU ♦ Use holes #1 and #6 for left-mounting the RFU 4-9 Chapter 4- 26 GHz Base Station ODU Installation Figure 4-13: Fastening the Remaining Bolts 13.Insert the remaining mounting bracket bolts into the elevation plates as shown in Figure 4-14. Figure 4-14: Inserting the Remaining Mounting Bracket Bolts 14. Fasten the unit to the mast using the mounting brackets, washers, lock-washers and hex nuts (fully tighten the hex nuts) as shown in Figure 4-15 NOTE: Prior to installation, determine whether the RFU will be right or left mounted WALKair 3000 Installation Guide 4-10 Installation Procedure Figure 4-15: Fastening the Unit to the Mast 15.Align the unit temporarily to the mast. NOTES: • • It is recommended to fasten the mounting brackets, washers, lock-washers and hex nuts onto the mounting bolts before climbing to the top of the mast. Use the assembled mounting brackets as a handle to carry the unit to the mast top 16.Fasten the ODU (RFU and antenna) to the brass plate using the four screws, washers and lock-washers provided. 17.Align the four corner holes of the brass plate with the four corner holes of the RFU as shown in Figure 4-16. Figure 4-16: Aligning the Four Corner Holes 4-11 Chapter 4- 26 GHz Base Station ODU Installation 26 GHz ODU with an Integrated Antenna To install the 26 GHz ODU with an integrated antenna on a mast 1. Remove the contents from the box. 2. Remove the paper seal from the RFU/adapter. 3. Remove the bolts, washers, and lock-washers from the mounting bracket as shown in Figure 4-8. Figure 4-17: Mounting Brackets 4. Fasten the elevation adjustment plate to the unit, as shown in Figure 18. Use 4 x M6 screws with M6 washers and M6 spring washers to connect the mounting adaptor to the Radio. CAUTION Do not touch or lean on the antenna radome. Tightening Torque: 6.4 [N.M] 57 [Lbf.in] WALKair 3000 Installation Guide 4-12 Installation Procedure M6 screws with washers and spring washers Figure 4-18: Mounting the Elevation Adjustment Plate 5. Slide two mounting bracket bolts through the mini-elevation plate as shown in Figure 4-10. Figure 4-19: Mini Elevation Plate 4-13 Chapter 4- 26 GHz Base Station ODU Installation 6. Place the mini-elevation plate on top of the elevation plate as shown in Figure 4-11. Ensure that the top surfaces of both plates are aligned parallel to each other. This will provide 0° elevation. Figure 4-20: Mini-elevation Plate placed on Elevation Plate 7. Fasten two elevation bolts, spacers, washers and lock-washers in the center holes (#2 and #5) of the mini-elevation plate as shown in Figure 4-12. Figure 4-21: Fastening the Mini-elevation Plate 8. Fasten the remaining elevation bolts, spacers, washers and lock-washers as follows (see Figure 4-13): ¾ Use holes #3 and #4 for right-mounting the RFU. ¾ Use holes #1 and #6 for left-mounting the RFU. WALKair 3000 Installation Guide 4-14 Installation Procedure Figure 4-22: Fastening the Remaining Bolts 9. Insert the remaining mounting bracket bolts into the elevation plates as shown in Figure 4-14. Figure 4-23: Inserting the Remaining Mounting Bracket Bolts 10. Fasten the unit to the mast using the mounting brackets, washers, lock-washers and hex nuts (fully tighten the hex nuts) as shown in Figure 4-15. NOTE: Prior to installation, determine whether the RFU will be right or left mounted. 4-15 Chapter 4- 26 GHz Base Station ODU Installation Figure 4-24: Fastening the Unit to the Mast 11. Align the unit temporarily to the mast. NOTES: It is recommended to fasten the mounting brackets, washers, lock-washers and hex nuts onto the mounting bolts before climbing to the top of the mast. Use the assembled mounting brackets as a handle to carry the unit to the mast top. 12. Fasten the ODU (RFU and antenna) to the brass plate using the four screws, washers and lock-washers provided. WALKair 3000 Installation Guide 4-16 Installation Procedure Connecting the Cables The procedure consists of connecting the ground and RF cables. See Table 4-1 and Figure 4-25. Note that a single coaxial cable is connected between each sector RFU and the respective sector IDU IF MUX/Power Feeder. NOTE: For a cable length greater than 150m, use a higher quality cable than the LMR400, since the total cable attenuation must not exceed 20dB regardless of its length. Table 4-1: BS 26 GHz ODU Cable Connections Cable Connector From To COAX 50Ω N-Type RFU BS-SA/IF-MUX/DEMUX Grounding M6 screw diameter RFU Ground Figure 4-25: Connections for 26 GHz BS ODU with Horn (left) and Integrated (right) antenna 4-17 Chapter 4- 26 GHz Base Station ODU Installation Connecting the Ground/Earth Cable To connect the ground/earth cable: • Referring to Figure 4-25, connect the ground/earth cable to the BS ODU. Connecting the IF cable To connect the IF Cable: • Referring to Figure 4-25, connect a single coaxial cable is between the ODU and the IDU. NOTE: For a cable length greater than 110m, use a higher quality cable than the LMR400, since the total cable attenuation must not exceed 20dB. • Referring to Figure 4-26, when routing the coaxial cable, leave a service loop at the RFU end to provide a sufficient length of cable to allow replacement of a faulty connector, when necessary. • Secure the coaxial cable so that there is no mechanical stress at the RFU connection. Follow the superstructure with the coaxial cable to its base, and then to the building. • If the coaxial cable requires suspension from the base to the building, use a stranded wire to support the coaxial cable weight (This support will prevent a migration of the cable's inner conductor to the shield.). WALKair 3000 Installation Guide 4-18 Installation Procedure • Sealing the ODU Connector – See Sealing the ODU Connector. Figure 4-26: Service Loop for BS 26 GHz ODU with Horn (left) and Integrated (right) Antenna CAUTION The IF cable connector must be a certified outdoor connector. The outdoor connectors should be tightened using sleeves. 4-19 5 Chapter 5 - 28 GHz Base Station ODU Installation In This Chapter: This chapter describes how to install the 28 GHz BS ODU.. Chapter 5- 28 GHz Base Station ODU Installation General Guidelines When installing the Base ODU, the following steps must be performed: • Install the outdoor equipment, including the antenna. • Connect RF and IF cables. • Align the Base antenna (as described in the following section) • Mount the unit. • Ground the ODU. Follow the guidelines below to ensure proper and smooth installation. NOTE: Perform an RF survey at the beginning of an installation project to ensure that the spectrum is clear. Continue performing surveys every so often during the course of installation to ensure that no one is interfering with your spectrum. Location and Orientation • Location: the location of the RFU on the mast, the location and orientation (azimuth) of the antenna, including tilt when applicable, must be determined prior to installation. • Do not install the antenna at the top of the pole: Always leave at least 40 cm space between the top of the pole and the antenna for better lightning protection. Clearance around BS antennas • To avoid frequency reuse problems caused by unwanted reflections, the main lobe of the antenna must be clear of any metallic objects for a range of up to 20 meters. • In order to avoid the need to refer to particular antenna radiation patterns, the following criterion can be used: Clear metallic objects from a zone of up to 90 degrees to the right and left, and 45 degrees above and below, the antenna bore sight, for a distance of at least 20 meters. • Make sure that there are no obstacles located in front of the WALKair antenna, such as masts, transmission equipment from other vendors, or another WALKair antenna. These kinds of obstacles can reflect power from the rear Terminals (which are behind the antenna) directly into the antenna's main beam, which can potentially decrease the Frequency Reuse performance. WALKair 3000 Installation Guide 5-2 General Guidelines Alignment • BS Antenna Alignment: Proper alignment of the base antenna in the elevation plane is critical for decreasing the level of interference with neighboring cells. Therefore, be sure to balance the antenna pole before Elevation alignment. We recommend using an electronic level for proper pole balancing. Inter-sector Distance • Inter-sector distance; The minimal distance required between neighboring sectors is 1m, as shown below: Figure 5-1: Distance between Neighboring Sectors (view from above) 5-3 Chapter 5- 28 GHz Base Station ODU Installation Roof Corner Installation When installing on a roof corner, leave a space of 0.5 meter above the railing and no less than 15 meters above the ground, as shown below: Figure 5-2: Installing on a Roof Corner Redundancy Installations For a redundancy installation, leave a space of 1m between the two ODUs, either vertically or horizontally (installed on separate masts). NOTE: Before tightening the redundant antenna, verify that the alignment is the same as the original sector. Inspection • Before leaving the installation site, check that all the hardware on the mount and antenna is secure. • The antenna should be inspected at least once a year to check its condition and to ensure safe operation and maintenance. • Qualified personnel, experienced in antenna installation, must perform this inspection. WALKair 3000 Installation Guide 5-4 Installation Procedure Installation Procedure Tools Required for Installation Tools Required: • Cross screwdriver • Flat head screwdriver • Adjustable wrench • Spirit Level BS-RFU Management Software and Hardware NOTE: It is recommended to configure the RFU indoors before mounting it on the mast. Optional software purchased from Alvarion is used to electronically configure the RF Gain of a 28 GHz Base Station antenna via a laptop computer (see Configuring the RF Gain Using Optional BS-RFU Management Software, on page 5-11). The following equipment is required: • Laptop computer with Windows OS • Optional Software application for Base Station: See WALKair 3000 Price List item BS-RFU Management SW for Windows (to install, copy it from the software CD to the laptop) • RS-232 Cable with one male and one female D-Type termination: pin-outs as follows: Laptop TS Signal 5 5 GND 2 3 TX 3 2 RX 5-5 Chapter 5- 28 GHz Base Station ODU Installation Mounting BS 28 GHz ODU on a Mast The BS 28 GHz ODU is supplied with the RFU, antenna and mounting adapter already assembled as a unit as shown in Figure 5-3. Mounting Holes RFU Antenna Figure 5-3: BS-ODU as supplied The assembled mounting kit bracket attaches to a vertical pipe ranging in diameter from 2-3/8” (60mm) to 4-1/2” (114mm). Mounting the Base Station 28 GHz ODU includes: • Mounting the BS 28 GHz ODU Brackets on page 5-7 • Setting the Azimuth on page 5-9 • Attaching the BS 28 GHz ODU to the assembly on page 5-9 • Adjusting the elevation on page 5-10 • Configuring RFU Gain Using Optional BS-RFU Management Software, on page 5-11 • Connecting the Cables on page 5-11 WALKair 3000 Installation Guide 5-6 Mounting BS 28 GHz ODU on a Mast Installing the Mounting Brackets To assemble the mounting brackets: 1. Locate the antenna mounting bracket and the elevation adjustment assembly. Figure 5-4: Threading the Elevation Adjustment Assembly 2. Thread the elevation adjustment assembly into the correct mounting bracket hole. 3. Lay the mounting bracket flat so that the slot and hole are centered. Loosely thread on the jam nut of the elevation bracket assembly. 5-7 Chapter 5- 28 GHz Base Station ODU Installation 4. Referring to Figure 5-5, assemble the two mounting braces and Vclamps to the pole/mast, each with two M10 x 160 mm hex head bolts and M10 flat washers. Figure 5-5: Attaching Brace and Clamp (one shown) 5. Referring to Figure 5-6, attach the antenna mounting bracket to the upper and lower braces using the M10 flat washer, M10 split lock washer and M10 hex nut (two nuts for the upper brace and two nuts for the lower brace). Figure 5-6: Attaching Antenna Mounting Bracket 6. Tighten the nuts so that the assembly is clamped to the pole/mast but is free to rotate around it. This will enable adjustments to the bracket assembly later on. WALKair 3000 Installation Guide 5-8 Mounting BS 28 GHz ODU on a Mast Setting the Azimuth To set the azimuth for the 28 GHz BS ODU: 1. Using a compass, optical sight or other suitable apparatus, rotate the pole/mast braces and V-clamps to the required azimuth. 2. Tighten the four nuts on the antenna mounting bracket bolts so that the assembly is held in place, but movement is possible. 3. Place a spirit level on the mount and adjust the mount to its vertical position (see Figure 5-7. Tighten the nuts fully. Figure 5-7: Setting the Azimuth Assembling the 28 GHz BS ODU To assemble the 28 GHz BS ODU: 1. Referring to Figure 5-8, assemble the BS 28 GHz ODU to the antenna mounting bracket using: 5-9 Chapter 5- 28 GHz Base Station ODU Installation • Two M10 x 40 mm hex head bolts, • M10 flat washers (one for the inside and one for the outside of the antenna), • M10 split lock washers and • Hex nuts. 2. Do not fully tighten the assembly in order to enable later adjustments. Figure 5-8: Attaching the BS 28 GHz ODU to the Assembly Adjusting the Elevation To adjust the 28 GHz BS ODU elevation: 1. Obtain the elevation tilt angle from the System Planner. Referring to Figure 5-9, place a spirit level on the top surface of the antenna. Adjust the elevation tilt (jam nut) until the required angle is achieved. 2. Tighten the antenna mounting bolts and the elevation tilt angle adjustment jam nut. After tightening, recheck the tilt angle. WALKair 3000 Installation Guide 5-10 Mounting BS 28 GHz ODU on a Mast Figure 5-9: Adjusting the Elevation Configuring RF Gain Using Optional BS-RFU Management Software The BS-RFU Radio Gain for RX and TX is set and the maximum signal reception is detected by locally connecting to the unit from a laptop running the (optional) BS-RFU Management Software. See also Optional BS-RFU Management Software and Hardware, on page 5-5. To configure the RF Gain using the BS-RFU Management Software 1. Referring to Figure 5-10, locate the software connector weatherproof cover at the underside of the BS RFU. Release the four fixing screws and put them along with the cover in a safe place. 5-11 Chapter 5- 28 GHz Base Station ODU Installation Figure 5-10: BS Software Connection 2. Attach a D-Type cable from the laptop to the Base Station software connector. (See also Optional BS-RFU Management Software and Hardware, on page 5-5). 3. Launch BS-RFU Management Software on the laptop. The Main window appears. WALKair 3000 Installation Guide 5-12 Mounting BS 28 GHz ODU on a Mast Figure 5-11: BS-RFU Management Software Window button to connect to the Base Station. The 4. Click the Base Station Serial Number and Version Number, and Status “running”, will appear in the Device Information section. Figure 5-12: BS-RFU Management Software Window (partial view), after Login 5. Check the Base Station Supply Voltage in the Supply Voltage Monitor area, and the Tx Power in the Radio Tx area. 6. Referring to Table 5-1, select the Transmit (Tx) and Receive (Rx) Gain values (in DBm), corresponding to the Cable Gain (attenuation) for your system in dBm 7. In the Radio Gain area of the window, using the adjacent buttons, enter the Transmit (Tx) and Receive (Rx) Gain values (from the previous step). 5-13 Chapter 5- 28 GHz Base Station ODU Installation Table 5-1: BS Radio Gain as a Function of Cable Gain (Attenuation) Tx Rx Tx Gain Cable Gain Rx Gain Cable Gain 45 -20 40 -12 44 -19 39 -11 43 -18 38 -10 42 -17 37 -9 41 -16 36 -8 40 -15 35 -7 39 -14 34 -6 38 -13 33 -5 37 -12 32 -4 36 -11 31 -3 35 -10 30 -2 34 -9 33 -8 32 -7 31 -6 30 -5 29 -4 28 -3 27 -2 7. Click the button to exit the software, and disconnect the cable from the Base Station. WALKair 3000 Installation Guide 5-14 Mounting BS 28 GHz ODU on a Mast Connecting the Cables The procedure consist of connecting the ground and the IF cables listed in Table 5-2 to the connections shown in Figure 5-13. Table 5-2: BS 28 GHz Cables and Connections Cable Connector From To IF/DC COAX 50 Ώ N-Type BS ODU BS IDU Ground/earth M6 screw diameter BS ODU Ground/earth Management D-Type 9 pin BS ODU PC Refer to the following sub-sections for specific instructions and criteria for connecting the cables. Figure 5-13: Connecting the BS 28 GHz ODU Connecting the Ground/Earth Cable To connect the 28 GHz BS ODU ground/earth cable: • Referring to Figure 5-13, connect the ground/earth cable to the BS ODU. 5-15 Chapter 5- 28 GHz Base Station ODU Installation Connecting the IF Cable To connect the 28 GHz BS ODU IF cable: • Referring to Figure 5-13, connect a single coaxial cable between the ODU and the IDU IF MUX. For a cable length greater than 150m, use a higher quality cable than the LMR400, since the total cable attenuation must not exceed 20dB regardless of its length. • Refer to Figure 5-14. When routing the coaxial cable, leave a service loop at the RFU end to provide a sufficient length of cable to enable replacing faulty connectors, when necessary. Secure the coaxial cable so that there is no mechanical stress at the RFU connection. Follow the superstructure with the coaxial cable to its base, and then to the building. If the coaxial cable requires suspension from the base to the building, use a stranded wire to support the coaxial cable weight (This support will prevent a migration of the cable's inner conductor to the shield) Sealing the ODU Connector – See Sealing the ODU Connector. Figure 5-14: BS 28 GHz ODU Service Loop CAUTION The IF cable connector must be a certified outdoor connector. The outdoor connectors should be tightened using shrink sleeves. WALKair 3000 Installation Guide 5-16 6 Chapter 6 - Base Station IDU Installation In This Chapter: • BS-SA Views and Interfaces, on page 6-2 • Mounting and Connecting the BS-SA, on page 6-6. Chapter 6- Base Station IDU Installation Overview The following elements may be part of a BS IDU: • BS-SA – provides interface to the backbone and to the RF equipment • IF-MUX 2 – used to implement two carriers per sector configuration • IF-MUX 4 – used to implement configurations of up to four carriers per sector (including Alvarix topology) and ODU redundancy. • E1-Switch – used to implement IDU redundancy NOTE: The number and type of elements in the indoor and outdoor equipment varies depending on the site topology. BS-SA Description The BS-SA is a stackable, 1U high unit that can be installed in rack, mounted on a wall, or simply placed on a flat surface such as a desk. It provides the following functions: • Connection to 10/100BaseT IP/Layer 2 backbone • Interface to E1 SDH backbone • Base-band to IF signal conversion • Local and remote management capabilities of the BS-SA and the TSs that it hosts. Power is provided by a dedicated -48 VDC power source. Several BS-SA models corresponding to the various frequency bands are available: 10.5 GHz, 26 GHz and 28 GHz. WALKair 3000 Installation Guide 6-2 BS-SA Description Views, LEDs and Connections The following figure shows the BS-SA front view. It is followed by tables describing the LEDs and interfaces. LEDs Figure 6-1: BS-SA Front View BS-SA LED Description The following table describes the BS-SA LEDs indications. Table 6-1: BS-SA LED Descriptions LED Internal Description BS-SA internal elements (software, Services, Ports Etc.) condition : Red - Missing or uncalibrated IF Card; E1 or ETH Port down - (blinking) BS-SA not configured or disabled Green - Ethernet port is “UP” (when service is configured on this port) - (blinking) BS-SA SW download running Yellow - BS-SA SW download failed - BS-SA SW version switchover - BS-SA unauthorized access External Air link status: Red - Most TS radio link loss - (blinking) BS-SA not configured or disabled Green - All the radio links and all ports are “UP” Yellow - S radio link loss (less than 50%) E1 E1 ports administration status and functionality Ethernet Ethernet Port administration status 6-3 Chapter 6- Base Station IDU Installation Table 6-2: BS-SA Front Panel Interface Connectors Interface Type/Rate Description 8 x E1 RJ45 Each port provides the interface to a 2 Mbps channel. 1 x Ethernet Port RJ45, 802.3 10/100 Ethernet interface Base T 1 NMS Ethernet Port RJ-45 Used for connection to WALKnet Network Management System. LCI RJ45 Provides an interface to a local craft terminal for management purposes. IF Port N-Type TX/RX -48 VDC Provides the interface to the RFU. WALKair 3000 Installation Guide 6-4 BS-SA Description The following figure shows the BS-SA rear panel with the power and ground connections. It is followed by a table describing the interface connections. NOTE: The ventilation is on the rear panel. Be sure to allow enough space for proper air-flow during the installation. Ground connection Power connection Figure 6-2:-BS-SA Rear View NOTE: Some BS-SA may have a four pin power connector. Both types of power connectors are described in the following table. Table 6-3: BS-SA Rear Panel Interface Connectors Power - Nominal –48 VDC, Fuse protected (5 A) Power - Nominal –48 VDC, Fuse protected (5 A) Ground Connector - Female 2-Pin Molex P/N 42179-2RI Pin for 16-18 AWG Connector - CN1068 Molex part number 39-01-2040 Located on rear panel 6-5 Chapter 6- Base Station IDU Installation Ground and Power Connections To connect the BS-SA to ground: Connect an earth cable to the grounding point on the rear panel of the BS-SA. To connect the BS-SA to power: Connect the –48 VDC power cable to the rear panel of the BS-SA. Mounting the BS-SA The BS-SA can be installed in any of the following configurations: • Wall mounting • Desktop mounting • Rack mounting Wall Mount To mount the Terminal Station on a wall: 1. Turn the BS-SA upside down and locate the two wall mounting holes. 2. Measure the distance between the holes. Prepare the wall for mounting. It is recommended to use rawlplugs and screws. Figure 6-3: Terminal Station IDU Wall Mounting WALKair 3000 Installation Guide 6-6 BS-SA Description Desktop Mount The BS-SA comes with four miniature support legs for the desktop option. Attach the support legs and place on a clean, flat surface as shown in Figure 10-2. Figure 6-4: Desktop Mount Rack Installation (19" or ETSI Racks) The BS-SA can be installed in either an ETSI or 19" rack using horizontal mounting. The unit is supplied with rack mounting brackets suitable for installation in both rack types. Before beginning the installation, verify that the rack is grounded in accordance with the local standards. To install the BS-SA IDU on a rack: 1. Referring to the following figure: • Position the BS-SA upside down and slide the side brackets into place. • Insert the screws provided and secure them. • Turn the unit the right way up. 6-7 Chapter 6- Base Station IDU Installation Figure 6-5: Installing Side Brackets 2. Referring to and Figure 10-3: • Fix the Terminal Station to the rack. Use the screws provided, two for each side bracket. Figure 6-6: Fixing the Terminal Station to the Rack WALKair 3000 Installation Guide 6-8 Descriptions of Additional Devices Descriptions of Additional Devices The devices described in this section are required to implement various configurations. For example, IF-MUX II and IF-MUX 4 are used to implement multi-carrier configurations and E1 switch is used to implement redundancy. The panels, LEDs and connections of each device is detailed. IF-MUX II IF-MUX II devices are used in two carrier configurations to multiplex the IF signal from two BS-SAs and feed the single signal to a single RFU. NOTE: DC is acquired from only one of the BS-SA units (In 2 + DC port). If the BS-SA connect to In 2 + DC fails, then the RFU will not receive power. To overcome this possibility, it is recommended to connect an external power feeder. RFU IF and DC All IF-MUX II connectors are N-Type Female IF-MUX II IF BS-SA IF BS-SA Figure 6-7: IF-MUX II To connect the BS-SAs to an IF-MUX device Connect the IF connector output on the front panel of each BS-SA to the IF connectors of the IF-MUX II. NOTE: No power connections are required to the IF-MUX II 6-9 Chapter 6- Base Station IDU Installation 2-Port Power Feeder The 2-Port Power Feeder supplies an external –48 VDC voltage to one or two RFUs. Figure 6-8: 2-Port Power Feeder WALKair 3000 Installation Guide 6-10 Descriptions of Additional Devices IF-MUX 4 NOTE: IF-MUX 4 is relevant to all frequency bands from 10.5 and 26 GHz (for Alvarix) to 28 GHz. IF-MUX 4 is used to implement topologies of: • Up to four carriers per sector (as opposed to two carriers per sector implemented using IF-MUX II) • ODU redundancy – by supplying connections to two RFUs NOTE: IF-MUX 4 requires a –48 VDC supply. Front Panel The IF-MUX 4 front panel contains the IF connections to the BS-SA (3000) and BS-BU (1000). Figure 6-9: IF-MUX 4 Front Panel Table 6-4: IF-MUX 4 Front Panel LED Descriptions LED Status Description Operational status of IF-MUX: OFF – power OFF. Green – device operational – OK Red – fault or error indication RFU LED RFU A and RFU B connection indication Green - RFU A power detected Orange - RFU B power detected 6-11 Chapter 6- Base Station IDU Installation Table 6-5: IF-MUX 4 Front Panel Port Descriptions Port Description COMMON/Tx Four IF port connections. Each port can be connected to either the IF port of a BS-SA device or the Tx connection to a BS-BU 1000 device (the BS-BU Rx is connected to one of the Rx ports). Rx Four ports that provide the IF Rx connection for the 1000 BS-BU Rear Panel The IF-MUX 4 rear-panel contains the RF connection ports, RF redundancy control ports, the power connection and fuse locations. NOTE: All fuses are (TBD) 3. Figure 6-10: IF-MUX 4 Rear Panel Table 6-6: IF-MUX 4 Rear Panel Port Descriptions Port RFU A and RFU B Description Connection to RF (outdoor) unit(s) through a coaxial cable. RFU A – Master or default RFU connection. RFU B – standby RFU connection for redundancy configuration (in which both RFU ports are connected in addition to the COM port.) COM Control port – connects to the WALKair 3000 LCI port I and R WALKair 1000 BS-BU I and R connections Power Power input: 48VDC WALKair 3000 Installation Guide 6-12 Descriptions of Additional Devices E1 Switch The E1-Switch provides redundancy capability to the BS-SA in terms of switching between up to 16 E1 lines from one BS-SA to another and controlling the IF-MUX 4 device. The Master BS-SA determines switching between the BS-SAs. There is also a reference clock switch for the input clock. The output clock is derived directly from the input clock. The default port is A. E1-switch also monitors the communication channel between BS-SA and IF-MUX 4. If a ‘Master request’ from the redundant BS-SA is detected, the E1 lines, reference clock and If-MUX 4 communication channel are switched to that BS-SA. A ‘Keep alive’ messaging mechanism relays specific message to the redundant (standby or slave) BS-SA as backup to the Ethernet channel. If there are no ‘Keep Alive’ signals from the Master BS-SA for more than 30 seconds, a timeout is indicated and a RED LED is lit on the E1Switch front panel. Front Panel The E1 switch front panel contains the backbone and network connections to the BS-SA units. Figure 6-11: E1 Switch Front Panel Table 6-7: E1 Switch LED Descriptions LED Status-A Description Green – BS-SA A is currently active Red – no message received from the BS-SA B for 30 seconds Status-B Green – BS-SA B is currently active Red – no message received from the BS-SA B for 30 seconds 6-13 Chapter 6- Base Station IDU Installation Table 6-8: E1 Switch Front Panel Port Descriptions Port Description Network Network interface to the E1 ports of the currently active BS-SA. BS A Connections to Master BS-SA E1 ports through the appropriate interface cables. BS B Connections to Stand-by BS-SA E1 ports through the appropriate interface cables. Clk-in Reference clock from network (for future support) Clk-out Based on Clk-in. (for future support) BS A Com Connection to BS-SA A COM (LCI connection) port BS B Com Connection to BS-SA B COM (LCI connection) port IF-MUX Com Connection to IF-MUX COM port Rear Panel The rear-panel contains the power connections, fuse and grounding. Figure 6-12: E1 Switch Rear Panel Table 6-9: E1 Switch Rear Panel Port Descriptions Port Power Fuse Description 48VDC 5A WALKair 3000 Installation Guide 6-14 Descriptions of Additional Devices Connections The E1-Switch connects one IF-MUX 4 device and two BS-SAs: Master BS-SA and Standby BS-SA. Each BS-SA is connected through two 8xE1 cables and one RS232 LCI cable. The IF-Mux 4 COM port is connected to the E1-Switch using a RS232 cable. The E1-Switch unit is connected to the network, using two 8xE1 cables and clock in/out for system synchronization. Figure 6-13. E1 Connections 6-15 Chapter 6- Base Station IDU Installation Connections for Various Configurations This section describes the connections for various configurations. General Instructions NOTE : This section describes only the BS-SA IF connections. The rest of the BSSA connections (E1, Ethernet, NMS, power and ground) are described in the previous section. The following instrucitons apply to all IF and RF connections : • Prepare the IF cables according to IF Cable Installation, page 2-13. • For the connections to the RFU, refer to the section Connecting the Cables in the relevant BS RFU section: 10.5/26/28 GHz. One Carrier per Sector This configuration is implemented by one BS-SA per RFU. To connect one BS-SA to one RFU: 1. Connect all the BS-SA connections according to the instructions in Views, Connections and LED Descriptions, page 6-3. 2. Route and connect the IF cable between the IF connector on the BSSA rear panel to the relevant IF connector on the RFU. RFU IF BS-SA Figure 6-14: Single Carrier per sector configuration WALKair 3000 Installation Guide 6-16 Connections for Various Configurations Two Carriers per Sector This configuration is implemented using two BS-SAs per RFU. An IFMUX II device is used to feed the two carriers to a single RFU. To connect two BS-SAs to one RFU: 1. Connect all the BS-SA connections according to the instructions in Views, Connections and LED Descriptions, page 6-3. 2. Route and connect the IF cables between the IF connectors on the rear panel of each BS-SA to the IF connectors on the IF-MUX II device. 3. Route and connect the IF cable from the IF-MUX II to the RFU. RFU Outdoor IF-MUX II BS-SA Indoor BS-SA Figure 6-15: Two BS-SAs and one RFU 6-17 Chapter 6- Base Station IDU Installation Up to Four Carriers (BS-SA only) per Sector IF-MUX 4 is used to implement a configuration of up to four carriers per sector. The carriers may be implemented using: • Only BS-SA 3000 devices - as described in this section; • Only BS-BU 1000 – as described in the WALKair 1000 Installation Manual; • A combination of both (Alvarix) – as described in the following section). Connecting up to Four BS-SAs to one RFU 1. Connect all the BS-SA connections according to the instructions in Views, Connections and LED Descriptions, page 6-3. 2. Route and connect the IF cables between the IF connectors on the rear panel of each BS-SA to the COMMON/Tx IF connectors on the IF-MUX 4 front panel. 3. Connect 48 VDC to the IF-MUX 4 rear panel power connector. 4. Connect the LCI port of any one of the BS-SAs to the IF-MUX 4 rear panel COM port. 5. Route and connect the IF cable from the IF-MUX 4 rear panel RFUA connector to the RFU. LCI from any one BS-SA, to IF-MUX 4 COM Figure 6-16: Four BS-SAs to One RFU WALKair 3000 Installation Guide 6-18 Connections for Various Configurations Alvarix This section describes how to connect any combination of up to four BS-SA and BS-BU (1000) devices to a single RFU, providing four carriers per sector. NOTE: Each BS-SA requires a single IF connection, while the BS-BU requires two IF connections: Tx and Rx. Four of the IF-MUX 4 IF ports (labeled as COMMON/Tx) serve as either BS-SA IF ports or BS-BU Tx ports. 1. Connect all the BS-SA connections according to the instructions in Views, Connections and LED Descriptions, page 6-3. 2. Route and connect the IF cables between the BS-SA rear panel IF connectors to the IF-MUX 4 front panel COMMON/Tx ports. 3. Route and connect the IF Tx cables from the BS-BU 1000 to the IFMUX 4 front panel COMMON/Tx ports, and the IF Rx cables from the BS-BU 1000 to the IF-MUX 4 front panel Rx ports. 4. Connect 48 VDC to the IF-MUX 4 rear panel power connector. 5. Connect the LCI port of any one of the BS-SAs to the IF-MUX 4 rear panel COM port (use the RJ45 pin-to-pin cable). 6. Route and connect the IF cable from the IF-MUX 4 rear panel RFUA connector to the RFU. The following figure shows a three carrier configuration implemented by two BS-SAs and one BS-BU 1000. Note that the BS-BU 1000 requires two connections. Figure 6-17: IF-MUX 4 Configuration 6-19 Chapter 6- Base Station IDU Installation One Carrier per Two Sectors This configuration is implemented by connecting a single BS-SA to two RFUs (the sectors should be exactly opposite and with different polarization). This configuration requires: • DE-MUX device - used to feed the single carrier to two RFUs. • 2-Port Power Feeder – used to supply the additional power to support two RFUs. The power feeder requires a power connection. NOTE: The DE-MUX device is weather proof and installed outdoors – near the RFUs to which it is directly connected. To connect one BS-SA to two RFUs: 1. Connect all the BS-SA connections according to the instructions in Views, Connections and LED Descriptions, page 6-3. 2. Route and connect the IF cable from the BS-SA IF connector to the 2-port Power Feeder. 3. Connect an IF cable between the 2-Port Power Feeder to the DEMUX, and from the DE-MUX to the RFUs. 4. Connect the IF cables from the DE-MUX to the RFUs. NOTE: N-Type right-angled connector is supplied to ensure the cabling does not interfere with closing of the rack door. Figure 6-18: One BS-SA and two RFUs WALKair 3000 Installation Guide 6-20 Redundancy Connections Redundancy Connections WALKair 3000 provides redundancy support for: • RFUs • BS-SA E1 connections • Management - LCI management connection is backed-up by an Ethernet management connection Redundancy is implemented through E1 Switch and IF- RFU Redundancy RFU redundancy is achieved by connecting two RFUs to the RFU A/B connections on the IF-MUX 4 rear panel. The Master and Standby units are automatically determined by the physical connection: the Master connections are the RF A connection to the IF-MUX 4. 1. Connect the IF connector of the RFU designated as the Master, to the RFU A connector on the IF-MUX 4 rear panel. 2. Connect the IF connector of the RFU designated as the Standby, to the RFU B connector on the IF-MUX 4 rear panel. 3. Connect the BS-SA LCI port to the IF-MUX 4 COM port. 4. Connect the BS-SA IF port to one of the COMMON ports on the IFMUX 4 front panel. Figure 6-19. Example of RFU Redundancy Connections 6-21 Chapter 6- Base Station IDU Installation BS-SA E1 Redundancy BS-SA E1 redundancy is implemented by connecting the E1 connections of two BS-SAs to the E1 Switch. 1. Master BS-SA connections: • Using the supplied cables, connect the E1 ports of the BS-SA designated as the Master, to the A ports on the E1 Switch. • Connect the BS-SA LCI port to the E1 Switch BS A COM • Connect the BS-SA Mng port to an Ethernet router or switch. 2. Standby BS-SA connections: • Using the supplied cables, connect the E1 connections of the BS-SA designated as the Standby, to the B connectors on the E1 Switch. • Connect the BS-SA LCI connector to the E1 Switch BS B COM • Connect the BS-SA Mng port to an Ethernet router or switch. 3. Connect E1 Switch Network ports to the E1backbone. 4. Connect E1 Switch COM port to the Network. Figure 6-20: Example of E1 Redundancy Connections WALKair 3000 Installation Guide 6-22 Redundancy Connections E1 and RF Redundancy To implement redundancy for the BS-SA and for RFUs, the following equipment is required: • Two BS-SAs • Two RFUs • E1 Switch • IF-MUX 4 Referring to the previous sections, interconnect the devices as illustrated in the following figure. Figure 6-21: Example of E1 and RFU Redundancy Connections 6-23 Chapter 6- Base Station IDU Installation RFU Redundancy in Alvarix This section describes how to implement RFU redundancy in an Alvarix installation consisting of up to four BS-SA (3000) and BS-BU (1000) devices (in any combination). General comments The following explanations clarify the connections. • The BS-SA and BS-BU (1000) units, as well as the Master and Standby RFUs are connected to an IF-MUX 4 device. • IF connections: • • Each BS-SA requires a single IF connection. • Each BS-BU requires two IF connections: Tx and Rx. Four of the IF-MUX 4 IF ports (labeled as COMMON/Tx) serve as either BSSA IF ports or BS-BU Tx ports. Redundancy information: • BS-BU (1000) - transmits redundancy information through two ports: I and R connected to corresponding I and R ports on IFMUX 4. NOTE: If more than one BS-BU is connected, the I and R port of the BSBUs must be interconnected according to instructions in the WALKair 1000 Installation Manual. • BS-BU (3000) – transmits redundancy information through LCI connection of one BS-SA to IF-MUX 4 COM port Connections 1. BU IF connections: • BS-SA IF connections: Route and connect the IF cables between the BS-SA rear panel IF connectors to the IF-MUX 4 front panel COMMON/Tx ports. • BS-BU IF connections: Route and connect the IF Tx cables from the BS-BU 1000 to the IF-MUX 4 front panel COMMON/Tx ports, and the IF Rx cables from the BS-BU 1000 to the IF-MUX 4 front panel Rx ports. 2. RFU Connections: • Connect the IF connector of the RFU designated as the Master, to the RFU A connector on the IF-MUX 4 rear panel. • Connect the IF connector of the RFU designated as the Standby, to the RFU B connector on the IF-MUX 4 rear panel. 3. RFU Redundancy information connections: • BS-SA: Connect the LCI port of any one of the BS-SAs to the IFMUX 4 rear panel COM port (use the RJ45 pin-to-pin cable). WALKair 3000 Installation Guide 6-24 Redundancy Connections • BS-BU: referring to the WALKair 1000 Installation Manual, interconnect (chain) the I and R ports of the BS-BUs and then connect the I and R ports of the top BS-BU in the chain to the I and R ports of the IF-MUX 4 rear panel. The following figure shows a three carrier configuration implemented by two BS-SAs and one BS-BU 1000. Note that the BS-BU 1000 requires two connections. Figure 6-22: IF-MUX 4 Configuration 6-25 7 Chapter 7 - 10.5 GHz Terminal Station ODU Installation In This Chapter: • Installation Guidelines, on page 7-2 • 10.5 GHZ TS ODU Specifications and Connections, on page 7-5 • Installing and Mounting the 10.5 GHz TS ODU, on page 7-5 • Aligning the 10.5 GHz ODU using the AAU, on page 7-10 • Aligning the 10.5 GHz Antenna Using a Compass, on page 7-15 Chapter 7- 10.5 GHz Terminal Station ODU Installation Installation Guidelines Follow these guidelines below to ensure proper and smooth installation: • Never install the RFU near power lines. • Assemble the RFU, bands and mounting adapter in a safe location before climbing up to the mounting location. Use caution when climbing, and when working at the mounting location. • Make sure you have determined the best location for the RFU pole before mounting the pole. Make sure that you can route the IF cable from the location into the building. • Before drilling any hole at the site building, make sure there are no electrical wires in the area of the holes. • All installations should conform to the local building and electrical codes. If you are not sure, contact a licensed building inspector or electrician in your area to assist you. Be aware that community conventions, if any, may have additional requirements. Also, check your homeowner's insurance policy for any restriction or expectations that may apply. • Choose a location that is easily accessible in most weather conditions for proper maintenance. • Consider seasonal changes. The location may appear clear in the winter, but spring and summer foliage could dramatically attenuate the signal. • If a tower/mast is already installed, we recommend installing the RFU-TS as high as possible to obtain the highest-quality power. • Do not install the RFU at the top of the pole; always leave at least 40 cm space between the top of the pole and the RFU for better lightning protection. • The RFU-TS and antenna must have a clear line-of-sight to the Base Station. Line-of-sight is defined as a first-order Fresnel zone that is clear of obstructions between the Base and the Terminal, including neighboring buildings, trees, power lines and other obstructions. • Do not install the RFU where people can block its line of sight. • Required clearance around TS antennas: To avoid frequency reuse problems caused by unwanted reflections, the main lobe of the antenna must be clear of any metallic objects for a range of up to 10 meters. In order to avoid the need to refer to particular antenna radiation patterns, the following criterion can be used: Clear metallic objects from a zone of up to 45 degrees to the right and left, and 45 degrees above and below, the antenna bore sight, for a distance of at least 10 meters, as shown below: WALKair 3000 Installation Guide 7-2 Installation Guidelines Figure 7-1: TS Antenna Clearance • Wall-mount installation requires a 0.5-meter gap between the wall and the RFU. The permitted azimuth alignment limits are ±45° (angle α in Figure 7-1 above). • The RFU-TS may be attached directly to the surface of the wall, with no gap in between, provided the wall is directly in front of the base station. When attaching the RFU-TS to a wall, azimuth is tolerated by no more than ±5° (angle β in the following figure). Figure 7-2: Mounting the RFU-TS on a Wall We recommend installing the RFU-TS at the corner of the roof 0.5 meters above the railing, as described in the figure below. If the existing conditions do not match the rules of a specific area, install it according to the description in the above paragraph (see Figure 7-2 above). 7-3 Chapter 7- 10.5 GHz Terminal Station ODU Installation Figure 7-3: Installing the RFU-TS on the Roof Corner NOTE: Installation on a roof corner is designed to overcome multipath problems arising due to proximity to a road. If you are mounting it on the middle of the roof, we recommend installing the RFU-TS at least 2 meters above the lowest roof line (for example, the line of the railing can be taken as a reference line). Make sure that there are no walls or blocks in front the RFU on the roof. • Before leaving the installation site, check that all hardware on the mount and antenna is secure. • The antenna should be inspected at least once a year to check its condition and to ensure safe operation and maintenance. Qualified personnel, experienced in antenna installation, must perform this inspection. Short Range Terminal The 10.5 GHz RFU-TSs should be installed at least 300 meters from the base station. For shorter distances, use a short-range (50-500 meter) RFU. This short-range type of RFU has a different part number than the standard RFU, and requires setting the RFU head type in the TS-BU as Short Range. WALKair 3000 Installation Guide 7-4 10.5 GHZ TS ODU Specifications and Connections 10.5 GHZ TS ODU Specifications and Connections The specifications of the integrated 10.5 GHz System antenna and RFU, are presented in the table below. Table 7-1: 10.5 GHz Terminal Station Specifications Item Parameters RFU + Antenna size (mm) 260x260x80 RFU + Antenna weight 4.3 kg Antenna Beam width 8º vertical and horizontal Figure 7-4 below shows the Terminal Station ODU cable connections: Figure 7-4: 10.5 GHz ODU Cable Connections Installing and Mounting the 10.5 GHz TS ODU Antenna Polarization NOTE The following instructions refer to a Terminal Station whose distance is farther than 300m from the Base Station. For close Terminal Stations (less than 300m) refer to your local distributor for further instructions. 7-5 Chapter 7- 10.5 GHz Terminal Station ODU Installation The 10.5 GHz unit supports both horizontal and vertical polarization using a mounting adaptor, without the need to disassemble and rotate the antenna. The RFU/antenna is mounted on a mast with an adjustable mounting grip/bands. It can be oriented in either a horizontal or a vertical polarization. The two figures below show the vertical and horizontal polarization of the antenna, from the front of the unit: Figure 7-5: Vertical Polarization Figure 7-6: Horizontal Polarization NOTE: Each polarization has a unique Part Number. Before attaching the mounting grip/bands to the RFU/antenna, refer to the example figures below for antenna orientation (rear of the unit). Figure 7-7: Vertical Polarization – rear of unit Figure 7-8: Horizontal Polarization – rear of unit WALKair 3000 Installation Guide 7-6 Installing and Mounting the 10.5 GHz TS ODU NOTE Use the position of the grounding connections to determine the RFU/antenna polarization. Vertical grounding pins and a left IF cable connector indicates vertical antenna polarization; horizontal grounding pins and a right IF cable connector indicates horizontal polarization. See the pictures above for more information. NOTE Use the position of the grounding connections to determine the RFU/antenna polarization. Vertical grounding pins and a left IF cable connector indicates vertical antenna polarization; horizontal grounding pins and a right IF cable connector indicates horizontal polarization. See the pictures above for more information. One of two alternative mounting kits may be provided for mounting the 10.5 Terminal Station ODU: MD – 0087 or MD – 1022. The following two sections describe these mounting kits. MD - 0087 Mounting Kit Figure 7-9: Vertical Polarization Figure 7-10: Horizontal Polarization To install and mount the 10.5 GHz ODU (mounting kit MD – 0087): 1. Open the packaging and remove the mounting adapter. 2. For a square adapter, insert the two bands in the designated slots. 3. Place the RFU upside down on a clean surface (with the antenna panel facing down). For Vertical polarization, the RF connector must be in the bottom left corner, and for Horizontal polarization, the RF connector must be in the bottom right corner. Refer to Antenna Polarization on page 7-5 for the correct polarization. 7-7 Chapter 7- 10.5 GHz Terminal Station ODU Installation 4. Place the mounting adapter on top of the RFU (located on the back of the antenna) with the spring on top, according to the polarization. 5. Connect the mounting adapter to the back of the RFU with four 10 mm screws. 6. Position the RFU on the mast, leaving at least 40 cm between the top of the pole and the RFU for better lightning protection. The mounting adapter slots/bands is designed to fit a wide range of poles/masts. The band will fit any mast up to 4.3 " diameter. The adjustable top bracket option is suitable for 3/4" to 3" poles/masts. 7. Tighten the bands or top bracket around the mast. 8. Slightly loosen all screws and adjust the tilt/elevation using the following screws: • To adjust the elevation, use the long screw located on the bottom of the adapter (1). When the elevation is properly set, tighten the two screws on both sides of the adapter (2). WALKair 3000 Installation Guide 7-8 Installing and Mounting the 10.5 GHz TS ODU • To adjust the azimuth, use the long screw located on the left side of the adapter (3). When the azimuth is properly set, tighten the two screws on the top and bottom of the adapter (4 Figure 7-11: Adjusting the Tilt/Elevation NOTE Each ¼ turn of the azimuth /elevation screws is equivalent to 0.5o (½ degree). The azimuth adjustment range is 20o, and the elevation adjustment range is ±21o (total of 42o). 9. To adjust the elevation, turn the antenna on the axis screw that joins the cross adapter base to the bottom bracket. 10. Ground the RFU to the mast using the grounding connections (M6 diameter) located at the back of the RFU/antenna. 11. Seal the IF cable connection to the RFU to prevent water drainage. 7-9 Chapter 7- 10.5 GHz Terminal Station ODU Installation Aligning the 10.5 GHz ODU Using the AAU AAU Overview The Antenna Alignment Unit tool (AAU) is a convenient, compact, waterresistant tool, designed to simplify installation of the WALKair 1000 Terminal Station's (TS) RFU + Antenna. This is achieved by providing audio and visual indications of the received signal strength. The AAU functions as an IF receiver that allows precise, yet easy alignment of the TS antenna towards the Base Station (BS) antenna. AAU Functionality The AAU is connected between the Indoor-Outdoor cable and the RFU. This provides a mechanism for measuring the received signal strength at the Terminal Station's RFU, enabling the installer to determine the best alignment of the TS's RFU/Antenna. The RX Signal Strength (RSS) is detected at the IF level. This is indicated via an audio tone, detected through an earphone, and a visual indication on the AAU. The AAU supports 3.5 GHz, 10.5 GHz and 26 GHz frequency bands, which are selected prior to activation. WALKair 3000 Installation Guide 7-10 Aligning the 10.5 GHz ODU Using the AAU AAU Specifications The AAU has two indicators, visual (an analog dial) and audio (via an earphone). When the received signal is strong, the needle on the visual indicator moves to the right, and a louder tone is audible in the earphone. The following table lists the AAU specifications: The following table describes the specifications for the AAU. Table 7-2: AAU Specifications Specifications Description Power Control: On/Off Frequency Selection: Thumb switch to set the received frequency Indications: Audio or Visual Received Gain: To adjust the received signal strength Power The AAU uses 48 VDC nominal from the TS BU via the Indoor-Outdoor cable and feeds the RFU. Size L x W x H = 25 x 12 x 6 cm. Water Immunity AAU complies with IP62 – water splash (IEC 529) AAU Frequency Bands support 26 GHz sub-bands A through H are supported with a single set of 64 IF channels (AAU index f24-f87) 10.5 GHz band is supported with a single set of 85 IF channels (AAU index f0-84) as shown in Annex 1. 7-11 Chapter 7- 10.5 GHz Terminal Station ODU Installation AAU Dials and Controls The following figure shows the AAU dials and controls. Figure 7-12: Antenna Alignment Unit (AAU) The following table describes the AAU control functions. Table 7-3: AAU Control Functions Controls Description RSS Level Indicator Shows the Rx Signal Strength RSS Level Selector Adjusts the offset level of the AAU Band Selector Selects which of the available bands is being used Channel Selector Selects the IF channel to be used ON/OFF Button Powers on the AAU Load Button Loads the IF Index with the channels to be used Earphone Jack Plugs the earphone connection into the AAU Power Indicator Indicates if power is on (Green) WALKair 3000 Installation Guide 7-12 Aligning the 10.5 GHz ODU Using the AAU AAU Installation Pre-requisites Before connecting the AAU, ensure that the following prerequisites apply: • The BS-BU is commissioned and the sector is transmitting. • The TS-BU is installed and powered ON. The IF cable is installed and connected to the TS-BU. Connecting the AAU To connect the AAU to the TS RFU: 1. Install the TS RFU with the antenna attached, and direct it in the approximate direction of the BS. Verify that the radio link is commissioned and active. 2. To use the AAU, disconnect the Indoor-Outdoor cable from the TS RFU, and connect it to the AAU Indoor connector. 3. Connect the power cable (part of the AAU kit) to the TS RFU. After the AAU is connected from the cable to the TS RFU, it is ready to detect the RSS. The AAU can now be used to make fine adjustments to the alignment. The following figure shows AAU to TS IDU connection. Figure 7-13: Connecting the AAU 7-13 Chapter 7- 10.5 GHz Terminal Station ODU Installation Detecting the RSS To activate the AAU and detect RSS: 1. Turn on the AAU. 2. Select the RF band and the AAU Index channel. See index conversion tables Table 3-8. 3. Press the LOAD button. The AAU is now operational and the indicator reflects the measured RSS. NOTE: The selected channel should be one that is transmitted by the sector of this Terminal Station. A conversion table is used so that the selected channel reflects the desired RF frequency. To detect the optimal RSS: 1. Point the antenna in the approximate direction of the Base Station, so that the RSS is strong enough to be detected by the antenna and the RFU. 2. Fine-tune the antenna azimuth by aligning it in the direction of the strongest received signal. NOTE If the indicator shows a weak signal, rotate the antenna until the signal gets stronger. Continue turning the antenna until optimal reception is achieved. After passing the optimal point, the signal gets weaker. The installer should now turn the antenna back in the opposite direction until the optimal point is reached again. If the received signal is too weak or too strong, the needle of the visual indicator will not point to the center, and detection of the optimal point will be difficult. Use the Level Selector to adjust the offset level so that the detection of the optimal point is clear, and the needle is in the center. 3. After determining the optimal azimuth point, perform the previous steps in this procedure once again to tune the elevation. NOTE It is recommended to verify the azimuth alignment again after aligning the elevation. WALKair 3000 Installation Guide 7-14 Aligning the 10.5 GHz Antenna Using a Compass Aligning the 10.5 GHz Antenna Using a Compass Aligning the TS antenna using the compass takes into account the original azimuth of the Base Station and calculates a new azimuth that is 90o to the Base Station. The idea is to align the outer frame of the antenna so that it is more in line with the new azimuth, which will achieve greater accuracy. Required Tools • Compass • Binoculars To align the TS antenna: 1. Identify the Base Station location and azimuth using the compass and the binoculars. 2. To achieve greater accuracy, add or subtract 90o to/from the Base Station azimuth, depending on whether you are looking from the left or the right side of the antenna. 3. Using the compass, align the outer frame of the antenna to the newly calculated azimuth so that the antenna's flat surface faces the Base Station, as shown in the following figure. Figure 7-14: TS Antenna Alignment 7-15 Chapter 7- 10.5 GHz Terminal Station ODU Installation Possible Interferences Generally, large reflecting surfaces in parallel or partly in the beam, will cause reflections of the radio signal. For example: • Metal/glass building • Moist earth • Water • Above ground metals (like poles and telephone lines) If you have a clear line-of-sight as defined above, the effect of this interference will be minor. NOTE: Avoid installing near reflecting objects. WALKair 3000 Installation Guide 7-16 8 Chapter 8 - 26 GHz Terminal Station ODU Installation In This Chapter: This chapter includes: • Unpacking guidelines on page 8-2 • Installation Guidelines on page 8-2 • Installing a TS 26 GHz ODU on page 8-5 • Connecting the Cables, on page 8-16 • Terminal Station Antenna Alignment using the AAU on page 8-18. Chapter 8- 26 GHz Terminal Station ODU Installation Unpacking Guidelines To unpack the TS system, follow these steps: 1. Carefully cut the sealing tape with a box cutter and open the box. 2. Remove the cardboard packing, any foam packing material, and protective plastic. 3. Compare the packing list with the items you received. If the items on the packing list do not match the items received, notify your Alvarion's representative. 4. Save the shipping cartons for reuse. Installation Guidelines CAUTION Never install the RFU near power lines. Before drilling any hole at the site building, make sure there are no electrical wires in the area of the holes. Assemble the RFU, bands and mounting adapter in a safe location before climbing up to the mounting location. Proceed with extreme caution when climbing, and working at the mounting location. Before leaving the installation site, check that all hardware on the mount and antenna is secure. All installations should conform to the local building and electrical codes. If you are not sure, contact a licensed building inspector or electrician in your area to assist you. Be aware that community conventions, if any, may have additional requirements. Check your homeowner’s insurance policy for any restrictions or exceptions that may apply. The antenna must be inspected at least once a year to check its condition and to ensure safe operation and maintenance. Qualified personnel must perform antenna inspection WALKair 3000 Installation Guide 8-2 Installation Guidelines Observe the above cautions and the guidelines below to ensure a proper and smooth installation: • Make sure you have determined the best location for the TS-RFU pole before mounting the pole. Make sure that you can route the IF cable from the location into the building. • Choose a location that is easily accessible in most weather conditions for proper maintenance. • Consider seasonal changes. The location may appear clear in the winter, but spring and summer foliage could dramatically attenuate the signal. • Do not install the TS-RFU where people can block it. • The TS-RFU and antenna must have a clear line-of-sight to the Base Station. The TS-RFU must be mounted so that the line-of-sight is clear of neighboring buildings, trees, power lines and other obstructions. • If you are mounting the TS-RFU on the middle of the roof, it is recommended to install the TS-RFU at least 2m above the lowest roofline (for example, the line of the railing can be taken as a reference line). Make sure that there are no walls or blocks in front of the RFU on the roof. • If you need to mount the RFU on the wall of a building, you must ensure that the RFU-TS will be at least 0.5m away from the wall and no less than 15m above the ground as shown in Figure 8-1. Figure 8-1: Mounting the RFU on a Wall • Do not install the RFU at the top of the pole; always leave at least 40 cm space between the top of the pole and the RFU for better lightning protection (see Figure 8-2). 8-3 Chapter 8- 26 GHz Terminal Station ODU Installation • It is recommended to install the TS-RFU at the corner of the roof 1m above the railing and no less than 15 m above the ground (see Figure 8-2). If the existing conditions do not match the rules of a specific area, install it according to the previous guideline. Figure 8-2: Installing the RFU-TS on the Roof Corner Short Range Terminal The 26 GHz RFU-TSs should be installed at least 300 meters from the base station. For shorter distances, use a short-range (50-500 meter) RFU. This short-range type of RFU has a different part number than the standard RFU, and requires setting the RFU head type in the TS-BU as Short Range. Tools Required for Installation Tools required for installation are as follows: • Cross screwdriver • Flat head screwdriver • Adjustable wrench WALKair 3000 Installation Guide 8-4 Installing a Terminal Station 26 GHz ODU Table 8-1 provides the recommended tightening torques for nuts used on stainless steel bolts, galvanized bolts or any bolts without the AST "A325" marking on the head. Table 8-1: Recommended Tightening Torque Nominal Bolt Size (inches) Nut Torque 1/4 50 IN-LBf 0.57 KGf-m 5.65 N-m 5/16 102 IN-LBf 1.175 KGf-m 11.52 N-m 3/8 15 FT-LBf 2.07 KGf-m 20.33 N-m 7/1 24 FT-LBf 3.32 KGf-m 32.54 N-m 1/2 37 FT-LBf 5.11 KGf-m 50.16 N-m Installing a Terminal Station 26 GHz ODU The mounting brackets described in this section support both horizontal and vertical antennas. NOTE: All the illustrations in this section depict a 1.5” pole diameter. For larger diameters, the azimuth adjustment bracket should be installed in a reverse position. Table 8-2 describes the recommended tightening torque for nuts used on stainless steel bolts, U-bolts, galvanized bolts or any bolts without the AST “A325” marking on the head. Table 8-2: Recommended Tightening Torque Nominal Bolt Size (inches) Nut Torque ¼ 50 IN-LBf 0.57 KGf-m 5.65 N-m 5/16 102 IN-LBf 1.175 KGf-m 11.52 N-m 3/8 15 FT-LBf 2.07 KGf-m 20.33 N-m 7/16 24 FT-LBf 3.32 KGf-m 32.54 N-m ½ 37 FT-LBf 5.11 KGf-m 50.16 N-m Tools Required • Cross head screwdriver • 9/16” socket or wrench 8-5 Chapter 8- 26 GHz Terminal Station ODU Installation • ½” wrench • Torque meter Installing a Terminal Station 26 GHZ ODU with a Vertical/Horizontal Mounting Adapter includes: • Mounting the Terminal Station 26 GHz ODU on this page • Adjusting the Terminal Station 26GHz ODU Antenna on page 8-13 • Connecting the Cables, on page 8-16 • Inspection before leaving the site on page 8-18. Mounting the Terminal Station 26 GHz ODU Mounting the Terminal Station 26 GHz ODU includes (in sequence): • Installing the Azimuth adjustment plate, on this page • Installing the Pole mount plate assembly, on page 8-8 • Installing he Elevation adjustment plate, on page 8-8 • Installing the TS 26 GHz ODU RFU Mounting Bar, on page 8-10 • Attaching the RFU to the Mounting Adapter, on page 8-12. Installing the Azimuth Adjustment Plate To install the azimuth adjustment plate 1. Attach the azimuth adjustment plate (P/N 101488-1) to the mast as shown in Figure 8-4. Use the U-bolt (100441-1), flat washer (WF38.SS-1), split lock washer (WS38.SS-1) and 3/8” x 16 bronze nuts (NH38-16.SB-1). 2. Align the plate so that the antenna will face the required direction (install the plate on the pole opposite to the antenna). 3. Attach the pole mount plate assembly to the mast (see Figure 8-3) using the two pole clamps (101459-1) and four 3/8” x 16 x 6.0 galvanized bolts (101585-600), galvanized split washers (WS38-GV1), galvanized flat washers (WF38-GV-1) and 3/8” x 16 galvanized hex nuts (NH38-16GV-1). WALKair 3000 Installation Guide 8-6 Installing a Terminal Station 26 GHz ODU Figure 8-3: Pole Mount Plate 4. Fully tighten the nuts so the azimuth adjustment plate is secured to the mast. Figure 8-4: Azimuth Adjustment Plate 8-7 Chapter 8- 26 GHz Terminal Station ODU Installation Installing the Pole Mount Plate Assembly To install the pole mount plate assembly: 1. Position the pole mount plate assembly against the mast directly opposite the azimuth adjustment plate as shown in Figure 8-3. 2. Remove the 3/8” hex nut and the flat and split lock washer attaching the azimuth adjustment rod to the pole mount plate assembly, and slip the rod into the azimuth adjustment hole of the azimuth adjustment plate (see Figure 8-3). NOTE The azimuth adjustment rod is shipped from the factory attached to the pole mount plate. CAUTION At this time, do not completely tighten the two 3/8” x 16 nuts. Installing the Elevation Adjustment Plate To install the elevation adjustment plate: NOTE The elevation adjustment plate allows the antenna to be tilted up or down, as shown in Figure 8-5. 1. Attach the elevation adjustment plate (101487-2) to the antenna mount, as shown in Figure 8-5. Use five ¼” – 20 pan head screws (SP14-20.09) and split lock washers (WS14.SS-1). 2. Fully tighten the screws to the proper torque. WALKair 3000 Installation Guide 8-8 Installing a Terminal Station 26 GHz ODU Figure 8-5: Elevation Adjustment Plate 3. Align the large diameter hub on the elevation adjustment plate to the pole mount plate and insert the brass rod into the elevation adjustment hole as shown in Figure 8-6. 4. Attach the two plates using two of the four screws, but do not tighten them. The screws should be inserted in the middle screw sockets (see Figure 8-6) and should be used with the SS flat washers, split lock washers, nylon washers and hex bolts as shown in Figure 8-7. 5. Align the brass rod in the pole mount plate with the desired elevation adjustment hole. Figure 8-6: Elevation and Mount Assembly 8-9 Chapter 8- 26 GHz Terminal Station ODU Installation 6. After choosing the maximum look-up or look-down angle, attach the two assemblies together using the other two hex bolts (the other two hex bolts used in the middle screw socket). 7. Tighten the bolts so the hardware sits snugly against the pole, but do not tighten them fully, as shown in Figure 8-7. Figure 8-7: Elevation and Mount Assembly Installing the TS 26 GHz ODU RFU Mounting Bar Vertical Polarization For vertical polarization, attach the RFU mounting bar to the antenna flange using the screw slots that are furthest from the marking dots as shown in Figure 8-8. WALKair 3000 Installation Guide 8-10 Installing a Terminal Station 26 GHz ODU Figure 8-8: Marking Dots Horizontal Polarization Installation For horizontal polarization, attach the RFU mounting bar to the antenna flange using the screw slots that are closest to the marking dots. Figure 8-9: Vertical Polarization Installation Figure 8-10: Horizontal Polarization Installation NOTE Whenever you disassemble the RFU mounting bars to switch polarization, make sure you replace the four spacers properly as shown in Figure 8-11. 8-11 Chapter 8- 26 GHz Terminal Station ODU Installation Figure 8-11: Spacers Location Attaching the RFU to the Mounting Adapter To attach the RFU to the mounting adapter: 1. Before you attach the RFU to the mounting adapter wave-guide, make sure that the round extra adapter is attached to the RFU. 2. Attach the RFU to the mounting bar according to polarization as shown in Figure 8-9 and Figure 8-10. WALKair 3000 Installation Guide 8-12 Installing a Terminal Station 26 GHz ODU Figure 8-12: RFU Adapter Adjusting the Terminal Station 26GHz ODU Antenna Adjusting the Terminal Station includes: • Adjusting the antenna azimuth clockwise, on this page • Adjusting the antenna azimuth counterclockwise, on this page • Adjusting the antenna elevation, on page 8-15 NOTE See also optional Terminal Station Antenna Alignment using the AAU on page 8-18. Adjusting the Antenna Azimuth Clockwise To adjust the antenna azimuth clockwise: 1. Using either a 9/16” wrench or an adjustable wrench, loosen the two inside 3/8” – 16 galvanized hex nuts on the azimuth adjustment rod as shown in Figure 8-13. 2. To rotate the antenna clockwise around the pole, tighten the outer 3/8” – 16 hex nut on the adjustment rod until the antenna is in the desired position. 8-13 Chapter 8- 26 GHz Terminal Station ODU Installation Adjusting the Antenna Azimuth Counterclockwise To adjust the azimuth counterclockwise: 1. Using either a 9/16” wrench or an adjustable wrench, loosen the 3/8” – 16 galvanized nut on the azimuth adjustment rod, as shown in Figure 8-13. 2. To rotate the antenna counterclockwise around the pole, tighten the inner two 3/8” – 16 hex nuts on the adjustment rod until the antenna is in the desired position. CAUTION Remember to fully tighten the two inside nuts and the four hex nuts on the pole mount clamp to the proper torque specification when the adjustment is complete. Fine azimuth adjustment allows for ±10 degrees. Be careful to tighten the pole clamps evenly to avoid creating a gap between a clamp and the pole. Figure 8-13: Fine Azimuth Adjustment WALKair 3000 Installation Guide 8-14 Installing a Terminal Station 26 GHz ODU Adjusting the Antenna Elevation To adjust the antenna elevation: 1. To adjust the look-up angle, using a ½” wrench or an adjustable wrench, rotate the elevation adjustment rod (as shown in Figure 8-14) counterclockwise to the desired position. 2. To adjust the look-down angle, using a1/2” wrench or an adjustable wrench, rotate the elevation adjustment rod (as shown in Figure 8-14) clockwise to the desired position. CAUTION Remember to fully tighten the four 3/8” – 16 bolts on the elevation adjustment plate to the proper torque specification, using a 9/16” wrench. Fine elevation adjustment allows for ±25º. Figure 8-14: Fine Elevation Adjustment 3. Check the fine azimuth adjustment. If necessary, repeat the Fine Azimuth Adjustment, and recheck the fine elevation until the antenna is aligned correctly. CAUTION Before leaving the installation site, check that all the hardware on the mount and antenna has been fully tightened. 8-15 Chapter 8- 26 GHz Terminal Station ODU Installation Connecting the Cables Table 8-3 and Figure 8-15 provide the details of the TS 26 GHz-ODU cable connections. Please notice that a single coaxial cable is connected between the TS-RFU and the TS-IDU. For a cable length greater than 150m, use a higher quality cable than the LMR400, since the total cable attenuation must not exceed 20dB regardless of its length. Table 8-3: 26 GHz ODU Cable Connections Cable Connector From To COAX 50Ω N-Type RFU IDU Ground M6 screw diameter RFU Ground Figure 8-15: TS 26 GHz-ODU Cable Connections Connecting the TS 28 GHz ODU Cables includes: • Connecting the ground/earth cable • Connecting the IF cable WALKair 3000 Installation Guide 8-16 Installing a Terminal Station 26 GHz ODU Connecting the Ground/Earth Cable connect the ground/earth cable: • Referring to Figure 8-15, connect the ground/earth cable to the TS ODU. Connecting the IF cable To connect the IF cable: • Referring to Figure 8-15, connect a single coaxial cable is between the ODU and the TS IDU IF connector. For a cable length greater than 150m, use a higher quality cable than the LMR400, since the total cable attenuation must not exceed 20dB regardless of its length. • At the RFU end of the cable, leave a Service Loop. Refer to Figure 8-16. When routing the coaxial cable, leave a service loop at the RFU end to provide a sufficient length of cable to allow replacement of a faulty connector, when necessary. Secure the coaxial cable so that there is no mechanical stress at the RFU connection. Follow the superstructure with the coaxial cable to its base, and then to the building. If the coaxial cable requires suspension from the base to the building, use a stranded wire to support the coaxial cable weight (This support will prevent a migration of the cable's inner conductor to the shield). • Sealing the ODU Connector – See Sealing the ODU Connector. Figure 8-16: TS 26 GHZ-ODU Service Loop 8-17 Chapter 8- 26 GHz Terminal Station ODU Installation CAUTION The IF cable connector must be a certified outdoor connector. The outdoor connectors should be tightened using sleeves. At the RFU end of the cable, leave a Service Loop (see above). Inspection and Routine Maintenance CAUTION Before leaving the installation site, check that all the ODU hardware on the mount and antenna are secure. The antenna must be inspected at least once a year to check its condition and to ensure safe operation and maintenance. Qualified personnel must perform antenna inspection. Terminal Station Antenna Alignment Using the AAU (Fine Tuning) For the description of the Antenna Alignment Unit (AAU) controls and functionality, refer to the AAU Manual. Before connecting the AAU, ensure that the following prerequisites apply: • The BS-BU is commissioned and the sector is transmitting. • The TS-BU is installed and powered ON. • The IF cable is installed and connected to the TS-BU. Terminal Station Antenna Alignment using the AAU includes: • Connecting the AAU • Setting the AAU and detecting the RSS • Locating the Optimal RSS Connecting the AAU To connect the AAU: 1. Install the TS-RFU with the antenna attached and direct it in the approximate direction of the BS. Verify that the radio link is commissioned and active. WALKair 3000 Installation Guide 8-18 Terminal Station Antenna Alignment Using the AAU (Fine Tuning) 2. To use the AAU, disconnect the IF cable from the TS-RFU and connect it to the AAU indoor connector. 3. Connect the power cable (part of the AAU kit) to the TS-RFU as shown in Figure 8-17. Figure 8-17: Connecting the AAU Setting the AAU and Detecting the RSS To set the AAU and detect the RSS: 1. Turn on the AAU. 2. Refer to the Antenna Alignment Unit Manual, Appendix A, pages A11 to A24 for index conversion tables. 3. Press the LOAD button. The AAU is now operational and the indicator reflects the measured RSS. 8-19 Chapter 8- 26 GHz Terminal Station ODU Installation NOTE The selected channel should be one that is transmitted by the sector of this TS. A conversion table is used so that the selected channel reflects the desired RF frequency. Locating the Optimal RSS To locate the optimal RSS: 1. Point the antenna in the approximate direction of the Base Station, so that the RSS is strong enough to be detected by antenna and RFU. 2. Fine-tune the antenna azimuth by aligning it in the direction of the strongest received signal. NOTE If the indicator shows a weak signal, rotate the antenna until the signal gets stronger. Continue turning the antenna until optimal reception is achieved. After passing the optimal point, the signal gets weaker. The installer should now turn the antenna back in the opposite direction until the optimal point is reached again. If the received signal is too weak or too strong, the needle of the visual indicator will not point to the center and detection of the optimal point will be difficult. Use the Level Selector to adjust the offset level so that the detection of the optimal point is clear and the needle is in the center.. 3. After determining the optimal azimuth point, repeat previous steps to determine the elevation point. NOTE After aligning the elevation, it is recommended to verify the azimuth alignment again. WALKair 3000 Installation Guide 8-20 9 Chapter 9 - 28 GHz Terminal Station ODU Installation In This Chapter: This chapter includes: • Unpacking the TS , on page 9-2 • Installation Guidelines, on page 9-2 • Installing the 28 GHz TS ODU, on page 9-7 • Connecting the Cables, on page 9-25 • Inspection and Maintenance, on page 9-27. Chapter 9- 28 GHz Terminal Station ODU Installation Unpacking Guidelines To unpack the TS system, follow these steps: 1. Carefully cut the sealing tape with a box cutter and open the box. 2. Remove the cardboard packing, any foam packing material, and protective plastic. 3. Compare the packing list with the items you received. If the items on the packing list do not match the items received, notify your Alvarion's representative. Installation Guidelines CAUTION Never install the RFU near power lines. Before drilling any hole at the site building, make sure there are no electrical wires in the area of the holes. Assemble the RFU, bands and mounting adapter in a safe location before climbing up to the mounting location. Proceed with extreme caution when climbing, and working at the mounting location. Before leaving the installation site, check that all hardware on the mount and antenna is secure. All installations should conform to the local building and electrical codes. If you are not sure, contact a licensed building inspector or electrician in your area to assist you. Be aware that community conventions, if any, may have additional requirements. Check your homeowner’s insurance policy for any restrictions or exceptions that may apply. The antenna must be inspected at least once a year to check its condition and to ensure safe operation and maintenance. Qualified personnel must perform antenna inspection. WALKair 3000 Installation Guide 9-2 Installation Guidelines Observe the above cautions and the guidelines below to ensure a proper and smooth installation: • Make sure you have determined the best location for the TS-RFU pole before mounting the pole. Make sure that you can route the IF cable from the location into the building. • Choose a location that is easily accessible in most weather conditions for proper maintenance. • Consider seasonal changes. The location may appear clear in the winter, but spring and summer foliage could dramatically attenuate the signal. • Do not install the TS-RFU where people can block it. • The TS-RFU and antenna must have a clear line-of-sight to the Base Station. The TS-RFU must be mounted so that the line-of-sight is clear of neighboring buildings, trees, power lines and other obstructions. • If you are mounting the TS-RFU on the middle of the roof, it is recommended to install the TS-RFU at least 2m above the lowest roofline (for example, the line of the railing can be taken as a reference line). Make sure that there are no walls or blocks in front of the RFU on the roof. • If you need to mount the RFU on the wall of a building, you must ensure that the RFU-TS will be at least 0.5m away from the wall and no less than 15m above the ground as shown in Figure 9-1. Figure 9-1: Mounting the 28 GHz TS ODU on a Wall • Do not install the RFU at the top of the pole; always leave at least 40 cm space between the top of the pole and the RFU for better lightning protection (see Figure 9-2). • It is recommended to install the TS-RFU at the corner of the roof 1m above the railing and no less than 15 m above the ground (see Figure 8-2). If the existing conditions do not match the rules of a specific area, install it according to the previous guideline. 9-3 Chapter 9- 28 GHz Terminal Station ODU Installation Figure 9-2: Installing the TS 28 GHz ODU on the Roof Corner WALKair 3000 Installation Guide 9-4 Installation Guidelines Tools Required for Installation Tools required for TS 28 GHz ODU installation are as follows: • Cross screwdriver • 9/16" wrench or adjustable wrench • 1/2 " wrench or adjustable wrench Table 9-1 provides the recommended tightening torques for nuts used on stainless steel bolts, galvanized bolts or any bolts without the AST "A325" marking on the head. Table 9-1: 28 GHz TS ODU Recommended Tightening Torque Nominal Bolt Size (inches) Nut Torque 1/4 50 IN-LBf 0.57 KGf-m 5.65 N-m 5/16 102 IN-LBf 1.175 KGf-m 11.52 N-m 3/8 15 FT-LBf 2.07 KGf-m 20.33 N-m 7/16 24 FT-LBf 3.32 KGf-m 32.54 N-m 1/2 37 FT-LBf 5.11 KGf-m 50.16 N-m 9-5 Chapter 9- 28 GHz Terminal Station ODU Installation Optional TS-RFU Management Software and Hardware Optional software can be purchased from Alvarion to electronically adjust a 28 GHz Terminal Station antenna via a laptop computer (for a PDA device, Terminal Station only). The adjustment method involves first programming the Station RFU for required Radio Gain, then adjusting azimuth for maximum signal reception, and finally adjusting the elevation while maintaining or improving the maximum signal reception. Equipment required for each method is as follows: Table 9-2: Terminal Station Antenna Electronic Adjustment Method Laptop Tools required Laptop computer with Windows OS Optional Software application for Terminal Station: See WALKair 3000 Price List item TS-RFU Management SW for Windows (to install, copy it from the software CD to the laptop) RS-232 Cable with one male and one female D-Type termination: pin-outs as follows: PDA (Palm) Laptop TS Signal 5 5 GND 2 3 TX 3 2 RX PDA Optional Software application for Terminal Station: See WALKair 3000 Price List item TS-RFU Management SW for Palm OS (to install, copy it from the TS software CD to the Palm OS) RS-232 Cable with two male D-Type terminations: pin-outs as follows: PDA TS Signal 5 5 GND 2 3 TX 3 2 RX WALKair 3000 Installation Guide 9-6 Installing the TS 28 GHz ODU Installing the TS 28 GHz ODU The TS 28 GHz ODU is supplied with the RFU, antenna and mounting adapter already assembled as a unit as shown in Figure 9-3. Figure 9-3: TS-ODU as Supplied from Manufacturer Installing the Terminal Station 28 GHz ODU includes: • Installing the azimuth adjustment plate on page 9-8 • Installing the pole mounting plate on page 9-9 • Attaching the TS 28 GHz ODU to the Elevation Adjustment Plate on page 9-10 • Installing the ODU/elevation assembly on the pole mount assembly on page 9-11 • Adjusting the TS 28 GHz ODU Antenna on page 9-12 • Connecting the Cables on page 9-25 9-7 Chapter 9- 28 GHz Terminal Station ODU Installation Installing the Azimuth Adjustment Plate To install the azimuth adjustment plate on the pole/mast: 1. Before installing, decide on which side of the pole to install the antenna. You will install the azimuth adjustment plate on the opposite side. 2. Referring to Figure 9-4, fix the azimuth adjustment plate to the pole. Use the U-bolt and flat washer, split lock washer, and 3/8" - 16 bronze nuts. 3. Fully tighten the nuts so that the azimuth adjustment plate is secured. The recommended nut torque is 15 ft-lb. Figure 9-4: Azimuth Adjustment Plate WALKair 3000 Installation Guide 9-8 Installing the TS 28 GHz ODU Installing the Pole Mounting Plate To install the pole mounting plate: 1. Referring to Figure 9-5, position the pole mount plate assembly against the pole directly opposite the azimuth adjustment plate. 2. The fine adjustment rod is attached to the pole mounting plate when shipped from the factory. Remove the 3/8 hex nut, flat and split lock washer. 3. Slip the rod into the azimuth adjustment plate slot (see also Figure 9-4). Figure 9-5: Pole Mounting Plate 4. Attach the pole mounting assembly to the pole using the two pole clamps and the four 3/8 –16 x 6.0" galvanized bolts, galvanized split lock washers, galvanized flat washers and 3/8-16 galvanized hex nuts. CAUTION Do not completely tighten the nuts yet. 5. With the rod in position through the slot of the azimuth adjust bracket, add one galvanized flat washer, one galvanized split lock washer and 3/8-16 galvanized hex nut. 9-9 Chapter 9- 28 GHz Terminal Station ODU Installation Attaching the 28 GHz TS ODU to the Elevation Adjustment Plate To attach the 28 GHz TS ODU to the elevation adjustment plate: 1. Referring to Figure 9-6, attach the elevation adjustment plate (on the TS 28 GHz ODU assembly) to the antenna mount as shown in figures x and y. Use five ¼-20 pan head screws and split lock washers. 2. Fully tighten the screws to the recommended torque of 50 in-lb. Figure 9-6: Elevation Adjustment Plate Attachment WALKair 3000 Installation Guide 9-10 Installing the TS 28 GHz ODU Installing the ODU/Elevation Assembly on the Pole Mount Assembly To install the ODU/elevation assembly on the pole mount assembly: 1. Align the large diameter hub on the elevation adjustment plate to the pole mount plate (see Figure 9-7). 2. Insert the brass rod into the elevation adjustment hole. For maximum downlook, insert the brass rod into the lower hole. For uplook angle, insert the rod into the top hole (see Figure 9-8). Figure 9-7: Aligning the Hub Figure 9-8: Inserting the Brass Rod 9-11 Chapter 9- 28 GHz Terminal Station ODU Installation 3. Referring Figure 9-9, attach the elevation assembly to the pole mount assembly using four flat washers, split lock washers, nylon washers and hex bolts. 4. Tighten the bolts until the hardware is snug with the pole, but do not fully tighten at this point. Figure 9-9: Attaching Elevation Assembly to Pole Mount Assembly Adjusting the TS 28 GHz ODU Antenna Adjusting the TS 28 GHz ODU antenna includes: • Fine Azimuth Adjustment, on this page • Fine Elevation Adjustment, on page 9-14 • Vertical/Horizontal Adjustment, on page 9-16 • Adjustment Using Optional TS-RFU Management Software, on page 9-16. Fine Azimuth Adjustment Fine Azimuth adjustment enables ± 10º accuracy. If you are using Optional TS-RFU Management Software: • For adjustment with a laptop computer: perform this procedure in conjunction with Adjusting with a Laptop, on page 9-16. on page 9-21. • -OR- • For adjustment with a PDA device: perform this procedure in conjunction with Adjusting with a PDA, on page 9-22. WALKair 3000 Installation Guide 9-12 Installing the TS 28 GHz ODU Clockwise Fine Adjustment To adjust the azimuth clockwise: 1. Referring to Figure 9-10, loosen the four azimuth lock bolts on the pole mount clamps. 2. Using a 9/16 or an adjustable wrench, loosen the two 3/8-16 inner galvanized hex nuts on the azimuth adjustment rod. Figure 9-10: Clockwise Azimuth Adjustment 3. To rotate the antenna clockwise, tighten the outer 3/8-16 hex nut on the azimuth adjustment rod until the antenna is in the required position. 4. Fully tighten the two inside nuts to the recommended torque of 15 ft-lb. Tighten the four azimuth lock bolts to the same torque. CAUTION Tighten the pole clamps evenly to avoid a gap between the clamp and pole. Counter clockwise Fine Adjustment To adjust the azimuth counter clockwise: 1. Referring to 9-11, loosen the four azimuth lock bolts. 2. Using a 9/16 or an adjustable wrench, loosen the outer 3/8-16 outer galvanized hex nut on the azimuth adjustment rod. Leave at least three threads exposed. 9-13 Chapter 9- 28 GHz Terminal Station ODU Installation Figure 9-11: Counter Clockwise Azimuth Adjustment 3. To rotate the antenna counter clockwise, tighten the two inner 3/816 hex nuts on the azimuth adjustment rod until the antenna is in the required position. 4. Fully tighten the outside 3/8-16 nut to the recommended torque of 15 ft-lb. Tighten the four azimuth lock bolts on the pole mount clamps to the same torque. CAUTION Tighten the pole clamps evenly to avoid a gap between the clamp and pole. Fine Elevation Adjustment Fine elevation adjustment enables ± 25º. If you are using Optional TS-RFU Management Software: • For adjustment with a laptop computer: perform this procedure in conjunction with Adjusting with a Laptop, on page 9-16. on page 9-21. • -OR- • For adjustment with a PDA device: perform this procedure in conjunction with Adjusting with a PDA, on page 9-22. Uplook Adjustment WALKair 3000 Installation Guide 9-14 Installing the TS 28 GHz ODU To adjust uplook: 1. Referring to Figure 9-12, using a 1/2" or adjustable wrench, rotate the elevation rod adjust nut counter clockwise to the required position. 2. Using a 9/16" or adjustable wrench, tighten the four 3/8-16 bolts on the elevation adjustment plate to the recommended torque specification of 15 ft-lb. Figure 9-12: Uplook Adjustment Downlook Adjustment To adjust downlook: 1. Referring to Figure 9-12, using a 1/2" or adjustable wrench, rotate the elevation rod adjust nut clockwise to the required position. 2. Using a 9/16" or adjustable wrench, tighten the four 3/8-16 bolts on the elevation adjustment plate to the recommended torque specification of 15 ft-lb. 9-15 Chapter 9- 28 GHz Terminal Station ODU Installation Vertical/Horizontal Adjustment The default polarization for the antenna is vertical polarization. To change the antenna polarization: 1. Remove the RFU from the antenna. 2. Rotate the antenna by 90°. 3. Remount the RFU onto the antenna. Adjustment Using Optional TS-RFU Management Software The TS-RFU Management Software enables you to set Radio Gain for RX and TX, and detect maximum signal reception. Software is available for both laptops and PDA (Palm Pilot). The following techniques are described below: • Adjusting with a Laptop, on this page • Adjusting with a PDA, on page 9-22 Adjusting with a Laptop See also Optional TS-RFU Management Software and Hardware, on page 9-6. The procedure is performed in five steps as follows: Step 1 – Connecting the Laptop to the Terminal Station, on this page Step 2 – Setting the Radio Gain, on page 9-17 Step 3 – Setting Azimuth for Maximal Signal Reception, page 9-21 Step 4 – Setting the Elevation for Maximal Signal Reception, page 9-21 Step 5 – Completing the Procedure, on page 9-21 Step 1 – Connecting the Laptop to the Terminal Station To connect the laptop to the Terminal Station: 1. Referring to Figure 9-13, locate the software connector weatherproof cover on the Terminal Station. Release the four fixing screws and put them along with the cover in a safe place. WALKair 3000 Installation Guide 9-16 Installing the TS 28 GHz ODU Figure 9-13: TS Software Connection 2. Attach a D-Type cable from the laptop to the Terminal Station software connector. See Optional TS-RFU Management Software and Hardware, on page 9-6. Step 2 – Setting the Radio Gain To set the Radio Gain: 1. Open the TS-RFU Management Software on the laptop by doubleclicking the icon. The TS-RFU Management Software window is displayed below. 9-17 Chapter 9- 28 GHz Terminal Station ODU Installation Figure 9-14: TS-RFU Management Software Window 2. Click the button to connect to the Terminal Station. When the password window appears (as displayed below), if you are using the application for the first time, type the default password 123, and then click OK. Figure 9-15: TS-RFU Management Software Password Window NOTE To request an alternative password, please contact Alvarion Technical Support. The Terminal Station Serial Number and Version Number will appear in the Device Information section, as shown below. WALKair 3000 Installation Guide 9-18 Installing the TS 28 GHz ODU Figure 9-16: TS-RFU Management S/W Window, after Login 3. Check the Terminal Station Supply Voltage in the Supply Voltage Monitor area of the window. 4. Referring to Table 9-3, select the Transmit (Tx) and Receive (Rx) Gain values (in DBm), corresponding to the Cable Gain (attenuation) for your system in dBm 5. In the Radio Gain area of the window, using the adjacent buttons, enter the Transmit (Tx) and Receive (Rx) Gain values (from the previous step). 9-19 Chapter 9- 28 GHz Terminal Station ODU Installation Table 9-3: TS Radio Gain, and Cable Gain (Attenuation) Tx Tx Gain Rx Cable Gain Rx Gain Cable Gain 40 -12 40 -20 39 -11 39 -19 38 -10 38 -18 37 -9 37 -17 36 -8 36 -16 35 -7 35 -15 34 -6 34 -14 33 -5 33 -13 32 -4 32 -12 31 -3 31 -11 30 -2 30 -10 29 -9 28 -8 27 -7 26 -6 25 -5 24 -4 23 -3 22 -2 WALKair 3000 Installation Guide 9-20 Installing the TS 28 GHz ODU Step 3 – Setting Azimuth for Maximal Signal Reception To set Azimuth for maximum signal reception: Read and perform this procedure in conjunction with Fine Azimuth Adjustment, on page 9-12. 1. The RSSI area of the TS-RFU Management Software window in Figure 9-16 includes fields and bars for numeric and graphic representations of signal strength. 2. Adjust the antenna azimuth hex nuts until the maximum signal strength is achieved. You can use either Peak or Value. They will be almost identical. 3. Tighten the four azimuth lock bolts. 4. Check the signal strength once again. Repeat adjustment if necessary. 5. Proceed to Step 4 below. Step 4 - Setting the Elevation for Maximal Signal Reception To set the Elevation for maximum signal reception: Read and perform this procedure in conjunction with Fine Elevation Adjustment, on page 9-14. 1. The RSSI area of the TS-RFU Management Software window in Figure 9-16 includes fields and bars for numeric and graphic representations of signal strength. 2. Adjust the antenna elevation rod adjust nut until the maximum signal strength is achieved. You can use either Peak or Value. They will be almost identical. 3. Tighten the four lock bolts on the elevation adjustment plate. 4. Check the signal strength once again. Repeat adjustment if necessary. Step 5 – Completing the Procedure To complete the procedure: • Click the button to exit the software, and disconnect the serial cable from the Terminal Station. 9-21 Chapter 9- 28 GHz Terminal Station ODU Installation Adjusting with a PDA See also Optional TS-RFU Management Software and Hardware, on page 9-6. The procedure is performed in five steps as follows: Step 1 – Connecting the PDA to the Terminal Station, on this page Step 2 – Setting the Radio Gain, on page 9-23 Step 3 – Setting Azimuth for Maximal Signal Reception, on page 9-24 Step 4 – Setting the Elevation for Maximal Signal Reception, page 9-24 Step 5 – Completing the Procedure, on page 9-25 Step 1 – Connecting the PDA to the Terminal Station To connect the PDA to the Terminal Station: 1. Referring to Figure 9-13, locate the software connector weatherproof cover on the Terminal Station. Release the four fixing screws and put them along with the cover in a safe place. Figure 9-17: TS Software Connection 2. Attach a D-Type cable from the PDA to the Terminal Station software connector. See Optional TS-RFU Management Software and Hardware, on page 9-6. WALKair 3000 Installation Guide 9-22 Installing the TS 28 GHz ODU Step 2 – Setting the Radio Gain To set the Radio Gain: 1. On the PDA, open the TS-RFU Management Software application. The TS-RFU Management Software screen is displayed as shown below. Figure 9-18: TS-RFU Management Software Screen 2. Referring to Table 9-3, select the Transmit (Tx) and Receive (Rx) Gain values (in DBm), corresponding to the Cable Gain (attenuation) for your system in dBm 3. In the Radio Gain area of the window, using the adjacent buttons, enter the Transmit (Tx) and Receive (Rx) Gain values (from the previous step). Figure 9-19: Radio Gain Screen 4. Click on OK to confirm the changes. 9-23 Chapter 9- 28 GHz Terminal Station ODU Installation Step 3 – Setting Azimuth for Maximal Signal Reception To set Azimuth for maximum signal reception: Read and perform this procedure in conjunction with Fine Azimuth Adjustment, on page 9-12. 1. In the TS-RFU Management Software screen, click RSSI. The RSSI Level screen is displayed. Figure 9-20: RSSI Level Screen The RSSI screen includes fields and bars for numeric and graphic representations of signal strength. 2. Adjust the antenna azimuth hex nuts until the maximum signal strength is achieved. You can use either Peak or Value. They will be almost identical. 3. Tighten the four azimuth lock bolts. 4. Check the signal strength once again. Repeat adjustment if necessary. 5. Proceed to Step 4 below. Step 4 - Setting the Elevation for Maximal Signal Reception To set the Elevation for maximum signal reception: Read and perform this procedure in conjunction with Fine Elevation Adjustment, on page 9-14. 1. The RSSI area of the TS-RFU Management Software window in Figure 9-14 includes fields and bars for numeric and graphic representations of signal strength. 2. Adjust the antenna elevation rod adjust nut until the maximum signal strength is achieved. You can use either Peak or Value. They will be almost identical. 3. Tighten the four lock bolts on the elevation adjustment plate. 4. Check the signal strength once again. Repeat adjustment if necessary. WALKair 3000 Installation Guide 9-24 Installing the TS 28 GHz ODU Step 5 – Completing the Procedure To complete the procedure: • Exit the PDA TS-Management software, and disconnect the serial cable from the Terminal Station. Connecting the Cables Figure 9-22 shows the TS 28 GHz ODU connections. Table 9-4 describes the connections. Figure 9-21: Connecting the TS 28 GHz ODU Table 9-4: TS 28 GHz Cables and Connections Cable Connector From To IF/DC COAX LMR 50 Ω/ NType TS ODU BS IDU Ground/earth M6 screw diameter TS ODU Ground/earth Digital Control D-Type 9 pin TS ODU PC/lap top/palm 9-25 Chapter 9- 28 GHz Terminal Station ODU Installation Connecting the TS 28 GHz ODU Cables includes: • Connecting the ground/earth cable • Connecting the IF cable Connecting the Ground/Earth Cable To connect the ground/earth cable (See Figure 9-22): • Connect the ground/earth cable to the TS ODU. Connecting the IF cable To connect the IF cable: • Referring to Figure 9-22, connect a single coaxial cable is between the ODU and the TS IDU IF connector. For a cable length greater than 150m, use a higher quality cable than the LMR400, since the total cable attenuation must not exceed 20dB regardless of its length. • At the RFU end of the cable, leave a Service Loop. Refer to Figure 9-23. When routing the coaxial cable, leave a service loop at the RFU end to provide a sufficient length of cable to allow replacement of a faulty connector, when necessary. Secure the coaxial cable so that there is no mechanical stress at the RFU connection. Follow the superstructure with the coaxial cable to its base, and then to the building. If the coaxial cable requires suspension from the base to the building, use a stranded wire to support the coaxial cable weight (This support will prevent a migration of the cable's inner conductor to the shield). • Sealing the ODU Connector – See Sealing the ODU Connector. WALKair 3000 Installation Guide 9-26 Inspection and Maintenance Figure 9-22: TS 28 GHz-ODU Service Loop CAUTION The IF cable connector must be a certified outdoor connector. The outdoor connectors should be tightened using sleeves. At the RFU end of the cable, leave a Service Loop (see above). Inspection and Maintenance Before leaving the installation, check that all hardware on the mount and antenna are fully secured according to the recommended torques. An antenna inspection must be performed at least once a year to ascertain its condition and to ensure safe operation and maintenance. Qualified personnel must carry out the inspection. . 9-27 10 Chapter 10 - Terminal Station IDU Installation In This Chapter: This chapter includes: • Terminal Station IDU Mounting on page 10-2 • Terminal Station IDU Cabling on page 10-5 Chapter 10- Terminal Station IDU Installation Terminal Station IDU Mounting The Terminal Station Indoor Unit (TS- IDU) component of the WALKair 3000 system is typically installed at the customer's site. Power is supplied to the TS from an external 110/220VAC source. The Terminal Station IDU can be mounted with either of the following options: • Wall mounting • Desktop mounting • Rack mounting Mounting a Terminal Station IDU on a Wall To mount the Terminal Station on a wall: 1. Referring to Figure 10-1, turn the Terminal Station IDU upside down and locate the two wall mounting holes. 2. Measure the distance between the holes. Prepare the wall for mounting. It is recommended to use rawlplugs and screws. Figure 10-1: Terminal Station IDU Wall Mounting WALKair 3000 Installation Guide 10-2 Terminal Station IDU Mounting Mounting a Terminal Station IDU on a Desktop The TS-BU comes with four miniature support legs for the desktop option. Attach the support legs and place on a clean, flat surface as shown in Figure 10-2. Figure 10-2: Desktop Mount Mounting a Terminal Station IDU on a Rack (19" or ETSI Racks) The Terminal Station (TS-IDU) equipment can be installed in either an ETSI or 19" rack using horizontal mounting. The TS-IDU is supplied with rack mounting brackets suitable for installation in both rack types. Before beginning the installation, verify that the rack is grounded in accordance with the local standards. To install the Terminal Station IDU on a rack 1. Turn the Terminal Station upside down and slide the side brackets into place. 2. Insert the screws provided and secure them. 3. Turn the unit the right way up. 4. Fix the Terminal Station to the rack. Use the screws provided, two for each side bracket. 10-3 Chapter 10- Terminal Station IDU Installation Figure 10-3: Fixing the Terminal Station to the Rack The TS-IDU ground screw is connected to the earth ground (the ground screw is located on the rear panel of the TS-IDU and the ground pin diameter is MC8). WALKair 3000 Installation Guide 10-4 Terminal Station IDU Cabling Terminal Station IDU Cabling The Terminal Station TS-IDU interfaces between the CPE and the WALKair 3000 TS-ODU. Figure 10-4 shows the Terminal Station IDU front panel and Figure 10-5 shows the rear panel. Figure 10-4: Terminal Station IDU Front Panel Figure 10-5: Terminal Station IDU Rear Panel 10-5 Chapter 10- Terminal Station IDU Installation Table 10-1 lists the Terminal Station connectors. Table 10-1: Terminal Station Interface Connectors Interface Type/Rate Description Dual 4 x E1 RJ45 Each port provides the interface to a 2 Mbps channel. 2 x Ethernet RJ45, 802.3 10/100 Base T Used also for connection to WALKnet Network Management System. LCI RJ45 Provides an interface to a local craft terminal for management purposes. IF Port N-Type TX/RX 48 VDC Provides the interface to the RFU. Power (located on rear panel) 3-Pin IEC Socket Provides operating power to the TS-BU using 110/220V AC. Or Optional –48V. Ground Located on rear panel Connecting the Terminal Station IDU to Ground To connect the Terminal Station IDU to Ground (see Figure 10-5): Connect an earth cable to the grounding point on the rear panel of the Terminal Station IDU. Connecting the Terminal Station IDU to Power To connect the Terminal Station IDU to Power (see Figure 10-5): Connect a 220 VAC power cable to the rear panel of the Terminal Station IDU. NOTE In case of a 48V Terminal Station IDU, the same power cable as for the BS-SA is used. WALKair 3000 Installation Guide 10-6 Terminal Station IDU Cabling Connecting the Terminal Station IDU to the Terminal Station ODU To connect the Terminal Station IDU to the ODU (Figure 10-4): Connect the cable from the ODU to the N-Type jack IF Port on the front panel of the Terminal Station IDU. 10-7 Chapter 10- Terminal Station IDU Installation This page left intentionally blank. WALKair 3000 Installation Guide 10-8 A Appendix A - Site Survey Report In This Appendix: • Site Survey Report, to be filled-in by the customer before installation. A-1 Appendix A- Site Survey Report Site Survey Report General Site Data Site Name Site Address BS Site Type TS Telephone Contact Person UTM Co-Ordinates Altitude Above Sea Level m Distance From Sea or River km TS distance from BS and azimuth regarding the BS (relevant for BS only): TS Number TS Name Distance from BS (Km) Azimuth (°) to the BS 1. 2. 3. 4. 5. 6. 7. 8. Azimuth to BS (for TS): ______________ WALKair 3000 Installation Guide A-2 Site Survey Report Line of Sight Data The line of sight is an unobstructed view from transmitter to receiver. For optimum system performance, line of site testing must include the mapping of the following obstacles: buildings, sea, rivers, hills, etc. Obstacle Photo Number Description Possibilities for Interference 1. 2. 3. 4. Radio Survey Existing Antennas Type Mast Height Frequency Azimuth Direction 1. 2. 3. 4. Comments: A-3 Appendix A- Site Survey Report Spectrum Images Spectrum Image RBW Angle Relative to North Antenna Beam Width Image 1 Image 2 Image 3 Image 4 Image 5 Image 6 Image 7 Image 8 Image 9 Image 10 Existing Rack Survey If there is no existing rack, ignore this section and proceed to the next section of this appendix. If there is an existing rack, fill in the following forms: Rack Climate Air conditioning Available Not available Fan Available Not available Comments: Rack Readiness for Installation Power Supply DC –48V AC 220V Customer Other AC Distributor (distance from rack) m m m m m m DC Distributor (distance from rack RBC – Earth Bar (distance from rack) WALKair 3000 Installation Guide A-4 Site Survey Report Power Distribution Panels AC Fuse Panel min. 2A blow (customer supplied) Available Not available DC Fuse Panel min. 5A blow (customer supplied) Available Not available DC Fuse Space for Installation Available Not available Comments: Rack Parameters Raised Floor Available Not available Grounding Point Available Not available Rack Type 19" ETSI Rack Depth 600 mm Not available Rack Ventilation Available Not available BS Installation Horizontal Vertical Front / Back Door Available Not available Free Space for Installation Available Not available Screw Type Ohm Type Comments: IF Cable Survey Cable Duct Available *Not available High Power RF cables near IF cable duct Yes No High voltage power cables near IF cable duct Yes No Comments: *If checked, cable duct must be prepared. Length A-5 Appendix A- Site Survey Report Customer Interface Network Interface Type and Manufacture Service Data Traffic Interfaces 1 Type Service 2 Type Service 3 Type Service 4 Type Service 5 Type Service 6 Type Service BS Source Clock NIU Priority Slot Internal External Clock Control Connections ______________________________________________________________________ WALKair 3000 Installation Guide A-6 Site Survey Report Pole and Tower Tower/Mast Available Not Available Comp Date: Mast Height (m) Mast Diameter (min. 5 cm, max. 10 cm) Comments: Tower Data Lightning Protection Available Not Available Obstruction Light Available Not Available Climbing Ladder Available Not Available Protective Earthing (Grounding) Available Not Available Extension Possible Not Possible Condition Very Good Good Poor Very Poor General Comments A-7 Appendix A- Site Survey Report This page left intentionally blank. WALKair 3000 Installation Guide A-8 B Appendix B - Pin-Outs In This Appendix: • This appendix provides the pin-out assignment for the Base Station and Terminal Station connectors of the WALKair 3000 system. B-1 Appendix B- Pin-Outs BS-SA Pin-Out Table B-1: Table BS SA ETH Connector Pin-out (RJ-45) Pin Signal Name 1 RD+ 2 RD- 3 TD+ 6 TD- 4, 7, 8 - Table B-2: BS-SA E1 (1 to 8) Connector Pin-outs (RJ-45) Pin Signal Name 1, 2 Tx 4, 5 Rx 3, 6-8 - Table B-3: BS-SA LCI Connector Pin-outs RJ-45 Pins (BS-BU) Signal Name D type 25 Pins (CPU) D type 9 Pins (CPU) 1 - 2 RXD 2 3 3 TXD 3 2 4 - 5 GND 7 5 6 - 7 - 8 - WALKair 3000 Installation Guide B-2 IF Mux Pin-out IF Mux Pin-out Table B-4: WALkair 1000 Redundancy BS Connector R Pin-out Pin Signal Name Direction 1 IFMUX_EXIST Out 2 RFU_CURRENT Out 3 MUX_RFU_ON In 4 GROUND 5 BU_ACT In 6 IFMUX_LED_0 In 7 IFMUX_RFU Out 8 MUX_RFU_SELECT In Table B-5: WALkair 1000 Interface BS Connector I Pin-out Pin Signal Name Direction 1 IFMUX_TYPE_0 Out 2 IFMUX_TYPE_1 Out 3 IFMUX_TYPE_2 Out 4 GROUND 5 BU_NUM_0 Out 6 BU_NUM_1 Out 7 BU_NUM_2 Out 8 BU_NUM_3 Out Table B-6: WALkair 3000 Interface BS Connector Comm Pin-out Pin Signal Name Direction 1 2 Txd Serial com. out 3 Rxd Serial com. in 4 5 GROUND 6 7 8 B-3 Appendix B- Pin-Outs TS-BU Pin-Out Table B-7: TS IDU ETH (1 to 4) Connector Pin-out (RJ-45, MIDX) Pin Signal Name 1 RD+ 2 RD- 3 TD+ 6 TD- 4, 7, 8 - Table B-8: TS IDU E1 Connector Pin-out (RJ-45) Pin Signal Name 1, 2 Tx 4, 5 Rx 3, 6-8 - Table B-9: TS IDU LCI Connector Pin-out (RJ-45) RJ-45 Pins (TS IDU) Signal Name D type 25 Pins (CPU) D type 9 Pins (CPU) 1 - 2 RXD 2 3 3 TXD 3 2 4 - 5 GND 7 5 6 - 7 - 8 - WALKair 3000 Installation Guide B-4 E1-Switch Pin-Out E1-Switch Pin-Out Table B-10: E1 Switch Network I/F 1 Connector Pin-out (D-sub HD 44-pin) Pin Signal Name Pin Signal Name Pin Signal Name 1 E1-01-TXP 16 E1-01-TXN 31 E1-01-RXN 2 E1-02-TXN 17 E1-01-RXP 32 CGND 3 E1-02-TXP 18 E1-02-RXN 33 E1-02-RXP 4 E1-03-TXN 19 CGND 34 E1-03-RXN 5 E1-03-TXP 20 E1-03-RXP 35 CGND 6 E1-04-TXP 21 E1-04-TXN 36 E1-04-RXN 7 CGND 22 E1-04-RXP 37 CGND 8 E1-05-TXN 23 E1-05-TXP 38 E1-05-RXN 9 E1-06-TXP 24 E1-05-RXP 39 E1-06-RXN 10 E1-06-TXN 25 CGND 40 E1-06-RXP 11 E1-07-TXP 26 E1-07-TXN 41 E1-07-RXN 12 E1-08-TXP 27 E1-07-RXP 42 CGND 13 E1-08-TXN 28 E1-08-RXP 43 E1-08-RXN 14 NC 29 CGND 44 NC 15 NC 30 NC E1 Switch Network I/F 2 Connector Pin-out (D-sub HD 44-pin) Pin Signal Name Pin Signal Name Pin Signal Name 1 E1-09-TXP 16 E1-09-TXN 31 E1-09-RXN 2 E1-10-TXN 17 E1-09-RXP 32 CGND 3 E1-10-TXP 18 E1-10-RXN 33 E1-10-RXP 4 E1-11-TXN 19 CGND 34 E1-11-RXN 5 E1-11-TXP 20 E1-11-RXP 35 CGND E1-12-RXN 6 E1-12-TXP 21 E1-12-TXN 36 7 CGND 22 E1-12-RXP 37 CGND 8 E1-13-TXN 23 E1-13-TXP 38 E1-13-RXN 9 E1-14-TXP 24 E1-13-RXP 39 E1-14-RXN 10 E1-14-TXN 25 CGND 40 E1-14-RXP 11 E1-15-TXP 26 E1-15-TXN 41 E1-15-RXN 12 E1-16-TXP 27 E1-15-RXP 42 CGND 13 E1-16-TXN 28 E1-16-RXP 43 E1-16-RXN 14 NC 29 CGND 44 NC 15 NC 30 NC B-5 Appendix B- Pin-Outs E1 Switch CLK IN Connector Pin-out (RJ-45) Pin Signal Name 2, 3 CLK IN 1, 4-8 - Function Differential input/output clock signal - E1 Switch CLK OUT Connector Pin-out (RJ-45) Pin Signal Name 2, 3 CLK OUT 1, 4-8 - Function Differential input/output clock signal - E1 Switch BS A COM, BS B COM pin-out (RJ-45) RJ-45 Pins Signal Name 2 TXD 3 RXD 5 GND 1,4,6-8 - E1 Switch IF MUX COM pin-out (RJ-45) RJ-45 Pins Signal Name 2 RXD 3 TXD 5 GND 1,4,6-8 - WALKair 3000 Installation Guide B-6 C Appendix C - Glossary In This Appendix: • Glossary of WALKair 3000 terms. C-1 Appendix C- Glossary Term Description AAU Antenna Alignment Unit ASL Above Sea Level ATS Air Time Slot BER Bit Error Rate BRI Basic Rate Interface BS Base Station BS IDU Base Station Indoor Unit BS ODU Base Station Outdoor Unit BS-SA Base Station Stackable architecture BU Basic Unit CPE Customer Premises Equipment DDF Data Distribution Frame EMI Electro-Magnetic Interference ETSI European Telecommunications Standards Institute FDD Frequency Duplexing Division FEC Forward Error Correction IDU In Door Unit IF Intermediate Frequency IF MUX Intermediate Frequency Multiplexing units IFU Intermediate Frequency Unit ITU International Telecommunication Union LAN Local Area Network LCI Local Craft Interface LOS Loss of Signal Mbps Mega Bits per Second MDF Main Distribution Frame MHz Mega-Hertz MPU Main Processor Unit ODU Out Door Unit PM Performance Monitoring PMP Point-to-Multi-Point PR Packet Radio QAM Quadrature Amplitude Modulation QPSK Quadrature Phase Shift Keying RF Radio Frequency RFU Radio Frequency Up-converter RSS Received Signal Strength RTTB Radio To The Building WALKair 3000 Installation Guide C-2 E1-Switch Pin-Out Term Description SME Small/Medium Enterprise SNMP Standard Network Management Protocol TDMA Time Division Multiple Access TS Terminal Station TS IDU Terminal Station Indoor Unit TS ODU Terminal Station Outdoor Unit VAC Volts Alternating Current VDC Volts Direct Current WLL Wireless Local Loop C-3 Appendix C- Glossary This page left intentionally blank WALKair 3000 Installation Guide C-4 WALKair™ 3000 Commissioning Guide About This Guide WALKair 3000 Commissioning Guide ii About This Guide The WALKair 3000 Commissioning Guide provides instructions for the personnel who are responsible for the correct commissioning of the WALKair 3000 Base Station and Terminal Station equipment. The technical engineer should work according to the workflow presented in this guide (in Chapter 1 - Figure 1-1). Please note that Appendix A Includes frequency tables for the 10.5, 26 and 28 GHz bands. Safety Precautions CAUTION High voltages are present at specific points in this electrical equipment. Some parts may be subjected to high operating temperatures. Non-observance of these conditions and safety instructions can result in personal injury or property damage. The WALKair system complies with the EN 60950 standard. All connected equipment must comply with the applicable safety standards. Equipment complies with the following EMC and safety standards: • EN 50081-1 • EN 55022 • IEC 100-4-as 2, 3, 4, 5, 6, 8, 11 • ETSI 300339. About This Guide This page left intentionally blank. WALKair 3000 Commissioning Guide iv Contents Chapter 1 - Introduction............................................................. 1-1 System Commissioning Process Overview..................................................1-2 Connecting and Navigating LCI .................................................................1-4 Connecting the BS-SA or TS-BU to the LCI ...........................................1-4 Logging on to a TS-BU Remotely ...........................................................1-9 WALKnet Network Management System ..................................................1-10 Managing W3000 BS-SA System Elements .........................................1-11 Launching the WALKnet Network Management System ......................1-11 Chapter 2 - BS Commissioning ................................................... 2-1 Step 1: 28 GHz RFU Installations ..............................................................2-2 Step 2: Sector Configuration .....................................................................2-2 A) Sector Properties ..............................................................................2-2 B) Sector RFU and Antenna Parameters................................................2-3 C) Sector Frequency Index ....................................................................2-6 Step 3: BS-SA Parameters .........................................................................2-7 A) SNMP Trap Destinations...................................................................2-7 B) BS-SA Global Parameters .................................................................2-8 Step 4: TS Registration............................................................................2-10 Chapter 3 - Service Commissioning ............................................ 3-1 Step 1: Physical Port Configuration ...........................................................3-2 Configuring BS-SA and TS-BU Ports...................................................3-2 Step 2: Defining Clients.............................................................................3-5 Step 3: SLA and Service Parameters..........................................................3-6 Creating and Allocating IP SLAs............................................................3-6 Creating Leased Line (TDM) SLA .........................................................3-10 Setting the TDM Service Parameters ...................................................3-11 Contents Setting System Clock for Leased Line (TDM) Services ......................... 3-13 Chapter 4 - TS Commissioning ................................................... 4-1 Step 1: Configuring the 28 GHz DW RFU .................................................. 4-2 Step 2: Setting the TS-BU Administrative Parameters ............................... 4-2 Step 3: Setting the TS RFU Parameters..................................................... 4-3 Appendix A - WALKair Operating Frequencies................................ 1 IF Frequency Range ..................................................................................... 2 Frequency Band Tables ............................................................................... 2 WALKair 3000 Commissioning Guide vi 1 Chapter 1 - Introduction In This Chapter: This provides an overview of the system commissioning procedure and introduces the LCI and WALKnet applications that are used in the commissioning process. 1-1 Chapter 1 - Introduction System Commissioning Process Overview The commissioning procedure consists of the following basic stages as illustrated by the flowchart in Figure 1-1: 1. Assigning the IP Address and VLAN definitions (if relevant) to each and every BS-SA in order to enable remote management of the BSSA and its TSs. NOTE: This is done through a local LCI connection; the remaining configuration BS-SA procedures may be performed remotely through the WALKnet management application or through a Telnet connection . 2. Commissioning (configuring) the Base Stations (BS): NOTE: This procedure includes the configuration of 28 GHz RFU, in installations where this is relevant. • Sector parameters • BS-SA parameters • TSs registration 3. Commissioning the services: • Ethernet and E1 port configuration • Client definitions • Service configuration 4. Commissioning the Terminal Stations (TS): NOTE: This procedure includes the configuration of 28 GHz RFU, in installations where this is relevant. • Administrative – general and RF parameters (through a local LCI connection) • RFU parameters (through a local LCI connection) • Verifying link performance WALKair 3000 Commissioning Guide 1-2 System Commissioning Process Overview Figure 1-1 illustrates the commissioning process workflow. Figure 1-1: Commissioning Process Workflow 1-3 Chapter 1 - Introduction Connecting and Navigating LCI LCI is used for local connection to the BS-SA and TS-BU IDUs. On the BS-SA, LCI is used to configure the network parameters (IP Address and VLAN) and to configure the first authorized administrator; on the TSBU, LCI is used to configure the administrative and RFU parameters and to verify the link. LCI can also be used for troubleshooting and some monitoring functions. Other management and monitoring operations are usually performed through WALKnet. Access to the sessions is acquired through: • A terminal emulation application such as HyperTerminal, PROCOMM, PCPLUS, etc. • Through Telnet Connecting the BS-SA or TS-BU to the LCI Connect the LCI port on the front panel of the relevant BS-SA or TS-BU to the RS232 port on a computer on which a terminal emulation application (i.e. HyperTerminal, PROCOMM, PCPLUS, etc.) is installed, as illustrated in the following figure. Laptop Figure 1-2: Connecting LCI to a BS-SA or a TS-BU WALKair 3000 Commissioning Guide 1-4 Connecting and Navigating LCI To setup the LCI connection 1. Connect a standard RS232 cable (whose pin out is given in the following table) between the computer RS232 port and the LCI port of the BS-SA or TS-BU device. Table 1-1: BS-SA /TS-BU Serial Cable Pin-out RJ-45 Pin-out (TS/BS IDU) Signal Name D-type 25-pin (PC) D-type 9-pin (PC) 1 RXD 2 2 3 TXD 3 3 2 7 5 4 GND 5 6 7 8 2. Launch the terminal emulation application on you computer and set the COM port to the COM settings described in Table 1-2. Table 1-2: PC COM Port Settings Parameter Setting Bit Rate 9600 bps Parity None Data Bits 8 Stop Bits 1 Protocol Type ASCII Duplex Full duplex 3. To access the network configuration parameters, logon using either the Tech or Admin User Levels using the Username and Password provided by your System Administrator, in accordance with your security Level. The available options for each user level are described in the following table. Table 1-3: LCI Security Levels Username Default Password Security Level Permissions USER ALVRU USER GET menus TECH ALVRT TECH GET and SET menus Setting USER permissions ADMIN ALVRA ADMIN GET and SET menus Setting TECH permissions Adding/changing User Passwords 1-5 Chapter 1 - Introduction 4. At the Terminal window prompt, press Enter. The following prompt appears. MPU/L/A> Enter Option No : * NOTE: If this prompt does not appear, the BS-SA may have an open Telnet session. To close the additional session, press Esc on your keyboard. 5. Type asterisk (*) and press Enter to display the Help menu. Type The <Symbol><Enter> At * Main Menu ^ Previous Menu ? Get Print Modules ESC Exit LCI Main Menu -----------1. Configuration Menu. 2. Maintenance Menu. d. Debug Menu. l. LCI Configuration Menu. Any % = $ Time : Toggle Error Messages Display Refresh Menu Screen Get LCI Status 6. To access the Networks Parameters definitions, enter 1 (Configuration Menu). The Configuration Menu options appear. Configuration Menu --------------------1. BU BS Configuration Parameters Menu. 2. Services Configuration Parameters Menu. 3. TS Configuration Parameters Menu. 4. Sector Configuration Parameters Menu. 5. RFU Configuration Parameters Menu. 7. Authorize Manager Configuration Parameters Menu. 8. Port Configuration Parameters Menu. 9. Network Parameters Menu. a. Clock Control Menu. c. IDU Redundancy Parameters Menu 7. Enter 9 (Network Parameters Menu). The Network Parameters Menu appears. Network Parameters Menu -------------------------1. Get Out Band Management. 2. Set Out Band Management. 3. Remove Out Band Management. 4. Get In Band Management. 5. Set In Band Management. 6. Remove In Band Management. MPU/L/A> Enter Option No : 1 NOTE: The network parameters can be set either through in-band or out-ofband – not both. WALKair 3000 Commissioning Guide 1-6 Connecting and Navigating LCI Get, Set and Remove options are provided for in-band and for outof-band management definitions. NOTE: To set new definitions (either in-band or out-of-band), the current definitions must first be removed using the corresponding Remove option. 8. To view the current definitions: • Enter 1. Get out band … or 4. Get in-band… (according to the type of management to be defined). The VLAN and IP Address definitions of the management port are displayed. Out Band Management: Management Port is UnTagged: Vlan ID = 4000 Management IP Address: 10.0.6.18:ffffff00 Default Gateway IP address: 10.0.6.29 Management MAC Address: 00:03:40:a5:00:02 MPU/L/A> Enter Option No : The information includes Tagged/Untagged status, VLAN ID, IP Address and subnet (under MNG IP Address) and the Default Gateway. The format of the MNG IP Address displays the IP Address followed by a colon and the subnet in Hex format: i.e. 10.0.6.28:ffffff00 where 10.0.6.28 is the IP Address and ffffff00 is the subnet mask. 9. To set or change definitions: • First remove the current definitions by typing 3. Remove out band…. or 6. Remove in-band… (as required). • Enter the new definitions by typing 2. Set out-band… or 5. Set in-band… (as required). • You will be prompted for each parameter. NOTE: Pay attention to the format of the IP Address and subnet mask: they are on the same line, in different formats, separated by colon (i.e. 10.0.6.28:ffffff00) MPU/L/A> Enter Option No : 2 MNG port IP Address: (enter parameters or 'q') Enter MNG port vlan ID [1 - 4000] -> 1 Enter MNG port Tagging: 1.Disable 2.Enable -> 1 Enter IP address [xxx.xxx.xxx.xxx:yyyyyyyy] -> 10.0.6.28:ffffff00 After completing the definitions, a summary of the network parameters appears. 1-7 Chapter 1 - Introduction Out Band Management: Management Port is UnTagged: Vlan ID = 4000 Management IP Address: 10.0.6.18:ffffff00 Default Gateway IP address: 10.0.6.29 Management MAC Address: 00:03:40:a5:00:02 MPU/L/A> Enter Option No : 10. If the information is correct, exit the LCI menu. NOTE: The changes will take effect immediately . 11. Configure the first authorized manager through the LCI: • From the LCI Main menu enter 1. Configuration Menu • From the Configuration Menu, enter 7. Authorized Manager Configuration Parameters Menu. • Define the authorized manager user name and password. NOTE: Additional authorized managers can then be configured from the WALKnet by logging on using the authorized manager user name and password. 12. You may continue to perform additional commissioning procedures through the WALKnet application. WALKair 3000 Commissioning Guide 1-8 Connecting and Navigating LCI Logging on to a TS-BU Remotely If you have already logged on to a Base Station BS-SA, you can remotely log on to one of the Terminal Station TS-BUs connected to it. NOTE: You must be logged in as an Administrator. See LCI Security Levels on page 1-5. To log on to a TS-BU remotely 1. In the Main Menu, type l (lower case L) and then press <Enter> to display the LCI Configuration Menu. Main Menu -----------1. Configuration Menu. 2. Maintenance Menu. 1. LCI Configuration Menu MPU/L/A> Enter Option No : l Figure 1-3: Connecting to a Remote Terminal Station from the BS LCI 2. From the LCI Configuration Commands Menu, type 8 (Connect to a Remote Device); then press <Enter>. LCI Configuration Commands Menu ---------------------------------1. Get LCI Configuration Status 2. Set Exit Timeout 3. Add LCI User 4. Delete LCI User 5. Set LCI User Password 6. Set LCI User Default Password 7. Get LCI Users 8. Connect To Remote Device MPU/L/A> Enter Option No : 8 1-9 Chapter 1 - Introduction 3. At the Remote BS-SA ID prompt, type in the number of the BS-SA Station that interfaces the Terminal Station to be accessed, and then press <Enter>. LCI Set State: Enter Remote BS-SA Id -> 4 Enter Remote TS Index -> 1 MPU/C/A> Enter Option No : LCI: Remote LCI been successfully connected. *BS 4 TS 1* LCI: Received Connection Req from RLCI_M. *BS 4 TS 1* LCI Status: *BS 4 TS 1* LCI Security Level = ADMIN *BS 4 TS 1* LCI State (RLCI_S) = Remote LCI - Slave *BS 4 TS 1* Remote Master IP Addr = 0xa0afefe *BS 4 TS 1* TSBU/R/A> Enter Option No : = 4. At the Enter Remote TS Index prompt, type in the Terminal Station Index, and then press <Enter>. If access is successful, the following message appears: “Remote LCI been successfully connected”. 5. To exit the Remote LCI, press #. WALKnet Network Management System Except for the initial IP Address and VLAN definitions for each IDU (BSSA), all other configuration procedures may be performed through the WALKnet network management application. WALKnet provides a graphical representation of the WALKair 3000 system, and enables configuration and maintenance through interactive device views and intuitive monitoring options. WALKnet runs on Microsoft™ Windows NT (and higher) and UNIX platforms. For a list of system requirements, see the WALKnet User’s Manual. WALKair 3000 Commissioning Guide 1-10 WALKnet Network Management System Managing W3000 BS-SA System Elements Management of the WALKair3000 stackable system's Network Elements (BS-SA) is as follows: • WALKnet is connected to the Management (OUT Band) or Ethernet (In Band) port of the BS-SA and communicates with it via the SNMP protocol over UDP/IP. The SNMP agent residing on the BS-SA provides management capabilities for the WALKair 3000 system. • The BS-SA communicates with the corresponding TS-BUs via an Alvarion proprietary protocol over an air link. The TS-BU does not have an SNMP agent. Instead, it has a small management kernel that interfaces the BS-SA management kernel using the air-link Embedded Operation Channel (EOC). WALKnet sends all SNMP queries to the WALKair 3000 BS-SA. The BSSA encodes the requests and collects the information from the appropriate TS-BUs (if required). This way, configuration and monitoring can be achieved at centralized locations. Launching the WALKnet Network Management System The procedure for launching WALKnet varies depending on whether it is installed over HP OpenView or as a standalone application. • HP OpenView - select Run_WALKNet from the HP OpenView Main menu. • Standalone without HP OpenView - invoke WALKnet, as described below. To start WALKnet without HP OpenView on UNIX: • When WALKnet is installed on UNIX, WALKnet is invoked by activating Run_WALKnet from the installation directory. 1-11 Chapter 1 - Introduction To start WALKnet without HP OpenView on MS Windows: 1. From the Windows Start menu, select Programs > WALKnet > WALKnet. The WALKnet Login dialog box is displayed as shown below: Figure 1-4: WALKnet Login Dialog Box NOTE: This path is the default path, specified during installation. Access to the WALKair system from WALKnet requires authentication. An administrator user configures the user name and password. The default user name is admin and the default password is ad. 2. Enter your User Name and Password, and click OK. For more information on WALKnet, see the WALKnet User Manual.his page left intentionally blank. WALKair 3000 Commissioning Guide 1-12 WALKnet Network Management System This page left intentionally blank…. 1-13 2 Chapter 2 - BS Commissioning In This Chapter: This chapter describes the Base Station commissioning procedures. This consists of: 28 GHz RFU configuration – where relevant Sector configuration BS-SA Parameter configuration TS Registration 2-1 Chapter 2 - BS Commissioning Step 1: 28 GHz RFU Installations NOTE: Perform this step ONLY if a 28 GHz system is installed. 28 GHz DW RFUs require configuration. It is obviously easier (and as such recommended) to perform the procedure before mounting the device on the mast. Therefore, it is described in the WALKair 3000 Installation Guide, 28 GHz Base Station ODU Installation Chapter 5 –“ Configuring RFU Gain using optional BS-RFU Management Software”. However, you may also perform it at this stage according to the instructions in the WALKair 3000 Installation Guide. Step 2: Sector Configuration This phase consists of configuring (for each sector) the sector: • Properties • RFU and antenna parameters • IF Frequency Index A) Sector Properties To define the sector properties from the WALKnet 1. From the Cell View dialog, select the Sector menu and choose New. The Sector Properties dialog appears. NOTE: IF-MUX Type is only available when creating a new sector – otherwise it is blocked. To access it again, the sector must be deleted and re-created. 2. Enter the sector Name, in the Heading box, enter the direction and select the Beam Width. 3. Select the IF-MUX type according to the following criteria: WALKair 3000 Commissioning Guide 2-2 Step 2: Sector Configuration • W3000 De-MUX - BS-SA connected to two sectors • W3000 None - BS-SA connected to one sector • W3000 2 ports - IF-MUX II: two indoor units (BS-SAs) as well as Alvarix solution (BS-SA and BS-BU 1000) • W1K/W3K 4 ports - IF-MUX 4: up to four indoor units to one sector Table 2-1. IF MUX Attenuation Table IF MUX Type W3000 4 Ports Tx Gain [dB] Rx Gain [dB] 1 -2 0 -2 -0.5 -2 W3000 None 0 0 W3000 2 Ports -4 -4 W3000 De MUX and Power Feeder -5 -5 Remarks 3.5GHz and 10.5GHz bands W3000 4 Ports 26/28GHz Bands W3000 4 Ports China Band BS-SA NOTE: when choosing W3000 4 ports or DE MUX the DC output of the BS-SA is turned off (the IF-MUX 4 or Power Feeder supplies the DC). B) Sector RFU and Antenna Parameters The sector configuration defines the RFU and IF parameters, as well as the redundancy settings and control for each sector. In response to a prompt at the completion of the configuration, the parameters are then broadcast to every BS-SA in the sector. NOTE: In order for the BS-SAs in the sector to be updated, they must be disabled (BS-SA Admin status = Disabled). ATTENION: Be sure to define the parameters correctly since in response to the prompt, they will be broadcast to ALL BS-SAs in the sector. Incorrect RFU and Antenna parameter definitions may result in downtime. 2-3 Chapter 2 - BS Commissioning To set the RFU and Antenna Parameters: 1. In the Sector View dialog, Sector menu select RFU and Antenna. The RFU & Antenna dialog appears. Figure 2-1: RFU and Antenna Parameters NOTE: Initially, the fields in the RFU and Antenna are enabled. To exit without a change click on Cancel. 2. Enter the antenna description (for information only): • Under Antenna, select the antenna Type: Vertical, Horizontal or Other. • Enter the antenna Altitude (in meters). 3. Define the RF parameters: • Under RFU, select the radio-button corresponding to the RFU type in this sector. • Select the RFU Type from the available list – this defines the type of the outdoor unit in terms of frequency band. Refer to the WALKair 3000 System Manual Appendix A - RFU Heads and Operating frequencies for the RFU types and operating frequencies appendix. In the RFU area of the RFU and Antenna dialog box • In the RFU H/W version field for RFU A/B (where relevant), the default value is AA (can be left as default) 4. Define the IF cable attenuation parameters for each RFU (A and B if relevant): • Under RFU A IF Cable, set the Type of IF cable as Other. WALKair 3000 Commissioning Guide 2-4 Step 2: Sector Configuration • Type the cable Length in meters (this parameter is for information only). • In the Gain Valid field, select Valid. This indicates that the manually defined Tx Gain and Rx Gain are valid. • Enter the measured or calculated Tx Gain: range = –2 to -20 dB • Enter the measured or calculated Rx Gain: range = –1 to -12 dB NOTE: For a system with two IF-MUX II units and WALKair 1000 units, the Cable Gain = the measured Cable Gain –4 dB 5. For sector installations supporting RFU redundancy (using IF-MUX 4), configure the redundancy as follows: • Under IF MUX, set Redundancy to Enabled. • Under RFU, set the Selection Mode: o Automatic – active RFU is automatically selected by the system according to the redundancy criteria o Manual – the RFUs are not automatically switched by the system: the active RFU must be set by the user in the Active RFU field. 6. After configuring RFU and ANT press the Apply button. You will be prompted with ”Broadcast parameters to all devices? “ • Yes – updates all TS-BUs • No – select to update only selected TS-BUs according to the following procedure: o A dialog for selecting the devices to be updated is invoked. o Click on the Show status button and check that the status is green meaning update was performed (red - no update performed). 2-5 Chapter 2 - BS Commissioning C) Sector Frequency Index Frequency planning enables you to assign frequencies for WALKair 1000 and WALKair 3000 BS-SAs in a sector. NOTE: BS-SA Admin status must be disabled before defining the frequency index. Frequencies are assigned via the Sector Frequency Planning dialog box. To set the Frequency Index: 1. Invoke the Sector Frequency Planning dialog in one of the following ways: • From the Sector View, Sector menu, select Frequencies. • From the Main window, Configuration menu, select Frequencies. Browse to the required sector in the Browse Sector dialog box, and click OK. The Sector Frequency Planning dialog box appears. WA3000 freq WA1000 and WA3000 freq Figure 2-2: Sector Frequency Planning Edit Dialog Box 2. BS-SA Frequency Assignment - provides a list of the WALKair 1000 BS-BUs and WALKair 3000 BS-SAs in the sector, and the assigned frequency channels. Each unit is described according to its ID, frequency band, the frequency in which it is currently operating (Channel in Use). and the selected channel. Refer to Commissioning Appendix A - RFU Heads and Operating Frequencies. WALKair 3000 Commissioning Guide 2-6 Step 3: BS-SA Parameters To select a new frequency index/RF channel number: Click the Select Channel drop-down options and select a new frequency. It will becomes active after the next BS-SA reset. 3. Frequency Scale - lists the Uplink and Downlink frequencies (in MHz) for the selected frequency channel. Note the two scales indicated by column headers. • F (upper case) – frequency rows relevant to WA1000; • f (lower case) - frequency rows relevant WA3000 4. Click OK when you have completed the frequency assignment for the sector. 5. Verify that no BS-SA alarms are displayed. Step 3: BS-SA Parameters A) SNMP Trap Destinations The SNMP trap destinations for each BS-SA are defined through a common dialog in which all BS-SAs are listed. The SNMP trap destinations must be defined for each and every BS-SA. To set the BS-SA SNMP trap destinations through the WALKnet 1. From the BS-BU menu, select Authorized Managers. The Authorized Managers dialog with the trap destination management options appears. Figure 2-3. Authorized Managers 2-7 Chapter 2 - BS Commissioning 2. From the Managers menu, add a destination address, delete or modify a selected address. You may also double-click on a selected address to modify its definitions. (note: only pre-authorized manager can modify this parameters) B) BS-SA Global Parameters To set the BS-SA global parameters 1. In Sector View, Element menu, select W3000 BS-SA and choose New from the submenu. The new BS-SA is created and displayed in the selected slot. 2. To start configuring W3000 BS-SA, select W3000 BS-SA from the Element menu in Sector View, and then select View. 3. In BSSA View dialog, BSSA menu, select RFU and Antenna. The RFU and Antenna Dialog box appears. Figure 2-4: BS-SA RFU and Antenna Dialog Box 4. Set the Modulation Change to Enable 5. Set Tx Power default 15 dBm 6. In BSSA View dialog, BSSA menu, select Edit BS-SA. The BS-SA Parameters Dialog box appears. WALKair 3000 Commissioning Guide 2-8 Step 3: BS-SA Parameters Figure 2-5: BS-SA Parameters 7. Define the system Name. Location and contact are for information only 8. Define the Channel Bandwidth to be used, 14MHz, 7MHZ or 3.5MHz (3.5 MHZ applicable on 10.5GHz Band only). 9. Define the Default Gateway parameters under Default Gateway by entering the gateway: Name, IP Address, Location and Contact information. 10. For installations supporting IDU redundancy (E1 Switch), to configure for IDU redundancy: NOTE: First, the BS-SA designated as the Master must be defined, and then the BS-SA designated as the Redundant (Slave): • If this BS-SA is designated as the Master, in the IDU Redundancy area, set Configured Status to Master and in the Partner IP Address, enter the IP Address of the Slave. • If this BS-SA is designated as the Redundant (Master already defined), in the IDU Redundancy area, set Configured Status to Redundant and in the Partner IP Address, enter the IP Address of the Master. 11. Change the Admin status to Enable in order to enable the BS-SA operation. 12. Click the OK button to save any modifications made to the W3000 BS-SA properties. NOTE: You can re-configure W3000 BS-SA parameters using the BS-SA Properties Edit Dialog Box. 2-9 Chapter 2 - BS Commissioning Step 4: TS Registration Each of the TS hosted by a BS-SA must be allocated to the designated BS-SA according to the procedure described in this section. To register TSs 1. In BS-BU View dialog, BS-BU menu, select Registered Terminals. 2. From the Terminals menu, choose New. The New Terminal dialog box appears. Figure 2-6: New Terminal Dialog Box The BS-SA ID shows the designated BS-SA. The TS index is a value between 1 and 64 that is sequentially assigned to each allocated TS. 3. Define the TS customer ID – up to 8 digit decimal number. The customer ID can only be defined when a new TS is created and cannot be edited later. In the Terminal area, enter a number in the Customer ID field. 4. Enter the System Name (no spaces), System Location and Contact Information (optional). WALKair 3000 Commissioning Guide 2-10 Step 3: BS-SA Parameters 5. Select the Configured Type (default = Not Installed) according to the following options: • TS 3000 Type A - 4 Ethernet ports, 2 E1 ports (supported only up to Version 3.0) • TS 3300 Type A - 2 Ethernet ports • TS 3300 Type B - 2 Ethernet ports, 4 E1 ports • TS 3300 Type C - 2 Ethernet ports, 8 E1 ports 6. Enter the Estimated TS-BS Distance - the estimated distance between the BS and TS in kilometers (within ±2.5km). Range: 0 to 10 (Km). The default Rx Operating Point (below) is automatically assigned according to the distance. 7. Select the Rx Operating Point - target Rx power per TS at the RFU input. The default Rx Operating Point varies depending on the distance (you can manually change the values): • Up to 2 Km = -70 dBm • 2 to 4 Km = -72 dBm • Over 4 Km = -76 dBm 8. Select the Modem Modulation (recommended) - modulation of the TS uplink connection and the BS downlink connection. Make the selection according to the link budget calculations. Options: QAM16 and QPSK. NOTE: If Modulation Change is enabled at the BS SA, QAM 16 modulation is automatically changed to QPSK in case of bad link performance. If QPSK is selected, the modulation will always be QPSK, even if a modulation change is enabled on the BS-SA. 9. To activate the TS, set TS Administrative Status to Enable. 2-11 3 Chapter 3 - Service Commissioning In This Chapter: This chapter describes the service commissioning procedures. These consist of: Physical port configuration Defining the clients Defining the SLA and service parameters 3-1 Chapter 3 - Service Commissioning Step 1: Physical Port Configuration Begin by configuring the physical port parameters of the Ethernet and E1 ports on the BS-SA and Terminal Station. NOTE: Except for the identification of the relevant BS-SA or TS-BU, the port configuration dialogs are the same for both – and so only one is described. Configuring BS-SA and TS-BU Ports Ethernet Port(s) The configuration procedure consist of enabling the Ethernet port and, if necessary, changing the communication settings. NOTE: The Output VLAN Data definitions differ in the BS-SA and TS-BU. In the BS-SA it automatically set to Tagged, while in the TS-BU it can be set to Tagged or Untagged. To configure the Ethernet port: 1. To access the Ethernet Port Configuration dialog: From the BS-SA View (or TS-BU View), double-click the Ethernet interface line (or use the Port menu Edit function). Figure 3-1 W3000 BS-SA Ethernet Dialog Box WALKair 3000 Commissioning Guide 3-2 Step 1: Physical Port Configuration 2. Set Auto Negotiation: • Enable – (recommended). System automatically identifies the communication mode. • Disable – disables Auto-negotiation. Requires selecting the communication modes: Handshake (Full Duplex, Half Duplex, None) and Ethernet Speed (Ethernet 10M, Ethernet 100M). 3. For TS-BU only, set the Output VLAN Data to Tagged or Untagged – this enables or disables VLAN tags on packets entering the LAN: • Untagged – single IP service configured to the Ethernet port • Tagged – a number of IP service can be configured to the Ethernet port 4. To enable the port, set Port Administrative Status to Enable. 5. Click OK. E1 Ports To configure the E1 ports on the BS-SA: 1. Access the E1 Port Configuration dialog: From the BS-SA View (or TS-BU View), double-click the E1 interface line (or use the Port menu Edit function). Figure 3-2 W3000 BS-SA E1 Port Configuration 3-3 Chapter 3 - Service Commissioning 2. Under Setting, select the line type from available options: • Unframed: No synchronization on time slot “0” of the E1. The port is synchronized only by clock. Fractional E1 service cannot be configured on this port • Framed-No CRC: The port is synchronized on time slot “0” of even and odd frames. No Multi-Frame synchronization and CRC are available. Fractional E1 service can be configured for this port. • Framed-CRC4: The port is synchronized on time slot “0” (zero) of Multi-Frame (16 frames) available CRC4. Fractional E1 service can be configured for this port. • Framed-CRC4 (Ext): The port will attempt to synchronize on Multi-Frame. If it fails, it will attempt to function as a “FramedNo CRC” port (synchronization on even and odd E1 frames). 3. In the Settings area, from the Loss Alarm Mode (standard used for loss alarm criteria) drop-down list, select one of the following: ITUT or ETSI. 4. In the Settings area, from the Signaling Mode drop-down list, select the E1 Signalling Mode: Transparent, CCS or None. 5. In the Settings area, from the Loopback Mode drop-down list, select the type of loopback applied to the E1 Telecom interface: • None – no loopback • Remote – in remote loopback testing, the clock and data recovered from the line inputs are routed back to the line outputs via the analog or digital transmitter. This loopback is used for remote self-testing. • Local – Local loopback disconnects the Rx lines from the receiver. The data provided b the system interface is routed through the analog receiver back to the system interface. This test is used to check the FALC. • Payload – Payload loopback loops the data stream from the receiver path back to the transmitter section. The looped data passes the complete Telecom port receiver including the wander and jitter compensation in the receive elastic store. NOTE: Refer to the troubleshooting manual for more information on connections and testing in loopback mode. 6. Enable the port by setting the Administrative Status to Enable. WALKair 3000 Commissioning Guide 3-4 Step 2: Defining Clients Step 2: Defining Clients WALKair 3000 system can support a maximum of 1520 clients, where each TS can support up to 64 user defined clients. Each client is individually defined by a description and contact information. To add a client 1. From the BS-BU View, Services menu, select Clients and Services. 2. From the Client List dialog, Client menu, select Add. The Add Client dialog box appears: Figure 3-3: Add Client Dialog Box – Stackable BS-SA 3. Define the description and contact information: • Client name – administratively assigned client name. An alphanumeric string that must begin with at least two alphabetic (not numeric) characters. All characters must be in English. The data is converted automatically to uppercase English letters when you press the OK button. • Client Location – reference only. Physical location of the client. • Information – reference only. Contact information. 4. In the TS ID drop-down list, select the TS that will host this client, from the predefined TSs in the list. 5. Click OK. The new client is displayed in the Client List dialog box. 3-5 Chapter 3 - Service Commissioning Step 3: SLA and Service Parameters Creating and Allocating IP SLAs The Service Level Agreement (SLA) defines the template of parameter values that is selected during the definition of an IP service for a client. WALKair 3000 supports up to 1024 IP SLAs per BS-SA. As it is created, each SLA is allocated to a specific TS. Up to 16 dedicated SLAs can be allocated to each TS. Configuration Procedure To create an IP SLA 1. From the BS BU View, Services menu select SLA and IP SLA. The IP SLA list dialog appears. Figure 3-4: IP SLA List Dialog Box 2. In the TS ID field, select the TS to which the SLAs will be allocated. NOTE: Until IP SLAs are allocated to the current BS-SA and selected TS, the IP SA ID field will be disabled. To discover allocated SLAs, click Find. WALKair 3000 Commissioning Guide 3-6 Step 3: SLA and Service Parameters 3. The From the IP SLA menu, select Add. The Add IP SLA dialog box is displayed with the next available sequential IP SLA ID as shown below. Figure 3-5: Add IP SLA Dialog Box 4. Enter the BS VLAN ID and TS VLAN ID (usually BS and TS VLAN IDs are the same). NOTE: VLAN tag value range is 1 to 3997, where BS VLAN ID is unique per BSSA and TS VLAN ID is unique per TS. The BS VLAN should be different than the Management VLAN. 5. In the IP SLA Name box, assign the new SLA an identifiable name. 6. Set the MIR (Maximum Information Rate) - the maximum rate obtainable from this pipe with no bandwidth limitations. Value = multiple of 256 Kbps (N*256 Kbps). 7. Select Class of Service - defines the SLA class of service. Refer to the System Description for CoS descriptions. 3-7 Chapter 3 - Service Commissioning Setting the IP Service Parameters After configuring a client and IP SLA, the IP Service that links the client and IP SLA must be configured. An IP service with the SLA assigned to each client must be defined. Up to 16 services of different (predefined) IP SLAs can be defined for a client. To set up the IP Service parameters: 1. From the BS-SA View, Services menu, select Clients and Services. The Client List dialog appears. Figure 3-6: Client List Dialog 2. In the Client List, select a client (enter “*” or enter the Client Name and click Find), and click the Service button. The Service List dialog appears. Figure 3-7. Service List dialog WALKair 3000 Commissioning Guide 3-8 Step 3: SLA and Service Parameters 3. In the IP Services menu, select Add. The Add IP Service Dialog Box appears. Figure 3-8: Add IP Service Dialog Box 4. Under IP Service set the following: • IP SLA ID – select from the pool of predefined SLAs allocated to this TS • CIR - Committed Information Rate for all IP traffic. Enter the CIR value as a multiple of 256 Kbit/sec (N*256 Kbps). NOTE: For a Bronze SLA, the CIR must be set to “0”. The CIR cannot exceed the maximum MIR in QAM and QPSK. 5. The Service Administrative Status parameter defines the Service status. To activate the service, set this parameter to Enable. 6. Click OK. 3-9 Chapter 3 - Service Commissioning Creating Leased Line (TDM) SLA WALKair 3000 supports up to 1024 TDM SLAs per BS-SA. The user can create and allocate to dedicated 16 TDM SLA for a specific TS. 1. Invoke the TDM SLA list dialog in one of the following ways: • From the BS-SA View, select Services, SLA, TDM SLA. • From the Main window, Configuration menu, W3000 Services, SLA, and finally TDM SLA. Browse to the required BS-SA and click OK. The TDM SLA List dialog box appears. Figure 3-9: TDM SLA List Dialog Box 2. Select the TS ID to which this SLA is allocated. 3. Select the TDM SLA ID – the ID of the SLA allocated to the TS. NOTE 1: The TDM SLA ID field is disabled when there are no TDM SLAs on the selected BS-SA and TS. NOTE 2: Click Find, to list any TDM SLAs currently defined on the selected BSSA and TS. 4. A new TDM SLA can now be added for the BS-SA and TS-BU: • From the TDM SLA menu, select Add. • The Add TDM SLA dialog box appears. WALKair 3000 Commissioning Guide 3-10 Step 3: SLA and Service Parameters Figure 3-10: Add TDM SLA Dialog Box 5. Enter the TDM SLA Name in the TDM SLA area, 6. In the BS-SA/SA E1 area, select the E1 port. The E1 port/interface number is required to define the service connection path. This number ranges from 2 to 9 and depends on the BS-SA interface: • BS-SA Type B – 2-5 • BS-SA Type C – 2-9 7. In the BS-SA/SA E1 area, select the First Channel (this is the E1 time slot: 1-31). Setting the TDM Service Parameters After configuring a client and TDM SLA, the TDM Service that links the client and TDM SLA must be configured. To set up the TDM Service parameters: 1. Access the Client list dialog box in one of the following ways: • In BS-SA View, select Clients and Services from the Services menu. • In the Main window - select Clients and Services from the W3000 Services submenu of the Configuration menu. Browse to the required BS-SA and click OK. 2. Access the Service list dialog box from the Client list dialog box in one of the following ways: • In the Client List dialog box, select a client in the client table and click the Service button. 3-11 Chapter 3 - Service Commissioning • In the Show Clients dialog box, select a client in the client table and click the Service button. The Service list dialog box is displayed as shown below: Figure 3-11: Service List Dialog Box A TDM service with the SLA assigned to each client must be defined. Up to 16 services of different LL SLAs can be defined for a client. The TDM SLA ID assigns the TDM SLA to the service. The TDM SLA parameters were previously defined. 3. In the Service List dialog box, from the TDM Services menu, select Add. The Add TDM Service dialog box appears. Figure 3-12: Add TDM Service Dialog Box The First E1 channel defines the first E1 time slot of the TS E1 port. The service will reside in this time slot and the following time slots according to the defined bandwidth. The Service Bandwidth defines the service bandwidth. Enter the value of the service bandwidth as a multiple of N*64kbps. WALKair 3000 Commissioning Guide 3-12 Step 3: SLA and Service Parameters NOTE: If the E1 port is configured as unframed, “the First E1 Channel” and “Service Bandwidth” fields are grayed. 4. In the TDM Service area, from the First Channel drop-down list, select the first channel. 5. In the TDM Service area, use the up/down buttons to enter the bandwidth. 6. The Service Administrative Status parameter defines the service status. To activate the service, set this parameter to Enable. 7. Click on OK. Setting System Clock for Leased Line (TDM) Services Two types of system clock settings are available: • Internal – BS-SA internal clock • Telecom – external from one of the BS-SA leased line (TDM) ports 1. From the BS-SA View dialog, BS-SA menu, choose BS-SA Clock Configuration. The BS-SA Clock Configuration dialog appears. Figure 3-13 BS-SA Clock Configuration 2. Select the clock source from the Clock Source field dropdown list, as one of the following: • Internal – BS-SA internal clock. • Telecom – clock source from E1 port. 3-13 Chapter 3 - Service Commissioning 3. If Telecom clock source is selected, in the Clock Primary Master field, assign any enabled E1 port that is in Up status. 4. If Telecom clock source is selected, you may configure an additional clock source. The secondary clock source is enabled if the primary clock source becomes unavailable. To configure Clock Redundancy: • Set the Clock Redundancy field to Enable. • In the Clock Secondary Master field, choose any enabled E1 port that is in Up status. 5. Click on OK to save any modifications made to the BS-SA properties. WALKair 3000 Commissioning Guide 3-14 3 Chapte terr 4 - TS Commissioning In This Chapter: This chapter describes the TS commission procedure. This includes: Step 1 – Configuring the 28 GHz RFU, on page 4-2 Step 2 -Setting the TS-BU Administrative Parameters, on page 4-2. Step 3- Setting the RFU parameters, on page 4-3 . Chapter 4 - TS Commissioning Step 1: Configuring the 28 GHz DW RFU See the WALKair 3000 Installation Guide, Chapter 10 (28 GHz Terminal Station ODU Installation) – “Adjustment using optional TS-RFU Management Software”. NOTE: Perform this step ONLY if a 28 GHz system is installed. Step 2: Setting the TS-BU Administrative Parameters The TS-BU administrative parameters consist of the: • TS customer ID – must have the same value as the value registered at the BS-SA • TS administrative status To set the Customer ID number: 1. In the Administrative Parameters Menu [path: MM/1/2], type 2 and press Enter. The current customer ID is displayed as shown in Figure 4-1: TS->> Enter Option No: 2 Enter Customer ID -> 3 44 Figure 4-1: Customer ID Screen 2. Enter the TS Customer ID (up to 8 digit decimal number unique to the host BS-SA) and press Enter. 3. To save the configuration in the Flash memory, type 5 and press Enter. 4. To enable the TS BU, type 3 and press Enter. WALKair 3000 Commissioning Guide 4-2 Step 3: Setting the TS RFU Parameters Step 3: Setting the TS RFU Parameters The RFU Head Type parameter defines the type of the outdoor unit each type operating at a different frequency band. For the list of the different RFU types and their operating frequencies, see Appendix A, RFU heads and Operating Frequencies. The Cable Gain parameter provides the values of the IF cable gain. The system automatically adjusts its RF working point according to the value of the cable gain parameter. The range of the transmit cable gain is –2 dB to –20 dB. The range of the receive cable gain is –1 dB to –12 dB. The RF frequency start/stop index parameter indicates the index of the frequency, from which the TS will start/stop scanning. To reduce the time of the frequencies scanning, the system operator can limit the range of the frequency scan by changing the default RF frequency stop index. To set the RF Head type parameters: 1. In the RFU Parameters Menu [path: MM/1/1], type 1 and press Enter. The screen shown in Figure 4-2 appears. 2. Enter the RFU Head Type and press Enter. TS->> Enter option No: 1 Enter RFU Head Type -> TS26EtsiAT526Ets1B The Entered RFU Head Type is -> TS26EtsiB Figure 4-2: Setting the RFU Parameters NOTE: To view the available RFU head types, type 7 and press Enter 4-3 Chapter 4 - TS Commissioning To set the RF Frequency Stop Index: 1. In the RFU Parameters Menu [path: MM/1/1], type 3 and press Enter. The screen shown in Figure 4-3 appears. 2. Enter the RF Frequency Stop Index and press Enter. TS->> Enter Option No: 3 RF Frequency End Index -> 248240 Figure 4-3: Setting the RF Frequency Stop Index NOTE 1: Change this parameter only if you need to reduce frequency-scanning time by limiting frequency range. NOTE 2: To restore the default values for a specific RFU type, 'set RFU head type' option should be used and the desired head type should be typed in explicitly (even if there is no change in the head type value itself). To set the Rx Cable Gain: 1. In the RFU Parameters Menu [path: MM/1/1], type 4 and press Enter. The following prompt appears. TS->> Enter Option No: 4 Cable Gain RX -> -2.000000-5 Figure 4-4: Setting the Rx Cable Gain 2. Referring to Table A-1. IF Frequency Range, enter the Rx Cable Gain and press Enter. WALKair 3000 Commissioning Guide 4-4 Step 3: Setting the TS RFU Parameters To set the Tx Cable Gain: 1. In the RFU Parameters Menu [path: MM/1/1], type 5 and press Enter. The screen shown in Error! Reference source not found. appears. 2. Referring to Table A-1. IF Frequency Range, enter the Tx Cable Gain and press Enter. TS->> Enter Option No: 5 Cable Gain TX -> -3.000000-7 3. Save the configuration by typing a and pressing Enter. 4. Reset the TS-BU according to the following procedure: • From the LCI Main Menu select 2. Maintenance Menu Main Menu -----------1. Configuration Menu. 2. Maintenance Menu. 3. Test Menu. l. LCI Configuration Menu. TSBU/L/A> Enter Option No : 2 WALKair 3000 – TS • From the LCI Maintenance Menu, select 4. Reset TS and respond with Yes to the verification prompt. Maintenance Menu ------------------1. Get Current S/W Version. 2. Get Backup S/W Version. 3. Switch & Reset TS. 4. Reset TS. 5. Alarm Control Menu. TSBU/L/A> Enter Option No : 4 Are you sure you want to reset TS (yes/no) ->yes 4-5 Chapter 4 - TS Commissioning Air Link Status Verify the link status and link budget according to the following procedure: 1. Access the LCI Main menu. Main Menu -----------1. Configuration Menu. 2. Maintenance Menu. 3. Test Menu. l. LCI Configuration Menu. TSBU/L/A> Enter Option No : 3 2. Choose 3. Test Menu. The Test Menu appears. Test Menu -----------2. TS Test Menu. 3. Port Test Menu. 3. Select 2. TS Test Menu. The TS control Menu appears. TS Control Menu -----------------1. TS Status. 2. Start Display Airlink Parameters. 3. Stop Display Airlink Parameters. WALKair 3000 Commissioning Guide 4-6 Step 3: Setting the TS RFU Parameters 4. From the TS Test menu, select 2. Start display Airlink parameters, and then choose Single print (single display). The following screen appears. NOTE: Refer to the Troubleshooting Manual for more information . Fr:7K57594033875322 RXM:12 (008) RLC:8 (008,ON) - RX_SYNC - DATA_SYNC Channel BW:14MHz EQU SNR [db]:+30.549407 TRUE SNR [db]:+30.081726 Init Gain:.499969 FER,Raw BER [ber]:0,< 0*E -3 RX curr. mod.:QAM16 RX Max. mod.:QAM16 Power [db]:-13.904388 RX gain [db]:-31.949890 Coarse AFC [khz]:-25.930180 Timing Error [deg]:+1.499462 Ph-Loop Freq [khz]:+0.455932 Ti-Loop Freq [KHz]:-2.405548 Ant RX pwr [dbm]:-62.279632 Ant TX pwr [dbm]:+7.799987 ALT. pos:26 4-7 A Appendix A - WALKair Operating Frequencies In This Appendix: • Frequency Band Tables for the 10.5, 26 and 28 GHz bands. • IF Frequencies A-1 Appendix A - WALKair Operating Frequencies IF Frequency Range Table A-1. IF Frequency Range BS Tx Start Stop TS Rx Tx Rx Start Stop Start Stop Start Stop 10.5GHz system 1000 1150 650 800 1000 1150 650 800 26GHz system 1666 1792 658 784 1680 1806 672 798 28GHz system 1491 1701 483 693 483 693 1491 1701 Frequency Band Tables Table A-2: WALKair 3000 Frequency Bands Band Downlink Band [MHz] Uplink Band [MHz] Reference 10.5 GHz 10157.250-10292.875 10507.250-10642.875 Table A-3 26GHz ETSI A 24549.000-24661.000 25557.000-25669.000 Table A-4 26GHz ETSI B 24633.000-24773.000 25641.000-25781.000 Table A-5 26GHz ETSI C 24773.000-24885.000 25781.000-25893.000 Table A-6 26GHz ETSI D 24885.000-24997.000 25893.000-26005.000 Table A-7 26GHz ETSI E 24969.000-25109.000 25977.000-26117.000 Table A-8 26GHz ETSI F 25109.000-25221.000 26117.000-26229.000 Table A-9 26GHz ETSI G 25221.000-25333.000 26229.000-26341.000 Table A-10 26GHz ETSI H 25333.000-25445.000 26341.000-26453.000 Table A-11 26GHz CHINA A0 24507.000-24619.000 25757.000-25869.000 Table A-12 26GHz CHINA A1 24619.000-24731.000 25869.000-25981.000 Table A-13 26GHz CHINA B1 24731.000-24843.000 25981.000-26093.000 Table A-14 26GHz CHINA A2 24843.000-24955.000 26093.000-26205.000 Table A-15 26GHz CHINA A3 24955.000-25067.000 26205.000-26317.000 Table A-16 26GHz CHINA B2 25067.000-25179.000 26317.000-26429.000 Table A-17 26GHz CHINA C12 25179.000-25291.000 26429.000-26541.000 Table A-18 26GHz CHINA C34 25291.000-25403.000 26541.000-26653.000 Table A-19 26GHz CHINA B3 25403.000-25515.000 26653.000-26765.000 Table A-20 28 GHz ETSI C 27996.500-28220.500 29004.500-29228.500 Table A-21 28 GHz ETSI D 28192.500-28444.500 29200.500-29452.500 Table A-22 WALKair 3000 Commissioning Guide A-2 Frequency Band Tables Table A-3: 10.5 GHz Frequency Band (Indexes 8-87) Index BS Tx BS Rx 8 TS Rx TS Tx 10157.250 10507.250 9 Index BS Tx BS Rx 60 TS Rx TS Tx 10202.750 10552.750 10158.125 10508.125 61 10 10159.000 10509.000 11 Index BS Tx BS Rx 112 TS Rx TS Tx 10248.250 10598.250 10203.625 10553.625 113 10249.125 10599.125 62 10204.500 10554.500 114 10250.000 10600.000 10159.875 10509.875 63 10205.375 10555.375 115 10250.875 10600.875 12 10160.750 10510.750 64 10206.250 10556.250 116 10251.750 10601.750 13 10161.625 10511.625 65 10207.125 10557.125 117 10252.625 10602.625 14 10162.500 10512.500 66 10208.000 10558.000 118 10253.500 10603.500 15 10163.375 10513.375 67 10208.875 10558.875 119 10254.375 10604.375 16 10164.250 10514.250 68 10209.750 10559.750 120 10255.250 10605.250 17 10165.125 10515.125 69 10210.625 10560.625 121 10256.125 10606.125 18 10166.000 10516.000 70 10211.500 10561.500 122 10257.000 10607.000 19 10166.875 10516.875 71 10212.375 10562.375 123 10257.875 10607.875 20 10167.750 10517.750 72 10213.250 10563.250 124 10258.750 10608.750 21 10168.625 10518.625 73 10214.125 10564.125 125 10259.625 10609.625 22 10169.500 10519.500 74 10215.000 10565.000 126 10260.500 10610.500 23 10170.375 10520.375 75 10215.875 10565.875 127 10261.375 10611.375 24 10171.250 10521.250 76 10216.750 10566.750 128 10262.250 10612.250 25 10172.125 10522.125 77 10217.625 10567.625 129 10263.125 10613.125 26 10173.000 10523.000 78 10218.500 10568.500 130 10264.000 10614.000 27 10173.875 10523.875 79 10219.375 10569.375 131 10264.875 10614.875 28 10174.750 10524.750 80 10220.250 10570.250 132 10265.750 10615.750 29 10175.625 10525.625 81 10221.125 10571.125 133 10266.625 10616.625 30 10176.500 10526.500 82 10222.000 10572.000 134 10267.500 10617.500 31 10177.375 10527.375 83 10222.875 10572.875 135 10268.375 10618.375 32 10178.250 10528.250 84 10223.750 10573.750 136 10269.250 10619.250 33 10179.125 10529.125 85 10224.625 10574.625 137 10270.125 10620.125 34 10180.000 10530.000 86 10225.500 10575.500 138 10271.000 10621.000 35 10180.875 10530.875 87 10226.375 10576.375 139 10271.875 10621.875 36 10181.750 10531.750 88 10227.250 10577.250 140 10272.750 10622.750 37 10182.625 10532.625 89 10228.125 10578.125 141 10273.625 10623.625 38 10183.500 10533.500 90 10229.000 10579.000 142 10274.500 10624.500 39 10184.375 10534.375 91 10229.875 10579.875 143 10275.375 10625.375 40 10185.250 10535.250 92 10230.750 10580.750 144 10276.250 10626.250 41 10186.125 10536.125 93 10231.625 10581.625 145 10277.125 10627.125 42 10187.000 10537.000 94 10232.500 10582.500 146 10278.000 10628.000 43 10187.875 10537.875 95 10233.375 10583.375 147 10278.875 10628.875 44 10188.750 10538.750 96 10234.250 10584.250 148 10279.750 10629.750 A-3 Appendix A - WALKair Operating Frequencies Table A-3: 10.5 GHz Frequency Band (Indexes 8-87) Index BS Tx BS Rx 45 TS Rx TS Tx 10189.625 10539.625 46 10190.500 10540.500 47 48 Index BS Tx BS Rx 97 TS Rx TS Tx 10235.125 10585.125 98 10191.375 10541.375 10192.250 10542.250 49 10193.125 10543.125 50 Index BS Tx BS Rx 149 TS Rx TS Tx 10280.625 10630.625 10236.000 10586.000 150 10281.500 10631.500 99 10236.875 10586.875 151 10282.375 10632.375 100 10237.750 10587.750 152 10283.250 10633.250 101 10238.625 10588.625 153 10284.125 10634.125 10194.000 10544.000 102 10239.500 10589.500 154 10285.000 10635.000 51 10194.875 10544.875 103 10240.375 10590.375 155 10285.875 10635.875 52 10195.750 10545.750 104 10241.250 10591.250 156 10286.750 10636.750 53 10196.625 10546.625 105 10242.125 10592.125 157 10287.625 10637.625 54 10197.500 10547.500 106 10243.000 10593.000 158 10288.500 10638.500 55 10198.375 10548.375 107 10243.875 10593.875 159 10289.375 10639.375 56 10199.250 10549.250 108 10244.750 10594.750 160 10290.250 10640.250 57 10200.125 10550.125 109 10245.625 10595.625 161 10291.125 10641.125 58 10201.000 10551.000 110 10246.500 10596.500 162 10292.000 10642.000 59 10201.875 10551.875 111 10247.375 10597.375 163 10292.875 10642.875 WALKair 3000 Commissioning Guide A-4 Frequency Band Tables Table A-4: 26GHz ETSI A Frequency Band (Indexes 8 – 120) Index 8 9 10 11 12 13 14 15 16 17 18 19 20 21 22 23 24 25 26 27 28 29 30 31 32 33 34 35 36 37 38 39 40 41 42 43 44 45 BS Tx TS Rx 24556.000 24556.875 24557.750 24558.625 24559.500 24560.375 24561.250 24562.125 24563.000 24563.875 24564.750 24565.625 24566.500 24567.375 24568.250 24569.125 24570.000 24570.875 24571.750 24572.625 24573.500 24574.375 24575.250 24576.125 24577.000 24577.875 24578.750 24579.625 24580.500 24581.375 24582.250 24583.125 24584.000 24584.875 24585.750 24586.625 24587.500 24588.375 BS Rx BS Tx BS Rx BS Tx BS Rx Index Index TS Tx TS Rx TS Tx TS Rx TS Tx 25564.000 46 24589.250 25597.250 84 24622.500 25630.500 25564.875 47 24590.125 25598.125 85 24623.375 25631.375 25565.750 48 24591.000 25599.000 86 24624.250 25632.250 25566.625 49 24591.875 25599.875 87 24625.125 25633.125 25567.500 50 24592.750 25600.750 88 24626.000 25634.000 25568.375 51 24593.625 25601.625 89 24626.875 25634.875 25569.250 52 24594.500 25602.500 90 24627.750 25635.750 25570.125 53 24595.375 25603.375 91 24628.625 25636.625 25571.000 54 24596.250 25604.250 92 24629.500 25637.500 25571.875 55 24597.125 25605.125 93 24630.375 25638.375 25572.750 56 24598.000 25606.000 94 24631.250 25639.250 25573.625 57 24598.875 25606.875 95 24632.125 25640.125 25574.500 58 24599.750 25607.750 96 24633.000 25641.000 25575.375 59 24600.625 25608.625 97 24633.875 25641.875 25576.250 60 24601.500 25609.500 98 24634.750 25642.750 25577.125 61 24602.375 25610.375 99 24635.625 25643.625 25578.000 62 24603.250 25611.250 100 24636.500 25644.500 25578.875 63 24604.125 25612.125 101 24637.375 25645.375 25579.750 64 24605.000 25613.000 102 24638.250 25646.250 25580.625 65 24605.875 25613.875 103 24639.125 25647.125 25581.500 66 24606.750 25614.750 104 24640.000 25648.000 25582.375 67 24607.625 25615.625 105 24640.875 25648.875 25583.250 68 24608.500 25616.500 106 24641.750 25649.750 25584.125 69 24609.375 25617.375 107 24642.625 25650.625 25585.000 70 24610.250 25618.250 108 24643.500 25651.500 25585.875 71 24611.125 25619.125 109 24644.375 25652.375 25586.750 72 24612.000 25620.000 110 24645.250 25653.250 25587.625 73 24612.875 25620.875 111 24646.125 25654.125 25588.500 74 24613.750 25621.750 112 24647.000 25655.000 25589.375 75 24614.625 25622.625 113 24647.875 25655.875 25590.250 76 24615.500 25623.500 114 24648.750 25656.750 25591.125 77 24616.375 25624.375 115 24649.625 25657.625 25592.000 78 24617.250 25625.250 116 24650.500 25658.500 25592.875 79 24618.125 25626.125 117 24651.375 25659.375 25593.750 80 24619.000 25627.000 118 24652.250 25660.250 25594.625 81 24619.875 25627.875 119 24653.125 25661.125 25595.500 82 24620.750 25628.750 120 24654.000 25662.000 25596.375 83 24621.625 25629.625 A-5 Appendix A - WALKair Operating Frequencies Table A-5: 26GHz ETSI B Frequency Band (Indexes 104 - 217) Index BS Tx BS Rx 104 TS Rx TS Tx 24640.000 25648.000 105 Index BS Tx BS Rx 153 TS Rx TS Tx 24682.875 25690.875 24640.875 25648.875 154 106 24641.750 25649.750 107 24642.625 25650.625 108 Index BS Tx BS Rx 202 TS Rx TS Tx 24725.750 25733.750 24683.750 25691.750 203 24726.625 25734.625 155 24684.625 25692.625 204 24727.500 25735.500 156 24685.500 25693.500 205 24728.375 25736.375 24643.500 25651.500 157 24686.375 25694.375 206 24729.250 25737.250 109 24644.375 25652.375 158 24687.250 25695.250 207 24730.125 25738.125 110 24645.250 25653.250 159 24688.125 25696.125 208 24731.000 25739.000 111 24646.125 25654.125 160 24689.000 25697.000 209 24731.875 25739.875 112 24647.000 25655.000 161 24689.875 25697.875 210 24732.750 25740.750 113 24647.875 25655.875 162 24690.750 25698.750 211 24733.625 25741.625 114 24648.750 25656.750 163 24691.625 25699.625 212 24734.500 25742.500 115 24649.625 25657.625 164 24692.500 25700.500 213 24735.375 25743.375 116 24650.500 25658.500 165 24693.375 25701.375 214 24736.250 25744.250 117 24651.375 25659.375 166 24694.250 25702.250 215 24737.125 25745.125 118 24652.250 25660.250 167 24695.125 25703.125 216 24738.000 25746.000 119 24653.125 25661.125 168 24696.000 25704.000 217 24738.875 25746.875 120 24654.000 25662.000 169 24696.875 25704.875 218 24739.750 25747.750 121 24654.875 25662.875 170 24697.750 25705.750 219 24740.625 25748.625 122 24655.750 25663.750 171 24698.625 25706.625 220 24741.500 25749.500 123 24656.625 25664.625 172 24699.500 25707.500 221 24742.375 25750.375 124 24657.500 25665.500 173 24700.375 25708.375 222 24743.250 25751.250 125 24658.375 25666.375 174 24701.250 25709.250 223 24744.125 25752.125 126 24659.250 25667.250 175 24702.125 25710.125 224 24745.000 25753.000 127 24660.125 25668.125 176 24703.000 25711.000 225 24745.875 25753.875 128 24661.000 25669.000 177 24703.875 25711.875 226 24746.750 25754.750 129 24661.875 25669.875 178 24704.750 25712.750 227 24747.625 25755.625 130 24662.750 25670.750 179 24705.625 25713.625 228 24748.500 25756.500 131 24663.625 25671.625 180 24706.500 25714.500 229 24749.375 25757.375 132 24664.500 25672.500 181 24707.375 25715.375 230 24750.250 25758.250 133 24665.375 25673.375 182 24708.250 25716.250 231 24751.125 25759.125 134 24666.250 25674.250 183 24709.125 25717.125 232 24752.000 25760.000 135 24667.125 25675.125 184 24710.000 25718.000 233 24752.875 25760.875 136 24668.000 25676.000 185 24710.875 25718.875 234 24753.750 25761.750 137 24668.875 25676.875 186 24711.750 25719.750 235 24754.625 25762.625 138 24669.750 25677.750 187 24712.625 25720.625 236 24755.500 25763.500 139 24670.625 25678.625 188 24713.500 25721.500 237 24756.375 25764.375 140 24671.500 25679.500 189 24714.375 25722.375 238 24757.250 25765.250 141 24672.375 25680.375 190 24715.250 25723.250 239 24758.125 25766.125 142 24673.250 25681.250 191 24716.125 25724.125 240 24759.000 25767.000 WALKair 3000 Commissioning Guide A-6 Frequency Band Tables Table A-5: 26GHz ETSI B Frequency Band (Indexes 104 - 217) Index BS Tx BS Rx 143 TS Rx TS Tx 24674.125 25682.125 144 Index BS Tx BS Rx 192 TS Rx TS Tx 24717.000 25725.000 24675.000 25683.000 193 145 24675.875 25683.875 146 Index BS Tx BS Rx 241 TS Rx TS Tx 24759.875 25767.875 24717.875 25725.875 242 24760.750 25768.750 194 24718.750 25726.750 243 24761.625 25769.625 24676.750 25684.750 195 24719.625 25727.625 244 24762.500 25770.500 147 24677.625 25685.625 196 24720.500 25728.500 245 24763.375 25771.375 148 24678.500 25686.500 197 24721.375 25729.375 246 24764.250 25772.250 149 24679.375 25687.375 198 24722.250 25730.250 247 24765.125 25773.125 150 24680.250 25688.250 199 24723.125 25731.125 248 24766.000 25774.000 151 24681.125 25689.125 200 24724.000 25732.000 152 24682.000 25690.000 201 24724.875 25732.875 A-7 Appendix A - WALKair Operating Frequencies Table A-6: 26GHz ETSI C Frequency Band Index BS Tx BS Rx 264 TS Rx TS Tx 24780.000 25788.000 265 266 267 268 269 270 271 272 273 274 275 276 277 278 279 280 281 282 283 284 285 286 287 288 289 290 291 292 293 294 295 296 297 298 299 300 301 24780.875 24781.750 24782.625 24783.500 24784.375 24785.250 24786.125 24787.000 24787.875 24788.750 24789.625 24790.500 24791.375 24792.250 24793.125 24794.000 24794.875 24795.750 24796.625 24797.500 24798.375 24799.250 24800.125 24801.000 24801.875 24802.750 24803.625 24804.500 24805.375 24806.250 24807.125 24808.000 24808.875 24809.750 24810.625 24811.500 24812.375 25788.875 25789.750 25790.625 25791.500 25792.375 25793.250 25794.125 25795.000 25795.875 25796.750 25797.625 25798.500 25799.375 25800.250 25801.125 25802.000 25802.875 25803.750 25804.625 25805.500 25806.375 25807.250 25808.125 25809.000 25809.875 25810.750 25811.625 25812.500 25813.375 25814.250 25815.125 25816.000 25816.875 25817.750 25818.625 25819.500 25820.375 Index BS Tx BS Rx 302 TS Rx TS Tx 24813.250 25821.250 303 304 305 306 307 308 309 310 311 312 313 314 315 316 317 318 319 320 321 322 323 324 325 326 327 328 329 330 331 332 333 334 335 336 337 338 339 24814.125 24815.000 24815.875 24816.750 24817.625 24818.500 24819.375 24820.250 24821.125 24822.000 24822.875 24823.750 24824.625 24825.500 24826.375 24827.250 24828.125 24829.000 24829.875 24830.750 24831.625 24832.500 24833.375 24834.250 24835.125 24836.000 24836.875 24837.750 24838.625 24839.500 24840.375 24841.250 24842.125 24843.000 24843.875 24844.750 24845.625 25822.125 25823.000 25823.875 25824.750 25825.625 25826.500 25827.375 25828.250 25829.125 25830.000 25830.875 25831.750 25832.625 25833.500 25834.375 25835.250 25836.125 25837.000 25837.875 25838.750 25839.625 25840.500 25841.375 25842.250 25843.125 25844.000 25844.875 25845.750 25846.625 25847.500 25848.375 25849.250 25850.125 25851.000 25851.875 25852.750 25853.625 Index BS Tx BS Rx 340 TS Rx TS Tx 24846.500 25854.500 341 342 343 344 345 346 347 348 349 350 351 352 353 354 355 356 357 358 359 360 361 362 363 364 365 366 367 368 369 370 371 372 373 374 375 376 24847.375 24848.250 24849.125 24850.000 24850.875 24851.750 24852.625 24853.500 24854.375 24855.250 24856.125 24857.000 24857.875 24858.750 24859.625 24860.500 24861.375 24862.250 24863.125 24864.000 24864.875 24865.750 24866.625 24867.500 24868.375 24869.250 24870.125 24871.000 24871.875 24872.750 24873.625 24874.500 24875.375 24876.250 24877.125 24878.000 25855.375 25856.250 25857.125 25858.000 25858.875 25859.750 25860.625 25861.500 25862.375 25863.250 25864.125 25865.000 25865.875 25866.750 25867.625 25868.500 25869.375 25870.250 25871.125 25872.000 25872.875 25873.750 25874.625 25875.500 25876.375 25877.250 25878.125 25879.000 25879.875 25880.750 25881.625 25882.500 25883.375 25884.250 25885.125 25886.000 WALKair 3000 Commissioning Guide A-8 Frequency Band Tables Table A-7: 26GHz ETSI D Frequency Band BS Tx BS Rx TS Rx TS Tx 392 393 394 395 396 397 398 399 400 401 402 403 404 405 406 407 408 409 410 411 412 413 414 415 416 417 418 419 420 421 422 423 424 425 426 427 428 24892.000 24892.875 24893.750 24894.625 24895.500 24896.375 24897.250 24898.125 24899.000 24899.875 24900.750 24901.625 24902.500 24903.375 24904.250 24905.125 24906.000 24906.875 24907.750 24908.625 24909.500 24910.375 24911.250 24912.125 24913.000 24913.875 24914.750 24915.625 24916.500 24917.375 24918.250 24919.125 24920.000 24920.875 24921.750 24922.625 24923.500 25900.000 25900.875 25901.750 25902.625 25903.500 25904.375 25905.250 25906.125 25907.000 25907.875 25908.750 25909.625 25910.500 25911.375 25912.250 25913.125 25914.000 25914.875 25915.750 25916.625 25917.500 25918.375 25919.250 25920.125 25921.000 25921.875 25922.750 25923.625 25924.500 25925.375 25926.250 25927.125 25928.000 25928.875 25929.750 25930.625 25931.500 429 24924.375 25932.375 Index BS Tx BS Rx TS Rx TS Tx 430 431 432 433 434 435 436 437 438 439 440 441 442 443 444 445 446 447 448 449 450 451 452 453 454 455 456 457 458 459 460 461 462 463 464 465 466 24925.250 24926.125 24927.000 24927.875 24928.750 24929.625 24930.500 24931.375 24932.250 24933.125 24934.000 24934.875 24935.750 24936.625 24937.500 24938.375 24939.250 24940.125 24941.000 24941.875 24942.750 24943.625 24944.500 24945.375 24946.250 24947.125 24948.000 24948.875 24949.750 24950.625 24951.500 24952.375 24953.250 24954.125 24955.000 24955.875 24956.750 25933.250 25934.125 25935.000 25935.875 25936.750 25937.625 25938.500 25939.375 25940.250 25941.125 25942.000 25942.875 25943.750 25944.625 25945.500 25946.375 25947.250 25948.125 25949.000 25949.875 25950.750 25951.625 25952.500 25953.375 25954.250 25955.125 25956.000 25956.875 25957.750 25958.625 25959.500 25960.375 25961.250 25962.125 25963.000 25963.875 25964.750 467 24957.625 25965.625 Index Index 468 469 470 471 472 473 474 475 476 477 478 479 480 481 482 483 484 485 486 487 488 489 490 491 492 493 494 495 496 497 498 499 500 501 502 503 504 BS Tx BS Rx TS Rx TS Tx 24958.500 24959.375 24960.250 24961.125 24962.000 24962.875 24963.750 24964.625 24965.500 24966.375 24967.250 24968.125 24969.000 24969.875 24970.750 24971.625 24972.500 24973.375 24974.250 24975.125 24976.000 24976.875 24977.750 24978.625 24979.500 24980.375 24981.250 24982.125 24983.000 24983.875 24984.750 24985.625 24986.500 24987.375 24988.250 24989.125 24990.000 25966.500 25967.375 25968.250 25969.125 25970.000 25970.875 25971.750 25972.625 25973.500 25974.375 25975.250 25976.125 25977.000 25977.875 25978.750 25979.625 25980.500 25981.375 25982.250 25983.125 25984.000 25984.875 25985.750 25986.625 25987.500 25988.375 25989.250 25990.125 25991.000 25991.875 25992.750 25993.625 25994.500 25995.375 25996.250 25997.125 25998.000 A-9 Appendix A - WALKair Operating Frequencies Table A-8: 26GHz ETSI E Frequency Band Index BS Tx BS Rx 488 TS Rx TS Tx 24976.000 25984.000 489 Index BS Tx BS Rx Index BS Tx BS Rx 537 TS Rx TS Tx 25018.875 26026.875 586 TS Rx TS Tx 25061.750 26069.750 24976.875 25984.875 538 25019.750 26027.750 587 25062.625 26070.625 490 24977.750 25985.750 539 25020.625 26028.625 588 25063.500 26071.500 491 24978.625 25986.625 540 25021.500 26029.500 589 25064.375 26072.375 492 24979.500 25987.500 541 25022.375 26030.375 590 25065.250 26073.250 493 24980.375 25988.375 542 25023.250 26031.250 591 25066.125 26074.125 494 24981.250 25989.250 543 25024.125 26032.125 592 25067.000 26075.000 495 24982.125 25990.125 544 25025.000 26033.000 593 25067.875 26075.875 496 24983.000 25991.000 545 25025.875 26033.875 594 25068.750 26076.750 497 24983.875 25991.875 546 25026.750 26034.750 595 25069.625 26077.625 498 24984.750 25992.750 547 25027.625 26035.625 596 25070.500 26078.500 499 24985.625 25993.625 548 25028.500 26036.500 597 25071.375 26079.375 500 24986.500 25994.500 549 25029.375 26037.375 598 25072.250 26080.250 501 24987.375 25995.375 550 25030.250 26038.250 599 25073.125 26081.125 502 24988.250 25996.250 551 25031.125 26039.125 600 25074.000 26082.000 503 24989.125 25997.125 552 25032.000 26040.000 601 25074.875 26082.875 504 24990.000 25998.000 553 25032.875 26040.875 602 25075.750 26083.750 505 24990.875 25998.875 554 25033.750 26041.750 603 25076.625 26084.625 506 24991.750 25999.750 555 25034.625 26042.625 604 25077.500 26085.500 507 24992.625 26000.625 556 25035.500 26043.500 605 25078.375 26086.375 508 24993.500 26001.500 557 25036.375 26044.375 606 25079.250 26087.250 509 24994.375 26002.375 558 25037.250 26045.250 607 25080.125 26088.125 510 24995.250 26003.250 559 25038.125 26046.125 608 25081.000 26089.000 511 24996.125 26004.125 560 25039.000 26047.000 609 25081.875 26089.875 512 24997.000 26005.000 561 25039.875 26047.875 610 25082.750 26090.750 513 24997.875 26005.875 562 25040.750 26048.750 611 25083.625 26091.625 514 24998.750 26006.750 563 25041.625 26049.625 612 25084.500 26092.500 515 24999.625 26007.625 564 25042.500 26050.500 613 25085.375 26093.375 516 25000.500 26008.500 565 25043.375 26051.375 614 25086.250 26094.250 517 25001.375 26009.375 566 25044.250 26052.250 615 25087.125 26095.125 518 25002.250 26010.250 567 25045.125 26053.125 616 25088.000 26096.000 519 25003.125 26011.125 568 25046.000 26054.000 617 25088.875 26096.875 520 25004.000 26012.000 569 25046.875 26054.875 618 25089.750 26097.750 521 25004.875 26012.875 570 25047.750 26055.750 619 25090.625 26098.625 522 25005.750 26013.750 571 25048.625 26056.625 620 25091.500 26099.500 523 25006.625 26014.625 572 25049.500 26057.500 621 25092.375 26100.375 524 25007.500 26015.500 573 25050.375 26058.375 622 25093.250 26101.250 525 25008.375 26016.375 574 25051.250 26059.250 623 25094.125 26102.125 WALKair 3000 Commissioning Guide A-10 Frequency Band Tables Table A-8: 26GHz ETSI E Frequency Band Index BS Tx BS Rx 526 TS Rx TS Tx 25009.250 26017.250 527 Index BS Tx BS Rx Index BS Tx BS Rx 575 TS Rx TS Tx 25052.125 26060.125 624 TS Rx TS Tx 25095.000 26103.000 25010.125 26018.125 576 25053.000 26061.000 625 25095.875 26103.875 528 25011.000 26019.000 577 25053.875 26061.875 626 25096.750 26104.750 529 25011.875 26019.875 578 25054.750 26062.750 627 25097.625 26105.625 530 25012.750 26020.750 579 25055.625 26063.625 628 25098.500 26106.500 531 25013.625 26021.625 580 25056.500 26064.500 629 25099.375 26107.375 532 25014.500 26022.500 581 25057.375 26065.375 630 25100.250 26108.250 533 25015.375 26023.375 582 25058.250 26066.250 631 25101.125 26109.125 534 25016.250 26024.250 583 25059.125 26067.125 632 25102.000 26110.000 535 25017.125 26025.125 584 25060.000 26068.000 536 25018.000 26026.000 585 25060.875 26068.875 A-11 Appendix A - WALKair Operating Frequencies Table A-9: 26GHz ETSI F Frequency Band (Indexes 648 - 760) Index 648 649 650 651 652 653 654 655 656 657 658 659 660 661 662 663 664 665 666 667 668 669 670 671 672 673 674 675 676 677 678 679 680 681 682 683 684 685 BS Tx BS Rx TS Rx TS Tx 25116.000 25116.875 25117.750 25118.625 25119.500 25120.375 25121.250 25122.125 25123.000 25123.875 25124.750 25125.625 25126.500 25127.375 25128.250 25129.125 25130.000 25130.875 25131.750 25132.625 25133.500 25134.375 25135.250 25136.125 25137.000 25137.875 25138.750 25139.625 25140.500 25141.375 25142.250 25143.125 25144.000 25144.875 25145.750 25146.625 25147.500 25148.375 26124.000 26124.875 26125.750 26126.625 26127.500 26128.375 26129.250 26130.125 26131.000 26131.875 26132.750 26133.625 26134.500 26135.375 26136.250 26137.125 26138.000 26138.875 26139.750 26140.625 26141.500 26142.375 26143.250 26144.125 26145.000 26145.875 26146.750 26147.625 26148.500 26149.375 26150.250 26151.125 26152.000 26152.875 26153.750 26154.625 26155.500 26156.375 Index 686 687 688 689 690 691 692 693 694 695 696 697 698 699 700 701 702 703 704 705 706 707 708 709 710 711 712 713 714 715 716 717 718 719 720 721 722 723 BS Tx BS Rx TS Rx TS Tx 25149.250 25150.125 25151.000 25151.875 25152.750 25153.625 25154.500 25155.375 25156.250 25157.125 25158.000 25158.875 25159.750 25160.625 25161.500 25162.375 25163.250 25164.125 25165.000 25165.875 25166.750 25167.625 25168.500 25169.375 25170.250 25171.125 25172.000 25172.875 25173.750 25174.625 25175.500 25176.375 25177.250 25178.125 25179.000 25179.875 25180.750 25181.625 26157.250 26158.125 26159.000 26159.875 26160.750 26161.625 26162.500 26163.375 26164.250 26165.125 26166.000 26166.875 26167.750 26168.625 26169.500 26170.375 26171.250 26172.125 26173.000 26173.875 26174.750 26175.625 26176.500 26177.375 26178.250 26179.125 26180.000 26180.875 26181.750 26182.625 26183.500 26184.375 26185.250 26186.125 26187.000 26187.875 26188.750 26189.625 Index 724 725 726 727 728 729 730 731 732 733 734 735 736 737 738 739 740 741 742 743 744 745 746 747 748 749 750 751 752 753 754 755 756 757 758 759 760 BS Tx BS Rx TS Rx TS Tx 25182.500 25183.375 25184.250 25185.125 25186.000 25186.875 25187.750 25188.625 25189.500 25190.375 25191.250 25192.125 25193.000 25193.875 25194.750 25195.625 25196.500 25197.375 25198.250 25199.125 25200.000 25200.875 25201.750 25202.625 25203.500 25204.375 25205.250 25206.125 25207.000 25207.875 25208.750 25209.625 25210.500 25211.375 25212.250 25213.125 25214.000 26190.500 26191.375 26192.250 26193.125 26194.000 26194.875 26195.750 26196.625 26197.500 26198.375 26199.250 26200.125 26201.000 26201.875 26202.750 26203.625 26204.500 26205.375 26206.250 26207.125 26208.000 26208.875 26209.750 26210.625 26211.500 26212.375 26213.250 26214.125 26215.000 26215.875 26216.750 26217.625 26218.500 26219.375 26220.250 26221.125 26222.000 WALKair 3000 Commissioning Guide A-12 Frequency Band Tables Table A-10: 26GHz ETSI G Frequency Band (Indexes 776 - 888) Index BS Tx BS Rx TS Rx TS Tx 776 25228.000 26236.000 777 778 779 780 781 782 783 784 785 786 787 788 789 790 791 792 793 794 795 796 797 798 799 800 801 802 803 804 805 806 807 808 809 810 811 812 813 25228.875 25229.750 25230.625 25231.500 25232.375 25233.250 25234.125 25235.000 25235.875 25236.750 25237.625 25238.500 25239.375 25240.250 25241.125 25242.000 25242.875 25243.750 25244.625 25245.500 25246.375 25247.250 25248.125 25249.000 25249.875 25250.750 25251.625 25252.500 25253.375 25254.250 25255.125 25256.000 25256.875 25257.750 25258.625 25259.500 25260.375 26236.875 26237.750 26238.625 26239.500 26240.375 26241.250 26242.125 26243.000 26243.875 26244.750 26245.625 26246.500 26247.375 26248.250 26249.125 26250.000 26250.875 26251.750 26252.625 26253.500 26254.375 26255.250 26256.125 26257.000 26257.875 26258.750 26259.625 26260.500 26261.375 26262.250 26263.125 26264.000 26264.875 26265.750 26266.625 26267.500 26268.375 Index BS Tx BS Rx 814 TS Rx TS Tx 25261.250 26269.250 815 816 817 818 819 820 821 822 823 824 825 826 827 828 829 830 831 832 833 834 835 836 837 838 839 840 841 842 843 844 845 846 847 848 849 850 851 25262.125 25263.000 25263.875 25264.750 25265.625 25266.500 25267.375 25268.250 25269.125 25270.000 25270.875 25271.750 25272.625 25273.500 25274.375 25275.250 25276.125 25277.000 25277.875 25278.750 25279.625 25280.500 25281.375 25282.250 25283.125 25284.000 25284.875 25285.750 25286.625 25287.500 25288.375 25289.250 25290.125 25291.000 25291.875 25292.750 25293.625 26270.125 26271.000 26271.875 26272.750 26273.625 26274.500 26275.375 26276.250 26277.125 26278.000 26278.875 26279.750 26280.625 26281.500 26282.375 26283.250 26284.125 26285.000 26285.875 26286.750 26287.625 26288.500 26289.375 26290.250 26291.125 26292.000 26292.875 26293.750 26294.625 26295.500 26296.375 26297.250 26298.125 26299.000 26299.875 26300.750 26301.625 Index BS Tx BS Rx 852 TS Rx TS Tx 25294.500 26302.500 853 854 855 856 857 858 859 860 861 862 863 864 865 866 867 868 869 870 871 872 873 874 875 876 877 878 879 880 881 882 883 884 885 886 887 888 25295.375 25296.250 25297.125 25298.000 25298.875 25299.750 25300.625 25301.500 25302.375 25303.250 25304.125 25305.000 25305.875 25306.750 25307.625 25308.500 25309.375 25310.250 25311.125 25312.000 25312.875 25313.750 25314.625 25315.500 25316.375 25317.250 25318.125 25319.000 25319.875 25320.750 25321.625 25322.500 25323.375 25324.250 25325.125 25326.000 A-13 26303.375 26304.250 26305.125 26306.000 26306.875 26307.750 26308.625 26309.500 26310.375 26311.250 26312.125 26313.000 26313.875 26314.750 26315.625 26316.500 26317.375 26318.250 26319.125 26320.000 26320.875 26321.750 26322.625 26323.500 26324.375 26325.250 26326.125 26327.000 26327.875 26328.750 26329.625 26330.500 26331.375 26332.250 26333.125 26334.000 Appendix A - WALKair Operating Frequencies Table A-11: 26GHz ETSI H Frequency Band Index 904 905 906 907 908 909 910 911 912 913 914 915 916 917 918 919 920 921 922 923 924 925 926 927 928 929 930 931 932 933 934 935 936 937 938 939 940 941 BS Tx BS Rx TS Rx TS Tx 25340.000 25340.875 25341.750 25342.625 25343.500 25344.375 25345.250 25346.125 25347.000 25347.875 25348.750 25349.625 25350.500 25351.375 25352.250 25353.125 25354.000 25354.875 25355.750 25356.625 25357.500 25358.375 25359.250 25360.125 25361.000 25361.875 25362.750 25363.625 25364.500 25365.375 25366.250 25367.125 25368.000 25368.875 25369.750 25370.625 25371.500 25372.375 26348.000 26348.875 26349.750 26350.625 26351.500 26352.375 26353.250 26354.125 26355.000 26355.875 26356.750 26357.625 26358.500 26359.375 26360.250 26361.125 26362.000 26362.875 26363.750 26364.625 26365.500 26366.375 26367.250 26368.125 26369.000 26369.875 26370.750 26371.625 26372.500 26373.375 26374.250 26375.125 26376.000 26376.875 26377.750 26378.625 26379.500 26380.375 Index 942 943 944 945 946 947 948 949 950 951 952 953 954 955 956 957 958 959 960 961 962 963 964 965 966 967 968 969 970 971 972 973 974 975 976 977 978 979 BS Tx BS Rx TS Rx TS Tx 25373.250 25374.125 25375.000 25375.875 25376.750 25377.625 25378.500 25379.375 25380.250 25381.125 25382.000 25382.875 25383.750 25384.625 25385.500 25386.375 25387.250 25388.125 25389.000 25389.875 25390.750 25391.625 25392.500 25393.375 25394.250 25395.125 25396.000 25396.875 25397.750 25398.625 25399.500 25400.375 25401.250 25402.125 25403.000 25403.875 25404.750 25405.625 26381.250 26382.125 26383.000 26383.875 26384.750 26385.625 26386.500 26387.375 26388.250 26389.125 26390.000 26390.875 26391.750 26392.625 26393.500 26394.375 26395.250 26396.125 26397.000 26397.875 26398.750 26399.625 26400.500 26401.375 26402.250 26403.125 26404.000 26404.875 26405.750 26406.625 26407.500 26408.375 26409.250 26410.125 26411.000 26411.875 26412.750 26413.625 Index 980 981 982 983 984 985 986 987 988 989 990 991 992 993 994 995 996 997 998 999 1000 1001 1002 1003 1004 1005 1006 1007 1008 1009 1010 1011 1012 1013 1014 1015 1016 BS Tx BS Rx TS Rx TS Tx 25406.500 25407.375 25408.250 25409.125 25410.000 25410.875 25411.750 25412.625 25413.500 25414.375 25415.250 25416.125 25417.000 25417.875 25418.750 25419.625 25420.500 25421.375 25422.250 25423.125 25424.000 25424.875 25425.750 25426.625 25427.500 25428.375 25429.250 25430.125 25431.000 25431.875 25432.750 25433.625 25434.500 25435.375 25436.250 25437.125 25438.000 26414.500 26415.375 26416.250 26417.125 26418.000 26418.875 26419.750 26420.625 26421.500 26422.375 26423.250 26424.125 26425.000 26425.875 26426.750 26427.625 26428.500 26429.375 26430.250 26431.125 26432.000 26432.875 26433.750 26434.625 26435.500 26436.375 26437.250 26438.125 26439.000 26439.875 26440.750 26441.625 26442.500 26443.375 26444.250 26445.125 26446.000 WALKair 3000 Commissioning Guide A-14 Frequency Band Tables Table A-12: 26GHz CHINA A0 Frequency Band Index 72 73 74 75 76 77 78 79 80 81 82 83 84 85 86 87 88 89 90 91 92 93 94 95 96 97 98 99 100 101 102 103 104 105 106 107 108 109 BS Tx BS Rx TS Rx TS Tx 24514.000 24514.875 24515.750 24516.625 24517.500 24518.375 24519.250 24520.125 24521.000 24521.875 24522.750 24523.625 24524.500 24525.375 24526.250 24527.125 24528.000 24528.875 24529.750 24530.625 24531.500 24532.375 24533.250 24534.125 24535.000 24535.875 24536.750 24537.625 24538.500 24539.375 24540.250 24541.125 24542.000 24542.875 24543.750 24544.625 24545.500 24546.375 25764.000 25764.875 25765.750 25766.625 25767.500 25768.375 25769.250 25770.125 25771.000 25771.875 25772.750 25773.625 25774.500 25775.375 25776.250 25777.125 25778.000 25778.875 25779.750 25780.625 25781.500 25782.375 25783.250 25784.125 25785.000 25785.875 25786.750 25787.625 25788.500 25789.375 25790.250 25791.125 25792.000 25792.875 25793.750 25794.625 25795.500 25796.375 Index 110 111 112 113 114 115 116 117 118 119 120 121 122 123 124 125 126 127 128 129 130 131 132 133 134 135 136 137 138 139 140 141 142 143 144 145 146 147 BS Tx BS Rx TS Rx TS Tx 24547.250 24548.125 24549.000 24549.875 24550.750 24551.625 24552.500 24553.375 24554.250 24555.125 24556.000 24556.875 24557.750 24558.625 24559.500 24560.375 24561.250 24562.125 24563.000 24563.875 24564.750 24565.625 24566.500 24567.375 24568.250 24569.125 24570.000 24570.875 24571.750 24572.625 24573.500 24574.375 24575.250 24576.125 24577.000 24577.875 24578.750 24579.625 25797.250 25798.125 25799.000 25799.875 25800.750 25801.625 25802.500 25803.375 25804.250 25805.125 25806.000 25806.875 25807.750 25808.625 25809.500 25810.375 25811.250 25812.125 25813.000 25813.875 25814.750 25815.625 25816.500 25817.375 25818.250 25819.125 25820.000 25820.875 25821.750 25822.625 25823.500 25824.375 25825.250 25826.125 25827.000 25827.875 25828.750 25829.625 Index 148 149 150 151 152 153 154 155 156 157 158 159 160 161 162 163 164 165 166 167 168 169 170 171 172 173 174 175 176 177 178 179 180 181 182 183 184 BS Tx BS Rx TS Rx TS Tx 24580.500 24581.375 24582.250 24583.125 24584.000 24584.875 24585.750 24586.625 24587.500 24588.375 24589.250 24590.125 24591.000 24591.875 24592.750 24593.625 24594.500 24595.375 24596.250 24597.125 24598.000 24598.875 24599.750 24600.625 24601.500 24602.375 24603.250 24604.125 24605.000 24605.875 24606.750 24607.625 24608.500 24609.375 24610.250 24611.125 24612.000 25830.500 25831.375 25832.250 25833.125 25834.000 25834.875 25835.750 25836.625 25837.500 25838.375 25839.250 25840.125 25841.000 25841.875 25842.750 25843.625 25844.500 25845.375 25846.250 25847.125 25848.000 25848.875 25849.750 25850.625 25851.500 25852.375 25853.250 25854.125 25855.000 25855.875 25856.750 25857.625 25858.500 25859.375 25860.250 25861.125 25862.000 A-15 Appendix A - WALKair Operating Frequencies Table A-13: 26GHz CHINA A1 Frequency Band BS Tx BS Rx TS Rx TS Tx 24626.000 24626.875 24627.750 24628.625 24629.500 24630.375 24631.250 24632.125 24633.000 24633.875 24634.750 24635.625 24636.500 24637.375 24638.250 24639.125 24640.000 24640.875 24641.750 24642.625 24643.500 24644.375 24645.250 24646.125 24647.000 24647.875 24648.750 24649.625 24650.500 24651.375 24652.250 24653.125 24654.000 24654.875 24655.750 24656.625 24657.500 25876.000 25876.875 25877.750 25878.625 25879.500 25880.375 25881.250 25882.125 25883.000 25883.875 25884.750 25885.625 25886.500 25887.375 25888.250 25889.125 25890.000 25890.875 25891.750 25892.625 25893.500 25894.375 25895.250 25896.125 25897.000 25897.875 25898.750 25899.625 25900.500 25901.375 25902.250 25903.125 25904.000 25904.875 25905.750 25906.625 25907.500 237 24658.375 25908.375 Index 200 201 202 203 204 205 206 207 208 209 210 211 212 213 214 215 216 217 218 219 220 221 222 223 224 225 226 227 228 229 230 231 232 233 234 235 236 BS Tx BS Rx TS Rx TS Tx 238 239 240 241 242 243 244 245 246 247 248 249 250 251 252 253 254 255 256 257 258 259 260 261 262 263 264 265 266 267 268 269 270 271 272 273 274 24659.250 24660.125 24661.000 24661.875 24662.750 24663.625 24664.500 24665.375 24666.250 24667.125 24668.000 24668.875 24669.750 24670.625 24671.500 24672.375 24673.250 24674.125 24675.000 24675.875 24676.750 24677.625 24678.500 24679.375 24680.250 24681.125 24682.000 24682.875 24683.750 24684.625 24685.500 24686.375 24687.250 24688.125 24689.000 24689.875 24690.750 25909.250 25910.125 25911.000 25911.875 25912.750 25913.625 25914.500 25915.375 25916.250 25917.125 25918.000 25918.875 25919.750 25920.625 25921.500 25922.375 25923.250 25924.125 25925.000 25925.875 25926.750 25927.625 25928.500 25929.375 25930.250 25931.125 25932.000 25932.875 25933.750 25934.625 25935.500 25936.375 25937.250 25938.125 25939.000 25939.875 25940.750 275 24691.625 25941.625 Index Index 276 277 278 279 280 281 282 283 284 285 286 287 288 289 290 291 292 293 294 295 296 297 298 299 300 301 302 303 304 305 306 307 308 309 310 311 312 BS Tx BS Rx TS Rx TS Tx 24692.500 24693.375 24694.250 24695.125 24696.000 24696.875 24697.750 24698.625 24699.500 24700.375 24701.250 24702.125 24703.000 24703.875 24704.750 24705.625 24706.500 24707.375 24708.250 24709.125 24710.000 24710.875 24711.750 24712.625 24713.500 24714.375 24715.250 24716.125 24717.000 24717.875 24718.750 24719.625 24720.500 24721.375 24722.250 24723.125 24724.000 25942.500 25943.375 25944.250 25945.125 25946.000 25946.875 25947.750 25948.625 25949.500 25950.375 25951.250 25952.125 25953.000 25953.875 25954.750 25955.625 25956.500 25957.375 25958.250 25959.125 25960.000 25960.875 25961.750 25962.625 25963.500 25964.375 25965.250 25966.125 25967.000 25967.875 25968.750 25969.625 25970.500 25971.375 25972.250 25973.125 25974.000 WALKair 3000 Commissioning Guide A-16 Frequency Band Tables Table A-14: 26GHz CHINA B1 Frequency Band Index 328 329 330 331 332 333 334 335 336 337 338 339 340 341 342 343 344 345 346 347 348 349 350 351 352 353 354 355 356 357 358 359 360 361 362 363 364 365 BS Tx BS Rx TS Rx TS Tx 24738.000 24738.875 24739.750 24740.625 24741.500 24742.375 24743.250 24744.125 24745.000 24745.875 24746.750 24747.625 24748.500 24749.375 24750.250 24751.125 24752.000 24752.875 24753.750 24754.625 24755.500 24756.375 24757.250 24758.125 24759.000 24759.875 24760.750 24761.625 24762.500 24763.375 24764.250 24765.125 24766.000 24766.875 24767.750 24768.625 24769.500 24770.375 25988.000 25988.875 25989.750 25990.625 25991.500 25992.375 25993.250 25994.125 25995.000 25995.875 25996.750 25997.625 25998.500 25999.375 26000.250 26001.125 26002.000 26002.875 26003.750 26004.625 26005.500 26006.375 26007.250 26008.125 26009.000 26009.875 26010.750 26011.625 26012.500 26013.375 26014.250 26015.125 26016.000 26016.875 26017.750 26018.625 26019.500 26020.375 Index 366 367 368 369 370 371 372 373 374 375 376 377 378 379 380 381 382 383 384 385 386 387 388 389 390 391 392 393 394 395 396 397 398 399 400 401 402 403 BS Tx BS Rx TS Rx TS Tx 24771.250 24772.125 24773.000 24773.875 24774.750 24775.625 24776.500 24777.375 24778.250 24779.125 24780.000 24780.875 24781.750 24782.625 24783.500 24784.375 24785.250 24786.125 24787.000 24787.875 24788.750 24789.625 24790.500 24791.375 24792.250 24793.125 24794.000 24794.875 24795.750 24796.625 24797.500 24798.375 24799.250 24800.125 24801.000 24801.875 24802.750 24803.625 26021.250 26022.125 26023.000 26023.875 26024.750 26025.625 26026.500 26027.375 26028.250 26029.125 26030.000 26030.875 26031.750 26032.625 26033.500 26034.375 26035.250 26036.125 26037.000 26037.875 26038.750 26039.625 26040.500 26041.375 26042.250 26043.125 26044.000 26044.875 26045.750 26046.625 26047.500 26048.375 26049.250 26050.125 26051.000 26051.875 26052.750 26053.625 Index 404 405 406 407 408 409 410 411 412 413 414 415 416 417 418 419 420 421 422 423 424 425 426 427 428 429 430 431 432 433 434 435 436 437 438 439 440 BS Tx BS Rx TS Rx TS Tx 24804.500 24805.375 24806.250 24807.125 24808.000 24808.875 24809.750 24810.625 24811.500 24812.375 24813.250 24814.125 24815.000 24815.875 24816.750 24817.625 24818.500 24819.375 24820.250 24821.125 24822.000 24822.875 24823.750 24824.625 24825.500 24826.375 24827.250 24828.125 24829.000 24829.875 24830.750 24831.625 24832.500 24833.375 24834.250 24835.125 24836.000 26054.500 26055.375 26056.250 26057.125 26058.000 26058.875 26059.750 26060.625 26061.500 26062.375 26063.250 26064.125 26065.000 26065.875 26066.750 26067.625 26068.500 26069.375 26070.250 26071.125 26072.000 26072.875 26073.750 26074.625 26075.500 26076.375 26077.250 26078.125 26079.000 26079.875 26080.750 26081.625 26082.500 26083.375 26084.250 26085.125 26086.000 A-17 Appendix A - WALKair Operating Frequencies Table A-15: 26GHz CHINA A2 Frequency Band Index 456 457 458 459 460 461 462 463 464 465 466 467 468 469 470 471 472 473 474 475 476 477 478 479 480 481 482 483 484 485 486 487 488 489 490 491 492 493 BS Tx BS Rx TS Rx TS Tx 24850.000 24850.875 24851.750 24852.625 24853.500 24854.375 24855.250 24856.125 24857.000 24857.875 24858.750 24859.625 24860.500 24861.375 24862.250 24863.125 24864.000 24864.875 24865.750 24866.625 24867.500 24868.375 24869.250 24870.125 24871.000 24871.875 24872.750 24873.625 24874.500 24875.375 24876.250 24877.125 24878.000 24878.875 24879.750 24880.625 24881.500 24882.375 26100.000 26100.875 26101.750 26102.625 26103.500 26104.375 26105.250 26106.125 26107.000 26107.875 26108.750 26109.625 26110.500 26111.375 26112.250 26113.125 26114.000 26114.875 26115.750 26116.625 26117.500 26118.375 26119.250 26120.125 26121.000 26121.875 26122.750 26123.625 26124.500 26125.375 26126.250 26127.125 26128.000 26128.875 26129.750 26130.625 26131.500 26132.375 Index 494 495 496 497 498 499 500 501 502 503 504 505 506 507 508 509 510 511 512 513 514 515 516 517 518 519 520 521 522 523 524 525 526 527 528 529 530 531 BS Tx BS Rx TS Rx TS Tx 24883.250 24884.125 24885.000 24885.875 24886.750 24887.625 24888.500 24889.375 24890.250 24891.125 24892.000 24892.875 24893.750 24894.625 24895.500 24896.375 24897.250 24898.125 24899.000 24899.875 24900.750 24901.625 24902.500 24903.375 24904.250 24905.125 24906.000 24906.875 24907.750 24908.625 24909.500 24910.375 24911.250 24912.125 24913.000 24913.875 24914.750 24915.625 26133.250 26134.125 26135.000 26135.875 26136.750 26137.625 26138.500 26139.375 26140.250 26141.125 26142.000 26142.875 26143.750 26144.625 26145.500 26146.375 26147.250 26148.125 26149.000 26149.875 26150.750 26151.625 26152.500 26153.375 26154.250 26155.125 26156.000 26156.875 26157.750 26158.625 26159.500 26160.375 26161.250 26162.125 26163.000 26163.875 26164.750 26165.625 Index 532 533 534 535 536 537 538 539 540 541 542 543 544 545 546 547 548 549 550 551 552 553 554 555 556 557 558 559 560 561 562 563 564 565 566 567 568 BS Tx BS Rx TS Rx TS Tx 24916.500 24917.375 24918.250 24919.125 24920.000 24920.875 24921.750 24922.625 24923.500 24924.375 24925.250 24926.125 24927.000 24927.875 24928.750 24929.625 24930.500 24931.375 24932.250 24933.125 24934.000 24934.875 24935.750 24936.625 24937.500 24938.375 24939.250 24940.125 24941.000 24941.875 24942.750 24943.625 24944.500 24945.375 24946.250 24947.125 24948.000 26166.500 26167.375 26168.250 26169.125 26170.000 26170.875 26171.750 26172.625 26173.500 26174.375 26175.250 26176.125 26177.000 26177.875 26178.750 26179.625 26180.500 26181.375 26182.250 26183.125 26184.000 26184.875 26185.750 26186.625 26187.500 26188.375 26189.250 26190.125 26191.000 26191.875 26192.750 26193.625 26194.500 26195.375 26196.250 26197.125 26198.000 WALKair 3000 Commissioning Guide A-18 Frequency Band Tables Table A-16: 26GHz CHINA A3 Frequency Band Index 584 585 586 587 588 589 590 591 592 593 594 595 596 597 598 599 600 601 602 603 604 605 606 607 608 609 610 611 612 613 614 615 616 617 618 619 620 621 BS Tx BS Rx TS Rx TS Tx 24962.000 24962.875 24963.750 24964.625 24965.500 24966.375 24967.250 24968.125 24969.000 24969.875 24970.750 24971.625 24972.500 24973.375 24974.250 24975.125 24976.000 24976.875 24977.750 24978.625 24979.500 24980.375 24981.250 24982.125 24983.000 24983.875 24984.750 24985.625 24986.500 24987.375 24988.250 24989.125 24990.000 24990.875 24991.750 24992.625 24993.500 24994.375 26212.000 26212.875 26213.750 26214.625 26215.500 26216.375 26217.250 26218.125 26219.000 26219.875 26220.750 26221.625 26222.500 26223.375 26224.250 26225.125 26226.000 26226.875 26227.750 26228.625 26229.500 26230.375 26231.250 26232.125 26233.000 26233.875 26234.750 26235.625 26236.500 26237.375 26238.250 26239.125 26240.000 26240.875 26241.750 26242.625 26243.500 26244.375 Index 622 623 624 625 626 627 628 629 630 631 632 633 634 635 636 637 638 639 640 641 642 643 644 645 646 647 648 649 650 651 652 653 654 655 656 657 658 659 BS Tx BS Rx TS Rx TS Tx 24995.250 24996.125 24997.000 24997.875 24998.750 24999.625 25000.500 25001.375 25002.250 25003.125 25004.000 25004.875 25005.750 25006.625 25007.500 25008.375 25009.250 25010.125 25011.000 25011.875 25012.750 25013.625 25014.500 25015.375 25016.250 25017.125 25018.000 25018.875 25019.750 25020.625 25021.500 25022.375 25023.250 25024.125 25025.000 25025.875 25026.750 25027.625 26245.250 26246.125 26247.000 26247.875 26248.750 26249.625 26250.500 26251.375 26252.250 26253.125 26254.000 26254.875 26255.750 26256.625 26257.500 26258.375 26259.250 26260.125 26261.000 26261.875 26262.750 26263.625 26264.500 26265.375 26266.250 26267.125 26268.000 26268.875 26269.750 26270.625 26271.500 26272.375 26273.250 26274.125 26275.000 26275.875 26276.750 26277.625 Index 660 661 662 663 664 665 666 667 668 669 670 671 672 673 674 675 676 677 678 679 680 681 682 683 684 685 686 687 688 689 690 691 692 693 694 695 696 BS Tx BS Rx TS Rx TS Tx 25028.500 25029.375 25030.250 25031.125 25032.000 25032.875 25033.750 25034.625 25035.500 25036.375 25037.250 25038.125 25039.000 25039.875 25040.750 25041.625 25042.500 25043.375 25044.250 25045.125 25046.000 25046.875 25047.750 25048.625 25049.500 25050.375 25051.250 25052.125 25053.000 25053.875 25054.750 25055.625 25056.500 25057.375 25058.250 25059.125 25060.000 26278.500 26279.375 26280.250 26281.125 26282.000 26282.875 26283.750 26284.625 26285.500 26286.375 26287.250 26288.125 26289.000 26289.875 26290.750 26291.625 26292.500 26293.375 26294.250 26295.125 26296.000 26296.875 26297.750 26298.625 26299.500 26300.375 26301.250 26302.125 26303.000 26303.875 26304.750 26305.625 26306.500 26307.375 26308.250 26309.125 26310.000 A-19 Appendix A - WALKair Operating Frequencies Table A-17: 26GHz CHINA B2 Frequency Band Index 712 713 714 715 716 717 718 719 720 721 722 723 724 725 726 727 728 729 730 731 732 733 734 735 736 737 738 739 740 741 742 743 744 745 746 747 748 749 BS Tx BS Rx TS Rx TS Tx 25074.000 25074.875 25075.750 25076.625 25077.500 25078.375 25079.250 25080.125 25081.000 25081.875 25082.750 25083.625 25084.500 25085.375 25086.250 25087.125 25088.000 25088.875 25089.750 25090.625 25091.500 25092.375 25093.250 25094.125 25095.000 25095.875 25096.750 25097.625 25098.500 25099.375 25100.250 25101.125 25102.000 25102.875 25103.750 25104.625 25105.500 25106.375 26324.000 26324.875 26325.750 26326.625 26327.500 26328.375 26329.250 26330.125 26331.000 26331.875 26332.750 26333.625 26334.500 26335.375 26336.250 26337.125 26338.000 26338.875 26339.750 26340.625 26341.500 26342.375 26343.250 26344.125 26345.000 26345.875 26346.750 26347.625 26348.500 26349.375 26350.250 26351.125 26352.000 26352.875 26353.750 26354.625 26355.500 26356.375 Index 750 751 752 753 754 755 756 757 758 759 760 761 762 763 764 765 766 767 768 769 770 771 772 773 774 775 776 777 778 779 780 781 782 783 784 785 786 787 BS Tx BS Rx TS Rx TS Tx 25107.250 25108.125 25109.000 25109.875 25110.750 25111.625 25112.500 25113.375 25114.250 25115.125 25116.000 25116.875 25117.750 25118.625 25119.500 25120.375 25121.250 25122.125 25123.000 25123.875 25124.750 25125.625 25126.500 25127.375 25128.250 25129.125 25130.000 25130.875 25131.750 25132.625 25133.500 25134.375 25135.250 25136.125 25137.000 25137.875 25138.750 25139.625 26357.250 26358.125 26359.000 26359.875 26360.750 26361.625 26362.500 26363.375 26364.250 26365.125 26366.000 26366.875 26367.750 26368.625 26369.500 26370.375 26371.250 26372.125 26373.000 26373.875 26374.750 26375.625 26376.500 26377.375 26378.250 26379.125 26380.000 26380.875 26381.750 26382.625 26383.500 26384.375 26385.250 26386.125 26387.000 26387.875 26388.750 26389.625 Index 788 789 790 791 792 793 794 795 796 797 798 799 800 801 802 803 804 805 806 807 808 809 810 811 812 813 814 815 816 817 818 819 820 821 822 823 824 BS Tx BS Rx TS Rx TS Tx 25140.500 25141.375 25142.250 25143.125 25144.000 25144.875 25145.750 25146.625 25147.500 25148.375 25149.250 25150.125 25151.000 25151.875 25152.750 25153.625 25154.500 25155.375 25156.250 25157.125 25158.000 25158.875 25159.750 25160.625 25161.500 25162.375 25163.250 25164.125 25165.000 25165.875 25166.750 25167.625 25168.500 25169.375 25170.250 25171.125 25172.000 26390.500 26391.375 26392.250 26393.125 26394.000 26394.875 26395.750 26396.625 26397.500 26398.375 26399.250 26400.125 26401.000 26401.875 26402.750 26403.625 26404.500 26405.375 26406.250 26407.125 26408.000 26408.875 26409.750 26410.625 26411.500 26412.375 26413.250 26414.125 26415.000 26415.875 26416.750 26417.625 26418.500 26419.375 26420.250 26421.125 26422.000 WALKair 3000 Commissioning Guide A-20 Frequency Band Tables Table A-18: 26GHz CHINA C12 Frequency Band Index 840 841 842 843 844 845 846 847 848 849 850 851 852 853 854 855 856 857 858 859 860 861 862 863 864 865 866 867 868 869 870 871 872 873 874 875 876 877 BS Tx BS Rx TS Rx TS Tx 25186.000 25186.875 25187.750 25188.625 25189.500 25190.375 25191.250 25192.125 25193.000 25193.875 25194.750 25195.625 25196.500 25197.375 25198.250 25199.125 25200.000 25200.875 25201.750 25202.625 25203.500 25204.375 25205.250 25206.125 25207.000 25207.875 25208.750 25209.625 25210.500 25211.375 25212.250 25213.125 25214.000 25214.875 25215.750 25216.625 25217.500 25218.375 26436.000 26436.875 26437.750 26438.625 26439.500 26440.375 26441.250 26442.125 26443.000 26443.875 26444.750 26445.625 26446.500 26447.375 26448.250 26449.125 26450.000 26450.875 26451.750 26452.625 26453.500 26454.375 26455.250 26456.125 26457.000 26457.875 26458.750 26459.625 26460.500 26461.375 26462.250 26463.125 26464.000 26464.875 26465.750 26466.625 26467.500 26468.375 Index 878 879 880 881 882 883 884 885 886 887 888 889 890 891 892 893 894 895 896 897 898 899 900 901 902 903 904 905 906 907 908 909 910 911 912 913 914 915 BS Tx BS Rx TS Rx TS Tx 25219.250 25220.125 25221.000 25221.875 25222.750 25223.625 25224.500 25225.375 25226.250 25227.125 25228.000 25228.875 25229.750 25230.625 25231.500 25232.375 25233.250 25234.125 25235.000 25235.875 25236.750 25237.625 25238.500 25239.375 25240.250 25241.125 25242.000 25242.875 25243.750 25244.625 25245.500 25246.375 25247.250 25248.125 25249.000 25249.875 25250.750 25251.625 26469.250 26470.125 26471.000 26471.875 26472.750 26473.625 26474.500 26475.375 26476.250 26477.125 26478.000 26478.875 26479.750 26480.625 26481.500 26482.375 26483.250 26484.125 26485.000 26485.875 26486.750 26487.625 26488.500 26489.375 26490.250 26491.125 26492.000 26492.875 26493.750 26494.625 26495.500 26496.375 26497.250 26498.125 26499.000 26499.875 26500.750 26501.625 Index 916 917 918 919 920 921 922 923 924 925 926 927 928 929 930 931 932 933 934 935 936 937 938 939 940 941 942 943 944 945 946 947 948 949 950 951 952 BS Tx BS Rx TS Rx TS Tx 25252.500 25253.375 25254.250 25255.125 25256.000 25256.875 25257.750 25258.625 25259.500 25260.375 25261.250 25262.125 25263.000 25263.875 25264.750 25265.625 25266.500 25267.375 25268.250 25269.125 25270.000 25270.875 25271.750 25272.625 25273.500 25274.375 25275.250 25276.125 25277.000 25277.875 25278.750 25279.625 25280.500 25281.375 25282.250 25283.125 25284.000 26502.500 26503.375 26504.250 26505.125 26506.000 26506.875 26507.750 26508.625 26509.500 26510.375 26511.250 26512.125 26513.000 26513.875 26514.750 26515.625 26516.500 26517.375 26518.250 26519.125 26520.000 26520.875 26521.750 26522.625 26523.500 26524.375 26525.250 26526.125 26527.000 26527.875 26528.750 26529.625 26530.500 26531.375 26532.250 26533.125 26534.000 A-21 Appendix A - WALKair Operating Frequencies Table A-19: 26GHz CHINA C34 Frequency Band Index 968 969 970 971 972 973 974 975 976 977 978 979 980 981 982 983 984 985 986 987 988 989 990 991 992 993 994 995 996 997 998 999 1000 1001 1002 1003 1004 BS Tx BS Rx TS Rx TS Tx 25298.000 25298.875 25299.750 25300.625 25301.500 25302.375 25303.250 25304.125 25305.000 25305.875 25306.750 25307.625 25308.500 25309.375 25310.250 25311.125 25312.000 25312.875 25313.750 25314.625 25315.500 25316.375 25317.250 25318.125 25319.000 25319.875 25320.750 25321.625 25322.500 25323.375 25324.250 25325.125 25326.000 25326.875 25327.750 25328.625 25329.500 26548.000 26548.875 26549.750 26550.625 26551.500 26552.375 26553.250 26554.125 26555.000 26555.875 26556.750 26557.625 26558.500 26559.375 26560.250 26561.125 26562.000 26562.875 26563.750 26564.625 26565.500 26566.375 26567.250 26568.125 26569.000 26569.875 26570.750 26571.625 26572.500 26573.375 26574.250 26575.125 26576.000 26576.875 26577.750 26578.625 26579.500 Index 1006 1007 1008 1009 1010 1011 1012 1013 1014 1015 1016 1017 1018 1019 1020 1021 1022 1023 1024 1025 1026 1027 1028 1029 1030 1031 1032 1033 1034 1035 1036 1037 1038 1039 1040 1041 1042 1005 25330.375 26580.375 1043 BS Tx BS Rx TS Rx TS Tx 25331.250 25332.125 25333.000 25333.875 25334.750 25335.625 25336.500 25337.375 25338.250 25339.125 25340.000 25340.875 25341.750 25342.625 25343.500 25344.375 25345.250 25346.125 25347.000 25347.875 25348.750 25349.625 25350.500 25351.375 25352.250 25353.125 25354.000 25354.875 25355.750 25356.625 25357.500 25358.375 25359.250 25360.125 25361.000 25361.875 25362.750 26581.250 26582.125 26583.000 26583.875 26584.750 26585.625 26586.500 26587.375 26588.250 26589.125 26590.000 26590.875 26591.750 26592.625 26593.500 26594.375 26595.250 26596.125 26597.000 26597.875 26598.750 26599.625 26600.500 26601.375 26602.250 26603.125 26604.000 26604.875 26605.750 26606.625 26607.500 26608.375 26609.250 26610.125 26611.000 26611.875 26612.750 Index 1044 1045 1046 1047 1048 1049 1050 1051 1052 1053 1054 1055 1056 1057 1058 1059 1060 1061 1062 1063 1064 1065 1066 1067 1068 1069 1070 1071 1072 1073 1074 1075 1076 1077 1078 1079 1080 BS Tx BS Rx TS Rx TS Tx 25364.500 25365.375 25366.250 25367.125 25368.000 25368.875 25369.750 25370.625 25371.500 25372.375 25373.250 25374.125 25375.000 25375.875 25376.750 25377.625 25378.500 25379.375 25380.250 25381.125 25382.000 25382.875 25383.750 25384.625 25385.500 25386.375 25387.250 25388.125 25389.000 25389.875 25390.750 25391.625 25392.500 25393.375 25394.250 25395.125 25396.000 26614.500 26615.375 26616.250 26617.125 26618.000 26618.875 26619.750 26620.625 26621.500 26622.375 26623.250 26624.125 26625.000 26625.875 26626.750 26627.625 26628.500 26629.375 26630.250 26631.125 26632.000 26632.875 26633.750 26634.625 26635.500 26636.375 26637.250 26638.125 26639.000 26639.875 26640.750 26641.625 26642.500 26643.375 26644.250 26645.125 26646.000 25363.625 26613.625 WALKair 3000 Commissioning Guide A-22 Frequency Band Tables Table A-20: 26GHz CHINA B3 Frequency Band Index 1096 1097 1098 1099 1100 1101 1102 1103 1104 1105 1106 1107 1108 1109 1110 1111 1112 1113 1114 1115 1116 1117 1118 1119 1120 1121 1122 1123 1124 1125 1126 1127 1128 1129 1130 1131 1132 1133 BS Tx BS Rx TS Rx TS Tx 25410.000 25410.875 25411.750 25412.625 25413.500 25414.375 25415.250 25416.125 25417.000 25417.875 25418.750 25419.625 25420.500 25421.375 25422.250 25423.125 25424.000 25424.875 25425.750 25426.625 25427.500 25428.375 25429.250 25430.125 25431.000 25431.875 25432.750 25433.625 25434.500 25435.375 25436.250 25437.125 25438.000 25438.875 25439.750 25440.625 25441.500 25442.375 26660.000 26660.875 26661.750 26662.625 26663.500 26664.375 26665.250 26666.125 26667.000 26667.875 26668.750 26669.625 26670.500 26671.375 26672.250 26673.125 26674.000 26674.875 26675.750 26676.625 26677.500 26678.375 26679.250 26680.125 26681.000 26681.875 26682.750 26683.625 26684.500 26685.375 26686.250 26687.125 26688.000 26688.875 26689.750 26690.625 26691.500 26692.375 Index 1134 1135 1136 1137 1138 1139 1140 1141 1142 1143 1144 1145 1146 1147 1148 1149 1150 1151 1152 1153 1154 1155 1156 1157 1158 1159 1160 1161 1162 1163 1164 1165 1166 1167 1168 1169 1170 1171 BS Tx BS Rx TS Rx TS Tx 25443.250 25444.125 25445.000 25445.875 25446.750 25447.625 25448.500 25449.375 25450.250 25451.125 25452.000 25452.875 25453.750 25454.625 25455.500 25456.375 25457.250 25458.125 25459.000 25459.875 25460.750 25461.625 25462.500 25463.375 25464.250 25465.125 25466.000 25466.875 25467.750 25468.625 25469.500 25470.375 25471.250 25472.125 25473.000 25473.875 25474.750 25475.625 26693.250 26694.125 26695.000 26695.875 26696.750 26697.625 26698.500 26699.375 26700.250 26701.125 26702.000 26702.875 26703.750 26704.625 26705.500 26706.375 26707.250 26708.125 26709.000 26709.875 26710.750 26711.625 26712.500 26713.375 26714.250 26715.125 26716.000 26716.875 26717.750 26718.625 26719.500 26720.375 26721.250 26722.125 26723.000 26723.875 26724.750 26725.625 Index 1172 1173 1174 1175 1176 1177 1178 1179 1180 1181 1182 1183 1184 1185 1186 1187 1188 1189 1190 1191 1192 1193 1194 1195 1196 1197 1198 1199 1200 1201 1202 1203 1204 1205 1206 1207 1208 BS Tx BS Rx TS Rx TS Tx 25476.500 25477.375 25478.250 25479.125 25480.000 25480.875 25481.750 25482.625 25483.500 25484.375 25485.250 25486.125 25487.000 25487.875 25488.750 25489.625 25490.500 25491.375 25492.250 25493.125 25494.000 25494.875 25495.750 25496.625 25497.500 25498.375 25499.250 25500.125 25501.000 25501.875 25502.750 25503.625 25504.500 25505.375 25506.250 25507.125 25508.000 26726.500 26727.375 26728.250 26729.125 26730.000 26730.875 26731.750 26732.625 26733.500 26734.375 26735.250 26736.125 26737.000 26737.875 26738.750 26739.625 26740.500 26741.375 26742.250 26743.125 26744.000 26744.875 26745.750 26746.625 26747.500 26748.375 26749.250 26750.125 26751.000 26751.875 26752.750 26753.625 26754.500 26755.375 26756.250 26757.125 26758.000 A-23 Appendix A - WALKair Operating Frequencies Table A-21: 28GHz ETSI C Frequency Band Index BS Tx BS Rx TS Rx TS Tx 520 522 524 526 528 530 532 534 536 538 540 542 544 546 548 550 552 554 556 558 560 562 564 566 568 570 572 574 576 578 580 582 584 586 588 590 592 594 596 598 600 28003.500 28005.250 28007.000 28008.750 28010.500 28012.250 28014.000 28015.750 28017.500 28019.250 28021.000 28022.750 28024.500 28026.250 28028.000 28029.750 28031.500 28033.250 28035.000 28036.750 28038.500 28040.250 28042.000 28043.750 28045.500 28047.250 28049.000 28050.750 28052.500 28054.250 28056.000 28057.750 28059.500 28061.250 28063.000 28064.750 28066.500 28068.250 28070.000 28071.750 28073.500 29011.500 29013.250 29015.000 29016.750 29018.500 29020.250 29022.000 29023.750 29025.500 29027.250 29029.000 29030.750 29032.500 29034.250 29036.000 29037.750 29039.500 29041.250 29043.000 29044.750 29046.500 29048.250 29050.000 29051.750 29053.500 29055.250 29057.000 29058.750 29060.500 29062.250 29064.000 29065.750 29067.500 29069.250 29071.000 29072.750 29074.500 29076.250 29078.000 29079.750 29081.500 Index BS Tx BS Rx TS Rx TS Tx 602 604 606 608 610 612 614 616 618 620 622 624 626 628 630 632 634 636 638 640 642 644 646 648 650 652 654 656 658 660 662 664 666 668 670 672 674 676 678 680 682 28075.250 28077.000 28078.750 28080.500 28082.250 28084.000 28085.750 28087.500 28089.250 28091.000 28092.750 28094.500 28096.250 28098.000 28099.750 28101.500 28103.250 28105.000 28106.750 28108.500 28110.250 28112.000 28113.750 28115.500 28117.250 28119.000 28120.750 28122.500 28124.250 28126.000 28127.750 28129.500 28131.250 28133.000 28134.750 28136.500 28138.250 28140.000 28141.750 28143.500 28145.250 29083.250 29085.000 29086.750 29088.500 29090.250 29092.000 29093.750 29095.500 29097.250 29099.000 29100.750 29102.500 29104.250 29106.000 29107.750 29109.500 29111.250 29113.000 29114.750 29116.500 29118.250 29120.000 29121.750 29123.500 29125.250 29127.000 29128.750 29130.500 29132.250 29134.000 29135.750 29137.500 29139.250 29141.000 29142.750 29144.500 29146.250 29148.000 29149.750 29151.500 29153.250 Index BS Tx BS Rx TS Rx TS Tx 684 686 688 690 692 694 696 698 700 702 704 706 708 710 712 714 716 718 720 722 724 726 728 730 732 734 736 738 740 742 744 746 748 750 752 754 756 758 760 28147.000 28148.750 28150.500 28152.250 28154.000 28155.750 28157.500 28159.250 28161.000 28162.750 28164.500 28166.250 28168.000 28169.750 28171.500 28173.250 28175.000 28176.750 28178.500 28180.250 28182.000 28183.750 28185.500 28187.250 28189.000 28190.750 28192.500 28194.250 28196.000 28197.750 28199.500 28201.250 28203.000 28204.750 28206.500 28208.250 28210.000 28211.750 28213.500 29155.000 29156.750 29158.500 29160.250 29162.000 29163.750 29165.500 29167.250 29169.000 29170.750 29172.500 29174.250 29176.000 29177.750 29179.500 29181.250 29183.000 29184.750 29186.500 29188.250 29190.000 29191.750 29193.500 29195.250 29197.000 29198.750 29200.500 29202.250 29204.000 29205.750 29207.500 29209.250 29211.000 29212.750 29214.500 29216.250 29218.000 29219.750 29221.500 WALKair 3000 Commissioning Guide A-24 Frequency Band Tables Table A-22: 28GHz ETSI D Frequency Band Index BS Tx BS Rx Index BS Tx BS Rx Index BS Tx BS Rx 744 TS Rx TS Tx 28199.500 29207.500 836 TS Rx TS Tx 28280.000 29288.000 928 TS Rx TS Tx 28360.500 29368.500 746 28201.250 29209.250 838 28281.750 29289.750 930 28362.250 29370.250 748 28203.000 29211.000 840 28283.500 29291.500 932 28364.000 29372.000 750 28204.750 29212.750 842 28285.250 29293.250 934 28365.750 29373.750 752 28206.500 29214.500 844 28287.000 29295.000 936 28367.500 29375.500 754 28208.250 29216.250 846 28288.750 29296.750 938 28369.250 29377.250 756 28210.000 29218.000 848 28290.500 29298.500 940 28371.000 29379.000 758 28211.750 29219.750 850 28292.250 29300.250 942 28372.750 29380.750 760 28213.500 29221.500 852 28294.000 29302.000 944 28374.500 29382.500 762 28215.250 29223.250 854 28295.750 29303.750 946 28376.250 29384.250 764 28217.000 29225.000 856 28297.500 29305.500 948 28378.000 29386.000 766 28218.750 29226.750 858 28299.250 29307.250 950 28379.750 29387.750 768 28220.500 29228.500 860 28301.000 29309.000 952 28381.500 29389.500 770 28222.250 29230.250 862 28302.750 29310.750 954 28383.250 29391.250 772 28224.000 29232.000 864 28304.500 29312.500 956 28385.000 29393.000 774 28225.750 29233.750 866 28306.250 29314.250 958 28386.750 29394.750 776 28227.500 29235.500 868 28308.000 29316.000 960 28388.500 29396.500 778 28229.250 29237.250 870 28309.750 29317.750 962 28390.250 29398.250 780 28231.000 29239.000 872 28311.500 29319.500 964 28392.000 29400.000 782 28232.750 29240.750 874 28313.250 29321.250 966 28393.750 29401.750 784 28234.500 29242.500 876 28315.000 29323.000 968 28395.500 29403.500 786 28236.250 29244.250 878 28316.750 29324.750 970 28397.250 29405.250 788 28238.000 29246.000 880 28318.500 29326.500 972 28399.000 29407.000 790 28239.750 29247.750 882 28320.250 29328.250 974 28400.750 29408.750 792 28241.500 29249.500 884 28322.000 29330.000 976 28402.500 29410.500 794 28243.250 29251.250 886 28323.750 29331.750 978 28404.250 29412.250 796 28245.000 29253.000 888 28325.500 29333.500 980 28406.000 29414.000 798 28246.750 29254.750 890 28327.250 29335.250 982 28407.750 29415.750 800 28248.500 29256.500 892 28329.000 29337.000 984 28409.500 29417.500 802 28250.250 29258.250 894 28330.750 29338.750 986 28411.250 29419.250 804 28252.000 29260.000 896 28332.500 29340.500 988 28413.000 29421.000 806 28253.750 29261.750 898 28334.250 29342.250 990 28414.750 29422.750 808 28255.500 29263.500 900 28336.000 29344.000 992 28416.500 29424.500 810 28257.250 29265.250 902 28337.750 29345.750 994 28418.250 29426.250 812 28259.000 29267.000 904 28339.500 29347.500 996 28420.000 29428.000 814 28260.750 29268.750 906 28341.250 29349.250 998 28421.750 29429.750 816 28262.500 29270.500 908 28343.000 29351.000 1000 28423.500 29431.500 818 28264.250 29272.250 910 28344.750 29352.750 1002 28425.250 29433.250 820 28266.000 29274.000 912 28346.500 29354.500 1004 28427.000 29435.000 822 28267.750 29275.750 914 28348.250 29356.250 1006 28428.750 29436.750 A-25 Appendix A - WALKair Operating Frequencies Table A-22: 28GHz ETSI D Frequency Band Index BS Tx BS Rx Index BS Tx BS Rx Index BS Tx BS Rx 824 TS Rx TS Tx 28269.500 29277.500 916 TS Rx TS Tx 28350.000 29358.000 TS Rx TS Tx 1008 28430.500 29438.500 826 28271.250 29279.250 918 28351.750 29359.750 1010 28432.250 29440.250 828 28273.000 29281.000 920 28353.500 29361.500 1012 28434.000 29442.000 830 28274.750 29282.750 922 28355.250 29363.250 1014 28435.750 29443.750 832 28276.500 29284.500 924 28357.000 29365.000 1016 28437.500 29445.500 834 28278.250 29286.250 926 28358.750 29366.750 WALKair 3000 Commissioning Guide A-26