1
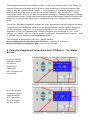
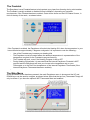
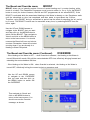
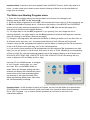
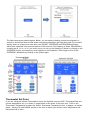
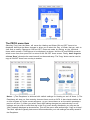
Contents 1. Safety and other Important Notices 2. Before you start using your Easytherm 3. Introduction to Easytherm 4. Using the Easytherm Pushbuttons and LCD menus 5. Using the Easytherm Smartphone App 6. Using the Easytherm via a Web Browser 7. Testing and Troubleshooting 8. Browser Compatibility 9. Final Word 10. Usernames, Passwords, API keys, etc. Copyright © Easytherm Ltd. 2015 All rights reserved by Easytherm Ltd. V2.3 26/1/2015 No part of this content may be reproduced or stored in any kind of a retrieval system without consent from the author. Referenced to version 4.02P Easytherm firmware and version 4.8.0T of the App 1. Safety and other Important Notices The Easytherm boiler controller must be installed by a suitably qualified person in accordance with the latest IEEE Wiring Regulations. Please ensure that the installer has obtained, read and fully understood the Easytherm Installation and User Manual, prior to starting the installation. There are no user serviceable parts within the Easytherm and the Easytherm enclosure must not be opened by anyone who has not been appointed and trained by Easytherm to do so. The Easytherm battery has an expected life of 10 years and can be replaced by a suitably qualified installation company by removing the Easytherm from its backplate and then sliding the battery out of its receptacle in the Easytherm enclosure. It is not necessary to dismantle the enclosure to do this. Batteries must be disposed of at an authorised battery disposal or recycling centre. As is the case for all boiler controllers, electronic equipment is prone to failure and while steps have been taken to minimise this in the Easytherm, there is a risk that failure of the Easytherm could result in damage (for example, in the case where heating fails to come on during cold weather). Easytherm Ltd. cannot accept liability for consequential damages. 2. Before you start using your Easytherm Make sure that your chosen Easytherm installation company has completed the following items, prior to handing over the Easytherm to you:1. Installation and wiring up of the Easytherm Boiler Controller. 2. Connection of the Easytherm Boiler Controller to your home network. 3. Installing the App on your chosen smartphone, pad or pc. WHILST YOU ARE WATCHING AND WITH YOUR PARTICIPATION 4. Logging into the Easytherm using at least one of your chosen devices (ideally, an Android Smartphone or iPhone, but a Pad or Laptop with a Chrome Browser will also work) 5. Configuring the basic Easytherm settings, such as a 7 Day programme for Heating and Hot Water. 6. Testing that the Heating and Hot water switch on and off via the Easytherm. 7. Logging Off and Logging On again. 8. Using the Easytherm when you are away from home. 9. Writing your Easytherm App & web access Username and Password in this manual. 10. Answering any questions about the operation of your Easytherm. 11. Tidying up. 3. Introduction to Easytherm The Easytherm has 2 channels which are independently controlled to switch your heating and hot water on and off up to 3 times each day. In this way, it is similar to a conventional 2 channel, 7 day boiler programmer, but with the added simplicity of being able to set the on and off times via an intuitive smartphone App or, alternatively, via a browser based web interface. The smartphone App has been designed to work on the more recent models of the iPhone and Android Phones and also works well (with some visual limitations) on iPads and Android Pads. There is also web browser based access to the Easytherm, for customers who wish to use other devices within their home to view and control the Easytherm, such as Smart TVs. Certain configuration items, such as the WiFi settings and the Username / Password can only be changed via web browser access. Please note however that using the Web Browser interface is limited to the home only; you do need the App in order to access and control your Easytherm from outside the home. Your chosen Easytherm installation company will make the network connection between the Boiler Controller and your smartphone, tablet or pc and will demonstrate how you use the Easytherm via the smartphone App and via a browser in the home. If you want to have a detailed description of how your Easytherm was installed, configured and connected to your home network, you should read the manual entitled "Installing the Easytherm Boiler Controller", which is available from our website at:- www.easytherm.co.uk The remainder of this manual is split into 2 distinct sections:Using the Easytherm Pushbuttons and LCD menus - useful for all customers Using the Easytherm Smartphone App - useful for all customers 4. Using the Easytherm Pushbuttons and LCD Menus - The Status Screen If you are using an Easytherm without the optional external WiFi Thermostat, the LCD display will look like this. If you are using an Easytherm with the optional external WiFi Thermostat, the LCD display will look like this. The Froststat The Easytherm has a Froststat feature to help protect your pipes from freezing during cold weather. The Froststat is usually enabled or disabled during installation, depending on customer requirements. If the Froststat has been enabled, a star will be shown on the LCD Status Screen, in front of the day of the week, as shown below:- If the Froststat is enabled, the Easytherm will switch the Heating ON when the temperature in your house falls below approximately 5 degrees centigrade. It is important to note the following:- Use of the Froststat may increase your heating bills - The Easytherm must be located where the ambient temperature is representative of the temperature required for the Froststat to prevent freezing. - The Froststat will work, even if the Heating Program is set to OFF - During Heating ON periods, it is assumed that the internal Easytherm Froststat is NOT required and the Easytherm will heat your house to the temperature set on your Thermostat, or to the Set Point temperature of the internal Easytherm Thermostat (if the internal Easytherm Thermostat has been enabled). - The Main Menu Once the MENU button has been pressed, the main Easytherm menu is shown and the UP and DOWN keys can be used to navigate, as shown below. Note that the top line (Thermostat Temp) will only be shown if you have the optional WiFi Thermostat fitted and enabled. The Boost and Override menu BOOST BOOST allows you to instantly provide 2 hours of central heating and / or water heating, at the touch of a button. The Easytherm Programme must be set to either 1x, 2x or 3x for the BOOST button to work (for obvious reasons, the ON and OFF programmes do not allow BOOST). If the BOOST is activated while the associated Heating or Hot Water is already on, the Easytherm waits until the scheduled on time has completed and then starts to count down the 2 Hours. Therefore, using BOOST during a scheduled on period has the effect of extending the 'on' period by 2 hours. The BOOST function can be cancelled at any time, by selecting BOOST from the menu, again. Use the UP and DOWN arrows to navigate to the BOOST that you want and then click on the MENU button to switch ON the BOOST. Then navigate to 'Home' and click on the MENU button to return to the home screen. You should now see the Boost Left hour and minute counters. Remember, these will not start counting down if you are already in a Heating or Water ON period. The Boost and Override menu (Continued) OVERRIDE - If the Heating or Hot Water is OFF: - when Override is selected, the Heating or Hot Water is turned ON and will remain ON until the next scheduled OFF time, effectively bringing forward and extending the next scheduled ON time. - If the Heating or Hot Water is ON:- when Override is selected, the Heating or Hot Water is turned OFF, effectively brining the current cycle to a premature end. Use the UP and DOWN arrows to navigate to the OVERRIDE that you want and then click on the MENU button to switch ON the OVERRIDE Then navigate to 'Home' and click on the MENU button to return to the home screen. You should now see the Override message, as shown. Important Note: Override is a bit more powerful than the BOOST function, which only lasts for 2 hours - so care needs to be used to ensure that the Heating or Water is not left overridden for longer than is intended. The Water and Heating Program menu i). There are five possible settings for the Hot Water and a further five settings for the Heating, these are: OFF, 1x, 2x, 3x and ON. ii). If the Hot Water programme is set to OFF, the hot water will never come on. If the hot water is set to ON, the Hot Water will always be on - likewise for the Heating. ie the BOOST and OVERRIDE buttons will not work when the programme is set to OFF or ON (see the last few pages for a description of the Boost and Override Buttons). iii). You might want to use the OFF programme, if you go away (but, don't forget the risk of freezing weather!). You might want to use the ON programme to test that the Easytherm correctly fires your Heating or Hot Water. (See the next page). iii). Using the '1x' programme will cause the Hot Water or Heating to switch on for the first of the on & off times set for each day, only - the second and third set of on & off times will be ignored. Likewise, using the '2x ' programme will switch on the Hot Water or Heating for the first and second of the on & off times set for each day - etc. for the '3x' programme. iv). If you want to have the effect of '3x' programmes on some days and '2x' programmes on other days, you can set 'dummy' on & off times, such as an on time of 12:00, followed by a corresponding off time of 12:00. Eg, with the Heating programme set to '3x' and the Heating on & off times set to: ON1 06:30 OFF1 08:00, ON2 12:00 OFF2 12:00, ON3 18:00 OFF3 22:00, the Heating will only come on between 6:30 to 8:00am and 6 to 10pm. Use the UP and DOWN arrows to navigate to the Program setting that you want and then click on the MENU button to select. When the Program setting has been selected, the display will automatically return to the Home screen and selected program can be seen on the right hand side of the Water and Heating display lines. Also notice the 'ON Permanently' message. Important Note:- in this example of setting a Program, we have set the Water to be permanently ON. Whilst this is a common scenario, great care needs to be used with either the permanently ON or OFF Programs - e.g. to ensure that the premises do not freeze or that fuel is not inadvertently wasted. The Show ON OFF Times menu Displays all of the ON and OFF times for the Heating and Water for the current day. The ON and OFF times can only be changed via the App or via the Web Browser log in. The Show Network Info menu The Show Network Info screen is helpful for diagnosing and resolving connection problems. Additionally, the IP Address, shown on the top line of the Show Network Info display can be entered into the address bar of an internet browser on a smartphone, pad or pc, connected to the WiFi network, to gain access to the Easytherm web screens. Meaning of the 'WiFi :' messages in the 'Show Network Info' screen:'WFScan' - searching for a wifi router, which usually takes about 35 secs after power on 'NoDHCP' - cannot find a DHCP IP address. Disappears after approx 1 second if all is OK 'No WiFi' - WiFi not found. WFScan will usually re-start in approx 15 seconds 'LinkOK ' - WiFi successfully connected. Should see this approx 40 secs after power on/reset 'ET Home' - If WiFi OK, should flash every few seconds, indicating can see central server Note:- The optional external WiFi Thermostat has not been fitted in this example 5. Using the Easytherm Smartphone App The Easytherm App should have been installed o n a d e v i c e o f y o u r c h o o s i n g by the Installation Engineer. Click on the Easytherm App icon to start the App and then click on the 'Connect' button, as shown below. You should see the progress bar start to move, while the App looks for the Easytherm server. If your internet connection is working, the App should find the Easytherm server within a few seconds and you may then be asked to enter a Username and Password (these should have been written in the back of this manual). Don't worry if the Username and Password boxes don't appear, it just means that App security has been turned off by the installation engineer. Click on the Log In button to complete this step. The App home screen should appear. Below, you can see the Heating controls are aligned in a column on the left had side and the Water controls are aligned on the right hand side. If you haven't already done so, please now read about the BOOST, OVERRIDE and PROGRAM functions, which were explained in the previous section of this manual. If the Heating or Water PROGRAM is currently set to 1x, 2x, or 3x, you could now try to turn on the Heating or Water by clicking on the OVERRIDE button and observing what happens to the Easytherm. Don't forget to turn off the OVERRIDE, afterwards by clicking on the button again. Thermostat Mode Thermostat Set Point If you are using the Internal Thermostat or have the Optional external WiFi Thermostat fitted, the current temperature wi l l b e shown in large letters in the centre of the blue box. Click on the Thermostat Temperature to make the 'Select Thermostat Temperature' form to appear, as shown below. Use the UP and DOWN arrows on the form to select your chosen room temperature and then press 'OK' to save. The PROG menu item Selecting 'Prog' from the Menu, will cause the Heating and Water ON and OFF times to be displayed. Note that the Menu changes to allow you to select the Day of Week that you wish to view and or modify. Changes to ON and OFF times are made by clicking on the individual times, which causes a Time Spinner to be displayed, as shown. Use the UP and DOWN arrows to select a new time, then press OK to return to the ON OFF times screen. Finally, don't forget to click on 'Save', otherwise the new times will not be saved away. The 'Copy' button can be used to copy all ON OFF times from one day to another. Notes:- i).The Easytherm is delivered with default settings for Heating on and off times. ii). The Easytherm will stop you from entering incorrect times, such as 24:79. It also checks whether the on and off times are in the correct sequence - eg you cannot have an on time which precedes a previous off time. iii). When you select ‘Save’ after making changes to a particular day’s on-off settings, and you wish to revisit that day in the ‘Prog’ menu shortly afterwards, you may see the ‘Wait’ message displayed as shown below. This will also occur after performing a ‘Copy to all days’. The ‘Wait’ operation typically lasts around 45 seconds while your new settings are safely saved to the Easytherm. The Weather Menu Item Selecting 'Weather'' causes the weather forecast for the next 3 days to be displayed. The Graph Menu Item Selecting 'Graph' displays a graph of the temperatures from the Easytherm internal sensor. App Messages When using the App, you may see messages appear , like the message below. Currently, there are 3 messages like this: ‘No Internet’ – means that your Smartphone is not connected to 3G or WiFi ‘ET Home Timeout’ – you are connected but the signal may not be strong enough ‘Easytherm Timeout’ – your Easytherm is not connected to the internet properly Notes:- If your Easytherm is not connected to the internet at all, or is powered off, it is usually not possible to log into the App. ‘ET Home Timeout’ messages may also occur if ET Home is not working, or if ET Home has been taken off line for maintenance purposes. Maintenance is generally done during the hours of early morning. 6. Using the Easytherm via a Web Browser Many Easytherm customers will find that the App and Pushbutton methods for controlling the Easytherm, described in the last 2 sections of this manual, are sufficient for everyday use. Additionally, the Easytherm may be accessed and controlled via a web browser, but only from within the home. This can be useful, if you want to access the Easytherm from (eg) a Smart TV or other device which do not support Apps. Additionally, there are some features which are only available through this method of access, these include:- i) Setting a new Username and Password (the same Username and Password is used by the App and by web browser access) ii).Setting a new WiFi SSID and Password for the Easytherm iii).Setting the correct time on the Easytherm (Note:- this should not normally be required, as the Easytherm gets its time from the ET Home c e n t r a l server.) If you want to use Web Browser access to the Easytherm. Please read the detailed User Manual, which can be downloaded from our website at:- www.easytherm.co.uk 7. Testing and Troubleshooting Now that you have set the Easytherm clock, password, username, Heating and Hot Water on and off times and Heating and Hot Water programmes, keep a close eye on the Easytherm LEDs and your boiler for the first 24 hour cycle to ensure that all is well. Check that the Heating or Hot Water blue Status LEDs are lit on the Easytherm Boiler Controller during the expected on times and listen to the boiler for a good few minutes and you should eventually hear the boiler 'fire'. Many modern boiler installations take a few minutes to 'fire', because valves have to open and various processes have to take place in the boiler first. The boiler will then continue to fire in 'bursts' throughout the scheduled on period as the temperature exceeds the thermostat set point and then cooling causes the thermostat to demand heat again. Note; you should check that the room thermostat or cylinder thermostat is set at a level where the boiler will fire. Eg, if the ambient temperature is 25 degrees centigrade and your room thermostat is set to 22 degrees centigrade, the boiler will not fire the Heating, even if the Easytherm Heating LED is lit. Likewise, if the water in your hot water tank is already at, or above the temperature set on the tank thermostat, the boiler will not fire. If your Easytherm appears to have stopped controlling your boiler Check that the Easytherm display is lit and that the clock is working as expected. This is an important test, because the clock is operated via the Easytherm software - ie if the clock has stopped, the software has stopped working. If this has happened, Reset the Easytherm using the little reset button on the bottom of the Easytherm box.. Try switching the Easytherm programme to ON for first the Heating and then the Hot Water (via the ‘Menu’ button on the front of the Easytherm box – eg Menu/ Heat Program/On). Once you have set either the Hot Water or Heating programme to ON, check that the Heating or Hot Water blue Status LED is lit on the Easytherm and then listen to the boiler for a few minutes and you should eventually hear the boiler 'fire'. As before, you should check that the room thermostat or cylinder thermostat is set at a level where the boiler will fire. If you do not hear the boiler fire after 10 - 15 minutes and you are sure that the thermostat is set at a level where the Heating or Hot Water should fire and the relevant Easytherm LED is on, you might want to check your boiler status panel to see if your boiler is displaying any fault codes, before calling your installation company for help. If your App has stopped working Check that you have internet access to your smartphone, laptop. etc by opening a browser and trying to browse to a site like ‘www.bbc.co.uk’. Note:-due to a thing called ‘cacheing’, the Google site often appears, even if you are not connected to the internet – so this is not a good indicator of internet connectivity. If everything is ok on your Smartphone, Laptop etc – check that the little flashing lollipop WiFi Found Icon is showing on the right hand side of the Easytherm LCD (display) – see pictures in section 4 of this manual, to see what this looks like. If the lollipop is not flashing, check that your home WiFi router is working and then use a Smartphone or Laptop to check that you can get a WiFi signal by the Easytherm. Sometimes, re-positioning, or re-starting your router can solve this problem. If none of the above works, try looking at the FAQs on www.easytherm.co.uk for much more detailed fault finding information. 8. Browser Compatibility Examples of browsers that work well with Easytherm are: - iPhone - App tested and works on the iPhone 4 and iPhone 5 using the Safari browser. Should be OK for iPhone 6. Where possible, IOS Version 8.1.1 (or above) should be used. Versions 6 and 7 of IOS should also be OK, but versions 8.0.x and version 5.x.x must not be used. - Android - App works on Android 4.1 and above with Google Chrome. Probably OK for Android 4. Google Chrome browser version 31 or above should be used as the browser. The ‘standard’ Android browser must not be used. Most Android phones have the Google Chrome browser already installed, as well as the standard Android Browser. - Windows Phone – yet to be tested, but the App should work using the Internet Explorer browser on the more recent Windows Phones - Laptops - App works well on Windows 7 with Google Chrome 36 and probably works on Chrome 31 onwards. Although this has yet to be tested - the App should work fine on recent Mac laptops, using the Safari browser. The Easytherm Boiler Controller makes use of Javascript - you may need to turn on support for Javascript in your browser if some things are not working. If you use Google to search "How do I turn on Javascript in my Browser", you will find lots of useful guides for the various browsers. However, it is worth noting that most browsers will already have Javascript turned on. 9. Final Word This document contains a subset of the many capabilities and options available via the Easytherm. For more information, please read the detailed User Manual, which can be downloaded from our website at:- www.easytherm.co.uk 10. Your Web Password, Username and Internet URL Your Easytherm Web Access Username: Your Easytherm Web Access Password: Your Easytherm Web Access URL: ET Home API Key:- Installation Company Telephone Number:- Notes:- Your installer should have written important information relating to your installation into the boxes shown above and they should explain each item, before they leave. Please make sure that you write any changes that you make onto this page. Remember that you may not be able to access the Easytherm if you lose the passwords or usernames.