1
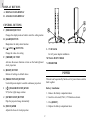
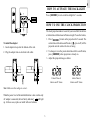
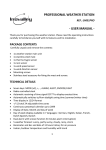
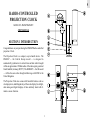
GB
RADIO-CONTROLLED
PROJECTION CLOCK
MODEL NO.: RM868P/RM868PU
USER’S MANUAL
SECTION 1 INTRODUCTION
Congratulations on your purchasing the RM868P Radio-controlled
projection Clock.
The Projection Clock is a compact, easy-to-handle device. The
RM868P — the Central Europe model — is designed to
automatically synchronize its current time and date when brought
within an approximate 1500km radius of the radio signal generated
from Frankfurt, Germany (DCF77). The RM868PU — the UK model
— will do the same when brought within range with MSF in the
United Kingdom.
The Projection Clock also comes with favorable features such as
clock projection, multilingual day-of-the-week display, back-light,
dual analog and digital displays of time and daily alarm with 8minute snooze function.
1
GB
DISPLAY BUTTONS
A DIGITAL CLOCK DISPLAY
B ANALOG CLOCK DISPLAY
CONTROL BUTTONS
C [MODE/SET] BUTTON
Changes the display mode or holds to enter the setting routine
D [ALARM] BUTTON
Manipulates the daily alarm function
E [
] AND [
] BUTTONS
L 3 V DC JACK
Change the value of a setting
For AC power adapter installation
F [ SNOOZE ] BUTTON
M WALL - MOUNT HOLE
Activates the snooze function or turns on the back-light and
clock projection
N PROJECTOR
G [RESET] BUTTON
POWER
Returns all settings to default values
H [PROJECTION ON] BUTTON
This unit can be operated by batteries or AC power alone as well as
both together.
Used with power adapter to enable continuous projection
I [
] [IMAGE ROTATION] KNOB
Battery Installation:
90º (left or right) image rotation
1. Remove the battery compartment door.
J [180º ROTATION] BUTTON
2. Insert two AA-sized (UM-3) 1.5V batteries as shown.
Flips the projected image horizontally
3. Press [RESET] .
K [FOCUS] KNOB
4. Replace the battery compartment door.
Adjusts the focus of clock projection
2
GB
HOW TO ACTIVATE THE BACK-LIGHT
Press [ SNOOZE ] to turn on the back-light for 5 seconds.
HOW TO USE THE CLOCK PROJECTION
The clock projection makes it easier for you to read the Current time
or Alarm time with alarm-on/off status at night. To use the feature,
1. Press [ SNOOZE ] to turn on the projection for 5 seconds. The
] on or off) will be
current time with alarm-on/off status ( [
projected onto the surface the lens is facing.
To install the adapter:
1. Insert adapter into jack at the bottom of the unit.
2. To change to view the preset alarm time with its on/off status,
press [ SNOOZE ] when projection is already on.
2. Plug the adapter into an electrical wall outlet.
3. Adjust the projected image as below.
Current Time &
Alarm-on/off Status
Note: Make sure the voltage is correct.
When the power level of the installed batteries is low or when only
AC adapter is connected, the low battery indicator [
] will light
up. In these cases, replace or install with new batteries.
3
Alarm Time &
Alarm-on/off Status
GB
Once the power adapter is in place, you can select to turn on the
projector for longer time (such as throughout the night) by sliding
the [ PROJECTION ON ] switch on. To turn off the projector, slide
the switch back.
Projector Features
Feature
Effect
Instructions
Adjustable
Rotates the
Tilt swivel projection to alter
Projector
projection 180°
the direction of projection
FOCUS
Focuses projection
Rotate to focus projection
If you have press [ SNOOZE ] to change the projected image to
Alarm time with its on/off status when projection is on, please note
that the projected image will return to Current time with Alarm-on/
off status automatically after 10 seconds.
Rotation of projection allows
Note that this switch can only be used with the power
adapter installed. For momentary projection, use the
[ SNOOZE ].
Knob
[
] IMAGE
Rotates projection
ROTATION
user to place clock in
knob
convenient
180°
Horizontally flips
Flips an image to maintain
ROTATION
the projection 180°
an upright position
SECTION 2 THE CALENDAR CLOCK
PROJECTION ON ] switch is switched to the
DIGITAL & ANALOG DISPLAY MODES
button
Note: Make sure the [
back.
Press [MODE/SET] to display the following in sequence:
Digital
HOW TO USE THE PROJECTOR
WITH POWER ADAPTER
1) Current Time with Second
------------------------------------
RM868P/RM868PU comes with an AC power adapter. Use of the
AC power adapter is required for continuous projection.
Calendar
4
Analog
GB
signal. After that, the periodical scanning will only take a few
seconds.
2) Current Time with Weekday
------------------------------------
The antenna icon indicates the quality of reception.
Calendar
3) Current Time with Weekday
STRONG
-----------------------------------2nd zone-time
WEAK
4) 2nd zone-time with Weekday
NO RECEPTION
-----------------------------------2nd zone-time Calendar
RECEIVING
To display the alarm clock and details, press [ALARM]. The daily
alarm time will appear in the lower line of the digital display as well
as the analog display.
When the reception is complete, the radio-reception icon will
] and the received radio-controlled time will be
appear as [
displayed accordingly.
Interference
ABOUT RADIO RECEPTION
Reception can be affected by a number of factors. For best reception,
place the device away from metal objects and electrical appliances.
When the unit is within range of its respective radio signals, its
radio-control mechanism will override all manual settings unless
radio reception is being deactivated.
Note: Interference from sources such as TV sets can affect the
signal. If, after batteries have been inserted for ten minutes, the
signal is not received, then set the time manually (see section: How
To Set The Clock & Calendar Manually).
After battery installation, the unit will start to search for radio
signal automatically. When it is receiving radio signal, the radioreception icon will start to blink. A complete reception generally
takes about 2 to 10 minutes, depending on the strength of the radio
5
GB
HOW TO ENABLE OR DISABLE
AUTO-RECEPTION
If you wish to disable the auto-reception of radio signal feature
] button for 2
while the unit is within range, press and hold [
seconds. The radio-reception icon on the will disappear and the
unit will NOT respond to radio signals.
To enable the feature again, press and hold [ ] for 2 seconds. The
radio-reception icon will be shown again and it will start blinking
to initiate reception automatically.
HOW TO SET THE CLOCK &
CALENDAR MANUALLY
1. Press and hold [MODE/SET] for 2 seconds.
3. Enter the clock format using [
or 24-hour display.
2. Enter the 2nd time-zone offset hour using [ ] / [ ] . You can
select between + 23 and - 23 hours. Hold down either button to
rapidly increase or decrease the value. Press [MODE/SET] .
]/[
] . You can select 12-hour
4. Press [MODE/SET] .
5. Enter the hours using [
]/[
] . The hand of hour on the
analog display will be adjusted simultaneously.
6. Press [MODE/SET] .
7. Enter the minutes using [ ] / [ ] . The hand of minutes on
the analog display will be adjusted simultaneously.
8. Press [MODE/SET] .
9. Follow the same pattern to set the year, date format (month-day
or day-month), month, day, and display language (English [E],
German [D], French [F], Italian [I] or Spanish [S]) for day-of-theweek.
6
Monday
Tuesday Wed. Thursday
Friday Saturday Sunday
6. Press [ALARM] .
English
The alarm will be automatically activated. The [
] icon will
appear. To deactivate the alarm, press [ ] / [ ] when the alarm
time is displayed.
German
French
HOW TO USE THE DAILY ALARM
Italian
Spanish
An alarm will go off for 2 minutes in two-step crescendo patterns if
undisturbed. The [
] icon will flash, the back-light and the clock
projection will be activated for 5 seconds. To mute the alarm, press
any key. Pressing [ SNOOZE ] will activate the snooze function.
10.Press [MODE] to save the changes and exit. If changes are made
during the process, the seconds will reset and start from zero.
The unit will also save all changes and return to normal display
automatically after the unit has been left idle for a minute.
SNOOZE FUNCTION
When the snooze function is activated, the alarm will be muted
temporarily and set off again after 8 minutes. To disable the snooze
function, press [ALARM].
ABOUT THE ALARM
This unit is equipped with a daily alarm function.
To set the alarm,
1. Press [ALARM] to change both the digital and analog display
to the alarm-time display mode.
2. Press and hold [ALARM] for 2 seconds.
]/[
] to enter the hours. The hand of hour on the
3. Use [
analog display will be adjusted simultaneously.
4. Press [ALARM] .
7
GB
5. Use [ ] / [ ] to enter the minutes. The hand of minutes on
the analog display will be adjusted simultaneously.
Day-of-the-week
Language
GB
SECTION 3
ADDITIONAL INFORMATION
NOTES ON BACKLIGHT
- The EL panel that provides illumination will lose power after
extensive usage.
- The unit may emit an audible sound whenever the display is
illuminated by the EL backlight. This is due to vibration of the
EL panel used for illumination and does not indicate
malfunction of the unit.
THE RESET BUTTON
The [RESET] button is used to enhance synchronization of signals
after battery replacement or when the unit is operating in an
unfavorable way or malfunctioning. Use a blunt stylus to hold
down the button. All settings will return to their default values.
PRECAUTIONS
This unit is engineered to give you years of satisfactory service if
handled carefully.
WALL-MOUNT OR TABLE-STANDING
1. Do not immerse the unit in water.
This unit is designed specially so that you can adjust the angles of
the different parts to facilitate table-standing or wall-mounting.
2. Do not clean the unit with abrasive or corrosive materials.
Wall-Mount
4. Do not tamper with the unit’s internal components.
3. Do not subject the unit to snow or excessive force, shock, dust,
temperature or humidity.
Table-Stand
5. Do not mix new and old batteries or batteries of different
specifications.
8
Radio Control
: Auto Synchronization of current
time and date
This device complies with the essential requirements of Article 3 of
the R&TTE 1999/5/EC Directive, if used for its intended use and
that the following standard(s) has been applied:
Calendar
: Day-of-Week in English / German /
Franch / Italian / Spanish
Electromagnetic compatibility (Article 3.1.b of the R&TTE
Directive)
Clock Time
: 12 / 24-hour format
Accuracy
: +/- 0.5 second / day
(when RF is disabled)
Alarm
: 2-minute crescendo alarm with
8-minute snooze function
Applied standards
Month / Day or Day / Month format
Power
: 2 pcs of UM-3 or AA-size batteries
Power Adapter
: 3V DC
Weight
: 200 g (without battery)
Dimensions (mm)
: 135 x 152 x 26 mm ( H x W x D )
ETS 300 683 : 1997
Efficient use of the radio frequency spectrum (Article 3.2 of the
R&TTE Directive)
Applied standards
EN300 220 –1 : 1997
INTENDED USE OF THE DEVICE
CAUTION
— The content of this manual is subject to change without
further notice.
NOTE ON COMPLIANCE
— Due to printing limitation, the displays shown in this
manual may differ from the actual display.
Warning: Changes or modifications to this unit not expressly
approved by the party responsible for compliance could void the
user’s authority to operate the equipment.
— The contents of this manual may not be reproduced
without the permission of the manufacturer.
9
GB
R&TTE Compliance Note
SPECIFICATIONS