1
Sequence-Based Typing
Chapter II: DNA Based Testing
Section: Application Module
MODULE: HLA SEQUENCE-BASED TYPING
Authors: Dong-Feng Chen, Ph.D., D.(ABHI), Angelica DeOliveira, MS, CHS
Clinical Transplantation Immunology Laboratory
Duke University Medical Center, Durham, NC
REVISED: 05/26/2009
1
Sequence-Based Typing
INTRODUCTION OF HLA SEQUENCE-BASED TYPING
Sequence Based Typing (SBT) is a technology used to determine the exact
nucleotide sequence of a gene or a DNA fragment of interest. Therefore, it is a
powerful tool to characterize the genetic complexity and allelic diversity of the HLA
genes. Recent technological developments have made sequencing sufficiently
rapid, cheap, simple and robust, thus, making it feasible to perform high resolution
HLA typing by sequencing in clinical HLA laboratories. Sequencing is considered
the gold standard for HLA allele identification and high resolution typing.
The Sanger chain termination based sequencing is a method of DNA
synthesis. It requires a single stranded DNA template obtained either by PCR
amplification or by DNA cloning, a primer that specifically anneals to the template,
a DNA polymerase like Taq DNA polymerase or Sequenase, nucleotides
(deoxynucleotide - dNTP , dideoxynucleotides - ddNTP), and a fluorescent dye to
identify the newly synthesized DNA strand. Currently, the fluorescent dye
terminator technique is the most popular SBT strategy used for HLA typing. The
“four color dye” terminators are the four different dideoxynucleotides (ddNTP) each
labeled with a different fluorescent dye, fluorescing at different wavelengths.
During the cycle sequencing reaction, the template DNA is denatured and the
primer is annealed. As the polymerase is synthesizing a new complementary DNA
strand, it has a choice of nucleotides for the incorporation. If a normal nucleotide
(dNTP) is incorporated, the chain will continue to extend. If a dye labeled
dideoxynucleotides (ddNTP) is incorporated, the chain extension halts. In this way,
the reaction generates a mix of dye labeled oligonucleotides of different lengths
that begin from the primer and terminate randomly at the residue of the dye labeled
ddNTP. The oligonucleotides of different lengths are separated either by a
polyacrylamide gel electrophoresis or by a capillary electrophoresis. A laser
detects the fluorescence of the dye carried on each of the DNA fragments passing
by a light detector. Data collection and analysis software generate a DNA base
calling. The nucleotide sequences (determined by the base calling) are compared
to sequences from the IMGT database and identify various alleles.
2
Sequence-Based Typing
There are at least four SBT strategies developed for HLA typing.
1. Generic/Multiplex amplification and sequencing: All alleles of a HLA
locus are amplified by one pair of primers or by a mixture of multiple primer
pairs in one tube. Each exon is sequenced in two tubes – one in the
forward direction and the other in the reverse direction. This method has a
great potential for high throughput typing but yields a high percentage of
ambiguities mainly caused by the incapability to determine the cis/trans
linkage of the polymorphic motifs. Other HLA typing methods may be
needed to resolve the ambiguities.
2. Group-specific amplification and sequencing: A set of group-specific
primer pairs are used to separate alleles in different tubes/wells and each
allele is then sequenced separately. This approach dramatically reduces the
ambiguity rate to a minimum and additional ambiguity resolving tests are
rarely needed.
3. Generic/multiplex amplification and group-specific sequencing: Upon
the generic amplification of all alleles in one tube with one pair or a mixture
of multiple primers, a set of group-specific primers is used to sequence the
PCR products.
4. Individualized allele-specific amplification and sequencing: Based on
the availability of the low resolution typing results, allele or group specific
primers are selected for individual allele amplification and sequencing. For
example, for a DR4 and DR15 positive sample, DR4 and DR15/16 specific
primers can be chosen for the amplification and sequencing.
The following factors for selection of SBT method and reagent may be
considered.
•
Robust and reliable
•
Typing resolution and ambiguity rate
•
Turn-around time
3
Sequence-Based Typing
•
Labor (bench work including initial SBT and additional ambiguity
resolving test, data analysis and review)
•
Final cost per typing including all reagents, supplies and labor
In this chapter we introduced two procedures. One represents the
generic/multiplex amplification and sequencing strategy using Abbott SBT kits and
the other represents the group-specific amplification.
References:
1. Sanger F, Nicklen S, Coulson AR. DNA sequencing with chain-terminating
inhibitors. Proc Natl. Acad. Sci. USA 1977: 74:5463-5467.
2. Petersdorf EW, Hansen JA. A comprehensive approach for typing the
alleles of the HLA-B locus by automated sequencing. Tissue Antigens 1995;
46:73-85.
3. Ross J. Sequencing-Based Typing. Histocompatibility Testing, Editor
Bidwell and Navarrete, 2000, Imperial College Press.
4. Wu J, Bassinger S, Griffith BB, Williams TM. Analysis of HLA class I Alleles
via Direct Sequencing of PCR Products. ASHI Laboratory Manual, Forth
Edition 2000.
5. Blasczyk R. HLA Diagnostic Sequencing – Conception, Application and
Automation. J Lab Med 2003: 27(9/10): 359-368.
6. Hurley CK, Ellis JM. DNA methods for HLA typing – a workbook for
beginners. Version 6, 2004.
4
Sequence-Based Typing
PROCEDURE I:
HLA SEQUENCE-BASED TYPING
SINGLE LOCUS AMPLIFICATION
Principle:
The Human Leukocyte Antigen (HLA), encoded within the Major
Histocompatibility Complex (MHC) is one of the most polymorphic gene complex in
the human genome. Sequence-based typing (SBT) methods for HLA are based on
elucidation of exon 2 for HLA-DRB1 and elucidation of exons 2, 3 and 4 for HLAA, B and C loci. The most common commercial HLA SBT reagents involve one
single initial PCR reaction per locus using primers that will amplify both alleles
present. The DRB1 primers will amplify the fragments of all DRB1 alleles between
the first hypervariable region (codon 13) and the 3’end of exon 2 (codon 90) Its
product is in the range size of 250-300 base pairs (bp). The PCR reaction for HLA
class I alleles has a larger size product since it amplifies exons 2, 3 and 4 of each
locus. While the PCR product size for HLA class II is 250-300 bp only, each PCR
product for HLA class I genes is in the range of 1000 bp.
The presence of a PCR product obtained is verified using a 2% agarose gel
followed by an enzymatic cleaning step, which will eliminate the unincorporated
primers. The products, once treated, are diluted and mixed with the sequencing
primers for exon 2 Forward, exon 2 Reverse, exon 3 Forward, exon 3 Reverse,
exon 4 Forward, and exon 4 Reverse individually. Codon 86 primer for DRB1 is
used to distinguish alleles which are heterozygous at codon 86 of exon 2. The
primer will only prime alleles that contain GTG sequence motif at codon 86,
resulting in a hemizygous sequence, which will permit the identification of one
allele in the ambiguous combination. Purified PCR products serve as templates for
cycle sequencing reactions utilizing Big Dye Terminator v1.1 from ABI. Cycle
sequencing products are precipitated using ethanol and sodium acetate-EDTA to
eliminate the unincorporated nucleotides. The sequencing products are rehydrated in formamide and injected in the capillary electrophoresis genetic
analyzer utilizing appropriate module and mobility files.
5
Sequence-Based Typing
The data is pre-analyzed using ABI sequencing analysis software and ABI
file formats are imported to the HLA analysis software that will compare the
sequence obtained to the IMGT-HLA sequence library. Innumerous factors are
relevant to the data analysis.
Specimen:
2-4 µl genomic DNA/locus in molecular biology grade water.
* The integrity of the genomic DNA used is very important.
Reagents:
A. Provided with the kit:
1. Locus Specific PCR Pre-Mix
2. AmpliTaq Gold (5U/µl)
3. ExoSAP-IT
4. Three DRB1 Sequencing primer mixes
(Exon 2 F, 2R and Codon 86)
5. Six HLA-A, HLA-B and HLA-C Sequencing Primer mixes
Exon 2 F, 2R; Exon 3F, 3R; Exon 4F, 4R per locus
6. NaOAc /EDTA Buffer.
B. Additional Reagents needed but not provided with the kit:
1.
2.
4.
5.
6.
Molecular biology grade water.
Ethanol 99% anhydrous, molecular biology grade
Sequencing buffer 10X with EDTA
POP-6 (Performance Optimized Polymer) from ABI
Hi-Di Formamide from ABI
Supplies:
1. Pipette tips for the following volumes:1-20µl, 21-200µl, 100-1000µl
2. PCR tubes(0.2 thin walled) ABI #N801-0838
3. PCR tube caps ABI # 801-0535
4. Lint free tissue ( Kimwipes)
5. MicroAmp Optical 96well reaction plate ABI # N801-0560
6. MicroAmp Full Plate Cover ABI # N801-0550
7. MicroAmp Support Base ABI # N801-0531
8. Genetic Analyzer Plate Septa 96-wells ABI # 4315933
9. Genetic Analyzer Plate Retainer ABI # 4317241
10. Capillary Array 16x 36cm ABI # 4315931
6
Sequence-Based Typing
Equipment:
1. Vertical laminar flow hood.
2. Thermocycler with heated lid and 96-well format.
3. Pipettes, volumes 1-20µl, 20-200µl, and 100-1000µl.
4. Agarose Gel apparatus.
5. Gel documentation camera
6. Electrophoresis power supply
7. Variable speed vortex.
8. Table top centrifuge ( 96-well trays holder)
9. ABI 3130XL Analyzer (16 capillary)
10. Computer
11. Printer
Procedure:
1. Creating a panel for PCR amplification:
1.1.
Create a SBT PCR list indicating order of samples to be tested for each
locus.
1.2.
Arrange DNA samples in an order that follows the SBT PCR list to
prevent pipetting error.
1.3.
Label the PCR tubes using the numerical order from the SBT PCR list.
2. Preparing the PCR reaction:
These steps are done in the Pre-amplification area.
2.1.
Remove the DNA samples (concentration already adjusted to 20 -30
µg/ml) from the refrigerator and vortex/spin down each one before
opening them.
2.2. Remove PCR buffer and Taq Gold from freezer.
2.3. Let buffer thaw at room temperature, vortex well and spin down.
2.4.
Place buffer and Taq Gold on an ice box rack.
Note: From this point work inside the laminar flow hood.
2.5.
Add the appropriate DNA volume (2 µl for DRB1 or 4 µl for each HLA
class I) to each pre labeled PCR tube.
2.6.
Prepare the master PCR mix for the locus tested using the
chilled/thawed PCR buffer and Taq Gold.
7
Sequence-Based Typing
2.7.
Vortex master mix well, spin down briefly and add 10 or 16 µl to each
PCR tube containing the different DNA samples.
2.8. Cap the tube strips and take it to pre-warmed thermocycler .
3. Amplification Profile:
3.1. Place the tube strips in the thermocycler and run the following profile.
Locus Specific SBT –PCR profile
95°C
96°C
60°C
72°C
4°C
10 minutes
20 seconds
30 seconds
2 minutes
1 cycle
32cycles
∞
4. PCR verification:
4.1.
While PCR profile is running, prepare a 2% agarose gel using 0.5X
TBE.
4.2.
Use 2 grams of agarose in 100 ml buffer and 3 µl of ethidium
bromide.
4.3.
Cool gel and once profile is finished remove tubes from thermocycler.
4.4.
Spin strips containing PCR products before opening them.
4.5.
Remove 2.5 µl of each PCR product and dispense on a 96 well tray.
4.6.
Close strips back, using a new set of tube caps and place in the
refrigerator if continuing with the procedure immediately. Otherwise
freeze at -20°C.
4.7.
Add 10 µl of loading dye to each 2.5 µl of PCR product.
4.8.
Remove combs from gel tray and submerge it under 0.5X TBE
containing 3 µl of ethidium bromide.
4.9.
Load 12.5 µl of each PCR product in each well on the gel.
4.10.
Run gel at 150V/15 minutes.
4.11.
Disconnect from the power supply and take the gel to the
electrophoresis documentation apparatus.
4.12.
Take a photo and attach to the SBT documentation.
8
Sequence-Based Typing
4.13.
Document positive amplifications and confirm size of PCR products.
4.14.
Eliminate any failed amplification from the Cycle- Sequencing map
for the current run.
5. PCR product cleaning using ExoSAP-IT .
5.1
Take the vial of ExoSAP-IT from the freezer.
5.2
tubes.
Add 3 µl of ExoSAP-IT to each positive PCR product and cap the
5.3
Vortex briefly and spin them down for few seconds.
5.4
Place in the thermocycler and run the following profile:
ExoSAP-IT
thermocycler profile
37°C 15minutes
80°C 15minutes
4°C
∞
5.5
1 cycle
Remove ExoSAP-IT treated PCR products from thermocycler
Note: For DRB1 amplifications ONLY add 20 µl of molecular biology
grade water to each treated PCR-product.
At this step you can freeze the products to continue the sequencing
later.
Cycle-Sequencing step
1. Thaw the primer mixes to room temperature, vortex and spin down before
opening vials.
2. Create a sequencing tray panel using a 96-well tray paper template already
having the primer identification as a plating guide.
3. Pull a 96-well optical tray and label the run ID on the front lower side.
Note: We prefer working with each locus separately to prevent mixing up
primers.
4. SBT testing for HLA-A and B allows for 16 samples /locus to be tested in a 96-well
tray
• Dispense 8µl of the Exon 2 Forward (F) Sequencing Primer Mix to
columns1 & 7.
• Dispense 8µl of the Exon 2 Reverse (R) Sequencing Primer Mix to columns
2 & 8.
9
Sequence-Based Typing
•
•
Dispense 8µl of the Exon 3 forward Sequencing Primer Mix to columns 3 &
9.
Dispense 8µl of the Exon 3 Reverse Sequencing Primer Mix to columns 4
&10
•
Dispense 8µl of the Exon 4 forward Sequencing Primer Mix to columns 5
&11
•
Dispense 8µl of the Exon 4 Reverse Sequencing Primer Mix to columns 6
&12
1
2F
2F
2F
2F
2F
2F
2F
2F
2
2R
2R
2R
2R
2R
2R
2R
2R
3
3F
3F
3F
3F
3F
3F
3F
3F
4
3R
3R
3R
3R
3R
3R
3R
3R
5
4F
4F
4F
4F
4F
4F
4F
4F
6
4R
4R
4R
4R
4R
4R
4R
4R
7
2F
2F
2F
2F
2F
2F
2F
2F
8
2R
2R
2R
2R
2R
2R
2R
2R
9
3F
3F
3F
3F
3F
3F
3F
3F
10
3R
3R
3R
3R
3R
3R
3R
3R
11
4F
4F
4F
4F
4F
4F
4F
4F
12
4R
4R
4R
4R
4R
4R
4R
4R
5. SBT testing for HLA-C allows for 24 samples to be tested in a 96-well tray.
•
Dispense 8µl of the Exon 2 Forward Sequencing Primer Mix to columns 1, 6&
10.
•
Dispense 8µl of the Exon 2 Reverse Sequencing Primer Mix to columns 2, 6&
10.
•
Dispense 8µl of the Exon 3 Forward Sequencing Primer Mix to columns 3, 7,
&11.
•
Dispense 8µl of the Exon 3 Reverse Sequencing Primer Mix to columns 4,8 &
12.
A
B
C
D
E
F
G
H
1
2F
2F
2F
2F
2F
2F
2F
2F
2
2R
2R
2R
2R
2R
2R
2R
2R
3
3F
3F
3F
3F
3F
3F
3F
3F
4
3R
3R
3R
3R
3R
3R
3R
3R
5
2F
2F
2F
2F
2F
2F
2F
2F
6
2R
2R
2R
2R
2R
2R
2R
2R
7
3F
3F
3F
3F
3F
3F
3F
3F
8
3R
3R
3R
3R
3R
3R
3R
3R
9
2F
2F
2F
2F
2F
2F
2F
2F
10
2R
2R
2R
2R
2R
2R
2R
2R
11
3F
3F
3F
3F
3F
3F
3F
3F
12
3R
3R
3R
3R
3R
3R
3R
3R
6. SBT testing for HLA-DRB1 allows for 32 samples to be tested in a 96-well
tray.
•
•
Dispense 8µl of the Exon 2 F Sequencing Primer Mix to columns 1, 4, 7 &10.
Dispense 8µl of the Exon 2 R Sequencing Primer Mix to columns 2, 5, 8&
11.
•
Dispense 8µl of the Codon 86 Sequencing Primer Mix to columns 3, 6, 9
&12.
A
B
C
D
E
F
G
H
1
2F
2F
2F
2F
2F
2F
2F
2F
2
2R
2R
2R
2R
2R
2R
2R
2R
3
86
86
86
86
86
86
86
86
4
2F
2F
2F
2F
2F
2F
2F
2F
5
2R
2R
2R
2R
2R
2R
2R
2R
6
86
86
86
86
86
86
86
86
10
7
2F
2F
2F
2F
2F
2F
2F
2F
8
2R
2R
2R
2R
2R
2R
2R
2R
9
86
86
86
86
86
86
86
86
10
2F
2F
2F
2F
2F
2F
2F
2F
11
2R
2R
2R
2R
2R
2R
2R
2R
12
86
86
86
86
86
86
86
86
Sequence-Based Typing
7. Using a multi dispensing pipette add 2 µl of each ExoSAP-IT treated PCR
product pre diluted with 20 µl of H2O to each combination of 3 columns
containing the same sequencing primer mixes. Use the sequencing tray
template as guide to add the samples in the correct order.
8. Cover tray using a micro-amp full plate cover. Mark the top left corner to
prevent switching the position in further steps.
9. Spin tray for 30 seconds at 1200 rpm and immediately place it in the
thermocycler and start the Cycle Sequencing profile.
Cycle –Sequencing thermocycler profile
96°C
60°C
4°C
20 seconds
2 minutes
25 cycles
∞
10. Remove tray from thermocycler and proceed with the ethanol precipitation.
11. If not performing precipitation immediately, centrifuge the tray 1 minute at
1260g, wrap tray in foil or plastic and store at 4°C protected from light for
few days (limit should be set from a Friday to the following Monday).
Ethanol + Sodium Acetate precipitation
Ethanol 100% and EDTA/ NaOAc precipitation will eliminate unincorporated
fluorescent dyes from the sequencing reactions. This is a very important step
and has to be done without interruption and in the exact order described. The
precipitation step will determine the quality/signal strength of your sequencing
data.
1. Prepare an 80% ethanol solution mixing 16 ml of 100% ethanol to 4 ml
of molecular biology grade water. Mix well.
2. Thaw the EDTA/NaOAc solution, vortex/spin down gently before opening
vial.
3. Add 2 µl of the NaOAc/EDTA solution to each sequencing reaction.
Note: The static can prevent the drop to be dispensed from the pipette
tip.
Make sure the volume gets added to each well.
4. Spin tray for 30 seconds at 2160g.
5. Add 25 µl of 100% ethanol to each well.
11
Sequence-Based Typing
6. Place the full plate cover onto the tray and vortex the tray thoroughly.
Note: Incomplete mixing will result in poor quality data.
7. Centrifuge tray at 2000g for 30 minutes.
Note: This centrifugation is important to ensure complete removal of
unincorporated dyes.
8. Immediately remove supernatant, inverting tray on a paper towel stack.
9. Place the inverted tray and paper towels in the centrifuge and spin at
500g for 30 seconds to remove the supernatant.
10. Add 50 µl of 80% ethanol to the wells.
11. Centrifuge at 2000g for 5 minutes.
12. Immediately invert the tray on a paper towel stack.
13. Place the inverted tray and paper towels in the centrifuge and spin at
500g for 30 seconds to remove the supernatant.
14. If not performing capillary sequencing immediately, seal the tray with the
full plate cover and plastic wrap and store tray at -20°C.
15. If running electrophoresis immediately, add 15 µl of Hi Di formamide to
each well and place tray for 2 minutes at 95°C and place tray on ice for
at least 2 minutes .
16. Spin tray for 30 seconds at 1260g and place it on the ABI 3100 Support
Base, observing that the position A1 is at the top left corner.
17. Place a Full Plate Septa over the tray and follow with the 96-well Plate
retainer.
Note: The position of the retainer over the Septa should be perfectly set
to prevent damage to the capillary when collecting samples.
18. Place Support base + Tray + Septa + retainer onto the ABI 3100
Analyzer and get the run started.
3100 Analyzer preparation for a run
A.
Calibration of 3100 Analyzer
Spect36_POP6 default module
Run temperature
55°C
Leak threshold
25 steps
Current tolerance
100µAmp
Run Current
100µAmp
12
Sequence-Based Typing
Voltage tolerance
Pre Run Voltage
Pre Run time
Injection Voltage
Injection Time
Run Voltage
0.6 kvolts
15kvolts
180 seconds
1kvolts
22 seconds
15kvolts
1. Select the spectral calibration parameters: SeqStd{any dye Set}.par
2. Link the plate just created from the Pending Plate Record to the
corresponding graph of the loaded tray (A or B) then click to start the
run.
3. Once the run is complete, accept the result by clicking OK. The software
will then assign calibration values to passed /failed capillaries as well.
4. Under File, click on Override Spectral Calibration to allow the
examination of the data for each capillary.
B.
Refilling capillary array syringes and buffer/water reservoirs
5. Remove both syringes from equipment and dispose the leftover POP-6.
6. Rinse them thoroughly using warm tap water followed by dH2O followed
by molecular grade water.
7. Prime them both using a small volume of POP-6 and reserve.
8. Disconnect the capillary array from the upper block making sure to
protect the light path window.
9. Flush them both with warm tap water, followed by dH2O and then
molecular grade water.
10. Using the vacuum line dry both syringes very well.
11. Remove all the buffer/water cups and rinse them thoroughly using
molecular biology grade water.
12. Prepare 50 ml of 1X ABI running buffer using 5ml from the 10X vial
mixed with 45 ml of molecular grade water.
13. Fill the analyzer buffer cup using about 15 ml of 1X ABI buffer.
14. Fill the reservoirs for waste and washing with molecular grade water
(approx. 15 ml each) and fill the front left reservoir with 15 ml of 1X ABI
buffer.
15. Place the septa in each one and place them back on the Autosampler.
13
Sequence-Based Typing
16. Place the blocks back and reinsert the capillary array making sure is
tightly set in the proper position. Do not twist the capillaries.
17. Fill the large syringe with 2-3 ml of POP-6 and fill the small syringe with
300µl.
18. Under Tools choose change polymer wizard and remove bubbles from
the entire path manually. Place buffer cup under lower block and close
the equipment doors.
19. Perform Spatial calibration for the capillaries checking the box Fill
Capillaries
C. Run sequence analyzer
20. Open collection software and click on the NEW button under the Plate
View page.
21. Select Sequencing and a spread sheet will be displayed for the
information required from each sample tested.
22. Once the plate editor opens name the plate following the run ID criteria
Example A zxzx 002 05
26. Each sample will have 3 entries. Spreadsheet is designed as the
columns from the plate.
27. Names are identified per the following criteria:
Name/ locus/primer ID P3456_ locus _ 2F ID
locus
primer.
28. Each DRB1 sample will have 3 entries, name, locus, different primer.
.
29. Repeat for all the samples making sure the positions are correct.
Note: The names given here will be in all the analysis reports.
30. Fill the column indicating Dye Set, Mobility File, Run Module,
Analysis File Dye Set____ (set by ABI when installing your genetic
analyzer)
•
•
Mobility File: DT3100POP6_36cm.mob
Run Module: 36cm_ 5sec_POP6 module
Run temperature
55°C
Leak threshold
25 steps
Current tolerance 100µAmp
Run Current
100µAmp
Voltage tolerance 0.6 kvolts
Pre Run Voltage
15kvolts
14
Sequence-Based Typing
Pre Run time
Injection Voltage
Injection Time
Run Voltage
•
180 seconds
1kvolts
5 seconds
5kvolts
Analysis Module: BC-3100RRv2_SeqOFFFToff.saz
30. Save information. Click close. New tray ID will be displayed on pending
plate record screen. Link plate clicking on its ID and on the now yellow
graph (A or B) that represents where the plate was placed in the
Autosampler.
31. The Tray ID will be displayed on Linked plate Record and the green
triangle button from the heading of the screen can be selected to start
the run.
32. It will take about 10-20 minutes until the samples start to be collected.
In order to expedite the heating of the over, set the manual control to
pre-heat the oven at 55°C.
33. All the data obtained will be available on the extracted files folder.
34. Analysis proceeds using the sequencing analysis software that will allow
looking at the raw data and adjusting the beginning and end of data
collection for each sample. Also the signal intensity of each individual
reaction will be taken in consideration
HLA SBT DATA ANALISYS USING ASSIGN SOFTWARE.
After a sequencing run is completed, raw data can be visualized in the computer
screen. Assign SBT is designed for use with ABI format sequence files after they
have been analyzed by the version of sequence analysis available in the Genetic
Analyzer computer. Assign SBT features include a base caller for accurate base
calling of heterozygous sequence, an algorithm for determination of the consensus
sequence, a sequence alignment algorithm, and a sequence matching algorithm.
The Assign software was developed by scientists with extensive experience in
DNA sequencing based HLA typing in a clinical HLA laboratory. It was specifically
designated for HLA SBT, but applicable to any re-sequencing application including
SNP scoring.
Note: The allele database utilized by Assign SBT 3.2.7 will have updates
performed twice yearly following the updates provided by the IMGT-HLA Sequence
Database. The following analysis procedure was established based on the version
Assign SBT 3.2.7 .
15
Sequence-Based Typing
Equipment:
1. Computer using Windows XP.
2. External Zip Disk Drive
3. HP color printer
Procedure:
1.
Once data is analyzed by Sequencing Analysis close out of software
and open data from the Extracted files folder and save to a zip disk
naming the copied folder with the ID given to that specific locus SBT
run.
2.
Operator Login can be done by clicking the Assign exe..icon.
The operator login dialogue prompts the user to the operator ID:
admin and the password:
3.
Click: submit to login.
XY 99
•
The Analysis window will appears once you logged in
No samples loaded.
4. In order to perform sequence analysis using Assign-SBT the sequence file
name convention must be defined.
•
The dialogue box allows you to:
Create your sequence file name convention:
16
Sequence-Based Typing
_
(underscore)
Locus library
•
Exclude primer site sequences where primer site is within the exon.
•
Enter the location and sequence details of primers for the resolution
of heterozygous ambiguities.
•
Activate or deactivate automated editing of the consensus
sequences.
5. Click update after making any changes to ensure that the alterations are
recorded.
6 Use the sample delimiter pane to enable to define the location of the
sample ID within the sequence file name.
The name for the sequence reaction should be:
Sample ID_ locus_ primer name& orientation
Example: 004589_ A_2F
.
7.
Use the following features:
a. Create locus code following the name criteria the laboratory uses to
call each HLA locus.
b. Set the primer set trimming appropriately.
Note: HLA-A, B or C don’t require trimming, only DRB1 SBT data
requires trimming settings.
c. Matching Mode is to be set as heterozygous library mode.
8.
Automated Editing:
This function uses information from the typing libraries to refine the
base calling in the consensus sequence. The criteria must be
followed before data can be reviewed by the automated editing
function.
17
Sequence-Based Typing
a. The Base call score of the consensus sequence at a site must be
less than 70.
b. There must be signal present at the edited position for each base in
the new call.
c. The algorithm is weighted towards including extra bases rather than
changing heterozygous to homozygous. It minimizes the possibility of
incorrect calls.
d. All the automatically edited positions are stored in the Edit list and
highlighted in red above the consensus sequence.
e. Clicking the Undo button can change all the automatic or manual
editing.
9. The Assign SBT test sample analysis pane is composed of 3 panes:
A. Sample Pane
B. Sequence Pane
C. Assignment Pane
• The first line contains the library name and date.
•
The active sample is highlighted dark blue with white text.
•
Either the mouse or the scroll bar can let you select the sample to
be analyzed.
•
The consensus sequence, the electropherogram display and the
allele assignment are updated automatically as you move
between samples
•
Samples highlighted in orange have warnings associated with
them. Show the warnings by a right click on the sample.
18
Sequence-Based Typing
10. The Sample Pane:
Samples highlighted in orange may have warnings associated with
them.. Click on the sample and you can read the warning.
10a.
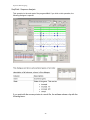
The Sequence Pane displays information about the reference
sequence, the consensus sequence and the electropherogram
associated with each sample.The picture below indicates the
information necessary for you to process the data analysis.
19
Sequence-Based Typing
10b.
Assignment Pane:
11.
An allele assignment cannot be considered correct unless the
number of mismatches indicated is 0 unless a novel allele is present.
12.
Several allele pairs can have 0 mismatches. This is because different
heterozygous allele pairs may have identical sequence.
13.
These are heterozygous ambiguities. Some alleles are identical in
the sequenced region.
20
Sequence-Based Typing
14.
The Navigator tool can be launched by selecting “Launch/Navigator”
from the menu.
15.
Checking the BCS and mismatch boxes enables fast verification of
bases with low Base Call Scores and consensus sequence which are
mismatched with allele pairs within the assignment pane.
Sample Selection
16.
Once each sequence data is analyzed save your changes before
closing the software.
17.
Create a report for each locus analyzed.
.
References:
1. ASHI laboratory manual 4th Edition.
2. Allele SEQR HLA SBT – Users manual.
3. Assign SBT 3.2.7 User Guide
21
Sequence-Based Typing
PROCEDURE II: HLA CLASS I & II SEQUENCE-BASED TYPING
USING GROUP SPECIFIC AMPLIFICATION
Principle:
This procedure describes the chemistry protocol for group-specific HLA
sequence based typing (SBT) strategy. It gives the most reliable and accurate
information of the DNA sequence of a gene and it is, therefore, of particular
interest to fully characterize the genetic complexity of the HLA genes in the human
Major Histocompatibility Complex. The allelic diversity in HLA class I and class II
makes SBT the method of choice for HLA typing. Recent developments have
made sequencing equally simple and robust, making it attractive for patient-related
diagnostic, bone marrow registry typing and genetic investigation.
The method described here amplifies the alleles in a group-specific fashion,
providing medium to high resolution results. Each HLA loci have the alleles
grouped in 8 or 15 reactions tested simultaneously under identical conditions.
“Group-Specific SBT” strategy:
Group-specific SBT is designed to reach a maximal level of allele-specific
sequencing and in turn lowering the number of ambiguities. This is achieved by
applying either 7 or 14 Group-Specific Amplifications (GSA) and 1 Locus-Specific
PCR Amplification (LSA) in parallel, allowing in most of the cases identification of
sequence data for both alleles present separately (hemizygous). If the GSA
reactions do not identify two separate alleles the LSA reaction must be sequenced
(true only for HLA-class I). This ensures in all cases the recognition of both alleles
present. Special emphasis was put on the complete coverage of exons 2, 3, and 4
to sort out nearly all ambiguities caused by genetic polymorphism in these relevant
areas of the HLA molecule and the location of the sequencing primers to ensure
complete exon sequences in both orientations. For ease of use the group-specific
primer mixes are pre-dispensed in one or two 8- well PCR tube stripes
22
Sequence-Based Typing
Note: HLA-DRB1 kits only tests exon 2 of the DRB1 alleles. HLA-A, B and C test exons
2, 3 and 4.
The 8 PCR reactions can reach a high level of allele- specific sequence with a
lowest number of ambiguities when used for the locus A and C that are not as
polymorphic as HLA –B and DRB1. Either approach having 7 group-specific PCR
amplifications (GSA) and 1 locus-specific PCR amplification (LSA) or 14 group-specific
PCR amplifications (GSA) and 1 locus-specific PCR amplification (LSA) in parallel allow
in most of the cases both alleles to be analyzed separately. If the GSA reactions do not
indicate two separate alleles the LSA reaction must be sequenced. This ensures in all
cases the recognition of both alleles.
Amplification procedure:
1. Creating a panel for PCR amplification:
1.1. Label the PCR tube strip using the sample ID. The tube containing mix 1
should be facing the user to the left side.
1.2. Cross check as you go to ensure that the ID in the tube strip and the ID
from the DNA tube are the same.
8 PCR reactions format.
Mix 1 is marked in black.
1
2
3
4
5
6
7
8
1
15 PCR reactions format.
Mix 1 at the cut corner.
1
2
a
3
4
5
6
7
8
9
1
0
0
1
1
1
1
1
0
1
1
1
1
1
1
P
N
23
Sequence-Based Typing
2. Preparing the PCR reaction:
These steps are done in the Pre-Amplification Area inside the laminar flow
hood.
2.1
Remove PCR mix (PSD) and Amplitaq Gold from freezer.
2.2
Let the PCR mix thaw to room temperature (RT)
2.3
Let PSD sol. thaw, vortex well and spin down.
2.4
Place PSD on ice box rack.
Note: From this point work inside the Laminar Flow Hood.
2.5
Prepare the master mix for each sample tested using the
chilled/thawed PSD solution and Taq Gold.
2.6
Add 15 µl of the PCR-Amplitaq mix to the negative well before adding
the DNA sample to the PDS mix.
2.7
Add the appropriate DNA volume to each PCR mix tube vortex
master mix well, spin down briefly.
2.8
Dispense carefully to the wall of each tube.
2.9
Follow SOP procedure used in the lab regarding pre-amp and postamp precautions to maintain, pipettes, gloves, lab coat, racks
separated between pre and post PCR areas.
2.10
Run the SBT PCR amplification profile using a thermocycler.
3. Amplification Program:
Group Specific SBT -PCR: volume= 15µl
95°C 2 minutes
1 cycle
24
Sequence-Based Typing
96°C
64°C
72°C
40 seconds
60 seconds
2 minutes
15cycles
96°C
60°C
72°C
20 seconds
60 seconds
2 minutes
15cycles
96°C
56°C
72°C
4°C
20 seconds
60 seconds
2 minutes
10cycles
∞
4. PCR verification:
4.1 Prepare a 2% Agarose gel using 0.5X TBE.
4.2 Cool gel and prepare documentation.
4.3 Remove combs from gel tray and submerge it under 0.5X TBE buffer.
4.4 Add 6 µl of loading dye to a 96-well PCR tray.
4.6 Once PCR profile is complete, remove 3.0 µl of each PCR product and add
to the tray with loading dye.
4.7 Re-cap strips and place PCR products in the refrigerator.
4.8 Run gel at 150V/9 minutes
4.9 Take photo following SOP and attach to SBT documentation.
4.10 Fill paperwork for each sample identifying all positive PCR reactions.
4.11Open Pipetting Assistant software to start documentation necessary to
identify PCR reactions that will proceed to sequence.
4.12 Order amplifications in Pipetting Assistant software (PPA)
A.
Select Sample Input tab.
B.
Select Template button and choose format (8 vs. 15) and
locus from the drop-down menu.
25
Sequence-Based Typing
C.
In Sample ID box, enter 1st sample, using each sample unique
ID
D.
Select Add button.
E.
Repeat for subsequent samples.
F.
Once 96-well tray is complete, or all samples have been
entered.
G
Select Complete.
H
Name the plate: (PPA requires some type of identification).
I.
Click Print & Complete.
I
5. Create the Purification/ExoSAP-IT tray:
5.1 Click the Result Input tab.
5.2 In the Sample ID box, type the 1st sample number/ID. If the chosen
Sample number was amplified for more than 1 locus, a list of all the
amplification trays on which that sample number appears will pop up.
5.3 Choose the appropriate tray.
5.4 The entire amplification tray that includes the chosen sample ID will appear
in the upper window.
5.5 On the tray map click on the first amplification product to be sequenced.
5.6 On the right-side margin, click on all the desired sequencing primers
(exon and direction).
5.7 The lower window will display the amplification products to be purified and
their positions on the purification tray.
5.8 Repeat for 2nd amplification product and for subsequent samples.
26
Sequence-Based Typing
5.9 When all amplification products from the upper tray have been selected,
click print result to print a grid graphically showing which amplification
wells will be purified.
5.10 When all amplification trays have been added to the Purification plate, click
Complete
5.11 Name Purification Tray: Date of Purification-Pur-Loci
(i.e. 20050829-Pur-ABDR).
5.12 Click Print & Complete. (The printout is saved as an excel file in the
directory: C:\Program Files\PipettingAssistant\PrintFiles. This doc.
can be opened, reformatted, and reprinted to let you see all the
required information if the default printout is truncated.
6..
Choosing the positive PCR reaction products to proceed to Sequencing:
6.1Choose a minimum of 2 positive PCR products or in case of homozygosity
6.2Select the appropriate LSA for the loci being tested.
6.3Identify in PPA the chosen positive reactions, these will proceed to Cycle-
Sequencing
7. ExoSAP-IT PCR product treatment
The PCR products have to be purified before being used as sequencing
templates, because residual PCR primers and nucleotide triphosphates
(dNTPs) can interfere with the SBT chemistry resulting in lower data quality.
An easy way to perform PCR purification is by using Exonuclease I and
Shrimp Alkaline Phosphatase enzyme mix (ExoSAP-IT ) treatment of PCR
products that will remove unincorporated primers and dNTP’s.
7.1 Take the vial of ExoSAP-IT from the freezer.
7.2 Add 4 µl of ExoSAP-IT to the required wells of the Pur-tray following the
Purification tray map generated previously in PPA
7.3 Transfer 10µl of each positive amplification selected to be sequenced into
the appropriate wells of the Purification tray created following the PPA location
for each positive reaction chosen to be sequenced.
7.4 Seal the purification tray with micro amp full plate covers or caps.
7.5 Spin tray down at 1000g for 20-30 seconds.
7.6 Place in the thermal cycler and run the following profile:
27
Sequence-Based Typing
ExoSAP-IT Thermocycler Profile:
37°C 15minutes
80°C 15minutes 1 cycle
4°C
∞
7.7 Remove treated PCR from Thermal Cycler.
Note: To each DRB1 product only add 20 µl molecular biology grade
H2O to each PCR product treated with ExoSAP-IT .
7.8 At this step you can freeze the products to continue the sequencing
reactions later.
8.
To Create the Sequencing Tray using PPA software
Note: Choose on the upper right corner box drop down menu: 3130xl format or 3730 format
and keep track of this choice all the way because the equipments 3130Xl (16 capillaries) and
3730 (48 capillaries) use a different approach during sample injection.
8.1 Click on the Sequencing Plates tab.
8.2 In Purification Plate ID type the purification tray name EXACTLY
(case-sensitive) and click Search. (or you can leave the tray name blank,
click search and scroll down the list to find the correct Purification Tray).
8.3 Click on the desired locus-exon-direction tab, then click Join.
8.4 Type a name for the sequencing tray (ABI analyzers only accepts
underscore as a connecting character when creating sequence tray
identification)
8.5 Continue to Join locus-exon-primer orientation tabs until all positive
reactions are added to the sequencing tray.
8.6. Once finished Joining, click Plate Record (this will prompt you for a name;
the default tray name is the one assigned above. Just click OK to accept
it.).
8.7 Click Print. This will also prompt you for a tray name; just click OK. This
will also tell you that the tray already exists and asks if you want to
continue. Click Yes.
8.8 Transfer Sequencing Plate template to appropriate Analyzer computer
(this does not use the Pipetting Assistant software).
8.9 Plate Record is stored in the directory: C:\Programs files/
PipettingAssistant\PlateRecords as a .txt file .
8.10 Right-click on the .txt file and change the name/format from .txt to .plt.
28
Sequence-Based Typing
8.11Transfer tray format information to the 3130xl or 3730 computer
8.12Copy the plt file into the Plate Import folder on the sequencer computer
8.13In the sequencer software, Import and choose the appropriate .plt file.
8.14Pipette to your Sequencing tray following the map created in PPA
2µl of Big DT v.1.1
6µl of the appropriate primer F or R
Spin tray for 30sec/1000rpm
2µl of the Exo-SAP- IT treated PCR product
8.15Run Cycle-Sequencing profile.
Set volume for 10 µl
96°C 1 min
Hold
96°C 10 sec
50°C 5 sec
25 cycles
60°C 4 min
4°C
∞
Following cycle sequencing, the sequencing reactions have to be purified to
remove non-incorporated dye terminators which would otherwise cause
sequencing artifacts.
9. Ethanol 100% and EDTA+ Sodium Acetate Precipitation
Ethanol 100% and EDTA/ NaOAc will eliminate unincorporated fluorescent
dyes from the sequencing reactions. This is an important step and has to be
done without interruption and in the exact order described. The precipitation
step will determine the quality /signal strength of your sequence data.
9.1 Thaw the EDTA/NaOAc buffer and Vortex/spin down gently before
opening vial.
9.2 Add 3 µl of the NaOAc/EDTA buffer to each sequencing reaction.
9.3 Cover tray using full plate cover and spin tray for 30 seconds at 1000
rpm.
9.4 Add 25 µl of the 100% Ethanol solution to each well.
29
Sequence-Based Typing
9.5 Place the Plate Septa onto the tray and vortex the tray thoroughly,
using an Eppendorf Mix-mate for 30 seconds
9.6 Centrifuge tray at 3160 rpm for 30 minutes.
9.7 Prepare an 80% Ethanol solution mix well and keep it closed.
9.9 Immediately remove supernatant, invert tray on paper towel stack.
9.10Place the inverted tray and paper towels in the centrifuge carrier and
spin at 1000 rpm for 20 seconds to remove the supernatant.
9.11Add 50 µl of 80% Ethanol to the wells, spin down at 3160 g for 5 min.
9.12Immediately invert the tray onto paper towel stack. Place the inverted
tray and paper towel stack in the centrifuge and spin at 1000 rpm for
20 seconds to remove the supernatant.
9.13Dry reactions for 15 minutes protected from light.
9.14Add 15 µl of Hi Di Formamide, cover with full plate cover and spin tray
for 30 seconds at 1000 rpm.
9.15Incubate for 2 minutes at 95°C and cool on ice for 2 minutes.
9.16Spin tray for 30 seconds at 1000 rpm and place it on the Support Base,
Specific for each Analyzer.
9.17Place a Full Plate Septa over the tray and follow with the 96-Well
Plate Retainer.
9.18Place Support base +Tray+ Septa+ retainer onto the ABI Analyzer
Wait the tray to go back inside the sampler area
9.19Link tray map to tray ID and click on the green arrow to start the run.
9.20The run module for this procedure takes about 30 minutes for each
injection on the 3130XL and 25 minutes on the 3730 Analyzer when
using a 36 cm long capillary array.
9.21Genetic Analyzers module
3130XL
60 °C
3730
60ºC
•
Oven Temperature
•
Cap Fill Volume
184 steps
•
Pre Run Voltage
15 kV
n/a
•
Pre Run Time
180 sec
180 sec
•
Injection Voltage
1.5 kV
30
n/a
1.2 kV
Sequence-Based Typing
•
Injection Time
5 sec
5 sec
•
Run Voltage
8.5 kV
8.5 kV
•
Data Delay Time
405 sec
120 sec
•
Run Time
3600 sec
1500sec
9.22 A. 3130 XL Analyzer analysis settings
•
Mobility file:
3130_POP7_BDTv1.1 mob
•
Analysis module:
•
Basecaller
•
Dye set/primer file
•
Run Module:
KB_V1_PCR_Mixed Bases_10-20-15
KB.bcp
KB_3130_POP7_BDTv1.1
Protrans _Result _Group
B. 3730 Analyzer analysis settings
•
Mobility file:
KB_3730_POP7_BDTv1.1.mob
•
Analysis module:
•
Basecaller
•
Dye set/primer file
KB_3730_POP7_BDTv1.1
•
Run Module:
StdSEq36_POP7_IV1.2_IT5_RT25min
KB_V1_PCR_Mixed Bases_10-20-15
KB.bcp
10. Identification of the Alleles
The final step in sequence analysis consists of the allele assignment using the JSI
SeqPilot Allele Identification Software or other computer softwares developed for
sequence-based typing. The SeqPilot Allele Identification Software is compatible or
adaptable to all four-dye sequencing instruments available. The HLA library is updated
with each new Sequence Database release of the HLA Informatics group. The
software performs allele identification, allows manual review or editing sequencing
data as well as reporting, exporting and archiving of sequences and results. The
following example provides basic steps of allele identification using SeqPilot software
analysis version 1.3.
10.1
Sample name convention
The Sequence Pilot software automatically recognizes the locus and exon
sequence as well as the direction of the sequence. In order to allow the software
31
Sequence-Based Typing
to properly pair/join the sequences of the same sample, the name of sequences
has to follow the naming convention as shown:
(Sample ID_amplification mix_sequence primer)_any other information
10.2
Process sequencing files using ABI Sequencing Analysis program.
• Transfer folders to computer with SeqPilot software.
• Open SeqPilot and choose from System drop down menu, Load Seq Results Files.
• Choose LIS, click on Order list.
• Right click and choose “Jump to order Input” for each patient listed in order list.
• Patient ID”box will fill with the Sample ID”. Last name “box will fill (automatically) with
P- xxx Sample ID”
• In “First name” box, type patient’s first name or any other ID. Click “Save” order list
and for all sample data imported into SeqPilot Software.
• Click the “SeqPilot tab and click on “Joining”. It will display the sequencing data to be
analyzed.
• Choose a sample to analyze and click on “Sequence”. Choose first gene and the
first exon to analyze (most of the time it will be exon 2).
• Scroll through entire sequence data watching for low peaks indicating background
noise, irregular migration, compression areas, peak shoulders, heterozygous
positions or presence of dye blobs.
• Compare sequences of the same exon on opposite orientation to make sure they
are complementary to each other. Edit data as necessary.
• Check all the exons for the gene being analyzed to verify that there are no
mismatches to rule out the possibility of recombination.
• After analyzing all the exons, if there are still mismatches, or if the software can’t
agree upon an allele or pair of alleles, reanalyze sequencing data and look for
missed ambiguities or basecall and check the initial PCR gel documentation.
• When a result can’t be reconciled repeat sequence reaction using the same PCR
product and include other PCR positive and/or other primers in both directions.
• When allele combination or single allele with no mismatch is clearly achieved, click
the TV (Technical Validation) box to validate the test result, print out the “HLA” and
the “HLA short” reports.
11. Troubleshooting Guide
32
Sequence-Based Typing
PCR is an extremely sensitive method, which can efficiently amplify the very small
amount of DNA. Therefore, even trace of contaminating DNA in a sample can be
amplified by PCR and falsify the test result. One particular source of contamination
is amplified DNA coming into contact with samples, which are still to be amplified.
To avoid contamination with amplified material, SBT follows the standard SOP
keeping the reagents, equipments and utensils physically separated.
Pre-PCR area:
All work carried out before PCR (preparing and storing sample DNA,
preparing PCR amplification reactions, setting up and storing reagents and
solutions for DNA isolation and PCR) should be done inside the laminar
Flow hoods dedicated for Pre Amplification procedures.
Post-PCR area:
All work carried out after PCR (running thermocycler and DNA analyzers,
preparing and running Agarose gel electrophoresis, preparing and purifying
sequencing reactions, storing amplified DNA or sequencing reactions).
PCR trouble shooting:
No PCR product or weak PCR product
1.1 No ethidium bromide in gel:
Re-stain the gel in 1X TBE with 0.5 µg/ml Ethidium bromide
1.2 Incomplete mixing of AmpliTaq Gold and PCR reaction mix
Repeat PCR with attention to mixing
1.3 DNA concentration out of range (ideal is 25- 100 ng)
Recheck DNA concentration.
1.4 Blood sample collected in Heparin
Treat DNA sample with Heparinase or recollection
1.5 PCR tube caps not well settle in the thermocycler causing
evaporation and false negative reactions
1.6 Incorrect thermocycler profile.
33
Sequence-Based Typing
Check the cycling profile and current variation causing profile to stop
before completion.
SBT Troubleshooting
SBT problems may be due to low quality sequences or heterozygous
sequences of specific allele combinations that can have “C” and ”G” rich
regions causing peak shift or high background. The majority of these
anomalies occurs in only one sequencing orientation at a certain base
position and can be resolved by reviewing data from the other orientation.
3.1
Weak signal strength
Inappropriate injection time or injection voltage because of
variations between instruments, adjustments of the injection time
and/or the injection voltage may be needed to get a signal range
from 100 – 2000 relative fluorescent units
3.2
Too little sequencing reaction applied
Increase injection time, injection voltage or concentration of sequencing
reaction.
3.3
Too strong signal strength
Inappropriate Injection time or injection voltage because of
variations between instruments, adjustments of the injection time
and/or the injection voltage may be needed to get a signal range
from 100 – 2000 relative fluorescent units
3.4
Noisy baseline
Inappropriate PCR product purification or poor quality reaction
precipitation
3.5
Inappropriate sequencing reaction purification.
Re-purify the sequencing reaction or purify the correct one.
3.6
Broad fluorescent terminator artifacts (dye blobs)
Inappropriate sequencing reaction purification.
3.7
High fluorescent artifact peaks
Air bubbles in the capillary. Clean blocks and refill the capillaries with
fresh polymer.
34
Sequence-Based Typing
Incorrect 10X Buffer dilution. Consider the option of change the
capillary if problem persists after replacing buffer and flushing
polymer block with water before refilling with fresh polymer.
Data Analysis using Sequence Pilot Software
After the sequencing run is complete, results can be displayed, analyzed in the
Sequencer computer and produce ABI data files (sequence trace file) that can be
imported into the HLA SBT software of choice. Sequence Pilot features require that
the files to be imported following the guidelines for sample naming, dye set,
analysis format and data quality. All this information is available to the user in
Sequencing Analysis 5.2. SeqPilot features include a base caller for accurate base
calling of most of heterozygous data, an algorithm for determination of the
consensus sequence, and a sequence alignment algorithm. SeqPilot was
developed for a high throughput sequencing system to typing hundreds of samples
daily. It is developed for general sequence data analysis with a special component
for HLA SBT.
Sample naming conventions of SeqPilot:
For automatic joining of patient orders and their result files, the program HLA
needs special information for each result file:
•
DNA number (unique number for each examined DNA in your laboratory)
•
Name of the used amplification module
•
Name of the used sequence primer
35
Sequence-Based Typing
The following format is required by the Sequencer and also by SeqPilot software®:
name of the used seq. primer
↓
(0306781_BGM7_B-E3F)
↑
DNA number
↓
name of the used amplification module
The information related to the sequence is enclosed in parentheses. Within the
parentheses the three sectors are separated by underscores, this information is
required by SeqPilot. Any text outside the parentheses will not be regarded by the
SeqPilot software.
HLA database
To install the HLA database, go to the download section of our home page
www.jsi-medisys.de and execute steps listed.
Genes and exons
The following entries in the section [HLA-Genes] of the lis.ini file (located in
the bin-directory of your installation) are needed:
A
B
Cw
DRB
E2, E3, E4
E2, E3, E4
E2, E3, E4
E2
Please note that the program HLA checks these default entries for genes and
exons. Genes and exons which are not listed here can't be analyzed.
Load Sequencing Result files
When choosing this command, the following dialogue is opened:
.
The sequencer ABI is pre-chosen to open
the dialogue Load Result File. If you don't
want to continue the file import, press the
button [Cancel} and the dialogue Load
Result files is closed.
36
Sequence-Based Typing
37
Sequence-Based Typing
Tab Test Order
Join function
The Join function allows the user to start checking the sequence data upload in the
Seq Pilot software. This feature indicates the reactions uploaded and also the ones
not uploaded for a reason. Un-joined result files in the upper table can be joined
manually, by selecting an order in the Lower table (For this please select the order,
by setting a hook into the box in front of the line, select one or more entries in the
Upper table and press the button [Join]. The selected result files are joined to the
selected order and deleted from the Upper table.
Please note that if the field DNA # in the Lower table for a patient result file is
shown with a grey background, the order and the patient result file have different
DNA numbers. This can happen, when result files are joined manually. In this case
please check if the patient result file is joined to the correct order.
38
Sequence-Based Typing
Auto-join function
In case of entering orders with valid DNA numbers, after loading result files or
manual changing of DNA numbers of result files, the function auto-join can be used
to join the orders automatically with their corresponding un-joined result files.
Work list function
39
Sequence-Based Typing
SeqPilot Sequence Analysis
This operation is the main part of the program HLA. If you click on this operation, the
following dialogue is opened:
If you point with the mouse pointer at a result file, the software shows a tip with the
following items:
40
Sequence-Based Typing
Result File
Join to both haplotype
If the assignment of a result file to both haplotype could not be done automatically
by the program HLA, or you think the automatically assignment is wrong, you can
join it manually. If you join a result file to both haplotype, the sequence is checked
for mismatching positions with other result file sequences, also assigned to both
haplotype. If there are any mismatches, an error message appears which states
the mismatching positions. In this case, the sequence is not joined.
Note: hemizygous result file sequences only can be joined to haplotype 1 or 2.
Heterozygous result file sequences always belong to both haplotype.
41
Sequence-Based Typing
Hide sequence / Show sequence
The item hide sequence is shown if the selected result file is not hidden yet. If
you select this item, the result file is hidden within the Electropherogram and in the
column State of this dialogue part an “H“ is shown.
The item show sequence is shown, if the selected result file already is hidden. If
you select this item the result file is not hidden any longer and shown again in the
Electropherogram.
Result
Within this dialogue part the total results calculated for the selected gene in the
Dialogue part Genes are shown. The first line indicates whether it is a
heterozygous or a hemizygous result and on which haplotype the result calculation
is based on. If the Tab Haplotype 1 or the Tab Haplotype 2 of the Matching table
is selected, this dialogue part shows additionally the hemizygous results for the
selected haplotype tab in the first lines.
Within this dialogue you can see and edit the original electropherogram(s) of the selected
result file
42
Sequence-Based Typing
Functions
43
Sequence-Based Typing
44
Sequence-Based Typing
Printing Reports
References:
1. Protrans medizinische diagnostische Produkte GmbH. S3 and S4 User Manual.
2. Protrans Sequence Pilot Software User Manual.
3. Pipetting Assistant User manual.
45
Sequence-Based Typing
QUALITY ASSURANCE PLAN
HLA CLASS I & II SEQUENCING-BASED TYPING
Introduction:
The Sequence-Based Typing described in this protocol has been well established in the Clinical
Transplantation Immunology Laboratory. The method has proven to be accurate, precise, and
reliable.
We follow the guidelines provided by the kit manufacturer and common sense Molecular Biology
precautions to prevent contamination or degradation of reagents and/or DNA samples.
This quality assurance plan (QA Plan) is developed for HLA class I and class II Sequence-Based
Typing and it can be used as a guideline or reference for the HLA Sequence-Based Typing using
other SBT reagents source.
1. Guidelines Pre-Amplification Area:
1.1. PRE-PCR:
1.1.1. All DNA preparations and PCR setup are handled in a Laminar Flow Hood
contamination control chamber in a Pre-Amplification room.
1.1.2. All Pre-PCR reagents are thawed to room temperature, vortex, spun and kept cold until
ready to be used.
1.1.3. Wear a dedicated pre-amplification lab coat and fresh gloves when preparing samples
or reagents for PCR amplification.
1.1.4. Open and close all sample tubes carefully to avoid reagent or sample splashes. Always
vortex/spin down vials of DNA and/or reagents before opening with intention to use it..
1.1.5. Use positive displacement or air-displacement pipettes with filter-plugged tips. Change
tips after each use.
1.1.6. Keep all the racks and lab coats used in pre-amplification area. Amplified material
should never re-enter the Pre-PCR room.
1.1.7. A new lot of reagents must be QC’d and approved before use in clinical typing.
•
New Lot QC’d with 2-3 DNA samples previously tested.
•
New batch/shipment QC’d with 1 DNA sample previously tested.
•
Unusual shipment delays will be QC’d as new lots.
1.1.8. A new lot is identified by a new version # ID indicated in the heading of documentation
associated with the Lot Amplification and Sequencing Unit number. Sequencing
Primers for the different loci/exons tested are listed for QC purposes in the QC
documentation only.
1.1.9. New lots of AmpliTaq Gold, BDTv1.1 (Big Dye Terminator) and ExoSAP-IT tested
along with the QC performed for the new lot of SBT reagents received.
46
Sequence-Based Typing
1.2. PCR Amplification Failures:
Amplification failures can be identified by Agarose gel electrophoresis or by the failure of all
the sequencing reactions from a single sample. Failures at the PCR step may be due to the
following:
1.2.1. AmpliTaq Gold not added to PCR/Taq Mix
In this case, all samples are failed to amplify.
1.2.2. PCR/Taq Mix not well mixed.
•
•
•
In this case, samples will show variable intensities or absence of a PCR product
in the Agarose gel photo.
SBT PCR Amplification that fail to identify a specific allele that have been
picked up by the All Alleles Mix (only HLA-Class I) should be used to reamplify for QC documentation. Result can be confirmed by other method in
case result is needed to state in the patient record. (Consult patient information
to make decision).
Unacceptable DNA quality or quantity.
a.
check the 260/280 ratio of DNA sample
b.
In case of low ratio (below 1.5), ethanol precipitate DNA sample
to remove protein contamination. Examine the integrity of
genomic DNA in a 0.8% Agarose gel electrophoresis. Re-isolate
DNA if the amount of DNA is insufficient.
1.2.3. DNA not added
•
Repeat PCR set-up
1.2.4. Thermocycler problems
•
Incorrect thermocycler profile.
a. Confirm the profile used, fix if appropriate and repeat amplification.
•
Thermal cycler failure or interruption during the PCR run.
a. Document Profile interruption and use caution to judge photo
documentation from the problem PCR
b. Run the instrument performance test per manufacturer's
recommendations and repeat amplification.
2. Guidelines Pre-Analytical Area:
A PCR run is considered to be “Invalid” and needs to be repeated if:
47
Sequence-Based Typing
2.1. No positive PCR products are visualized in the photo.
2.2. PCR products with a band of wrong size.
2.3. The sequencing product generates an unreadable data (e.g., low signal strength, noisy or
artifact/artificial peaks, unexpectedly truncated, large spacing between peaks) for the
Forward and/or Reverse sequence reaction.
• Due to Genetic Analyzer malfunction.
• Due to operator error.
• Due to faulty reagents.
2.4. If a given sample fails to amplify, repeat the test on that sample in the next run. If again no
sequence is seen, confirm with other technologists how the performance of that sample
with other tests, reconfirm OD readings and DNA dilution made. Check anticoagulant used
to collect blood sample. Heparin will cause fail in SBT amplification.
2.5. If a given sample fails to generate good quality data, repeat the Cycle Sequencing reaction
using the same ExoSAP-IT treated PCR product available.
Note 1: ExoSAP-IT treated PCR products can stand a “small dilution” sometimes necessary
to repeat a given Cycle-Seq reaction (usually 6 to 8µl of Molecular grade water).
Note 2: Make sure to add the water, cover the tray, vortex briefly, and spin for 1 minute
before using it for a new Cycle Sequencing reaction.
3. Guidelines Analytical Area:
3.1. All nucleotide positions must be as expected unless there is a confirmed novel substitution.
3.2. The data is reviewed by at least two qualified individuals (a technologist plus a designee or
director).
3.3. Homozygous typing, rare types and types that are unexpected for any reason (e.g.,
linkage disequilibrium, prior typing, family analysis, race/ethnicity) should be confirmed
using a different typing method or reagents.
3.4. Reliability of test results should be monitored by periodic use of positive controls of known
HLA types. Sequencing of both directions of each sequencing reaction product is
recommended when 2 distinct groups of alleles can’t be distinguished by initial PCR.
4. CRITERIA FOR ACCEPTANCE & REVIEW OF SBT RESULTS:
To ensure typing accuracy sequencing of at least one forward or reverse direction on the same
exon is mandatory. When using Protrans strategy the alleles get separated in different PCR
products (amplicon) that are sequenced separately and it is not necessary to perform sequencing
in both directions if the alleles are distinct in the PCR step.
Note: When the PCR products can’t clearly separate both alleles, each exon must be sequenced
in both directions.
4.1. Repeat the PCR amplification when the number of constant positions errors
(E.g. heterozygous base calls) in hemizygous sequence data is greater than 40/per single
sequence orientation
48
Sequence-Based Typing
Note: Some exceptions may apply when the number of edits exceeds 40, but a
confirmation of the present alleles is supported by another method that obtains the same
result and has reliable data.
4.2. If only one DRB1 allele is assigned (possible homozygous) the result must be confirmed by
another method (SSP, Luminex, etc) or using different SBT reagents. Note: HLA-Class I
reagents have an All Alleles PCR product that once sequenced can identify most alleles
missed by the different allele group mixes.
4.3. Repeat the entire SBT when rare alleles are identified. Use at least two additional separate
PCR products to be sequenced and confirm typing using different reagents. When a
potential novel allele is confirmed sequence data should be submitted to GeneBank and to
the WHO/ HLA Nomenclature Committee for name designation.
4.4. Weak PCR amplification usually causes weak signal strengths; as a result non reliable
assignments can be made. The average signal strengths, across all four bases should be
equal/greater than 40 [(T+A+C+G)/ 4 > 30]. If after data being “forced” into the software
to be analyzed it fails to meet this requirement and requires more than 20 editing/exon,
PCR should be repeated because data may not be reliable.
4.5. Any discrepancy between sequencing orientations must have the data reviewed before
repeating PCR. It is possible to have the wrong PCR product sequenced or a wrong primer
ID was used. Review Purification tray and Seq tray before repeating discrepancies. Be
aware of anomalous heterozygous positions and artificial peaks which may cause
discrepancy between two sequencing orientation. In these cases a repeat may not be
necessary.
4.6. Review the data available in SeqPilot manually and independent of the list of possible
alleles. The SBT report is generated by the technologist that performs the first analysis and
electronically does the TECHNICAL VALIDATION (TV) on each test on a given run.
5. SBT limitations:
Using the Protrans SBT kits there is no missing bases at the beginning or end of the exons
sequencing data, because all the PCR primers are outside of the exons.
•
•
DRB1* SBT limitation: Novel sequence outside of exon 2 will not be
detected.
Ambiguous allele assignments can occur when two alleles are present and
the composite sequence is identical for more than one combination
(cis/trans ambiguities).
Note: See the Anthony Nolan Research Institute publication from April
2005 “Exon Identities and Ambiguous Typing Combinations.”
6. SBT Kit Troubleshooting:
6.1. Sequence Failures:
6.1.1. If all reactions of an individual sample are negative, the most likely explanations
are:
o
o
There was a missing/faulty common reagent.
Sequencing reactions set up/precipitation failure.
49
Sequence-Based Typing
o
o
6.1.2.
Not all sequencing reactions failed.
o
6.1.3.
If some, but not all of the sequencing reactions of an individual sample failed,
it is likely due to a pipetting error during Sequence reaction, cross
contamination when adding reagents, splashes when vortexing tray. Since at
least one reaction was successful, you know that the PCR product isn’t the
problem.
Random, multiple weak or failed sequencing reactions.
o
6.1.4.
Poor manipulation during PCR purification steps.
Equipment failure (e.g. buffer, capillary, bubbles, poor resolution polymer,
mobility file, etc)
If the vortexing step is not performed following the addition of Absolute
Ethanol/ NaOAc/EDTA, then the precipitation of sequencing reactions will be
inconsistent. Significant variability in sequence signal strengths will result
from that.
When the following problems are encountered, they do not indicate a failure in the
amplification or sequencing reactions. Rather, they are most likely related to the
post-sequencing precipitation or data analysis steps.
6.1.4.1. Small peaks at the beginning of sequence may be due to:
•
Inefficient Ethanol precipitation.
•
Ethanol used for wash step may be diluted incorrectly..
6.1.4.2. Dye blobs at the beginning of sequence may be due to:
•
Failure to add or incomplete mixing of NaOAc/EDTA to the sequencing
reaction prior to ethanol precipitation will cause dye blobs.
•
Weak/miscellaneous peak size/shape due to incorrect volume of BDTv1.1
•
When this step is performed correctly, minimal dye blobs will be present
in the sequencing data.
6.1.4.3. Noisy sequences may be due to:
•
Failure to add correct volume of ExoSAP-IT to PCR products prior to
setting up the sequencing reactions.
•
Inactive ExoSAP-IT added to the PCR products.
•
Incorrect Module.
50
Sequence-Based Typing
Weak/miscellaneous peak size/shape due to incorrect volume of BDTv1.1.
•
6.1.4.4. Incorrect Ethanol precipitation may result in excess salt remaining in the
sequence reaction.
•
These salt ions will preferentially inject onto the capillary over the
sequence DNA molecules resulting in weak sequence. Be sure to
perform the ethanol precipitation correctly and do a well
measured/correct concentration wash step afterwards.
6.2. Allele drop out
6.2.1.
6.2.2.
6.2.3.
Rarely, a particular allele may not be amplified:
•
This may be caused by a denaturation failure which may be related to
proximity to regions of very high GC content which serve as clamps
during denaturation.
•
If this occurs, the allele will usually amplify after heating the DNA for
5-10 min at 65°C and placing the sample immediately on ice just
before re-setting the PCR.
Allele drop out may also occur when a DNA sample with poor quality is used:
•
If this is the reason, the typing will be repeated using a re-purified DNA
isolate with optimal quality. Check DNA on a 0.8% Agarose gel to check
quality.
•
Allele drop out can also be caused by mismatch between the primers and
target DNA that may present a novel allele differing at the binding sites.
Technical failure:
•
Allele primer may be not present in the primer strip causing failure of PCR
reaction.
•
Lack of AmpliTaq Gold in the PCR reaction may cause failure of PCR
reaction.
•
Problem during dilution of PCR reaction to perform electrophoresis can
cause failure
6.3. Anomalous Heterozygote Positions
With dye terminator sequencing, the peak incorporation patterns are not completely
uniform. For homozygous positions, this is not a problem, but for certain heterozygote
positions, one peak may be present at a much lower level than the other. Consequently,
the allele-calling software may not correctly identify these positions as heterozygous
sequencing in both orientations. By sequencing in both orientations, the number of these
anomalous positions can be minimized (DRB1*09 and 10 on S4-DRB1 kits).
51
Sequence-Based Typing
Furthermore, the incorporation patterns are very reproducible and most anomalies have
been identified by analyzing a relevant panel of DNA samples.
7. SBT QC - General Guidelines:
7.1.
Select appropriate number of samples to either QC a new lot (2-3) or a new
batch/shipment (1) of reagents.
7.2.
Find from database the SBT run file they were tested in (write down information on the
QC form) and make a copy of the short form of the SEQ Pilot analysis.
7.3.
Using database prepare new SBT work list using the letters QC behind each DNA
sample # to use as a guide for the SBT procedure remainder steps.
7.4.
7.5.
Find the DNA samples from their appropriate location
Make the dilutions of the DNA and have the appropriate typing strips, PSD buffer,
AmpliTaq Gold®.
7.6.
Set up the SBT- PCR per SOP.
7.7.
When setting up the sequencing map in PPA use the letters QC behind the DNA number
for each sample. This will allow each sample to be analyzed in SeqPilot independently
from previous tests.
7.8.
Confirm that a new lot of ExoSAP-IT is /or not available and also the BDTv.1 write
down the lot numbers of these reagents in the SBT run report form filled for the QC run.
7.9.
Confirm that the Sequencing Primers identification for each locus/exon/direction
matches the information provided.
7.10. When a new lot is received for QC purposes run the primers that react for each positive
PCR mix in BOTH Directions. The expected primer reactivity for each PCR mix can be
obtained from the Appendix available for each locus SBT appendix. The primer boxes
that don’t have anything written on them indicate that the mix (primer mixes are listed in
rows and exons/directions are listed down in columns) don’t react with that specific
exon/direction.
7.11. Mark the positive reactions observed in the photo documentation per SOP.
7.12. Use the Appendix as the guide for the Primer mixes tested along with the PPA forms
filled in the computer.
7.13. Perform Cycle-Seq per SOP and analyze data per SOP.
7.14. Fill the QA form indicating result concordance and document any comments.
7.15. Analyze data print the short form of report indicating in the QC form any observation
about primers and concordance or not of results obtained.
7.16. Confirm that Allele database utilized is the same. Result may present ambiguities if there
is an Allele Database update between both tests.
52
Sequence-Based Typing
PART V: ASHI STANDARDS APPLIED TO SEQUENCE-BASED TYPING
The flowing ASHI Standards (Version 2005) can be used as guidelines for Sequence-Based
Typing:
D.2.2.4 Laboratories performing amplification of nucleic acids must:
D.2.2.4.1 Use physical and/or biochemical barriers to prevent nucleic acid contamination (carryover).
D.2.2.4.2 Perform pre-amplification procedures in a work area that excludes amplified nucleic acid
that has the potential to serve as a template in any other amplification assays performed in the
laboratory (e.g., PCR product, plasmids containing HLA genes or relevant STR/VNTR sequences).
Restricted traffic flow is recommended
D.2.2.4.3 Use dedicated lab coats, gloves and disposable supplies in the pre-amplification area.
D.2.2.4.4 Ensure that for methods that utilize two consecutive steps of amplification, addition of the
template for the second amplification occurs in an area isolated by physical or chemical barriers
from both the pre-amplification work area and post-amplification work areas.
D.4.1 Laboratories performing nucleic acid testing must have written criteria or protocols for:
D.4.1.1 Accepting the validity of each molecular assay.
D.4.1.2 Preventing DNA contamination using physical and/or biochemical barriers for assays
involving amplification of templates.
D.4.2 Laboratories performing HLA typing must have written criteria or protocols for:
D.4.2.1 Preparation of cells or cellular component isolations (for example, soluble antigens and
nucleic acids), as applicable to the HLA typing technique(s) performed.
D.4.2.2 Selecting typing reagents, whether prepared in-house or commercially.
D.4.2.3 Ensuring that reagents used for typing are adequate to define HLA specificities or alleles
that are appropriate to the clinical application.
D.4.2.4 The assignment of HLA antigens and alleles.
D.4.2.5 Determining when antigen or allele redefinition and retyping are required.
D.4.2.6 Documentation of antigens and/or alleles that are defined by each test system used in the
laboratory.
D.4.6.11 Laboratories performing nucleic acid testing must:
D.4.6.11.1 When applicable, interpret data using the IMGT/HLA nucleotide sequence database or
equivalent. The database that is used must be updated at least every six months.
D.4.6.11.2. Ensure that the laboratory has criteria for accepting each lot and shipment of primers or
probes.
53
Sequence-Based Typing
D.4.6.11.3 Have acceptable limits of signal intensity for positive and negative results. If these are
not achieved, acceptance of the results must be justified and documented.
D.4.6.11.4 Have an independent review of the data and its interpretation.
D.4.6.11.5 Include in each electrophoretic process, controls that verify that the specific targets can
be detected.
D.4.6.11.6 If the size of a nucleic acid is a critical factor in the analysis of the data:
D.4.6.11.6.1 In each gel, include size markers that produce discrete electrophoretic bands spanning
and flanking the entire range of expected fragment sizes.
D.4.6.11.6.2 The amount of DNA loaded in each lane must be within a range that ensures
equivalent migration of DNA in all samples, including size markers.
D.4.6.11.7 Ensure that each lot and shipment of primers or probes is monitored to confirm stability
and performance of the primers or probes.
D.4.6.11.8 Ensure that oligonucleotide probes and primers are stored under conditions that maintain
specificity and sensitivity.
D.4.6.11.9 Define the specificity and critical polymorphic sequence of each primer and probe.
D.4.6.11.10 Document and validate the methods used to purify nucleic acids. If tests are performed
without prior purification of nucleic acids, the method must be documented and validated in the
laboratory.
D.4.6.11.11 Ensure and document acceptable electrophoretic conditions used for each gel
electrophoresis.
D.4.6.11.12. Ensure that the DNA isolation method used provides sufficient quantity and quality of
DNA for testing, including specimens containing a low number of cells.
D.4.6.11.13 Laboratories performing amplification-based methods must:
D.4.6.11.13.1 Ensure that pre-amplification procedures are performed in an area that excludes
amplified DNA, which has the potential to serve as a template for amplification for any of the gene
targets that are amplified in the laboratory.
D.4.6.11.13.2 Ensure that equipment used for post-amplification products, with the potential to
cause contamination is not used for pre-amplification procedures.
D.4.6.11.13.3 Ensure that each work area (i.e., pre-amplification, secondary amplification, and
post-amplification) has dedicated equipment. Positive displacement pipettes or filter-barrier tips are
recommended for pre-amplification and secondary amplification work areas.
D.4.6.11.13.4 Ensure that thermal cycling instruments achieve the appropriate target temperatures
during cycling.
D.4.6.11.13.5 Ensure that all batches of aliquoted reagents (solutions containing one or multiple
components) utilized in the amplification assay are demonstrated to be free of contamination.
54
Sequence-Based Typing
D.4.6.11.13.6 Ensure that reagents used for primary amplification are not exposed to postamplification work areas.
D.4.6.11.13.7 Ensure that reagents used for secondary amplification are stored in a contamination
free area
D.4.6.11.13.8 Verify that the conditions for primer extension (e.g. polymerase type, polymerase
concentration, primer concentration, concentration of nucleotide triphosphates) are appropriate for
the template (e.g. length of sequence, GC content).
D.4.6.11.13.9 Ensure that for each set of primers, conditions that influence the specificity or
quantity of amplified product have been demonstrated to be satisfactory for the range of samples
routinely tested.
D.4.6.11.13.10 Ensure that template quantity and quality are sufficient to provide interpretable data
for a locus (or loci) or allele(s).
D.4.6.11.13.11 Ensure that the amount of amplification template in each amplification reaction is in
an acceptable range.
D.4.6.11.13.12 Define and document the specificity and sequence of primer targets. The genetic
designation (e.g. locus) of the target amplified by each set of primers must be defined and
documented. For each locus analyzed, the laboratory must have documentation that includes the
chromosome location, the approximate number of alleles, and the distinguishing characteristics
(e.g. sizes, sequences) of the alleles that are amplified.
D.4.6.11.16 Laboratories performing sequencing methods must:
D.4.6.11.16.1 Ensure that the method for preparing sequencing templates reliably generates
appropriate length sequencing templates that are free of inhibitors of subsequent reactions (e.g.
residual primer extension) and free of contaminants that cause sequencing artifacts.
D.4.6.11.16.2 Ensure the use of a scientifically and technically sound method for interpretation,
acceptance, and/or rejection of sequences, especially in regions that are technically difficult (e.g.
compression, ends).
D.4.6.11.16.3 Determine the sequences of both sense and anti-sense strands, if a sequence suggests
a novel allele or a rare combination of alleles.
D.4.6.16 HLA typing
D.4.6.16.1 Laboratories performing HLA typing must:
D.4.6.16.1.1 Conform to all pertinent Standards for the methods used.
D.4.6.16.1.2 Ensure that the level of resolution of HLA typing is appropriate for the clinical
application and based on established criteria.
D.4.6.16.1.3 Define the criteria used for the assignment of HLA types.
D.4.6.16.1.4 Use HLA antigen terminology that conforms to the latest report of the World Health
Organization (W.H.O.) Nomenclature Committee for factors of the HLA System. Potential new
55
Sequence-Based Typing
antigens not yet approved by this committee must have a designation that cannot be confused with
W.H.O. terminology.
D.4.6.16.3 Laboratories performing HLA typing by nucleic acid analysis must:
D.4.6.16.3.1 Recognize and document ambiguous combination(s) of alleles for each
template/primer or template/probe combination.
D.4.6.16.3.2 Define the specificity and sequence of each primer and/or probe for each HLA type.
D.4.6.16.3.3 Define and document the genetic designation (e.g., locus) of the target amplified by
each set of primers or hybridized with probes.
D.4.6.16.3.4 Define the HLA locus and allele designation(s) for each template, primer and or probe
combination.
D.4.7.7 Nucleic acid testing
D.4.7.7.2 Laboratories performing sequencing must:
D.4.7.7.2.1 Ensure that the methods employed for preparation of sequencing templates do not alter
the accuracy of the final sequence (e.g. mutations created during cloning, preferential
amplification).
D.4.7.7.2.2 Ensure that the conditions for primer extension in cycle sequencing reactions (e.g.
polymerase type, polymerase concentration, primer concentration, concentration of nucleotide
triphosphates, concentration of terminators) are appropriate for the template (e.g. length of
sequence, GC content).
D.4.7.7.2.3.Establish criteria for acceptance and interpretation of primary data (e.g. correct
assignments for non-polymorphic positions, definition of sequencing region, criteria for peak
intensity, baseline fluctuation, signal-to-noise ratio and peak shapes). Document established
sequence-specific artifacts and utilize the information in routine interpretation of data.
D.4.7.7.2.4 For heterozygous templates, if only one strand is sequenced, ensure that sequencing of
only one strand consistently yields accurate sequence assignments. Sequencing of sense and antisense strands is strongly recommended. If assignments are routinely based upon data from one
strand of DNA, periodic confirmation of complementary strands is recommended.
D.4.9 Calibration and calibration verification procedures
D.4.9.2 For thermal cycling instruments, the appropriate target temperatures must be achieved.
Accuracy of these temperatures must be verified and documented at least every six months.
D.4.10.4 Laboratories performing nucleic acid testing must:
D.4.10.4.1 Use a method to prepare DNA that provides sufficient quality (e.g., purity,
concentration) and quantity to ensure reliable test results. Written guidelines will specify the
minimal acceptable sample in terms of volume or numbers of nucleated cells.
D.4.10.4.2 Handle and store specimens under conditions that maintain sufficient integrity of nucleic
acids to ensure reliable test results.
56
Sequence-Based Typing
D.4.10.4.3 If nucleic acids are not used immediately after purification, ensure that samples are
stored under conditions that preserve the integrity of the nucleic acids that will be tested.
D.4.10.4.4 Ensure that samples containing nucleic acids that will be amplified (e.g., blood, DNA
isolates) are stored under conditions that do not result in artifacts, inhibition of the amplification
reaction, or exposure to sources of carry-over contamination.
D.4.10.4.5 Ensure that samples containing nucleic acids that will be used in a primary amplification
are not exposed to post-amplification work areas.
D.4.10.4.6 Have sequencing templates with sufficient purity, specificity (e.g. locus or allelespecificity), quantity and quality to provide interpretable primary sequencing data.
D.4.11 Control procedures
D.4.11.4.4 For each electrophoretic procedure include, concurrent with patient specimens, at least
one control material containing the substances being identified or measured (e.g. molecular weight
markers).
D.4.11.10 Laboratories performing nucleic acid testing must:
D.4.11.10.1 Routinely monitor for contamination of the most common amplification products that
are produced in the laboratory.
D.4.11.10.2 Routinely monitor pre-amplification work areas with wipe tests.
D.4.11.10.3 Monitor potential contamination using a method that is at least as sensitive as routine
test methods and that uses the routine testing primers. At least one negative (no nucleic acid) and
one positive control must be included in each amplification assay.
D.4.11.10.4 If amplified product is detected, clean the area to eliminate the contamination and
document re-testing as well as the measures taken to prevent future contamination.
D.4.11.10.5 To minimize the detection of minor contaminants and the occurrence of stochastic
fluctuation during thermal cycling, set the number of cycles at a level sufficient to detect the target
nucleic acid but insufficient to detect small amounts of contaminating template.
D.4.11.10.6 Monitor the quantity of specific amplification products (e.g., gel electrophoresis,
hybridization).
D.4.11.10.7 Adhere to the established criteria for accepting or rejecting an amplification assay or
document the justification for acceptance of an assay when acceptance criteria are not met.
D.4.11.10.8 If presence of an amplified product is used as the end result, include controls to detect
amplification failure in every amplification mixture.
D.4.11.10.9 Utilize oligonucleotide probes under empirically determined conditions that achieve
the defined specificity.
D.4.11.10.10 Perform quality control testing to confirm specificity for each lot and shipment of
primers and probes.
D.4.11.10.11 Use reference material for quality control of new lots.
57
Sequence-Based Typing
D.4.11.10.12 Use reference material for each shipment when it contains a labile reagent.
D.4.11.10.13 For each new lot or shipment of commercial kits, perform parallel tests with reference
DNA specimens or spiking (positive panel) to assess that all components of the typing kits are
working properly.
D.4.11.10.14 Have available a sufficient number of DNA samples of known class I or class II
alleles, and representative of the ethnic population served by the laboratory.
D.4.11.10.14.1 For each new lot of kits, perform parallel testing using the number of reference
samples determined by the Director, or designee, for the size of the kit and frequency of use.
D.4.11.10.14.1.1 When possible, include testing of alleles known to have demonstrated weak/false
negative amplification with previous lots of the same kit.
D.4.11.10.14.1.2 When possible, include testing of new primer/probe sets that have changed from
the previous lot.
D.4.11.10.14.2 Test each new shipment of kits to demonstrate that the integrity of the kits has not
been compromised during shipment. This can be accomplished by:
D.4.11.10.14.2.1 Testing with reference DNA samples and assessing the results or
D.4.11.10.14.2.2 Testing with non-critical clinical samples and assessing the quality of the
reactions and the ability to give a clear interpretation of the results or
D.4.11.10.14.2.3 Testing the new lot or shipment in parallel with the old lot.
D.4.11.11 Laboratories performing nucleotide sequencing must:
D.4.11.11.1 Establish a scientifically and technically sound method for interpretation, acceptance,
and/or rejection of sequences, especially regions that are technically difficult (e.g. compression,
ends).
D.4.11.11.2 Ensure that sequences contributed by amplification primers are not considered in the
assignment of alleles.
58