1
Kaviza VDI-in-a-box™
Administration Guide Version 3.0
kaviza Inc. (www.kaviza.com)
Table of Contents
1
Welcome ........................................................................................................ 4
1.1 How to use this guide .................................................................................. 4
2
Kaviza VDI-in-a-box Overview ....................................................................... 5
2.1 Kaviza VDI-in-a-box Architecture ................................................................ 5
2.1.1 Templates, images and desktops...................................................... 6
2.1.2 Kaviza grid ........................................................................................ 7
2.2 Kaviza VDI-in-a-box Deployment ................................................................ 8
3
Getting Started............................................................................................... 9
3.1 Overview of images, templates and desktops ............................................. 9
3.2 Creating the first template ......................................................................... 11
3.2.1 Task 1: Creating a Windows XP or Windows 7 VM ......................... 12
3.2.2 Task 2: Installing & verifying pre-requisites ..................................... 12
3.2.3 Task 3: Importing the VM into Kaviza .............................................. 17
3.2.4 Task 4: Installing the Kaviza Desktop Agent (kDA) ......................... 19
3.2.5 Task 5: Preparing, testing and saving the desktop image ............... 23
3.2.6 Task 6: Creating the first template from the desktop image ............ 25
3.2.7 Task 7: Provisioning desktops......................................................... 27
3.3 Assigning templates to users and groups ................................................. 27
3.4 Testing the connection as an end user ..................................................... 28
3.4.1 Configuring the end-point device for Kaviza Java Client ................. 29
3.4.2 Configuring the end-point device for HDX connections ................... 29
3.4.3 Connecting to the virtual desktop from the Kaviza Java Client........ 30
3.4.4 Connecting to the virtual desktop from the browser ........................ 32
4
Common Image Management Operations ................................................... 34
4.1 Overview and Benefits .............................................................................. 34
4.2 Creating new image versions .................................................................... 35
4.3 Patching an existing image ....................................................................... 36
5
Understanding Template Refresh Policies................................................... 38
5.1 Refresh Policy Definitions ......................................................................... 38
5.2 Usage Scenarios and Best Practices ........................................................ 39
6
Taking a Kaviza server in a grid offline ........................................................ 41
6.1 Plan for the server going down ................................................................. 41
6.2 Deactivate the server ................................................................................ 41
7
Appendix ...................................................................................................... 43
7.1 URLs for Kaviza Administrators and End Users ........................................ 43
7.2 Logging into the kMGR virtual appliance (Using PuTTY) .......................... 44
7.3 Shutting down and starting kMGR............................................................. 45
7.3.1 Shutting down the kMGR service on a kMGR virtual appliance ...... 45
7.3.2 Starting the kMGR service on a kMGR virtual appliance................. 45
7.4 Passwords for the kMGR virtual appliance and the console ..................... 46
7.5 Uninstalling VMware SVGA 3D driver ....................................................... 46
7.6 Installing the recommended Microsoft hot fix patch on Windows 7 VM..... 49
7.7 Known Windows 7 sysprep behavior ........................................................ 50
2
Copyright
Copyright © 2010 Kaviza, Inc. All rights reserved. This material is protected by the copyright laws
of the United States and other countries. It may not be reproduced, distributed, or altered in any
fashion by any entity (either internal or external to Kaviza), except in accordance with applicable
agreements or contracts of licensing, without the express written consent of Kaviza, Inc.
Notice
Every effort has been made to ensure that this document is complete and accurate at the time of
release, but information is subject to change. The specifications and other information in this
document regarding the product(s) described in this document are subject to change without
notice. All statements, information and recommendations contained in this document are believed
to be accurate but are presented without warranty of any kind, express or implied. Users must
take full responsibility for their application of any product. While Kaviza has made every effort to
ensure the accuracy and completeness of this document, Kaviza assumes no responsibility for
the consequences to users of any errors that may be contained herein. Kaviza reserves the right
to revise this document and to make changes in its content without notice.
3
1 Welcome
This guide is intended for those who will use Kaviza VDI-in-a-box™ to create and
manage virtual desktops and the users who will access them. At a minimum, the
reader should have familiarity with administering Windows desktops.
For instructions on how to install and configure Kaviza VDI-in-a-box™ and for
system requirements please refer to the Kaviza VDI-in-a-box™ Installation Guide
and the Systems requirements guide. Both guides are available to customers
and registered partners from Kaviza’s website at http://www.kaviza.com.
1.1 How to use this guide
This guide is broken into the following key sections:
1. Overview section: This section provides an overview of Kaviza VDI-in-abox and its architecture.
2. Getting started section: Step-by-step instructions on how to configure a
Kaviza server (a physical server managed by Kaviza Manager), create
your first template, assign users, and have them access their desktops.
3. Appendix. Useful management tools and procedures are presented in this
section.
4
2 Kaviza VDI-in-a-box Overview
The Kaviza VDI-in-a-box is a server-based virtual desktop solution where:
Desktops run on virtual machines inside Kaviza VDI-in-a-box managed
servers.
The administrator uses a browser-based console to design and configure
desktop templates ("master images") and specify users who will have access
to them. As users login desktops are created from their associated templates.
Users access their desktops through a browser. The will require an endpoint
device (e.g. thin clients and refurbished PCs) that can run a browser and the
RDP client.
By creating the desktops from templates, the IT organization can standardize the
desktops and reduce management overhead because only the templates need to
be updated, patched and controlled. Kaviza VDI-in-a-box automatically updates
all the user desktops to reflect the changes made to their associated templates.
Since users are provided with a pristine desktop each time they login, it
substantially limits the impact of viruses, reduces the need for desk-side support
and virtually eliminates the need to diagnose issues caused by diverging
desktops.
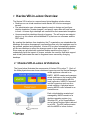
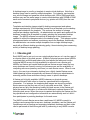
2.1 Kaviza VDI-in-a-box Architecture
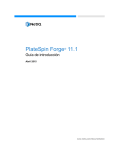
The figure below illustrates the components of Kaviza VDI-in-a-box™. Each of
the three physical servers shown contains a hypervisor and the Kaviza Manager
virtual appliance referred to as
kMGR. kMGR creates and manages
virtual desktops on the local physical
server by communicating with the
local hypervisor. kMGR is “imported”
into the hypervisor and runs as a
virtual machine. A physical server
running kMGR is also referred to as
Kaviza server.
Each virtual desktop created and
managed by kMGR consists of a
desktop operating system (e.g.
Windows XP), a set of applications
and a Kaviza Desktop Agent referred
to as kDA. The kDA communicates
with the kMGR to inform it when
5
users login and logout and of its health.
2.1.1 Templates, images and desktops
The virtual desktops are created from templates. A template consists of a
desktop image (e.g. an operating system, the applications and kDA) from which
virtual desktops are provisioned and metadata that specifies virtual desktop
provisioning policy such as the size (e.g. CPU and RAM) of the virtual desktops,
maximum number of virtual desktops that can be provisioned from it, the number
of virtual desktops that should be pre-started, and refresh policy.
A desktop image is created from a virtual machine that is imported and converted
to a working image. A working image is different from a virtual desktop in that it is
used to either create or update a desktop image (and is only accessed by an
administrator) whereas a virtual desktop is used to provision a user session.
Desktop
Virtual
Machine
Working
Image
Modify, patch,
& test
Automated
sysprep
Desktop
Image
Template
Working
Image
Automated
sysprep
New
Desktop
Image
Desktop
Desktop
Virtual
Desktop
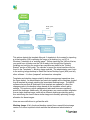
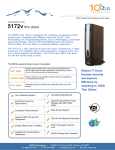
This picture depicts the template lifecycle. A template is first created by importing
a virtual machine (VM) containing the image of a desktop (e.g. an XP or
Windows 7 desktop) as a “working image”. The controls to import the virtual
machine can be found in the Working Desktop sub-tab. The administrator must
then login to the working image to install the Kaviza Desktop Agent (kDA) and
any other software. It is then “sysprepped” and saved as a desktop image.
6
A desktop image is used by a template to create virtual desktops. Note that a
desktop image can be used by multiple templates. For instance, one template
may use the image and generate virtual desktops with 1GB of RAM each while
another may use the same image to create virtual desktops with 500MB of RAM
each and no access to peripheral devices (e.g. printer and USB) from the user
endpoints.
Templates and desktop images simplify desktop management and reduce
storage requirements. All the desktops created from a template use the desktop
image associated with the template. This reduces the amount of storage
required per desktop significantly. An administrator can patch and update all the
desktops created from a template by simply patching the associated desktop
image. The kMGR software ensures that all desktops of that template are
updated to reflect the changes made to the desktop image. This reduces routine
management tasks and ensures consistency across the desktops. Additionally,
the administrator can create multiple templates from a single desktop image,
each with a different desktop provisioning policy, thus minimizing time-consuming
activity of desktop image patching.
2.1.2 Kaviza grid
Each kMGR can be set up to run as a single physical server or it can be a part of
a cohesive fabric of physical servers. A fabric of physical servers where kMGRs
coordinate their activities and balance the load across the fabric and use the
individual kMGR servers for high availability is referred to as a Kaviza grid.
kMGRs in a Kaviza grid create desktops across Kaviza servers based on how
many desktops are currently running on Kaviza servers and the availability of
computing resources (memory and cores) on each Kaviza server. When a user
logs in, the user is provisioned a desktop from a lightly loaded Kaviza server.
Load balancing is done automatically and does not require an administrator to
manually perform these activities or assign users to specific desktops.
A Kaviza grid is highly available. kMGR instances on physical servers
communicate with each other to share key operational and configuration
information. For instance, the templates and images are stored on multiple
Kaviza servers so that they are not lost if a physical server fails. When a
physical server fails, the remaining healthy physical servers in the Kaviza grid
have the needed information to create extra desktops to replace those on the
failed physical server. When the server is repaired and rejoins the Kaviza grid the
key operational and configuration information are automatically sent to it and it
then participates in providing desktops for the end users.
The kMGR on each Kaviza server has a web-based UI (kMGR console) to
configure and manage Kaviza servers, desktops, templates, and the Kaviza grid.
Operations such as creating and managing templates, desktops and their users
can be performed at the Kaviza grid level by connecting to any kMGR console.
7
The kMGR console also provides a way to view the status and the activity on
each Kaviza server individually.
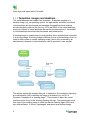
2.2 Kaviza VDI-in-a-box Deployment
The figure below illustrates a typical deployment of Kaviza VDI-in-a-box. The
three Kaviza servers form a Kaviza grid. kMGR running on each Kaviza server
communicates with kMGRs on other Kaviza servers in the Kaviza grid. Each
Kaviza server must have sufficient local storage to keep templates and
configuration information required to create a highly available system.
Since the typical usage is to create desktops dynamically from a template and
destroy them based on a refresh policy, user data must be kept outside the
desktop. A simple network file system is sufficient for this.
Active Directory service is required to provide authorization and authentication of
the users. Active Directory can also be used to provide “roaming profiles”
whereby user application configurations and their “My Documents” folders are
kept centrally and outside the desktop. With this approach a user can get a
personalized desktop each time they log in. The use of roaming profiles is
optional but it provides personalization that makes the user experience for virtual
desktops nearly identical to that for a physical desktop.
8
3 Getting Started
We are assuming that you have set up a Kaviza grid with one server and you are
ready to create a template and provision desktops. If you have not setup a
Kaviza grid yet, please refer to the Kaviza VDI-in-a-box™ Installation Guide V3.0
for step-by-step instructions on how to create a Kaviza grid before getting started
on this section.
This section specifies how to create Windows 7 and Windows XP desktops and
assign them to users via templates.
3.1 Overview of images, templates and desktops
In order to provision Windows 7 or Windows XP desktops, you must first create a
base desktop image. A base desktop image will contain the underlying OS and
the set of applications that need to be rolled out to the end users. The first
desktop image can be created by bringing a Windows XP or Windows 7 VM into
Kaviza and going through a ‘working image’ operation. Once you have created a
desktop image, you can then create a template that associated policies to the
desktop image. Through templates you can control the settings of the virtual
desktops such as the memory, refresh policies, maximum number of virtual
desktops that can be provisioned from it, the number of virtual desktops that
should be pre-started, and administer controls to lock down end point local
device re-direction.
Desktop
9
Virtual
Machine
Working
Image
Modify, patch,
& test
Automated
sysprep
Desktop
Image
Template
Working
Image
Automated
sysprep
New
Desktop
Image
Desktop
Desktop
Virtual
Desktop
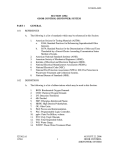
This picture depicts the template lifecycle. A template is first created by importing
a virtual machine (VM) containing the image of a desktop (e.g. an XP or
Windows 7 desktop) as a “working image”. Before importing the VM into Kaviza,
you would have to make sure the VM is ready to be brought into Kaviza by
installing and verifying the required pre-requisites as stated in the “Getting
Started” section of this guide. The controls to import the virtual machine can be
found in the Templates -> Working Image sub-tab. The administrator must login
to the working image desktop to install the Kaviza Desktop Agent (kDA) and any
other software. It is then “prepared” and saved as a template.
Templates and desktop images simplify desktop management operations (see
the figure below). An administrator can patch and update all the desktops created
from a template by simply patching the associated desktop image. The kMGR
software ensures that all desktops of that template are updated to reflect the
changes made to the desktop image based on the templates refresh policy
settings. This reduces routine management tasks and ensures consistency
across the desktops. Additionally, the administrator can create multiple templates
from a single desktop image, each with a different desktop provisioning policy,
thus minimizing the need to have similar image sets thereby optimizing storage
allocation for these images.
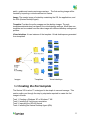
Here are some definitions to get familiar with:
Working Image: A fully functional desktop started from a saved Kaviza image
version or from an imported virtual machine that allows and administrator to
10
patch, update and create new image versions. The first working image will be
created by importing a virtual machine into Kaviza.
Image: The master image of a desktop containing the OS, the applications, and
the kDA (Kaviza Desktop Agent).
Template: Provides the policy wrapper on the desktop images. Through
templates administrators can specify the virtual desktop settings. More than one
template can be created from the same image with different desktop settings and
policies.
Virtual desktop: It is an instance of the template. Virtual desktops are generated
from templates.
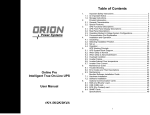
Images
Templates
Virtual desktops
3.2 Creating the first template
The Kaviza VDI-in-a-box™ is designed to be simple to use and manage. This
section walks you through the step by step tasks required to create the first
image in Kaviza.
Task 1: Creating a Windows XP or Windows 7 VM
Task 2: Installing & Verifying pre-requisites
Task 3: Importing the VM into Kaviza
Task 4: Installing the Kaviza Desktop Agent (kDA)
11
Task 5: Preparing, Testing and Saving the Virtual Desktop Image
Task 6: Creating a template
Task 7: Provisioning desktops
CAUTION:
Ensure that you perform the procedures in the correct order.
This is a set of sequential tasks labeled Task 1 through Task 7. You
must perform these tasks in the order in which they are arranged and,
within each task, you must perform the procedures in the order in
which they occur.
3.2.1 Task 1: Creating a Windows XP or Windows 7 VM
This task is carried out from outside the Kaviza product using the management
console of the hypervisor you are working with – namely the VMware
Infrastructure Client (VIC) or the vSphere Client for ESX and XenCenter for Citrix
XenServer.
You can create a VM either from an .ISO image or by doing a P2V conversion
using the tools of your choice. Please refer to the related vendor documentation
(VMware or Citrix) for creating a new VM from an ISO image.
3.2.2 Task 2: Installing & verifying pre-requisites
This task is carried out before importing the VM into Kaviza.
3.2.2.1 Verify the Windows VM (XP and Windows 7) selection
criteria
Ensure that your VM meets the following selection criteria:
On XenServer:
CAUTION:
The VM you are trying to import must meet all of the following criteria.
1. The VM is 'Started' and is in a 'Powered On' state.
2. It is a Microsoft Windows XP Professional (32-bit) or a Microsoft
Windows 7 (32-bit) Professional, Enterprise, or Ultimate VM. Verify
this information under the Edit Settings -> Options tab.
3. It is stored on the datastore kMGR is configured with.
4. The VM name contains only letters, numbers, spaces ( ), periods (.),
12
hyphens (-), and underscores (_).
5. The VM has only one disk image.
6. The VM is not snapshotted.
On ESX Server:
CAUTION:
The VM you are trying to import must meet all of the following criteria.
1. The VM is 'Started' and is in a 'Powered On' state.
2. The VM should be saved in the top level directory
3. For VMware, the VM Name, VM Configuration File, and the VM
Working Location all match. Verify this information under the
Edit Settings -> Options tab
4. It is a Microsoft Windows XP Professional (32-bit) or a Microsoft
Windows 7 (32-bit) Professional, Enterprise, or Ultimate VM. Verify
this information under the Edit Settings -> Options tab.
5. It is stored on the datastore kMGR is configured with.
6. The VM name contains only letters, numbers, spaces ( ), periods (.),
hyphens (-), and underscores (_).
7. The VM has only one disk image.
8. The VM is not snapshotted.
3.2.2.2 Windows XP (32-bit) Pre-import steps
These steps are completed outside the kMGR using your hypervisor tools and
before this VM are imported into kMGR.
1. Activate the VM using a proper Microsoft Volume License Key
2. Install VMware tools or XenCenter tools depending on the hypervisor
being used
Note:
Please ensure that you perform a typical installation of the VMware
tools or XenCenter tools installation. Do not uncheck or disable any
drivers during the installation process.
3. Log into the desktop as a local administrator and enable remote
connections for your end users
a. On the desktop, navigate to My Computers > properties.
b. Navigate to the remote tab and check the “allow users to connect
remotely” option.
13
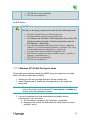
4. Enable Windows firewall settings to allow remote desktop connections to
this computer.
5. Make sure your group policies allow remote connections and opens up
ports 3389.
6. Install the required applications.
7. Disable automatic update checks, anti-virus checks etc. that would cause
reboot of desktops.
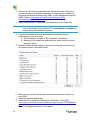
8. Enable remote connections for the end users. If desktops are going to be
in a domain, make sure you have allowed remote connections to domain
users. If desktops are going to be in ‘workgroup’ mode, make sure you
have allowed remote connections to workgroup users. Sample screenshot below:
14
9. Open an RDP connection (mstc.exe) and access the desktop as an end
user (domain or workgroup) to verify access to these desktops remotely.
Additional Steps for HDX connections:
10. Make sure your group policies allow remote connections and opens up
ports 1494 & 2598
11. Install Microsoft .NET Framework 3.5
12. Uninstall ‘VMware SVGA 3D (Microsoft Corporation – WDDM)” display
driver.
Refer to the Appendix section 7.5 for details.
3.2.2.3 Windows 7 (32-bit) Pre-import steps
These steps are completed outside the kMGR using your hypervisor tools and
before this VM are imported into kMGR.
1. Enable “local administrator” account on the Windows 7 VM. This account
is ‘disabled’ by default.
a. Launch the cmd prompt in elevated mode- Make sure you select,
'Run as administrator' when launching this command
b. On the command window, run the following commands
- net user administrator <youradminpassword>
- net user administrator /active:yes
15
2. Activate the VM using a proper Microsoft Volume Activation (VA) key to
ensure activation of provisioned desktops. The two options available for
activation are Multiple Activation Key (MAK) or Key Management Service
(KMS). Refer to http://www.microsoft.com/licensing/existingcustomers/product-activation.aspx for more details.
3. Install VMware tools or XenCenter tools depending on the hypervisor
Note:
Please ensure that you perform a typical installation of the VMware
tools or XenCenter tools installation. Do not uncheck or disable any
drivers during the installation process.
4. Log into the desktop as a local administrator and enable remote
connections for your end users
a. On the desktop, navigate to My Computers > properties.
b. Navigate to the remote tab and check the “allow users to connect
remotely” option.
5. Enable Windows firewall setting to allow remote desktop connections for
all networks (Home, Work and Public).
6. Make sure your group policies allow remote connections and opens up
ports 3389.
7. Install the required applications.
8. Install the hot fix patch from Microsoft for Windows 7 32-bit (x86):
http://support.microsoft.com/hotfix/KBHotfix.aspx?kbnum=976494&kbln=e
n-us
Refer to the Appendix section 7.6 for details.
16
9. Enable remote connections for the end users. If desktops are going to be
in a domain, make sure you have allowed remote connections to domain
users. If desktops are going to be in ‘workgroup’ mode, make sure you
have allowed remote connections to workgroup users. Sample screenshot
shown below.
10. Open an RDP connection (mstc.exe) and access the desktop as an end
user (domain or workgroup) to verify access to these desktops remotely.
Additional Steps for HDX connections:
13. Make sure your group policies allow remote connections and opens up
ports 1494 & 2598
14. Install Microsoft .NET Framework 3.5
15. Uninstall ‘VMware SVGA 3D (Microsoft Corporation – WDDM)” display
driver.
Refer to the Appendix section 7.5 for details.
Note:
Please refer to the Appendix section 7.7 for “Known Windows 7
sysprep behavior”.
3.2.3 Task 3: Importing the VM into Kaviza
The pre-requisite for this task is that you have completed the prior section and
have properly prepared the VM and once completed you have logged into it as a
17
domain or workgroup user to ensure that it has the proper license to generate a
desktop that is then accessible to a user.
Please follow the steps below to import the VM:
1. Log into the Kaviza management console as an administrator
a. Open a browser window and type in the following URL:
http://[ kMGR address]/admin
b. Enter:
User name: kavizaadmin
Password: kaviza
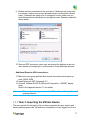
2. Import the VM as a working image and start it up.
a. Navigate to the “Template” tab. This is where you create and
manage templates, images and working images.
b. Click on the ‘Working Images’ sub-tab.
c. Click on “Import an existing virtual machine as a working image”.
d. In the popup select the Windows VM you prepared in the prior step
and hit continue.
The imported desktop (aka working image) will be powered up by
kMGR. This operation may take a few minutes to complete. The
status of the working image will change from:
PRESTARTUP > CREATING > STARTUP > STARTINGIP >
STARTINGCONN > RUNNING
Note:
If you do not see the VM in the drop down list it may not
adhere to the restrictions listed in the section for
creating a Windows XP or Windows 7 VM. Please click
on the help icon in the popup for the full list of
requirements.
Note:
If it is taking a long time, go to your hypervisor console
(VIC or XenCenter), highlight the VM and use the console
to see what the issue is. It could be that it needs a
Microsoft license to activate it if this was not done
correctly in the earlier step. If so, please enter a valid
volume license.
If the status of the working image is getting stuck at
STARTINGCONN, you may not have enabled the remote
desktop connections to go through the Windows firewall.
18
3.2.4 Task 4: Installing the Kaviza Desktop Agent (kDA)
Follow the steps below to install the Kaviza Desktop Agent. This is the agent that
will reside on each desktop created from the template. kMGR will manage
communications to the desktops via this agent. The Kaviza desktop agent needs
to be installed as a local administrator and NOT as a domain administrator.
Note:
The free version comes with the Kaviza Accelerator license with Citrix
HDX pre-installed on the appliance. So when you are installing he kDA
on the working image, the components to support HDX will be
automatically installed on the images.
1. Log in to the working image as a local administrator of the computer
(NOT Domain Administrator)
a. Once the status of the working image changes to “RUNNING”,
press the green ‘connect’ >> button.
b. Login to the working image as a local administrator.
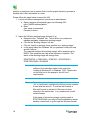
2. Install the Kaviza Desktop Agent (kDA) as follows:
a. Start a browser in the working image and navigate to
http://[ kMGR address]/dt/dtagent.exe
You will see a file download window with options shown below:
b. Click on the “Run” button. A Security warning dialog will be shown:
19
c. Click on the “Run” button to start the installation. You will see the
welcome screen shown below:
20
d. Click on the “Next” button. You will be taken to the “Ready to
Install” screen shown below:
e. Click on “Install” button to begin the installation. A command shell
window will popup to inform that the working image will be rebooted
once installation completes:
21
f. Press a key on your keyboard to proceed. You will see “Completing
the Setup” screen shown below:
g. Click on “Finish” button. The working image will be rebooted. The
Kaviza Desktop Agent is now installed!
Note: It may take a few minutes for the working image entry to
be rebooted. The status will change from RUNNING to
SHUTDOWN first and will then will continue to the
RUNNING state.
h. Once the status changes to RUNNING you can proceed with the
next step.
22
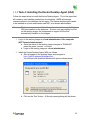
3.2.5 Task 5: Preparing, testing and saving the desktop
image
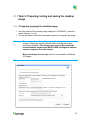
3.2.5.1 Preparing (sysprep) the desktop image
1. Once the status of the working image changes to “RUNNING”, press the
green ‘Prepare’ >> icon.
2. You will be asked to enter the information required to ‘sysprep’ the image.
Note:
The example shown here is for preparing the image to be in a
domain. Please pay special attention when entering the domain
controller credentials. The domain account specified should be
an administrator account and MUST HAVE privileges to add and
remove computers from the domain.
Microsoft Volume License key needs to be provided for Windows
XP images.
23
3. Once you have entered the information, click on ‘Continue’
4. The status of the working image will change to ‘PREPARING’
5. Once the sysprep process successfully completes, the status of the
desktop will change to ‘PREPARED’.
3.2.5.2 Testing the prepared desktop image
CAUTION:
If you are preparing the image for the first time, do NOT skip this step.
This is to make sure that the image has gone through the sysprep
process properly. What you are doing now is simulating the desktop
provisioning process from the working image and testing the desktop
as an end user. This will allow you to catch any configuration issues
with the image before generating desktops from it. If you skip this step
you may end up provisioning desktops that will end up in a BROKEN
state.
1. Restart the working image by clicking the green upper arrow under
‘Restart’.
2. Wait for the status to change to ‘RUNNING’.
3. Connect to the working image as an end user (domain or workgroup) and
see if you can connect properly
Best
Practice:
Test the HDX or ICA connection option if available in addition to
RDP.
4. Logout of the working image as a domain user and then proceed with the
next step.
3.2.5.3 Re-Sysprepping and saving the working image as a
desktop image.
Please ensure that you repeat the sysprep cycle one more time before saving
the image. Please note that all the parameters entered during the earlier
prepare cycle has been preserved. So follow these simple steps to complete
the sysprep cycle and to save the working image.
1. Once the status of the working image changes to “RUNNING”, press the
green ‘Prepare’ >> icon.
24
2. All the entries from the previous cycle including the password have
been preserved.
3. If you need to alter any of the entries, uncheck the “Use information from
the previous image” box to make the changes.
4. Once you have entered the information, click on ‘Continue’.
5. Wait for the status to change to PREPARING and then to ‘PREPARED’.
6. Click the green >> icon under ‘SAVE’ to save the working image.
7. The status of the working image will be changed to ‘SAVING’. This is a
lengthy and non-reversible operation that takes several minutes.
8. After the desktop image is saved, it will be listed under the ‘Images’ subtab.
Now you are ready to create your first template to provision desktops.
Best
Practice:
As the preceding steps are a rather involved process, it is
recommended that you keep this first desktop image as a base
image from which other images are generated. The new images
generated from the base image will have the Kaviza desktop
agent pre-installed and hence will not require repetition of these
tasks.
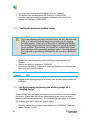
3.2.6 Task 6: Creating the first template from the desktop
image
A template enables an administrator to specify the desktop provisioning policy for
a desktop image. Kaviza VDI-in-a-box allows you to specify as many desktop
provisioning policies as you would like for a desktop image by associating a
desktop image with multiple templates.
1. Navigate to the ‘Templates’ sub-tab.
2. Click on the ‘New’ button.
3. You will see a dialog as shown below.
25
4. Enter the required template details.
Best
Practice:
Allocated a minimum of 512MB of memory to Windows XP
desktops and 1536 MB (1.5GB) of memory to Windows 7
desktops.
Set Maximum desktops to 2 and Pre-started desktops to 1 to
go through an initial round of testing quickly.
Set the policy to ‘Upon Admin request’ for the 1st round of
testing.
5. Click on the ‘Save’ button and wait for the desktops to be provisioned.
6. Refer to Section 5 to understand the template properties in detail.
26
3.2.7 Task 7: Provisioning desktops
There are two ways to create desktops. First, when you save a template, you
can specify the maximum and pre-started number of desktops. This will cause
the Kaviza manager to automatically generate the specified number of desktops.
The second approach is to navigate to the “Desktops” tab, click on the template
and then specify the maximum and pre-started number of desktops. If the
minimum number of pre-started desktops is not specified, it will default to the
maximum number.
1. Navigate to the ‘Desktops’ main tab.
2. View the provisioned desktops from the ‘Summary’ sub-tab.
3. Click on the ‘template’ link to alter template properties at any time.
3.3 Assigning templates to users and groups
This section describes how to specify the users and groups who have access to
Kaviza desktops and how to associate them to a specific template (i.e. a specific
type of desktop).
We will assume the Kaviza server is configured to use an external user database
in the step by step instructions below. Also, we’ll assume for now that you will
just set it up for specific users as opposed to groups. This is so that you can get
started quickly and it avoids the situation where you do not have groups of users
setup in your user database.
1. Register Users in Kaviza
a. Navigate to the ‘Admin’ tab and click on the ‘Administer Users’ link.
b. Click the green ‘+’ icon to add users.
c. Enter the ‘UserID’ of the users in your external database and click
on the ‘Save’ button.
d. If kMGR can find these users from AD, it will register them
successfully.
Note:
Alternatively if you would like to roll the desktops out to
groups of users, you can register the groups in Kaviza from
the ‘Administer Groups’ link.
2. Assign Users to Templates
a. From the ‘Admin’ tab, Click the ‘Assign Desktop Templates’ link.
b. You should see a panel as shown below.
27
c. Click the ‘pencil’ icon and assign the template to the users and
groups.
You are now ready to roll out desktops to the users!
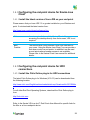
3.4 Testing the connection as an end user
Now that at least one template is set up, desktops have been created from it and
users have been assigned to them, it is time to login as an end user and test the
connection to Kaviza desktops.
The free trial version will allow you test HDX connections to desktops.
The instructions here provide steps to test the end user connections via the
Kaviza Java Client. It also assumes you are using a Windows endpoint. If you
are using Linux or a Mac OSX endpoint please refer to the Kaviza VDI-in-a-box™
End Points User manual for details.
28
3.4.1 Configuring the end-point device for Kaviza Java
Client
3.4.1.1 Install the latest version of Java JRE on your end point
Please ensure that you have JRE 1.5 or greater installed on your Windows end
point. If not download the latest version from:
http://www.java.com/en/download/manual.jsp
Note:
Java is required to launch the Kaviza Client. If you are
accessing the desktop directly from the browser, JRE is not
required.
Best
Practice:
The Kaviza Java Client provides a nice login interface for
your users. Using the Kaviza Java Client, you can provide a
lock-down control on end points. In addition it can be used
on end-points where browser access is not available.
Please refer to the Kaviza Client User manual for additional
details.
3.4.2 Configuring the end-point device for HDX
connections
3.4.2.1 Install the Citrix Online plug-in for HDX connections
The latest Citrix Online plug-in for Windows (V12.0.3) can be downloaded from
the following location.
http://www.citrix.com/English/ss/downloads/details.asp?downloadId=2301299#to
p
For all other End Point Operating Systems, download the Citrix Online plug-in
from
http://hdx.citrix.com
Refer to the Kaviza VDI-in-a-box™ End Points User Manual for specific links for
the Mac or a Linux endpoint device.
29
3.4.3 Connecting to the virtual desktop from the Kaviza
Java Client
The Kaviza Java Client will automatically launch the desktops using the HDX
connection (ICA) protocol if the end-point is HDX enabled with the Citrix Online
plug-in. If it does not find the Citrix Online plug-in on the end point, it will launch
the desktop using RDP.
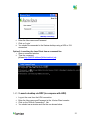
3.4.3.1 Launch the “zero-install” Kaviza Java client
Option 1: Quick launch from a browser window
1. Open a new browser window
2. Launch the Kaviza Java Client from
http://[kMGR address]/dt/kavizaclient.jnlp
3. You should see a window such as the one shown below:
4. Check the “Do this automatically for files…” and click on OK.
5. You will see a ‘Java Starting’ window and then you will see the Kaviza
Client console as shown below.
30
6. Enter the User name and Password.
7. Click on ‘Login’
8. You should be connected to the Kaviza desktop using a HDX or ICA
connection.
Option 2: Launching the Java Client from a command line
1. Open a command window.
2. Type the command:
javaws http://[kMGR address]/dt/kavizaclient.jnlp
3.4.3.2 Launch desktop via RDP (to compare with HDX)
1.
2.
3.
4.
Log out the user from the HDX connection.
Enter the User name and Password at the Kaviza Client console.
Click on the ‘Difficult Connecting?’ link.
You should see a window such as the one shown below:
31
5. Click on ‘Proceed’ and you will get an RDP connection to the desktop.
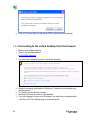
3.4.4 Connecting to the virtual desktop from the browser
1. Open a new browser window.
2. Type in the desktop address
http://[kMGR address]/
3. You may see a ‘website’s security certificate message
4. Accept the security certificate by Clicking on ‘Continue to this website (not
recommended)’.
5. You should see the Kaviza Console.
6. Now login the user to connect to the desktop.
7. If you are logging in from a non-IE browser, you may have to associate the
“.ica” file to the Citrix Online plug-in as shown below.
32
33
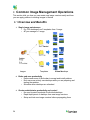
4 Common Image Management Operations
This section tells you how you can create new image versions easily and how
you can apply patches to existing images in Kaviza
4.1 Overview and Benefits
1. Single image maintenance
o E.g. 200 desktops from 3 templates from 1 image
o All you manage is 1 image
Images
Templates
Virtual desktops
2. Better end-user productivity
o Relieve end-users of the burden to accept and install patches
o End-users can actively use desktops while you are preparing and
testing the updates
o Schedule when desktops are refreshed
3. Greater administrator productivity and control
o No need to patch hundreds of individual desktops
o Rapid deployment of desktops from new image versions
o Setup and test new image versions before propagating them
34
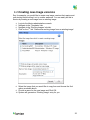
4.2 Creating new image versions
Say for example, you would like to create new image versions that require enduser testing before rolling it out to a wider audience. You can easily do this in
Kaviza by creating a new image from an existing image.
4.
5.
6.
7.
Log into the Kaviza administrative console.
Navigate to the ‘Templates’ tab.
Navigate to the ‘Working Images’ sub-tab.
Click on the 1st link “Generate a working image from an existing image’.
8. Select the image that you would like to copy from and choose the 2nd
option as shown above.
9. Provide a name for the new image and Click OK.
10. System will generate a ‘Working image’ entry for you.
35
11. Once the ‘Working Image’ status changes to RUNNING, you can connect
to the desktop as a ‘local administrator’ and perform the updates
required.
12. Once you are done with the updates, you can prepare it, test it and save it
as a new image.
13. Then follow the standard process of creating a template from this image ,
provisioning desktops from the template and assigning users & groups to
this new template.
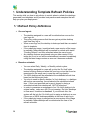
4.3 Patching an existing image
Say for example, you would like to patch an existing image to perform security
and high-priority patch fix operations that require immediate propagation. You
can easily do this in Kaviza by updating an existing image. The changes to the
images will be propagated to the desktops based on the associated template
refresh policies and/or can be enforced through a manual refresh process.
1.
2.
3.
4.
36
Log into the Kaviza administrative console.
Navigate to the ‘Templates’ tab.
Navigate to the ‘Working Images’ sub-tab.
Click on the 1st link “Generate a working image from an existing image’.
5. Select the image that you would like to update and choose the 1st option
as shown above.
6. Click OK to confirm the operation.
7. System will generate a ‘Working image’ entry for you.
8. Once the ‘Working Image’ status changes to RUNNING, you can connect
to the desktop as a ‘local administrator’ and perform the updates
required.
9. Once you are done with the updates, you can prepare it, test it and save it
as an updated image.
10. Based on the associated template refresh policies the changes will be
propagated to the desktops.
11. You can also enforce the changes through a manual refresh process.
37
5 Understanding Template Refresh Policies
This section tells you how to set policies to control when to refresh the desktops
generated from templates and it provides best practices and examples that will
help you plan your deployment.
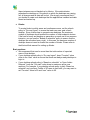
5.1 Refresh Policy Definitions
1. On user logout:
o The desktop assigned to a user will be refreshed as soon as the
user logs out.
o This policy setting ensures that the user gets a pristine desktop
each time they log in.
o When a user logs out, the desktop is destroyed and then re-created
from its template.
o If the underlying image is patched and a new version of the image
is available, these desktops will be marked for refresh with status
“Pending Refresh” and then refreshed when the users log out.
o Any desktop that was provisioned using an older version of the
image but is not in use will be reclaimed and recreated immediately
using the latest image version as soon as it becomes available.
2. Based on schedule:
o You can select Daily, Weekly, or Monthly refresh cycles.
o The desktop assigned to a user will go into the ‘On Hold’ state
instead of being destroyed when the user logs out so that it can be
reassigned to the same user in case the user logs back in.
o ‘On Hold’ desktops will be refreshed at the scheduled refresh time
based on the Kaviza grid clock.
o You also to need to specify whether ‘In Use’ desktops, i.e. desktops
with active user sessions, are refreshed at the scheduled refresh
time. If this is not specified and a user is logged in during a
scheduled refresh their desktop will NOT be refreshed.
o In order to guarantee re-assignment of an ‘On Hold’ desktop to its
original owner, make sure the “Do not reassign ‘On Hold’ desktops
to new users” checkbox is checked. If you uncheck this, the
system will dip into the ‘On Hold’ pool to assign a desktop to a user
if there are no NEW desktops available at the time of user log in.
o If the underlying image is patched and a new version of the image
is available, these desktops will be refreshed at the time of the
refresh schedule.
38
3. Upon Admin request:
o These desktops are never refreshed even when they are “On Hold”.
o You need to manually refresh them by clicking on the refresh policy
link from the “Desktops-> Summary” tab.
o Use this refresh policy if you need to assign “persistent” or
dedicated desktops i.e. desktops that preserve user changes such
as installation of new applications across multiple reboots.
o Make sure the “Do not reassign ‘On Hold’ desktops to new users”
checkbox is checked.
5.2 Usage Scenarios and Best Practices
You can create virtual desktops to meet various work requirements by simply
manipulating the maximum number of desktops and its refresh policy. Here are
a few usage scenarios:
1. Controlled desktop for employees:
For regular employees set the desktop refresh policy to "Based on
schedule" and set the schedule to refresh nightly or weekly. This provides
a fresh virus free desktop that does not degenerate in performance. The
user data should be kept on a network share and it will need to be
checked for viruses. Note that the refresh policy does NOT refresh
desktops which are in use (i.e. those with active sessions or which have
been disconnected but not logged out).
2. Labs and shift workers:
Assume you have 3 shifts of 20 workers each and you want each to get a
pristine desktop from the same template. You can effect this by specifying
a maximum of 40 desktops with 20 pre-started and the "On user logout"
refresh policy. When the first shift of 20 logs in, the system will
automatically generate 20 more. When the new shift arrives they will have
20 desktops ready to go. As the prior shift logs out, their desktops will be
refreshed immediately in preparation for the 3rd shift.
3. Dedicated desktops:
If some of your users require a dedicated desktop, this can be affected by
setting the refresh policy to "On admin request" and ensuring that "max" is
at least as large as the number of users. Setting "max" as specified will
ensure that when a user logs in they are re-assigned their prior desktop.
Make sure that the setting ‘Do not reassign desktops “On Hold” to new
users is enabled. Note that the applications installed and the data kept on
39
these instances are not backed up by Kaviza. If the administrator
refreshes the desktops or if the server on which the desktops are running
fail, all changes and all data will be lost. We strongly recommend that if
you decide to create such desktops that the applications installed and data
stored are backed up.
4. Kiosks:
To create kiosks in public areas and conference rooms, set the refresh
policy to "On user logout" to ensure that each new user gets a fresh
desktop. Since it takes time to generate new desktops, the maximum
number of desktops should exceed the number of kiosk endpoint devices.
If the load is heavy and desktop re-generation on each use is too resource
intensive, you can use the "Based on schedule" policy to ensure that the
desktops are refreshed every night. In this case, the maximum number of
desktops does not need to exceed the number of kiosks. Please refer to
the Kaviza Kiosk manual for setting up Kiosks.
Best practices:
We recommend that max be more than the total number of expected
users of that desktop.
If your desktop refresh policy is “On user logout”, keep “Pre-start” value
close to the “max” value to ensure that there are always ready desktops to
login to.
If your desktop refresh policy is “Based on schedule” or “Upon Admin
Request”, keep the “Pre-start” value close to maximum active user
sessions. For example, if your desktop refresh policy is daily “Based on
schedule” and you have 3 shifts of 20 users in each shift, you may want to
set “Pre-start” value to 20 and “max” value to 60.
40
6 Taking a Kaviza server in a grid offline
This section prescribes the recommended way to bring down a Kaviza server in a
grid for server upgrade operations such as adding more memory, adding more
disk space etc.
6.1 Plan for the server going down
1. Identify the users that are currently logged into virtual desktops that are
running on that server.
2. You can do this by navigating to the Desktops -> User Sessions sub-tab
and doing a search by ‘Server’.
3. Co-ordinate the downtime with your users before bringing the server down
for maintenance.
4. Make sure there are no image transfer activities happening at this time.
5. Please note that when you deactivate a server, this server’s desktop load
will be picked up by the rest of the servers in the grid and will be load
balanced across all the live servers in the grid. Say for example this server
has 10 desktops running on it. Now when the server goes into
‘Deactivated’ state, KMGR will automatically start 10 desktops across the
rest of the servers in the grid. So, make sure the rest of the servers in the
grid can handle the extra load. If not alter the Max/Prestart numbers of all
the templates to take into account the loss of capacity from temporarily
getting this server offline.
6.2 Deactivate the server
1. Navigate to the ‘Servers’ tab.
2. Click on the server link that corresponds to the server that will be brought
3.
4.
5.
6.
down for upgrade.
Click on the ‘Deactivate’ button when you are ready to bring the server
down.
Deactivate will destroy all ‘Active’, ‘On Hold’, ‘New’ and ‘Starting’ sessions
on that server. So, any user that is currently logged onto a virtual desktop
on that server will be disconnected from that server
The server status will change to ‘DEACTIVATED’ when all the sessions
are destroyed.
Now the server is ready to go through the upgrade operations
41
Note:
42
When you bring the server back online, ensure that the server is
in an ACTIVATED state.
7 Appendix
7.1 URLs for Kaviza Administrators and End Users
Kaviza Administrators:
To access the Kaviza management console
http://[kMGR address]/admin/ (or)
https://[kMGR address]/admin/ (For SSL port 443 access)
If you are logging in as the ‘kavizaadmin’ super user, you can alternately
login from this address:
http://[kMGR address]/ (or)
https://[kMGR address]/ (For SSL port 443 access)
Kaviza End Users:
To access the Kaviza desktops from the browser client:
http://[kMGR address]/ (or)
https://[kMGR address]/ (For SSL Port 443 access)
Remote users connecting to Kaviza desktops via the Kaviza Gateway
add-on service may connect from:
http://[Kaviza Gateway address]/dt/
To launch the zero-install Kaviza Java Client from the browser to access
desktops via the Kaviza Java Client:
http://[kMGR address]/dt/kavizaclient.jnlp
Refer to the Kaviza Client Cheat Sheet manual for details.
43
7.2 Logging into the kMGR virtual appliance
(Using PuTTY)
You can either use ESX VIC console to log into the kMGR virtual
appliance or you can use any ‘ssh’ client such as ‘PuTTY’ to do the same.
We have found that it is easier to log into the kMGR virtual appliance
using a ‘PuTTY’ shell. PuTTY can be downloaded from
http://www.chiark.greenend.org.uk/~sgtatham/putty/ . Once you have done
that, please do the following:
a. Bring up PuTTY
b. Host Name: Enter your kMGR virtual appliance DNS name or static
IP address
c. Connection type: Choose SSH
d. Click on Open
e. You will see a PuTTY window
f. Login as user: kvm
44
g. Password: kaviza123 (default password)
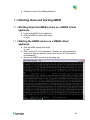
7.3 Shutting down and starting kMGR
7.3.1 Shutting down the kMGR service on a kMGR virtual
appliance
a. Login to the kMGR virtual appliance.
b. Run the kMGR shutdown shell script:
tc_stop
7.3.2 Starting the kMGR service on a kMGR virtual
appliance
a. Run the kMGR startup shell script:
tc_start
b. Enter ‘kaviza123’ for the password. [ Please note: root password’ is
required to stop and start the service and ‘kaviza123’ is the default
root password]
c. Ensure that kMGR service is up by typing: psj
45
7.4 Passwords for the kMGR virtual appliance and
the console
The Kaviza VDI-in-a-box software ships with the following default passwords.
They can be changed as required
kMGR virtual appliance administrator : (Linux Ubuntu)
Login: kvm
Password: kaviza123 (default )
Please note that ‘sudo’ privilege has been set up for ‘kvm’ user. The
default root password is ‘kaviza123’.
kMGR Console administrator: (http://[kMgr name or IP]/dt/)
Login: kavizaadmin
Password: kaviza (default)
7.5 Uninstalling VMware SVGA 3D driver
Unable to Connect to Windows 7 desktops with VMware Tools ESX 4.0
Update 1. The issue and the fix are described in detail at
http://support.citrix.com/article/CTX123952. The fix is to uninstall
“VMWare SVGA 3D (Microsoft Corporation - WDDM)” display driver and
its files (C:\\Windows\system32\vm3dum.dll,
C:\\Windows\system32\DRIVERS\vm3dmp.sys) before sysprepping a
working image. Take the following steps to delete the display driver:
46
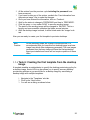
Take the following steps to delete the display driver:
o Click on Microsoft Windows logo in the left corner of the task bar on
Windows 7 working image(replaces “Start” in Windows XP).
o Enter “device” in “Search Programs and Files” search box.
o Click on “Device Manager” search results item shown in the
“Control Panel” as shown below:
o Click on “Display adapters” to get the detailed list of display
adapters (shown below). Right Click on “VMware SVGA 3D
(Microsoft Corporation – WDDM)” and select “Uninstall”.
47
o “Confirm Device Uninstall” dialog pops up. Select the checkbox
“Delete the driver software for this device.” and click “OK”.
48
7.6 Installing the recommended Microsoft hot fix
patch on Windows 7 VM
Kaviza users may encounter the ‘The security database on the server
does not have a computer account for this workstation trust relation’ issue
when attempting to connect to Kaviza desktops in a domain.
A supported hot fix is available from Microsoft to correct this problem. The
hot fix is available for download from
http://support.microsoft.com/hotfix/KBHotfix.aspx?kbnum=976494&kbln=e
n-us .
The related knowledge base article can be found at
http://support.microsoft.com/?id=976494
This is a 3 step process. You need to download, extract and then install
the file.
1. When you download the patch and install it, you will be prompted to
provide the password.
2. Enter the password and then you will be asked to provide the directory
to extract the files.
3. Then go to the folder where these files get unzipped.
49
4. Then run the installer to install the hot fix
5. The VM will be rebooted when the patch has been installed
successfully
6. Verify that the patch has been installed from Control Panel ->
Programs -> Program and Features -> Installed Updates
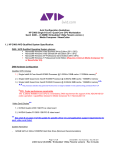
7.7 Known Windows 7 sysprep behavior
Kaviza leverages the standard Windows 7 sysprep process to provision
new Windows 7 desktops from images. Desktops provisioned from the
saved desktop images are considered new hardware by Windows 7. Here
are some known computer-specific settings that are not preserved on the
prepared desktop image. Namely if you provide these settings in the
master image, it is not carried across syspreps and onto the provisioned
desktops.
Activation: Windows 7 will always try to activate desktops when they are
started up. Hence even if you have disabled auto activation on the master
image, you will notice that the generated desktops will attempt to go
through the standard auto-activation cycle. In order to
make sure that the generated desktops go through a successful activation
cycle, you need to make sure you are preparing the underlying working
image with a valid MAK or KMS license key.
Please refer to http://www.microsoft.com/licensing/existingcustomers/productactivation.aspx for more details on volume activation
and for obtaining the MAK or KMS keys.
Network Location: Provisioned desktops that are in workgroup
membership mode will always have their network location defaulting to the
“Public” network. Even if you changed the location to point to a different
network while preparing the master image, you will notice that
this setting is changed to “Public” on the generated desktops.
Automatic Updating: The automatic update setting is not preserved on
the desktop image. So, even if you have turned on the automatic update
setting on the working image, you will find that the generated desktops do
not have this setting turned on their computer.
Here is a suggested workaround from Microsoft that will allow you to
preserve the Automatic update configuration on the images:
- Set the “Automatic Update” setting via the group policy setting or the
Windows registry setting as described in Microsoft Support article
http://support.microsoft.com/kb/328010.
Note: Follow the normal Kaviza recommended working image test
procedure to verify the settings before saving it as a Kaviza image.
50
- As a best practice, we recommend that you do not allow “Automatic
Updates” to be scheduled on end user desktops. This is recommended to
prevent user desktops from being automatically rebooted during an active
user session. Depending on the template policy settings, kMGR may
attempt to destroy these desktops in the event they are rebooted.
51