1
Agenda2
User Manual
Agenda2 User Manual Copyright© 2010-2013 Bobsoft
1 of 34
Agenda2 User Manual Copyright© 2010-2013 Bobsoft
2 of 34
Contents
1. User Interface !
5
2. Quick Start!
6
3. Creating an agenda!
10
3.1.
Adding and removing categories!
10
3.2.
Adding and removing meetings!
10
3.3.
Adding and removing sessions!
11
3.4.
Adding and removing agenda items!
12
4. Setting up a meeting!
15
4.1.
Meeting Details!
15
4.2.
Themes and participants!
15
5. Advanced editing of agenda items!
5.1.
Constraining agenda items!
6. Defining the look of the agenda !
17
17
19
6.1.
Define the meeting look!
19
6.2.
Layout the sessions!
20
6.3.
Ordering the items!
21
7. Comments and Minutes!
23
8. Imports, Exports and Archives !
25
9. Preferences!
26
9.1.
General Preferences!
26
9.2.
Themes!
26
9.3.
Rendering!
26
9.4.
Date / Time!
26
9.5.
HTML!
27
9.6.
Company!
27
Agenda2 User Manual Copyright© 2010-2013 Bobsoft
3 of 34
9.7.
Layouts!
27
9.8.
Email!
27
10.Layouts!
28
10.1. Introduction!
28
10.2. Editing and creating Layouts!
28
10.3. Basic Template Syntax!
28
10.4. Formatters!
30
10.5. Meeting commands!
30
10.6. Meeting Settings Commands!
31
10.7. Session Commands!
32
10.8. Session Settings Commands!
33
10.9. Agenda Item Commands!
34
Agenda2 User Manual Copyright© 2010-2013 Bobsoft
4 of 34
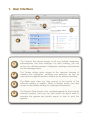
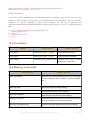
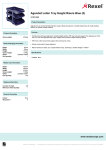
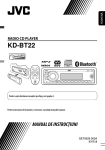
1. User Interface
2
3
4
1
1
The Content Tree allows access to all your defined categories,
subcategories, and their meetings. For each meeting, you can
access any defined sessions. Categories, meetings and sessions
can be rearranged here.
2
The Toolbar allows quick access to the common features of
creating new categories, meetings and sessions, as well as
opening the an agenda preview window for the selected meeting.
3
The Editor area. Here you have access to the content of the
selected meeting of session. When in display mode, you have
access to the display settings for meetings and sessions.
4
The Preview Panel shows a live rendered agenda for the currently
selected meeting. Here you can also select the layout used to
generate the agenda and quickly export to html or print the
agenda.
Agenda2 User Manual Copyright© 2010-2013 Bobsoft
5 of 34
2. Quick Start
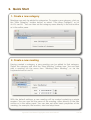
1. Create a new category
Meetings can only be added to categories. To create a new category, click on
the “New Category” toolbar button, or select “File->New Category”, or hit
shift-cmd-N. You can then set the category name directly in the tree outline
or in the editor pane.
2. Create a new meeting
Having created a category, a new meeting can be added to that category.
Select the category and click the “New Meeting” toolbar icon. You can also
add a meeting via the menu item “Meeting->New Meeting”, or via the
keyboard shortcut cmd-N.
With the default settings, a new meeting will be created containing a single
session. You can now set the name of the meeting, either directly in the tree
outline or in the editor panel. You can also set other basic properties of the
meeting, for example, the location, start and stop times.
Agenda2 User Manual Copyright© 2010-2013 Bobsoft
6 of 34
3. Create a new session
With the default settings, Agenda2 already created a new session for you
when you created your new meeting. That feature can be switched off in the
preferences. To create a new session yourself, select a meeting in the tree
outline and click the “New Session” toolbar button (or select the menu item
“Meeting->New Session”, or use the keyboard shortcut alt-cmd-N).
Having created the new session, you can then edit its name and set the
location of the session (this will be inherited from the meeting if the meeting
has a location at the time of creating the session). The start and stop time of
the session will default to the start and stop time of the meeting. You can edit
the start and stop time either directly in the editor pane, or by clicking the
“select” button to open a graphical date/time editor.
Agenda2 User Manual Copyright© 2010-2013 Bobsoft
7 of 34
4. Add agenda items
With a session selected in the tree outline, the editor pane shows the various
properties of a meeting session that can be edited. The main property is the
list of agenda items in the session. This is where you add, edit and arrange
individual agenda items.
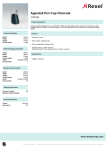
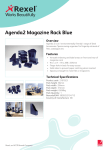
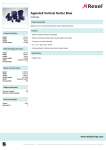
Agenda2 supports 4 different kinds of
items: presentations, discussions, break
items, and spacers. Adding new agenda
items can be done via the “New Item”
button or via the menu items under the
“Meeting” menu. For example, let’s add a
new presentation to the session. Click the
“New Item” button and select “New
Presentation”.
A presentation item will now appear in the
Session Items list. The basic properties of
the presentation can now be edited directly
in the list. For example, you can set the title
of the presentation, the speaker and the
duration. Further properties of the agenda
items can be configured by clicking the
“edit” button. See the section “Advanced editing of agenda items” for further
details.
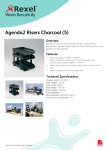
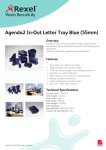
Go ahead and add further agenda items and set their basic properties: title,
speaker, and duration. A quick way to create a new presentation is just to
duplicate an existing one
using the keyboard shortcut
cmd-D. You can rearrange
agenda items by selecting
them and using the “up”
and “down” arrows to the
left of the item list. To select
multiple agenda items, hold
down the cmd key and select
items with the
mouse. You can also
drag-and-drop items
to rearrange them.
Agenda2 User Manual Copyright© 2010-2013 Bobsoft
8 of 34
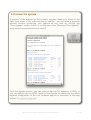
5. Preview the agenda
A preview of the agenda for the currently selected meeting is shown in the
right most panel of the main window. In addition, you can open a separate
preview window containing your agenda at any time by clicking the
“View Agenda” toolbar button, or via the menu item “Meeting->View Agenda”,
or by using the keyboard shortcut cmd-R.
From the agenda preview, you can print the agenda (for example, to PDF), or
you can directly save an HTML version of the agenda for posting on-line. More
detailed configuration of the final rendered agenda is discussed in the help
section “Configuring Agenda2”.
Agenda2 User Manual Copyright© 2010-2013 Bobsoft
9 of 34
3. Creating an agenda
In Agenda2, an agenda is associated to a particular meeting and meetings are
arranged in categories. The following sections describe the different ways in which
you can build up agendas by defining categories, meetings and then sessions
within those meetings. Finally, agenda items (such as presentations and
discussions) can be added to the different sessions.
3.1. Adding and removing categories
To add a new category, you can do one of:
1. click the “New Category” toolbar button;
2. select the menu item “File->New Category”;
3. use the keyboard shortcut shift-cmd-N.
When a new category is added, its name can be edited in the editor pane. There
you can also see a summary of the number of sub-categories and meetings that a
category contains.
To delete an existing category and all of the meetings and sub-categories it
contains, select the category and hit cmd-delete, or select the menu item
“Edit->Delete”.
3.2. Adding and removing meetings
In Agenda2, meetings can be added to categories. To add a
meeting, select an existing category and click on the “New
Meeting” toolbar button.
When a new meeting is created, the details of the meeting appear
Agenda2 User Manual Copyright© 2010-2013 Bobsoft
10 of 34
in the editor pane. There you can edit:
1. The name/title;
2. The location;
3. The start date/time;
4. The end date/time;
5. The themes in the meeting;
6. The participants of the meeting;
7. Additional notes.
Further details about configuring the meeting can be found in section “Setting up a
Meeting”.
Deleting Meetings
To delete an existing meeting and all of its sessions, select the meeting and hit
cmd-delete, or select the menu item “Edit->Delete”.
3.3. Adding and removing sessions
Each meeting in Agenda2 can have multiple sessions. Each session is meant to
represent a block of time within a meeting. For example, each day of a meeting
could be represented by a session in Agenda2, or you could have sessions for
mornings and afternoons, or even parallel sessions to be held in different
locations.
To add a new session to an existing meeting, select the meeting and do one of the
following:
1. Click the “New Session” toolbar button
2. Select the menu item “Meeting->New Session”
3. Use the keyboard shortcut alt-cmd-N
You can also copy and paste sessions from other meetings, or duplicate existing
sessions and drag them in to place.
Agenda2 User Manual Copyright© 2010-2013 Bobsoft
11 of 34
When the final agenda is rendered, the sessions are displayed in the order they
appear in the tree outline. You can reorder the sessions within a meeting by just
dragging them to the position you want.
Drag sessions with the mouse to
reorder them within the meeting, or
even move them from one meeting to
another.
3.4. Adding and removing agenda items
Agenda2 support 4 different kinds of agenda items: presentation items, discussion
items, break items and spacer items.
Presentation Items
Presentation items have various properties that you can set. The following table describes each
of them:
Property
Description
Title
The title for the presentation. This title will appear in the final
agenda.
Duration
The total duration for the presentation in minutes. This will be
split in to speaking time and discussion time in the final
agenda.
D i s c u s s i o n The time (in minutes) allocated for discussion following the
Time
presentation. This is subtracted from the total time in the final
agenda.
Speaker
The name of the speaker.
Theme
The theme this presentation belongs to. If the agenda is
colored by theme, then the entries for this presentation will
appear in that color in the final agenda.
Constraint
The start or end time of the presentation can be constrained to
occur at a given time. See the section "Advanced editing of
agenda items" for more details.
Agenda2 User Manual Copyright© 2010-2013 Bobsoft
12 of 34
Minutes
Minutes can be entered for a presentation item. These minutes
can then be displayed in the final agenda. See the section
"Advanced editing of agenda items" for more details.
Comments
Comments can be entered for a presentation item. These
comments can then be displayed in the final agenda. See the
section "Advanced editing of agenda items" for more details.
To add a presentation item, select a session and use one of the following methods:
1. Click on the “New Item” button and select “New Presentation” from the popup
menu.
2. Select the menu item “Meeting->New Presentation”
3. Use the keyboard shortcut ctrl-cmd-P.
To remove one or more agenda items, select them in the item list and select the
menu item “Meeting->Delete Selected Items” or use the keyboard shortcut cmddelete.
Discussion Items
Discussion items are very similar to presentation items: they just lack a “discussion
time” property. They are meant to indicate periods of discussion in a meeting
agenda.
Agenda2 User Manual Copyright© 2010-2013 Bobsoft
13 of 34
To add a discussion item, select a session and use one of the following methods:
1. Click on the “New Item” button and select “New Discussion” from the popup
menu.
2. Select the menu item “Meeting->New Discussion”
3. Use the keyboard shortcut ctrl-cmd-D
Break Items
Break items are placeholders for coffee breaks, lunch breaks, etc. As with
presentation and discussion items, they can be themed and constrained to occur
at particular times.
To add a break item, select a session and use one of the following methods:
1. Click on the “New Item” button and select “New Break” from the popup menu.
2. Select the menu item “Meeting->New Break”
3. Use the keyboard shortcut ctrl-cmd-B.
Spacer Items
Spacer items can be used to insert periods of unallocated time during an agenda.
For properties, they only have a duration, a theme, and comments.
To add a spacer item, select a session and use one of the following methods:
1. Click on the “New Item” button and select “New Spacer” from the popup menu.
2. Select the menu item “Meeting->New Spacer”
3. Use the keyboard shortcut ctrl-cmd-S.
Agenda2 User Manual Copyright© 2010-2013 Bobsoft
14 of 34
4. Setting up a meeting
Before adding sessions to a meeting and items to a session, there are some
aspects of the meeting that you can configure.
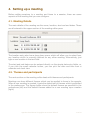
4.1. Meeting Details
The main details of the meeting are the name, location, start and end dates. These
are all entered in the upper section of the meeting editor pane:
The location entry also has a drop down menu which will allow you to select from
any location which is currently defined for any other meeting. Alternatively, just
type a new location in the text field.
The start and end dates can be entered directly on the simple date entry fields, or,
if you click the small calendar button, you can pick the date and time from a
calendar and clock view.
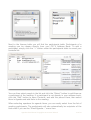
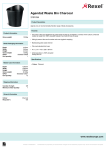
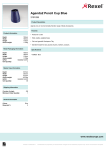
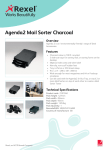
4.2. Themes and participants
The next section on the meeting editor deals with themes and participants.
Meetings can have different themes which can be applied to items in the agenda.
When a new meeting is created, it gets the default set of themes which is specified
in the preferences. The figures below show the default themes as specified in the
preferences (left) and the default themes added to a new meeting upon creation
(right).
Agenda2 User Manual Copyright© 2010-2013 Bobsoft
15 of 34
Next to the themes table you will find the participants table. Participants of a
meeting can be chosen directly from your OS X Address Book. To add a
participant, simply click the “+” button under the participants table to reveal your
contacts list:
You can then select people in the list and click the “Select” button to add them as
a participant of the meeting. If a participant is not already in your address book,
click the “Edit” button to open Contacts, and add the person there, then select
them in Agenda and add them to the meeting.
When selecting speakers for agenda items, you can easily select from the list of
meeting participants. The participants will also automatically be recipients of the
final email if you use the “Email Agenda...” menu item.
Agenda2 User Manual Copyright© 2010-2013 Bobsoft
16 of 34
5. Advanced editing of agenda items
The basic details of an agenda item, its title, speaker (if applicable) and duration,
can be edited directly in the item list. Further details of the agenda item can be
revealed by clicking the “Edit Details” button on the agenda item.
Edit title
Edit Details
Edit Speaker
Edit Duration
You should then see an expanded view of the agenda item like the one shown
below.
There you can edit additional properties, like setting the item’s theme, or constrain
the item to start or stop at a particular time.
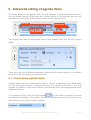
5.1. Constraining agenda items
Agenda items can be constrained to start or stop at a particular time. Depending
on the final layout chosen, constrained items are visually identified in the final
agenda. In addition, items which follow a constrained item, have appropriate times
assigned to them.
To constrain an item, click the edit button
on the item in question to reveal
the advanced settings. From there, access the constraint panel by clicking on the
edit button next to the constraint display:
Agenda2 User Manual Copyright© 2010-2013 Bobsoft
17 of 34
You should see a popup panel like the one below:
You can now set the item to be constrained to start at a particular time, or to end
at a particular time. This will be reflected in the final rendered agenda.
5.2. Linking Files
You can link files on your computer to particular agenda items, allowing you to quickly retrieve
files associated with particular events. For example, you may want to link a presentation file to an
agenda item. To link a file, click the ‘links’ button
you can select files to link to the agenda item.
to show the file links popup. From there
Agenda2 User Manual Copyright© 2010-2013 Bobsoft
18 of 34
6. Defining the look of the agenda
Agenda2 has a large number of options for defining the look of the final agenda. In
addition to the display options, a layout for the agenda can be selected. (You can
also create your own layout: see the section “Layouts” for more details.)
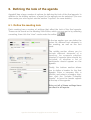
6.1. Define the meeting look
Each meeting has a number of settings that affect the look of the final agenda.
These can be found on the Meeting View Editor, which you can get to by selecting
a meeting, then click the “view” mode under the editor:
In the top section you can define the
colors for different text elements in
the meeting, as well as the font
used.
The middle section allows you to
include different elements of a
meeting, for example whether
minutes of agenda items should be
included, or whether a list of
participants should appear on the
agenda.
Finally, the bottom section allows
you to define a header for the final
agenda. Enter a company title, a
subtitle, and select a company logo,
then click the “Include Company
Header” to have the header appear
at the top of the agenda.
Note: not all of these settings have
an effect in all layouts.
Agenda2 User Manual Copyright© 2010-2013 Bobsoft
19 of 34
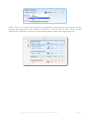
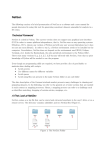
6.2. Layout the sessions
The sessions will appear in the final agenda according to their position in the
navigator tree:
In the example above, the session “Day 1” will appear above session “Day 2”, and
so on.
In the final agenda, sessions are laid out according to the template. For example,
below you see two possible layouts in action:
Agenda
Column
As well as ordering of the sessions, each session has a number of view settings
which you can use to adjust the final agenda. To get to these view settings, select
a session and click the “view” mode under the editor pane:
Agenda2 User Manual Copyright© 2010-2013 Bobsoft
20 of 34
The top section of the session view
settings is concerned with session
contents and their look. For
example, here you can select how
agenda items are itemized (by time,
numbered, etc) in the session. Here
you can also choose if the items in
this session should be colored
according to their theme (if the
layout supports item coloring).
The middle section deals with the
fine details of laying out the
elements in the agenda items table.
Most of the layouts you will use in
Agenda use html tables to present
the agenda items. The values here
allow you to resize the various
columns to improve the look.
The bottom section just allows you
to choose the font used for this
session. Alternatively, just select
“Use Meeting Font” to adopt the
font defined in the meeting view
settings.
6.3. Ordering the items
Agenda items will appear in the order in which they are arranged in the item list. If
unconstrained, the times for an agenda item will be calculated according to the
start time of the session and the duration of all preceding items. Constrained items
will appear in the agenda at the time dictated by the constraint. Subsequent items
will continue from there.
To order items, you can either drag and move them in the item list, or select the
item and use the up/down buttons to the left of the item list, or use menu items
“Meeting -> Move selected items up” (cmd up arrow) and “Meeting -> Move
selected items down” (cmd down arrow).
Agenda2 User Manual Copyright© 2010-2013 Bobsoft
21 of 34
If the “Color by Theme” view setting is selected on the session, then items will be
colored according to their theme. To select a theme for an item, click on the
“advanced” button to reveal the theme drop-down menu (see figure above).
Agenda2 User Manual Copyright© 2010-2013 Bobsoft
22 of 34
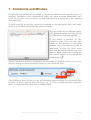
7. Comments and Minutes
Comments and notes can be added to meetings, sessions and agenda items. In
addition, discussion and presentation items can have minutes associated with
them. All of these can be shown on the final agenda (if selected in the meeting
view settings).
To add notes to a meeting, select the meeting in the navigation tree, and enter
notes in the bottom section of the meeting editor:
You can enter text in different fonts,
with different colors, and this will all
be reflected on the final agenda.
If you select a session on the
navigation tree, then you can edit
notes for the session in a similar
manner, Here the note entry field is
restricted in size (to give more
space to the items list) but you can
open a larger editor by clicking on
the ‘pencil’ button to the left of the
notes editor
.
When it comes to entering comments and minutes for agenda items, you can do
this by clicking on the appropriate button on the particular item:
Minutes
Comments
One difference here is that you get a standalone editor window for comments and
minutes of each agenda item, allowing you to have multiple minutes windows
open, to ease capturing during the meeting itself.
Agenda2 User Manual Copyright© 2010-2013 Bobsoft
23 of 34
Agenda2 User Manual Copyright© 2010-2013 Bobsoft
24 of 34
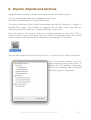
8. Imports, Exports and Archives
Agenda2 has an extensive import and export system that allows you to
1) share meeting agendas with colleagues and friends
2) create comprehensive or individual backups
To export a meeting to disk, select the meeting and use the “Meeting -> Export ->
Agenda File” menu. This creates a “.agenda: file on disk, which can later be
imported using the “Meeting -> Import Meetings” menu item.
You can create a full archive of all your meeting agendas by using the “File ->
Create Archive” menu command. This will create an “agendabackup” file on disk
which contains a full backup of all categories and meetings in Agenda2.
You can then open this archive using the “File -> Open Archive” menu command:
From the archive window, you can
select meetings and import them, or
restore the full backup, discarding
the all the meetings and categories
currently present in Agenda2.
Agenda2 User Manual Copyright© 2010-2013 Bobsoft
25 of 34
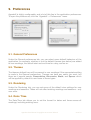
9. Preferences
Agenda2 is highly configurable, and a lot of this lies in the application preferences.
To open the preferences, click the “Agenda2 -> Preferences” menu.
9.1. General Preferences
Under the General preferences tab, you can select some default behaviour of the
application, for example, whether or not the default themes (see below) are added
to new meetings, the default start and end time for a day, and so on.
9.2. Themes
The themes defined here will be present in new meetings if the appropriate setting
is made in the General preferences. Themes can have any name you want, but
there are 4 special names, Presentation, Discussion, Break, and Spacer which
will be applied by default to new items of those types.
9.3. Rendering
Under the Rendering tab, you can set some of the default view settings for new
meetings and sessions. These will not affect existing meetings and sessions - only
new ones.
9.4. Date / Time
The Date/Time tab allows you to set the format for dates and times across all
meetings, including existing ones.
Agenda2 User Manual Copyright© 2010-2013 Bobsoft
26 of 34
9.5. HTML
The HTML tab presents some further default settings that will be adopted by new
sessions. Existing sessions will be unaffected by changes made here. These
settings reflect the HTML section of the session view settings discussed earlier.
9.6. Company
Under the Company tab you can enter a default company header (title, subtitle and
logo) which will be automatically applied to new meetings.
9.7. Layouts
The Layouts tab gives you access to the different layouts installed in Agenda2.
Here you can also create new layouts. See the “Layouts” section below for further
details.
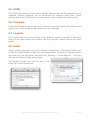
9.8. Email
When emailing agendas, you will be offered a drop-down sheet which allows you
to edit the email subject, body text and attachments. To email an agenda, select
the meeting in the navigation tree and click “Meeting -> Email Agenda ...” and you
will see the following drop-down sheet:
The default entries here can be set in the
Email tab in the preferences:
Agenda2 User Manual Copyright© 2010-2013 Bobsoft
27 of 34
10.Layouts
10.1.Introduction
As of version 2.0, Agenda2 has layout schemes which change how the final
agenda is displayed. Agenda2 comes with some built-in layouts, but you can
easily create your own.
Layout files are a mix of html and some special markup language (based on
MGTemplateEngine by Matt Gemmel).
Layouts can be edited directly within Agenda2 and the results can be seen live in
the preview.
The best place to start is by duplicating an existing layout and modify the
contents.
10.2.Editing and creating Layouts
Editing and creating layouts is done through the Agenda2 preferences. The built-in
layouts can’t be edited so first you need to select one and click the “Duplicate”
button. The new layout can now be edited. You can rename the layout by double
clicking the name in the list. To edit the layout click the “Edit” button. The layout
will be opened in an editor.
10.3.Basic Template Syntax
Here are some basic syntax structures for writing templates. More detail can be
found at http://mattgemmell.com/2008/05/20/mgtemplateengine-templates-withcocoa/
Agenda2 User Manual Copyright© 2010-2013 Bobsoft
28 of 34
Accessing Values
To use the various commands listed in the sections below, you enclose them in
pairs of curly braces. For example, to get the HTML code for the header of a
meeting, you can do:
{{ meeting.header }}
Iterators
You can iterate over arrays of items. For example, here is the command to iterate
over the meeting sessions:
{% for session in meeting.sessions %}
! {{ session.header }}
{% /for %}
Within the loop, you can use the variable ‘session’ to access the properties of the
session.
And here is the command to iterate over the agenda items in a session:
{% for item in session.sortedItems %}
! <!-- Do things with ‘item’ -->
{% /for %}
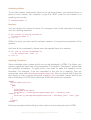
Applying Formatters
Some variables return values which can not be displayed in HTML. For these, you
need to transform them first using formatters. The section “Formatters” below lists
the available formatters. To apply them, you need to pass the variable to the
formatter. For example, if we are interested in the font for a meeting, then we
access the value with meeting.meetingSettings.font. We can format this to get the
font family or size in pixels using the unarchive_font formatter. Here’s how to do
this in the body of a CSS block within an HTML document, for example:
<head>
<STYLE TYPE="text/css">
<!-BODY
{
color:black;
background-color:white;
font-family: {{ meeting.meetingSettings.font | unarchive_font:
"family" }};
font-size:{{ meeting.meetingSettings.font | unarchive_font: "size" }}px;
}
-->
</STYLE>
</head>
Here’s an example of formatting a color value to a hex string for use in HTML:
Agenda2 User Manual Copyright© 2010-2013 Bobsoft
29 of 34
<table bordercolor="#{{ session.sessionSettings.borderColor |
unarchive_color_format: "hex" }}">
Logic Structures
A number of the variables you can access return a boolean, yes or no. You can use
these to form logical constructs in the templates. For example, you can decide
whether or not to display a table with borders or not by accessing the
session.sessionSettings.showBorders variable and using it in an ‘if’ statement like
this:
{%
!
{%
!
{%
if session.sessionSettings.showBorders %}
<table border="1">
else %}
<table border="0">
/if %}
10.4.Formatters
Input
Formatter
Description
Font Object
unarchive_font: "family"
Returns the font family
Font Object
unarchive_font: "size"
Returns the size in pixels
Color Object
unarchive_color_format: "hex" Returns the color in hex
suitable for use in html
10.5.Meeting commands
Command
Description
meeting.header
Returns the meeting header which is a composite
of the meeting name, location, company header
etc.
meeting.name
Returns the name of the meeting
meeting.location
Returns the location of the meeting
meeting.comments
Returns the comments for the meeting
meeting.interval
Returns the time interval for this meeting using the
format specified in the meeting settings.
meeting.startDateTime
Returns the start date and time of the meeting
Agenda2 User Manual Copyright© 2010-2013 Bobsoft
30 of 34
Command
Description
meeting.endDateTime
Returns the end date and time of the meeting
meeting.startDate
Returns the start date of the meeting
meeting.endDate
Returns the end date of the meeting
meeting.startTime
Returns the start time of the meeting
meeting.endTime
Returns the end time of the meeting
meeting.meetingSettings
Returns the meeting settings object for the
meeting
meeting.sessions
Returns an array of the sessions in the meeting in
the order they are arranged in Agenda2
10.6.Meeting Settings Commands
Command
Description
meeting.meetingSettings.locationColor
Returns the color object set for the
meeting location
meeting.meetingSettings.titleColor
Returns the color object set for the
meeting title
meeting.meetingSettings.dayColor
meeting.meetingSettings.commentColor
meeting.meetingSettings.minutesColor
meeting.meetingSettings.companyTitleColor
meeting.meetingSettings.companySubtitleColor
meeting.meetingSettings.includeThemeKey
meeting.meetingSettings.includeMinutes
meeting.meetingSettings.includeComments
meeting.meetingSettings.includeGenerationTime
Agenda2 User Manual Copyright© 2010-2013 Bobsoft
31 of 34
Command
Description
meeting.meetingSettings.includeLocation
meeting.meetingSettings.includeDateTime
meeting.meetingSettings.showCompanyHeader
meeting.meetingSettings.companyTitle
meeting.meetingSettings.companySubtitle
meeting.meetingSettings.companyLogo
meeting.meetingSettings.companyLogoType
meeting.meetingSettings.font
10.7.Session Commands
Command
Description
session.header
Returns the session header which is a composite of
the session name, location, etc.
session.startDayString
Returns the day (as a string) on which the session
starts formatted according to the Agenda2 settings.
session.endDayString
Returns the day (as a string) on which the session
ends formatted according to the Agenda2 settings.
session.startTimeString
Returns the time (as a string) at which the session
starts formatted according to the Agenda2 settings.
session.endTimeString
Returns the time (as a string) at which the session
ends formatted according to the Agenda2 settings.
session.name
Returns the name of the meeting
session.location
Returns the location of the meeting
session.comments
Returns the comments for the meeting
session.sortedItems
Returns an array of agenda items sorted according
to the arranged order.
session.sessionSettings
Returns the session settings object for the session
Agenda2 User Manual Copyright© 2010-2013 Bobsoft
32 of 34
10.8.Session Settings Commands
Command
Description
session.sessionSettings.borderColor
Returns the color object set for the
borders of any item tables in this
session.
session.sessionSettings.borderWidth
Returns the border width which can
be used for any item tables in this
session.
session.sessionSettings.showBorders
session.sessionSettings.itemPadding
Returns the value set for the table
padding for this session.
session.sessionSettings.titleFieldWidth
Returns the value set for the title
field width used for any item tables in
this session.
session.sessionSettings.durationFieldWidth
Returns the value set for the
duration field width used for any item
tables in this session.
session.sessionSettings.speakerFieldWidth
Returns the value set for the
speaker field width used for any item
tables in this session.
session.sessionSettings.infoFieldWidth
Returns the value set for the
information (overrun, constrained,
etc) field width used for any item
tables in this session.
session.sessionSettings.timeFieldWidth
Returns the value set for the time
field width used for any item tables in
this session.
session.sessionSettings.sepFieldWidth
Returns the value set for the time
separator width used for any item
tables in this session.
session.sessionSettings.itemizeStyle
Returns the value itemize style:
• 0 == none
• 1 == bullets
• 2 == numbered
• 3 == times
session.sessionSettings.colorByTheme
Agenda2 User Manual Copyright© 2010-2013 Bobsoft
33 of 34
Command
Description
session.sessionSettings.useMeetingFont
session.sessionSettings.includeLocation
session.sessionSettings.includeDateTime
session.sessionSettings.font
10.9.Agenda Item Commands
Command
Description
item.tableRow
Returns a formatted HTML table
row respecting the settings in
Agenda2.
item.infoString
Returns the information string for
this agenda item.
item.itemizeString
Returns the itemize string for this
agenda item. This will be either
empty, a bullet, a number or a time
range, depending on the settings.
item.titleString
Returns the title string for this
agenda item.
item.speakerString
Returns the speaker string for this
agenda item.
item.durationString
Returns the duration string for this
agenda item.
Agenda2 User Manual Copyright© 2010-2013 Bobsoft
34 of 34