1
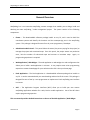
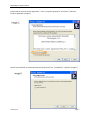
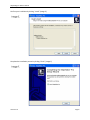
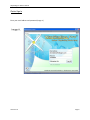
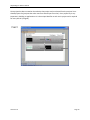
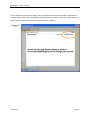
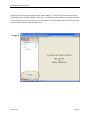
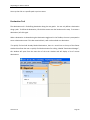
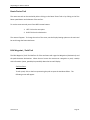
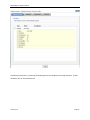
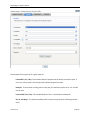
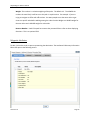
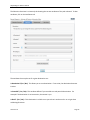
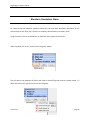
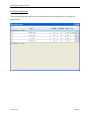
Plotter Software User Guide: Version #: 2.01 April 3, 2014 This Document is the Property of: Rivendell Technologies, LLC 3316 5th Avenue – Suite 100 Altoona, PA 16602 © Copyright 2014, Rivendell Technologies, LLC, All right reserved. Patents Pending. Wayfinding Pro Plotter Manual Table of Contents General Overview……………………………………………………………………………….4 Downloading and Installing Plotter…………………………………………………………5 Sign In…………………………………………………………………………………………………….9 General Controls……………………………………………………………………………………13 Basic Functions………………………………………………………………………………………13 Map List………………………………………………………………………………………….16 Toolbox…………………………………………………………………………………………..17 Pan Tool……………………………………………………………………………………………….17 Path/Aisle Tool…………………………….………………………………………………………18 Move Tool…………………………………………………………………………………………….19 Selection Tool……………………………………………………………………………………….19 Eraser Tool……………………………………………………………………………………………19 Destination Tool……………………………………………………………………………………20 Route Tester Tool………………………………………………………………………………….21 Edit Waypoint Path Tool…………………….…………………………………………………21 Zoom…………………………………………………………………………………………………….26 POI Manager…………………………………………………………………………………………27 Elevators, Escalators, Stairs……………………………………………………………………28 Elevators, Escalators, Stairs……………………………………………………………..29 Vertical Lift Type……………………………………………………………………………………30 Version 2.01 Page 2 Wayfinding Pro Plotter Manual Vertical Lift Direction……………………………………………………………………………30 Disable Vertical Lift……………………………………………………………………………….30 Delete Vertical Lift………………………………………………………………………………..30 Tool Bar…………………………………………………………………………………………..30 File……………………………………………………………………………………………………….30 Edit……………………………………………………………………………………………………….31 Project Settings…………………………………………………………………………………….32 Display Settings…………………………………………………………………………………….32 POI Manager…………………………………………………………………………………………33 Destinations Manager…………………………………………………………………………..35 Short Cut Keys…………………………………………………………………………………36 Index……………………………………………………………………………………………….37 Version 2.01 Page 3 Wayfinding Pro Plotter Manual General Overview Wayfinding Pro is an interactive wayfinding content manager that enables you to design, build and develop your own wayfinding / indoor navigational project. The system consists of the following components: Plotter – This downloadable software package installs on any PC, and is used to build the coordinate systems and identify the locations and the accompanying text in the wayfinding system. This package is designed for ease of use by a non-programmer / developer. Administrative Web Portal – This portal allows the owner (the person paying for the project) to manage the project and associated maps. From this portal, the project owner may authorize users, limit the number of authorized maps and activate or inactivate maps. Again, no programming experience is required. Web Application / Web Widget – The web application or web widget is a code configurator that allows you to build a web application in minutes. It may require some minor programming expertise to create the web page for your web site and to link it into your home page. Kiosk Application – The kiosk application is a downloadable software package that installs on any PC. It can be customized with your own branding and sized to fit the screen. This package is designed for ease of use by a non-programmer to implement a kiosk wayfinding user interface in minutes. API’s – The Application Program Interfaces (API’s) allow you to build your own custom wayfinding applications whether for a web, kiosk or mobile application. Use of the API’s does require programming expertise. This user manual provides detailed instructions on the use of the Web Application / Web Widget. Version 2.01 Page 4 Wayfinding Pro Plotter Manual Program Download and Install System Requirements This software package is downloadable from any Administrative Web Portal pages. Wayfinding Pro is a graphic design system and utilizes considerable processing resources to productively create maps. The systems requirements required for effective use of the Plotter are: Processor: 32 bit or 64 bit Intel or AMD multi-core Processor Memory: 4GB RAM minimum (8GB recommended) Available Free Disk Space: 4.5GB Operating System: Windows XP, Windows 7, Windows 8 (32 or 62 bit) Download and Install To download and install the Wayfinding Pro software, you must first be a registered user. To become a registered user, go to https://wayfindingpro.com/register. Once registered, click the download button at the bottom left of the website. (Image A.) Version 2.01 Page 5 Wayfinding Pro Plotter Manual When prompted, click run on your web browser and follow the set-up instructions. (Images B-F.) Version 2.01 Page 6 Wayfinding Pro Plotter Manual Please read the end user license agreement. Click “I accept the agreement” and “Next” if the terms listed are agreeable. (Image C.) Select if you would like to create a desktop and quick launch icon. The default is “checked” (Image D.) Version 2.01 Page 7 Wayfinding Pro Plotter Manual Confirm your installation by clicking “Install” (Image E.) Complete the installation process by clicking “Finish” (Image F.) Version 2.01 Page 8 Wayfinding Pro Plotter Manual Plotter Sign In Enter your email address and password (Image A.) Version 2.01 Page 9 Wayfinding Pro Plotter Manual Once project has been created on the website, that project may be selected from the projects list or shared projects list (projects that other users have invited you to work on). Your project key is very important in building an application as it is the unique identifier to each user’s project and is required for every API call. (Image B) Version 2.01 Page 10 Wayfinding Pro Plotter Manual If you are editing someone else’s project, then you should click on the Shared Projects radio button in the upper right corner or go to the Administrative Web Portal to create a project. If the message shown below appears, no projects have been created for sharing. (Image C.) Version 2.01 Page 11 Wayfinding Pro Plotter Manual After you open a project, the deck top on the left will appear. To work on a map, select a floor plan or click the add button to add a building or floor map. The Speed Keys at the bottom of the page will zoom in on an image. Either the route Tester tool in the Toolbox or the Test Route button at the bottom of the screen will allow the user to test plotted routes. Version 2.01 Page 12 Wayfinding Pro Plotter Manual General Controls The Plotter is a tool for working both on your own projects as well as other projects that have been shared with you. The Plotter utilizes both the right and left buttons on your mouse. The normal left mouse button is used as with any standard application. The right mouse button brings up special controls that are commonly used during the editing process. With each step these right mouse buttons will be explained. With this function, the user can adjust attributes, write descriptions of waypoints, and give a selection overview (i.e. – is route passable, kiosk, accessible). The Navigation Plane on the left has three tool bars: 1. Map List – Manage maps from this tool bar 2. Tool Box – Design and edit your map from this tool bar 3. Elevators, Escalators, Stairs – Define the connection points between floors Map Hierarchy Wayfinding Pro is organized into organization tiers. The main 2 tiers are buildings and floors: 1. Buildings: For each map, one building may be defined and there must be one building per project in order to proceed. A building is not a map but a designated location. The floor of a building is a map. 2. Floor Map: For each building, multiple floors may be defined. Each floor may be linked together by defining the elevators, escalators or stairs that link them together. A building must have at least one floor. Basic Functions Understanding Destinations / Waypoint Destinations or waypoints are end points defined by the user when paths are drawn. The system automatically creates a waypoint each time paths intersect. Version 2.01 Page 13 Wayfinding Pro Plotter Manual Individual attributes may be defined for each waypoint. These attributes not only define the manner by which the directions are determined, but the way in which you can build directories to guide the users in your application. Sharing a Project To share a project with another user, the owner of the project must sign onto the Administrative Web Portal and initiate an invitation using the tools in the invites tab. (Note: The owner must first click “Add User” on the Projects page.) To share a project, both participants must be registered users of Wayfinding Pro. Registered users who do not own any projects and are only working on shared maps do not need to enter any billing information. Once an invitation has been sent by the owner of the project to another user, the user must accept the invitation. This acceptance is performed in the Administrative Web Portal under the invites tab. Multiple Users Working on the Same Project The system allows for multiple users to work on the same project at the same time. However, it will not allow two users to work on the same map at the same time. When a user begins working on a map in the Plotter, it will automatically close that map on the 2nd users system and indicate it is locked. When the first user is finished editing and saving the map, a notification is sent to the 2nd user indicating that the map is now available for editing. Examples: Two people working on the same project simultaneously. The project has one building and two floors. Example A 1. Person-A makes a change to floor-1. Version 2.01 Person-B's plotter closes floor-1 if it's open. Person-B's plotter shows a "locked" icon next to floor-1's name. Person-B is not able to open or edit floor-1. Page 14 Wayfinding Pro Plotter Manual 2. Person-A saves their changes. Person-B's plotter shows a notification that Person-A has finished editing floor-1. Person-B's plotter removes the "locked" icon next to floor-1's name. Person-B's plotter downloads the updated floor-1. Person-B is now able to open and edit floor-1. Example B 1. Person-A opens the elevator editor tool. Person-B's plotter closes floor-1 if it's open. Person-B's plotter closes floor-2 if it's open Person-B's plotter shows a "locked" icon next to floor-1's name. Person-B's plotter shows a "locked" icon next to floor-2's name. Person-B is not able to open or edit floor-1. Person-B is not able to open or edit floor-2. 2. Person-A closes the elevator editor and saves their changes. Person-B's plotter shows a notification that Person-A has finished editing floor-1. Person-B's plotter shows a notification that Person-A has finished editing floor-2. Person-B's plotter removes the "locked" icon next to floor-1's name. Person-B's plotter removes the "locked" icon next to floor-2's name. Person-B's plotter downloads the updated floor-1. Person-B's plotter downloads the updated floor-2. Person-B is now able to open and edit floor-1. Person-B is now able to open and edit floor-2. Deleting a Project A project cannot be deleted from the Plotter. It can only be deleted by the project owner from the Administrative Web Portal. Version 2.01 Page 15 Wayfinding Pro Plotter Manual Map List The Map List relates specifically to the project you have selected. Maps are classified into 2 categories: 1. Building Maps 2. Floor Maps There can only be one building per map, but there can be multiple floors per building. Loading Maps All maps must be loaded as image files. Acceptable file formats include: PNG, JPEG, GIF and Bitmap. Any images in PDF format, Adobe or CAD system drawings must be saved as one of these formats. If you would like your map to have a transparent background, it is recommended that you load your map as a PNG file with a transparent background. Defining North It is important to define the orientation of any map that is used, so with any map that is scanned in, you should define “North”. Defining North for Floor Maps: To define North on a Floor Map, click the arrow beside the floor on the Maps List and select North. A dropdown box will appear and a direction can be selected. Buildings Buildings are not maps, but designated locations. Buildings can be renamed by clicking on the arrow next to the Building function and selecting “Rename Building”. Once selected, enter a new name. Version 2.01 Page 16 Wayfinding Pro Plotter Manual Floor Maps Add a Floor Map To add a Floor Map, click on the “Add a Floor” link under the Maps List. You must enter a floor number and a floor name. Then click on “Browse for Image” and import your map. All image files must be in PNG, JPEG, GIF or Bitmap formats. Change a Floor Number To change the Floor Number, click on the right arrow and select Change Floor and enter a new floor number. Please note: floor numbers cannot be duplicated. Change Image To change the image of the Floor Map, click on the right arrow and select Map Image. Delete a Floor Map To Delete a Floor Map, click on the right arrow and select Delete Floor Map. Rename a Floor To Rename a Floor Map, click on the right arrow and select Rename Floor Link and enter the new name. Tool Box Pan Tool The Pan Tool allows you to move the map across the canvas. This is performed by moving the mouse over the map, holding down the left mouse button and moving the mouse. Version 2.01 Page 17 Wayfinding Pro Plotter Manual Path Tool The path tool is used to build the paths or walkways on the map. Applying attributes to these paths is performed using the Edit Wayfinding / Path Info. function. When you click on the path tool, two options will appear. If you click on the right arrow, a list of attributes will appear. Options: Allow Diagonals Lines The Path Tool is designed to allow a path to be drawn in any direction. Many maps are set up in a grid format. By un-checking the Allow Diagonal Lines box, the Path Tool will only allow lines to be drawn in the up/down, left/right and at a 45° angel. If the box is checked, you may draw the path at any angle. Allow Intersections The Path Tool will automatically create intersections where two paths cross. An intersection allows a route to make a turn where the two paths cross. If you do not want to create an intersection, uncheck this box. Attributes: (located after clicking the right arrow beside the Path Tool function) Path Attributes The Path Attributes enables a user to select the specific path attributes (line color, weight and border). Route Attributes The Route Attributes enables a user to select the specific route attributes (line color, weight and border). The route is displayed when the Test Route option is used. This only impacts the users specific editor, it does not impact the way routes are displayed in the wayfinding application. Version 2.01 Page 18 Wayfinding Pro Plotter Manual Waypoint Attributes The Waypoint Attributes enables a user to select the specific waypoint attributes (line color, weight and border). Destination Indicators The Destination Indicators enables a user to select the specific destination attributes. Other Info. These options allow the user to display directional arrows and any Point of Interest Icons that are assigned to a destination on the editor. This only impacts the user’s specific editor; it does not impact how maps are displayed in the wayfinding application. Move Tool The Move Tool allows you to move specific locations or the entire path grid. To move a specific destination, move the mouse over the destination, hold down the left mouse button and move the mouse to the desired location and release. Selection Tool The section tool allows you to click and drag your mouse over an area to select waypoints and paths. To select only waypoints or paths, un-check the appropriate box. Once select, right click your mouse to display the attributes box. A full explanation of the attributes may be found in the Waypoint / Path Info. function section. Eraser Tool To use the Eraser Tool, left click the mouse and hold, then drag your mouse across the area to erase. If you make a mistake, use the undo tool under the Edit tool bar. Version 2.01 Page 19 Wayfinding Pro Plotter Manual You may also click on a specific path or point to erase. Destination Tool The destination tool is for defining destination along the way paths. You can only define a destination along a path. To define the destination, left-click the mouse over the location on the map. To remove a destination, left-click again. When a destination is selected using the Destination toggle tool in the Toolbox, the user is prompted to enter a destination name. If this box remains blank, it will not be marked as a destination. *To quickly find and edit already labeled destinations, there is a search bar at the top of the Plotter window that allows the user to quickly find the destination for editing. Labeled “Destination Manager”, this window will open from the menu bar of the main window and will display a list of current destinations. Version 2.01 Page 20 Wayfinding Pro Plotter Manual Route Tester Tool The route test tool can be reached by either clicking on the Route Tester Tool or by clicking on the Test Route speed button at the bottom of the tool bar. To use the route test tool you will use BOTH mouse buttons. 1. LEFT-click on the start point 2. RIGHT-click on the destination. The route will appear. To change the color of the route, use the Display Setting option on the main tool bar and change the Route Attributes. Edit Waypoint / Path Tool The Edit Waypoint / Path Tool defines all of the attributes with regard to Waypoints (destinations) and the paths between destinations. When the user hovers the mouse over a waypoint or path, a tooltip with information (name, passable/not passable) about that item will display. Path Attributes To edit a path, click on the line representing the path to open the Attributes Editor. The following screen will appear: Version 2.01 Page 21 Wayfinding Pro Plotter Manual The Selection Overview is a view only tab showing the current attributes of the path selected. To alter attributes, click on the Attributes tab. Version 2.01 Page 22 Wayfinding Pro Plotter Manual The attributes that may be set for a given path are: Is Passable? (Yes / No): This attribute defines if people have the ability to travel this path. If set to no, it will prevent it from being used in determining the best path. Example: If construction is taking place on this path, this attribute may be set to “no” and will not be used. Is Accessible? (Yes / No): This attribute defines if this is a handicap accessible path. One or Two Way?: This attribute enables paths to be one way only when calculating the best route. Version 2.01 Page 23 Wayfinding Pro Plotter Manual Weight: This number is a relative weighting of the paths. The default is 3. The LOWER the number the more likely it will be to use this path in any directions. For example: If you are trying to navigate an office with office cubes. You want people to use the outer aisles to get close to a specific cube before walking among the cubes. Set the Weight to a LOWER weight for the otter aisles and a HIGHER weight for cube aisles. Name or Number: Used if the path has a name that you would like to refer to when displaying directions. This is an optional field. Waypoint Attributes To edit, click on the circle or square representing the destination. The Attributes & Directory Information Editor will open to the following screen: Version 2.01 Page 24 Wayfinding Pro Plotter Manual The Selection Overview is a view only tab showing the current attributes of the path selected. To alter attributes, click on the Attributes tab. The attributes that may be set for a given destination are: Is Destination? (Yes / No): This allows you to set a destination. If set to No, the destination becomes inactive. Is Passable? (Yes / No): This attribute defines if you are able to travel past this destination. For example if the destination is an intersection, the answer is yes. Is Kiosk? (Yes / No): If this destination is a kiosk set to yes so that it can be used as an origin when calculating directions. Version 2.01 Page 25 Wayfinding Pro Plotter Manual Is Accessible? (Yes / No): This attribute defines if this is a handicap accessible destination. POI Category: You can assign a POI category icon to the destination. This will be passed to your application. Name or Number: This can be a destination name, room number or booth number. Description: You can enter a long description of the destination including imbedded links if desired. Departments This feature is used to create and manage departments for directory purposes. Departments are used to create groups of waypoints such as “Clothing”, “Dining”, “Building Exits”, “Restrooms”, “ATM’s”, etc. This allows users find all destinations within a department. For example: a user could view all stores in a mall that sell clothes by selecting the department named “Clothing”. Also Here This feature is used to add and manage multiple destinations that are also at this location. For example: An office building may require all guests to be directed to a Receptionist on each floor rather than to a specific office. So the destination would be the receptionist, but all of the associated offices would be listed in the Also Here list so that they can appear in the directory. Zoom Zoom In The Zoom In feature enables a user to zoom in (make bigger and reduce the view area) on the map. Zoom Out The Zoom Out feature enables a user to zoom out (make smaller and increase the view area) on the map. Reset Zoom The Reset Zoom feature will restore the canvas to its original size. Version 2.01 Page 26 Wayfinding Pro Plotter Manual Points of Interest (POI) Manager Destinations can be tagged with a Point of Interest icon. This allows the application designer to display these icons when they display the map. Point of Interests may be destinations such as restrooms, restaurants, different departments such as jewelry, hand bag, etc. There is an extensive library of existing icons already located on Wayfinding Pro as well as a function to create your own! Tagging a destination with a Point of Interest Icon To attach a POI Icon to a destination, use the Edit Waypoint / Path Info. function and select the POI icon. Active Category List By clicking on the right arrow, you may choose the POI Active Category List. View / Edit Categories Clicking on View / Edit Categories will bring up the POI Lists Manager. From this list you can add, delete or create your own POI categories. Add New Icons To add a new Icon you must first create a category. To do so: 1. Click on File 2. Click on New List or to start with current default icons, click New List from Current 3. Enter the title of your category and click OK 4. Click on Insert 5. Click on Add New Category or insert an entire folder of icons by clicking on Bulk Add New Category 6. Enter the name of the icon 7. Browse for the image to import (use PNG, JPEG, GIF or Bitmap image) 8. Click Save Version 2.01 Page 27 Wayfinding Pro Plotter Manual 9. Note: the category must be saved before exiting in order for the changes to be saved. You will be prompted to do so as you exit. Delete Icons Only lists created by the user can be deleted from the POI Manager. There are 2 ways to delete icons: 1. Click File, then Delete List. Select “Name of Opened List Here”. By clicking this menu item, the entire opened list will be deleted. 2. Click Edit, then Delete. By clicking this menu item, the selected icon from the opened list will be deleted. Show POI By checking this box, the POI Icons will appear on your map beside their associated destination. This does not impact how they are displayed in the application. Elevators, Escalators, Stairs, Etc. Clicking on this function under Toolbox will take you to the Elevator, Escalators, Stairs section of the Plotter. Version 2.01 Page 28 Wayfinding Pro Plotter Manual Elevators, Escalators, Stairs To create vertical lifts (elevators, escalators and stairs), you must have identified a destination for the vertical lift(s) on each floor map. Once this is complete, select Elevators, Escalators, Stairs. Using the mouse, click on the destination on each floor that represents vertical lift. When complete, click on the “create vertical lift group” button. This will draw a path between the floors and create a vertical life group below the create button. To define this vertical lift, right click on the vertical lift group: Version 2.01 Page 29 Wayfinding Pro Plotter Manual Vertical Lift Type Select the vertical lift type from the drop down box. Types include: Elevator, Escalator, Stairs, ramp and other. (see figure above.) Vertical Lift Direction Select if the lift is up only, down only or both (see figure above). Disable Vertical Lift To disable the lift, click on the Disable Vertical Lift option (see figure above). Delete Vertical Lift To delete the vertical lift, click on the Delete Vertical Lift option (see figure above). To define the attributes of the vertical lift (such as accessible), adjust the attributes of each destination which designates the location of the vertical lift. Tool Bar File Open Project The open project function displays the projects that are available for editing. The user may select from your own projects or those that you have been invited to share. To switch between your own and shared projects, click on the respective radio button. Version 2.01 Page 30 Wayfinding Pro Plotter Manual It is important to note that you cannot create a new project from the Plotter. To create a new project, you must sign onto the Administrative Web Portal and click on create a project. To view shared projects, you must be invited by the owner of the project and have accepted the invitation (through the Administrative Web Portal) in order for shared projects to be in your project list. Please note that project owners have the ability to “un-invite” users from their projects. If a project is removed from your shared list, the owner of the project should be contacted. Save & Upload Project The Save & Upload Project Function will save your current work to the cloud. You must have an active internet connection in order for the file to be saved. In order to open a project and work on a map, an Internet connection must be established. View Project The view project function displays your current project in a web browser using a simple web based wayfinding template. This function will display your project in either Chrome or Internet Explorer. Edit Undo The Undo function reverses the previous action. Redo The redo function performs a previously undone action. Version 2.01 Page 31 Wayfinding Pro Plotter Manual Project Settings Project Reload The project reload function will reload the project from the cloud. If you have made changes to the project, you will be prompted to save the changes. Display Settings Path Attributes The Path Attributes enables a user to select the specific path attributes (line color, weight and border). Route Attributes The Route Attributes enables a user to select the specific route attributes (line color, weight and border). The route is displayed when the Test Route option is used. This only impacts the users specific editor, it does not impact the way routes are displayed in the wayfinding application. Waypoint Attributes The Waypoint Attributes enables a user to select the specific waypoint attributes (line color, weight and border). Destination Indicators The Destination Indicators enables a user to select the specific destination attributes. Other Info. These options allow the user to display directional arrows and any Point of Interest Icons that are assigned to a destination on the editor. This only impacts the user’s specific editor; it does not impact how the maps are displayed in the wayfinding application. Version 2.01 Page 32 Wayfinding Pro Plotter Manual POI Manager (Points of Interest) Destinations can be tagged with a Point of Interest icon. This allows the application designer to display these icons when they display the map. Point of Interests may be destinations such as restrooms, restaurants, different departments such as jewelry, hand bag, etc. There is an extensive library of Point of Interest Icons included with Wayfinding Pro and you can create and add your own. Tagging a destination with a Point of Interest Icon To attach a POI Icon to a destination, use the Edit Waypoint / Path Info. function and select the POI icon. Active Category List By clicking on the right arrow, you may choose the POI Active Category List. View / Edit Categories Clicking on View / Edit Categories will bring up the POI Lists Manger. From this list you can add, delete or create your own POI categories. Add New Icons To add a new Icon you must first create a category. To do so: 1. Click on File 2. Click on New List (or New List from Current if you want to start with the current default Icons) 3. Enter the title of your category and click OK. 4. Click on Insert 5. Click on Add New Category or you can insert an entire folder of icons by clicking on Bulk Add New Category 6. Enter the name of the icon 7. Browse for the image to import (use PNG, JPEG, GIF or Bitmap image) 8. Click Save Version 2.01 Page 33 Wayfinding Pro Plotter Manual 9. Note: You must save your category before exiting in order for these to be saved. You will be prompted as you exit. Delete Icons 1. Click File, then Delete List. Select “Name of Opened List Here”. By clicking this menu item, the entire opened list will be deleted. 2. Click Edit, then Delete. By clicking this menu item, the selected icon from the opened list will be deleted. Version 2.01 Page 34 Wayfinding Pro Plotter Manual Destinations Manager The Destinations Manager will list all created destinations on a map and allow for editing. (see figure below.) Version 2.01 Page 35 Wayfinding Pro Plotter Manual Short Cut Keys Ctrl + O Open Project Ctrl + S Save & Upload Project Ctrl + Z Undo Ctrl + Y Redo Ctrl + + Zoom In Ctrl + - Zoom Out Ctrl + 0 Reset Zoom Ctrl + N New List (in POI Manager) Ctrl + X Cut Ctrl + C Copy Ctrl + V Paste Del Delete Ctrl Shift + N New List from Current (in POI Manager) Ctrl Shift + S Save POI Lists (in POI Manager) Ctrl +W Close POI Manager Version 2.01 Page 36 Wayfinding Pro Plotter Manual Index Allow Diagonals Lines, 18 Allow Intersections, 18 Also Here, 26 Buildings, 13, 16 Delete a Floor Map, 17 Departments, 26 Destination Attributes, 24 Destination Attributes - Description, 26 Destination Attributes - Is Accessible?, 26 Destination Attributes - Is Destination?, 25 Destination Attributes - Is Kiosk?, 25 Destination Attributes - Is Passable?, 25 Destination Attributes - Name or No., 26 Destination Attributes - POI Category, 26 Destination Indicators, 19, 32 Destination Tool, 20 Destinations / Waypoint, 13 directional arrows, 19 Directional Arrows, 32 Download and Install, 5 Edit Waypoint / Path Tool, 21 Elevators / Stairs, Etc., 28 Elevators, Escalators, Stairs, 29 Eraser Tool, 19 Floor Map, 13 Floor Maps - Add, 17 Floor Maps - Change a Floor No., 17 Floor Maps - Change Image, 17 Floor Maps - Rename, 17 Move Tool, 19 Multiple Users / Same Project, 14 Open Project, 30 Pan Tool, 17 Path Attributes, 18, 21, 32 Path Attributes - Is Accessible, 23 Path Attributes - One or Two Way, 23 Path Attributes - Weight, 24 Path Attrubites - Is Passable?, 23 Path Tool, 18 POI - Active Category List, 27, 33 POI - Add New Icons, 27, 33 POI - Delete Icons, 34, 35 POI - View / Edit Categories, 27, 33 Point of Interest Icons, 19, 32 Points of Interest, 27 Project Reload, 32 Redo, 31 Reset Zoom, 26 Route Attributes, 18, 32 Route Tester Tool, 21 Save & Upload Project, 31 Selection Tool, 19 Sharing a Project, 14 Short Cut Keys, 36 Show POI, 28 Tagging a destination with a POI Icon, 27, 33 The Navigation Plane, 13 Undo, 31 Vertical Lift - Attributes, 30 Vertical Lift - Delete, 30 Vertical Lift - Direction, 30 Vertical Lift - Disable, 30 Vertical Lift - Type, 30 View Project, 31 Waypoint Attributes, 19, 32 Zoom, 26 Zoom In, 26 Zoom Out, 26 THIS BOOKLET IS THE PROPERTY OF RIVENDELL TECHNOLOGIES, LLC. Version 2.01 Page 37 Wayfinding Pro Plotter Manual © Rivendell Technologies, LLC, 2014 ALL RIGHTS RESERVED UNDER THE COPYRIGHT LAWS OF THE UNITED STATES OF AMERICA . THIS IS COMMERCIAL TECHNICAL DATA THAT HAS BEEN DEVELOPED AT PRIVATE EXPENSE. THE GOVERNMENT’S USE, MODIFICATION, REPRODUCTION, RELEASE, PERFORMANCE, DISPLAY AND DISCLOSURE OF THIS COMMERCIAL TECHNICAL DATA SHALL BE IN STRICT ACCORDANCE WITH 48 C.F.R. 12.211, 48 C.F.R. 52.227-14, 48 C.F.R. 252.227-7015 AND 48 C.F.R. 227.7102 AND IN STRICT ACCORDANCE WITH OUR STANDARD LICENSE TERMS. UNPUBLISHED – RIGHTS RESERVED UNDER THE COPYRIGHT LAWS OF THE UNITED STATES OF AMERICA © Rivendell Technologies, LLC, 2014 Version 2.01 Page 38