1
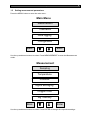
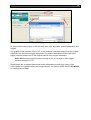
PreSens
Precision Sensing GmbH
Instruction Manual
Control panel LP-1 v2
Manual Version 5
PreSens
Precision Sensing GmbH
Control panel LP-1 v2
LCD&Data-logger Unit
PC Software Version LCDLP1v105
June 2007
Specification:
Control panel with graphical LCD and integrated
Data-logger for oxygen and trace oxygen meters.
PC control of the LCD&Data-logger Unit is
available.
Manufacturer:
PreSens
Precision Sensing GmbH
Josef-Engert-Straße 11
D-93053 Regensburg
Germany
Phone:
Fax:
Email:
Internet:
Date: 18 June 2007
+49 941 942 72 100
+49 941 942 72 111
[email protected]
www.presens.de
Filename: 70618_LP1v2_UM5
Table of contents
2
Table of contents
Control panel ..........................................................................................................................3
1.1
Compatibility ...........................................................................................................3
1.2
Starting the instrument ..........................................................................................3
1.3
Setting measurement parameters.........................................................................6
1.4
Calibration ...............................................................................................................7
1.4.1
1.4.2
1.4.3
Calibration standards for the respective oxygen sensors ............................................................ 8
Calibration of the PSt1 and PSt3 oxygen sensors..................................................................... 10
Calibration of the PSt6 oxygen sensor ...................................................................................... 11
1.5
Sensor type ...........................................................................................................13
1.6
Data logging ..........................................................................................................13
1.7
Configuration ........................................................................................................15
1.8
Technical data.......................................................................................................17
1.9
Menu structure......................................................................................................18
3
Control panel
Control panel
The control panel LP-1 is a device to control several PreSens oxygen and trace oxygen
meters without the need to connect the oxygen meters to PC. The LP-1 supports the oxygen
meters Microx TX3, Fibox 3 and Fibox 3-trace v3.
It is also possible to store up to 26150 readings into the internal memory of the control panel.
For readout of stored data a connection to a PC and the use of the PC software LCDLP1 is
necessary.
1.1
Compatibility
The control panel LP-1 supports the following oxygen meters with three versions of oxygen
sensor as displayed in the chart below.
oxygen meter and sensor compatibility of the LP-1 v2
sensor
PSt1
PSt3
oxygen meter
PSt6
Fibox 3 (FW 3.016)
▬
X
▬
Fibox 3-trace v3 (FW 3.025)
▬
X
X
Microx TX3 (FW 3.016)
X
▬
▬
Oxygen meters with other firmware version or not listed types are not compatible. If a
supported device shows ‘Device type’ on the Display from the control panel, please contact
our service team for help and further information’s!
1.2
Starting the instrument
Connect the delivered cables on the backside between the instrument and the control panel
LP-1 as shown in picture 1 (12 VDC cable left and RS232 cable rightmost). Then connect the
respectively power supply (send by oxygen instrument) into the control panel and attach the
temperature sensor and oxygen sensor to the instrument.
Picture 1: Connection between control panel and oxygen instrument
Control panel
Switch on the instrument by pressing the button on the right side (pic 2):
Picture 2: Topside control panel
The instrument starts to measure with the settings of the last measurements.
By pressing VIEW (second button from left) you can choose between three different views:
1st VIEW:
4
5
Control panel
2nd VIEW:
3rd VIEW:
Actual oxygen
value
Maximum
oxygen value
Actual oxygen
value
Ongoing
graph
Status of
temperature
Minimum
oxygen value
Selected sampling
rate x 5 times
6
Control panel
1.3
Setting measurement parameters
Press the MENU button to enter the main menu:
Main Menu
Measurement
Calibration
Data logging
Configuration
Back
Enter
Use the up and down buttons to select. Press MEASUREMENT to enter the Measurement
mode:
Measurement
Sampling
Temperature
Pressure
Signal averaging
Oxygen units
Sig. intensity
Back
Enter
Use the up and down buttons to select. Press ENTER to change the respective settings:
Control panel
Sampling rate:
Press edit to change sampling rate and adjust the desired sampling rate. Use the up and
down buttons to select the respective unit and confirm by pressing enter.
Note! The minimum sampling rate from devices which are connected to the Control
Panel LP-1 is 2 sec!
Temperature:
Press edit to change the temperature compensation:
Pt 1000 means temperature compensation with the delivered Temperature sensor
Manual allows the manual input of a constant temperature; Use the up and down buttons to
select the desired temperature and confirm by pressing enter
Pressure:
Disabled – please contact our service for this function!
Signal averaging:
Press edit to change Signal Averaging
Auto: The instrument itself chooses the best settings
Manual The higher the running average, the longer the time (sampling time) used for
averaging. The higher the running average is set, the smoother the measurement signal
Oxygen units:
Press edit to change the oxygen unit displayed. Use the up and down buttons to select the
respective unit and confirm by pressing enter.
Sig. Intensity:
Press edit to change the intensity of the signal LED. Please notice that your calibration is
not valid after changing this parameter! Use the + and – button to adjust and press SET
to confirm the settings. Values between 5 and 100 % are possible.
1.4
Calibration
Press ‘Status‘ to display the settings of your last calibration.
You can press any button to return to the main menu.
Press ‘Calibrate‘ to enter the calibration procedure.
Choose the calibration mode:
a)Temperature ON means calibration with the actual temperature reading (either
Pt1000, external or manual which is defined under Measurement – Temperature).
b)Temperature OFF means calibration with the manual input of temperature
c)Manual means manual input of phase and temperature values
7
Control panel
1.4.1
8
Calibration standards for the respective oxygen sensors
• PSt1 type oxygen sensor
Calibration of oxygen microsensors (sensor type PSt1 compatible to Microx TX3 oxygen
meter) is performed using a conventional two-point calibration in oxygen-free water (cal 0)
and water vapor-saturated air or air-saturated water (cal 100).
Preparation of calibration solution 0 (oxygen-free water):
1. Add 1 g sodium sulfite (Na2SO3) to the vessel and label it cal 0.
2. Dissolve Na2SO3 in 100 mL water.
The water becomes oxygen-free due to a chemical reaction of oxygen with Na2SO3. Additional
oxygen, diffusing from air into the water, is removed by surplus of Na2SO3.
3. Close the vessel with a screw top and shake it for approximately one minute to dissolve
Na2SO3 and to ensure that the water is oxygen-free.
Keep the vessel closed after calibration with a screw top to minimize oxygen contamination.
To prepare oxygen-free water you also can use sodium dithionit (Na2S2O4). The shelf life of
cal 0 is about 24 hours provided that the vessel has been closed with the screw top.
As alternative you can also use pure nitrogen gas (5.0) to adjust the cal0 calibration value.
Preparation of calibration standard 100 (water-vapor saturated air)
1. Place wet cotton wool in a vessel and label it cal 100.
2.
Drill two holes for inserting the minisensor and the temperature sensor in the screw top
and close the vessel.
3.
Wait about 2 minutes to ensure that the air is water vapor-saturated
Alternative preparation of calibration standard 100 (air-saturated water)
1.
Add 100 mL water to a suitable vessel and label it cal 100.
2.
To obtain air-saturated water, blow air into the water using an air-pump with a glass-frit
(airstone), creating a multitude of small air bubbles, while stirring the solution.
3.
After 20 minutes, switch off the air-pump and stir the solution for further 10 minutes to
ensure that the water is not supersaturated.
Control panel
9
• PSt3 type oxygen sensor
Calibration of oxygen minisensors (sensor type PSt3 compatible to Fibox 3 or Fibox 3-Trace
v3 oxygen meter) is performed using a conventional two-point calibration in oxygen-free
water (cal 0) and water vapor-saturated air or air-saturated water (cal 100).
Preparation of calibration solution 0 (oxygen-free water):
1. Add 1 g sodium sulfite (Na2SO3) to the vessel and label it cal 0.
2. Dissolve Na2SO3 in 100 mL water.
The water becomes oxygen-free due to a chemical reaction of oxygen with Na2SO3. Additional
oxygen, diffusing from air into the water, is removed by surplus of Na2SO3.
3. Close the vessel with a screw top and shake it for approximately one minute to dissolve
Na2SO3 and to ensure that the water is oxygen-free.
Keep the vessel closed after calibration with a screw top to minimize oxygen contamination.
To prepare oxygen-free water you also can use sodium dithionit (Na2S2O4). The shelf life of
cal 0 is about 24 hours provided that the vessel has been closed with the screw top.
As alternative you can also use pure nitrogen gas (5.0) to adjust the cal0 calibration value.
Preparation of calibration standard 100 (water-vapor saturated air)
4.
Place wet cotton wool in a vessel and label it cal 100.
5.
Drill two holes for inserting the minisensor and the temperature sensor in the screw top
and close the vessel.
6.
Wait about 2 minutes to ensure that the air is water vapor-saturated
Alternative preparation of calibration standard 100 (air-saturated water)
4.
Add 100 mL water to a suitable vessel and label it cal 100.
5.
To obtain air-saturated water, blow air into the water using an air-pump with a glass-frit
(airstone), creating a multitude of small air bubbles, while stirring the solution.
6.
After 20 minutes, switch off the air-pump and stir the solution for further 10 minutes to
ensure that the water is not supersaturated.
• PSt6 type trace oxygen sensor
Calibration of trace oxygen minisensors PSt6 (compatible to Fibox 3-trace v3 oxygen meter)
is performed using a conventional two-point calibration in a nitrogen-saturated atmosphere
(nitrogen 5.0) (cal 0) and a second calibration value, optimally in the range between 5 and 10
% air-saturation (ca. 1 and 2 % pure oxygen). The second calibration value may be adjusted
via a gas mixing device or with a commercially available test gas. Please use humidified
gases e.g. by bubbling the gases through a washing bottle with a frit.
Control panel
1.4.2
•
10
Calibration of the PSt1 and PSt3 oxygen sensors
Calibration with temperature compensation:
1.
Choose Temperature ON in calibration menu;
2.
Adjust the atmospheric pressure by using the ‘+’ and ‘–‘ button. Confirm the
atmospheric pressure by pressing the ‘Set’ button;
3.
Please insert the sensor in the Cal0 calibration solution (sodium sulfite) or cal0
calibration gas (nitrogen 5.0);
Please have a look in the user manual for details of the calibration process
of the respective sensor!
4.
Wait about 3 minute until the phase angle and the temperature value is constant (the
variation of the phase angle and the temperature should be smaller than ± 0.05° and
0.1. Press the ‘STORE’ button.
5.
Please insert the sensor (PSt1, PSt3) into the cal100 calibration solution (airsaturated water) or cal100 gas (humidified air).
Please have a look in the user manual for details of the calibration process
of the respective sensor!
6.
Wait about 3 minute until the phase angle and the temperature value is constant (the
variation of the phase angle and the temperature should be smaller than ± 0.05° and
0.1. Press the ‘STORE’ button.
The calibration with temperature control is finished.
•
Calibration without temperature compensation:
1.
Choose Temperature OFF in calibration menu;
2.
Adjust the atmospheric pressure by using the ‘+’ and ‘–‘ button. Confirm the
atmospheric pressure by pressing the ‘Set’ button;
3.
Adjust the calibration temperature by using the ‘+’ and ‘–‘ button. Confirm the
calibration temperature by pressing the ‘Set’ button;
4.
Please insert the sensor in the Cal0 calibration solution (sodium sulfite) or cal0
calibration gas (nitrogen 5.0);
Please have a look in the user manual for details of the calibration process
of the respective sensor!
5.
Wait about 3 minute until the phase angle is constant (the variation of the phase
angle should be smaller than ± 0.05°. Press the ‘STORE’ button.
6.
Please insert the sensor (PSt1, PSt3) into the cal100 calibration solution (airsaturated water) or cal100 gas (humidified air). In case you are calibration a trace
oxygen sensor PSt6 please use a gas mixture between 1 and 2 % oxygen.
Please have a look in the user manual for details of the calibration process
of the respective sensor!
7.
Wait about 3 minute until the phase angle is constant (the variation of the phase
angle should be smaller than ± 0.05°. Press the ‘STORE’ button.
The calibration without temperature control is finished.
Control panel
•
11
Manual temperature compensation:
A manual calibration should be applied, if you don't want to calibrate your sensor again.
However, this is only possible if you already know the calibration values of the special
sensor.
PreSens GmbH delivers an inspection sheet with each oxygen sensor where you can find
two calibration values, which you have to enter in the manual calibration mode.
1.
Choose Manual in calibration menu;
Please have a look in the user manual for details of the calibration
process of the respective sensor!
2.
Enter the cal0 phase angle (first calibration value, provided on the inspection sheet)
by using the ‘+’ and ‘–‘ button. Confirm the cal0 phase angle of the 1st calibration
point by pressing the ‘Set’ button;
3.
Adjust the cal100 phase angle (second calibration value, provided on the inspection
sheet) by using the ‘+’ and ‘–‘ button. Confirm the cal100 phase angle of the 2nd
calibration point by pressing the ‘Set’ button;
4.
Adjust the calibration temperature of the first calibration value (provided on the
inspection sheet) by using the ‘+’ and ‘–‘ button. Confirm the calibration temperature
by pressing the ‘Set’ button;
5.
Adjust the calibration temperature of the second calibration value (provided on the
inspection sheet) by using the ‘+’ and ‘–‘ button. Confirm the calibration temperature
by pressing the ‘Set’ button;
6.
Adjust the atmospheric pressure (provided on the inspection sheet) by using the ‘+’
and ‘–‘ button. Confirm the atmospheric pressure by pressing the ‘Set’ button;
The manual calibration process is finished.
1.4.3
Calibration of the PSt6 oxygen sensor
Please have a look in the user manual for details of the calibration process of
the respective sensor type!
•
Calibration with temperature compensation
1. To calibrate the trace oxygen sensor with temperature compensation adjust sensor type
PSt6 in the calibration menu under ‘sensor type’
2. Press in the ‘Calibrate’ menu the button ‘temperature on’
3. Adjust the atmospheric pressure and confirm it by pressing the ‘Set’ button
4. Adjust the concentration of the second calibration gas in % air-saturation (e.g. 2 %
oxygen = 2/20.95*100 % air-sat. = 9.55 % air-sat.)and confirm it by pressing the ‘Set’
button
5. Please insert the sensor and the temperature sensor in the cal0 calibration standard.
Please ensure, not to create an overpressure and that no traces of oxygen can
diffuse into your measuring system.
6. Wait about 5 minutes until the phase angle and temperature are constant (the variation
of the phase angle and the temperature should be smaller than ± 0.05° and ± 0.1°C) and
press the ‘Store’ button.
7. Please insert the sensor and the temperature sensor in the second calibration standard.
Please ensure, not to create an overpressure or to contaminate your calibration
chamber with air.
Control panel
12
8. Wait about 5 minutes until the phase angle and temperature are constant (the variation
of the phase angle and the temperature should be smaller than ± 0.05° and ± 0.1°C) and
press the ‘Store’ button.
9. Now, calibration is complete. Protect the oxygen sensor with the delivered protective
plastic cover.
•
Calibration without temperature compensation
1) To calibrate the trace oxygen sensor without temperature compensation adjust sensor
type PSt6 in the calibration menu under ‘sensor type’;
2) Press in the ‘Calibrate’ menu the button ‘temperature off’;
3) Adjust the temperature of the calibration standards and confirm it by pressing the ‘Set’
button;
4) Adjust the atmospheric pressure and confirm it by pressing the ‘Set’ button;
5) Adjust the concentration of the second calibration gas in % air-saturation (e.g. 2 %
oxygen = 2/20.95*100 % air-sat. = 9.55 % air-sat.) and confirm it by pressing the ‘Set’
button
6) Please insert the sensor in the cal0 calibration standard. Please ensure, not to create
an overpressure and that no traces of oxygen can diffuse into your measuring
system.
7) Wait about 5 minutes until the phase angle and temperature are constant (the variation
of the phase angle should be smaller than ± 0.05°) and press the ‘Store’ button.
8) Please insert the sensor in the second calibration standard. Please ensure, not to
create an overpressure or to contaminate your calibration chamber with air.
9) Wait about 5 minutes until the phase angle and temperature are constant (the variation
of the phase angle should be smaller than ± 0.05°) and press the ‘Store’ button.
10) Now, calibration is complete. Protect the oxygen sensor with the delivered protective
plastic cover.
•
Manual Calibration
User-defined calibration should be applied, if you don't have the possibility to adjust the
second calibration value via a gas mixing device or if you don’t want to calibrate your sensor
again. PreSens GmbH delivers an inspection sheet with each oxygen sensor where you can
find two calibration values, which you have to enter in the user-defined calibration mode.
1) To calibrate the trace oxygen sensor with temperature compensation adjust sensor
type PSt6 in the calibration menu under ‘Sensor type’;
2) Press in the ‘Calibrate’ menu the button ‘Manual’;
3) Adjust the cal 0 phase angle delivered with the sensor inspection sheet;
4) Adjust the concentration of the second calibration gas in % air-saturation (e.g. 2 %
oxygen = 2/20.95*100 % air-sat. = 9.55 % air-sat.)and confirm it by pressing the ‘Set’
button
5) Adjust the second calibration phase angle delivered with the sensor inspection sheet;
6) Adjust the temperature for the cal0 calibration value and confirm it by pressing the
‘Set’ button;
7) Adjust the temperature for the second calibration value and confirm it by pressing the
‘Set’ button;
8) To finish the manual calibration, adjust the atmospheric pressure and confirm it by
pressing the ‘Set’ button;
Control panel
1.5
13
Sensor type
Press ‘Sensor type‘ in the Calibration menu to display the selected sensor or change the
sensor.
Note! The sensor selection is only enabled for trace devices!
To adjust the desired oxygen sensor type (PSt1, PSt3, PSt6) please go to Menu and
‘Sensor type’ or start the oxygen meter with the respective PC software there you also can
adjust the sensor type. The adjusted sensor type can be controlled in the menu configuration
under status.
Sensor type PSt1 for oxygen microsensors and the Microx TX3 oxygen meter (0-50 %
oxygen)
Sensor type PSt3 for oxygen minisensors and the Fibox 3 and Fibox 3-trace oxygen meter
(0-50 % oxygen)
Sensor type PSt6 for trace oxygen minisensors and the Fibox 3-trace oxygen meter (0-4.2
% oxygen)
1.6
Data logging
By default (delivery status) the data logger is stopped. In order to start data logging please
go to MENU and select ‘Data logging‘ and ‘Start‘. To stop the recording please select ‘Data
logging‘ and ‘Stop‘. The data logger status is available in ‘Data logging‘ and ‘Status‘ and
shows several details such as starting time and date, sampling rate, saved records and free
memory space. The maximal possible recording time depends on the selected sampling rate
and is shown on the display after selecting ‘Start‘.
During the recording (Data-logger activated) you can not access other functions from the
main menu. It is possible to switch off and restart the oxygen instrument again with activated
Data-logger. The recording of data will be continuing immediately after the restart.
Important! When you stopped the logging function and restart it, the previous records
will be overwritten!
Stored records can be uploaded with the supplied LP-1v104 software by clicking on the ’Data
logger’ button (Pic. 3). After choosing the folder for saving data (’file location’), you have to
click the ’Scan’ button and the software will show the stored number of data and the
estimated download time. The download will be started automatically after confirming the
shown details by clicking the ’Yes’ button.
14
Control panel
1
2
Picture 3: Readout stored records from Data logger
All records will be stored as a txt-file including date, time, amplitude, phase, temperature and
oxygen.
The graphical user interface (GUI) of LP-1v104 software is similarly designed as the original
software of the connected oxygen instrument. For detailed description of other then data
logger functions please refer to the original manual of the oxygen instrument.
Note! Measurement logging function (storage in PC) is not equal to Data logger
function (storage in LP-1).
Please follow the on-display instructions during initialisation process (app. 5sec), if the
control panel is to operate without any oxygen device. You have to switch into the PC MODE
to download stored data!
15
Control panel
1.7
Configuration
In this menu point you can set most instrument parameters
Configuration
Status
Analog out
Clock / Date
Display
Reset conditions
Back
Enter
Status:
Displays the main settings of the instruments:
Signal current [%]
Ref current [%]
Ref amplitude
Signal average
Temperat. Comp.
Sensor type
Firmware version
PhiBoard
LCD Borard
Serial number
Press any button to turn back to the main menu
If you have a problem with the oxygen meter or control panel, please contact our service
team and have the configuration status ready.
Control panel
16
Analog out:
Here you can choose which data are exported via the analogue outputs. The oxygen meter
has two voltage outputs (U1, U2). The desired data sources (oxygen, temperature,
amplitude, phase) can be chosen via the dialog box. The two output channels work
independent on each other.
Equivalence coefficient
oxygen
temperature
phase
amplitude
1 : 0.040 (e.g. 3,89 V = 97.25 % air saturation)
1 : 0.189 (e.g. 3.89 V = 20.6 % oxygen saturation)
1 : 0.019 (e.g. 3,89 V = 204.7 hPa)
1 : 0.026 (e.g. 3,89 V = 149.6 Torr)
1 : 0.434 (e.g. 3,89 V = 8.96 mg/l)
1 : 0.014 (e.g. 3,89 V = 277.85 umol/l)
1 : 0.166 (e.g. 3,45 V = 20.8°C)
1 : 0.112 (e.g. 3.08 V = 27.50°)
1 : 6.7*10-5 (e.g. 1,48 V = 22200 relative units)
Clock/Date:
Use ‘+’ and ‘next’ button to adjust clock and date and confirm with ‘SET’
Display:
Changes the backlight illumination of the display;
‘OFF’ The backlight illumination is switched off the complete time;
‘ON’ The backlight illumination is switched on the complete time;
‘Auto’ switches on the illumination after pressing any button and switches it of after a few
seconds.
Reset configuration:
Sets all parameters defined in this sub menu to default
Control panel
1.8
Technical data
DC Input
Power supply
Input voltage range
Standby current
Supply current
Polarity protection
:
:
:
:
:
via connected instrument (e.g. Fibox3)
9-24 V (nominal 18V)
30 mA @ 18V
150 mA @ 18V
max. 1A
Control features
Compatibility
Sampling rate
Sensor selection
Oxygen units
:
:
:
:
Fibox3 (trace v3), MicroxTX3
2sec-1hour
for trace instruments enabled
% air saturation, % oxygen saturation,
hPa, Torr, mg/l (ppm) and umol/l
Data-logger
Capacity
Read out
Scope of storage
: up to 26150 samples
: PC with Win98,ME, Win2000 or XP
: date, time, oxygen, phase, amplitude,
temperature and error-codes (txt-file)
Graphical LCD
Indication
Resolution
Illumination
Contrast
:
:
:
:
Conditions
Operating temperature : 0 to +50ºC
: -10 to +65ºC
Storage temperature
: up to 60% (IP20)
Relative humidity
Dimension
Size (D x W x H)
Weight
three differnet views available
128 x 64 pixels
green LEDs (function programmable)
automatic contrast control
: 190 x 125 x 45 mm
: 550 g
EAR 10886810
EN 61326
17
18
Appendix
1.9
Menu structure
Control panel LP-1
Menu Structure
MEASUREMENT
CALIBRATION
SAMPLING RATE
fastest
5 SEC
DATA LOGGING
STATUS
LAST
CALIBRATION
VALUES
Dependent on the
selcted sensor
from 1 sec to 3 sec
CONFIGURATION
STATUS
START
DATA LOGGER
STATUS
STATUS
ANALOG OUT
CALIBRATE
VOLTAGE U1
10 SEC
30 SEC
1 MIN
OTHER
Temperature ON
Calibration
assistent with
PT1000
Temperature OFF
Calibration
assistent witout
PT1000
Manual
Manual
calibration
SET SAMPLING
RATE
from 2 sec to 1 hour
CONFIGURATION
PARAMTERES
STOP
VOLTAGE U2
OUTPUT SIGNAL
SELECTION
Inactive
Oxygen
Temperature
Phase
Amplitude
TEMPERATURE
PT1000
CLOCK/DATE
SET CLOCK AND
DATE
MANUAL
SET SENSOR*
SENSOR TYPE
PRESSURE
MANUAL
PSt1, PSt3, PSt6,
TOS2, TOS7, etc.
BACKGROUND
ILLUMINATION
DISPLAY
PRESSURE
ADJUSTMENT
from 400 to 2000 hPa
off
on
auto
RESET CONFIG
SIGNAL AVERAGE
AUTO
MANUAL
AVERAGE
ADJUSTMENT
0 - 4 samples
OXYGEN UNITS
% AIR SAT.
% OXYGEN SAT.
hPa
Torr
mg/l
umol/l
SIG.
INTENSITY
SIGNAL
INTENSITY
0 - 100 %
*enabeld for trace devices!