1
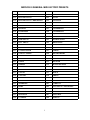
MIDIVOX III QUICK START GUIDE
MIDIVOX III
QUICK START GUIDE - NO MIDI EXPERIENCE NECESSARY
To make use of the MIDI electronics when playing your MIDIVOX III you must have a Multi-timbral
Sound Module or Sound Expander and some sort of Amplifier to process and amplify the sounds
produced by the Sound Module or Expander.
YOUR MIDIVOX III ACCORDION
When you unpack your accordion you should have:
1)
The Excelsior Accordion with MIDIVOX II system installed
2)
Two Shoulder Straps
3)
One Accessory Pouch
4)
One MIDIVOX III Power Supply With Power Cable
5)
One Expression Pedal (Alternatively known as a Swell Pedal)
6)
One Pedalboard Containing 4 Footswitches
7)
One Connecting Cable To Connect The Accordion To The Power Supply
8)
One MIDI Cable
9)
One Audio Patch Cord
10)
One Cleaning Cloth
CONNECTING YOUR MIDIVOX III TO YOUR SOUND MODULE AND AMPLIFER
DO NOT TURN ON THE POWER FOR ANY OF THE DEVICES UNTIL ALL CONNECTIONS
HAVE BEEN MADE.
1)
2)
3)
4)
5)
6)
Connect the Footswitch Pedalboard to the Footswitch Input on the Power Supply.
Connect the Swell Pedal to the Swell Pedal Input on the Power Supply
Using the supplied Audio Patch Cord connect the MIC OUT Output on the Power Supply
to the Audio Input on your Amplifer
Using the supplied MIDI Cable connect the MIDI OUT on the Power Supply to the MIDI
IN on your Sound Module
Using the supplied Power Cable connect the Power Supply to an electrical power outlet
To connect your Sound Module to your Amplifer, consult the Instruction Manuals for
those two devices.
TURNING ON THE POWER
When “powering up” your accordion, sound module and amplifier, it is a good idea to make certain
that the volume control on your amplifier is turned as low as possible. This will eliminate the
possibility of any unwanted loud noises as a result of controls on the Accordion or Sound Module
being set to too high a level. Power up the Amplifier first, followed by the Sound Module and
finally the Accordion. When the Accordion’s Power Supply has been turned on, the light in the
power switch and the front “spy light” should both be on. The display should show “PA11” If these
conditions are not present, turn the power supply off and consult the MIDIVOX III Owner’s Guide.
BASIC MIDI FACTS:
1.
2.
3.
4.
MIDI stands for Musical Instrument Digital Interface
The MIDI protocol allows different MIDI devices (keyboards, sound modules, drum
machines, accordions, etc.) to “talk” to each other, even though they may have been
made by different manufacturers.
MIDI information is transmitted on MIDI channels. There are 16 MIDI channels
There are certain “industry standards” with respect to MIDI channel transmission which
most manufacturers adhere to. For example, drum machines and the rhythm portion of
1
MIDIVOX III QUICK START GUIDE
5.
Multi-timbral Sound Modules or Sound Expanders DEFAULT to (are usually set up to
receive on) MIDI channel 10. Many Multi-timbral Sound Modules DEFUALT (or are very
easily capable of being set to default) to connect with a MIDI accordion right out of the
box.
A Multi-timbral Sound Module or Sound Expander is a sound producing device which is
capable of receiving and processing MIDI information on more than one channel at a
time and producing a number of different sounds simultaneously.
MIDI AND YOUR MIDIVOX III
The MIDIVOX III operates in two modes - When you first “power up” the MIDIVOX III it is
automatically in what is referred to in the Owner’s Guide as the PLAY MODE. As no accordionist
would actually undertake a live performance in the PLAY MODE, from now on let’s refer to the
PLAY MODE as the PROGRAM MODE. It is in the PROGRAM MODE that you will choose sound
combinations and save them to memory. The second operating mode for the MIDIVOX III is the
USER MODE. We will discuss how to make use of these MODES later.
Your MIDIVOX III is capable of transmitting information on a number of MIDI channels
simultaneously. The right hand treble keyboard is capable of transmitting on two channels at one
time. The chord section of the left hand keyboard is capable of transmitting on two channels. The
bass section of the left hand keyboard is capable of transmitting on one channel. The MIDIVOX
III is also capable of transmitting program change information on a “Utility” MIDI channel. The
Utility channel function is for advanced users, so no further explanation of this feature shall be
offered in this Quick Start Guide. Hence, your MIDIVOX III is capable of transmitting on six MIDI
channels simultaneously.
Let’s refer to the different channel transmitting parts as TRBL1, TRBL2, CHRD1, CHRD2, BASS
and UTILITY. Let’s also refer to each one of these individual parts as a SECTION. I.E. TRBL1 is
a SECTION, TRBL2 is a SECTION, etc.
While it is possible to assign any one of the sixteen MIDI channels to any one of the SECTIONS,
when the MIDIVOX III “powered up” for the first time, it is set to certain FACTORY DEFAULT
settings for the MIDI channels. The FACTORY DEFAULT settings are:
TRBL1 - MIDI Channel 1
TRBL2 - MIDI Channel 4
CHRD1 - MIDI Channel 2
CHRD2 - MIDI Channel 5
BASS - MIDI Channel 3
UTILITY - MIDI Channel 16
These FACTORY DEFAULT settings are “Industry Standard”. As mentioned in Basic MIDI Facts
above, it may well be the case that your Sound Module is already configured (or may easily be
configured) to receive MIDI information from a MIDI accordion on these channels. IT IS
RECOMMENDED THAT YOU DO NOT CHANGE THESE MIDI CHANNEL FACTORY
DEFAULTS UNTIL YOU REALLY UNDERSTAND WHAT YOU ARE DOING.
Many Sound Modules have several pre-configured MIDI SETS (Channel configuration
combinations), suitable for use with different instruments. Usually there will be a couple of MIDI
SETS or configurations which your Sound Module manufacturer will tell you are suitable for use
with your accordion. Usually the Sound Module can be set up so that it will DEFAULT to
(automatically load) whichever MIDI SET or configuration you desire. In this way, the Sound
Module will be ready to play every time you turn it on.
There are two configurations which you most often see:
Configuration 1
TREBLE 1 - MIDI Channel 1
TREBLE 2 - MIDI Channel 4
CHORDS - MIDI Channel 5
BASS - MIDI Channel 3
Configuration 2
2
MIDIVOX III QUICK START GUIDE
TREBLE - MIDI Channel 1
CHORDS - MIDI Channel 2
TREBLE - MIDI Channel 4
BASS - MIDI Channel 3
You will note that the only difference between the two configurations is that in the first
configuration the Chords are being received on MIDI Channel 5, whereas in the second
configuration the Chords are being received on MIDI Channel 2. Compare the two configurations
to the FACTORY DEFAULTS for your MIDIVOX III. Note the similarities.
Many Sound Modules also act as Arrangers, i.e. if you play one chord, the Arranger portion of the
Sound Module will play rhythm, a bass line and a multi-instrument background arrangement
based upon that one chord for as long as you hold the chord, or depending upon the sound
module, until another chord is played.
IT IS AN “INDUSTRY STANDARD” FOR ARRANGERS TO RECEIVE MIDI INFORMATION ON
CHANNEL 2. Therefore, if you have a Sound Module which is capable of this sort of Arranger
function, and if you choose to use it this way, you should choose a default setting for the module
which allows it to receive information from the chord section on Channel 2.
The purpose of the second configuration is to allow the accordionist to actually play the left hand
without triggering the Arranger functions. If you are intending to actually play the left hand and you
do not wish to use the arranger functions, you should choose a default setting for the module
which allows it to receive information from the chord section on Channel 5.
ACTIVE SECTIONS
You may choose which of the MIDIVOX III SECTIONS are “active”. (an Active SECTION
transmits MIDI information on it’s assigned channel - an Inactive SECTION does not transmit
MIDI information)
For example, you could have Active SECTIONS - TRBL1, CHRD1, BASS. In this case, if your
MIDIVOX III is using the FACTORY DEFAULTS, it will be transmitting information for the treble on
MIDI channel 1, chords on MIDI channel 2, and bass on MIDI channel 3. This set-up would be
useful if you are intending to use the Arranger function on your Sound Module.
If you choose to have Active SECTIONS - TRBL1, CHRD2, BASS, then the MIDIVOX III will be
transmitting information for the treble on MIDI channel 1, chords on MIDI channel 5 and bass on
MIDI channel 3. This set-up would be useful if you are intending to play the left hand and do not
want to trigger the Arranger function on your Sound Module.
THE FOLLOWING DISCUSSION ASSUMES THE MIDIVOX III IS IN THE PROGRAM MODE
CHOOSING THE ACTIVE SECTIONS
To choose which sections are Active, Press the FUNCT button on the accordion grill once. The
display will show “SECt”. At the same time the “spy lights” for the various SECTIONS will light up
if those particular SECTIONS are Active.
The FACTORY DEFAULT for the Active SECTIONS is: TRBL1, CHRD1, BASS, UTILITY. In
other words, your MIDIVOX III is set up to transmit treble on MIDI channel 1, chords on MIDI
channel 2, and BASS on MIDI channel 3 right out of the box. The very first time your press the
FUNCT button once the display will show “SECt” and the spy lights will be on for TRBL1, CHRD1,
BASS and UTILITY.
If you want to use arranger functions on your Sound Module, it will not be necessary to change the
Active SECTIONS. If you do not want to use arranger functions on your Sound Module, when you
are in this mode, press the CHRD1 button once to turn off the spy light and then press the CHRD2
3
MIDIVOX III QUICK START GUIDE
button to turn on the spy light for the CHRD2 SECTION. Your MIDIVOX III is now transmitting
chord information on MIDI channel 5.
Press the NUL button to exit from the FUNCT Mode.
NOTE THAT THE FUNCT BUTTON PERFORMS A LARGE NUMBER OF FUNCTIONS,
MOSTLY RELATED TO CONFIGURING THE SWELL PEDAL AND THE FOOTSWITCH
PEDALBOARD. For the time being, do not change these settings. Do not go any further than the
first level. Do not press the FUNCT button more than once. If you do accidentally press the
FUNCT button more than once, you can return it to the “SECt” setting by pressing the button a
number of times until the display returns to “SECt”. Remember, you can always exit from the
FUNCT mode by pressing the NUL Button.
SWELL PEDAL & FOOTSWITCHES
As mentioned briefly above, it is possible to change the functioning of the SWELL PEDAL and
FOOTSWITCHES. As with the MIDI channel assignments, there are certain FACTORY
DEFAULTS for the SWELL PEDAL and FOOTSWITCHES. IT IS RECOMMENDED THAT YOU
LEAVE THE SWELL PEDAL AND THE FOOTSWITCHES SET TO THE FACTORY DEFAULT
SETTINGS UNTIL YOU FULLY UNDERSTAND WHAT YOU ARE DOING WHEN YOU MAKE
CHANGES.
The FACTORY DEFAULT settings are as follows:
SWELL PEDAL set to affect the volume on TRBL1, TRBL2, CHRD1, CHRD2, BASS,
UTILITY
FOOTSWITCH #1 Treble Cancel (if pressed, it stops TRBL 1 and TRBL2 from transmitting
MIDI information until it is pressed again for a second time)
FOOTSWITCH #2 When pressed it will cause whatever sound is playing on either TRBL1
or TRBL2 to be sustained until the footswitch is released.
FOOTSWITCH #3 Program Up
FOOTSWITCH #4 Program Down
For most accordionists in most situations, the above FACTORY DEFAULT settings will be the
most useful settings.
USING YOUR MIDIVOX III TO SELECT SOUNDS ON YOUR SOUND MODULE
Check the user manual for your Sound Module. If, when you select sounds on your Sound
Module, the Module shows the different sound patches as A11, A12 ..... B78, B88, then your
module is using the GROUP, BANK, NUMBER system which the MIDIVOX III DEFAULTS to.
You are ready to select sounds. For Example, selecting A24 on your MIDIVOX III will result in
whatever sound is in A24 on your Sound Module being selected. You may now proceed to the
next section on saving sound combinations.
On the other hand, if your Sound Module is General MIDI (GM) compatible, things are slightly
more complicated. General MIDI was developed relatively recently as an industry wide standard
for operating MIDI devices. GM uses the same program change information to select a particular
sound regardless of what your make or model of Sound Module is. To make your MIDIVOX III
GM compatible, you must perform the following function once.
1.
Press the FUNCT button a number of times until the display reads “LOAD”
2.
Once you see “LOAD” in the display, press the UP or DWN buttons on the accordion grill
to change the display until “LOADP” appears in the display.
4
MIDIVOX III QUICK START GUIDE
3.
Press the STORE button on the accordion grill.
4.
Press the NUL button on the accordion grill.
Your MIDIVOX III is now GM compatible. See the chart at the end of this guide to determine
which BANK and NUMBER settings to use in order to select the desired sounds.
SAVING SOUND COMBINATIONS TO USER MEMORIES
For performance purposes you may save combinations of sounds to USER MEMORIES for quick
recall. (a combination might be treble - pan flute, chord - guitar and bass - acoustic bass) by
saving the combination to a USER MEMORY you can change all of the sounds for the treble,
chords and bass instantly with the press of a couple of buttons (or later as you will learn - with one
press of a footswitch)
TO SAVE COMBINATIONS OF SOUNDS YOU MUST BE IN THE PROGRAM MODE
Step 1 Decide what the Active SECTIONS are going to be. Unless you are a more advanced
user, you will probably not want to change the active sections to begin with.
Step 2 Select which sounds you want to use for each active section (e.g. pan flute for TRBL1,
guitar for CHRD2, and acoustic bass for BASS). To select a sound for a particular
SECTION, the spy light for that section must be lighted. e.g. If you are selecting a piano
sound for TRBL1 you must first check to see that the spy light for TRBL1 is on. If it is
not, press the TRBL1 button to put the light on. Now, select your sound using the
GROUP, BANK, and NUMBER buttons on the accordion grill. Next you may select a
sound for another section in the same manner.
HINT
If you are using the Arranger feature of your sound module, you will only have to select a
sound for the TRBL1 SECTION. Remember that when using the Arranger feature of
your Sound Module, you will not be playing the basses. Chord information will be used,
but only for the purposes of note information. No actual sound will be heard from the
chords when the chord buttons are pressed. Hence, it doesn’t matter which sounds are
selected for bass and chords in this configuration.
To save the sound combination to a USER MEMORY do the following:
1.
Press the STORE button
2.
If this is the first time you have pressed the STORE button for this purpose, the display
will show UA11. There are 128 USER MEMORY locations labelled UA11, UA12 ...
UB87, UB88.
3.
If you wish to store your sound combination in this UA11 location, press STORE again.
At this point, the display will show “SURE”. To confirm that you want to store in this
location, press STORE for a third time. If, after pressing STORE for the first time, the
display is showing a USER MEMORY location you do not want to save to, select the
USER MEMORY location you want and then follow the instructions in the previous
sentence. To abort the operation, press the NUL button at any time.
4.
You can create another sound combination and store it in the next memory location, e.g.
UA12.
Once you have programmed your sound combinations in the PROGRAM MODE, you are ready to
proceed to the USER MODE.
THE USER MODE
The USER MODE is the mode that you will probably be playing in during practice or live
5
MIDIVOX III QUICK START GUIDE
performance.
The advantage to the USER MODE is that the sound of all ACTIVE SECTIONS can be radically
altered with the press of a couple of buttons (or one press of the footswitch, as you will learn later)
To enter the USER MODE, press the USER button on the accordion grill. The spy light will come
on and the display will show the last USER MEMORY selected. From here you use the GROUP,
BANK, and NUMBER buttons to select the USER MEMORY you wish to make use of to play your
song.
Once you are in the USER MODE and you have selected the desired USER MEMORY location,
you may move to an adjacent USER MEMORY location by pressing the UP or DWN buttons on
the accordion grill. For example, if you have already selected USER MEMORY location A34,
when you press the UP button, the MIDIVOX III will change to USER MEMORY location A35.
Conversely, if you have already selected USER MEMORY location A34 and you press the DWN
button, the MIDIVOX III will change to USER MEMROY location A33.
You may also use FOOTSWITCH #3 and FOOTSWITCH #4 to perform the same function as the
UP and DWN buttons.
FOOTSWITCH #3 has the same function as the UP button.
FOOTSWITCH #4 has the same function as the DWN button. The FOOTSWITCHES allow you
to change USER MEMORY locations without taking your right hand away from the treble
keyboard.
HINT
You may wish to use several different sound combinations during the course of playing
one song. By doing a bit of planning, you can store all of the combinations you are
intending to use on that song in adjacent USER MEMORY locations. You can then
change from one desired sound combination to another by simply pressing either
FOOTSWITCH #3 to go up one location or FOOTSWITCH #4 to go down one location
each time you wish to change sounds.
To exit the USER MODE, press the USER button again and the spy light will go out. You are
once again in the PROGRAM MODE.
HINT
If you are using the Arranger function on your Sound Module and it doesn’t seem to be
recognizing the left hand chords properly - i.e. the Sound Module is producing sound, but
not the desired chord - consult ONE-BUTTON FUNCTION - 4.10 - Tenth Parameter on
page 13 of the USER GUIDE. This function assists the Arranger in your Sound Module
to better choose the correct chord. Keep in mind that many Sound Modules also have
“Smart Arranger” functions as well, so if the Sound Module is not recognizing the chords
properly, you might also want to check the USER MANUAL for your Sound Module to
see if it has some sort of “Smart Arranger” or “Intelligent Arranger”.
THESE INSTRUCTIONS ARE INTENDED TO PROVIDE ONLY AN OVERVIEW OF VERY
BASIC FUNCTIONS OF YOUR MIDIVOX III. FOR AN IN DEPTH EXPLANATION OF OTHER
FUNCTIONS NOT COVERED HERE, CONSULT YOUR USER GUIDE.
6
MIDIVOX III GENERAL MIDI FACTORY PRESETS
A11
PIANO
A51
OBOE
A12
PIANO + STRINGS
A52
BASSOON
A13
ELECTRIC PIANO
A53
FLUTE
A14
ELECTRIC PIANO + BRIGHTNESS
A54
PAN FLUTE
A15
VIBES
A55
WHISTLE
A16
VIBES + ORCHESTRA
A56
BRASS
A17
MUSETTE
A57
SYNTH BRASS 1
A18
BANDONEON
A58
SYNTH BRASS 2
A21
SOLO ORGAN
A61
SQUARE SYNTH
A22
POP ORGAN
A62
LEAD
A23
REED ORGAN
A63
DOUBLE SYNTH
A24
FULL ORGAN
A64
BRIGHTNESS
A25
J AZZ GUITAR
A65
FANTASIA
A26
DISTORTION GUITAR
A66
WARM PAD
A27
CLASSIC GUITAR
A67
GOBLIN
A28
GUITAR + STRING
A68
HIT ORCHESTRA
A31
HARP
A71
ORCHESTRA
A32
HARP + STRINGS
A72
BAROCCO
A33
VIOLIN
A73
BIG BAND
A34
STRINGS
A74
MUTED BIG BAND
A35
PIZZICATO
A75
HARMONICA
A36
TREMOLO
A76
MARIMBA
A37
VOX OH
A77
HAWAI
A38
VOX AHH
A78
ORIENT
A41
TRUMPET
A81
SCOTLAND
A42
MUTED TRUMPET
A82
WEST
A43
TROMBONE
A83
CARILLON
A44
HORN
A84
FULL ORGAN + ORCHESTRA
A45
SOPRANO SAX
A85
TUBEBELL
A46
ALTO SAX
A86
ORGANINO
A47
TENOR SAX
A87
PIANO RAG
A48
CLARINET
A88
EFFECTS
7