1
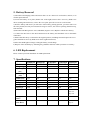
IN120L / IN120LB / TM120L/TM120LB
IN2400L
Contents
Page 2, Equipment Safety Guidelines
Page 3, Introduction
Page, 4-5 Charging
Page, 6-7 Operating Instructions
Page 8, Battery Performance
Page 9, Battery Removal
Page 9, LED Replacement
Page 10, Specifications
Page 11, Spare Parts
Page 11-15 Accessories Page
Page 16-17 Product Warranty
SMITH LIGHT - OPERATING MANUAL
PATENT PENDING 2008 904 852
1. Equipment Safety Guidelines
a) Every year many accidents occur which could have been avoided by a few seconds of thought
and adopting a more careful approach when planning a job or simply using equipment. You as the
operator can avoid many accidents or even damage to the equipment by observing and following
the precautions and instructions contained in this manual.
b) Ensure that you have fully read and understand this manual prior to setting up, installing or
operating the equipment
c) Never operate this equipment if under the influence of alcohol or drugs
d) This equipment is only to be operated by a competent person
e) If the ability of this equipment to carry out its intended function is in doubt then remove it from
service and return it to an authorised distributor for repair
f) When charging from mains power, please ensure that the charging procedure is adhered to, and
only charge with a power supply between 100-240v, if supplying power outside this voltage range
it may cause serious injury or damage to the equipment.
g) Never allow any person to mount, use or charge this equipment until they have developed a
thorough understanding of safety precautions and how it operates
h) In some states, territories or work sites, operator training or equipment documentation may be
required. Please check with your local regulatory authority prior to use.
2. Introduction
Thank you for purchasing a Smith Light. The information contained in this manual covers
charging, setting up, operation and maintenance of the Smith Light Traveller. This manual needs
to be fully read and understood prior to the Traveller being charged and used.
The Smith Light has been developed to help with the lighting needs of the Mining Sector, Hire
Industry and Service Providers such as the Electricity Authorities, Railways, Trades People and
Recreational use. The Smith Light removes the need for generators, power extension leads also
reducing set up times and running costs.
The information contained within this manual is based on the latest information and technical
specifications available at the time of printing. Smith Light International reserves the right to
make changes to product specifications without notice.
When removing the Smith Light from the packing carton, also remove the protective plastic bag,
plastic sheets covering both lenses and dispose in an environmentally correct manner, then follow
charging instructions to ensure battery protection, and that the battery is in a fully charged
condition.
3, Charging
At any time, the battery charge level can be checked by pushing the battery level indicator button
located on the rear of the Smith Light, holding the button in for at least three seconds, this will
display one of three colours. Green charged, yellow 50% charged, Red low battery, charge now.
The Smith Light can be recharged in three ways: 1. Mains charger suitable for 100-240 volt
50-60Hz supply. The charger should only be used indoors and not exposed to the weather. 2.
Standard 12/24 volt vehicle system (plugs into standard vehicle Close Space socket / lighter plug).
3. Solar Panel charger the Solar panel is an option and not included as a standard item. To charge
your Smith Light, ensure that it is placed on a firm level surface. Open the lid of the Smith Light
by pushing the button in the middle of the carry handle, raise the light head, Lift the sealed storage
lid located inside the body of the Smith Light, the storage area contains both chargers; remove the
appropriate lead (100-240 volt AC or 12/24 volt DC). Place the relevant end of the charging lead
into the socket located at the bottom rear of the Smith Light, this socket has a keyway which
allows easy entry for the plug, turn the circular collar of the plug clockwise and this will lock the
plug into place.
100-240 volt AC: Insert the charger into a 3 pin outlet (outlet needs to be on a protected circuit
fused / circuit breaker / RCD). Never charge the unit in a hazardous environment (i.e. a wet
environment poses numerous risks including electrocution). During Charging the LED indicator
located in the light reflector, on both sides of the Light Head will display two colours, RED when
in the charging mode and green when the battery is fully charged.
12/24 volt DC: Insert the male plug into a fused 12/24 volts (negative earthed) power socket.
Please check that the socket selected is on a constant supply. Some plugs may be connected to a
circuit on the vehicles accessory supply. (This means that the keys would need to be left in the
vehicle with the ignition switch in the accessory position and this may constitute an unacceptable
risk for both safety and theft).
The Red low battery LED indicator in the light reflector, on both sides of the light head will turn
on when the battery is approximately 1 hour from discharge, (may vary depending on battery
condition) and will sound an audible reminder beep approximately every 15 minutes. Also when
the Red LED is on and when charging only one side of the Light Head will operate. Full recharge
time is 7-8 hours for the IN120L & TM120L, 14-15 hours for the IN120LB, TM120LB &
IN2400L. To ensure optimum battery life the unit must not be left in a discharged (flat) condition.
The battery must be recharged within 7 days of being discharged to avoid permanent battery
damage.
SI-SOL1 Solar Panel Charger (Refer to SI-SOL1 solar charger operating instructions for charging
procedure and information)
Ensure that the light is switched off when recharging. For peak performance we recommend that
the Smith Light be kept on charge when not in use. When fully charged it will switch to a trickle
mode. If disconnected from a full charge and not used for prolonged periods, the battery will start
to discharge, then you must charge the battery at least once every three months.
3. Operating Instructions
When setting up the Smith Light, ensure that it is placed on a firm level surface. Push the button in
the middle of the handle, keep the button pressed in until you choose the lower or full height, you
must go to full height before you select the lower height. Ensure that your desired height has been
accepted by the locking pins. Once you have released the push button in the middle of the handle
you will hear and feel the pins go into place, remove your finger from the push button and if the
handle cannot move up or down you are in the locked position.
IN120L & IN120LB
The on off switch (Black), and the switch for each rotating each side of the Light Head, flashing
mode (Red), are located on the underside of the Light Head. To start, press the Black main power
switch, this will turn on the front of the Light Head (only), press the Red switch once for the back
of the Light Head (only) to turn on, press twice for both front and back to stay on, press three
times for the front of the Light Head (only) to flash, press four times for the back of the Light
Head (only) to flash, press five times for both front and back to flash at the same time, then once
more to return to the front Light Head (only), the red switch will not turn the Smith Light
completely off, you must press the Black main power switch for complete shutdown.
TM120L &TM120LB
The on off switch (Black), and the switch for the Light Head, Flashing Mode (Red) are located on
the underside of the light head. To start, press the Black main power switch, this will turn on the
Light Head (only), press the Red switch once for the Light Head to flash, then once more to return
to the Light only mode. The red switch will not turn the Smith Light completely off, you must
press the Black main power switch for complete shutdown.
IN2400L
The on off switch (Black), the switch for the Light Head Flashing Mode, and three levels of light
output (Red), are located on the underside of the Light Head. To start, press the Black main power
switch, this will turn on the Light Head (only), press the Red switch once for the light to be on
high, twice to be 50%, three times to be 25%, four times for the Flashing Mode, and five times to
return to the high level. The red switch will not turn the Smith Light completely off, you must
press the Black main power switch for complete shutdown.
To close the Smith Light, push the button in the middle of the handle, hold in, lower the lid of the
Light until the lid meets the top of the Light Body, release button, and you will hear and feel the
locking pins go into place, it is then locked in the closed position allowing you to carry the fully
integrated Smith Light, ready for your next job.
4. Battery Performance
The battery life is approximately 10,000 hours when charged according to the instructions in this
manual. The Battery is a Lead Acid Gel style (12/24 volt 18Ah or 10Ah) and does not need water
or service, only to be charged in accordance with the instructions provided.
(Figures based on a fully charged battery provide that the LED Light source has approximately)
60,000 life hours when the light is used in accordance with this manual.
WARNING: Never use a non-standard charger for the Smith Light. This may damage the light and
void your Warranty, never leave the battery fully discharged; this may permanently damage the
battery.
5. Battery Removal
a) Disconnect all charging cables and ensure that it is on a firm level work surface, indoors, or in
weather protected area.
b) Locate the battery cover plate (bottom rear of the light) unscrew the 8 screws by hand screw
driver (turning anti-clockwise), remove the cover plate, place the screws in a safe location.
c) Remove battery and ensure you take note of the battery packing position, you must return it to
the same position, this may need assisted leverage to remove, also remove packing foam from top,
front and side.
d) Disconnect the Red (positive wire) and Black (negative wire). Replace with the new battery.
e) Connect the Red wire to the Red connection on the battery and the Black wire to the Black
connection.
f) Ensure that the battery is returned to the original position, including foam and replace the cover
g) Re-install the 8 screws by hand screw driver (tighten clockwise)
h) Place the Smith light on charge to bring the battery to full charge.
I) Dispose of the old battery by following the guidelines and laws within your State or Territory.
6. LED Replacement
Please consult your local distributor for LED replacement
7. Specifications
Model
Industrial
IN120L
Industrial
IN120LB
Tradesman
TM120LB
10.76
Industrial
IN2400L
10.86
Tradesman
TM120L
7.74
Weight (kg)
8.86
Open Height
1120
1120
1120
1120
1120
580
580
580
580
580
Width (mm)
334
334
334
334
334
Depth (mm)
207
207
207
207
207
Voltage AC
110-240V
110-240V
110-240V
110-240V
110-240V
Voltage DC
12/24V
12/24V
12/24V
12/24V
12/24V
Light Type
LED
LED
LED
LED
LED
Lumens
1030 each side
1030 each side
1030
1030
Low-600
11.40
(mm)
Closed Height
(mm)
Med-1200
High-2400
Charge Time
7-8
14-15
7-8
14-15
14-15
10-12 one side
28-30 one side
10-12
28-30
Low-48
Hours
Battery
Run
Time Hours
High-8hrs
Med-16
9. Spare Parts
Replacement parts are available from Smith Light International Distributors (Please check our
website for your nearest Distributor) www.smithlightint.com or consult your place of purchase.
10. Accessories
The Smith Light comes with a 1.0 metre 110-240 volt (Voltage depending on Country
Requirements) charging cable and a 3.0 metre 12-24 volt charging cable; both cables are stored
within the Light Body inside the charging cable compartment.
The attachments mentioned in this manual are to be used for mounting Smith Lights only. They
are not to be used for any other purpose, they are a guide only, as each customer requirement and
specifications vary, hence each one is made to order.
All attachments are covered by our normal Manufacturer’s warranty; the warranty does not cover
damage by intention-al misuse or neglect.
10. (A) Pole Attachment
Product Code: SI-PA1
Description: Smith light attachment suitable for mounting on telegraph pole or any other suitable
upright pole like structures.
10. (B) Stabilising Plate
Product Code: SI-SP1
Description: Stabilising Plate. A 60cm plate that will provide extra stability at the base of the
Smith Light.
10. (C) Scaffold Attachment
Product Code: SI-SA1
Description: Adjustable product that will attach to most Scaffold type poles. Opening dimensions
7cm.
10. (D) Tripod Attachment
Product Code: SI-TP1
Description: The heavy duty construction of the Tripod allows standing 1100mm in height and a
leg span of 70cm, weighing 3.2kg. (without its Base Plate)
Full instructions are provided with the purchase of each attachment
11. Product Warranty
International Product Warranty
The Smith Light is covered by a 12 month Limited Warranty (the “Smith Light International
Warranty”).
Proof of Purchase
The Smith Light International Warranty can only be claimed with a copy of the dated sales receipt
as proof of purchase.
The Smith Light Warranty
Smith Light International makes every effort to ensure that its products meet high quality and
durability standards and warrants to the original customer/purchaser of our products that each
product be free from defects in materials and workmanship as follows:
The Smith Light International Warranty is a 1 year limited warranty from the time of purchase by
the end-user on this Smith Light product. This warranty does not apply to defects due directly or
indirectly to misuse, abuse, negligence or accidents, repairs or alterations outside of our facilities
or our Authorised Service Agents or due to a lack of maintenance or to LED's.
To proceed with a warranty claim; the product must be returned normal freight pre-paid to Smith
Light International for examination with proof of purchase and an explanation of the problem.
To the extent permissible by law, Smith Light International:
1. Excludes all implied conditions or warranties and consumer guarantees; and
2. Limits its liability for breach of the Smith Light International Warranty or for breach of any
non-excludable warranty, condition or consumer guarantee to:
A.replacement of the defective goods; or
repair of the defective goods.
3. Excludes all liability for death, injuries to persons or property or for incidental, and contingent,
special or consequential damages arising from the use of our products.
Local Laws
It is the responsibility of the Distributor to ensure that Smith Light International products,
packaging and labeling comply with any laws in the Distributor’s jurisdiction that impact on the
distribution of the Smith Light in such jurisdiction. Should such laws impact on such issues as
labeling, registration or certification of the product or warranties, it is the responsibility of the
Distributor to provide full details of such issues to Smith Light International before orders are
placed. Any changes required to Smith Light International labeling or products will be at the cost
of the Distributor.