1
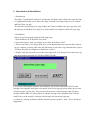
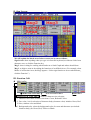
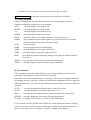
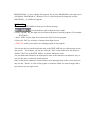
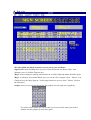
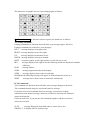
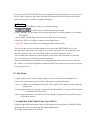
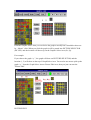
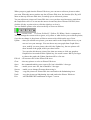
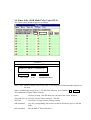
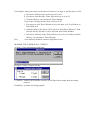
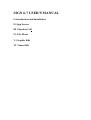
SIGN 6-7 USER'S MANUAL
I. Introduction and Installation
II. Sign Screen
III. Function Call
IV. File Menu
V. Graphic Edit
VI. Timer Edit
I. Introduction & Installation
1: Introduction
The Sign 6-7 applications software is an interface for Multi-color or Red color sign, the Sign
6-7 applications enable you to Edit Color Sign Text and Color Sign Graph, to set Comport
and Edit Timer for sign.
The function of Send Sign Text, Sign Graph, and Timer for Multi-color type sign only, and
the function of Edit Red Color Sign Text, choice Red Color Graph for Red color type sign.
2: Installation
Start to set up the program using the following steps:
a. Start Windows 95 or Windows 98 system.
b. Select the button “Start” on monitor screen first, then choose “Run”.
c. Place set up Disk 1 in a floppy Disk drive, in the Run dialogue box enter the drive and set
up (for example A:\Setup), then click the OK button. It will enter copy initiation files system.
d. Follow the guide on computer to install disk 2, disk 3.
e. Double click the sign work icon or the select sign work icon, then press the enter key to go
into the beginning program of COLOR or RED COLOR
f. After fully installing the software into computer, you need to connect the RS 232 cable
through your computer serial port to the phone jack of moving sign; please make sure to turn
off moving sign’s power first. You may turn on the power of moving sign when you have
already connected RS 232 cable and try to edit the message on the program, then click the
SendTxt key on the topside of window, the message will run on moving sign.
g. If there are still any problems with the operation, please open the " help " file to find more
suggestions.
II. Sign Screen:
We will explain the block area of above screen one by one as follows:
Sign Screen: show anything when you type it in from the keyboard, use Mouse clicks from
character area, or click the Function key.
Msg 2: show waiting for sending when Send text or Send Graph and others should show.
Msg 3: as help to assist in describing the functions of each Block Area. (For example: when
Mouse is in Function Area, the Msg3 appears “ Select sign function to screen when Mouse_
click the Function”.)
III. Function Call:
z Multi-color
CHARACTER TYPE AREA
SIGN FUNCTION AREA
EDIT AREA
CHARACTER TYPE AREA is color or character size selection:
1. Function color: there are three selections- Green, Red and Yellow.
2. Fore color: it is for selection of character body (character color) includes Green, Red
Yellow, rainbow color and black.
3. Background color: select the background color of screen and character (not include
character body) for Green, Red, Yellow or Black.
4. “Normal” key: set character size in normal mode or big size mode.
Sign Function Area for function selection operate, the details are as follows:
A. Leading commands
Leading commands are functions that will make your message appear, therefore,
Leading commands are used before your messages.
LEFT
: message displays from right to left.
RIGHT
: message displays from left to right.
UP
: message displays from bottom to top.
DOWN
: message displays from top to bottom.
DOFF
: characters appear on the right and move to the left one by one.
DOBIG
: large characters appear on the right, move to the left one by one, but the
characters will become small size when it stops.
FLSH
: message flashes.
JUMP
: message appears directly on the display.
OPEN < > : message displays from center to both sides
OPEN > : message displays from left to right one by one.
RND
: press RND key and the following message will appear in different function
styles by it.
SHIFT < >: message moves from center to both sides continuously.
SNOW
: message displays on the screen dots by dots gradually.
B. Tail commands
Tail commands are functions that will make your messages disappear, therefore tail
commands should always be used at the end of a message.
If you have used a tail command after your message, you must use a leading command to
start another message, otherwise, all the text after that tail command will not be displayed.
Under the same rule, if you put two tail commands together and the second one will not be
executed.
CLSE > < : message disappears from both sides to center one by one
CLSE >
: message disappears from left to right one by one.
SQZ > < : message moves from both sides to center and disappears in the center.
DSNOW : message disappears from screen dots by dots gradually.
CLOCK : to display time 24 hours or 12 hours (AM / PM) modes.
C. If you choose WAIT, SPEED and GOSUB, the screen appears an input box (display
screen) for you key in Value, then press OK, and it will shows the function which you
choose on the Sign Screen. If you press CANCEL, nothing will be happen.
D. PROGRAM – A: use to change the program. If you press PROGRAM-A, the sign screen
will display “PROGRAM-A”, then press A to Z on the keyboard to change the current
PROGRAM__ to a different program.
EDIT AREA
Use the key of EDIT AREA to help you to edit the message.
a.
Use the button to shift a character left or right.
b. Press “HOME” key the Sign Screen will show the head of current program. (For example:
B<START>)
c. Press “END” key the Sign Screen shows the End of Current program.
d. Press the “Del” key to delete a character from Sign-Screen.
e. DELETE: enable you to delete an existing program or list program.
You can use the keys on the keyboard same as the EDIT AREA key to edit message on the
sign screen. For example, you can use either the “Del” on the keyboard or the mouse to
click the “Del” key in the EDIT AREA - the delete function is same.
You can find some characters on keyboard are same as the characters on character area, so
you can also type it in directly from keyboard.
Some of the special characters on the character area and graph area on the screen, however,
only use the “ Mouse” to click on the graphic or character which you want to input, and it
just can key in to the sign screen.
z Red color
We will explain the block area above screen one by one as follows:
Sign Screen: show anything when you key in from keyboard, use Mouse clicks from
character area, or click the Function key.
Msg 2: show waiting for sending when Send text or Send Graph and others should be show.
Msg 3: as a help to assist which Block Area you can do. (For example: when ” Mouse” is in
Function Area, the Msg3 appears " Select sign function to screen, when ” Mouse” click on
the functions.)
Graph: when you just go into the screen, the graphic area just only has a graph key.
Use mouse clicks it then you can see the icon as screen. But when you work at
another area the graph icon will close again.
The characters on graphic area are representing graphs as follows:
Sign Function Area for function selection operate, the details are as follows:
A. Leading commands
Leading commands are functions that will make your message appear, therefore,
Leading commands are used before your messages.
LEFT : message displays from right to left.
RIGHT : message displays from left to right.
UP
: message displays from bottom to top.
DOWN : message displays from top to bottom.
DOFF : characters appear on the right and move to the left one by one.
BIG
: message displays from right to left the following characters displayed in double
width size.
FLSH
: message flashes.
JUMP
: message appears directly on the display.
OPEN : message displays from center to both sides
RANDOM: the following message will appear in different function styles by it.
SHIFT
: message moves from center to both sides continuously.
B. Tail commands
Tail commands are functions that will make your messages disappear, therefore
Tail commands should always be used at the end of a message.
If you have used a tail command after your message, you must use leading
command to start another message, otherwise, all the text after that tail command
can not be displayed.
Under the same rule, if you put two tail commands together, and the second one
can not be executed.
CLSE
: message disappears from both sides to center one by one
GRAPH -T : to display time for 24 hours type.
C. If you choose WAIT, SPEED, the screen displays an input box (display screen) for you to
Key in Value, then press OK, and it will show the function which you choose on the Sign
Screen. If you press CANCEL, nothing will happen.
EDIT AREA
Use the key of EDIT AREA to help you to edit the message.
a.
Use the button to shift a character left or right.
b. Press “HOME” key the Sign Screen will show the head of current program. (For example
B<START>)
c. Press “END” key the Sign Screen shows the End of Current program.
d. Press the “Del” key to delete a character from Sign Screen.
e. DELETE: enable you to delete an existing program or list program.
You can use the keys on the keyboard that is the same as the EDIT AREA key to edit
message on the sign screen. For example, you can use either the “Del” on keyboard or the
mouse to click the “Del” key at the EDIT AREA - the delete function is same.
You can find some characters on the keyboard are the same as the characters on character
area, so you can type it in directly from the keyboard.
Some special characters on character area and graph area on the screen, however, must use
the “ Mouse” to click on the graphic or character which you want to input, and it just can key
in to the sign screen.
IV. File Menu
1. Open: enables you to load on existing sign-text file, from the open file dialogue box.
2. Save: stores the current sign Text file to disk under its existing file name.
3. Save as: enables you to change the file name of the sign Text file before saving it from the
dialogue box.
4. Open graph: enables you to open a picture file; the file should be * .dot type. This function
is for Multi-Color Type only.
5. Exit: end programs that you work and close the Sign6-7 program, then you will be going
to Windows system.
V. Graph Edit: (FOR Multi-Color Type ONLY)
From the Sign Work main menu screen, use the mouse to click the button “GRAPH” which
on the top side, then you can go into the Graph Edit function.
The Graph window appears as follows:
From the Graphic Select Area you can choice the graph to modify but it should be taken out
by “ Mouse” click. When you click the graph it will be putted into PICTURE SELECTOR
(PIC SEL) and the location will shows up on the Graphic Select Area (Sx, Sy).
For example:
If you choose the graph “⊙ ”, the graph will show on PICTURE SELECTOR, and the
location (1, 5) will show on the top of Graph Select Area. You need to use mouse pick up the
graph “⊙ ” from the Graph Select Area to Picture Edit Area, then you just can start the
“Picture Edit”.
PICTURE EDIT:
When you put a graph into the Picture Edit Area, you can start to edit new picture to what
you want. When the mouse touches any dot of Picture Edit Area, the location (Dx, Dy) will
show on the top of Picture Edit Area, it can help you to edit a new picture.
You can edit a new picture on Picture Edit Area, even you have not chosen any graph from
the Graph Select Area. You can use the mouse to touch any dot of Picture Edit Area, then
click the left key to paint color or click the right key to clear it.
You can find the picture color select on the top of screen as follows:
Current Color G=Green; R=Red; Y=Yellow; W=White ( black = transparent )
You can change the current color to green, red, yellow or white before you to edit the picture,
if you do not change it, the picture will show current color which on the top of icon.
Update : when you edit the new picture, you must send it to the Graph Select Area, so you
can use it on your message. You can choose any one graph from Graph Select
Area, modify it to new picture, then click the Update key, the new picture will
show instead of the graph, which you chose before.
You can also edit the new picture first, then use mouse to click any graph on
Graph Select Area and click the Update key; the result is same. But if you forget
to choose the graph, the Update function will be of no use.
Fill All : fill current color on the Picture Edit Area.
Clear
: clear any picture or color on Picture Edit Area.
Open
: the command enables you to open a file, but it should be *.dot type.
Save
: enable you to store file, but it should be *.dot type.
Save as : enable you to change file name then saving it.
Temp
: copy the picture on Picture Edit Area and send to the Substituting Area.
Undo
: copy the picture on Substituting Area and send to the Picture Edit Area.
Exit
: end GRAPH EDIT and Return to Sign 6-7 screen.
VI. Timer Edit: (FOR Multi-Color Type ONLY)
The Timer setting Window appears as follows:
Open
Save
SetTimer
Save As SDTime
Exit
Page(A-Z)- hh(00-23): mm(00-59)
INDEX
Msg 1 Area
(1-32)
TIMER EDIT AREA
Msg 1 Area: when the mouse click to any area, it will help you to understand the function of
the area.
Index: including the section area (1-32) and timer edit area. (For example: 01 A-11:30 )
The commands of Timer Edit as follows:
Open
: open an existing *.tim file then you can load it into Timer Window.
Save and Save as : store the current Timer setting to *.tim file.
SD Time
: send Timer to sign from the setting comfort
OK command : save the corresponding data to timer window which one you key into the
index.
Del command
: Del the data of Timer Edit Area.
For Example: when you want to set the timer for Section 1 on Page A, and the time is 14:30.
a. Use mouse click the index section area, key in 01.
b. Use mouse click the index Timer Edit Area, key in A-14:30
c. Click the OK key, save the data to Timer Window.
If you want to change the time from 14:30 to 15:20
1. Use mouse to click Timer Window 01 area, the data A-14:30 will show on
Timer Edit Area.
2. Click the Del key, the data A-14:30 will clear from Timer Edit Area. Then
click the OK key the data A-14:30 will clear from Timer Window
3. Use mouse clicks the index Timer Edit Area, key in A-15:20 then click the
OK key, save the data to Timer Window.
Exit
: close SetTimer Window return to Sign Work screen.
REMARK: THE OTHER SIGN 6-7 MENUS
A. Sign 6-7 time Adjustment setting time
B. Sign 6-7 menu Comport Setting
C. SendTxt : enable you to send the current Text on Sign Screen output from the setting
comport.
D.SendGrp : send the current Sign graph.