1
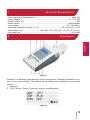
Money detector
English
User manual
www.pro-intell.com
PRO CL-400A MULTI
2
Contents
1 Specification ................................................................................................................5
2 Appearance .................................................................................................................5
3 Operation .....................................................................................................................6
4 Safety precautions.......................................................................................................7
5 Error codes .................................................................................................................8
Warranty .......................................................................................................................10
3
English
PRO INTELLECT TECHNOLOGY Co. Ltd provides the PRO CL-400A Multi, an
automatic multiple currency counterfeit detector from the new generation of CASH LINE
banking equipment series. It includes quick and accurate verification of 8 currencies:
USD, EURO, GBP, JPY, CHF, and also HKD, CAD, BRA, TRY, HUG, DKK, UAE, CRO,
SAR, ROL, BGL, SEK, PL, MXN, SAR, ZAR, BRA, AUD, IRR, RMB may to be installed.
The device automatically carries out a comprehensive analysis of each banknote and
gives an unambiguous result to the operator, which allows the operator to quickly check
banknotes without having a special knowledge of the banknote’s protective features.
This device allows you to analyze a banknote in less than 1 second, view total scanned
banknotes, and view the quantity of banknotes scanned by denomination.
The PRO CL-400A MULTI operates quietly and is capable of checking banknotes in any
orientation, which saves time during verification by not requiring preconditioning (layout)
of banknotes prior to analysis. This allows you to quickly handle large quantities of
banknotes. The detector is designed for use in banks, exchange offices, and other
specialized organizations which have high demands for the authentication of banknotes.
The device is very easy to use, which allows it to be used also in supermarkets,
accounting firms, retail stores, offices, and even in the places where an electrical
network is not present (includes a built-in battery and car adapter).
Advantages:
• Easy to use, without requiring the operator to have a special knowledge of the
banknote’s protective features.
• Verification types:
• Infrared detection
• Verification of visual images
• Magnetic detection
• Spectral ink analysis
• Optical density detection
• Banknote size detection
• Banknotes of all currencies can be fed into the device regardless of orientation
• High scanning speed with quiet operation
• Displays detailed results of scanned banknotes
• Clear and high contrast LCD display with backlighting
• Touch control panel
• The banknote filing guide can be adjusted to the size of the desired currency
• Can be powered by cable adapter, built-in battery or car adapter
• Built-in 12V/1000mA•h Li-Ion battery.
4
1
Technical Specifications
• Scanning speed, Banknotes/min......................................................................up to 100
• Power supply, V...........................................................................................12 / 110-220
• Power current, mA ....................................................................................................800
• Power source ............................................................................................cable adapter
• Li-Ion battery ………………………………………………………..……….12V/ 1000mА•h
• Operating temperature range, 0C (0F) .........................................+10~+40 ((+50...+105)
• Dimensions, mm .................................140 х 220 (330) х 89 ((5½” x 8 2/3” (13”) x 3½”))
• Net weight, kg................................................................................................1.2 (2.6lbs)
Appearance
English
2
Figure 1
Attention! The detector is operated by a touch control panel. Pressing the detector’s buttons is very easy and fast. The buttons are designed to be responsive to even light
touches.
1 - Input tray
2 - "CUR" button - Enters / Exits the currency selection mode:
Figure 2
5
English
USD and EURO are always installed. You can select the currency, with the active currency in the lower right corner. To select and switch currencies, press the «CUR» button
repeatedly. Press and hold the «CUR» button for 3 seconds to save the selected currency. (To exit this mode without saving the settings, press «CLR» or «DEN» buttons).
3 - «CLR» button - Resets the display. Press and hold the «CLR» button for 3 seconds,
the device will enter forward / backward banknote filing mode.
4 – Banknote filing guide - This can be adjusted to the size of a specific currency to
ensure that only one type of currency is being processed at a time.
5 – Counting display
6 – Output tray - If the detector is used in the forward banknote filing mode, you have to
install the output tray. It is not necessary to install the output tray when you use the backward banknote filing mode.
7- Power button - Press and hold the power button for 3 seconds to turn on / turn off the
detector.
8 - «DEN» button - This button is used to view the total quantity of scanned banknotes
by denomination. Each time you press the button, the device will display the currency
type and quantity of scanned banknotes by denomination. Press and hold the «DEN»
button, and after 3 seconds, the results that are on the display will begin printing.
9 – Upper access cover - If a banknote jam occurs, open this cover to remove banknotes.
3
Operation
1. Connect the attached AC adapter to the detector and plug into the electrical network
110-220V / 50-60Hz.
2. Press and hold the power button, as in Fig. 1-7
3. The detector enters into self testing mode. After the detector completes the self testing process, it is ready for operation. The display will show as follows:
Figure 3
4. If necessary, select the banknote filing mode.
In forward filing mode (the arrow in the upper left corner points up), after checking the
banknote, it will be placed on the output tray (Fig. 1-6). A suspicious banknote will not
be deposited in the output tray, but will be returned to the input tray. In the backward filing mode (the arrow in the upper left corner points down), the banknote will always be
returned to the input tray after the authentication process. To select the forward / backward filing mode, press and hold the «CLR» button for 3 seconds.
6
5. Place one banknote on the input tray (Fig. 4) as indicated by the arrow and press the
banknote firmly against the right side of the tray.
You can insert all currencies by any directions. Detector automatically detects currency
type and denomination. The device will detect the denomination of an authentic banknote and adds it to the total amount.
Figure 5
Attention! If the banknote isn’t placed right on the input tray, then the banknote won’t be
recognized as an authentic banknote and will result in an error code.
If an error occurs, please check the orientation of the banknote and put the banknote on
the input tray again. When the detector is operating via battery and is at rest for more
than five minutes, the detector automatically turns off. If a banknote is jammed inside of
the detector, open the upper access cover (Fig. 1-9) and remove the banknote.
4
Safety precautions
1. The device should be installed on an even horizontal surface, away from water and
dangerous objects.
2. Don’t put the device in an area where it can be affected by direct sunlight, directed
artificial light, strong vibration, dust.
3 If the device was exposed to cold for an extensive period of time, it is necessary to
keep it at the room temperature for not less than 3 hours.
4 If the device is not in use for an extended period of time, turn it off.
7
English
Figure 4
5 The battery only charges when the device is turned on. The battery charging time is
approximately 4 hours.
6 Only use the adapter kit that is included with the device.
5
Error codes
Attention! Errors can occur when testing authentic wrinkled, dirty, washed, torn, taped,
or faded banknotes. Additionally, banknotes that have been exposed to harsh
environments including laundry detergent or bleach may result in errors during
authentication.
Attention! If updated versions of banknotes are released into circulation, the detector
may return an error while checking these banknotes. It is necessary to install a new
version of the detector’s software to ensure proper detection of newly released
banknotes. During the warranty period, the new software will be installed at any licensed
service center for free.
English
8
Code
Reason
E01, E07, E08, E09
Error with magnetic mark’s
position
E02
Error with infrared mark’s
position
E05
Error with the banknote’s
identification image
E03
Error with the paper’s quality
E04
Error with the banknote’s size
E06
Error with the banknote’s color
printing quality
Solution
1. Check the banknote’s position on the input
tray, see Fig. 4
2. Check the banknote again. If the error
code appears again, then this banknote can
not be verified as authentic.
The start sensor can not
recognize the banknote
There is no banknote present or a banknote
is jammed in the device or
start sensor is blocked. Remove the
banknote or clean the start sensor.
Ready to downloading..
Enter ROM installation mode.
Switch off and then switch on the power
F01 - F26
Sensor test or button test error
Contact service centre
SOUND ALARM
Battery low
Switch off the device and then connect AC
adapter.
NO BANKNOTE
No banknote for viewing in
“DEN” mode
Cancel the action by pressing “CLR” button
9
English
E11, E12
Warranty
English
Manufacturer guarantees proper functioning of the device during the warranty period
since the date of sale under condition of compliance with maintenance and storage
procedures described in this manual. After unpacking the device please keep the
package and technical description. Warranties are canceled in the event that the device
was not transported in the original packaging or maintenance procedures were violated.
Manufacturer is not responsible for device malfunction as a result of improper
maintenance, storage and transportation including mechanical failures.
In case of the device failure during the warranty period, the customer has the right to
have it repaired in our service center for free. The service center accepts equipment for
cleaning due to dust and mud, however cleaning equipment from dust and mud is not
included in the warranty and is charged separately.
Warranty service does not include any training for equipment maintenance or other use
of the device (connection, testing, customizing, preventive works etc.) which the
customer can complete on their own by referencing the attached manual.
Producer is entitled to introduce updated software, not described in the current manual.
Warranty service is not available in the following cases:
-Absence of a warranty card, an incorrectly filed warranty card, or other invalid card
-If operation or maintenance rules mentioned in the manual were violated
-If there is mechanical damage to the equipment
-If there are foreign objects or liquid inside of the device
The present warranty does not apply to lamps, batteries, belts, network adaptors, power
units, safety fuses, brushes, parts of the body of the product or any other parts which
have a naturally limited period of service including failures caused by power supply
failures. Replaced defective parts are to be considered the property of the producer. The
owner delivers faulty equipment to the service center at their own expense.
10
11
English
© PRO INTELLECT TECHNOLOGY / www.pro-intell.com