1
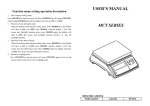
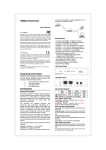
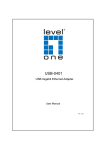
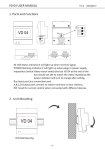
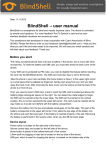
Currency counters
English
User manual
www.pro-intell.com
PRO 15
2
Contents
1 Specification . . . . . . . . . . . . . . . . . . . . . . . . . . . . . . . . . . . . . . . . . . . . . . . . . . . . . . . 4
2 Appearance . . . . . . . . . . . . . . . . . . . . . . . . . . . . . . . . . . . . . . . . . . . . . . . . . . . . . . . 4
3 Operation . . . . . . . . . . . . . . . . . . . . . . . . . . . . . . . . . . . . . . . . . . . . . . . . . . . . . . . . . . 4
4 Troubleshooting. . . . . . . . . . . . . . . . . . . . . . . . . . . . . . . . . . . . . . . . . . . . . . . . . . . . . 5
5 Warranty . . . . . . . . . . . . . . . . . . . . . . . . . . . . . . . . . . . . . . . . . . . . . . . . . . . . . . . . . . 7
3
The portable banknote counter PRO 15 is designed for quick counting of small volumes
of various currencies. This manual will help you to easily and quickly get acquainted with
the device, its functions, and its capabilities. Please read this manual to ensure proper
operation of the device.
1
•
•
•
•
•
•
•
Specification
Counting speed. . . . . . . . . . . . . . . . . . . . . . . . . . . . . . . . . . . . . . . . . . . . . 900 banknote/min
Stacker capacity . . . . . . . . . . . . . . . . . . . . . . . . . . . . . . . . . . . . . . . . . . . . . . . 100 banknote
Counting mechanism capacity . . . . . . . . . . . . . . . . . . . . . . . . . . . . . . . . . . . . . . . . . . . 0-999
Supply voltage . . . . . . . . . . . . . . . . . . 6V, Power source adapter 220V/110V, 4 elements AA
Operating temperature . . . . . . . . . . . . . . . . . . . . . . . . . . . . . . . . . +10..+400C (+50..+1040F)
Net weight. . . . . . . . . . . . . . . . . . . . . . . . . . . . . . . . . . . . . . . . . . . . . . . . . . . . 0.3 kg (0.66lb)
Overall dimensions. . . . . . . . . . . . . . . . . . . . 190x75x102 mm (7 ½”(L) x 2 9/10”(W) x 4”(H))
2
1
2
3
4
5
6
7
8
Appearance
–
–
–
–
–
–
–
–
Stacker cover
Display
Power indicator
Banknote positioning panel
“START” button
“ADD” button, summation
Counting rollers
Clamp plate
Figure 1
3
Operation
3.1 Connect the device to a power source using supplied adapter or 4 AA batteries.
3.2 Open the stacker cover (Fig. 1-1). Display (Fig. 1-2) will turn on.
3.3 ATTENTION! Adjust the banknote position plate to the end as Fig. 2-4.
3.4 To avoid mistakes in counting, sort banknotes and put aside the following:
-with folded or damaged edges
-well-worn or “washed”
-dirty
-torn
4
3.5 Place banknotes in a stack and insert them parallel to clamp plate (Fig. 1-8) as shown on Fig. 2,
holding the clamp plate by forefinger against the guide plate at the end of the stack. The stack of banknotes should be placed against the clamp plate by their end and lay between clamp plate (Fig. 18) and counting roller (Fig. 1-7) see Fig. 3. This is the only position that will ensure an accurate count.
3.6 REMEMBER! If the banknote is positioned incorrectly, it can result in an incorrect count.
Figure 2
Figure 3
3.6 Press “START” button. The counting roller (Fig. 1-7) starts rotating and banknotes are placed
onto cover (Fig. 1-1). After counting, the banknotes should be placed evenly on the cover (Fig. 1).
To avoid occasional errors repeat during counting. If a banknote or several banknotes were not
counted repeat counting again, see Table 3.4 and Table 3.5.
3.7 Press “ADD” button to add current sum to the previous. However, if there was an error during
counting, repeat the count to ensure accuracy. After operations are finished, the counter indicator will
switch off automatically after 1 minute. To avoid excessive power consumption, close cover (Fig. 11) when not in use.
4
Troubleshooting.
4.1 If counting roller (Fig. 1-7) rotates, but banknotes are not counted, check the correct
position of the banknote between clamp plate (Fig. 1-8) and counting roller (Fig. 1-7).
See Table3.5.
4.2 If banknotes spread chaotically during counting, check for the correct positioning of
the banknote positioning panel (Table 3.3).
4.3 If banknotes are not stacked neatly onto cover (Fig.1-1), check correct position of
the banknotes (Table3.5) and repeat counting again.
4.4 If a banknote or several banknotes were not counted, check banknotes (Table 3.5)
and their end position (folded and torn edges) see Table 3.4.
4.5 If indicator (Fig. 1-3) does not light up with cover (Fig. 1-1) opened, check power
supply.
4.6 If indicator (Fig. 1-3) starts blinking, replace batteries.
5
4.7 Error codes
Reason
Error Code
6
Solution
E-0
Low battery.
Install new batteries.
E-1
Lower sensor is dirty or failed.
Clean or replace sensor.
E-2
Upper sensor is dirty or failed
Clean or replace sensor.
E-3
Density level sensor error.
Count banknotes again.
Warranty
Manufacturer guarantees proper functioning of the device during the warranty period
since the date of sale under condition of compliance with maintenance and storage
procedures described in this manual. After unpacking the device please keep the
package and technical description. Warranties are canceled in the event that the device
was not transported in the original packaging or maintenance procedures were violated.
Manufacturer is not responsible for device malfunction as a result of improper
maintenance, storage and transportation including mechanical failures.
In case of the device failure during the warranty period, the customer has the right to
have it repaired in our service center for free. The service center accepts equipment for
cleaning due to dust and mud, however cleaning equipment from dust and mud is not
included in the warranty and is charged separately.
Warranty service does not include any training for equipment maintenance or other use
of the device (connection, testing, customizing, preventive works etc.) which the
customer can complete on their own by referencing the attached manual.
Producer is entitled to introduce updated software, not described in the current manual.
Warranty service is not available in the following cases:
-Absence of a warranty card, an incorrectly filed warranty card, or other invalid card
-If operation or maintenance rules mentioned in the manual were violated
-If there is mechanical damage to the equipment
-If there are foreign objects or liquid inside of the device
The present warranty does not apply to lamps, batteries, belts, network adaptors, power
units, safety fuses, brushes, parts of the body of the product or any other parts which
have a naturally limited period of service including failures caused by power supply
failures. Replaced defective parts are to be considered the property of the producer. The
owner delivers faulty equipment to the service center at their own expense.
7
© PRO INTELLECT TECHNOLOGY / www.pro-intell.com