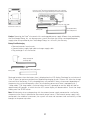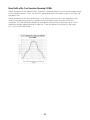
1
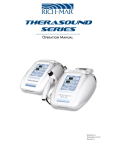
Forte CPS Series
®
USER MANUAL
ULTRASOUND
ISO 9001 Certified
Table of Contents
Remember When Operating the Forte Ultrasound
Introduction . . . . . . . . . . . . . . . . . . . . . . . . . . . .
Welcome to the Forte® Ultrasound . . . . . . . . . .
Features of the Forte Ultrasound . . . . . . . . . . .
.
.
.
.
.
.
.
.
.
.
.
.
.
.
.
.
.
.
.
.
.
.
.
.
.
.
.
.
.
.
.
.
.
.
.
.
.
.
.
.
.
.
.
.
.
.
.
.
.
.
.
.
.
.
.
.
.
.
.
.
.
.
.
.
.
.
.
.
.
.
.
.
.
.
.
.
.
.
.
.
.
.
.
.
.
.
.
.
.
.
.
.
.
.
.
.
.
.
.
.
.
.
.
.
.
.
.
.
.
.
.
.
.
.
.
.
..........1
..........2
..........2
..........2
Foreword . . . . . . . . . . . . . . . . . . . . . . . . . . . . . . . . . . . . . . . . . . . . . . . . . . . . . . . . . . . . . . . . . . . . 3
Precautionary Instructions . . . . . . . . . . . . . . . . . . . . . . . . . . . . . . . . . . . . . . . . . . . . . . . . . . . . . . . 3
Principles of Operation . . . . . . . . . . . . . . . . . . . . . . . . . . . . . . . . . . . . . . . . . . . . . . . . . . . . . . . . . . . 5
Initial Setup Instructions . . . . . . . . . . . . . . . . . . . . . . . . . . . . . . . . . . . . . . . . . . . . . . . . . . . . . . . . 5
System Components . . . . . . . . . . . . . . . . . . . . . . . . . . . . . . . . . . . . . . . . . . . . . . . . . . . . . . . . . . . 5
Optional Accessories . . . . . . . . . . . . . . . . . . . . . . . . . . . . . . . . . . . . . . . . . . . . . . . . . . . . . . . . . . . 5
Operator Interface . . . . . . . . . . . . . . . . . . . . . . . . . . . . . . . . . . . . . . . . . . . . . . . . . . . . . . . . . . . . . 5
Operating Controls . . . . . . . . . . . . . . . . . . . . . . . . . . . . . . . . . . . . . . . . . . . . . . . . . . . . . . . . . . . . 6
Indications and Contraindications . . . . . . . . . . . . . . . . . . . . . . . . . . . . . . . . . . . . . . . . . . . . . . . . . . . 7
Indications . . . . . . . . . . . . . . . . . . . . . . . . . . . . . . . . . . . . . . . . . . . . . . . . . . . . . . . . . . . . . . . . . . . 7
Contraindications . . . . . . . . . . . . . . . . . . . . . . . . . . . . . . . . . . . . . . . . . . . . . . . . . . . . . . . . . . . . . . 7
Precautions . . . . . . . . . . . . . . . . . . . . . . . . . . . . . . . . . . . . . . . . . . . . . . . . . . . . . . . . . . . . . . . . . . 7
Warnings . . . . . . . . . . . . . . . . . . . . . . . . . . . . . . . . . . . . . . . . . . . . . . . . . . . . . . . . . . . . . . . . . . . . 8
Potential for Burns . . . . . . . . . . . . . . . . . . . . . . . . . . . . . . . . . . . . . . . . . . . . . . . . . . . . . . . . . . . . . 8
To Prevent Overheating of Soundhead . . . . . . . . . . . . . . . . . . . . . . . . . . . . . . . . . . . . . . . . . . . . . . 8
Preventing Adverse Effects . . . . . . . . . . . . . . . . . . . . . . . . . . . . . . . . . . . . . . . . . . . . . . . . . . . . . . 8
Handle Applicator with Care . . . . . . . . . . . . . . . . . . . . . . . . . . . . . . . . . . . . . . . . . . . . . . . . . . . . . 9
US Ultrasound . . . . . . . . . . . . . . . . . . . . . . . . . . . . . . . . . . . . . . . . . . . . . . . . . . . . . . . . . . . . . . . . . 10
Introduction to Ultrasound Therapy . . . . . . . . . . . . . . . . . . . . . . . . . . . . . . . . . . . . . . . . . . . . . . . .10
Forte Clinical Features . . . . . . . . . . . . . . . . . . . . . . . . . . . . . . . . . . . . . . . . . . . . . . . . . . . . . . . . .10
General Setup Steps . . . . . . . . . . . . . . . . . . . . . . . . . . . . . . . . . . . . . . . . . . . . . . . . . . . . . . . . . . .10
Power-Up Preset Parameters . . . . . . . . . . . . . . . . . . . . . . . . . . . . . . . . . . . . . . . . . . . . . . . . . . . .10
Quick Start . . . . . . . . . . . . . . . . . . . . . . . . . . . . . . . . . . . . . . . . . . . . . . . . . . . . . . . . . . . . . . . . . .11
Detailed Setup Steps . . . . . . . . . . . . . . . . . . . . . . . . . . . . . . . . . . . . . . . . . . . . . . . . . . . . . . . . . .11
Clinical Protocol System Setup Procedures . . . . . . . . . . . . . . . . . . . . . . . . . . . . . . . . . . . . . . . . . .11
Appendix . . . . . . . . . . . . . . . . . . . . . . . . . . . . . . . . . . . . . . . . . . . . . . . . . . . . . . . . . . . . . . . . . . . . .12
Two Year Limited Warranty . . . . . . . . . . . . . . . . . . . . . . . . . . . . . . . . . . . . . . . . . . . . . . . . . . . . . .12
System Utilities . . . . . . . . . . . . . . . . . . . . . . . . . . . . . . . . . . . . . . . . . . . . . . . . . . . . . . . . . . . . . .13
Maintenance Instructions . . . . . . . . . . . . . . . . . . . . . . . . . . . . . . . . . . . . . . . . . . . . . . . . . . . . . . . 14
System Troubleshooting . . . . . . . . . . . . . . . . . . . . . . . . . . . . . . . . . . . . . . . . . . . . . . . . . . . . . . . 14
Technical Specifications for Ultrasound . . . . . . . . . . . . . . . . . . . . . . . . . . . . . . . . . . . . . . . . . . . . 15
Description of Ultrasound Field . . . . . . . . . . . . . . . . . . . . . . . . . . . . . . . . . . . . . . . . . . . . . . . . . . 18
Glossary . . . . . . . . . . . . . . . . . . . . . . . . . . . . . . . . . . . . . . . . . . . . . . . . . . . . . . . . . . . . . . . . . . . . . 21
Power Cord Illustration . . . . . . . . . . . . . . . . . . . . . . . . . . . . . . . . . . . . . . . . . . . . . . . . . . . . . . . . . . .22
Remember when Operating the Forte® Ultrasound
Changing Stored Protocols
The following power up protocols can be changed and stored as new protocols; Frequency,
Duty Cycle, Treatment Time and Intensity. To modify, first make the desired changes, the press and
hold the INTENSITY KEY
followed by the DISPLAY KEY
until a click is heard.
Brightening or Dimming LCD Screen
To brighten or dim the LCD Screen, first press and hold down the INTENSITY KEY
Next, press either the UP OR DOWN KEY
to brighten or dim the screen.
1
.
Introduction
• Welcome to the Forte® Ultrasound
• Features of the Forte Ultrasound
• Foreword
• Before Using the Forte Ultrasound
• Precautionary Instructions
Welcome to the Forte Ultrasound
The Forte US, designed and manufactured by Chattanooga Group, Inc. offers a new dimension in
portable ultrasound therapy made possible by advanced software design and digital signal processing.
The result is a unit with extraordinary versatility based on simplicity of operation.
The Forte US allows you to select a frequency of 1 or 3.3 MHz without changing sound heads. Sound
heads are available in 2 cm2, 5 cm2 and 10 cm2 and include the patent pending Electronic Signature ™
feature. Duty cycle may be set at 10%, 20%, 50% or Continuous.
Features of the Forte Ultrasound
• Clinical Portable Battery Powered Option
The world’s first truly portable ultrasound system that does not confine you to a wall socket to
operate. Dual frequency application in the clinic or on the road.
• Clinical Protocol System
An efficient approach for setting up a treatment using preset parameters.
• Electronic Signature (Patent Pending)
Automatically calibrate the system to any size Forte sound head.
• Ergonomic Applicators
A new ergonomic design that offers a 20 degree contour in the applicator hand grip. This
ergonomic extra will help deliver uniform ultrasound with greater clinician comfort.
• Head Warming
A feature traditionally available in more expensive brands of ultrasound. This will help curb the
anxiety of patients during the first moments of treatment.
• Clear LCD display
Guide the operator through the setup process providing continuous feedback about treatment
settings. Gives you optimal visibility during attended procedures.
• Easy as One-Two-Go
In just two steps you are ready to begin treatment.
2
Foreword
This manual has been written for the operators of the Forte® Ultrasound. It contains general instructions for operation, precautionary instructions, and maintenance recommendations. In order to obtain
maximum life and efficiency from your Forte Ultrasound and to assist in the proper operation of the
unit, read and understand this manual thoroughly.
The specifications put forth in this manual were in effect at the time of publication. However, owing
to Chattanooga Group’s policy of continuous improvement, changes to these specifications may be
made at any time without obligation on the part of Chattanooga Group, Inc.
Liability Disclaimer
Before administering any treatment to a patient, you should become acquainted with the operating
procedures, as well as the indications, contraindications, warnings, and precautions. Consult other
resources for additional information regarding the application of therapeutic ultrasound.
Precautionary Instructions
1. CAUTION:
Read, understand and practice the precautionary and operating instructions. Know the
limitations and hazards associated with using any ultrasound device. Observe the
precautionary and operational decals placed on the unit.
2. CAUTION:
DO NOT operate this Forte when connected to any unit other than Chattanooga
Group, Inc. devices. Contact Chattanooga Group’s service department at 800-5927329 for recommendations before connecting to other devices. DO NOT operate the
unit in an environment of short-wave diathermy use.
3. WARNING:
Federal law restricts this device to sale by, or on the order of, a physician or licensed
practitioner. This device should be used only under the continued supervision of a
physician or licensed practitioner.
4. CAUTION:
The Ultrasound generator should be routinely checked before each use to determine
that all controls function normally; especially that the intensity control does properly
adjust the intensity of the ultrasonic power output in a stable manner. Also,
determine that the treatment time control does actually terminate ultrasonic power
output when the timer reaches zero.
5. CAUTION:
Use of controls or adjustments or performance of procedures other than those
specified herein may result in hazardous exposure to ultrasonic energy.
6. CAUTION:
DO NOT use sharp objects such as a pencil point or ball point pen to operate the
buttons on the control panel as damage may result.
3
7. WARNING:
Explosion hazard if used in the presence of flammable anesthetics. The warning
symbol for this hazard is prominently displayed on the cabinet.
8. WARNING:
For continued protection against fire hazard, replace fuses only with ones of the
same type and rating.
9. WARNING:
Make certain that the unit is electrically grounded by connecting only to a grounded
electrical service receptacle conforming to the applicable national and local electrical
codes.
10. WARNING:
This device should be kept out of the reach of children.
11. WARNING:
This device should be used only under the continued supervision of a licensed
practitioner.
12. CAUTION:
Meets IEC/EN 60601-1-2 Electromagnetic Compatibility/Interference safety standard.
Care must be taken when operating this equipment around other equipment.
Potential electromagnetic or other interference could occur to this or to the other
equipment. Try to minimize this interference by not using other equipment in
conjunction with it.
13. CAUTION:
14. CAUTION:
15. ATTENTION:
Type B Equipment
This unit should be operated, transported and stored in temperatures between
15° - 40° C, with relative humidity ranging from 30% - 60%.
Consult Accompanying Documents.
16. CAUTION:
Where the integrity of the external protective Earth conductor arrangement is in
doubt, equipment shall be operated from its internal electrical power source.
17. CAUTION:
Batteries should be removed when storing the unit for extended periods of time.
4
Principles of Operation
• Initial Setup Instructions
• System Components
• Standard and Optional Accessories
• Operator Interface
• Operating Controls
Initial Setup Instructions
Remove the Forte® US unit and any additional items ordered from the carton and inspect for damage
that may have occurred during shipment. Check the voltage rating on the serial decal located on the
bottom of the unit. Plug the unit into a 120 Volt A.C. outlet, or 220/240 Volt A.C. outlet, as required.
DO NOT attempt to use Direct Current (D.C.). DO NOT attempt to use the unit if it is not properly
grounded. DO NOT place unit in a location where the power supply or power cord could be tripped
over or pulled out during treatment. Follow the procedures listed in the precautionary instructions
located later in this section.
System Components
The following accessories are included (standard) with your Forte Ultrasound:
4248
Conductor™ Gel
78047
Applicator, Ultrasound 5 cm2
78126
Operator’s Manual
Optional Accessories
The following is a list of optional accessories:
78046
Applicator, Ultrasound, 10 cm2
78048
Applicator, Ultrasound, 2 cm2
Operator Interface
The operator interface consists of an illustrated control panel (next page) with a liquid crystal display
(LCD). The LCD is divided into a parameter display field and an active display field. The operator is
able to view parameter options on the display and make selections by touching the designated area of
the control panel. The active display field will provide continuous information during the treatments
concerning power and elapsed time. Parameters are adjusted using control panel buttons on the front
of the unit. The ultrasound output can be stopped by pressing the “PAUSE” or “STOP” buttons located on the right side of the control panel.
5
Operating Controls
1. LCD Screen Display - Top: Parameter Display Field, Bottom: Active Display Field
• The following are displayed on the LCD: Frequency, Duty Cycle, Power, Treatment Time, and
Presets. Top half of LCD is the parameter display field, bottom is the active display field.
2. Protocols - Clinical Protocol System
• Select this prompt to access the internal library of presets.
3. Intensity (Power)
• Select this prompt to set or modify output power intensity.
4. Time
• Select this prompt to set or modify treatment time in minutes.
5. Frequency
• Select this prompt to change to a frequency of 1 MHz, or 3.3 MHz.
6. Duty Cycle
• Select this prompt to change to a duty cycle of 10%, 20%, 50%, or Continuous.
7. Stop
• Select this prompt to stop a treatment session.
8. Up / Down Arrows
• To modify Intensity or Time: select the appropriate button on the control panel and then use
the up and down arrows to make changes.
• To access a Clinical Protocols press the Presets button and then use the up and down arrows
to navigate through the available options.
9. Head Warm
• Select this button to warm the head of the ultrasound applicator prior to treatment. Note:
Turning Head Warm on will be accompanied by a fan turning on and the display of a thermometer icon adjacent to the active display of Power. The fan and icon will stop when Head
Temp is turned off. A low level of output will be displayed in the active display, and not the
parameter display field.
6
10. Display
• Select this button to change display from w/cm2 (Intensity) to Watts (Power).
11. Pause
• Select this prompt to pause a treatment session.
12. Start
• Select Start to begin a treatment session, or to accept a preset.
Indications and Contraindications
Indications
Ultrasound for use in applying deep heat can be used for treatment of selected medical conditions
such as the relief of pain, muscle spasms and joint contractures. These conditions may be associated
with adhesive capsulitis, bursitis with slight calcification, myositis, and soft tissue injuries. The Forte
Ultrasound can provide therapeutic deep heating between 40° and 45° C in all of its operating modes,
while using any of the applicators available for this device.
Contraindications
Ultrasound should not be used over:
• An area of the body where a malignancy is known to be present.
• The eyes
• The reproductive organs
• An acute infection or sepsis
• A pregnant uterus
• A deep vein thrombosis
• An arterial disease
• An anesthetized area or condition that causes impairment of sensation, such as chemotherapy.
• The epiphyses of skeletally immature children.
• The thoracic area if the patient is using a cardiac pacemaker.
• A healing fracture
• Ischemic tissues in individuals with vascular disease where the blood supply would be unable to
follow the increase.
Precautions
Precautions should be taken when used:
• For acute conditions of bursitis and tendonitis that can be exacerbated by the use of ultrasound.
• Over an area of the spinal cord following a laminectomy (i.e., when major covering tissues have
been removed).
• On patients with a tendency toward hemorrhaging.
7
Warnings
• Always keep the applicator sound head in constant motion.
• Always keep the sound head in full contact with the patient’s skin or submerged under water
when setting intensity.
• Use ample conductive gel to ensure good coupling throughout the treatment. If needed, apply
when setting intensity.
• Be sure to read all instructions for operation before treating a patient.
• DO NOT drop the sound head on hard surfaces. DO NOT cool the sound head with ice water or
ice packs. DO NOT allow the sound head to overheat repeatedly. All of these conditions are likely to damage the sound head crystal.
• CAUTION: Use of controls or adjustments or performance of procedures other than those specified herein may result in hazardous exposure to ultrasonic energy.
Potential for Burns
It is possible for ultrasound therapy to cause burns if the therapy is not performed properly. Skin burns
can result from one or more of the following:
• If the intensity (power) is too high.
• If you are using too low a frequency.
• Using a stationary technique (holding the sound head in one place).
• Moving the sound applicator head too slowly.
• Treating an area with sensory nerve damage (or the loss of normal skin sensations).
• Desensitized areas can be overheated or burned without the patient knowing it. Use extreme
caution with these patients (e.g., diabetes, neural damage, etc.).
• Bony prominences are especially vulnerable: they reflect sound waves and increase intensity to
the periosteum.
To Prevent Overheating of the Sound Head
• Check to be sure proper contact is being made throughout the treatment.
• When treating in water, make sure that the applicator head is completely under water.
• For direct coupling, you may need to apply more conductive gel or lotion during the treatment to
achieve better coupling.
• You can also reduce the power or duty cycle during the treatment if you are treating an area
where it is difficult to obtain good coupling.
Preventing Adverse Effects
• Applicator Movement
If movement of the ultrasound applicator is too slow, the patient may feel periosteal pain
characterized by a deep ache or pain. If motion is too fast, or if the applicator head does not
maintain good contact with the skin, the therapeutic effect of the sound waves will be reduced
and the sound head may overheat.
8
• Patient Susceptibility
Some patients are more sensitive to ultrasound output and may experience a reaction similar
to a heat rash. Be sure to inspect the treatment area during and following treatment, and
discontinue if an adverse reaction does occur.
• Output Power
Choose a lower watt setting to reduce output or select a pulsed duty cycle. Higher output
levels have a greater potential for patient discomfort.
• Coupling
Coupling is described as contact between the sound head and the treatment site and may be
accomplished through the use of a coupling agent, such as gel, lotion or water (underwater
treatments only). Anything used as a coupling agent must be highly conductive. Air is a very
poor conductor of ultrasonic waves.
• Head Max. Temp. Disclaimer
Note: Head Max. Temp. is for the protection of the equipment, not for the protection of the
patient.
Handle the Ultrasound Applicator(s) with Care
• DO NOT drop the sound head on hard surfaces.
• DO NOT allow the sound head to reach maximum temperatures repeatedly.
• DO NOT cool an overheated sound head with ice water or ice packs.
• All of these conditions are likely to damage the sound head crystal.
• Damage resulting from these conditions is not covered under the warranty.
9
US Ultrasound
• Introduction to Ultrasound
• Forte® Clinical Features
• General Setup Steps and Quick Start
• Detailed Setup Steps
• Clinical Applications
Introduction to Ultrasound Therapy
Utilizing ultrasound waves through muscle, nerve, and connective tissue has been well documented
as effective in reducing pain, muscle spasms, and joint contractures.
There are several items that affect the penetration of ultrasound on the target tissues. Please refer to
the literature as a reference on the appropriate frequency for your clinical needs.
There are 3 ultrasound applicators available with the Forte US: 2 cm2, 5 cm2, and 10 cm2. You may
select either 1 or 3.3 MHz frequencies for each ultrasound applicator. Frequency may be selected
either before or during treatment.
Forte Clinical Features
Clinical Portable Battery Powered Option
The world’s first truly portable ultrasound system that does not confine you to a wall socket. Dual frequency application in the clinic or on the road.
Clinical Protocol System
An efficient approach for establishing treatment based on a library of preset programs.
Electronic Signature (Patent Pending)
Automatically calibrates the system to any size Forte sound head.
Head Warming
A feature traditionally available in more expensive brands of ultrasound. This will help curb the anxiety
of patients during the first moments of treatment.
Ergonomic Applicators
A new ergonomic applicator offers a 20 degree contour in the hand grip. This ergonomic extra will
help deliver uniform ultrasound with greater clinician comfort.
General Setup Steps
The unique design of the front panel allows you to set up a treatment faster than ever. Careful grouping of treatment options allow you to easily identify and select from the appropriate options for a specific mode of treatment. Two simple steps are all that’s needed prior to touching Start and initiating
treatment.
Power-Up Preset Parameters
Frequency: MHz, Duty Cycle: 20%, Treatment Time: 5 min., Power: Clinician Controlled.
10
Quick Start
The following is a quick step by step procedure for using ultrasound (US). Before proceeding,
refer to cautions.
Procedure
Comments
Turn power “ON”
The unit will go through self diagnostics, followed by the main menu.
Apply ultrasound gel
Follow steps in preparation for treatment.
Set “Intensity”
Set intensity level for your treatment.
Press “Start”
To begin treatment.
End Treatment
Clean area of residual gel.
Detailed Setup Steps
1. Turn system power “ON”
2. The preset parameters, as described above, will be displayed on the LCD. To change the powerup presets, see System Utilities (page 13).
3. Select “Frequency”
Press the Frequency icon to select 1 or 3.3 MHz. When the icon is pressed, frequency will
toggle from 1 to 3.3 MHz and back again as long as the icon is being pressed. An audible tone
will be heard when changes are made. Note: With 2 and 5 cm2 head switching from 1 to 3.3
MHz results in no change in power. When using a 10 cm2 head at 11 watts or greater, changing
from 1 to 3.3 MHz reduces power 50%.
4. Select “Duty Cycle”
Press the Duty Cycle icon to select 10%, 20%, 50% or Continuous duty cycle. When the icon is
pressed, an audible tone will be heard as the duty cycle toggles through the options on the LCD
display.
5. Select “Treatment Time”
Press the Time icon, then raise or lower treatment time using the up and down arrow keys.
Note: The time section of the parameter display field displays set values only.
6. Increase “Intensity”
Press the Intensity icon, then raise or lower power using the up and down arrow keys.
7. Select “Start”
Press Start; the timer will count down, and ultrasound power will ramp up.
Note: When treatment time has expired a tone will sound. Wipe excess coupling media from patient’s
skin and ultrasound head.
Clinical Protocol System Setup Procedure
1. Press Preset button.
2. Move highlight box to desired Preset.
3. Press ENTER to begin treatment.
11
Appendix
• Warranty
• System Utilities
• Maintenance
• System Trouble Shooting
• Battery Option
• Technical Specifications
Two Year Limited Warranty
The Chattanooga Group Inc. (“Company”) warrants that the Forte® US (“Product”) excluding accessories is free of defects in material and workmanship.
This warranty shall remain in effect for two (2) years from the date of the original consumer purchase
of this and extends to any owner of the product during the warranty period. Accessories that are
included as standard with the product (as listed in the users manual) are warranted for 90 days.
Ultrasound applicators 2 cm2, 5 cm2 or 10 cm2 are warranted for one (1) year. If this product fails to
function during the two year warranty period because of a defect in material or workmanship, the
company or the selling dealer will replace or repair this product without charge within a period of 30
days from the date on which the defective product is returned to the company or the dealer. The
company or the dealer will ship the replacement or the repaired product to the owner. All calibration
and repairs must be performed by a service center authorized by the Chattanooga Group, Inc. Any
modifications or repairs performed by unauthorized centers or groups will void this warranty. To participate in warranty coverage, the products warranty registration card (included with the product) must
be filled out and returned to the Chattanooga Group, Inc. buy the original owner within 10 business
days of purchase.
This warranty does not cover:
Replacement parts or labor furnished by anyone other than the Company, the dealer or an approved
Company service agent. Defects or damage caused by labor furnished by someone other than
Company, the dealer or an approved Company service agent. Any malfunction or failure in the Product
while it is in the possession of the owner during the warranty period if the malfunction or failure is not
caused by a defect in material or workmanship or if the malfunction or failure is caused by unreasonable use, applications in which the product was not intended or the failure to prove reasonable and
necessary maintenance.
The Company Shall Not Be Liable for Incidental or Consequential Damages
Warranty Registration Complete the warranty registration card and return it to Chattanooga within 10
days of purchase. The warranty registration card should be filled out completely with the system serial
number and serial number of the included ultrasound applicator. Warranty registration will ensure that
you will not be billed for services that are covered by the warranty policy.
Complete the entire card included with your system and return postage paid to the Chattanooga
Group, Inc.
12
To Obtain Service from Company or the selling dealer under this warranty, the owner must do or
abide by the following:
• A written claim must be made within the warranty period to Company or the selling dealer.
• If the claim is made to the Company, the written claim should be sent to:
4717 Adams Rd.
PO. Box 489
Hixson, TN 37343 USA
Phone: (800) 592-7329, from outside the US: +423-870-2281
The Product must be returned to Company or the selling dealer by the owner.
This warranty gives you specific legal rights, and you may also have other rights which vary from state
to state.
The Company does not authorize any person or representative to create for it any other obligation or
liability in connection with the sale of the Product. Any representation or agreement not contained in
the warranty shall be void and of no effect.
System Utilities
Audible Tones
Audible tones will be heard in the following conditions: Changing Frequency or Duty Cycle, Max. Head
Temp is exceeded, Low Battery icon is displayed or any error message is displayed.
Changing Power-Up Preset Parameters
Change the parameters to your desired settings. Next press and hold the Intensity key, then touch the
Display key. At this point your power-up presets have been changed.
Changing a Treatment Parameter
Prior to or during a treatment session any parameter may be changed. To change Frequency or Duty
Cycle press the respective buttons to scroll through the provided options. As you scroll, an audible
tone will be heard to make you aware of the change. Intensity and Treatment Time changes are made
by touching their respective buttons then using the up or down arrow keys to advance to the desired
settings.
Note: Intensity display will first be viewed in the smaller Intensity display box of the parameter display
field. After touching Start, the in-treatment display of Intensity will ramp up to your desired setting.
Head Warm
Touch this option prior to starting a treatment session and the sound head will warm using a percentage of the units power. A small icon of a thermometer will appear, and a fan will turn on indicating
head warming is on. Note: Head Warm is only possible prior to touching the Start button initiating a
treatment. When the Start button is pressed Head Warm is turned off.
Battery Option
During battery operation, if the unit is left on, but not active, for more than one (1) minute, it will enter
a sleep mode to conserve battery power. The sleep mode is characterized a blank LCD screen. To exit
the sleep mode, touch the Start key.
LCD Intensity/Contrast
If the intensity of the LCD display diminishes, press and hold down the Intensity button and touch
either the Up or Down key to increase or decrease the display intensity.
13
Maintenance Instructions
To fully maintain compliance with Federal Regulation Title 21 (21 CFR), this unit must be recalibrated
annually. It is recommended that all Chattanooga Group, Inc. ultrasound products be returned to the
factory or an authorized servicing dealer for repairs or recalibration. Recalibration is also recommended
after the replacement or repair of any major component.
The following items should be checked at least monthly to ensure proper operation of this unit:
• Power cord and plug: Check to make sure the cord is not frayed, kinked or does not have torn or
cut insulation.
• Power supply: Check to be sure all connections are secure and there is no build up of material in
the connection area.
• Soundhead cable: Check to make sure the cable is flexible, free of kinks, not frayed and the
insulation is intact.
• Soundhead face: Check to see that there is no build-up of gel or foreign material on the
aluminum face.
Cleaning Ultrasound Applicators
• To clean these accessories use only soap and water. Alcohol may be used to disinfect the
aluminum surface, but avoid the gray plastic area.
• CAUTION: When cleaning, plug input cable into unit to prevent wetting electrical contacts.
Cleaning Forte® US Case
• The Forte Ultrasound case may be cleaned by wiping with a damp cloth or mild cleaning
solution. Avoid abrasive cleansers.
• Do not immerse unit or power supply and do not spray directly on unit or power supply. It is
best to dampen cloth, then wipe surface.
System Trouble Shooting
Display Messages
The following messages are displayed in the “Status Area” of the screen under the
following conditions.
Message
Displayed When
Head Over Temp.
Applicator head reaches a temperature which could damage the crystal
No Head Detected
Applicator not plugged in, or faulty applicator
Command Write Fail
Failure of communication with applicator
Data Read Fail
Failure of communication with applicator
Programming Failed
Failure of communication with applicator
Unknown Head Type
Failure of communication with applicator
EPROM Full
No more calibration memory left
Bad Calibration Data
Uncalibrated applicator or corrupted calibration values
14
Technical Specifications For Ultrasound
Dimensions: 8.25” x 11” x 2.5”
Weight:
8 lb. w/out batteries
Applicators:
2, 5, & 10 cm2
2 cm2 Applicator
5 cm2 Applicator
Frequency (MHz): 1.0 MHz, 3.3 MHz (all +/- 5%)
Frequency (MHz): 1.0 MHz, 3.3 MHz (all +/-5%)
Power (watts): 0 watt to 4 watts
Power (watts): 0 watt to 10 watts
ERA (cm2): 1.8 cm2
ERA (cm2): 4.0 cm2
Effective Radiating Area: 1.8 cm2 +/-0.4 cm2
for the 2 cm2 crystal
Effective Radiating Area: 4.0 cm2 +/-1.0 cm2
for the 5 cm2 crystal
Maximum beam non-uniformity ratio: 6.0:1
Maximum beam non-uniformity ratio: 6.0:1
Beam type: Collimating
Beam type: Collimating
10 cm2 Applicator
Frequency (MHz):
1.0 MHz, 3.3 MHz (all +/- 5%)
Power (watts):
1 MHz: 0 watt to 20 watts, 3.3MHz: 0-10 watts
ERA (cm2):
8.5 cm2
Effective Radiating Area:
8.5 cm2 +/-1.5 cm2 for the 10 cm2 crystal
Maximum beam non-uniformity ratio:
6.0:1
Beam type:
Collimating
Duty Cycle
Pulsed:
10%, 20%, 50%
Continuous:
100%
Pulse Duration:
5 msec +/-20% (50% duty cycle, pulsed mode)
2 msec +/-20% (20% duty cycle, pulsed mode)
1 msec +/-20% (10% duty cycle, pulsed mode)
Ultrasonic Power:
Variable from 0 watt to 20 watts, 10 cm2, crystal at 1.0 MHz, I - I 0 watts at 3.3 MHz
Variable from 0 watt to 10 watts, 5 cm2 crystal
Variable from 0 watt to 4 watts, 2 cm2 crystal
15
Output Meter Accuracy:
+/-20% for any output above 10% of maximum
Temporal Peak t Average Intensity Ratio:
2:1 +/20% for 50% Duty Cycle
5:1 +/20% for 20% Duty Cycle
9:1 +/20% for 10% Duty Cycle
Output:
Continuous:
1 MHz or 3.3 MHz, nominal signal that is activated as long the timer is operating.
Pulsed:
1 MHz or 3 MHz signal, modulated 100% by the 100 Hz rectangular wave with the
selected Duty Cycle.
Timer Accuracy
+/-0.2 minute
Power
Input
~100 - 250V, 1.0 A 50/60 Hz
Output
… +12V 4.1 A
Fuse:
4.0 A
Battery Power Option
When purchased as an accessory the Forte® ultrasound can operate with the provided rechargeable
power supply (Rechargeable Nicad batteries) for approximately five hours of continuous use. Please
follow the provided instructions included with your battery power option regarding connecting to unit
and recharging procedures. Note: When operating with wall power if you then change to battery
power all parameter settings will be reset to the power up preset values.
Installation
• On the bottom of the Forte ultrasound you will see a strip of silver tape labeled- “BATTERY
DRAWER SCREW”. Peel off this strip to expose the screw. (See A)
• Remove screw with a regular screw driver.
• Remove the back panel drawer cover. Retain this cover in a safe place for future use.
• Connect battery supply lead cable to the Forte power supply cable. (See B)
• Slide battery pack into Forte ultrasound until the rear door engages.
• Position screw with finger tips until threads engage. Finger tighten until snug. The screw must
be reinstalled to prevent the battery from falling out.
NOTE: Reverse Process for battery removal.
16
Rear view of Forte® Ultrasound showing back panel. Power supply door
removed and Forte power supply cable being connected to Battery Cable.
A
B
Forte power supply cable.
Bottom view of Forte® US.
Rechargeable battery
within sliding drawer.
Battery cable.
Caution: Operating the Forte® ultrasound with a rechargeable power supply different than provided by
the Chattanooga Group, Inc. can damage your system. Be aware that using a rechargeable power
supply other than provided by the Chattanooga Group, Inc. will nullify the warranty.
Battery Pack Recharging
• Remove batteries from the unit.
• Connect battery supply lead cable to charger supply cable.
• Plug recharger in to a wall outlet.
Battery recharger and
connecting cable.
Battery cable.
Rechargeable battery within sliding drawer
Recharge batteries when the battery icon is displayed on the LCD display. Recharge for a minimum of
10 to 12 hours for optimum performance. Repeated recharging of over 12 hours will affect the charge
time and life of the battery. A fully charged battery will provide 2-5 hours of treatment depending on
the power, duty cycle and frequency used. To save battery power each Forte is equipped with a
“sleep mode.” The sleep mode is activated when the unit is powered on and has been left idle for
approximately 60 seconds, at which time the LCD screen display will become blank. To exit the sleep
mode, press the START button.
Note: With batteries intact and operating with the external power supply connected to a wall outlet,
the power to the Forte is defaulted to the external power source. If the external power supply is disconnected in the middle of a treatment, the system will reset and treatment time and intensity will be
brought to the power up values.
17
Description of Ultrasonic Field
The spatial distribution of the radiated field is essentially a collimated beam of the ultrasonic energy
having a cross-sectional area of 8.5 cm2 for the 10 cm2 sound head when measured at a point 5 mm
from the transducer face.
The energy distribution within the radiated field is 2.4 W/cm2 maximum and it takes a generally conic
shape, having decreasing intensity at progressively increasing distance from the face of the
transducer. This field distribution applies for the radiation emitted into the equivalent of an infinite
medium of distilled, degassed water at 30° C and with the line voltage variations in the range of 10%
of the rated line voltage.
Abbreviations
The following abbreviations are used on the sound head of the Forte® US.
Abbreviation
Meaning
Area
Effective Radiating Area
Coll.
Collimating
BNR
Beam Non-Uniformity Ration
Freq.
Frequency
Beam Profile of the 10 cm2 Transducer Operating at 1 MHz
Spatial distribution of the radiated field is essentially a collimated beam of the ultrasonic energy having
a cross-sectional area of 8.5 cm2 for the 10 cm2 sound head when measured at a point 5 mm from the
transducer face.
Energy distribution within the radiated field is 2.4 W/cm2 maximum and it takes a generally conic
shape, having decreasing intensity at progressively increasing distance from the face of the
transducer. This field distribution applies for the radiation emitted into the equivalent of an infinite
medium of distilled, degassed water at about 30° C and with power line variations in the range
of +/- 10% of the rated voltage.
18
Beam Profile of the 5 cm2 Transducer Operating at 1 MHz and 3.3 MHz
Spatial distribution of the radiated field is essentially a collimated beam of the ultrasonic energy having
a cross-sectional area of 4.0 cm2 for the 5 cm2 sound head when measured at a point 5 mm from the
transducer face.
Energy distribution within the radiated field is 2.5 W/cm2 maximum and it takes a generally conic
shape, having decreasing intensity at progressively increasing distance from the face of the
transducer. This field distribution applies for the radiation emitted into the equivalent of an infinite
medium of distilled, degassed water at about 30° C and with power line variations in the range
of +/- 10% of the rated voltage.
19
Beam Profile of the 2 cm2 Transducer Operating 3.3 MHz
Spatial distribution of the radiated field is essentially a collimated beam of the ultrasonic energy having
a cross-sectional area of 1.8 cm2 for the 2 cm2 sound head when measured at a point 5 mm from the
transducer face.
Energy distribution within the radiated field is 2.22 W/cm2 maximum and it takes a generally conic
shape, having decreasing intensity at progressively increasing distance from the face of the
transducer. This field distribution applies for the radiation emitted into the equivalent of an infinite
medium of distilled, degassed water at about 30° C and with power line variations in the range
of +/- 10% of the rated voltage.
20
Glossary
Beam Non-uniformity Ratio – By nature an ultrasound beam is not homogeneous. The BNR is a ratio of
the highest intensity found in the beam field to the average intensity as indicated on the output display of the unit. This measure may not exceed 6.0:1. Because of the areas of increased intensity,
the sound head is moved continuously during the treatment.
Continuous Mode – The output of the ultrasound is not interrupted during the treatment time. This
mode imparts the most energy to the tissues and is used when a maximal effect is desired. (See
Duty Cycle)
Coupling Media – An agent used to insure that the ultrasound is transmitted from the sound head to
the tissue to be treated. Gels or lotions labeled for therapeutic ultrasound use are recommended.
Duty Cycle – This is the ratio of the “On” time to “Total” time of the cycle, expressed as a percentage.
The duty cycle describes the pulsed modes of ultrasound. The lower the percentage, the lower
temporal average intensity. 100% is continuous ultrasound.
Effective Radiating Area (ERA) – A measure of the ultrasound beam made underwater, 5 mm from the
radiating surface of the sound head. The ERA is always smaller than the geometric area of the
sound head, but should be as close as possible. This measurement is used to calculate the ultrasound intensity in W/cm2.
Frequency – Selectable to 1 or 3.3 MHz with the 5 cm2 or 2 cm2 sound head. The lower the frequency,
the longer the wavelength, the deeper the penetration of ultrasound.
Lead Zirconate Titanate – A synthetic crystal used to create the ultrasound beam by vibrating 1,000,000
(1 MHz) to 3,300,000 (3.3 MHz) times per second. This type of crystal is both durable and efficient
in its functions.
Power – A measure of the intensity of the ultrasound delivered to the patient. Unit of measure is
watts (W).
Pulse Duration – Refers to the amount of time the ultrasound is being delivered in the pulsed mode.
For example, in the 20% duty cycle mode, the ultrasound is delivered for 2 msec and off for 8
msec through out the treatment period.
Pulsed Mode – The output of the ultrasound is automatically interrupted during the treatment time.
This limits the amount of energy delivered to the tissues.
Sound head – The applicator used for delivery of ultrasound to the patient. An aluminum face contacts
the patient’s skin. It covers a transducer mechanism that converts electrical energy to mechanical
energy in the form of a vibrating crystal.
Ultrasound Intensity – Ultrasound power delivered to the patient expressed in total power as watts (W)
or in terms of the sound head’s effective radiating area, watts per centimeter squared (W/cm2).
21
22
Power Cord
ISO 9001 Certified
4717 Adams Road
P.O. Box 489
Hixson, TN 37343
1-800-592-7329
1-423-870-2281
www.chattgroup.com
© 2000 Chattanooga Group, Inc.
78126 D