1
Seismogram Transfer Program (STP)
Reference Manual
Version: 1.01
Revised: April 23, 2007
Prepared by the Southern California Earthquake Data Center
Seismological Laboratory
California Institute of Technology
Table of Contents
1
INTRODUCTION ............................................................................................................................ 1
2
SYSTEM REQUIREMENTS AND DOWNLOADING................................................................... 1
3
INSTALLATION AND STARTUP OF THE COMMAND-LINE CLIENT..................................... 2
3.1
3.2
4
UNIX, LINUX, AND MACINTOSH ................................................................................................... 2
WINDOWS................................................................................................................................... 2
USING THE COMMAND-LINE CLIENTS..................................................................................... 4
4.1 STARTING THE C LIENT AND GETTING HELP ................................................................................ 4
4.2 FINDING EVENTS ........................................................................................................................ 5
4.2.1 Search Criteria for Events ................................................................................................ 5
4.2.2 Event Output ..................................................................................................................... 6
4.2.3 Events with Known IDs ..................................................................................................... 7
4.3 DOWNLOADING EVENT WAVEFORMS .......................................................................................... 7
4.3.1 Finding Available Waveforms .......................................................................................... 7
4.3.2 Downloading Waveforms ................................................................................................. 8
4.4 DOWNLOADING CONTINUOUS TIME-WINDOW W AVEFORMS ...................................................... 10
4.4.1 Finding Available Waveforms ........................................................................................ 10
4.4.2 Downloading Waveforms ............................................................................................... 10
4.5 DOWNLOADING PHASE PICKS ................................................................................................... 11
4.6 DATE FORMATS AND TIME W INDOWS ....................................................................................... 12
4.7 SAVING OUTPUT ....................................................................................................................... 13
4.7.1 Other Ways of Saving Output ........................................................................................ 13
4.7.2 XML Format..................................................................................................................... 14
4.8 AUTOMATING STP.................................................................................................................... 14
4.9 RUNNING EXTERNAL COMMANDS ............................................................................................. 15
4.10 OTHER STP COMMANDS ........................................................................................................ 15
5
USING THE WEB INTERFACE .................................................................................................. 16
5.1 STARTING THE WEB INTERFACE ............................................................................................... 16
5.2 DOWNLOADING TRIGGERED WAVEFORMS ................................................................................ 16
5.2.1 Setting Options................................................................................................................ 16
5.2.2 Finding Events ................................................................................................................ 17
5.2.3 Downloading Waveforms ............................................................................................... 18
5.3 DOWNLOADING CONTINUOUS TIME-WINDOW W AVEFORMS ...................................................... 22
5.4 DOWNLOADING PHASE PICKS ................................................................................................... 22
5.5 PROFILES ................................................................................................................................. 23
6
APPENDIX A- STP HELP FILES................................................................................................ 25
6.1
6.2
6.3
6.4
6.5
6.6
6.7
6.8
6.9
6.10
6.11
6.12
6.13
6.14
NEWS ..................................................................................................................................... 25
WIN ......................................................................................................................................... 25
WIND ...................................................................................................................................... 26
TRIG ....................................................................................................................................... 27
STA ......................................................................................................................................... 27
CHAN ...................................................................................................................................... 28
EVENT .................................................................................................................................... 28
ALTLOC .................................................................................................................................. 30
PHASE.................................................................................................................................... 30
SAC ....................................................................................................................................... 32
MSEED ................................................................................................................................. 32
SEED .................................................................................................................................... 32
FLT32.................................................................................................................................... 33
INT32 .................................................................................................................................... 33
STP Reference Manual – Page i
6.15
6.16
6.17
6.18
6.19
6.20
6.21
6.22
6.23
6.24
6.25
6.26
6.27
6.28
6.29
7
ASCII..................................................................................................................................... 33
COSMOS.............................................................................................................................. 34
XML ....................................................................................................................................... 35
NORM ................................................................................................................................... 35
GAIN ..................................................................................................................................... 35
DATE..................................................................................................................................... 36
INPUT ................................................................................................................................... 37
OUTPUT ............................................................................................................................... 37
STATUS................................................................................................................................ 38
VERBOSE ............................................................................................................................ 39
UPGRADE ............................................................................................................................ 39
BUGS .................................................................................................................................... 39
AVAIL .................................................................................................................................... 39
EAVAIL ................................................................................................................................. 40
SET ....................................................................................................................................... 40
APPENDIX B – TROUBLESHOOTING...................................................................................... 42
7.1 COMMAND-LINE STP ............................................................................................................... 42
7.1.1 General troubleshooting ................................................................................................. 42
7.1.2 I extracted the STP client’s tar file, and I can’t find the directory. ............................... 42
7.1.3 I can’t compile STP. ........................................................................................................ 42
7.1.4 Only 100 events are listed when I run EVENT, but I know there should be more. .... 42
7.1.5 I tried to download waveforms, but I got an error message about no data being
available....................................................................................................................................... 43
7.1.6 I tried to download waveforms and didn’t get any errors, but I can’t find the files...... 43
7.2 WEB STP................................................................................................................................. 43
7.2.1 Nothing happens when I click “Get data from FTP site,” “View files on FTP site,” or
“Plot Seismograms.” ................................................................................................................... 43
7.2.2 I can’t see the buttons for downloading or plotting seismograms. .............................. 43
STP Reference Manual – Page ii
1 Introduction
STP, the Seismogram Transfer Program, was developed by the Southern California
Earthquake Data Center (SCEDC) to provide the seismological community with access
to the waveform and parametric data archived at the Data Center. STP is a highly
innovative client-server application that uses a simple (C-language) client code to handle
the client side of the user transaction. The complexity of the interface is on the serverside and this method allows the Data Center to add functionality without requiring the
user to obtain a new client code. The STP interface allows users to issue commands
that search the earthquake catalog, retrieve phase picks, and download waveforms. The
format of the waveforms can be set by the user and includes SAC, miniSEED, dataless
SEED, full SEED and COSMOS V0 and V1.
This program is available as command-line clients available at:
http://www.data.scec.org/research/downloads.html for Unix, Linux, Macintosh and
Windows platforms and a Web-based, graphical interface at:
http://www.data.scec.org/stp/stp.html.
2 System Requirements and Downloading
The STP client is available for Unix, Linux, and Macintosh and Windows platforms. All
versions of the client require Internet access. If you are behind a firewall, you may need
to check your firewall documentation or talk to your system administrator to ensure that
the STP client can connect to port 9999 of the SCEDC servers, stp.gps.caltech.edu,
stp2.gps.caltech.edu, and stp3.gps.caltech.edu. The Unix, Linux, and Macintosh clients
also require the gcc compiler and Make, which are standard on most distributions of
Unix and Linux.
The SCEDC download page at: http://www.data.scec.org/research/downloads.html hosts
all available STP clients.
The web version of STP is a Java applet located at:
http://www.data.scec.org/STP/stp.html. Downloads and more information about Java
plug-ins for your browser are available at http://www.java.com/en/download/manual.jsp.
In addition to the Java plug-ins, your browser will also need to allow popups and
automatic downloads from http://www.data.scec.org for the seismogram plotting and
automatic download features to work. The applet works best in the Firefox browser,
available at http://www.mozilla.com/en-US/firefox/.
STP Reference Manual – Page 1
3 Installation and Startup of the Command-Line Client
3.1 Unix, Linux, and Macintosh
The Unix, Linux, and Macintosh STP clients are compiled from the same source code,
which can be downloaded as a tar file at:
http://www.data.scec.org/ftp/programs/stp/stp.1.4.1.tar. This file is also linked from the
SCEDC download page at http://www.data.scec.org/research/downloads.html.
Create a new directory and download the STP tar file into that new directory. In the
following cases, the user downloaded the tar file into the directory “stp1.4.1.”
On a Unix machine, type the following commands to unpack the tar file in the stp1.4.1
directory and compile the STP source code:
cd stp1.4.1
tar xvf stp1.4.1.tar
make
On a Linux machine:
cd stp1.4.1
tar xvf stp1.4.1.tar
make linux_stp
On a Mac:
cd stp1.4.1
tar xvf stp1.4.1.tar
make mac_stp
Older releases of version 1.4.1 had a bug that caused errors when compiling with newer
versions of gcc. If this is the case, download
http://www.data.scec.org/ftp/programs/stp/stp1.4.1.fix.tar and extract the file “editline.h.”
Overwrite the original “editline.h” with the new version and recompile STP:
tar xvf stp1.4.1.fix.tar
cp stp1.4.1.fix/editline.h stp1.4.1/
cd stp1.4.1
make
When STP compiles, a binary file named “stp” is created in the directory where it was
compiled. If the file is not executable, set the permissions:
chmod +x stp.
To start the client, enter:
./stp
at the command prompt. To start STP from any directory, add the path of the directory
containing “stp” to your PATH variable, or move “stp” to a directory that is in your PATH
variable.
3.2 Windows
On the download page at http://www.data.scec.org/research/downloads.html, click on
the download link for WinSTP and follow your browser’s instructions for saving the file
STP Reference Manual – Page 2
“STP.exe.” Once the file is saved, double-click its icon to open an STP command-prompt
window. For easiest access, save the file STP.exe onto your desktop.
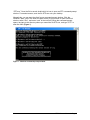
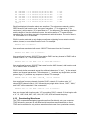
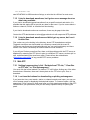
Alternatively, you can start the client from a command-prompt window. Click the
Windows “Start” icon in the lower left-hand corner of your screen to open a terminal
window, select “Run”, and enter “cmd” in the text field. When the command prompt
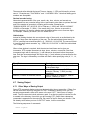
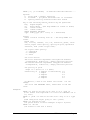
opens, navigate to the directory where you saved the file STP.exe, and type “STP” to
start the client (Figure 1).
Figure 1 - Windows command prompt window.
STP Reference Manual – Page 3
4 Using the Command-Line Clients
4.1 Starting the Client and Getting Help
Start the STP client by typing the name of the executable – either “STP” or “stp,” at the
command prompt. By default, STP will connect to the SCEDC’s main server,
stp.gps.caltech.edu. If the main server is unavailable, STP will automatically connect to
the other STP servers, stp2 and stp3.
You can manually choose a server by using the “-a” flag. For example:
stp –a stp2
will create an STP connection to the server stp2. The “-a” flag is useful if the connection
to the main server is overloaded and or responding quickly.
When the STP client starts, you will see the following:
STP: Connected to stp.gps.caltech.edu
You are currently running the latest version of stp.
**************************************
* Welcome to the Southern California *
*
Earthquake Data Center
*
*
Seismic Transfer Program
*
**************************************
STP>
There may be a “message of the day” between the welcome box and the STP prompt
(“STP>”). Please read that message to stay current on the latest STP developments.
Commands are executed by typing them at the STP prompt and pressing the ENTER
key on your keyboard. Each time you press the up arrow on your keyboard, a previously
entered command, if any, will be displayed from newest to oldest after the STP prompt.
You may already be familiar with this sort of feature if you use the Windows XP
command prompt or the BASH or TCSH shell in Linux, Unix, or Macintosh.
STP has an interactive help feature that covers most commands. Entering:
HELP
at the STP prompt without any parameters displays a list of all available help topics.
To get help on a specific command, type “HELP” followed by the name of the command.
For example:
HELP TRIG
displays the help file for the TRIG command.
STP Reference Manual – Page 4
STP commands are case-insensitive i.e., “help” is the same as “HELP,” which is the
same as “HeLP.” For consistency all commands in this manual are capitalized.
4.2
4.2.1
Finding Events
Search Criteria for Events
One of the most common STP activities is downloading triggered waveforms, i.e.,
waveforms associated with events. However, before you can do this, you need the
SCSN network-assigned ID numbers of the events. Use the EVENT command to find
event IDs and the event’s associated parametric information.
The EVENT command requires at least one set of search criteria to limit results by
magnitude, depth, location, time, or event type. If one or more criteria are omitted, STP
assumes that all possible values of the omitted criteria are acceptable.
For example, suppose you are looking for events with a magnitude between 3.5 and 6.
The command:
EVENT -mag 3.5 6
will provide all events in the SCEDC database with magnitude is between 3.5 and 6,
regardless of the event type, depth, or location. Now suppose you want to limit the
search results to events whose magnitude is between 3.5 and 6 and whose depth is
between 1.5 and 10 km. Then the command becomes:
EVENT -mag 3.5 6 -depth 1.5 10
Both “-depth” and “-mag” accept two arguments, a minimum and maximum, which can
be floating point numbers, like 3.5 or 3.55, or integer values like 6. All depth values are
in kilometers.
The “-lat” and “-lon” flags constrain latitude and longitude ranges for the search. The
values can be integers or floating-point numbers in degrees. South latitudes and west
longitudes are negative; north latitudes and east longitudes are positive. For example,
suppose you want to find events that occurred between 34.45º North and 36º North with
any longitude. The command for this search is:
EVENT -lat 34.45 36
If you want to restrict the location of events even further, add longitude criteria:
EVENT -lat 34.45 36 -lon -116 -118
This search will find all events that occurred between 34.45º and 36º North latitude, and
between 116º West and 118º West longitude. You can add the location search to the
previous searches:
EVENT -mag 3.5 6 -depth 1.5 10 -lat 34.45 36 -lon -116 -118
to find events between 34.45º N, 116º W, and 36º N, 118º W, and with depths between
1.5 and 10 km and magnitudes between 3.5 and 6.
STP Reference Manual – Page 5
The most complicated search parameter is time. The “-t0” flag restricts search results to
events that occurred within a specified time window. “-t0” accepts two arguments, a
minimum and maximum. Time and date arguments can be given in a variety of formats
covered in detail in section 4.6. Here are a few examples:
EVENT -t0 2006/2/1,00:00:00 2006/2/2,00:00:00
searches for events that occurred between midnight February 1, 2006, and midnight
February 2, 2006.
EVENT -t0 2006/2/1,00:00:00 +1d
searches for the same events as the previous query. “+1d” represents an increment of
one day.
The final type of search criteria is event type, specified by the “-type” flag, followed by an
abbreviation for the desired type.
Abbreviation
le
re
ts
qb
nt
uk
sn
Event Type
Local event (southern California events)
Regional event (northern California events)
Teleseism (large event anywhere in the world)
Quarry blast
Nuclear blast
Unknown event
Sonic blast
A single query can search for more than one type of event by stringing the types
together with commas.
Here are some examples that put everything together:
EVENT -t0 2005/12/15,00:00:00 +7d -type ts -mag 6 10
The above command returns events classified as teleseisms with magnitudes between 6
and 10 that occurred between December 15, 2005, and December 22, 2005.
EVENT -type le,re -mag 1 2.5 -t0 20051215000000 +2d -depth 1 3
The above query searches for local and regional events with magnitudes between 1 and
2.5 that occurred between December 15 and December 17, 2005, at depths between 1
km and 3 km. Note that the order of search criteria does not matter.
4.2.2
Event Output
When EVENT successfully finds events, the output will look like:
14204536 le 2005/12/16,07:15:38.420
14204672 le 2005/12/16,20:29:11.250
35.9210
33.8508
-117.9215
-117.4872
2.76
2.54
1.20
1.23
h 1.0
l 1.0
The above output lists two events with event IDs 14204536 and 14204672. The output
fields are event ID, event type, date, latitude, longitude, depth, magnitude, magnitude
type, and quality, respectively. The magnitude type is a one-letter abbreviation.
STP Reference Manual – Page 6
Abbreviation
b
l
c
w
e
s
n
h
Magnitude Type
Body-wave magnitude
Local magnitude
Coda magnitude
Moment magnitude
Energy magnitude
Surface-wave magnitude
No magnitude
Helicorder magnitude
To list only event IDs, include the “-s” flag in the EVENT command.
You can also have EVENT output downloaded directly to a file on your own computer.
To do this, include the “-f” flag followed by a file name. For example:
EVENT –f events_20051215.out -type le -mag 1 2.5 -t0 20051215000000
+2d -depth 1 3
will store its output in a file named “events_20051215.out” on your computer in the
current directory. If “events_20051215.out” does not exist, it will be created, but if it
already exists, it will be overwritten. The file name you provide can include a relative or
absolute directory path. All directories in the path must exist.
4.2.3
Events with Known IDs
If you already know the ID(s) of the event(s) of interest, you can display their information
using the “-e” flag instead of using the usual search criteria. For example:
EVENT –e 14204536 14204672
will display the information for events 14204536 and 14204672. The “-e” flag can also be
used with the “-f” flag to redirect output to a file on your computer.
4.3
Downloading Event Waveforms
4.3.1 Finding Available Waveforms
Once you have an event ID, you can download the waveforms associated with that
event. To search for available waveforms for the event, use the EAVAIL command with
the event ID. For example:
EAVAIL 10223377
displays the originating network, station, channel, and location code of each waveform
available for the event with ID 10223377. Each waveform’s network, station, and
channel information are separated by periods, e.g., AZ.BZN.HHE, CI.BBS.HHZ, etc.
The “-l” flag provides more detailed information about the available waveforms. The
command:
EAVAIL –l 10223377
displays output that includes:
STP Reference Manual – Page 7
AZ BZN
AZ BZN
AZ BZN
AZ CRY
AZ CRY
AZ CRY
AZ CRY
[etc.]
HHE
HHN
HHZ
HHE
HHN
HHZ
HLE
--------
T
T
T
T
T
T
T
T
T
T
T
T
T
T
2006/12/20,21:28:21.968
2006/12/20,21:28:22.968
2006/12/20,21:28:19.968
2006/12/20,21:28:23.080
2006/12/20,21:28:23.060
2006/12/20,21:28:23.060
2006/12/20,21:28:21.000
1.07m
1.00m
1.07m
0.99m
1.00m
0.99m
1.06m
Each line displays information about one waveform. The columns are network, station,
SEED channel, and location code, the type of waveform, (‘T’ for triggered or ‘C’ for
continuous), archive status (‘A’ for permanent or ‘T’ for temporary), the starting date/time
and the length of time the waveform covers. An archive status of ‘T’ means that the
waveform has not yet been moved to its permanent archival location. The unit of time is
“m” for minutes or “s” for seconds.
EAVAIL can be restricted to only display waveforms originating from a certain network,
station, channel, or non-default location code. For example:
EAVAIL –net CI 10223377
lists waveforms associated with event 10223377 that came from the CI network.
EAVAIL –sta PASC –loc 10 10223377
lists waveforms for event 10223377 from station PASC and any channel of PASC with a
location code of “10,” if such waveforms exist.
EAVAIL –net CI –sta PASC –loc 10 –chan HHE 10223377
lists waveforms for event 10223377 that came from the HHE channel, with location code
10, of station PASC of network CI.
EAVAIL and similar commands accept the wildcard characters ‘%’ and ‘_’ in the network,
station, and channel parameters. The underscore (‘_’) matches any single letter, and the
percent sign (‘%’) matches any sequence of letters. For example:
EAVAIL –net CI –sta PASC –chan HH_ -loc 10 10223377
lists waveforms from any channel of station PASC, network CI, location code “10,”
whose SEED channel code is “HH” followed by any single letter. Hence, “HHE,” “HHN,”
and “HHZ” will be searched. If the command is:
EAVAIL –net CI –sta PASC –chan H% -loc 10 10223377
then any channel with location code “10” from station PASC, network CI, that begins with
a “H” i.e., HHE, HHN, HHZ, HLE, HLN, HLZ, HDI, HDO will match the query.
4.3.2
Downloading Waveforms
The TRIG command downloads triggered waveform files directly onto your computer.
TRIG followed by an event ID will download all waveforms associated with an event.
TRIG can be restricted to only retrieve waveforms that come from a particular network,
STP Reference Manual – Page 8
station, channel, or location code. The parameters for these restrictions are the same as
those used by the EAVAIL command.
You can also restrict waveforms by the distance between the originating station and the
event. The maximum distance is specified as a value in kilometers preceded by the “radius” flag.
TRIG examples:
TRIG –net CI –sta PAS –chan B% 14204536
downloads waveforms for event 14204536 that come from any “B_ _” channel of station
PAS in the CI network.
TRIG –radius 100 14204536
downloads all waveforms for event 14204536 that originate from stations within 100 km
of the event.
The TRIG command downloads waveform files into a directory that will be created if it
doesn’t already exist. The name of this new directory is the event ID. A summary file
containing the event’s parametric information is stored in a file in this directory named
with the format “eventid.evnt.” The format of the waveform file names is
“eventid.net.station.channel.locationcode.extension.” If the location code is the default
double blanks, the “locationcode” field will not exist. For example, waveforms for event
14204536 from network CI, station PAS, channel BHZ, location code “--“ would be
named “14204536.CI.PAS.BHZ.sac” and be stored in directory “14204536.” All
directories are relative to the directory where STP is running.
The extension of a waveform file depends on the selected format. The default format is
SAC, which uses the extension ”sac.” Formats available are miniSEED, SEED, ASCII,
COSMOS, 32-bit integer, or 32-bit float. Change the download format by typing the
desired format at the STP prompt. You can check your session’s formats with the
‘STATUS’ command. For example:
STP> MSEED
<-- user typed “mseed” as the desired format
STP> STATUS
<-- user typed “status” to confirm change of format
Client Status:
Verbose = 0
Nline
= 24
Output = off
Server = stp
Address = stp.gps.caltech.edu
Port
= 9999
Server Status:
Wave Format = MSEED
<-- confirmation that format changed
Event/Phase Format = Normal
Gain
= OFF
Fill
= 0
Byte Swap = 1
Nevntmax = 100
STP Reference Manual – Page 9
Command
MSEED
SEED
ASCII
V0
V1
SAC
INT32
FLT32
4.4
Format
miniSEED
Full SEED format
ASCII
COSMOS-V0
COSMOS-V1
SAC (default)
32-bit integer
32-bit IEEE floating point
Extension
mseed
seed
ascii
v0
v1
sac
int32
flt32
Downloading Continuous Time-Window Waveforms
4.4.1 Finding Available Waveforms
The SCEDC archives low sample-rate channels such as B* (Broadband [20 or 40 Hz]),
L* (Long period [1 Hz]) and V* (Very long period [0.1 Hz]) continuously. These
waveforms are archived regardless of whether or not events occurred during the time
window covered by each waveform. They are stored in a separate archive from the
triggered waveforms and are accessed through a separate set of commands.
The AVAIL command lists the availability of continuous waveforms by time, since they
are not identified by event IDs. AVAIL accepts the “-net,” “-sta,” “-chan,” and “-loc”
search criteria. AVAIL also accepts single times and time windows without a preceding “t0” flag. If only one time is provided, the results will be waveforms whose time windows
include the provided time and meet all of the other search criteria. If a time window is
provided, then the results will include any waveform that includes any time within the
time window and meets the other criteria. Like EAVAIL, AVAIL also accepts the “-l” flag
to provide longer, detailed listings.
An AVAIL example:
AVAIL –l –net CI –sta PAS –chan BH% 2006/1/1,00:00:00 +1d
lists waveforms from the BH channels of station PAS in the CI network that include
times between January 1, 2006, and January 2, 2006. The output looks like:
CI PAS
CI PAS
CI PAS
CI PAS
CI PAS
[...]
BHZ
BHE
BHN
BHZ
BHE
------
C
C
C
C
C
A
A
A
A
A
2005/12/31,22:59:41.073
2005/12/31,22:59:51.273
2005/12/31,22:59:59.073
2006/01/01,00:59:44.273
2006/01/01,00:59:58.073
60.53m
60.37m
60.24m
60.33m
60.11m
The output format is the same as EAVAIL. Note that the value of the waveform type is
now “C” for “continuous.”
4.4.2
Downloading Waveforms
The WIN and WIND commands are both used for downloading continuous time-window
waveforms. They also have options for downloading triggered waveforms but do not
accept event IDs as search criteria.
STP Reference Manual – Page 10
WIN can search by network, station, channel, and time window. All four parameters must
be provided in this order. Network, station, and channel names may contain wildcards,
“%” for any sequence of characters and “_” for any one character. Optionally, WIN
accepts the “-t” flag to search the triggered archive for waveforms that meet the search
criteria or the “-a” flag to search both triggered and continuous archives. If provided,
these optional flags must precede the search criteria. If no flags are provided, WIN
searches only the continuous archives by default. WIN will download data for all location
codes belonging to matching channels but does not accept location code searches. If
you need to restrict your searches by location code, use the WIND command. Other
than the additional search parameter, WIND is the same as WIN.
WIND follows the more standard format used by the triggered commands. Like TRIG,
WIND accepts network, station, channel, and non-default location code as search
criteria in any order. WIND also accepts a time window using the standard STP date
format.
Examples of WIN and WIND:
WIND CI PAS BHZ % 2006/2/5,08:30:00.00 +1d
downloads continuous waveforms from between 8:30am UTC on February 5, 2006, to
8:30am UTC on February 6, 2006, that come from channels beginning with “BH” of
station PAS in the CI network. All location codes are acceptable.
WIN CI PAS BH% 2006/2/5,08:30:00 +1d
is the equivalent of the previous example.
WIN –t CI PAS BH_ 2006/2/4,08:30:00 +1d
downloads triggered waveforms with the same search criteria.
WIND CI PASC BHZ 10 2007/4/1,08:30:00.00 +1d
downloads continuous waveforms from CI.PASC.BHZ, with location code 10.
Both WIN and WIND download waveform files into the current STP directory on your
computer. File names follow the format “timestamp.network.station.channel. locationcode.extension.” If the location code is two blanks (which is the default location code and
currently applies to most channels), it will be ignored and the channel will be followed
directly by the extension. The default extension is “sac” for SAC format. See section
4.3.2 for information on formats.
4.5 Downloading Phase Picks
PHASE is used for downloading phase picks for events that meet the search criteria.
Like the EVENT command, PHASE accepts magnitude, time window, latitude, longitude,
depth, and event type to search for matching events. PHASE also accepts the “-e” flag
for specifying events by ID. Instead of only displaying event location information as
EVENT does, PHASE displays the information for each matching event followed by its
phase picks. The output of PHASE can be redirected to a file on your computer by using
the “-f” flag. When “-f” is invoked, only the event information is appears on your screen,
but the phase picks are printed to the file.
STP Reference Manual – Page 11
PHASE examples:
PHASE -e 10167485 10167513
lists event information and phase picks two events, 10167485 and 10167513.
PHASE –f 10167485.phase -e 10167485 10167513
downloads event information and phase picks for the same two events into a file on your
computer, located in your current directory, named “10167485.phase.” In this example,
the “-f” flag and its parameter must precede the “-e” flag. When STP detects “-e,” it
interprets everything following the flag as possible event IDs.
PHASE –t0 2006/2/1,05:00:00 +2h –mag 1 2.5 –depth 3 4
lists event information and phase picks for events with magnitude between 1 and 2.5 at
a depth between 3 and 4 km that occurred between 5:00AM UTC and 7:00 AM UTC on
February 1, 2006.
PHASE –t0 2006/2/1,05:00:00 +2h –mag 1 2.5 –depth 3 4 –f phases.txt
stores the event information and phase picks from the previous example in a file named
“phases.txt” in the working directory of your computer.
The output for each event begins with a line containing event location information. Each
subsequent line lists the phase picks for one channel with the following fields: network,
station, channel, two-digit location code, latitude, longitude, elevation, phase, firstmotion, signal onset quality, pick quality, epicentral distance, and time after origin time.
An example of phase output is:
10167485 le 2006/02/01,06:39:26.210
CI
WCS EHZ -- 36.0270 -117.7676
CI
WCS EHZ -- 36.0270 -117.7676
CI
JRC2 HHZ -- 35.9825 -117.8089
[...]
36.0207
-117.7710
1135.0 P d. i 1.0
1135.0 P d. w 1.0
1469.0 P c. i 1.0
1.91
0.77
0.77
5.44
0.95 l 1.0
0.337
0.370
1.072
4.6 Date Formats and Time Windows
The previous sections included numerous examples of time windows consisting of a
start time and either an end time or an increment. Most of the dates were written in the
format of “year/month/day,hour:minute:second.” This is the date format that the author
finds most intuitive, but several other formats are supported. All dates are in Universal
Time (UTC).
Year/month/day,hour:minute:second
The format “yyyy/mm/dd,hh:mm:ss” has been used throughout the tutorial. The number
of seconds can be a floating-point number. The month and day do not need to be zeropadded if they are less than 10.
Year,month,day,hour:minute:second
This format is the same as the previous, except that the forward slashes, ‘/’, are replaced
by commas. An example is “2006,2,1,20:35:50.105.”
Seconds after midnight Universal Time on January 1, 1970
STP Reference Manual – Page 12
The seconds after midnight Universal Time on January 1, 1970 are followed by a lowercase ‘u’. Examples are “1144792961u” and “1144792961.225u.” Note that floating-point
numbers are acceptable.
Decimal-encoded string
Numerical representations of the year, month, day, hour, minute, and second are
compressed into one numerical string with no punctuation other than an optional decimal
point if the number of seconds is a floating point number. Examples are
“20060201203550.105” (20:35:50.105 on February 1, 2006) and “20041211050000”
(5:00:00 on December 11, 2004). If the month, day, hour, minute, or second is a
number less than 10, then the number must be padded with a zero to form two digits.
For example, February is month 2, but it is written as “02.”
Ordinal dates
Instead of dividing the date into a month and a day of the month, an ordinal date is the
number of days since the beginning of the year. The first ordinal date format used by
STP is “year/day,hour:minute:seconds” e.g., “2006/101, 13:20:25.20” The second format
is “year,day,hour:minute:seconds” e.g., “2006,101,13:20:25.20.” In 2006 the ordinal date
“101” is April 11.
When a time window is required, both the start and end times can be given as
increments. STP accepts increments in days, hours, minutes, or seconds. Start time
increments begin with a minus sign (‘-‘) and indicate an increment before the present
time. End time increments begin with a plus sign (‘+’) and indicate an increment after the
start time. The sign is followed by a number and then a letter specifying units (‘d’, ‘h’, ‘m’,
‘s’).
Time Window
-8h +8h
2006/2/5,00:00:00 +2d
2006/2/5,11:38:50.25 2006/2/6,8:03:20
Meaning
From eight hours before the present time
to the present time
From midnight, February 5, 2006, to
midnight, February 7, 2006 (two-day
increment)
From 11:38:50.25, February 5, 2006 to
8:03:20, February 6, 2006
4.7 Saving Output
4.7.1 Other Ways of Saving Output
Some STP commands display output on the terminal but do not accept the “-f” flag. You
can still save their output by using the OUTPUT command to specify a file. OUTPUT
accepts one parameter, either a file name or the word “OFF,” which turns off output
mode. The file name can include a directory path. If no directory path is included, the file
is created in the directory from which you are running STP. Output from subsequent
commands is appended to the output file. Be careful of the file name you choose. If the
file already exists when you turn on OUTPUT mode, it will be overwritten.
The following sequence of commands:
!mkdir stpdata
STP Reference Manual – Page 13
OUTPUT
STA –l
OUTPUT
STA –l
OUTPUT
stpdata/stalist.txt
stpdata/ci_stalist.txt
–net CI
off
creates a station list in the file stalist.txt in the newly created directory “stpdata.” The
second OUTPUT call switches the output file to “stpdata/ci_stalist.txt.” Note the use of
an external command, “mkdir,” to create the “stpdata” directory. Also note that if a
directory path is included in an OUTPUT call, the directories must already exist. For
more information on the STA command, see its help section in Appendix A or enter
“HELP STA” in STP.
4.7.2 XML Format
In the previous sections we’ve discussed saving EVENT and PHASE output in a file on
your computer. Normally, this file contains flat text. You also have the option of saving
these files as XML. The SCEDC has an XML schema available at
http://www.data.scec.org/xml/event.xsd. Documentation for this schema is located at
http://www.data.scec.org/xml.
As mentioned earlier, the PHASE and EVENT commands accept the “-f” flag for
specifying an output file. To put the output in XML format, enter the command “XML”
before running PHASE or EVENT. If the “-f” flag is included, the XML output will be
saved in the file you specify. If the “-f” flag is not included, the output will be saved in a
file named with the format “phases_eventid.xml” for phase picks or “eventid.xml” for
EVENT output. The event ID in the file name is always the first event that appears in the
output. To turn off XML mode, type the NORM command.
The following sequence of commands:
XML
PHASE -t0 2006/4/1,00:00:00 +12h -f phases.xml
stores phase picks for events that occurred in a twelve-hour time window beginning from
midnight on April 1, 2006, in XML format in a file named “phases.xml.” If you then enter:
PHASE –t0 2006/4/1,00:00:00 +12h
in the same STP session, the phase picks will be stored in a file named
“phases_14219828.xml.” The event ID in the file name is “14219828” because event
14219828 is the first event that fulfilled the search criteria. Now, still in the same session,
enter:
NORM
PHASE -t0 2006/4/1,00:00:00 +12h
This time the phase picks will appear on the terminal in regular format because the
NORM command returned the event/phase format to the default STP output.
4.8 Automating STP
The INPUT command, abbreviated as IN, tells STP to run the commands listed in a file
stored on your computer. This feature allows the user to generate a sequence of STP
STP Reference Manual – Page 14
commands from her own scripts and then run the commands by typing only one line.
The format of the INPUT command is:
or
INPUT filename
IN filename.
“filename” should be the path to a file on your computer that contains a sequence of STP
commands, listed one on each line. STP will run these commands sequentially,
displaying the output as if the user had entered the commands manually at the STP
prompt.
As an example of the INPUT command’s applications, suppose you want to download
waveforms from station BFS in network CI for all local events with magnitude between 1
and 4 that occurred between 34 degrees North and 35 degrees North and -119 degrees
West and -117 degrees West within one week after March 24, 2006. The command:
EVENT –s -t0 2006/3/24,00:00:00 +7d -mag 1 4 -type le -lat 34 35 -lon
-119 -117 –f events.txt
saves the event IDs in the file “events.txt.” You can use your own scripts to construct a
file containing commands to download the waveforms you want for each event ID in
events.txt. The contents of the resulting file may contain:
TRIG –net CI –sta BFS 14218492
TRIG –net CI –sta BFS 14218564
TRIG –net CI –sta BFS 14218784
Let’s say the file is named “download_waveforms.” In the STP client enter
IN download_waveforms
and STP will run each command listed in “download_waveforms.”
4.9 Running External Commands
Sometimes you may need to run non-STP commands while using STP. Typing an
exclamation point (‘!’) followed by a non-STP command will run that command and
display its output as if you had run it outside STP. Suppose you are running STP and
forgot the name of your current directory. Unix’s “pwd” command will display the name of
the current directory, but you don’t want to exit STP or open a new window. At the STP
prompt type:
!pwd
and the name of the current directory will be displayed as if you had entered “pwd” on
the regular command line. Once the command is done, you can continue using STP
without interruption.
4.10 Other STP Commands
This section has covered the most important, but not all, functions of the command-line
STP client. Other commands are documented in STP’s interactive help feature,
accessible through the HELP command. The contents of STP’s help files are also listed
in Appendix A of this document.
STP Reference Manual – Page 15
5 Using the Web Interface
5.1 Starting the Web Interface
The web version of STP is a Java applet located at
http://www.data.scec.org/STP/stp.html. The STP applet can search for event
information, download triggered and continuous waveforms, plot SAC-format waveforms,
and download phase picks.
To begin a new STP session, enter a login name. This login name will be the name of
the directory on the SCEDC’s server where your downloaded files will be stored. It will
also be used to store your user profiles if you choose to use the profile feature.
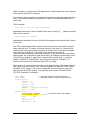
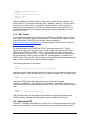
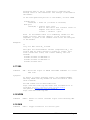
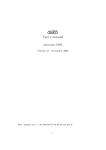
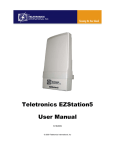
Once you log in, your browser loads the applet (Figure 2). The top of the applet includes
a number of fields where you can set modes and waveform output formats. The box
labeled “Message Window” will display status and error messages as they occur.
Figure 2 - STP applet in triggered mode.
5.1 Downloading Triggered Waveforms
5.1.1 Setting Options
The row of radio buttons at the top of the applet (Figure 2) allow you to switch modes,
depending on what kind of data you want to download. “Triggered Event” mode, which is
selected by default, must be selected if you want to download event waveforms.
Once “Triggered Event” is selected, you can select options for the waveforms you
download. You can choose to automatically display a graphical plot your waveforms by
selecting “Plot Data (SAC format only)” – make sure that the “Data Format” is SAC if you
select this option.
STP Reference Manual – Page 16
5.1.2 Finding Events
Before you can download triggered waveforms, you need event IDs. If you already know
the event IDs, enter them in the event ID textbox. Multiple IDs should be separated with
spaces.
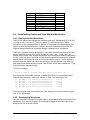
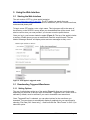
If you do not know the event IDs you need, you can search for them by clicking “Search
For Events.” To set a time window for your search, click “Start Time” to open a panel.
Web STP supports time window searches by an increment such as the last two hours or
the last seven days, or by specific UTC times. Click the radio button next to the method
you prefer, and fill in the fields. Once you are finished, your search criteria will be saved
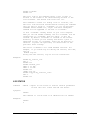
even if you click the “Close” button. In the example in Figure 3, we are using the second
method to search for events that occurred between 17:06:23 UTC on February 1, 2006,
and 19:06:23 UTC on February 5, 2006.
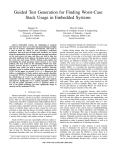
Next, enter additional search criteria by completing the remainder of the event search
panel. If you want to see more or fewer than 100 events in the search results, modify the
value in the “Maximum # events” field. When you are done entering search criteria, click
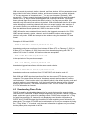
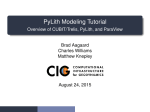
“Search.” Figure 3 illustrates a search for local events with a magnitude between 1 and
4 that occurred between 17:06:23 UTC on February 1, 2006, and 19:06:23 UTC on
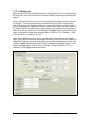
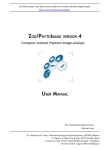
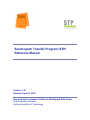
February 5, 2006. Figure 4 shows the results.
Figure 3 - Search panel
STP Reference Manual – Page 17
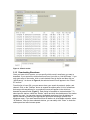
Figure 4 - Search results.
5.1.3 Downloading Waveforms
Once you have a list of events, you can specify which events’ waveforms you want to
download. If you want all the events that were found, just click on “Add All Events.” If you
only want some of the results, click on each desired event in the list and then click on
“Add Event(s).” As shown in Figure 4, the selected event IDs will appear in the “Event
ID” text box.
From this list of event IDs, you can narrow down your search by network, station, and
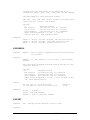
channel. Click on the “Stations” button to expand the station panel. A list of all stations
that can provide waveforms for your selected events will appear in the white box
beneath the search fields (Figure 5). Each listing is formatted as “network.station.” To
select specific stations, check the “Station” option and click the checkboxes of the station
names you want. You can also choose to download waveforms from all stations in a
specific network by selecting the appropriate option and choosing a network from
dropdown menu. If you want waveforms from all stations in all available networks, select
“All Stations.” After you have selected stations, you can safely click “Close” to close the
station panel and save browser space.
STP Reference Manual – Page 18
Figure 5 - Station panel.
Next, select channels by clicking on the “Channels” button (Figure 6). If you want all
channels from the stations you selected in the station panel, select “All Channels.” If you
want only channels that fit a certain pattern, select “All Channels Matching” and select
the pattern from the dropdown menu. The underscores in the patterns are wildcards that
can represent any character. For example, the pattern “B__” matches channel names
that begin with a ‘B’ followed by any two characters, such as “BHZ,” “BHE”, “BHN,”
“BL1,” “BL2,” or “BL3.” The pattern “BH_” matches “BHE,” “BHZ,” or “BHN.” Alternatively,
you can select specific channels by selecting “Channel” and selecting channels from the
list. The desired channel names will automatically appear in the text field.
STP Reference Manual – Page 19
Figure 6 - Channel panel.
Now you are ready to download waveforms. First, make sure that you have selected the
appropriate options at the top of the applet (Figure 2). Next, click on “Put data on FTP
site”. The waveforms you want will be uploaded into your directory on our server. If you
selected “Plot waveforms” at the top of the applet, a graphical plot of your waveforms will
automatically appear in a separate window (Figure 7). Otherwise, you can still plot them
by clicking the “Plot seismograms” button at the bottom of the applet. A window will open
that prompts you to select which waveforms you want to plot (Figure 8). Once you make
your selection, click on “Plot Seismograms” at the bottom of the window to display the
plots. The seismogram-plotting package is available as a stand-alone application from
http://alomax.free.fr/seisgram/SeisGram2K.html. The web version does not allow you to
save plots, but the stand-alone version has this capability.
Waveforms can be downloaded onto your computer through one of several ways.
Clicking on “View files on FTP site” will open your directory in a separate browser
window. The name of this directory is the same as your login name. Each event has its
own subdirectory identified by event ID. Each event directory will contain the waveform
files, which are named in the format “eventid.net.station.channel.extension,” where
“extension” depends on the format you chose, and an information file named in the
format “eventid.evnt.” The “.evnt” file contains the same information about the event that
appeared in the search results in Figure 4.
You can download individual files by left-clicking on their names or by right-clicking on
their names and selecting “Save As,” depending on your browser. Clicking on “Get Data
from FTP Site” in the STP applet will compress all the files in your directory into a tar
archive and initiate an automatic download.
You can also access your files by directly navigating to your directory at
http://www.data.scec.org/ftp/stpdata/user.name, replacing “user.name” with your login
name. STP files are deleted nightly, so don’t delay in downloading them.
STP Reference Manual – Page 20
Figure 7 - Plotting waveforms.
STP Reference Manual – Page 21
Figure 8 - Selecting waveforms to plot.
5.2 Downloading Continuous Time-Window Waveforms
To download continuous waveforms, first select the “Time Window” option at the top of
the applet (Figure 2). The specification of time windows, stations, and channels is
almost identical to the search covered in the section on finding events, with the
difference that continuous time-window mode does not offer options for searching by
magnitude, location, depth, or event type. Once you have entered your criteria, click “Put
Data on FTP site” to upload the waveform files onto our servers. Continuous timewindow waveforms are named in the format “timestamp.net.station.channel.extension.”
See section 5.2.3 for information on downloading and plotting waveforms and section
5.2.1 for information on setting waveform options.
5.3 Downloading Phase Picks
Selecting the “Phase” option (Figure 2) switches the applet into phase pick mode. This
mode looks like a simplified version of triggered mode. In fact, searching for events is
identical to the method covered in the section on finding events. Again, you can search
for events by time window, magnitude, latitude, longitude, depth, and event type. Once
you have a list of events, you can add them to the “Event ID” list in the same way that
you added events for waveform downloading. Finally, enter a file name in the “Output
File” field (Figure 9) and click “Put Data on FTP Site.” When you click on “View files on
FTP site,” a text file with the name you entered should appear in your FTP directory in a
separate browser window. Click on the file name to open and display the phase picks it
contains. If you do not provide an output file name, your phase picks will be stored in a
STP Reference Manual – Page 22
temporary file named “.temp” in your FTP directory. This temporary file will open
automatically in a separate browser window when you click “Put Data on FTP Site.”
Figure 9 - Phase picks.
5.4 Profiles
If you frequently use certain search criteria, you may want to save them for future use as
a profile. To do this, click on “Store Profile.” Enter the name of the profile in the resulting
dialog window (Figure 10). If you want this profile to load automatically every time you
log in, select “Make default profile.” Then click “OK.” In the next dialog window, click
“Yes” and your profile will be saved on our server.
To load an existing profile, click on “Load Profile.” The resulting dialog window will
display your login name and a list of profiles (Figure 11). Select the profile you want,
and click on “Use Selected Profile” to load it. You can make the selected profile default
by selecting “Make default profile.” The applet will load the search settings that were
stored in the profile you selected.
You can also user other users’ profiles if you know their login names. Type another
user’s login name in the “User:” field and press the ENTER key on your keyboard. A list
of their profiles will appear in the “Profiles:” box, and you can select the one you want.
If you decide you don’t want to use any profile for your current session, click on “Use No
Profile” to close the dialog and continue.
Figure 10 - Saving a profile.
STP Reference Manual – Page 23
Figure 11 - Loading a profile.
STP Reference Manual – Page 24
6 Appendix A- STP Help Files
This section contains listings of the interactive help files available in command-line STP.
You can access each help file from within STP by entering the command:
HELP topic
replacing “topic” with the title of one of the following sections.
6.1 NEWS
The command
HELP NEWS
displays the latest STP news instead of a regular help file.
6.2 WIN
Command:
Synopsis:
WIN – Retrieves seismograms that match the search criteria.
By default only the continuous archive is searched.
WIN [-t] [-a] net sta chan time_on time_off
Options:
-t
-a
Search only the triggered archive.
Search all archives.
Paramters:
net
sta
chan
time_on time_off -
network code
station code
seed channel
date/time of
date/time of
(i.e. CI)
(i.e. PAS)
name (i.e. BHZ)
start of record
end of record
Wild cards ('%') and letters ('_') can be used in the
net/sta/chan names.
Seismogram file names follow the format
YYYYMMDDHHMMSS.NET.STA.CHAN.[LOC.]EXT
YYYYMMDDHHMMSS is the starting timestamp of the request. If
the location code is the default double blanks, then it is
omitted from the file name.
By default, waveforms are downloaded in SAC format, which
ends with the “sac” extension. See HELP SAC for details.
Notes:
After an event it may be some time before the continuous
archive is available. For the SCEDC, this can be around a 2
hour delay or longer if there is a major earthquake sequence
in progress.
The time windows will be reduced with the triggered archive
by what is available in the trigger window.
STP Reference Manual – Page 25
To see the list of available stations and channels, use the
'STA' command. See “HELP STA.”
For date/time formats, see “HELP DATE.”
Examples:
WIN CI PAS BHZ 1999/12/23,10:24:14.12 1999/12/23,11:33:15.23
Get the CI.PAS.BHZ continuous data from December 23, 199,
10:24:14 to December 23, 1999, 11:33:15.23.
WIN CI PAS BH_ 2000/02/14,10:00:00 +1.2h
Get 1.2 hours of all three components of the
CI.PAS.BH(Z/E/N) channels, starting from 10:00 on February
14, 2000.
6.3 WIND
Command:
Synopsis:
WIND - Version of WIN that allows searching by location code.
WIND [-t] [-a] net sta chan loc time_on time_off
Options:
-t
-a
Search only the triggered archive.
Search all archives.
Paramters:
net
sta
chan
loc
time_on time_off -
network code (i.e. CI)
station code (i.e. PAS)
seed channel name (i.e. BHZ)
location code (i.e. 01)
date/time of start of record
date/time of end of record
Wild cards ('%') and letters ('_') can be used in the
network, station, channel, and location code names. ‘-‘
represents a blank space in location code names.
Seismogram file follow the format
YYYYMMDDHHMMSS.NET.STA.CHAN.[LOC.]EXT
YYYYMMDDHHMMSS is the starting timestamp of the request. If
the location code is the default double blanks, then it is
omitted from the file name.
By default, waveforms are downloaded in SAC format, which
ends with the “sac” extension.
Notes:
After an event it may be some time before the continuous
archive is available. For the SCEDC, this can be around a 2
hour delay or longer if there is a major earthquake sequence
in progress.
The time windows will be reduced with the triggered archive
by what is available in the trigger window.
STP Reference Manual – Page 26
To see the list of available stations and channels, use the
'STA' command. See “HELP STA.”
For date/time formats, see “HELP DATE.”
Examples:
WIND CI PAS BHZ -- 1999/12/23,10:24:14.12
1999/12/23,11:33:15.23
Get the CI.PAS.BHZ continuous data from December 23, 1999,
10:24:14 to December 23, 1999, 11:33:15.23. Only get data
from the double blanks location code.
WIND CI PAS BH_ % 2000/02/14,10:00:00 +1.2h
Get 1.2 hours of all three components of the
CI.PAS.BH(Z/E/N)
channels, starting from 10:00 on February 14, 2000. Get all
location codes. For this station, the only location code is
the default double blanks.
6.4 TRIG
Command:
Synopsis:
TRIG – Returns all triggered seismograms for the specified
events.
TRIG [-net network] [-sta station] [-chan seedchan] [-loc
locationcode] [-radius maxdist] eventid eventid ...
where eventid is numberic identifier of the event. All flags
are optional except for eventid.
The STP program creates a directory with the name 'eventid'
and puts the seismograms in there. The parameters of the
event are also put in the directory in a file
'eventid.evnt'. The format of the seismogram files
depends on the mode the user has selected. SAC mode is
selected by default. See help SAC and help MSEED for more
information.
The optional parameters -net, -sta, -chan, and -loc may be
useful to restrict the class of returned seismograms. The
usual Oracle/SQL wildcards apply. That is '_' matches and
single letter, and '%' matches any sequence of letters.
Hence, -chan BH_ will match the BHZ, BHE, BHN (and BH1, BH2,
BH3) channels. The parameter -radius restricts seismograms
to those from stations within a specified radius in
kilometers from the event.
Examples:
TRIG
TRIG
TRIG
TRIG
9501793
-net CI -chan BH_ 9589201
-sta PAS 9589201
-net CI -dist 100 9589201
6.5 STA
Command:
STA - Lists the stations available in the SCEDC archive
STP Reference Manual – Page 27
within a specified time interval or at a specified
time.
Synopsis:
STA [-l] [-net net] [-sta station] [-chan channel] [-loc
locationcode] [date] [date2]
where date is in the format described in DATES. See help
DATES for more information.
If no date is given, the current date is used. If
one date is given, then the stations active on that date are
returned. If two dates are given, then stations with any
activity during that interval are returned.
Do not use dates before 1971 or after 2037 (the extent
of UT seconds).
Options:
-l
Examples:
Long listing. Each line displays the following:
Net.Sta.Chan.Loc lat lon elevation
STA 1999/12/13
STA -l
STA -l 1971 2010
(this will return the entire station list)
6.6 CHAN
Command:
Synopsis:
CHAN - Lists seed channels that meet the user's search
criteria.
CHAN [-l] net sta [date]
Lists the seed channels available for station 'sta' on
network 'net' on date 'date'. Date is specified according
to HELP DATE. If no date is given the current date is used.
Flags:
-l
Long listing. Each line has
Net.Sta.Chan azimuth sample_rate gain units
Examples:
CHAN CI PAS 2000/04/15
CHAN -l CI RVR
6.7 EVENT
Command:
Synopsis:
EVENT - Find events in the catalog that match the search
criteria.
EVENT [output_options] <search_criteria>
EVENT [output_options] -e eventid1 eventid2 ...
STP Reference Manual – Page 28
Any of the following search criteria may be specified:
-mag
magmin magmax
-t0
date1 date2
(see help DATES for format of dates)
-lat
latmin latmax
-lon
lonmin lonmax
-depth depthmin depthmax
-type event_type (le = local, ts = teleseisms)
output options:
-f
filename - put event info in 'filename'
-s
short listing multi-columns of eventids.
default: long listing, includes
'#' eventid, event_type, t0, lat, lon, depth, mag,
mag_type, quality.
By default, a max of 100 events are listed. You can change
this with 'SET NEVNTMAX nnnn', where nnnn is the new limit.
Output:
event id ET
origin date-time
depth mag MT qual
9720297 le 2001/11/04,02:01:31.740
15.81 1.27 l 1.0
ET= event type
le = local event
re = regional event
ts = teleseism
MT= magnitude type
b = body-wave magnitude
l = local magnitude
c
w
= coda magnitude
= moment magnitude
lat
33.5135
qb = quarry blast
nt = nuclear blast
uk = unknown event
e
s
n
h
lon
-116.5095
sn = sonic
boom
= energy magnitude
= surface-wave
magnitude
= no magnitude
= helicorder
magnitude
qual= solution/location quality [0.0,1.0], 0.0 -> worst, 1.0
-> best
old quality measures: 'A'=[0.8,1.0], 'B'=[0.6,0.8],
'C'=[0.4,0.6], 'D'=[0.0,0.4]
Examples:
EVENT -mag 6.5 8.0 -type ts
(teleseisems of mag >= 6.5)
EVENT -t0 2000/04/15 +12h
(all events within 12 hours of midnight on April 15,2000)
EVENT -t0 -6h +6h
(all events in the last 6 hours)
EVENT -e 14187288
(event with ID 14187288)
EVENT -f events.out -e 14187288 14172228
(events 14187288 and 14172228, output written to file
events.out on user's local computer)
STP Reference Manual – Page 29
6.8 ALTLOC
Command:
Synopsis:
ALTLOC - Find events in the various alternate catalogs.
ALTLOC [-s] [-l] [-mag magmin magmax] [-t0 date1 date 2] [lat latmin latmax] [-lon lonmin lonmax] [-depth depthmin
depthmax] [-source catalog1, catalog2, ... ]
Optional parameters:
-s
: (default) short listing, includes
eventid, t0, lat, lon, depth, mag,
mag_type, source
-l
: long listing, includes
eventid, t0, lat, lon, depth, mag, mag_type,
source,err_ns, err_ew, err_z, num_primary,
num_secondary, total_ps, rms
The following search criteria may be specified:
-mag
: magnitude range
-t0
: time window
(see help DATES for format of dates)
-lat
: latitude range
-lon
: longitude range
-depth : depth range
-source: catalog name (i.e. HAUK2003, SHLK2003)
By default, a max of 100 events are listed. You can change
this with 'SET NEVNTMAX nnnn', where nnnn is the new limit.
Examples:
altloc -t0 2003/01/02 2003/01/03 -mag 2.5 3.0
Output:
9875545 2003/01/02,03:45:59.400
34.0202
-116.4317
9.14 2.56 l HAUK2003
9875545 2003/01/02,03:45:59.840
34.0168
-116.4347
7.81 2.56 l SCSN
9875637 2003/01/02,15:55:15.250
35.3198
-118.6693
5.76 2.51 l HAUK2003
9875637 2003/01/02,15:55:15.570
35.3212
-118.6697
5.60 2.51 l SCSN
9875677 2003/01/02,17:49:28.070
32.2377
-115.7682
5.53 2.54 l HAUK2003
9875677 2003/01/02,17:49:28.770
32.2467
-115.7912
6.99 2.54 l SCSN
9513574 2003/01/02,17:49:47.230
32.3122
-115.7478
4.86 2.55 l HAUK2003
6.9 PHASE
Command:
Synopsis:
PHASE - Get phase picks for events that match the search
Criteria or that match the given event IDs. By
default ouput is displayed onscreen unless the -f
flag is set and/or the output mode is XML.
PHASE [-v] [-f filename]
or
search_criteria
STP Reference Manual – Page 30
PHASE [-v] [-f filename]
-e eventid1 eventid2 eventid3 ....
Options:
-v
quiet mode - minimal reporting
-f
filename - put phase and event info in 'filename'.
-e
specify events by eventid rather than search
Any of the following search_criteria may be specified:
-mag
magmin magmax
-t0
date1 date2
(see help DATES for format of dates)
-lat
latmin latmax
-lon
lonmin lonmax
-depth depthmin depthmax
-type event_type (le = local, ts = teleseisms)
Output:
-event location starting with '#' - see help EVENT for
format
-phase info
net, station, channel, lat, lon, elevation, phase, firstmotion,signal onset quality, quality-of-pick, epicentral
distance, time (after origin time).
For signal onset quality:
i = impulsive
e = emergent
w = weak
For first motion:
The first character represents short-period channels
c=compression, d=dilation, .=empty character position
The second character represents long-period channels
u=compression, r=dilation, .=empty character position
For quality of pick:
Range is 0 (worst) to 1.0 (best)
Uncertainty of 0 samples is indicated by 1.0
1 sample
0.8
2 samples
0.5
3 samples
0.3
>3 samples
0.0
By default, a max of 100 events are listed. You can
change
this with 'SET NEVNTMAX nnnn', where nnnn is the new
limit.
Examples:
PHASE -t0 2001/01/05 2001/01/12 -mag 3.0 9.0 -type le
(local events with magnitude >=3.0 and <=9.0 between Jan 512, 2001)
PHASE -f junk1 -t0 2001/01/05 2001/01/12 -mag 3.0 9.0 -type
le
(same thing with output going to file 'junk1')
PHASE -t0 2000/04/15 +12h
(all phase within 12 hours midnight on April 15,2000)
PHASE -t0 -6h +6h
(all events in the last 6 hours)
STP Reference Manual – Page 31
6.10 SAC
Command:
Synopsis:
SAC - Put seismic data output in SAC-format files created
locally on the user's computer. Used with the WIN
and TRIG commands.
For continuous data (WIN command), the files are named
yyyymmddhhmmss.NET.STA.CHAN.sac
i.e. 20000223120415.CI.PAS.BHZ.sac
For triggered data (TRIG command), the files are named
nnnnnnn/nnnnnnn.NET.STA.CHAN.sac
where nnnnnnn is the eventid of the event.
i.e. 9512345/9512345.CI.PAS.BHZ.sac
NOTE: the directory nnnnnnn/ is created if it does not
exist.
Note of Units:
Although SAC defines its units with a distance scale of nm
(nanometers), and hence units of nm, nm/sec and nm/sec**2,
STP uses the native units of TriNET which uses a length
scale of cm (centimemters).
Examples:
SAC
TRIG -net CI -sta PAS -chan BHZ 9512345
The above sequence of commands creates a directory named
9512345 if it doesn't exist. Within 9512345 a file is
created named 9512345.CI.PAS.BHZ.sac.
6.11 MSEED
Command:
Synopsis:
Examples:
MSEED - Put waveform output in mini-seed file on the user's
computer. Used with the TRIG and WIN commands.
The output filename is in the format
eventid/eventid.net.sta.chan.mseed
for triggered waveforms. For continuous waveforms the output
filename is the format
yyyymmddhhmmss.net.sta.chan.mseed
mseed
trig -net AZ -sta FRD -chan BHZ 14200524
6.12 SEED
Command: SEED - Put waveform output in SEED files on the user's
computer. Used with the TRIG and WIN commands.
Synopsis:
STP Reference Manual – Page 32
SEED
The output filename is in the format
eventid.net.sta.chan.seed
for triggered waveforms. For continuous waveforms the output
filename is in the format
yyyymmddhhmmss.net.sta.chan.seed.
The output SEED volumes will include, if available, channel
gains, responses, and poles and zeros for the epochs relevant
to the time window.
Please note that the SCEDC is not the authoritative source
for non-CI stations. As a result, the SEED headers for non-CI
stations may be incomplete or out of date. If a station lacks
sufficient information to construct a valid SEED volume, the
downloaded file will be in miniSEED format. The dataless
SEED volumes required to make a full SEED volume should be
downloaded from the authoritative source for the station.
Examples:
seed
trig -net AZ -sta FRD -chan BHZ 14200524
The output file is 14200524.AZ.FRD.BHZ.seed in the directory
14200524.
6.13 FLT32
Command:
Synopsis:
FLT32 – Put waveform output in a 32-bit IEEE float file on
the user’s computer. Used with the TRIG and WIN
commands.
The output filename has the format
eventid/eventide.net.sta.chan.flt32
for triggered waveforms and
yyyymmddhhmmss.net.sta.chan.flt32
for continuous waveforms.
6.14 INT32
Command:
Synopsis:
INT32 - Put waveform output in a 32-bit integer file on the
user's computer. Used with TRIG and WIN commands.
INT32
The output filename has the format
eventid/eventid.net.sta.chan.int32
for triggered waveforms and
yyyymmddhhmmss.net.sta.chan.int32
for continuous waveforms
6.15 ASCII
Command:
ASCII - Put waveform output in an ASCII-format on the user's
computer. Used with TRIG and WIN commands.
STP Reference Manual – Page 33
Synopsis:
FLT32
The output filename has the format
eventid/eventid.net.sta.chan.ascii
for triggered waveforms and
yyyymmddhhmmss.net.sta.chan.ascii
for continuous waveforms.
The first line of the ASCII file is a header beginning with
'#' that contains net, station, channel, date-time, UT-time,
and sample interval. An example is:
# CI PAS BHE 1999/11/12,10:30:15.000 942402615.000
0.050000
Both the date-time and the UT-time (seconds since Jan 1,
1970) are the time of the first sample. The data follows
with one sample per line.
Examples:
ASCII
trig -net AZ -sta FRD -chan BHZ 14200524
6.16 COSMOS
Command:
Synopsis:
COSMOS - Put output in COSMOS V0 or V1 format.
COSMOS [V0|V1]
COSMOS-[V0|V1]
V0
V1
There are several ways of issuing the COSMOS command.
V0
is a shortcut for
COSMOS-V0
or
COSMOS V0
All three versions will put output in COSMOS V0 format,
Similarly, any of the following three commands:
V1
COSMOS V1
COSMOS-V1
put output in COSMOS V1 format
The COSMOS format is the brain-child of the Constorium of
Organizations for Strong-Motion Observation Systems. See
the document
www.cosmos-eq.org/cosmos_format_1_120.pdf
for an explanation of the format.
The V0 format is for raw data and stp sends raw integer
values that are completely unprocessed. Even when 'GAIN ON'
is set no gain is applied.
The V1 format is for data values for which instrument gain
has been corrected. Even if 'GAIN OFF' is specified, the
data ARE corrected for gain. Output units will be cm/sec for
velocity sensors and cm/sec/sec for accelerometers. The only
STP Reference Manual – Page 34
processing done to the V1 format data is removing the
average value of the timeseries. The average is recorded in
the header.
In the user-specified portion of the header, we have added
Integer-part
ihead(90) = event ID (if known or relevant)
Real-part
fhead(90) = station gain/ 1000.
This is the factor that converts counts to
samples with units. This is
v1-data = raw-data / gain.
Note: At the moment there is no numbering scheme for the
TriNet stations. The true identity of the station and
component is given in the comment lines after the real-part
of the header.
Examples:
v1
trig -sta DNR -chan HL_ 9753421
This gets the accelerometer records (components HL_) for
station DNR for event 9753421 in Cosmos V1 format. Four
files (three data files) and 1 event summary file are
created:
9753421/9753421.CI.DNR.HLE.v1
9753421/9753421.CI.DNR.HLN.v1
9753421/9753421.CI.DNR.HLZ.v1
9753421/9753421.evnt
6.17 XML
Command:
Synopsis:
XML - Write the output of PHASE and EVENT commands to a local
XML file.
To return to normal onscreen output, use command "NORM".
See help PHASE and help EVENT for more information about
those commands.
Our XML schema can be downloaded from
http://www.data.scec.org/xml/event.xsd. Documentation is
available at http://www.data.scec.org/xml/event,
and general information can be found at
http://www.data.scec.org/xml
6.18 NORM
Command:
NORM - Return to normal onscreen output after entering XML
mode.
6.19 GAIN
Command:
GAIN - Toggle correction for station gain.
STP Reference Manual – Page 35
Synopsis:
Examples:
GAIN [on|off]
on -> correct the seismograms for station gain
off -> do not apply gain corrections to the seismograms
GAIN ON
GAIN OFF
6.20 DATE
Synopsis:
Specifying date and time:
We've recently changed the way STP handles dates internally.
It is now very important that punctuation is handled in a
specific way. Below is a table specifying the correct
punctuation for each format:
FMT
1
SLASHES
0
COMMAS
0
COLONS
0
2
0
0
0
must pad with '0's to get
correct format
(i.e. 200301 is right, 20031
is wrong)
3
2
1
2
2
0
0
no padding necessary,
2003/01 = 2003/1
0
3
2
0
2
0
1
1
2
1
0
0
0
2
2
0
1
0
4
5
6
OTHER COMMENTS
must end with 'u'
no padding necessary,
2003,01 = 2003,1
no padding necessary,
2003/15 = 2003/015
no padding necessary,
2003,15=2003,015
The following formats can generally be used interchangeably
when specifying date and times on the STP commands:
FMT
1
2
3
4
5
6
SPECIFICATION
ssssssssss.sssu
DESCRIPTION
UT seconds, note 'u' is
literal
yyyymmddhhmmss.sss
decimal encoded year-monthday
yyyy/mm/dd,hh:mm:ss.sss year-month-day with '/'
yyyy,mm,dd,hh:mm:ss.sss year-month-day with ','
yyyy/jjj,hh:mm:ss.sss
year-jday with '/'
yyyy,jjj,hh:mm:ss.sss
year-jday with ','
STP Reference Manual – Page 36
Note that all will assume minimums if all or any part of
hh:mm:ss.sss is omitted. Format 2 can be minumized down to
just the 4 digit year.
In cases when a time window is being specified such as with
the WIN command, the second time can be specified as
incremental to the first by giving it as
+nnnnnn.nnn[s,m,h,d]
incremental value '+' is literal
nothing= seconds
s= seconds
m= minutes
h= hours
d= days
The '+' is the key to interpreting this as incremental
The first time in a time window can be specified as
-nnnnnn.nnn[s,m,h,d]
before present time, value '-' is
Literal set the time to this value
before present.
Examples:
The following are equivalent for the 'ton'-'toff' of the WIN
command:
20000415181617.1
20000415181817.1
2000/04/15,18:16:17.1
2000/04/15,18:18:17.1
2000/04/15,18:16:17.1
+2.0m
2000/04/15,18:16:17.1
+120s
-8h
+8h
<- time interval is
8 hours before
present
6.21 INPUT
Command:
Synopsis:
Examples:
INPUT - Sets STP to read input commands from a file on the
user's local computer.
INPUT filename
where "filename" is the path to the file containing STP
commands. At the end of the file, the input returns to the
terminal. Output and error messages from the commands in
"filename" are displayed normally. The IN command can be
used instead of INPUT as shorthand.
INPUT myfile
IN myfile
6.22 OUTPUT
Command:
OUTPUT - Toggles whether the output of an STP command should
be written to a file on your local computer.
Synopsis:
STP Reference Manual – Page 37
OUTPUT filename
OUTPUT off
The first form of the command causes a copy of what is
written to the screen to be simultaneously written to the
file filename'. The second form turns this off.
This command is useful for making lists of stations, etc.
The first form should be entered before running the commands
that you want to write to 'filename'. If you run multiple
commands before OUTPUT off, output from each subsequent
command will be appended to the end of 'filename.'
If file 'filename' already exists on your local computer
when you run the OUTPUT command, the old 'filename' will be
overwritten. If 'filename' does not exist, it will be
created. By default 'filename' is created in the current
directory in which you are running STP unless a path is
specified as part of 'filename'. Paths can be absolute or
relative. If paths are specified, all directories in the
path must exist already.
The status of OUTPUT is not saved between sessions. For
example, if you create stp.out during one session, exit STP,
and run
OUTPUT stp.out
during the next session, stp.out will be overwritten.
Examples:
OUTPUT my_station_list
STA -l
OUTPUT off
OUTPUT channel_info
CHAN -l CI PAS
CHAN -l CI RVR
OUTPUT off
!mkdir stp_out
OUTPUT stp_out/my_stations_list2
STA -l
OUTPUT off
6.23 STATUS
Command:
Synopsis:
STATUS - Report on the status of certain session parameters
on both the local client STP and the server.
STATUS
The command 'S' can be used as an abbreviation for STATUS.
Examples:
STATUS
S
STP Reference Manual – Page 38
6.24 VERBOSE
Command:
VERBOSE - Toggle verbose mode on/off.
Synopsis:
VERBOSE
Verbose mode causes extra information to be displayed on the
terminal of the STP server. This command is really only
relevant to STP developers.
6.25 UPGRADE
Command:
UPGRADE - Downloads the latest version of the STP commandline client software.
Synopsis:
After executing the command there will be a file stpX.Y.tar
(i.e. stp1.2.tar) in the current directory. To compile the
new version of STP:
tar xvf stpX.Y.tar
make stp
(or make linux_stp on Linux machines)
On Linux machines the last command would be:
make linux_stp
while on Macintosh machines it would be:
make mac_stp
This command is not relevant to the Windows client.
Examples:
UPGRADE
(that all there is to it)
6.26 BUGS
This is another another help topic, like NEWS, that does not display a help file.
Instead,
HELP BUGS
displays a list of known bugs and other issues in STP.
6.27 AVAIL
Command:
Synopsis:
AVAIL - List available waveform table entries that match the
user-specified criteria.
AVAIL [-l] [-net network] [-sta station] [-chan channel]
date-time [date-time2]
If only date-time is given, waveforms whose on/off
include the specified date-time will be listed. If
time2 is also provided, all waveforms that include
within the range from date-time to date-time2 will
time
dsteany time
be
STP Reference Manual – Page 39
listed. Note that date-time2 can be specified in an
incremental format (+30m, +12h, +10d) like the WIN command.
See help DATES for valid date-time formats.
The -net, -sta, and -chan options further limit the search
results by net, station, and channel.
Options:
-l
detailed listing
-net network
give entries only for 'network'
-sta station
give entries only for 'station'
-chan seedchan
give entries only for 'seedchan'
NOTE: Oracle wildcards ('%' and '_') can be
used in net, sta, chan specifications.
Examples:
AVAIL -l -net CI -sta PAS -chan BH_ 2000/04/14,12:12:12.0
AVAIL -l -net NR -sta NE71 -chan LHZ 2002/04/15 +10d
AVAIL -l -net CI -chan BH_ 2000/04/14,12:12:12.0
6.28 EAVAIL
Command:
Synopsis:
EAVAIL - List available triggered waveform archive entries
for an event.
EAVAIL [-l] [-net network] [-sta station] [-chan channel]
eventid
List available triggered waveform archive entries for the
specified eventid.
Options:
-l
detailed listing
-net network
give entries only for
-sta station
give entries only for
-chan seedchan give entries only for
NOTE: Oracle wildcards ('%' and '_')
sta, chan specifications.
Output:
Examples:
'network'
'station'
'seedchan'
can be used in net,
Net Sta Cha T S Start date-time
CI NSS HHZ T A 2001/10/25,04:43:29.375
Duration
2.03m
eavail -l 9716149
eavail -chan EHZ 9526485
EAVAIL -l -net CI -chan BH_ 9526485
6.29 SET
Command:
SET - Changes certain default values in STP.
Synopsis:
STP Reference Manual – Page 40
SET variable new_value
SET is the general command for setting certain default
values in STP. The current variables that are "settable"
are:
FILL
[any number] -the padding value STP uses in filling
gaps in seismograms. Default: 0.0
NEVNTMAX
[any int] -maximum number of events reported by
catalog search programs. Default:100
SWAP
[ 0 or 1] - 0 => force to same byte order as
STP server
- 1 => force to opposite byte order
as STP server
Examples:
SET FILL 9999999
SET NEVNTMAX 1000
STP Reference Manual – Page 41
7 Appendix B – Troubleshooting
In this section you’ll find solutions to some common STP problems. The title of each
subheading is a description of a possible error. If you can’t resolve the problem you are
encountering, email the administrator at [email protected].
7.1 Command-Line STP
7.1.1 General troubleshooting
When you run STP, you may find some solutions by taking advantage of STP’s inprogram help menus. Type
HELP
at the STP prompt for a general help menu.
Type
HELP command
for help on a specific command, replacing “command” with the actual command name.
If you still have problems with command-line STP, you can try connecting to one of our
secondary STP servers, stp2 or stp3, by starting STP with the “-a” flag:
stp –a stp2
Even if a secondary STP server works, you should still contact the STP administrator at
[email protected] to report the problem and which, if any, servers worked.
7.1.2 I extracted the STP client’s tar file, and I can’t find the directory.
The files for this version of the STP client are extracted into the same directory as the tar
file. If you have many files in your working files, it may be difficult to find STP files. To
simplify matters and to avoid overwriting files, move the tar file into its own directory
before extracting it.
7.1.3 I can’t compile STP.
First, make sure that you are running the appropriate command for your operating
system. If you are using Solaris, “make” should successfully compile the client. However,
if you are using Linux, you will need to enter “make linux_stp,” and if you are using a
Macintosh, “make mac_stp.” The punctuation marks are not part of the command.
If compilation still fails, make sure that your version of STP is up-to-date. The default
“editline.h” that comes with STP v1.4.1 does not work with newer versions of gcc. You
will need to download the bugfix from our website.
7.1.4 Only 100 events are listed when I run EVENT, but I know there should
be more.
By default, only 100 events are listed even if there are more. You can change this by
setting NEVNTMAX to a value larger than 100. For example,
STP Reference Manual – Page 42
SET NEVNTMAX 9999
sets NEVNTMAX to 9999 maximum listings, a value that is sufficient for most users.
7.1.5 I tried to download waveforms, but I got an error message about no
data being available.
If you tried to download triggered waveforms from a specific network and station, it is
possible that this station did not provide any data for the event. If you’re unsure about a
station or channel, EAVAIL to check before downloading.
If you tried to download continuous waveforms, there may be gaps in the data.
Contact the STP administrator at [email protected] with suspected STP problems.
7.1.6 I tried to download waveforms and didn’t get any errors, but I can’t
find the files.
First, make sure you’re looking in the directory where STP downloads are written.
Triggered waveforms are downloaded into a directory named with the event ID.
Continuous waveforms are downloaded directly into your working directory and have
names of the format “timestamp.net.station.channel.locode.extension.”
If you still can’t find any waveform files, there could be problems with the STP server or
databaseTry restarting the STP client to point to a different STP server, such as stp2 or
stp3, and downloading the waveforms again. Please inform the administrator
([email protected]) of any possible STP server problems.
7.2 Web STP
7.2.1 Nothing happens when I click “Get data from FTP site,” “View files
on FTP site,” or “Plot Seismograms.”
You must click the button labeled “Put data on FTP site” before clicking any of the other
three buttons. Otherwise, there won’t be any data on the FTP site to plot, view, or
download.
7.1.6 I can’t see the buttons for downloading or plotting seismograms.
If you leave the time, event search, station, or channel search panel open, you may run
out of browser space for displaying the download buttons. To conserve space, click the
appropriate “Close” button for each panel after you finish entering parameters. Web STP
will remember your parameters, and you can always update them by re-opening the
panel.
STP Reference Manual – Page 43