1
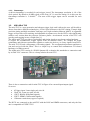
AIDA & EUDET TLU characterisation tests Daniele Areoluci Università degli studi di Firenze, Italy Summer student program 2014 Supervisor: Igor Rubinsky Abstract The request for high performance by the trigger system along with the request of versatility and development, have led to the development of a new platform for this purpose. In fact, the previous system of triggers, EUDET TLU, doesn’t allow high frequency performance, and great versatility. In this report we will analyze the performance limits of EUDET TLU, the new features and the state of development of the new trigger system AIDA Mini-TLU. 1 Contents 1. Introduction ............................................................................................................................................... 3 1.1. EUDET/AIDA beam Telescope ........................................................................................................... 3 1.2. EUDET Trigger Logic Unit (TLU) ......................................................................................................... 4 1.2.1. Handshake between TLU and DUT ............................................................................................ 4 1.2.2. Timestamps ............................................................................................................................... 6 1.3. 2. 3. 4. 1.3.1. Data Format and trigger data .................................................................................................... 7 1.3.2. Handshake between Mini-TLU and DUT ................................................................................... 8 1.4. EUDAQ Software................................................................................................................................ 8 1.5. GitHub................................................................................................................................................ 9 EUDET Trigger Logic Unit performance ..................................................................................................... 9 2.1. Frequency, width and amplitude threshold of scintillator signal ...................................................... 9 2.2. ROOT Histograms ............................................................................................................................ 12 2.2.1. Run Control data acquisition procedure ................................................................................. 13 2.2.2. Frequency histograms ............................................................................................................. 14 2.2.3 Efficiency histograms ............................................................................................................... 16 AIDA Mini TLU characterisation tests ...................................................................................................... 19 3.1. Run Control data acquisition procedure ......................................................................................... 19 3.2. Timestamps errors........................................................................................................................... 20 3.3. Frequency test ................................................................................................................................. 21 3.4. Efficiency test .................................................................................................................................. 22 3.5. Buffer test ........................................................................................................................................ 23 Conclusion and future developments ..................................................................................................... 24 4.1. 5. AIDA Mini TLU.................................................................................................................................... 6 Acknowledgement ........................................................................................................................... 24 References ............................................................................................................................................... 25 2 1. Introduction This project has been incentrated to the caraterization test of the AIDA mini Trigger Logic Unit (AIDA mini-TLU). After a brief description of the telescope and its components, the description of EUDET TLU and AIDA TLU will be given. In the following section will be describe the procedure with which the measures were made. Then the part of tests and results with EUDET TLU and AIDA Mini-TLU will be given. 1.1. EUDET/AIDA beam Telescope A beam telescope (Figure 1) is a very useful tool for testing and determining properties of devices under test (DUTs). This is a high resolution (σ < 2 μm) beam telescope based on monolithic active pixel sensors (MAPS) was developed within the EUDET collaboration. A beam telescope at a testbeam offers the required environment to do various studies, for example the examination of the charge collection properties of parts of the ATLAS pixel detector before and after irradiation. Six Mimosa sensors BEAM Scintillator fingers with PMTs Six telescope planes Figure 1 - Telescope The telescope consists of six sensor planes (six planes are a good trade-off between this and the precision of track reconstruction) with a pixel pitch of either 18.4 μm or 10 μm and can be operated inside a solenoidal magnetic field of up to 1.2 T. Also there is a pair of crossed scintillators before the first and after the last telescope plane, which are read out via photomultiplier tubes (PMTs). The signal from these scintillators is used for generate the trigger signal for read-out of all the telescope sensors and the DUT. The unit which deals to generate the trigger signal is the TLU (trigger logic unit). Usually for a read-out to be trigger, a coincidence of all four PMTs is required. 3 1.2. EUDET Trigger Logic Unit (TLU) The EUDET TLU (Figure 2) is based on a ZestSC1 card manufactured by Orange Tree Technology Ltd. The card incorporates a Xilinx Spartan-3 FPGA and a USB 2.0 port [2]. The TLU is a heart of telescope because it makes the trigger for DAQ and telescope. Trigger logic unit receives signals from scintillators, when any charged particle passes through the detector, and generates triggers that it distributes to the telescope and any DUT. The four scintillators inputs can be combined in an arbitrary fashion (AND, OR, VETO) to generate the trigger signal, and there is also an internal trigger generator for testing and pedestal runs. Several internal scalers allow monitoring of the running conditions. For each generated trigger a trigger counter is incremented, and a timestamp is stored in an internal buffer that may be read out over USB by a PC. The DUTs have the option to read out the trigger number via the DUT interface in order to ensure proper synchronization of triggers [1]. DUTs can connect either via the RJ45 connectors using LVDS, or via the LEMO connector using either NIM or TTL levels. Four PMTs channel. Scintillator signal input Six RJ44. Out of trigger Four Test channel. Out of discriminator Four LEMO channel (NIM and TTL). Out of trigger Figure 2 – Trigger Logic Unit (TLU) Busy signal from the DUTs 1.2.1. Handshake between TLU and DUT There are three modes of hand-shake between the TLU and the DUT: “trigger data handshake”, “simple handshake” and “no handshake”. Trigger Data handshake: In this mode the TLU receives trigger from the beam scintillators, then the TLU asserts the trigger for the DUTs. When the trigger arrives at the DUT, this one sends a state of BUSY to TLU, and TLU de-asserts the trigger and switches 4 the trigger line to the output of a shift register holding the trigger number/data. The least significant bit of the trigger data is shifted out first. Only the bottom 15-bits of 32-bit trigger counter are clocked out. After this state of BUSY the system is ready for triggers again. The problem for this mode is the duration of the BUSY state, because the DAQ system which keeps BUSY longest. Figure 3 – Trigger Data handshake Simple handshake: In this mode the TLU receives the trigger from the beam scintillators, then the TLU asserts the trigger. On receipt of trigger going high, the detector assert BUSY, and the YLU de-asserts the trigger. On receipt of trigger going low and the detector being ready to take more data, the DUT de-asserts BUSY, and then the system is ready for triggers again. Figure 4 – Simple handshake No handshake: In this mode the TLU issues a fixed-length pulse on the trigger line (default pulse width is two cycles of the internal clock). Just a trigger pulse can be sent to the DUT without any handshake. 5 1.2.2. Timestamps A 64-bit timestamps is recorded for each trigger issued. The timestamps resolution is 1/8 of the clock period. By default a 48 MHz clock on the Zeus_SC1 is used for timing. So in this case the timestamps resolution is 2.604x . The state of the trigger inputs can be recorded for each trigger. 1.3. AIDA Mini TLU The mini-TLU is a next generation and advance trigger logic and it allows the user will be able to choose from three different technologies: ATLAS pixel detectors with LHC timing; Timepix high precision timing and high resolution; and large area, high resolution Mimosa MAPS. A segmented trigger will provide easier tracking and adjustable acceptance area for the DUTs with significantly smaller cross section than the telescope reference planes. An advanced version of the TLU will provide track tagging in case of high rates [1]. The AIDA mini-TLU provides to synchronize and timing signals to test-beam readout hardware. It accepts the asynchronous trigger signals from an external source, for example the beam scintillators and generate synchronous signals to send to the devices, or a busy signals from DUTs. The mini-TLU records a timestamps of incoming signals. The configuration parameter and data re sent and received with the IPbus. This is a simple way to control and communicate TCA-based hardware via IPbus protocol. The AIDA mini-TLU consist of a XilinX Spartan 605 evaluation kit, attached to a connection card by its FMC-LPC connector. This is a cheap solution for mini-TLU. Figure 5 – AIDA Mini-TLU There is also a connection card for mini-TLU in Figure 6 for external input/output signal. So we are: 4 Trigger input: Lemo single-pole size-00 Clock I/O: Lemo two-pole size-00 1 DUT: RJ45(4 differential signals) 2 DUT: HDMI (5 differential signals) 1 Ethernet connection (copper or optical) The DUTs are connected to the miniTLU with the RJ45 and HMDI connectors, and only the first one is compatible to EUDET TLU. 6 Figure 6 – Connection card 1.3.1. Data Format and trigger data The mini-TLU records the timestamps of input and internally generated signals with an accuracy better than 1 ns. The timestamps format is variable depending on the signal recorded and the number of input signals. The type of possible signals are: trigger, internally generated and edge signals. The AIDA mini-TLU has four trigger input, so it will sends two 64 bits words as in Figure 7. Of this 64 bits, the 48 lowest significant bits for the first word indicate the 25ns timestamps synchronized with 40 MHz main system clock. Than the bit between 48 to 59 indicate which of the trigger input is enable and the 4 most significant bits indicate the event type, and the two possibility are: internal trigger or external trigger. For the second word the 32 lowest significant bits are for the event number and the 32 highest significant bits are divided in four words of 8 bits. Each word indicate the 1 ns accuracy timestamps of the signal received in each dedicated input. In case of internally generated signal we have only one word of 64 bits (the first one), and then is composed to the event type (4 bits), the event number counter (12 bits) and 25 ns timestamps (48 bits). These signals are synchronous with the 40 MHz system clock, therefore only a 25 ns timestamps is needed. Figure 7 – Mapping of the trigger signal information 7 1.3.2. Handshake between Mini-TLU and DUT Besides the EUDET TLU handshake mode, in the Mini-TLU there is a Synchronous mode (Figure 8), and this incompatible with the previous handshake modes. Synchronous mode: the TLU receives trigger from the beam scintillators. The TLU assert the trigger synchronous with its internal trigger clock and after one clock cycle the system is ready for triggers again. Spurious or missing triggers can be detected by comparing the arrival time (measured in clock cycles) of each trigger received by the detector with the time recorded by the TLU [3]. Figure 8 – Synchronous trigger The period of the clock transmitted to the detector/device-under-test is (tm x ), where tm is the period of the TLU master clock and N≥0 and is selectable under software control. Different detectors can operate with different clock periods, related by a factor of ( N1 and N2 are the clock factors for two different detectors ) [3]. 1.4. EUDAQ Software The EUDAQ software is a data acquisition framework, written in C++, and designed to be modular and portable, running on Linux, Mac OS X, and Windows. It was written primarily to run the EUDET Pixel Telescope[4], but is designed to also be generally useful for other systems. The architecture (Figure 9) is split into a number of different process but each communication is based on TCP socket. A central Run Control with a graphic interface provides to interface for controlling the acquisition system, and all the process connect to the Run Control receiving commands from its and report their status. The Producer process is for TLU, telescope, or a DUT, (each piece of hardware that produces data) and this process will configure the hardware to read data and send data to the Data Collector. For example, for the TLU, TLU Producer controls this one, and sends the timestamps to the Data Collector. 8 Figure 9 – Data acquisition software architecture The Data Collector receives all the data streams from all the Producers, and combines them into a single stream that is written in to the file. The Logger receives log messages from all processes, it stores this messages into a central location and displays them to the user, this allows for easier debugging. The Monitor reads the data file and generates online-monitoring plots for display. 1.5. GitHub GitHub is a Git repository web-based hosting service which offers all of the distributed revision control and source code management(SCM) functionality of Git as well as adding many of its own features. Unlike Git, which is strictly a command-line tool, GitHub provides a web-based graphical interface and desktop as well as mobile integration. It also provides access control and several collaboration features such as wikis, task management, and bug tracking and feature requests for every project [6]. In this project GitHub project has been used to import data from other developers about the software eudaq for the Mini-TLU. When someone upgraded the software was necessary to import the data in your repository (danix2561 in my case) and recompile the software. 2. EUDET Trigger Logic Unit performance This part of the report is centered of EUDET TLU analysis. In particular in the first part will be analyzed the limits of the trigger logic unit with the oscilloscope and the trend in frequency and the efficiency through a few histograms in ROOT, in the second part. 2.1. Frequency, width and amplitude threshold of scintillator signal This part it is centered to discover the critical threshold of scintillator signal that arrives in PMT channel of TLU. For these tests weren’t used the real scintillators but one pulse generator was provide to simulate their signals. In Figure 9 there is a setting for this test: the pulse generator sends the signal to TLU, in PMT channel and also this signal, with one splitter, enter in the scope (CH1, the yellow one). The green one is the signal from discriminator (Test channel), and the blue one is the trigger signal from LEMO NIM channel of TLU. 9 Pulse generator Oscilloscope EUDET TLU Linux PC Figure 10 – Tests setting AIDA MniTLU For generate the trigger signal, EUDAQ software (in the linux PC) with TLUControl was used. In particular this is the correct procedure: launch STARTRUN.local in main folder of EUDAQ and the the Run Control and Log Collector are opens, then in /bin folder we have to launch TLUControl with the correct parameters as indicated in [5]. In my case the correct setting for the input and output read and send data was ./TLUControl.exe –a 1 –d 8 -i LEMO. Once generated the trigger signal will follow the measures for the threshold on the scope. In the Figure 11-13 we can see: the yellow one signal from the pulse generator, the green signal from discriminator output (test channel of TLU) and the blue one signal from the LEMO output channel of TLU, and it’s the trigger signal. So here we are the three tests for the thresholds: Amplitude threshold test (Figure 11) With the pulse generator the amplitude is made to change until when the TLU doesn’t sends the trigger signal any more. So the minimum value of amplitude is 48 mV. Under this threshold the TLU doesn’t feel the external signal which should be the signal from the scintillator Width threshold test (Figure 12) Which in the previous case we have a minimum value for which the TLU doesn’t feel the signal from the pulse generator. The threshold in this case is 3.72 ns. 10 Frequency threshold test (Figure 13) Also in this last one case is there a minimum value of frequency from the pulse generator. This value on the scope is 1.2 MHz. Over this value we have a distortion about the signal from the discriminator (Test channel). Figure 11 – Amplitude threshold (left) – Under the amplitude threshold (right) Figure 12 – Width threshold (left) – Under the width threshold (right) 11 Figure 13 – Frequency threshold (left) – Over the frequency threshold (right) I want to make a consideration about the discriminator board of EUDET TLU (Figure 14) because for this type of trigger logic unit is the mainly responsible for the various thresholds. In fact immediately after the PMT enter channel there is a comparator and this component has a variable threshold with a potentiometer. This potentiometer allows to change the comparator input threshold for the high and low of the output, but for the input threshold of width, frequency and amplitude these are three intrinsic limitation of this component, and it doesn’t changes. Figure 14 – EUDET TLU discriminator board 2.2. ROOT Histograms In this part of EUDET TLU tests will be explain how to acquire timestamps data from TLU with Run Control on EUDAQ software, and how to plot this values on ROOT for the frequency and the efficiency analysis. From here onward it will use another type of pulse generator, Agilent 12 Technologies 81160A, because the previous one (Figure 10) wasn’t very accurate, in fact, varying the frequency there were small variations in pulse duration. 2.2.1. Run Control data acquisition procedure In both case the procedure for acquire the timestamps data and save this type of data in a file it will be the same. The pulse generator output, with the variable setting for each type of measure, goes in the PMT channel to simulate the scintillator signal. So, for acquire data, first of all in EUDAQ folder we have to launch STARTRUN.tlu and so the Run Control and Log Collector are opens, then we have to choose one configuration file with right settings, for my acquisition I use tlu_only configuration file. At this point is possible to press start to generate the signal trigger and the relative information with the timestamps are saved in a raw2 file in data folder (.raw2 file is a new type of .raw file comes from EUDAQ2). When we are satisfied with the number of acquired trigger can stop the acquisition process by pressing Stop. Then with python is possible to convert this .raw2 file in a pybindgen file with this instruction in the ect/pybindgen folder: python reader.py name_of_file.raw2 > name_of_file.pybindgen &. This file will be save in the python folder (pybindgen in this case). The next step is deleting all the other information except the timestamps information. For this we have to isolate the “type 1” information in the pybindgen file. So in the prompt of command: grep “type’: 1” name_of_file.pybindgen > name_of_file.txt. Now we have a txt file and once eliminated the non important things like letter parentheses and points, will have a only timestamps number that can be plots with a C++ script in ROOT. The total procedure step by step is indicate in Figure 15 and in Figure 16. Figure 15 – Save a raw2 data file 13 Figure 16 – Convertion of pybindgen file in a txt file with only the timestamps number 2.2.2. Frequency histograms This type of analysis was done to see what happens with a number of triggers, in my case I use a sample of 10000 triggers, at different frequency. So it has been reported on a histogram in ROOT the difference between a timestamps and the previous timestamps that representing the time, associated at the clock, between a trigger sample and the next. Dividing this value by the clock frequency (48 MHz) and the resolution (1/8) is obtained by the temporal trend of timestamps output by the TLU In my case they were made two acquisitions, each in turn composed of five acquisitions 10000 trigger each, one with a Read Out Delay equal 0 and another with a Read Out Delay equal to one second. The Read Out Delay is the software readout waiting time, that is the time to wait between updates, and it can changes in a configuration file . For the five acquisitions were used the following frequencies: 10 Hz for the first, 1 KHz for the second, 100 KHz for the third, the fourth and 1.3 MHz to 1 MHz for the sixth. The last one was made at this frequency to see what was going over the threshold frequency of 1.2 MHz detected in paragraph 2.1. The other parameters of the acquisitions was: width=5 ns and amplitude=-200 mV. So, here we are a summary of acquisitions: 1. Amplitude= -200 mV; Width= 5 ns; ReadOutDelay=0; Frequency=10 Hz, 1 KHz, 100 KHz, 1 MHz, 1.3 MHz 2. Amplitude= -200 mV; Width= 5 ns; ReadOutDelay=1 ms; Frequency=10 Hz, 1 KHz, 100 KHz, 1 MHz, 1.3 MHz For the acquisition I used the procedure indicated in 2.2.1. Then I made a C++ for plot these data in to histograms with ROOT, and the results are in Figure 17 and Figure 18. 14 1 MHz Figure 17 – Normalized histogram frequency Figure 18 - Normalized histogram frequency We can see that the situation doesn’t change with Read Out Delay equal 0 and 1s, but there is a strange lines before the frequency of pulse generator signal in fact the correct situation it should be with one line at the right frequency of signal, like the green one line that correspond at 100 KHz signal. The other strange thing is this: the line that correspond at 1.3 MHz signal should be on the left of 1 MHz because in time it’s a bigger number, but it doesn’t happen. This confirms what the expectations because how results on the scope over 1.2 MHz there is a mistake on the discriminator signal and then an error on trigger signal. 15 2.2.3 Efficiency histograms This type of analysis has been made by taking ten seconds acquisitions and on some histograms has been represented the efficiency in function of the width of pulse generator signal. To evaluate the efficiency of the EUDET TLU were made two types of tests. The first one has been done for some width of signal at different frequencies and with Read Out Delay equal 1000 and equal to 1. So, in this first test have been made three different acquisitions with the same amplitude and three different frequency, but for each one acquisition the width and the read out delay was variable. For clarify things these are the acquisitions: 1. Amplitude= -200 mV; Frequency=500 Hz ; Width= 20 ns to 2.3 ns; ReadOutDelay= 1 ms and 1 s 2. Amplitude= -200 mV; Frequency=10 KHz ; Width= 20 ns to 2.3 ns; ReadOutDelay= 1 ms and 1 s 3. Amplitude= -200 mV; Frequency=100 KHz ; Width= 20 ns to 2.3 ns; ReadOutDelay= 1 ms and 1 s The second test has been done for some signal amplitudes at various frequencies and with Read Out Delay equal 1000 and equal to 1 So, in this test have been made three different acquisitions with the same width and three different frequencies (the same frequencies of the previous test), but for each one acquisition the amplitude and the read out delay was variable. For clarify things these are the acquisitions: 1. Width= 5 ns; Frequency=500 Hz ; Amplitude= 200 mV to 56 mV; ReadOutDelay= 1 ms and 1 s 2. Width= 5 ns; Frequency=500 Hz ; Amplitude= 200 mV to 56 mV; ReadOutDelay= 1 ms and 1 s 3. Width= 5 ns; Frequency=500 Hz ; Amplitude= 200 mV to 56 mV; ReadOutDelay= 1 ms and 1 s For each acquisition I used the procedure indicated in 2.2.1. Then I made a C++ for plot these data in to histograms with ROOT, and the results are in the Figure 19 and Figure 20 for the efficiency in function of the width and in Figure 21 for the efficiency in function of the amplitude. 16 500 Hz 10 KHz 100 KHz Figure 19 - Eudet tlu efficiency width test 500 Hz readoutdelay=1000 (1s) 500 Hz 10 KHz 100 KHz Figure 20 - Eudet tlu efficiency width test 500 Hz readoutdelay=1 (1ms) 17 500 Hz 10 KHz 100 KHz Figure 21 - Eudet tlu efficiency amplitude test 500 Hz readoutdelay=1000 (1s) 500 Hz 10 KHz 100 KHz Figure 22 - Eudet tlu efficiency amplitude test 500 Hz readoutdelay=1 (1ms) Comment for the efficiency in function of the width histograms (Figure 19-20): In Figure 19 there is a 100% of efficiency for 500 Hz but when there frequency goes up the efficiency goes down. When the read out delay equals 1ms (Figure 20) there is another situation because the efficiency for 500 Hz is lower than in the previous histogram and the efficiency for 10 KHz is much better, this is a very strange point. In the end we have a worst situation for 100 KHz in 18 both situation. Another strange point is that the efficiency should not change with the read out delay parameter. For the histogram with read out delay equals 1ms there is a pick of efficiency at lower width, instead at highest width the efficiency lower. Also this is the other strange thing, which together with the previous, for the moment is without explanation. Comment for the efficiency in function of the amplitude histograms (Figure 21-22): The situation is very similar to the previous one in both histograms, in fact in Figure 21 when the frequency goes up the efficiency goes down, and in the second histogram (Figure 22) the efficiency for 500 Hz is lower than in the previous histogram and the efficiency for 10 KHz is much better. 3. AIDA Mini TLU characterisation tests This part of the work describes the performance of the AIDA Mini-TLU. For these tests will not be used oscilloscope but the data will be acquired by Run Control and will be analyze the behavior in frequency, width and of the buffer for the mini-TLU. Then will be describe the procedure for the data acquisition and so the part of ROOT histograms for the frequency, efficiency and buffer analysis will be given. 3.1. Run Control data acquisition procedure In this case we don’t have an external signal for the trigger generation but the trigger signal is generates internally in the Mini-TLU, and the procedure for acquire the timestamps data and save this type of data in a file is the following. So first of all in danix2561, my folder, we have to launch STARTRUN.minitlu and so the Run Control and Log Collector are opens, then we have to choose one configuration file with right settings, for any acquisition. And in all configuration files that we can use we have to specify the InternalTriggerInterval, this parameter is very important because it specifies the frequency that we decided for the internal trigger. So the relation beween the frequency of the triggers and this parameter is this: Once we have chosen the configuration file with the right setting is possible to press start to generate the signal trigger and the relative information with the timestamps are saved in a .raw2 file in data folder. When we are satisfied with the number of acquired trigger can stop the acquisition process by pressing Stop. Then with python is possible to convert this .raw2 file in a pybindgen file with this instruction in the ect/pybindgen folder: python reader.py name_of_file.raw2 > name_of_file.pybindgen &. This file will be save in the python folder (pybindgen in this case). The next step is deleting all the other information except the timestamps information. For this we have to isolate the “type 3” information in the pybindgen file. So in the prompt of command: grep “type’: 3” name_of_file.pybindgen > name_of_file.txt. Now we have a txt file and once eliminated the non important things like letter parentheses and points, will have a only timestamps number that can be plots with a C++ script in ROOT. This procedure is quite similar to the previous EUDET TLU Run Control data acquisition procedure indicated in 2.2.1. 19 3.2. Timestamps errors Unfortunately during the internal generation trigger mode there are some errors in the triggers information. However this behavior can be happens for high frequencies. So for example if we put in the configuration file the InternalTriggerInterval=160 that is 1 MHz of trigger frequency, there are a strange and random jumps in the type 3 information, that is the timestamp information about the trigger. For 100 KHz or 1 KHz the mini-TLU works fine and doesn’t generates this jumps, but we have a steady increase between a timestamp and its previous that is determined by the selected frequency. How we can see in Figure 23, for 1 KHz and 100 KHz of internal trigger frequency, we don’t have breaks during the line. Instead of looking at the chart for 1 MHz, 1.6 MHz, 10 MHz, 32MHz (Figure 24-25) we see that the line is broken, this means that there are many wrong jumps in the timestamps information. Figure 23 - Timestamps information for 1 KHz (right) and 100 KHz(left) of internal trigger frequency Figure 24 - Timestamps information for 1 MHz (right) and 1.6 MHz(left) of internal trigger frequency 20 Figure 25 - Timestamps information for 10 MHz (right) and 32 MHz(left) of internal trigger frequency At now this behavior is the same through ControlHub or with direct UDP. So, I could done tests only with a few low frequency, like 1 KHz or 100 KHz but not more of this value. 3.3. Frequency test For this type of test have been made three acquisitions following the method indicated in 3.1, but the InternalTriggerInterval has been changed as follows: 1. InternalTriggerInterval=160000 1 KHz 2. InternalTriggerInterval=1600 100 KHz 3. InternalTriggerInterval=160 1 MHz For each acquisition 10000 samples have been taken, this is the reason because there is also the acquisition with the InternalTrigeerInterval=160 that is the frequency at which you start having errors. In fact in the firsts 10000 samples we don’t have any wrong jump. So, for this type of histogram we expect a single line at the right frequency at which the trigger is generated internally by the Mini-TLU. This is because we don’t have an external trigger signal and so the frequency of the triggers generated by the system should be the one set by the user in the configuration file through the parameter InternalTriggerInterval, as said earlier. In fact in Figure 26 (normalized histogram) we can see that this prediction is true. 21 1 MHz 1 KHz 100 KHz Figure 26 – Frequency test for Mini-TLU 3.4. Efficiency test For the efficiency test of Mini-TLU have been made two acquisitions, following the method indicated in 3.1, were taken all the timestamps in the first 10 seconds of each acquisition. Then InternalTriggerInterval has been changed as follows: 1. InternalTriggerInterval=160000 1 KHz 2. InternalTriggerInterval=1600 100 KHz So, for this type of test we can’t use the frequencies like 1 MHz or over because how we can seen in 3.2 there are a lot of errors after a certain number of triggers. In Figure 27 we can see the efficiency (number of expect trigger over the real number of trigger) in function of the 1/frequency of signal (difference between each timestamps over the clock cycle) and there is a 100% of efficiency for both frequencies. This behavior was to be expected because we are using the internal trigger and so in this case the efficiency can only be 100%. 22 Figure 27 – Mini-TLU efficiency test 3.5. Buffer test Also in this test the procedure for acquire data is the method indicated in 3.1. In this type of test was taken only the frequency of 100 KHz. Of this acquisition have been taken all the timestamps and put these in a normalized histogram, where in the x we have 1/frequency of signal (difference between each timestamps over the clock cycle). The result (Figure 28) was a single line at the right frequency. Even in this case, this result was to be expected. Figure 28 – Mini-TLU buffer test 23 4. Conclusion and future developments For the EUDET TLU the tests were done by taking timestamps and analyzing them with ROOT and showed strange results difficult to interpret, especially the test for the efficiency which depended on the frequency and the waiting time of the software. For the Mini-TLU unfortunately it was only possible to acquire some data generating the trigger inside the main board. However, these few tests have confirmed the expectations. With a fully functional software would be possible to acquire data and analyze the behavior of the card even at high frequency. Another important aspect would be to acquire the data with an external signal (from pulse generator or PMTs) to generate the trigger. Unfortunately, during this project I did not have the connection board suitable for this purpose. With the connection board, in fact, would be possible to characterize fully the Mini-TLU comparing its performance with the results obtained by EUDET TLU. 4.1. Acknowledgement I would like to thank Igor Rubinsky, my supervisor, as well as for giving me the opportunity to work with him in the ATLAS group, for his help and support, always available to clarifications or questions. He followed me step by step throughout the project and it was a really good supervisor. I would also like to thank all my friends who helped me when I had some difficulties, especially with the part of ROOT. 24 5. References [1] Igor Rubinsky, An EUDET/AIDA pixel beam telescope for detector development [2] D. Cussans, Description of the JRA1 Trigger Logic Unit (TLU), v0.2c. EUDET-Memo-2009-4. [3] David Cussans, AIDA Common DAQ Timing/Triggering/Control Hardware Interface Version: 0.1 [4] P. Rolo_, “The EUDET high resolution pixel telescope", Nucl. Instrum. Meth., A604, (2009) [5] EUDAQ Software User Manual EUDAQ Development Team As of 27th February 2014 [6] http://en.wikipedia.org/wiki/GitHub 25