1
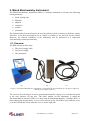
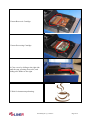
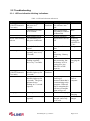
Grant Agreement no. 287596 D-LIVER ICT-enabled, cellular artificial liver system incorporating personalized patient management and support INSTRUMENT: Collaborative Project (Integrating Project) OBJECTIVE: ICT-2011.5.1 D6.4: User Manual for d-LIVER instrumentation platform Due Date of Deliverable: Completion Date of Deliverable: Start date of project: 31st January 2015 6th March 2015 1st October 2011 Lead partner for deliverable: Duration: 48 months CSEM Revision: v1.0 Project co-funded by the European Commission within the 7th Framework Programme (2007-2013) Dissemination Level PU Public PP Restricted to other programme participants (including the Commission Services) RE Restricted to a group specified by the consortium (including Commission Services) CO Confidential, only for members of the consortium (including Commission Services) d-LIVER_D6.4_v1.0.docx Page 1/14 Document History Issue Date 4th February 2015 22nd February 2015 Version v0.1 v0.2 27th February 2015 6th March 2015 v0.3 v1.0 Changes Made / Reason for this Issue First draft Include SINTEF contribution, add introduction and conclusion, rephrase some paragraphs Include final figures, minor updates Final version Document Main Author(s): Stephan Dasen (CSEM) Frode Strisland (SINTEF) Trine Seeberg (SINTEF) Document signed off by: David Wenn (iXscient) Copyright © Copyright 2015 CSEM & SINTEF. This document has been produced within the scope of the D-LIVER Project and is confidential to the Project’s participants. The utilisation and release of this document is subject to the conditions of the contract within the 7th Framework Programme, grant agreement no. 287596. d-LIVER_D6.4_v1.0.docx Page 2/14 Table of Contents 1. Introduction ...................................................................................................................... 4 1.1. Disclaimers and Warnings ........................................................................................... 4 2. Blood Biochemistry Instrument ...................................................................................... 5 2.1. Overview ..................................................................................................................... 5 2.2. Instrument Installation ................................................................................................. 6 2.3. User Guide ................................................................................................................... 7 2.3.1. Start-up ................................................................................................................. 7 2.3.2. Measurement ........................................................................................................ 7 2.3.3. Switch off ............................................................................................................. 8 2.4. Quick User Guide ........................................................................................................ 8 2.5. Precautions, Hygiene and Maintenance .................................................................... 11 2.6. Troubleshooting ......................................................................................................... 11 3. Wearable Device ............................................................................................................. 11 3.1. Overview ................................................................................................................... 11 3.1.1. Electronic compartment ..................................................................................... 11 3.1.2. Charging ............................................................................................................. 12 3.2. Measurements ............................................................................................................ 12 3.3. Troubleshooting ......................................................................................................... 13 3.3.1. LED and vibration blinking indications ............................................................. 13 3.3.2. Electrode detaching ............................................................................................ 14 3.3.3. Reset procedure .................................................................................................. 14 3.3.4. Contact ............................................................................................................... 14 4. Conclusions ..................................................................................................................... 14 d-LIVER_D6.4_v1.0.docx Page 3/14 1. Introduction The present document compiles the user manuals of the d-LIVER instrumentation platform. This consists into two devices: the Blood Biochemistry Instrument and the Wearable Device. The document is intended to be a support for the end-user. However, training is necessary to handle those devices safely, and this will be carried out prior to the clinical evaluation studies. 1.1. Disclaimers and Warnings The d-LIVER instrumentation platforms are prototype systems developed within the EU project d-LIVER. The instruments are in the development and testing stage, and do not have any medical device approval required to market them in the EU. Contract partners cannot be held responsible for incorrect use of this equipment. Usage of the equipment that is not described in this documentation is considered incorrect use. The system is not intended for life preserving treatment. The system is not verified as a diagnostic tool. The system has been developed according to industry standards, but the system is not CE approved. Errors may occur. This system must only be configured by trained medical personnel. The equipment must be used under supervision by a responsible person who has been trained how to use the system. The Wearable Device shall not be used on patients with a pacemaker device. The Wearable Device may not be used during defibrillation. This equipment contains radio transmitters and must not be used in areas where such equipment is forbidden, e.g. on board aircraft. Do not use several devices with radio transmitters on the body for an extensive time. Portable and mobile RF equipment may interfere with medical equipment. Though no known problems regarding EMC have been discovered during testing, the performance of this equipment cannot be guaranteed when operated together with other body-worn RF equipment. This equipment may not be used in strong electric or magnetic fields, such as Magnetic Resonance or X-ray machines or similar. Do not use the sensor belt of the Wearable Device if the skin has open wounds or rashes in the chest area. Always inspect the equipment before use and if dropped or bumped into something that could possibly harm the unit. Do not use if the equipment is deformed or has other visible damage. Do not insert any other equipment into the sensor belt of the Wearable Device USB contact than the appropriate electrode or charging cable. The current adapter should be CE marked. Do not charge the Wearable Device while wearing it on body. Do not expose the sensor unit of the Wearable Device to water or other fluids. Do not direct the green LED of the Wearable Device that is part of the PPG sensor and located on the backside of the device, towards the eyes when the LED is lit. Do not modify this equipment! d-LIVER_D6.4_v1.0.docx Page 4/14 2. Blood Biochemistry Instrument The Blood Biochemistry Instrument (BBI) is a desktop instrument to measure the following blood parameters: blood clotting time bilirubin albumin creatinine sodium potassium The instrument has been developed to be used by patients with liver disease in the home setting. Therefore, it has been developed to be as simple as possible to use and safe for the patient. However, the clinical evaluation of the instrument will be performed in a supervised environment by trained personal only. 2.1. Overview The BBI consists of three parts: The power supply cable The power supply The instrument (a) (b) (c) Figure 1: The Blood Biochemistry Instrument is constituted by the instrument (a), the power supply (b) and the power supply cable (c). The screen is fixed on hinges. It can be opened and closed like a laptop. It is a touchscreen and it is the only interface for the user. The black module on the instrument is called the Electromechanical Interface (EMI). It is there that the Blood Biochemistry Cartridge (BCC) is hosted during the measurement. A cover can be slid on its top. The EMI is open when the cover is on the left side and closed when the cover is on the right side. d-LIVER_D6.4_v1.0.docx Page 5/14 Touchscreen EMI cover Electromechanical Interface (EMI) Power button Ethernet connector Power plug Figure 2: BBI and its parts, connectors and button. On the back panel of the BBI, one can find two connectors and one button. One connector is the power plug and the button is the power button to switch the instrument on and off. The second connector is an Ethernet connector which is not used in normal operation. It is only used for distant debugging in case of troubleshooting (see chapter 2.6). 2.2. Instrument Installation The instrument is intended to be powered by a 230V/50Hz network. This means that it works with all European networks. It should also work with American 110V/60Hz network, but this does not enter into the current field of use of the instrument. The power supply cable has to be connected between the power supply and a 230V/50Hz power source. The output of the power supply is connected to the power plug of the BBI. No other power supply shall be used than the one furnished with the instrument. d-LIVER_D6.4_v1.0.docx Page 6/14 The touchscreen of the instrument can be opened. To switch it on, the power button need to be pressed. To switch the instrument off, the software must first be properly shut down, and then the power button can be switched off (see chapter 2.3.3). 2.3. User Guide 2.3.1. Start-up The instrument has to be connected to the power supply. It then needs to be switched on. The user has to wait a few minutes for MS Windows to start up. The application starts automatically. However, a link to the application can be found on the Desktop, if necessary. 2.3.2. Measurement To start the measurement, the user has just to click on the Start Measurement button. The instructions to follow will be shown on the screen. Figure 3: Main user interface. The user will first be asked to insert the cartridge into the instrument and close the cover. The cartridge is formed by two separate pieces, a measurement cartridge and a reservoir cartridge. The reservoir cartridge has to be inserted first, followed by the measurement cartridge. After that, the cover should be closed. Once the cover is slid to the end, it needs to be pressed down and moved a bit further to the right to engage the locking mechanism. This process connects the two cartridges together while avoiding leakage between the two parts. The instrument detects automatically when the cover is closed and if the cartridges have been inserted. Once this is done, the instrument automatically preheats the cartridge. This operation may take some time and the user is asked to wait. It is not necessary for the user to wait for the instrument d-LIVER_D6.4_v1.0.docx Page 7/14 to be ready. Once the cartridge is preheated the instrument keeps its temperature until the process is started and throughout the measurement. The next steps can be done at any moment after the preheating of the cartridge. After the preheating of the instrument, the user is asked to prick his/her finger and fill the cartridge capillary. The instrument automatically detects when the capillary is filled. If the instrument does not react once the blood has been applied on the capillary, this means that insufficient blood has been inserted. A second finger prick might be necessary. Once enough blood has been inserted into the capillary, the instrument starts the suction of the blood into the cartridge and the measurement of the various blood parameters. The measurement will now continue without further interventions of the user. Once the measurement is completed, the instrument displays a message that the measurement has been successful or has failed. If the measurement has failed, the cartridge has to be changed and a full measurement has to be started from the beginning. If the measurement has succeeded, the data will be sent to the personal Health Manager (PHM) and a result file is stored on the instrument. The cartridge then has to be removed from the instrument. Note: the cartridge must not be reused. 2.3.3. Switch off After a measurement is completed and the cartridge removed from the instrument, the instrument can be switched off. To do so, the user has to click on File Exit. The application will close, MS Windows will shut down and the embedded computer within the instrument as well as the screen will turn off. Then, the instrument can be manually switched off with the switch on the back panel. It is strongly advised to do so as some parts of the instrument will remain powered otherwise. 2.4. Quick User Guide 1. Click on Start Measurement. d-LIVER_D6.4_v1.0.docx Page 8/14 2. Insert Reservoir Cartridge. 3. Insert Processing Cartridge. 4. Close cover by sliding to the right side until the stop, pressing down a bit, and sliding a bit further to the right. 5. Wait for instrument preheating. d-LIVER_D6.4_v1.0.docx Page 9/14 6. Prick finger and apply blood on the capillary of the cartridge. If necessary, complete blood filling with a second fingerprick. 7. Wait for the measurement completion. If measurement has failed, remove cartridge as shown in steps 8 & 9 and proceed to the measurement again starting at step 1. 8. Open cover by the reverse operation of step 4. 9. Remove cartridge from instrument. d-LIVER_D6.4_v1.0.docx Page 10/14 2.5. Precautions, Hygiene and Maintenance Blood must always be handled with care. If blood is spilled, it must be immediately cleaned and disinfected. Also, if a next-of-kin, carer or health professional helps the patient to perform the finger-prick and blood measurement, he/she must wear some medical gloves and be careful with possible blood dripping. As no liquid flows into the instrument, no particular cleaning of the instrument is required. Moreover, the instrument is not directly in contact with the finger opening, so no contamination should arise because of the instrument. However, the instrument should be kept clean for hygienic reasons. It can be cleaned with a dry or damp wipe. No water or other liquid should enter the instrument! During the measurement, the cover should not be opened. In case the cover is accidentally opened during the measurement, the routine is automatically interrupted and the result rejected. The measurement then needs to be restarted with a new cartridge. After each measurement, the instrument should be visually inspected to see if any liquid has leaked out of the cartridge. The region where the capillary of the cartridge appears must be disinfected after each measurement. If some blood has dropped on the instrument, it should also be carefully cleaned and disinfected. Any alcoholic based solution can be used for disinfection. The plastic part of the instrument may lose its colour but its function will not be altered. If liquid has leaked out of the cartridge and into the instrument, CSEM should be contacted (see chapter 2.6). 2.6. Troubleshooting If a measurement fails, the measurement protocol is interrupted and the result –if any– is rejected. The cartridge has to be removed and the measurement restarted from the beginning with a new cartridge. Several malfunctions could lead to an error. Whatever the reason, the measurement is interrupted. One single failure does not need to be reported. However, if the instrument persistently fails, CSEM should be contacted. You can contact one of the persons below: Stephan Dasen +41 32 720 50 73 [email protected] Lingchuan Zhou +41 32 720 52 40 [email protected] For remote debugging, the instrument needs to be connected to a wired internet access by connecting an Ethernet cable to the socket on the back panel. A remote control software (Teamviewer) is installed on the computer and the CSEM team may take control of the instrument. Before calling, be sure that you have wired internet access available for the instrument. 3. Wearable Device 3.1. Overview 3.1.1. Electronic compartment The d-LIVER wearable device consists of an electronic compartment, as shown in Figure 4. On the front side of the compartment there is an on/off button and on upper edge are two LEDs to indicate the status of the device and a connector slot for electrodes. On the back side are two d-LIVER_D6.4_v1.0.docx Page 11/14 push buttons to attach the belt (which also have two electrodes), the PPG sensor used in the pulse transit time (PTT) measurements and an IR temperature sensor. The compartment is designed to be splash protective and can be gently swiped with a soft cloth with water or disinfection agent. Figure 4: d-LIVER Wearable Device. 3.1.2. Charging Make sure the device is fully charged before using the device. Charging takes approximately 2 hours for a full charge. 3.2. Measurements a) Prepare device Attach the electrode wires to the connector slot and connect one of the push button on the compartment with one on the belt. b) Prepare for measurements The device shall only be worn if the skin is intact and without severe rashes. Consider shaving the area where the disposable electrodes have to be placed, and clean with an alcoholic agent. This is to ensure good and stable contact. c) Placing of the device on the body Fasten the belt around the chest by attaching the second push button on the electronic compartment with the other end of the belt. There should be no clothing between the skin and the belt. The sensor belt is made of elastic material and can be elongated 4-6 inches. The belt should be attached so that is does not change position when you are moving around, however do not tighten it so much that it feels uncomfortable. d) Fasten disposable electrodes Attach the three disposable electrodes to the electrode wires. Place electrodes so that the driver current goes through the main chest area. e) Start measurement Start the measurements by pushing the on/off button. Connect the device to a computer through Bluetooth (HDP or SPP protocol), or store data on unit. d-LIVER_D6.4_v1.0.docx Page 12/14 3.3. Troubleshooting 3.3.1. LED and vibration blinking indications Table 1: LED and vibration indications. Operation Turning unit on (ON/OFF button in 3 seconds) Errors when turning unit on Normal operation LED indication Fast alternating red and green in 5 seconds. Constant green LED in 10 seconds. Slow blinking green Fast alternating red and green continuous Fast red diode for 1 second Green light is flashing regularly; once every 3 seconds Green and red light is flashing regularly; once every 3 seconds. Turning unit off (ON/OFF button in 5 seconds) Charging Both green and red indicator lights up for 3 seconds Both green and red indicator lights up for 3 seconds. The green indicator keeps flashing in a 3 second sequence Vibration Function Two short Opening for loading vibrations new software into unit Start-up procedure (not ready to connect to Bluetooth) Normal operation Applications can't be run Battery too low to start The sensor belt is on and measuring. Battery is ok The sensor belt is on and measuring, but the battery level is getting low; less than 20% of full capacity Two short Shut down vibrations Green light is on. Green light is flashing regularly d-LIVER_D6.4_v1.0.docx The sensor belt has a back-log of measured data that it is transmitting to the computer. When all data is transmitted it will turn off and the lights will go off The unit is charging. The unit is fully charged, and ready to be used Action Wait Wait None Restart by pushing the ON/OFF for 15 sec Charge None Plan for charging the unit None Keep device close to computer Continue charging Disconnect charger Page 13/14 Operation Disconnecting charger and unit not immediately attached to chest, or unit is taken of chest but not turned off Short push on ON/OFF LED indication Green light will flash regularly, after 5 minutes normal turn off sequence Vibration Function Normal Waiting, then turn turn off off sequence Action None Short green flash Short vibration None This indicates that the sensor-belt is alive and responsive to user interaction 3.3.2. Electrode detaching It's a known problem that the electrodes might come off when the skin gets wet due to sweat. It may be necessary to wash the skin with alcohol before re-attaching the electrodes, and to shave the area if necessary. If the electrodes do seem to come off, try to pinch/push them again to attach. Note this in the logbook. 3.3.3. Reset procedure Push the ON-OFF button for 15 seconds to reset the unit. This might be necessary if the unit for some reason freezes due to incorrect Bluetooth connectivity, such as closing the PC application window without disconnecting. 3.3.4. Contact In case of other troubles with the Wearable Device, you can contact the following person: Trine Seeberg +47 22 06 78 03 [email protected] 4. Conclusions This deliverable provides a user manual for the Blood Biochemistry Instrument as well as for the Wearable Device. It has been written so that anybody can handle these platforms. However, to avoid any confusion and possible accidental mishandling, but also as highlighted in the risk analysis matrix, only trained personal should use the instruments and this deliverable used as a checklist. Therefore, no technical details are provided in this report. At this stage, the Wearable Device is already undergoing clinical evaluation, whereas the BBI still needs to be tested and optimized before being evaluated. Therefore, some minor updates to the user manual might be required. d-LIVER_D6.4_v1.0.docx Page 14/14