1
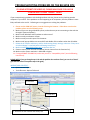
TROUBLESHOOTING PROBLEMS ON THE BBI WEB SITE IF USING INTERNET EXPLORER 10, PLEASE MAKE SURE YOU ARE IN “COMPATIBILITY VIEW” UNDER “TOOLS” If you are experiencing problems with the Brighton Best web site, please start by checking another computer in your office. If the problems are not happening on all computers, then the problem is most likely confined to the one PC. Following are our suggestions to solving the problems: 1. Please use the SIGN OUT button, instead of closing the browser. If that does not solve the problem, please see the following steps. 2. Make sure you are using a Windows system, and make sure you are connecting to the web site through IE (Internet Explorer). 3. Make sure all Windows and IE updates are taken care of. 4. Make sure only one browser is open. 5. Make sure only one tab is open in the browser. 6. Make sure all pop-up blocker are turned OFF and disable all the toolbars other than IE toolbar 7. Delete the PC cookies and history, and for the Browsing History settings, make sure “Every time I visit the webpage” is marked (see the following instructions). 8. Make sure add www.Brightonbest.com to the trust Site list. 9. Please manually enter the web site address (do not choose from the Favorites list). 10. Make sure the screen resolution is 1024x768 or higher. 11. If using INTERNET EXPLORER 10, make sure you are in “Compatibility View” (see the following instructions). PLEASE NOTE: If you go through steps 1-10 and the problem has not been fixed, you can do a “Reset” (you will then need to complete steps 1-10 again). INSTRUCTIONS FOR STEP 7: Open Internet Explorer ToolsInternet OptionsGeneral 2. Click Here 3. Click here 4. Click OK to apply settings 1. Click here to clear Cookies and History first INSTRUCTIONS FOR STEP 8: 1 2 3 4. key in www.brightonbest.com 5. Make sure uncheck this INSTRUCTIONS FOR STEP 11: Open Internet Explorer ToolsCompatibility View 6. Click “Add” INSTRUCTIONS TO COMPLETE A “RESET” (IF STEPS 1-8 DO NOT TAKE CARE OF THE PROBLEM): PLEASE NOTE: after the “Reset” has been completed, you will need to follow steps 1-7 again (see previous pages).