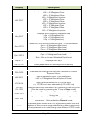
1
CASTLE SONUS RANGE Sound Level Meter & Dose Meter Operating Manual www.castlegroup.co.uk Thank you for buying a Castle product, I am sure you will find both the goods and the service to be of the highest quality but if not, then please feel free to write to me personally and I will ensure that your needs are dealt with immediately. This manual is designed to show you the operation of the goods you have purchased and a very brief insight into acoustics itself. If you would like to become a competent person in the eyes of the law, then you may like to know more about our Competent Persons training course for the Noise at Work Regulations. It is my intention for Castle Group Ltd to provide a complete range of Noise and Vibration products and Services of the highest standard. If you would like to know more about any of our other products and services then please telephone on +44(0)1723 584250. Simon Bull Managing Director To the Safety, Health and Environment Professional … The issues faced every day by Health, Safety and Environmental professionals are vast and varied. At Castle, we have spent a lot of time developing products and services to make your life easier! Castle Group Ltd are one of the leading international group specialists in technical safety, health and environment solutions. Whether you are in Industry, Construction, Local Authority or anywhere there are safety or environment issues, we are a resource you really could use. We can help with Noise, Vibration, Air sampling, Gas detection, Light and temperature and just about anything else that needs measuring. The following services show you how we can help. FREE Health & Safety Training Seminars! To get you off the ground, refresh your knowledge or just to get a taste, Castle is continually running FREE Safety, Health and Environmental seminars around the country. Covering subjects from Noise at Work, to COSHH and Audiometry, the list is ever growing, as are the locations. Check out our web site for the next seminar near you. www.castlegroup.co.uk Castle Instruments Dealing with many Safety, Health and Environmental issues may well mean you need access to a plethora of equipment and instrumentation to carry out measurements and assessments necessary for the job. At Castle we can provide you with just about any of the equipment you might need. All our equipment comes with the guarantee of back-up and support you only get from a company with 40 years under its belt! Here are a few of the core products we can offer, but we can also source anything you may need! Noise and Vibration Measurement Equipment Audiometers, Otoscopes and Booths Air-Sampling Pumps, Calibrators and Consumables Gas-Detection and Personal Monitors Emissions and Air Quality Light, Temperature, Humidity and Airflow www.castlegroup.co.uk Castle Training Academy Training is becoming an ever more important area of consideration to industry professionals and the Castle Training Academy is fulfilling the need for more and more companies every year. The Academy now offers competence training along with IOSH and CIEH qualifications. What is more, look out for our NEW City & Guilds provision. All courses come with professional CPD points and many are eligible for CITB and Train to Gain grant funding. You can see a full list of courses and book-online on our website. www.castletrainingacademy.com Castle Rent There are a number of reasons why rental may be the solution for you. You may only have a one-off use, a special contract, a limited budget or a need for supplementary products. In any case, our flexible booking system, next day a.m. delivery and open-pricing mean that you can address any of these issues without delay. For long-term contracts, such as construction projects, Castle Rent is also a tax efficient way to 'own' equipment. Finally, for peace of mind, what better way is there to try a product before deciding to buy it? We even give you money back if you do purchase! The Advantages of Castle Rent: Easier on cash-flow Rent for long- or short-term as you need it Let the Tax Man pay for you! Try before you buy Four weeks for the price of three No on-going maintenance costs Sourcing service for any other equipment you need www.castle-rent.com Castle Care Measurement instrumentation must be regularly calibrated to a traceable standard and this is certainly true for most health, Safety and Environmental monitoring equipment. At Castle, our team of highly trained and experienced technical staff can service and calibrate almost any type of monitoring equipment from Noise and Vibration meters to Thermometers to Scales. The Castle 'Premier Service' includes menu pricing and a normal turnaround time within 5 days. What is more, we will evaluate any instrument and return it for FREE if you do not want to proceed. Castle premier service and calibration offers... Free Evaluation Service Clear and Simple Pricing UKAS Accreditation Available Large range of equipment calibrated 4 Levels of calibration available for most equipment Annual contract calibrations with up to 20% off www.castle-care.com Castle Contracts For companies with multiple pieces of equipment, there is also Castle’s ‘Contract Calibrations’; an annual scheme to take the hassle out of maintaining equipment certification. Castle will issue calibration reminders, collect your equipment if required and return it calibrated as soon as possible. This scheme also affords a saving of up to 20% on annual calibration charges. www.castle-care.com Castle Consultancy Castle experts are waiting to help you. Because we have a network of consultants across the country, we are poised to react to your requirement. Not only can we normally provide a local service, but we can usually help right away if you need us to! Whether you are limited for time, in need of further expertise or just want some advice, we can assist. We have provided a wide range of services to many top companies for projects large and small. Here are some of the services we can provide, but if it’s not here, just ask! Noise or Vibration risk assessments Building Acoustics COSHH compliance Environmental Impact Assessments Air Quality Monitoring Occupational Health Screening programmes www.castle-consultancy.com Castle Online You can access all our products and services online whenever you want, just go to www.castlegroup.co.uk and you will find a knowledgebase packed full of useful facts and information. You will also find details of all our upcoming FREE seminars and training courses as well as product information on literally hundreds of health, safety and environmental items, which are available to purchase directly through a secure server. Among other things you will find: HS&E Measurement Products Books, Standards and Publications HS&E CD’s DVD’s Stopwatches and Timers Scales and Distance Measurement Water Testers You will also find our shop on ebay of all places - http://stores.ebay.co.uk/Castle-GroupSafety or just go onto ebay and type Castle Group Safety in the shops section. Who are Castle For 40 years, Castle has been driving forward with product and service innovation. For a number of the early years, the company focused on the development of sound and vibration measuring equipment. This was then progressed by adding training courses, rental and consultancy eventually leading to the Castle of today, which is helping many customers deal with a vast range of health, safety and environmental issues in a variety of ways. The future is a very exciting place at Castle and we are working on many new initiatives with our customers firmly in mind! Copyright This manual is copyrighted with all rights reserved. The manual may not be copied in part or in whole without the prior written consent of Castle Group Ltd. Precautions • Only operate the instrument as described in this manual. • These are precision instruments, protect from shocks and vibrations. • Take special care with the microphone. The diaphragm is made from a very thin metal and is easily damaged. • Ambient conditions for the operation of the unit are as follows:Temperature: -10°C to +50°C Relative Humidity: 25 to 90% • Protect the unit from extremes of temperature and humidity, direct sunlight and air with a high salt or sulphur content. • Always turn the unit off after use. Remove the batteries from the instrument when not in use for extended periods of time. • Do not use any solvents or cleaning agents on the instrument. Use only a soft dry cloth or a soft cloth lightly moistened with water when necessary. • Do not allow any conductive objects, such as wire or metal scraps to enter the unit. • Do not try to disassemble the instrument or attempt any repairs as this will invalidate your warranty. Take a note of the condition of the instrument and contact your authorised Castle service station. • To ensure continued precision performance of your instrument have it checked and serviced at regular intervals. Contacting Castle Group This manual contains complete operating instructions for the Castle Pro DX Vocis Meter, read it carefully and you will quickly become familiar with your instrument and its operation. If you do encounter problems with the operation of your instrument please feel free to contact customer support with your enquiry on: Telephone: Fax: Website: Email: +44 (0)1723 584250 +44 (0)1723 583728 www.castlegroup.co.uk [email protected] [email protected] Contents Introduction............................................................................................... 1 Sonus Variations ..................................................................................... 2 Chapter 1 ................................................................................................... 4 Microphone ........................................................................................................................................... 4 Microphone Types .......................................................................................................................... 4 Microphone Polarisation ............................................................................................................. 4 Microphone Sensitivity ................................................................................................................. 5 Certifiable Calibration.................................................................................................................... 5 Pre-Amplifier and Microphone Removal and Fitting ........................................................... 6 Removal of Microphone ............................................................................................................... 6 Attaching & Removing the Pre-Amplifier (Models 116L, 216I & 216L-P) .......... 6 Attaching & Removing the Microphone Extension Cable (Model 'L' Only) ............ 6 Chapter 2 ................................................................................................... 7 Measuring Sound ............................................................................................................................... 7 Sound Level - General Advice..................................................................................................... 7 Reflections ......................................................................................................................................... 8 Time Weighting ............................................................................................................................... 8 Slow Weighting .......................................................................................................................... 8 Fast Weighting ........................................................................................................................... 8 Impulse Weighting (Model 'L' Only) ................................................................................... 8 Frequency Weighting Filters...................................................................................................... 9 A Weighting ................................................................................................................................. 9 C Weighting ................................................................................................................................. 9 Z Weighting ................................................................................................................................. 9 Overload and Under Range Conditions .............................................................................. 10 Overload Condition ................................................................................................................. 10 Under Range Condition ....................................................................................................... 10 Measuring Ranges ...................................................................................................................... 11 Changing Range (All models except GA257B & GA257L) ................................. 11 Lock Keypad (GA257B & GA257L) ............................................................................... 12 Chapter 3 ................................................................................................ 13 Getting Started ................................................................................................................................. 13 Models I & B................................................................................................................................... 13 Models L .......................................................................................................................................... 13 All Models ........................................................................................................................................ 14 Keypad Layout - GA116, GA216 Models B, I & L ............................................................. 15 Keypad Layout - GA257L & GA257B .................................................................................... 16 Powering Your Sonus Meter...................................................................................................... 17 Switching Your Sonus Meter On/Off ..................................................................................... 18 Chapter 4 ................................................................................................ 19 Main Menu Structure .................................................................................................................... 19 Models GA116I, GA216I, GA116B, GA216B, GA257B........................................... 20 Calibration [CAL <OK] ........................................................................................................... 20 Exposure Time [ET <OK] ...................................................................................................... 22 Frequency / Time Weighting [WTG <OK] ................................................................... 22 Exchange Rate [EXCH <OK] ............................................................................................... 23 Criterion [CRIT <OK] .............................................................................................................. 23 Threshold [THR <OK] ............................................................................................................ 24 Keypad Lock [LOCK <OK] .................................................................................................... 24 Display Contrast [CONT <OK] ........................................................................................... 25 Models GA116L, GA216L, GA257L .................................................................................. 26 Calibration [CAL] ..................................................................................................................... 26 Instrument Settings [SETUP] ............................................................................................ 28 Frequency Weighting [FREQ WGT]........................................................................... 29 Time Weighting [TIME WTG] ...................................................................................... 30 Recording Interval Period [INTERVAL] .................................................................... 31 Display Contrast [CONTRAST] .................................................................................... 33 Percentiles [USER Ln] ..................................................................................................... 34 Criterion Level [CRIT] ....................................................................................................... 35 Threshold [THR] ................................................................................................................. 35 Exchange Rate [EXCH] .................................................................................................... 36 Record Timer [TIMER] .................................................................................................... 37 Current Date [DATE] ....................................................................................................... 38 Real Time Clock [TIME] ................................................................................................... 38 User Mode [MODE] ............................................................................................................... 39 View Saved Logs [LOGS] ..................................................................................................... 40 Delete Saved Logs [DELETE] ............................................................................................. 41 Set Instrument Defaults [DEFAULTS] ........................................................................... 42 Keypad Lock [LOCK] .............................................................................................................. 43 Chapter 5 ................................................................................................ 44 Stop / Record Mode ..................................................................................................................... 44 Model 'I' & 'B' Instruments ....................................................................................................... 44 Model 'L' Instruments ................................................................................................................ 45 All Models ........................................................................................................................................ 46 Model 'I' & 'B' Instruments - Information Screen .............................................................. 46 Model 'L' Instruments - Information Screen ........................................................................ 47 Reset Data ......................................................................................................................................... 48 Models 'I' & 'B' ............................................................................................................................... 48 Model 'L' ........................................................................................................................................... 48 Chapter 6 ................................................................................................ 49 Parameters........................................................................................................................................ 49 Model 'I' & 'B' .................................................................................................................................. 49 Model 'L' ........................................................................................................................................... 51 Chapter 7 ................................................................................................ 53 Downloading Saved Recordings - Model 'L' Only................................................................ 53 Chapter 8 ................................................................................................ 54 Miscellaneous ................................................................................................................................... 54 Available Accessories ................................................................................................................ 54 Warranty and After Sales Service ....................................................................................... 55 Trouble Shooting Guide ............................................................................................................. 56 Instrument Disposal ................................................................................................................... 57 Chapter 9 ................................................................................................ 58 Technical Specification.................................................................................................................. 58 Chapter 10 ............................................................................................. 73 A Guide to Acoustical Terms and Units ................................................................................ 73 Disclaimer ........................................................................................................................................... 82 Instrument Details .......................................................................................................................... 82 Table of Figures Figure 1 - Frequency Weighting Curves ....................................................................................................... 9 Figure 2 - Keypad Layout (Sound Meter) .................................................................................................. 15 Figure 3 - Keypad Layout (DoseMeter) ...................................................................................................... 16 Introduction Thank you for purchasing your product from Castle Group Ltd. The Sonus range of pocket sound level meters brings simplicity and power to the worlds of Noise at Work and Environmental sound monitoring. From a basic sound pressure meter to full data logging, combined sound and dose-meter, the range of systems covers a wide diversity of applications. Mobility of instrumentation is essential for effective noise measurement. As the name indicates, the Castle Sonus Pocket Meter packs all the necessary features into pocket sized proportions. Future Proof… The built in firmware for these meters is designed to suit future upgrading for feature enhancements, legislative changes or instrument upgrades. Details are mailed to customers as soon as they become available. With the Castle range of Sonus Pocket meters you will always be in step with the law and market requirements. Periodic enhancements or bug fixes to the software will be supplied free of charge for a period of one year from the purchase date. Page 1 Sonus Variations Sonus L GA116L – Class 1, Ln’s, User Selectable Modes GA216L – Class 2, Ln’s, User Selectable Modes Available in either class 1 or class 2, this top of the range model is a Noise at Work and Environmental Sound Meter boasting a combined Integrating Sound Level Meter and Dose Meter with full data logging capability. Simply unplug the Sound Meter Microphone and plug in the Dose Meter cable to convert to a fully functional Dose Meter. This model also features dual measurement capability meaning two versions of applicable parameters can be measured simultaneously. This feature means you only ever need to measure once to capture all the data you need! The instrument has user selectable operating modes for instant automatic setup of the instrument for Noise at Work or Environmental parameters, alternatively the instrument can be configured manually to meet your exact requirements. Analysis of recorded data can be achieved by transferring the data from the instrument into the software dBdataPro using the instruments USB port. GA257L –Dose Meter This model is a dedicated Dose Meter with full data logging capabilities which also features dual measurement capability meaning two versions of applicable parameters can be measured simultaneously. This feature means you only ever need to measure once to capture all the data you need! Analysis of recorded data can be achieved by transferring the data from the instrument into the software dBdataPro using the instruments USB port. Page 2 Sonus I GA116I – Class 1 GA216I – Class 2 Available in either class 1 or class 2, this model is a low cost integrating sound level meter that measures simultaneous Leq and peak measurement for assessments and compliance with the Health and Safety at work Act; Noise at Work Regulations 1989. Sonus B GA116B – Class 1 GA216B – Class 2 Available in either class 1 or class 2, this model is a general purpose low cost non-integrating sound level meter that can assist with compliance to the Health and Safety at Work Act; Noise at Work Regulations 1989. GA257B –Dose Meter A low cost dedicated Dose Meter giving simultaneous Sound Exposure (LAE) and peak measurement for assessments to the Noise at Work Regulations 1989. Page 3 Chapter 1 Microphone Measurement microphones by the very nature of their manufacture are precision components that are easily damaged through incorrect use. Great care must be taken when using the instrument to ensure the longevity of the microphone. PLEASE NOTE THAT DEPENDING ON YOUR INSTRUMENT MODEL, IT MAY BE SUPPLIED WITH A PROTECTIVE WHITE PLASTIC CAP COVERING THE END OF THE MICROPHONE. IF SUPPLIED THIS CAP MUST BE REMOVED PRIOR TO USING THE INSTRUMENT. Microphone Types Three different types of microphone are manufactured, each designed for measuring noise in different applications which is out of the scope of this manual. Each one however has a different sound incidence angle. The sound incidence angle determines the angle the instrument is held relative to the actual noise source being measured. 1. Free Field Sound Incidence Angle = 0° Point the sound meter directly towards the noise source 2. Pressure Sound Incidence Angle = 90° Point the sound meter at 90° towards the noise source 3. Random Incidence Point the sound meter at approximately 70° towards the noise source All Sonus meters are supplied with Free Field measurement microphones. Microphone Polarisation Microphones require a polarisation voltage to operate and are manufactured in two ways: 1. Externally Polarised These microphones require an external charge for the microphone to operate which is generally 200V and supplied by the sound level meter. 2. Pre-Polarised These microphones generate the polarisation voltage internally and do not require the externally generated 200V polarisation charge. All microphones supplied with Sonus meters are Pre-Polarised. Page 4 Microphone Sensitivity The sensitivity of a microphone is determined by the output voltage it produces for a defined sound source. Microphones are manufactured with numerous sensitivity levels and operate within a specified tolerance. Different microphones of the same model may therefore give slight differences in readings when used on the same sound meter. To allow for this all Sonus meters have been designed to accommodate any variations in the tolerance of the supplied microphone up to ±3dB. All Sonus meters have been designed for microphones with a sensitivity of 25mv/Pa. Great care must be taken to ensure the microphone and sound meter sensitivities match otherwise incorrect readings will occur. Certifiable Calibration The calibration process includes the microphone, pre-amplifier and sound level meter. Any change in this measurement chain will require a new certifiable calibration. Castle Group Ltd offers a complete calibration service offering either a full UKAS calibration or a standard NPL traceable calibration which can be supplied with or without a test report. It is recommended that your sound meter instrumentation is calibrated annually to ensure your measuring equipment is completely accurate and fully compliant. Page 5 Pre-Amplifier and Microphone Removal and Fitting Measurement microphones by the very nature of their manufacture are precision components that are easily damaged through incorrect use. Great care must be taken when using the instrument to ensure the longevity of the microphone. Removal of Microphone The microphone can be fitted to the pre-amplifier by screwing the microphone in a clockwise direction ensuring that the pre-amplifier spring pin is located centrally in the microphone. To remove the microphone unscrew in an anticlockwise direction. The microphone has a protection grid which can also be unscrewed and removed, great care must be taken to ensure that this is not removed. Underneath the protection grid is the microphone diaphragm which should never be touched or be subject to dust or dirt. Doing so may damage the microphone beyond repair or affect its acoustic response. Attaching & Removing the Pre-Amplifier Models GA116L, GA116I & GA216L-P To attach the pre-amplifier, position the orientation key on the pre-amplifier which is identified with a RED mark, with the RED identification mark on the instrument and gently push the pre-amplifier into the connector. To remove, gently pull the pre-amplifier stem away from the instrument body. DO NOT TWIST THE MICROPHONE STEM. Attaching & Removing the Microphone Extension Cable (Model L Only) To attach the microphone extension cable, position the orientation key on the extension cable connector which is identified with a RED mark, with the RED identification mark on the instrument and gently push the extension cable into the connector on the instrument. To fit the pre-amplifier to the extension cable see Attaching & Removing the Pre-Amplifier above. To remove, gently pull the extension cable connector by pulling on the knurled part of the stem. DO NOT TWIST THE MICROPHONE STEM. Page 6 Chapter 2 Measuring Sound Always calibrate your instrument prior to, and after taking measurements using a known sound source such as the Castle GA607 sound level calibrator. The type of microphone supplied with your instrument is Free Field and requires an incidence angle of 0 degrees, therefore whilst measuring always point your Sonus Pocket Meter directly towards the noise source being measured. Sound Level – General Advice In some environments, high levels of noise can occur. The Castle Sonus Pocket sound meter has therefore been designed for complete accuracy up to sound levels of 140dB. Before you record measurements take the time to ensure you have chosen the optimum range for the process to be recorded. Wherever possible, the optimum range is when the average measured signal is approximately half way between the top of the range and the bottom of the range. Where high levels of noise are encountered the meter may register an overload and in these circumstances the meter will display that this has occurred, it is therefore advisable to determine if an Over Load occurs on the selected range. In such cases you will need to select a higher range to accommodate the higher peak levels. See Technical Specifications for peak range limits on each individual range. If the noise levels are too low for the range selected then the meter will display an under range condition. Under these circumstances you will need to select a lower range. For more detailed information see Overload and Under Range Conditions and Measuring Ranges. If measuring low level noise then be aware of the inherent noise levels caused by a combination of thermal and electrical noise from both the microphone and the sound level meter. Measuring data that lies within 10dB of the lowest quoted level on the lowest measuring range may be influenced by the self noise of the system. See Technical Specifications for inherent noise levels and range limits. Page 7 Reflections The sound level meter operator and the sound level meter itself can interfere with the measurements being made, reflecting the noise signal. The instrument case for the Sonus range of sound level meters has therefore been designed to minimize reflections whilst also being of rugged construction. To minimize reflections from the operator hold the sound level meter at arm’s length, mount the sound meter on a suitable tripod (adapter required) or use a microphone extension cable (if applicable). Time Weighting The time weighting is a time constant that modifies the response of the instrument to fluctuating noise levels. Without time weighting the meter display would fluctuate following the measured noise level and would be unreadable, the selected time weighting therefore softens these fluctuations over the time periods described below and in doing so the meter has a more readable display. Depending on your instrument type (see Technical Specifications for further details), the following standardised time weightings are available: Slow Weighting Shows a slow rise in the Sound Pressure Level even for a sharp rise in the noise level, likewise a rapid reduction in noise will be shown as a slow decrease in Sound Pressure Level. The rise and fall times applied for Slow Weighting are 1 second. Fast Weighting The most commonly used time weighting which follows the noise level closer than slow weighting by displaying a fast rise and fall in the Sound Pressure Level. The rise and fall times applied for Fast Weighting are 125m Seconds. Impulse Weighting – (Model ‘L’ Only) Allows your meter to show rapid rises in the noise level but has a very slow decay. The rise and fall times for Impulse Weighting are 35m Seconds and 1.5 Seconds respectively. Page 8 Frequency Weighting Filters Frequency Weightings are where the Sound Pressure Level (SPL) is modified by use of filtering. All Sonus Pocket Meters use electronic frequency weighting filters between the standardised frequencies of 10Hz and 20,000Hz. Depending on your instrument type (see Technical Specifications for further details), the following standardised frequency weightings are available: ‘A’ Weighting The SPL is filtered in such a manner as to reflect the hearing response of a human ear. The signal is progressively attenuated at the higher and lower ends of the audible frequency range but much more attenuation occurs at the lower end of the audible frequency range. Generally this is the most common used frequency weighting. ‘C’ Weighting The signal is progressively attenuated at the higher and lower ends of the audible frequency range, however the attenuation at the lower end is much less than with A Weighing. The response has a flat area between 200Hz and 1250Hz and has -3dB points at 31.5Hz and 8kHz. It is generally used for the acoustic emissions of machinery and for peak sound levels. ‘Z’ Weighting (Zero) Often referred to as the FLAT or LIN response, this weighting has a virtually flat response over the entire audible frequency range having -3dB points at 10Hz and 22kHz. Frequency Weighting Curves 0 Z Weighting A Weighting C Weighting -10 -20 dB -30 -40 -50 -60 10 100 1000 Frequency Figure 1 - Frequency Weighting Curves Page 9 10000 100000 Overload and Under Range Conditions Overload Condition An overload condition occurs when the peak signal starts to exceed the signal handling capability of the pre-amplifier circuitry. If the noise source is greater than 0.5dB over the top of the range selected, an overload condition occurs and an overload indicator is displayed on your meter. The overload indicator will flash for a minimum of one second or while the overload condition remains. OVERLOAD In such circumstances it is highly recommended you change to a higher range with a lower sensitivity (i.e. less gain) as your meter will be out of specification. An overload indication can occur in both Stop or Record Mode on ‘L’ models and only in Record Mode for models ‘I’ and ‘B’. All models have an overload latch indicator which can be viewed by scrolling through the available parameters. Depending on whether an overload has occurred or not, the overload latch screen will display either off the following: O.L. NO O.L. YES On models ‘I’ and ‘B’ if an overload has been latched it can be removed in Stop Mode or Record Mode by resetting the parameters. On model ‘L’ instruments a latched overload can be removed in Stop Mode by resetting parameters and if in Record Mode it is automatically removed when the recording has been stopped. Under Range Condition An under range condition occurs when the noise source is more than 0.1dB below the bottom of the range selected, at which point an under range indicator will flash on the display of your meter. In such circumstances it is highly recommended to change to a higher range with a higher sensitivity (i.e. more gain) as your meter will be out of specification. **UR** The under range indicator will flash for a minimum of one second or while the under range condition remains. Where the noise source is more than 0.5dB below the bottom of the selected range, no value or under range warning is displayed. LAF --.Page 10 Measuring Ranges The Sonus instrument range has been specifically designed to utilise only three measuring ranges. The three available ranges ensure complete accuracy throughout the entire dynamic range whilst ensuring the instrument remains low power to maximise operational life from one PP3 battery. The measuring display ranges available are as follows: Models L (dB) Models I & B (dB) 30 – 100 50 – 120 70 – 140 35 – 100 55 – 120 75 – 140 Please note that the GA257L and GA257B Dose meter models operate on the fixed range 70–140 dB and 75–140 dB respectively. Changing Range – All models except GA257B and GA257L dB To change the measuring range, press the key on the keypad. The current measuring range will be shown and indicated with an asterisk *. 50-120* 55-120* Use the Up and Down Arrow Keys ranges. to scroll through the available OK Press the key to select the required range. The instrument briefly displays the following to confirm a change has been made and returns to the last parameter screen unless multiple screens have been accessed in which case the sound pressure level parameter screen will be displayed: DONE dB Press the key to return to the previous screen without selection. If multiple screens have been accessed the sound pressure level parameter screen will be displayed. C Press the key to return to sound pressure level parameter screen without making a selection. Returning to the previous screen is also possible Page 11 Lock Keypad – GA257B and GA257L Press to immediately place the instrument in Lock mode. The instrument will constantly display the battery status. To UNLOCK the keypad press C, OK then C respectively. It is also possible to LOCK the keypad on GA116L and GA216L models through the options available under the Main Menu. Use the same procedure as above to UNLOCK the keypad. The LOCK feature is used to lock the instrument keypad. All keypad functions are therefore disabled including the POWER key. This function is often used to avoid inadvertent operation or tampering while the instrument is being used. Page 12 Chapter 3 Getting Started All models of the Sonus range of instruments have two modes of operation referred to as: • Stop Mode • Record Mode Whilst the instrument is in Record Mode the noise activity is analysed and all parameters available on your instrument are calculated. On ‘L’ models only, all data captured can be saved to the internal flash memory and viewed or downloaded to Castle’s noise analysis software dBdataPro as and when required. Whilst the instrument is in Stop Mode, on ‘I’ and ‘B’ models noise activity is not monitored and parameter calculations are halted during this period. On ‘L’ models calculations are displayed but not stored in flash memory. Models I and B During Stop Mode and whilst viewing parameter display screens, the display will flash between the parameter and the following: STOP Models L During Stop Mode and whilst viewing parameter display screens, the displayed parameter name will not blink: LAF 49.4 Non Blinking Parameter Name Indicates Stop Mode On all models when the meter is first switched on, the instrument defaults into Stop Mode. To set the instrument into Record Mode press the key located on your instruments keypad, see Stop / Record Mode in Chapter 5 for more information. To place the instrument back into Stop Mode press the Page 13 key again. All Models Changing the settings of your instrument and performing a calibration are all found under the Main Menu. To activate the Main Menu press the menu Use the Up and Down Arrow Keys options. Key on your instruments keypad. to scroll through the available OK Press the key to select the required menu option or press the to cancel and return to the parameter display screen. C key Some options may also have further sub-menus where further options are available. Again use the Up and Down Arrow Keys to scroll through the available options. The Main Menu is described in detail in Chapter 4. Page 14 Keypad Layout – GA116, GA216 Models B, I and L OK Up Arrow Down Arrow Cancel Main Menu Measuring Range Information Stop / Record Power On / Off Figure 2 - Keypad Layout (Sound Meter) Page 15 Keypad Layout – GA257L & GA257B OK Up Arrow Down Arrow Cancel Main Menu Lock Keypad Information Stop / Record Power On / Off Figure 3 - Keypad Layout (Dose Meter) Page 16 Powering Your Sonus Meter Your Sonus meter can be powered from either one 9V PP3 battery and Model ‘L’ instruments can also be powered using an external 12V DC Power Supply which can be purchased separately if required (PSU4:SONUS). The battery compartment is located on the bottom left hand side of your instrument. Open the battery door by sliding the cover downwards towards the bottom of the instrument. The cover will now swing open exposing the battery compartment. Insert the battery observing the correct polarity as marked on the case wall inside the battery compartment. To achieve a greater battery life from your instrument, it is strongly recommended you use alkaline type batteries. To power the instrument via the Castle DC Power Supply (purchased separately), plug your Power Adapter Cable into the 9 pin Lemo connector located at the right side of the instrument. Ensure the red dots are aligned before insertion. Insert the DC power supply into the DC socket on the adapter cable. Ensure the DC power supply is plugged into a mains socket and switch on power to the socket. Your Sonus meter is equipped with a four stage battery level indicator; this is displayed during the power up sequence and can also be viewed using the information key. BAT: BAT: BAT: BAT: A series of four bars indicates that the battery is fully charged whilst only one bar indicates the battery is almost flat. It is strongly recommended that if the instrument is displaying only one bar that the battery is replaced as soon as possible. When the battery charge is too low for the instrument to operate the instrument will flash the following message: BAT. LOW All meters will shut down and Model ‘L’ instruments will automatically save any data if the instrument is in Record Mode. Page 17 Switching Your Sonus Meter On/Off To turn on your instrument press and hold the Power On/Off key approximately one second. for Your meter will display the start-up screen and initialise any saved settings. Once the start-up sequence is complete the instrument is placed in Stop Mode and the parameter sound pressure level is displayed. It is recommended that you calibrate your instrument before use, see the heading Calibration in Chapter 4 for detailed information on calibration of your specific model of instrument. To turn off Model ‘I’ or ‘B’ instruments press and release the Power On/Off at any time. key Models ‘I’ and ‘B’ will now power down. Model ‘L’ instruments display the following:INS OFF? OK Press the key to confirm or the previous screen. C key to cancel and return to the is Please be aware that on Model ‘L’ instruments the Power On/Off key disabled whilst the instrument is in Record Mode or if the instrument is Locked. On the GA116I and GA257B instruments the Power On/Off key disabled if the instrument is Locked. is To preserve instrument settings and saved data always turn your instrument off using the Power On/Off Key . On model ‘I’ and ‘B’ instruments please ensure that all required readings have been taken from the instrument before turning off the instrument as all data is lost when the instrument is powered off. Page 18 Chapter 4 Main Menu Structure The Main Menu is activated by pressing the MENU Key menu once. menu Pressing the Key again will return the instrument to the last parameter display screen unless multiple screens have been accessed in which case the sound pressure level parameter screen will be displayed. C Pressing the Key always returns to the sound pressure level parameter screen unless sub menus are open in which case refer to the specific function in the user manual to determine its action. Use the Up and Down Arrow Keys options. Press the OK to scroll through the available key to select the required menu option. Some options may also have further sub-menus where further options are Arrow Keys to scroll through the available available. Again use the options and use the OK key to accept. Depending on your instrument model, the following Menu options are available: - Page 19 Models GA116I, GA216I, GA116B, GA216B, GA257B Display Description Instrument CAL <OK Calibrate Instrument ALL ET <OK Set Exposure Time GA116I/GA216I/GA257B WTG <OK Set Frequency & Time Weightings GA116I/GA116B GA216I/GA216B EXCH <OK Set Exchange Rate GA116I/GA257B CRIT <OK Set Criterion Level GA116I/GA257B THR <OK Set Threshold Level GA116I/GA257B LOCK <OK Lock Instrument Keypad GA116I CONT <OK Adjust Display Contrast ALL Calibration [CAL <OK] It is recommended that the instrument’s calibration is checked and adjusted where necessary with a calibrator before readings being taken. The calibration should be re-checked after taking readings to confirm the validity of the results. The calibrators recommended for use are the Castle GA601/GA607, which supply typically 94dB/ 104dB (relative to 20μPa pressure) at a frequency of 1kHz. i Press to check the battery condition, scroll to the battery indicator arrow keys if required. Replace the battery if the screen using the indication is low. In the MENU display screen use the following is displayed: - arrow keys as required until the CAL <OK OK Press and the instrument will now display the previous calibration level e.g. >94.0. Page 20 The calibration will be performed at the selected level e.g. 94.0dB but may be changed in 0.1 or 1 dB steps using the following keys: Key i / Calibration Level Adjustment (dB) +0.1 -0.1 -1.0 +1.0 Ensure the calibrator is attached to the microphone by gently inserting the microphone into the cavity of the calibrator. A certain amount of resistance should be felt whilst inserting the microphone as the o-ring seal on the calibrator forms a seal around the microphone. Ensure that the calibrator is switched on and set to the chosen level and all correction factors for atmospheric pressure and microphone type have been accounted for. The pressure to free-field correction value to be applied when used with a Castle calibrator GA601, GA607, or a B&K4231 is as follows: Calibrator Castle GA607 Castle GA601 B&K4231 Correction (dB) -0.2 -0.2 -0.2 OK Press and the instrument will calibrate to the level of the calibrator. The display will show CAL WAIT while calibrating to the chosen level. When calibrated the display will show COMPLETE and will return to the Sound Pressure Level display. It is recommended that the unit is then placed into STOP mode and data is cleared. The instrument is now ready to take measurements. If the calibration is interrupted or the input level is not within +/- 3dB of the chosen reference level then the display will show CAL FAIL. An error message of NO INPUT is shown if the input level is lower than or greater than 3dB. Check to make sure the calibrator is switched on and emitting the correct level before proceeding again as indicated above. Page 21 Exposure Time [ET <OK] It is possible to select alternative exposures of an employee in hours and minutes. Exposure Time is used for calculating projected dose and projected Lep’d calculations. In the MENU display screen use the following is displayed: - arrow keys as required until the ET <OK OK Press and the instrument will now display the currently selected exposure time in hours. Use the / arrow keys to alter this figure between 00 and 24. OK Press again and the instrument will display the currently selected number of minutes. Use the / arrow keys to alter this figure between 00 and 59. OK Press to confirm the changes and return to the Sound Pressure Level display screen. Frequency / Time Weighting [WTG <OK] In the MENU display screen use the following is displayed: - arrow keys as required until the WTG <OK OK Press and the instrument will display the currently selected Frequency and Time Weighting, indicated with an asterisk *. A, F* Scroll through the available options using the arrow keys: Display Description A, S ‘A’ Frequency Weighting, Slow Time Weighting A, F ‘A’ Frequency Weighting, Fast Time Weighting C, F ‘C’ Frequency Weighting, Fast Time Weighting C, S ‘C’ Frequency Weighting, Slow Time Weighting OK Press to confirm or Level display screen. C to cancel and return to the Sound Pressure Page 22 Exchange Rate [EXCH <OK] In the MENU display screen use the following is displayed: - arrow keys as required until the EXCH <OK OK Press and the instrument will display the currently selected Exchange Rate, indicated with an asterisk *. 3dB * Scroll through the available options using the Display 3dB 4dB 5dB OK Press to confirm or Level display screen. C arrow keys: - to cancel and return to the Sound Pressure Criterion [CRIT <OK] In the MENU display screen use the following is displayed: - arrow keys as required until the CRIT <OK OK Press and the instrument will display the currently selected Criterion Level, indicated with an asterisk *. 85dB * Scroll through the available options using the Display 80dB 85dB 90dB OK Press to confirm or Level display screen. C arrow keys: - to cancel and return to the Sound Pressure Page 23 Threshold [THR <OK] It is possible to select a threshold level for the lower limit of noise levels which are used to measure dose. In the MENU display screen use the following is displayed: - arrow keys as required until the THR <OK OK Press and the instrument will display the currently selected Threshold Level, indicated with an asterisk *. -10dB * Scroll through the available options using the arrow keys: - Display -10dB -5dB OFF OK Press to confirm or Level display screen. C to cancel and return to the Sound Pressure Keypad Lock [LOCK <OK] In the MENU display screen use the following is displayed: - arrow keys as required until the LOCK <OK OK Press to confirm, the instrument is placed in Lock mode and the instrument displays the battery status. To UNLOCK the keypad press C, OK then C respectively. The LOCK feature is used to lock the instrument keypad. All keypad functions are therefore disabled including the POWER key. The function is often used to avoid inadvertent operation or tampering while the instrument is being used. Page 24 Display Contrast [CONT <OK] Select to adjust the contrast level of your instrument. In the MENU display screen use the following is displayed: - arrow keys as required until the CONT <OK OK Press and the instrument will display the following or return to the Sound Pressure Level display screen: - C to cancel and CONT ADJ Use the Press OK arrow keys to adjust the contrast as required. to confirm a change and the instrument will briefly display: - DONE Or press screen. C to cancel and return to the Sound Pressure Level display Page 25 Models GA116L, GA216L, GA257L Display Description Instrument CAL Calibrate Instrument ALL SETUP Change Instrument Settings ALL MODE Set Operating Mode GA116L/GA216L LOGS View Saved Log ALL DELETE Delete Saved Log ALL DEFAULTS Reset to Default Settings ALL LOCK Lock Instrument Keypad GA116I/GA216B Calibration [CAL] It is recommended that the instrument’s calibration is checked and adjusted where necessary with a calibrator before readings being taken. The calibration should be re-checked after taking readings to confirm the validity of the results. The calibrators recommended for use are the Castle GA601/GA607, which supply typically 94dB/ 104dB (relative to 20μPa pressure) at a frequency of 1kHz. i Press to check the battery condition, scroll to the battery indicator arrow keys if required. Replace the battery if the screen using the indication is low. In the menu display screen use the following is displayed: - arrow keys as required until the CAL OK Press e.g. 94.0. and the instrument will now display the previous calibration level The calibration will be performed at the selected level e.g. 94.0dB but may be changed in 0.1 or 1 dB steps using the following keys: Page 26 Calibration Level Adjustment (dB) +0.1 -0.1 -1.0 +1.0 Key i / Ensure the calibrator is attached to the microphone by gently inserting the microphone into the cavity of the calibrator. A certain amount of resistance should be felt whilst inserting the microphone as the o-ring seal on the calibrator forms a seal around the microphone. Ensure that the calibrator is switched on and set to the chosen level and all correction factors for atmospheric pressure and microphone type have been accounted for. The pressure to free-field correction value to be applied when used with a Castle calibrator GA601, GA607, or a B&K4231 is as follows: Calibrator Castle GA607 Castle GA601 B&K4231 Correction (dB) -0.2 -0.2 -0.2 OK Press and the instrument will calibrate to the level of the calibrator. The instrument will countdown from five seconds and the display will show: WAIT 5s When calibrated the display will show DONE and will return to the Sound Pressure Level display. The instrument is now ready to take measurements. If the calibration is interrupted or the input level is not within +/- 3dB of the chosen reference level then the display will show CAL FAIL. An error message of NO INPUT is shown if the input level is lower than or greater than 3dB. Check to make sure the calibrator is switched on and emitting the correct level before proceeding again as indicated above. Page 27 Instrument Settings [SETUP] In the menu display screen use the following is displayed: - arrow keys as required until the SETUP Press OK to enter the SETUP sub menu page. Depending on your instrument model, the following SETUP options are available: Instruments GA116L, GA216L, GA257L Display Description Instrument FREQ WGT Set Frequency Weighting ALL (Mode Dependant*) TIME WGT Set Time Weighting ALL (Mode Dependant*) INTERVAL Set Interval Period ALL CONTRAST Set Display Contrast ALL USER Ln Set Percentile Level ALL (Mode Dependant*) CRIT Set Criterion Level ALL (Mode Dependant*) THR Set Threshold Level ALL (Mode Dependant*) EXCH Set Exchange Rate ALL (Mode Dependant*) TIMER Set Timer Function ALL DATE Set Real Time Date ALL TIME Set Real Time Clock ALL *See User Mode for further details. Page 28 Frequency Weighting [FREQ WGT] The frequency weighting of the instrument can only be changed if the instrument has the User Mode set to ALL. See User Mode for further details. Channel 1 is always ON and fixed to ‘A’ Weighting. Channel 2 can either be ‘C’ or ‘Z’ weighted and can be switched OFF either by User Mode selection or selecting only ‘A’ weighting. In the SETUP display screen use the following is displayed: - arrow keys as required until the FREQ WGT OK Press and the instrument will display the currently selected Frequency Weighting, indicated with an asterisk *. A, F* Scroll through the available options using the Display A A, C A, Z Press OK arrow keys: - Description Channel 1 = ‘A’ Frequency Weighting Channel 1 = ‘A’ Frequency Weighting Channel 2 = ‘C’ Frequency Weighting Channel 1 = ‘A’ Frequency Weighting Channel 2 = ‘Z’ (LIN) Frequency Weighting to confirm a change and the instrument will briefly display: - DONE Or press screen. C to cancel and return to the Sound Pressure Level display If the frequency weighting is selected for Channel ‘A’ only then Channel 2 is OFF. No parameters will be available, displayed or recorded for Channel 2. Page 29 Time Weighting [TIME WGT] The time weighting of the instrument can only be changed if the instrument has the User Mode set to ALL. See User Mode for further details. The selected time weighting applies to both channels (if Channel 2 is ON). In the SETUP display screen use the following is displayed: - arrow keys as required until the TIME WGT OK Press and the instrument will display the currently selected Time Weighting, indicated with an asterisk *. FAST Scroll through the available options using the Display FAST SLOW IMPULSE Press OK arrow keys: - Description Select FAST Time Weighting Select SLOW Time Weighting Select IMPULSE Time Weighting to confirm a change and the instrument will briefly display: - DONE Or press screen. C to cancel and return to the Sound Pressure Level display For more information on Time Weighting see Time Weighting in Chapter 2. Page 30 Recording Interval Period [INTERVAL] If an interval period is selected then the instrument will record data at each interval period selected from the log start time. Example:If a log interval of 1 second is selected and the start time of the log is 10:00:00 then the instrument will log data at 1 second interval periods from the start time: 10:00:01 10:00:02 10:00:03 etc until the recording is stopped. Approximately 2100 interval periods can be recorded on your instrument before the internal flash memory is full. Always ensure the interval period is set accordingly such that the total recording period is suitable. Example:To record over a period of 10 hours:Convert period length to minutes (10h * 60m) = 600m Convert period length to seconds (600m * 60s) = 36000s Min Interval Period (36000 / 2100) = 17.14s The nearest available selection above an interval period of 17.14 seconds would therefore be chosen i.e. 1 minute (5 minutes on GA257L). The above calculation is based on an instrument with no logs stored in the internal flash memory, if logs are already stored on the instrument then these would need to be taken into account before using the calculation. See Chapter 5 for more information. In the SETUP display screen use the following is displayed: - arrow keys as required until the INTERVAL OK Press and the instrument will display the currently selected Interval Period, indicated with an asterisk *. 1s Page 31 Scroll through the available Interval Periods using the Display OFF 1s 10s 1m 5m 10m 15m 30m 60m 8hr 12hr arrow keys: - Description Intervals OFF – Cumulative Data Only 1 second interval period * 10 second interval period * 1 minute interval period * 5 minute interval period 10 minute interval period 15 minute interval period 30 minute interval period 1 hour interval period 8 hour interval period 12 hour interval period * Not available on instrument GA257L If an interval period is not required select OFF. Only cumulative data will then be displayed / recorded. Press OK to confirm a change and the instrument will briefly display: - DONE Or press screen. C to cancel and return to the Sound Pressure Level display Page 32 Display Contrast [CONTRAST] Select to adjust the contrast level of your instrument. The selected contrast level is remembered on model ‘L’ instruments. In the SETUP display screen use the following is displayed: - arrow keys as required until the CONTRAST OK Press and the instrument will display the following or return to the Sound Pressure Level display screen: - C to cancel and CONT ADJ Use the Press OK arrow keys to adjust the contrast as required. to confirm a change and the instrument will briefly display: - DONE Or press screen. C to cancel and return to the Sound Pressure Level display Page 33 Percentiles [USER Ln] Model ‘L’ instruments have one user selectable percentile level and two fixed percentile levels. Percentile is commonly abbreviated to Ln where n denotes the actual dB (A Weighted) level exceeded n% of the time, example L99. Percentiles are only available if the User Mode is set to ALL or ENV. See User Mode for further information. Fixed percentile levels are: • L10 • L90 In the SETUP display screen use the following is displayed: - arrow keys as required until the USER Ln OK Press and the instrument will display the currently selected User Ln indicated with an asterisk *. 95* Scroll through the available User Selectable Percentiles using the keys: Display 1 5 50 95 99 Press OK arrow Description L1 – dB(A) Level exceeded 1% of the time L5 – dB(A) Level exceeded 5% of the time L50 – dB(A) Level exceeded 50% of the time L95 – dB(A) Level exceeded 95% of the time L99 – dB(A) Level exceeded 99% of the time to confirm a change and the instrument will briefly display: - DONE Or press screen. C to cancel and return to the Sound Pressure Level display Page 34 Criterion Level [CRIT] In the SETUP display screen use the following is displayed: - arrow keys as required until the CRIT OK Press and the instrument will display the currently selected Criterion Level, indicated with an asterisk *. 85dB* Scroll through the available options using the Display 75dB 80dB 85dB 90dB OK Press to confirm or Level display screen. C arrow keys: - to cancel and return to the Sound Pressure Threshold [THR] In the SETUP display screen use the following is displayed: - arrow keys as required until the THR OK Press and the instrument will display the currently selected Threshold Level, indicated with an asterisk *. -10dB * Scroll through the available options using the Display -10dB -5dB OFF OK Press to confirm or Level display screen. C arrow keys: - to cancel and return to the Sound Pressure Page 35 Exchange Rate [EXCH] In the SETUP display screen use the following is displayed: - arrow keys as required until the EXCH OK Press and the instrument will display the currently selected Exchange Rate, indicated with an asterisk *. 3dB* Scroll through the available options using the arrow keys: - Display 3dB 4dB 5dB OK Press to confirm or Level display screen. C to cancel and return to the Sound Pressure Page 36 Record Timer [TIMER] The Record Timer is a user selectable time that will govern the recording length after a recording has started. For example if the Record Timer is set to 00:01:00 (hh:mm:ss) then the instrument will automatically end the recording after a period of 1 minute. arrow keys as required until the In the SETUP display screen use the following is displayed: TIMER Press OK and the instrument will display: - TMR=OFF Scroll through the available options using the Display TMR=OFF TMR=ON Press OK arrow keys: - Description Record Timer OFF Record Timer ON to confirm your selection or C to cancel. If TMR=ON is selected then the following time entry screen is displayed using the following 24 hour format (hh:mm:ss): 00:00:00 The adjustable figure flashes, this always starts with the HOUR figure. arrow keys as required until the desired hour figure is displayed. Use the OK Press to confirm your selection and proceed to MINUTES and then SECONDS using the same procedure. Press C to cancel changes and return to the SETUP screen. Page 37 Current Date [DATE] In the SETUP display screen use the following is displayed: - arrow keys as required until the DATE OK Press and the instrument will display the following date entry screen using the following format (dd:mm:yy): 01:07:09 The adjustable figure flashes, this always starts with the DAY figure. arrow keys as required until the desired DAY figure is displayed. Use the OK Press to confirm your selection and proceed to MONTH and then YEAR using the same procedure. Press C to cancel changes and return to the SETUP screen. If an invalid date is entered the following will be briefly displayed: ERROR The date entry screen will then be displayed again and a correct date must be entered. Real Time Clock [TIME] In the SETUP display screen use the following is displayed: - arrow keys as required until the TIME OK Press and the instrument will display the following time entry screen using the following 24 hour format (hh:mm:ss): 09:05:09 The adjustable figure flashes, this always starts with the HOUR figure. Use the displayed. arrow keys as required until the desired HOUR figure is OK Press to confirm your selection and proceed to MINUTES and then SECONDS using the same procedure. Press C to cancel changes and return to the SETUP screen. Page 38 User Mode [MODE] The option to set a User Mode is only available on GA116L and GA216L instruments. Selecting a User Mode is a quick and straightforward way to correctly set your instrument up for taking measurements. Parameters are only displayed and recorded where required. In the MENU display screen use the following is displayed: - arrow keys as required until the MODE OK Press and the instrument will display the currently selected User Mode, indicated with an asterisk *. ALL* Scroll through the available options using the Display ALL N@W ENV Press OK arrow keys: - Description Select MODE = ALL Select MODE = Noise At Work Select MODE = Environmental to confirm a change and the instrument will briefly display: - DONE Or press screen. C to cancel and return to the Sound Pressure Level display Selecting a User Mode sets the instrument as follows:Mode ALL N@W ENV Description Freq Weighting=A, C Time Weighting=FAST Percentiles=ON Freq Weighting=A, C Time Weighting=FAST Percentiles=OFF Freq Weighting=A Time Weighting=FAST Percentiles=ON See Parameters – Chapter 6 for further information on viewable and recorded parameters based on the selected User Mode. Page 39 View Saved Logs [LOGS] Select this option to view saved logs on your instruments display. Only cumulative information is available to view on the instrument, if you wish to view this or recorded interval data then download via a USB port into the supplied software dBdataPro-LITE. Logs are sorted by date and time, first select the date the recording was made and then select the time using the following procedure: In the MENU display screen use the arrow keys as required until the following is displayed (If no logs are available this option is not shown): LOGS Press order. OK and the instrument will display the currently saved logs in date 30.06.09 Scroll through the available dates using the C arrow keys. OK Press to exit without selection or to confirm the selection, the instrument will then display the currently saved logs by time recorded: 10.35.10 Scroll through the available times using the arrow keys. C OK Press to exit without selection and return to the date list or to confirm the selection, the instrument will then view the saved cumulative information for the log selected. LAq 56.3 Every 5 seconds the screen will flash the following display to remind the user that they are currently viewing a saved log: LOG VIEW Scroll through the available data using the Press C arrow keys. to exit and return to the parameter display screen when required. Page 40 Delete Saved Logs [DELETE] This option is only available if the instrument has saved logs. Take extreme caution when deleting logs as they cannot be recovered. In the MENU display screen use the following is displayed: - arrow keys as required until the DELETE Press OK and the instrument will display the following: - ONE LOG Scroll through the available options using the Mode ONE LOG ALL LOGS OK Press screen. to confirm or arrow keys: - Description Delete Individual Saved Logs Delete ALL Saved Logs C to cancel and return to the parameter display If ONE LOG is selected then the available logs are sorted by date and time, first select the date the recording was made and then select the time using the following procedure: Scroll through the available dates using the C arrow keys: - OK Press to exit without selection or to confirm the selection, the instrument will then display the currently saved logs by time recorded: Scroll through the available times using the arrow keys. C Press to exit without selection and return to the date list or confirm the selection. OK to For either ONE LOG or ALL LOGS the following is displayed: CONFIRM? OK Press screen. to confirm or C to cancel and return to the parameter display When deleted, the instrument will return to the parameter display screen. Page 41 Set Instrument Defaults [DEFAULTS] In the MENU display screen use the following is displayed: - arrow keys as required until the DEFAULTS Press OK and the instrument displays the followings: - CONFIRM? OK Press screen. to confirm or C to cancel and return to the parameter display Default settings are as follows (where applicable): Description Operating Range User Mode Frequency Weighting Time Weighting Calibration Level Recording Interval Period User Percentile Criterion Threshold Exchange Record Timer Default Setting 50-120 ALL CH1 = A, CH2 = C Fast 94.0 OFF 95 85 -10 3 OFF Page 42 Keypad Lock [LOCK] In the MENU display screen use the following is displayed: - arrow keys as required until the LOCK Press OK and the following is displayed: - LOCK? OK Press to confirm, the instrument is placed in Lock mode and the instrument displays the battery status. Alternatively press or screen. C to cancel and return to the parameter display To UNLOCK the keypad press C, OK then C respectively. The LOCK feature is used to lock the instrument keypad. All keypad functions are therefore disabled including the POWER key. The function is often used to avoid inadvertent operation or tampering while the instrument is being used. Page 43 Chapter 5 Stop / Record Mode All models of the Sonus range of instruments have two modes of operation referred to as: • Stop Mode • Record Mode Whilst the instrument is in Record mode the noise activity is analysed and all parameters available on your instrument are calculated. On ‘L’ models only, all data captured can be saved to the internal flash memory and viewed or downloaded to Castle’s noise analysis software dBdataPro as and when required. All instruments start in Stop mode. Whilst the instrument is in Stop mode, on ‘I’ and ‘B’ models noise activity is not monitored and parameter calculations are halted during this period. On ‘L’ models calculations are displayed but not stored in flash memory. Model ‘I’ & ‘B’ Instruments Whilst in Stop mode the meter will flash between the current parameter and the following: STOP To enter Record mode press the STOP / RECORD Key instruments keypad and the following is briefly displayed: - on your REC MODE During Record mode the noise activity is analysed and all parameters available on your instrument are calculated. All functions can be held so that they do not update by pressing the key again. The meter is now again in STOP mode. In STOP mode the display may be read as normal, allowing the user to take note of any required readings. Toggle operation using the key as required. Always RESET data before Record mode is entered. See Reset Data for more information. Page 44 Model ‘L’ Instruments On ‘L’ model instruments whilst in Stop mode only the parameter name and value are displayed. To enter Record mode press the STOP / RECORD Key instruments keypad and the following is briefly displayed: - on your REC MODE Data is automatically reset when a recording begins. During Record mode the noise activity is analysed and all parameters available on your instrument are calculated using the settings made under SETUP. To identify you are currently in Record mode the parameter name flashes. To stop the recording and enter Stop mode, press the following screen is then displayed: - key again. The SAVE YES Scroll through the available options using the Display SAVE YES SAVE NO OK arrow keys: - Description Save the current log Do NOT save the current log Press to confirm or Level display screen. C to cancel and return to the Sound Pressure If the instrument has been set to User Mode = ENV then the log is automatically saved otherwise an Exposure Time can be entered on the following screen which uses the following 24 hour format (hh:mm:ss): 00:00:00 The adjustable figure flashes, this always starts with the HOUR figure. Use the displayed. arrow keys as required until the desired HOUR figure is OK Press to confirm your selection and proceed to MINUTES and then SECONDS using the same procedure. Press C to cancel changes and return to the parameter display screen. Exposure Time is used in DOSE and LEpd calculations. Page 45 All Models On all instruments in either Stop or Record mode it is possible to quickly view information and settings of your instrument. i Press the key once to access the information screen. Use the arrow keys to scroll through the available list. or i Pressing the key again returns to the previous screen. If multiple screens have been accessed then the sound pressure level parameter screen will be displayed. Press the C key to always return to the Sound Pressure parameter display. The information listings are shown below: - Model ‘I’ & ‘B’ Instruments – Information Screen Display Description Instrument BAT: Battery capacity remaining ALL A, F Indicates the current frequency and time weighting ALL ET 08:00 Shows the exposure time period GA116I/GA216I /GA257B 85/3 Indicates the current criterion and exchange level GA116I/GA257B TH -10dB Shows the threshold setting (relative to the criterion level) GA116I/GA257B Ver 1.00 Indicates the firmware version number ALL REC MODE or STOP Indicates that the instrument is in either Record or Stop Mode ALL Page 46 Model ‘L’ Instruments – Information Screen Display Description Instrument BAT Battery capacity remaining ALL MODE:ALL Indicates the current User Mode GA116L/GA216L CH1: A,F Show the Frequency and Time Weightings for Channel 1 ALL CH2: C,F Show the Frequency and Time Weightings for Channel 2 (Can be OFF and User Mode dependent) ALL CRIT: 85 Shows the Criterion Level (User Mode dependent) ALL EXCH: 3 Shows the Exchange Rate (User Mode dependent) ALL THR: -10 Shows the threshold setting (relative to the criterion level) (User Mode dependent) ALL L95 Show the User Selectable Percentile Level (User Mode dependent) ALL INT:OFF Show the Selected Recording Interval Period ALL TMR: OFF Show if Record Timer is ON or OFF ALL MEM: 85% Show available memory (%) ALL 09:15:07 Show Current Time ALL 01.07.09 Show Current Date ALL SN 67000 Show Instrument Serial Number ALL VER 0.19 Show Instrument Firmware Number ALL GA116L Show Instrument Model ALL CAL07.10 Show Factory Calibration Due Date ALL Page 47 Reset Data On all instruments it is possible to manually reset all current parameter data and status flags. When the instrument is first switched on all data is automatically reset. Models ‘I’ & ‘B’ Whilst in Stop or Record mode, press the C key to display the following: - CONFIRM? OK Press to confirm and reset data or parameter display screen. C to cancel and return to the WARNING: Reset data values cannot be retrieved. Model ‘L’ Data is automatically reset whenever Record mode is entered. Whilst in Stop mode, press the C key to display the following: - CONFIRM? OK Press to confirm and reset data or parameter display screen. C to cancel and return to the WARNING: Reset data values cannot be retrieved. Page 48 Chapter 6 Parameters On all instruments whilst in Stop or Record mode it is possible to change the parameter display screen. Scroll through the available parameter screens using the arrow keys: - Models ‘I’ & ‘B’ GA116I GA216I Sound Pressure Sound Pressure Leq Leq Max rms Level Max rms Level Peak Level Peak Level Elapsed Time Elapsed Time LEp’d LEp’d Projected LEp’d Projected LEp’d Sound Exposure Sound Exposure Dose Overload Yes / No Projected Dose Dose per Hour Pascal Squared Hours Overload Yes / No GA116B GA216B GA257B Sound Pressure Sound Pressure Sound Pressure Max rms Level Max rms Level Leq Peak Level Peak Level Peak Level Elapsed Time Elapsed Time Elapsed Time Overload Yes / No Overload Yes / No LEp’d Projected LEp’d Dose Projected Dose Dose per Hour Pascal Squared Hours Overload Yes / No Page 49 The table below is a breakdown of all the possible display parameters with a brief description. Please see the previous tables to determine which parameters your instrument displays. Display Description LAF 93.7 Frequency and Time Weighted Sound Pressure Level. LAF = A Weighted, Fast LCF = C Weighted, Fast LAS = A Weighted, Slow LCS = C Weighted, Slow LAq 93.7 Displays the Frequency Weighted Leq LAq = A Weighted Leq LCq = C Weighted Leq Amx 97.3 Maximum rms Sound Pressure Level – Freq Weighted Amx = A Weighted Max Level Cmx = C Weighted Max Level Cpk 100.3 Maximum Peak Level Reached – Freq Weighted (Fixed) Cpk = C Weighted Peak Level (All except GA257B) Zpk = Flat or Linear Weighted Peak Level (GA257B Only) 00:01:33 Lep 87.1 Run time duration of REC MODE (Elapsed Time) hh:mm:ss Displays the Lep’d Ple 78.6 Displays the projected Lep’d assuming an exposure length set in the Exposure Time LAE 93.1 Sound Exposure Level - Freq Weighted LAE = A Weighted Sound Exposure Level LCE = C Weighted Sound Exposure Level Do% 27.2 Dose (dependent on exchange and criterion) Pr% 212 Displays the projected DOSE assuming an 8 hour shift Hr% 53.2 Dose per Hour P2h 0.02 Indicates the energy that has been received in Pascal Squared Hours O.L. NO O.L. YES Overload latch that indicates if an OVERLOAD has occurred (Can only be reset by pressing the ‘C’ key) —–.— Indicates when values are 0 or significantly lower than the bottom of the current range selected e.g. when instrument is first powered on or after being reset whilst in STOP mode. Page 50 Model ‘L’ Parameter Instrument Sound Pressure - Channel 1 ALL Sound Pressure - Channel 2 ALL (Can be OFF and User mode dependent) Leq - Channel 1 ALL Leq - Channel 2 ALL (Can be OFF and User mode dependent) Max rms Level - Channel 1 GA116L / GA216L (User mode dependent) Max rms Level - Channel 2 GA116L / GA216L (Can be OFF and User mode dependent) Peak Level - Channel 2 ALL (Can be OFF and User mode dependent) LEp’d ALL (User mode dependent) Dose ALL (User mode dependent) Dose per Hour ALL (User mode dependent) Pascal Squared Hours ALL (User mode dependent) Sound Exposure GA116L / GA216L (User mode dependent) L10 GA116L / GA216L (User mode dependent) L90 GA116L / GA216L (User mode dependent) User Percentile GA116L / GA216L (User mode dependent) Overload Yes / No ALL Measurement Time ALL Interval Period ALL (Record mode Only) The following table below is a breakdown of all the possible display parameters with a brief description. Please see the previous tables to determine which parameters your instrument displays. Page 51 Display Description LAF 93.7 Frequency and Time Weighted Sound Pressure Level. LAF = A Weighted, Fast LAS = A Weighted, Slow LAI = A Weighted, Impulse LCF = C Weighted, Fast LCS = C Weighted, Slow LCI = C Weighted, Impulse LZF = Z Weighted, Fast LZS = Z Weighted, Slow LZI = Z Weighted, Impulse LAq 93.7 Displays the Frequency Weighted Leq LAq = A Weighted Leq LCq = C Weighted Leq LZq = Z Weighted Leq Amx 97.3 Maximum rms Sound Pressure Level – Freq Weighted Amx = A Weighted Max Level Cmx = C Weighted Max Level Cmx = C Weighted Max Level Cpk 100.3 Maximum Peak Level Reached – Freq Weighted Cpk = C Weighted Peak Level Zpk = Flat or Linear Weighted Peak Level Lep 87.1 Displays the Lep’d Do% 27.2 Dose (dependent on exchange and criterion) Hr% 53.2 Dose per Hour P2h 0.02 Indicates the energy that has been received in Pascal Squared Hours LAE 93.1 Sound Exposure Level - Freq Weighted LAE = A Weighted Sound Exposure Level L10 45.4 dB(A) level exceeded for n% of the time n = 10, 90 and user selectable (L10, L90, Lxx) O.L. NO O.L. YES Overload latch that indicates if an OVERLOAD has occurred (Can be reset by pressing the ‘C’ key in Stop mode) 00:01:33 Duration of Record mode (Measurement Time - MT) hh:mm:ss Duration of the selected Recording Interval Period remaining – Only available in Record mode PER 10s —–.— Indicates when values are 0 or significantly lower than the bottom of the current range selected e.g. when instrument is first powered on or after being reset whilst in STOP mode. Page 52 Chapter 7 Downloading Saved Recordings – Model ‘L’ Only As standard all model ‘L’ instruments are shipped with Castle’s dBdataPro – LITE noise analysis software. The full version of the software is available by purchasing a simple license key, consult your software user manual or contact Castle for further details. Using the software dBdataPro it is possible to download the stored recordings on your meter to your PC allowing the data to be viewed and printed in professional reports. Communication between a PC and your Sonus meter is made via the 9 pin connector at the right side of your instrument to a free USB port on your PC or laptop. The cable is supplied as standard with all Sonus instruments. Your Sonus Instrument has specialised USB drivers that MUST be installed correctly for the instrument to successfully download. For comprehensive instructions please refer to the dBdataPro user manual. The instrument does not need to be placed in any special mode or any menu option selected to download, simply follow the operational instructions for the software and also ensure the following: • • • • Supplied USB drivers are installed correctly Instrument is ON Communication cable attached to instrument and PC Software version 3.0 or higher is installed It is highly recommended that data is not downloaded whilst the instrument is currently in Record mode and recording data. Under such circumstances it is possible that transferred data may become corrupt. Page 53 Chapter 8 Miscellaneous Available Accessories GA607 GA601 PC007 ZL1107-02 KA020 MW402 PSU4:SONUS ZL1094-01 ZL1064-01 KG205 MK79 MK80 MK579DP1B KG204 KG205 KA010 6LR61 Dual Level Calibrator (Class 1) Single Level Calibrator (Class 2) dBdataPro Noise Analysis Software USB Download Cable (1.8m)* Weatherproof System* Weatherproof Microphone Housing* Power Supply* Microphone Extension Cable (1m) AC Output Cable (1m)* Windshield 60mm ACO 7052 25mV/Pa Microphone Capsule (Class 2) ACO 7146A 25mV/Pa Microphone Capsule (Class 1) Dose Meter Plug-in Microphone Capsule and Assembly Dose Meter Windshield Windshield 60mm Small Attaché Case (Holds Instrument and Calibrator) 9V Battery (Pack of 10) * Only available for model ‘L’ instruments Page 54 Warranty and After Sales Service Castle Group Ltd design and manufacture precision instruments, which if treated with reasonable care and attention should provide many years of trouble free service. In the event of a fault occurring, during the warranty period, the instrument should be returned to Castle Group Ltd, in its original packaging, or to an authorized agent. Please enclose a clear description of the fault or symptom. Details of the warranty cover are available from Castle Group Ltd or an authorized agent. All instruments are designed to meet rigid British and International Standards. An annual calibration is recommended to ensure that these high standards are maintained. This is particularly important for cases in which instrument readings are to be used in litigation or compliance work. For warranty and service return to: The Service Department Castle Group Ltd Salter Road Cayton Low Road Industrial Estate Scarborough North Yorkshire YO11 3UZ United Kingdom Telephone: Fax: Email: Web: +44 (0)1723 584250 +44 (0)1723 583728 [email protected] www.castlegroup.co.uk Any misuse or unauthorized repairs will invalidate the warranty. Damage caused by faulty or leaking batteries is not covered by the warranty. Page 55 Trouble Shooting Question My instrument will not turn on? Answer Check that there is a battery fitted to the instrument. Check that the battery is not flat. What is the white plastic cap This is a protective cover for the sensitive fitted to the top of the microphone. You must remove it before microphone? using the instrument. Where have my results gone? Models I or B do not have a backup memory so all readings are lost when the instrument is switched off. Always take a note of important readings before switching off the instrument My instrument is on but will not Have you locked the keypad ? respond to keypad presses? Is the instruments microphone properly inserted in the calibrator? Is the calibrator switched on and working? I keep getting CAL FAIL when trying to calibrate my instrument Has the instrument and/or calibrator – what am I doing wrong? been knocked or moved as the calibration routine is taking place? Has the microphone been damaged? The o-ring is essential to seal around the microphone stabilizing the pressure in the What is the black o-ring inside my calibrator’s cavity. If the o-ring is missing calibrator’s cavity for? and/or damaged the instrument will not calibrate properly (see above). This means that the noise you are When taking readings the display measuring is below the bottom of the is constantly flashing *UR* range you have the instrument selected to. – what does this mean? Try selecting a lower range My readings are within range but The overload is triggered by the Peak I keep getting OVERLOAD flashing reading whereas LP and LEQ are rms figures which are lower. Some noises on the screen – why is this? feature very high peaks compared to the rms. Page 56 Question Answer Is the microphone capsule loose on the My instrument has stopped instrument? When removing the responding to noise since I microphone from the calibrator it is calibrated it? possible to accidentally unscrew the microphone. Why is my projected Lep’d not The Exposure Time may be set to a time the same as the LEQ? other than 8 hours After taking my readings the Did you clear figures are a lot higher than calibration? expected? the memory after Instrument Disposal The symbol shown opposite can be found on your instrument and means that the product is classed as electrical or electronic equipment and should be disposed of at the end of its life separately to your commercial or household waste. The Waste of Electrical and Electronic Equipment Directive (2002/96/EC) has been established to help reduce the influx on landfill sites and effectively treat hazardous substances by using best practices for the recovery and recycling of products. There are various collection systems in place within the EU for the disposal of your product. To find the nearest UK waste recycling point in your area, enter your postcode in the website www.recycle-more.co.uk For more information please contact your local authority, the dealer where you purchased your product or Castle Group Ltd. Page 57 Chapter 9 Technical Specification The individual characteristic applies to each instrument unless specifically worded otherwise. Instrument Standards: GA116I, GA116L IEC 61672-1 : 2002 Class 1 Group X BS EN 61672-1 : 2003 Class 1 Group X IEC 61252 : 1993 BS EN 61252 : 1997 + A1:2001 GA116B IEC 61672-1 : 2002 Class 1 Group X BS EN 61672-1 : 2003 Class 1 Group X GA216I, GA216B, GA216L IEC 61672-1 : 2002 Class 2 Group X BS EN 61672-1 : 2003 Class 2 Group X GA216L-P IEC 61672-1 : 2002 Class 2 Group X BS EN 61672-1 : 2003 Class 2 Group X IEC 61252 : 1993 BS EN 61252 : 1997 + A1:2001 GA257B, GA257L IEC 61252 : 1993 BS EN 61252 : 1997 + A1:2001 Time Weighting: GA116I SLOW and FAST according to IEC 61672-1 Class 1 GA116L SLOW, FAST and IMPULSE according to IEC 61672-1 Class 1 Page 58 GA216I, GA216B SLOW and FAST according to IEC 61672-1 Class 2 GA216L, GA257L SLOW, FAST and IMPULSE according to IEC 61672-1 Class 2 GA257B FAST according to IEC 61672-1 Class 2 Frequency Weighting: GA116I A and C weightings according to IEC 61672-1 Class 1 GA116L A, C and Z weightings according to IEC 61672-1 Class 1 GA216I, GA216B A and C weightings according to IEC 61672-1 Class 2 GA216L, GA216L-P, GA257L A, C and Z weightings according to IEC 61672-1 Class 2 GA257 A weighting according to IEC 61672-1 Class 2 Peak Frequency Weighting: GA116I C weighted to IEC 61672-1 Class 1 GA116L C weighted to IEC 61672-1 Class 1, Z weighted to IEC 61672-1 Class 1 GA216I, GA216B C weighted to IEC 61672-1 Class 2 GA216L, GA21L-P, GA257L C weighted to IEC 61672-1 Class 2, Z weighted to IEC 61672-1 Class 2 GA257 Z weighted to IEC 61672-1 Class 2 Page 59 Measurement Parameters: GA116I Lp, Leq, Lmax, Cpeak, LE, Pa2h, Lep’d, Projected Lep’d, DOSE%, Projected DOSE%, Dose Per Hour, Elapsed time, Overload GA116L Lp, Leq, Lmax, peak, LE, Pa2h, Lep’d, DOSE%, Dose Per Hour, L10, L90, L(user), Measurement Time, Overload, Interval Duration GA216I Lp, Leq, Lmax, Cpeak, LE, Lep’d, Projected Lep’d, Elapsed time, Overload GA216L, GA216L-P Lp, Leq, peak, LE, Pa2h, Lep’d, DOSE%, Dose Per Hour, L10, L90, L(user), Measurement Time, Overload, Interval Duration GA116B, GA216B Lp, Lmax, Cpeak, Elapsed time, Overload GA257B Lp, Leq, Zpeak, Pa2h, Lep’d, Projected Lep’d, DOSE%, Projected DOSE%, Dose Per Hour, Elapsed time, Overload GA257L Lp, Leq, peak, LE, Pa2h, Lep’d, DOSE%, Dose Per Hour, Measurement Time, Overload, Interval Duration Display: Digital 1 x 8 alphanumeric, digit size 7mm x 5mm Liquid Crystal Display Display Refresh Rate: 250ms Detector Characteristics: RMS and Peak Warm up time: < 2 minutes Environmental Stabilization Time: 30 minutes Page 60 Linear Operating Range: (IEC 61672:2002) Model ‘I’ & ‘B’ Instruments Test start point for frequencies 31.5Hz, 1kHz, 4kHz and 8kHz: Display Range Start Point (dB) 35 – 100 dB 74.0 55 – 120 dB 94.0 75 – 140 dB 114.0 A Weighted Display Range 31.5 Frequency (Hz) 1000 4000 8000 (dB) (dB) (dB) (dB) 35 – 100 dB 41.0 – 60.6 41.0 – 100.0 41.0 – 100.0 41.0 – 100.0 55 – 120 dB 55.0 – 80.6 55.0 – 120.0 55.0 – 120.0 55.0 – 119.0 75 – 140 dB 75.0 – 100.6 75.0 – 140.0 75.0 – 140.0 75.0 – 140.0 C Weighted Display Range 31.5 Frequency (Hz) 1000 4000 8000 (dB) (dB) (dB) (dB) 35 – 100 dB 41.0 – 60.6 41.0 – 100.0 41.0 – 100.0 41.0 – 100.0 55 – 120 dB 55.0 – 80.6 55.0 – 120.0 55.0 – 120.0 55.0 – 119.0 75 – 140 dB 75.0 – 100.6 75.0 – 140.0 75.0 – 140.0 75.0 – 140.0 For the GA257B instrument refer only to the display range 75-40dB. Page 61 Model ‘L’ Instruments Test start point for frequencies 31.5Hz, 1kHz, 4kHz and 8kHz: Display Range Start Point (dB) 30 – 100 dB 74.0 50 – 120 dB 94.0 70 – 140 dB 114.0 A Weighted Display Range 31.5 Frequency (Hz) 1000 4000 8000 (dB) (dB) (dB) (dB) 30 – 100 dB 32.0 – 60.6 32.0 – 100.0 32.0 – 100.0 32.0 – 100.0 50 – 120 dB 50.0 – 80.6 50.0 – 120.0 50.0 – 120.0 50.0 – 119.0 70 – 140 dB 70.0 – 100.6 70.0 – 140.0 70.0 – 140.0 70.0 – 140.0 C Weighted Display Range 31.5 Frequency (Hz) 1000 4000 8000 (dB) (dB) (dB) (dB) 30 – 100 dB 33.0 – 60.6 33.0 – 100.0 33.0 – 100.0 33.0 – 100.0 50 – 120 dB 50.0 – 80.6 50.0 – 120.0 50.0 – 120.0 50.0 – 119.0 70 – 140 dB 70.0 – 100.6 70.0 – 140.0 70.0 – 140.0 70.0 – 140.0 Z or LIN Weighted Display Range 31.5 Frequency (Hz) 1000 4000 8000 (dB) (dB) (dB) (dB) 30 – 100 dB 34.0 – 60.6 34.0 – 100.0 34.0 – 100.0 34.0 – 100.0 50 – 120 dB 50.0 – 80.6 50.0 – 120.0 50.0 – 120.0 50.0 – 119.0 70 – 140 dB 70.0 – 100.6 70.0 – 140.0 70.0 – 140.0 70.0 – 140.0 For the GA257L instrument refer only to the display range 70-40dB. Page 62 Total Measuring Range: The difference between the lowest possible measurement on the most sensitive range and the highest level on the least sensitive range at a frequency of 1kHz. Models ‘I’ & ‘B’ 41.0 – 140.0 (dB) 41.0 – 140.0 (dB) N.A A Weighted C Weighted Z or LIN Weighted Model ‘L’ 32.0 – 140.0 (dB) 33.0 – 140.0 (dB) 34.0 – 140.0 (dB) Peak Operating Range @ 1kHz: Display Range Models ‘I’ & ‘B’ Models ‘L’ 30 – 100 dB 63.0 – 103.0 40.0 – 103.0 50 – 120 dB 83.0 – 123.0 60.0 – 123.0 70 – 140 dB 103.0 – 143.0 80.0 – 143.0 Acoustic Frequency Range: Microphone ACO 7146A ACO 7052 Frequency Range (Hz) 20 to 8000 20 to 8000 Electrical Characteristics: Frequency Range (Hz) 1 to 20000 Reference Points: Description Sound Pressure Level Range Frequency Models ‘I’ & ‘B’ Value 94.0dB 55 - 120 1kHz Page 63 Model ‘L’ Value 94.0dB 50 - 120 1kHz Typical Electrical Self Generated Noise Level: Model ‘A’ Weighting (dB) ‘C’ Weighting (dB) ‘Z’ Weighting (dB) ‘I’ & ‘B’ 32.0 38.0 N.A ‘L’ 23.0 24.0 25.0 Electrical Signal Input: Electrical signals can be applied to the Castle Sonus range of sound level meters by removing the acoustical microphone and replacing with a dummy microphone having a series capacitor of 18pF ±2%. The BNC termination is then used to interface with a suitable signal generator with an output impedance of 600Ω at 1kHz. Maximum Peak to Peak Electrical Signal Input For No Damage: Model ‘I’ & ‘B’ ‘L’ Max Input Voltage (V) 7.0 21.0 Upper Frequency for Periodic Acoustic Testing: 4kHz - (IEC 61672-3:2006) Windshield: The effects of using the KG205 (60mm) windshield 31.5Hz 0.0 1kHz 63Hz 0.1 2kHz 125Hz 0.1 4kHz 250Hz 0.1 8kHz 500Hz 0.2 0.2 0.2 0.7 0.0 The meter conforms to the Standards quoted when fitted with the windshield. Page 64 Microphone [GA116I, GA116L]: ACO ½“ Electret Condenser Microphone Cartridge Type 7146A. Microphone reference point is the centre of the diaphragm. Type MK80 (ACO 7146A) Diameter (inch) Response Type Polarization (V) Frequency Range (Hz) Sensitivity (mV/Pa) Sensitivity (dB re 1V/Pa) Capacitance (pF) Max. Sound Pressure Level (dB) Temperature Coefficient (dB/°C) Specification 0.5 Free-Field 0.0 20 - 8000 25.0 -32.0 ±1.5dB 18.0 146.0 -0.01 The pressure to free-field correction value to be applied when used with a Castle calibrator GA601/GA607 or B&K4231 is as follows: -0.2dB The capsule can be removed by unscrewing anti-clockwise although great care must be taken when doing this to avoid damage to either the capsule or the instrument. Re-fitting is a reverse of the above. Type MK80 (ACO 7146A) Typical Microphone Response 16Hz 0.0 1kHz 0.0 31.5Hz 0.0 2kHz 0.0 63Hz 0.0 4kHz -0.1 125Hz 0.0 8kHz -0.7 250Hz 0.0 16kHz 1.0 500Hz 0.0 Typical Actuator to free field correction factors(dB) of an MK80 (ACO 7146A) microphone (Based on 500Hz = 0) 250Hz 0.0 2.5kHz 1.0 315Hz 0.0 3.15kHz 1.2 400Hz 0.0 4kHz 1.5 500Hz 0.0 5kHz 2.0 630Hz 0.0 6.3kHz 2.5 800Hz 0.0 8kHz 3.8 1kHz 0.0 10kHz 4.6 1.25kHz 0.2 12.5kHz 6.8 1.6kHz 0.4 16kHz 8.8 2kHz 0.5 20kHz 10.0 Page 65 Microphone [GA216I, GA216B, GA216L, GA257B, GA257L]: MK79 ACO ½“ Electret Condenser Microphone Cartridge Type 7052. Microphone reference point is the centre of the diaphragm. Type MK79 (ACO 7052) Diameter (inch) Response Type Polarization (V) Frequency Range (Hz) Sensitivity (mV/Pa) Sensitivity (dB re 1V/Pa) Capacitance (pF) Max. Sound Pressure Level (dB) Temperature Coefficient (dB/°C) Specification 0.5 Free-Field 0.0 20 - 8000 25.0 -32.0 18.0 146.0 -0.01 The pressure to free-field correction value to be applied when used with a Castle calibrator GA601/GA607 or B&K4231 is as follows: -0.2dB The capsule can be removed by unscrewing anti-clockwise although great care must be taken when doing this to avoid damage to either the capsule or the instrument. Re-fitting is a reverse of the above. Type MK79 (ACO 7052) Typical Microphone Response 31.5Hz 0.2 1kHz 0.0 63Hz 0.1 2kHz 0.0 125Hz 0.0 4kHz 0.0 250Hz 0.0 8kHz 0.5 500Hz 0.0 Typical Actuator to free field correction factors(dB) of an MK79 (ACO 7052) microphone (Based on 500Hz = 0) 20Hz 0.0 500Hz 0.0 25Hz 0.0 630Hz 0.0 31.5Hz 0.0 800Hz 0.0 40Hz 0.0 1kHz 0.1 50Hz 0.0 1.25kHz 0.2 63Hz 0.0 1.6kHz 0.3 80Hz 0.0 2kHz 0.4 100Hz 0.0 2.5kHz 0.5 125Hz 0.0 3.15kHz 0.8 160Hz 0.0 4kHz 1.2 200Hz 0.0 5kHz 1.6 250Hz 0.0 6.3kHz 2.3 315Hz 0.0 8kHz 3.6 400Hz 0.0 Page 66 Maximum SPL at the Microphone for No Damage: ACO 7146A 146.0 dB ACO 146.0 dB Calibration Reference Conditions: Sound Field Air Temperature Relative Humidity Atmospheric Pressure Sound Pressure Level Reference Level Range Reference Frequency Models ‘I’ & ‘B’ Free Field 23°C (73°F) 50% 101.325 kPa 94.0dB 55 – 120dB 1kHz Model ‘L’ Free Field 23°C (73°F) 50% 101.325 kPa 94.0dB 50 – 120dB 1kHz The reference direction of incidence for all microphones is perpendicular to the front face (diaphragm surface) of the microphone. Operating range: Class 1: -10°C to +50°C Class 2: 0°C to +40°C Warning: DO NOT subject the instrument to temperatures greater than 70°C or less than -20°C for any length of time. Effect of Temperature: Class 1: Accuracy better than ± 0.5 dB over the range -10 to +50°C Class 1: Accuracy better than ± 0.5 dB over the range 0 to +40°C Effects of Humidity: Less than 0.5 dB over the range 25 to 90% relative humidity (provided there is no Condensation), relative to the value at 50% relative humidity and 40°C. Storage range: 0 to 90% relative humidity in the absence of condensation Effects of Vibration: From 20Hz to 1kHz at 1ms-2 no noticeable effect Magnetic Field: No noticeable effect Page 67 Operator Presence in Free Field: No noticeable effect when operator standing more than 2m behind the instrument Overload: Positive overload warning when the input circuit saturates Log Interval Periods: Model ‘L’ Only User Selectable with a minimum integrating period of one second Maximum potential log size approximately 2100 intervals Timer Function: Model ‘L’ Only An adjustable countdown timer to stop recordings with a user defined total measurement period. Time & Date: Model ‘L’ Only Battery backed Real time clock and calendar Overall Dimensions: 210mm x 60mm x 35mm (approx.) Batteries: 1 x 9V PP3 Alkaline Cell Life Expectancy: 12 hours continuous use (approx) Min Battery Level: 5.4V DC Max Battery Level: 9.4V DC Overall Weight including Batteries: 220g Page 68 Case Reflections: Stalk length 75mm from front of microphone grid to top of case body Frequency (Hz) Case Effect (dB) Frequency (Hz) Case Effect (dB) 31.5 0.0 800 0.2 40 0.0 1000 0.0 50 0.0 1250 -0.3 63 0.0 1600 -0.2 80 0.0 2000 -0.5 100 0.0 2500 0.4 125 0.0 3150 -0.2 160 0.0 4000 -0.2 200 0.0 5000 0.1 250 0.1 6300 0.1 315 0.1 8000 0.0 400 0.1 10000 0.0 500 0.1 12500 -0.2 630 0.1 16000 0.0 Page 69 AC Output: GA116I Vout ≈ 16.4mVrms at 94.0dB The output is un-weighted and not affected by the measurement range. DC Output: GA116I Vout ≈ 40mV/dB Vout ≈ 3.3 – [((top of range +3) - (reading in dB)) x 0.04] Output affected by: • Frequency Weighting • Measurement Range Output Socket: GA116I Both AC and DC outputs require load impedance's to exceed 10kΩ, however load impedance's > 100KΩ are recommended. Front View GND DC Output AC Output Page 70 AC Output: Model ‘L’ Instruments Vout ≈ 20.0mVrms at 94.0dB The output is un-weighted and not affected by the measurement range. Output Socket: Model ‘L’ Instruments The AC output requires the load impedance to exceed 10kΩ, however load impedance's > 100KΩ are recommended. Front View AC Output (pin 6) GND (pin 5) Radio Frequency Fields: The Sonus Pocket Range fall into classification X for the susceptibility to Radio Frequency Fields. Manufacturers Data: Uncertainty figures for all manufacturers’ data are under review at the time of going to print. Please contact Castle Group Ltd for up-to date information. Page 71 EC Declaration of Conformity: The CE marking of this Castle Product indicates compliance with the EMC Directive. Castle Group Ltd declares that the: • GA116, GA216, GA257 Pocket Sound Level Meters have in accordance with the following Electromagnetic Compatibility Directives: • 89/336/EEC been designed and manufactured to the following specification: • EN61326-1:1997 + A1:1998 with the following Tests: • Radiated Emissions: EN55022:1995 Class: B • ESD: EN61000-4-2:1995 Levels: ±4kV (C) , ± 8kV (A) • Radio-frequency EM field amplitude mod: EN61000-4-3:1996 Level: 3V/m No differences in radio frequency emissions are apparent between the available operating ranges where applicable on the Sonus range of instruments. Approved cables for use with the Castle Sonus Range of instruments to comply with these standards:Cable Order Code Length USB Download – Model ‘L’ ZL1107-02 1.8m Microphone Extension ZL1094-01 1m Microphone Extension ZL1094-10 10m We hereby declare that the instruments named above have been designed to comply with the relevant sections of the above referenced specifications, and that the above named instruments comply with all essential requirements of the specified Directives. EMC tests conducted at the standard test level of 74dB Page 72 Chapter 10 A Guide to Acoustical Terms and Units Sound Pressure Level (SPL) Sound level meters measure acoustic pressure, and by international agreement they are calibrated in decibels (dB). The Sound Pressure Level in decibels is defined as: SPL = 20LOG P Po Where: P is the measured rms sound pressure P o is the reference rms sound pressure. Note that the decibel is a ratio of two quantities which have dimensions of power, and is not a unit. The reference sound pressure Po is by agreement taken as 20 Pa, which is the minimum audible pressure to a person with 'normal' hearing. The use of a logarithmic scale, such as the decibel permits the wide range of audible sound pressures (approximately 1,000,000 to 1) to be compressed into a scale of 120 units. Hence a faint whisper may be measured as 20dBA where as a chipping hammer of a road workman may produce 105dBA. Standardised frequency curves Because the ear is relatively insensitive to very low and very high frequencies, sound level meters have by international agreement weighted frequency responses. Hence different frequency weightings will produce for the same sound source different SPL readings. Castle sound level meters may have any one of three frequency weightings. • ‘A’ weighting, which best expresses the human ears response to loudness is the most commonly used frequency weighting. • ‘C’ weighting, this is often used to ascertain the acoustic emissions of machines it has a much broader spectrum than that of the ‘A’ weighting curve. • Zero or ‘Z’ weighting (often termed un-weighted). It may vary between differing instruments as its characteristics are very dependent on the quality of the microphone and associated pre-amplifier. It is often used in conjunction with octave band filters. A typical Z weighted response would be flat from 20 Hz to 16 KHz. Page 73 Time weighting - Fast, Slow, Impulse and Peak It is important to understand that the SPL is an rms (root mean square) quantity and is therefore averaged within the constraints of an averaging time constant. These time constants are helpfully termed Slow, Fast and Impulse and are sometimes referred to as the time weighting. The SPL therefore is not only affected by the frequency weighting but by the time weighting of the instrument also. Hence by selecting Slow on the sound level meter a sharp rise in noise will be shown as a gradual rise in the SPL, alternatively a sharp fall in noise will be shown as a gradual decrease in the SPL. By using the Fast weighting on the instrument in both of the above scenarios the SPL will rise and fall on a more rapid scale. The Impulse response is not as commonly used as the above, it is used in situations of sharp impulsive noises typically a piling operation may require an impulse time weighting. It has a very fast rise time but a very slow exponential fall time. The Peak weighting is very different from Slow, Fast and Impulse weighting in that it is not an rms quantity. It is simply the crest of the sound pressure level and it is shown as the highest Peak achieved within the measuring period. The rise time of the Peak is extremely sharp and it is not uncommon for the Peak to be much higher than the SPL (rms). Lmax, Lmin, Peak Lmax is the highest rms sound pressure level within the measuring period (with slow, fast or impulse time weighting selected). Lmin is the lowest rms sound pressure level within the measuring period (with slow or fast time weighting selected). Peak is the crest (linear) of the sound pressure within the measuring period, not rms. Leq - Equivalent Continuous Sound Pressure Level Leq is the constant noise level that would result in the same total sound energy being produced over a given period. It can be measured using ‘A’ , ‘C’ or ‘Z’ frequency weighting. 70 60 50 SPL dB 40 Leq 30 20 1 2 3 4 5 6 7 8 TIME/MINS Page 74 9 10 Leq can be described mathematically by the following equation: LeqT 2 t2 ⎡ ⎛ P (t ) ⎞ ⎤ 1 ⎜ ⎟ dt ⎥ = 10 log10 ⎢ ⎢t 2 − t 1 t∫1 ⎜⎝ P 0 ⎟⎠ ⎥ ⎣ ⎦ Where: Leq is the equivalent continuous linear-weighted sound pressure level re 20 μPa, determined over a measured time interval TM (sec’s). P(t) is the instantaneous sound pressure of the sound signal. Po is the reference sound pressure of 20 μPa. When the instantaneous A-weighted sound pressure (PA) of the sound signal is introduced, then the equivalent continuous A-weighted sound pressure level determined over time interval TM is as follows: LAeq = 10 log10 1 TM 2 TM ⎡ P (t) ⎤ ∫0 ⎢⎣ PA o ⎥⎦ dt In practice when measuring noise it is possible to take Leq readings with your instrument of short duration i.e. <5 minutes providing all variations of noise emissions are covered. If the measured environment changes greatly, then the longer the Leq reading is taken, the more accurate the measurement. LAE, Level Exposure (formerly SEL) This is in effect an Leq normalised to 1 second. It can be used to compare the energy of noise events which have different time duration’s. The LAE can be described mathematically as below. LAE = 10 log10 TM 2 ⎡ P(t) ⎤ ∫0 ⎢⎣ Po ⎥⎦ dt Where TM is measured in seconds. Ln, Percentile Levels Percentile levels are used greatly when measuring environmental noise, i.e. that which may pollute the environment. Ln, where n may be anything from 1 to 99 is that noise level exceeded for n % of the measurement time. By definition of percentiles, L1 must be greater than or equal to L2 which must be greater than or equal to L3 etc. It is often the case that only a few Ln values are ever used. Page 75 90 80 70 60 SPL dB 50 L10 40 L50 30 L90 20 10 1 2 3 4 5 6 7 8 9 10 TIME/MINS The above figure shows L10, L50 and L90. L10 is the noise level exceeded for 10% of the measurement duration. This is often used to give an indication of the upper limit of fluctuating noise, such as that from road traffic. L50 is the noise level exceeded for 50% of the measurement duration. It is mathematically inaccurate to add, subtract or average percentile values. L90 is taken to the ambient or background noise level as used, for example, in BS4142: ’Rating industrial noise affecting mixed residential and industrial areas’. (L10-L90 ) is often used to give a prediction of noise nuisance, as noise with widely varying level is more annoying than a constant noise level. (L10-L90 )is used in such noise indices as Traffic Noise Index:TNI = 4[L10 – L90] + L90 – 30 L50 is simply the ‘middle point’ exceeded for 50% of the measurement duration ad has been incorporated in some American Community Noise Assessments. DOSE DOSE is a percentage measure of noise exposure similar to LEp’d, and can be described with the following statement: 100% DOSE = 85dBA for 8 hours The operation of dose can be mathematically described by the following equation which relates the percentage exposure D to the integrated sound power. D= 100 T L - L c ↑( )dt Tc ∫0 q Page 76 Where: ↑ D Tc T L Lc q represents the anti-log = Percentage exposure (%). = Criterion sound duration (usually 8 hours). = Measurement duration in (hr) = Weighted sound level = Criterion level (usually dBA) (Exchange rate parameter, expressed as dB) =(3/log2) for an exchange rate of 3 dB (Approx 9.96578) =(5/log2) for an exchange rate of 5 dB (Approx 16.61096) For discrete time intervals at a constant sound level the equation can be rewritten as below: L -L ( i c) 100 D= t i10 q Tc Where: Li = Weighted sound pressure level in the ith time interval ti = Time spent in the ith interval (hr) The dose can be converted to an Leq. L eq = L c +10.log10 [(D/100).(Tc /TM )] Where: Leq = the equivalent continuous sound level, with A-weighting, from the time TM. Lc = Typically 85 dBA in the UK. D = indicated dose index (%). Tc = reference time base 8 hours. Tm = measurement time in hours. Tables D1, D2 & D3 give examples of how DOSE is related to exposure time and LEp’d (assuming a criterion of 85 100% DOSE = 85dBA for 8 hours.) Table D1. Effect of changing SPL SPL (dBA) Exposure Time (hours) Dose (%) LEp’d (dBA) 94 91 88 85 82 79 8 8 8 8 8 8 800 400 200 100 50 25 94 91 88 85 82 79 Page 77 Table D2. Effect of changing exposure time. SPL (dBA) Exposure Time (hours) Dose (%) LEp’d (dBA) 85 85 85 85 85 85 16 12 8 4 2 1 200 150 100 50 25 12.5 85 86.76 85 82 79 76 Table D3. Effect of changing SPL and exposure time. SPL (dBA) Exposure Time (hours) Dose (%) LEp’d (dBA) 88 85 80 82 79 4 8 8 4 4 100 100 31.5 25 12.5 85 85 80 79 76 Each time the sound level increases by 3dB the DOSE doubles given the same exposure time, similarly if the sound level decreases by 3dB the DOSE will halve for the same exposure time. Doubling the exposure time doubles the DOSE and halving the exposure time halves the DOSE given the same sound level. Projected DOSE DOSE measurements usually require the noise exposure to be measured over a full 8 hour working day. This can be simplified by using Projected DOSE. Projected DOSE allows the present accumulated DOSE over the elapsed logged time duration to be projected forward to give the predicted 8 hour dose. For example, if you had been logging for 30 minutes with an accumulated DOSE of 5%, the Projected DOSE would show: 5% x 8 hours/0.5 hours = 80% DOSE. i.e. you would receive an 80% DOSE if you were to stay in this area with the same equivalent level of noise for the full 8 hours. The following should be taken into consideration when reporting Projected DOSE figures: 1. The Projected DOSE assumes that the current DOSE rate at the time of reading will remain constant, i.e. the sound level does not change over the measurement period compared to the total 8 hour period. Page 78 2. The Projected DOSE will be more accurate if the measurement duration is as long as possible. 3. DOSE, and therefore Projected DOSE are measured with 'A' frequency weighting selected. 4. If, say, a 12 hour day is worked the 8 hour Projected DOSE should simply be multiplied by 1.5 (i.e. 12/8) to calculate what the DOSE would be after 12 hours. LEp’d Daily Personal Noise Exposure (formerly LEX) LEp’d is a measure of exposure that depends not only on the sound pressure level but also on the duration of the noise exposure. It is intended to be used to measure the daily exposure of a worker, and therefore is dependent on shift duration. Unlike DOSE, LEp’d is displayed as a dB(A) value, and is derived from the equation shown below. T LEp ' d = 10 log10 2 M ⎡ P A (t ) ⎤ 1 ⎢ ⎥ dt ∫ 28800 0 ⎣ Po ⎦ Note the similarity between this definition and that of Leq. Since LEp’d is normalised to 8 hours the LEp’d would equal the 8 hour Leq of a worker exposed for 8 hours. Although similar to Leq, LEp’d will present a different value to the Leq if the exposure time is greater than or less than 8 hours. See tables, D1, D2, and D3. The relationship between LEp’d and DOSE is given by the following equations: LEp ' d = 85 + 10.log10 [DOSE/100] (For a criterion level of 85) LEp ' d = L eq + 10.log10 [t/T] Where: t = logging time T= 8 hours reference (28800 seconds) Note that LEp’d is a logarithmic measurement as opposed to DOSE which is a linear function. Hence DOSE can be added arithmetically but since LEp’d is logarithmic, values cannot be added arithmetically. Each time the sound level increases the LEp’d increases. If the exposure time doubles, say 4 hours to 8 hours, the LEp’d increases by 3dB. Page 79 Glossary of Acoustical Terms This section describes and defines many terms used in acoustics. Term Unit or Abbreviation Decibels dB Ten times the logarithm (to base 10) of the ratio of two mean square values of sound pressure. Frequency Hz The number of cyclical variations per unit time Octave Bands Hz Frequency ranges in which the upper limit of each band is twice the lower limit. Octave bands are identified by their geometric mean frequency or centre frequency. Sound Power W The acoustic power of a sound source expressed in Watts. Sound Power Level LW The acoustic power radiated from a given sound source as related to a reference power level (typically 10-12 W); expressed in decibel as: Definition LW = 10 log10 ( W 10 −12 )dB or LW = 10 log10 W + 120dB W = acoustic power in Watts. i.e. 1 Watt = 120 dB for LW Sound Pressure P Fluctuations in air pressure caused by the presence of sound waves. Sound Pressure Level SPL The ratio expressed in decibels of mean - square sound pressure to a reference mean - square pressure which by convention has been selected to be equal to the assumed threshold of hearing. SPL = 20 log10 ( P ) Po Where: SPL = Sound Pressure Level P = Root Mean Square sound pressure Po = 2 x 10⁻⁵ Nm-2 = 20μPa ( R M S ) Weighting Network A - dB(A) An electronic or digital filter in a sound level meter which approximates under defused conditions the frequency response of the human ear. The A - Weighting network is the one most commonly used. Equivalent Continuous Frequency Weighted Sound Pressure Level LEQT The equivalent continuous level which is a measure of the energy content of a sound over a time period. It gives a single figure expressing the equivalent of a varying level. It is an energy average. Page 80 Term Unit or Abbreviation Definition Dose Do% Noise dose is a percentage number where: 100% Dose = 85 dB(A) for 8 hours. Note that not only is the sound level important (85 dBA) but also the time a person was exposed (8 hours). Dose per Hour Hr% Designed to show the Dose exposure over each hour. Projected Dose Pr% Projected dose allows the present accumulated dose over the present logged time duration to be projected forward to give the predicted 8 hour dose. This assumes the logged dose rate remains constant over the 8 hour period. A time inhibit on Castle instruments prevents projections being made if the measurement duration is less than five minutes. Noise Exposure LEp’d Personal noise exposure; usually referred to a daily 8 hour rate. "Exposed" means exposed whilst at work; expressed in dB(A) LEp ' d = 10 log 10 1 To Te ∫ 0 [ P A (t ) 2 ] dt Po Where: Te = the duration of the person's personal exposure to sound. To = 8 hours = 28800 seconds. Po = 20 μPa PA = the time - varying value of A weighted instantaneous sound pressure in Pascal’s in the undisturbed field in air at atmospheric pressure to which the person is exposed. Percentile Sound Levels Ln The dB(A) level exceeded n% of the time. Page 81 Disclaimer Whilst every effort is made to ensure the accuracy and reliability of both the instrument described and the associated documentation, Castle Group Ltd makes no representation or warranties as to the completeness or accuracy of this information. Castle Group Ltd assumes no responsibility or liability for any injury, loss or damage incurred as a result of misinterpreted or inaccurate information. Any documentation supplied with your product is subject to change without notice. Instrument Details For your records and for future correspondence with Castle Group Ltd regarding your instrument, please complete the following details: - Instrument Model Instrument Serial Number Purchase Date HB/0116/005/A5 Rev 1.01 Page 82