1
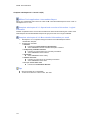
Table of Contents
Welcome ......................................................................................................................................................... 1
About ............................................................................................................................................................... 2
About APPEL ............................................................................................................................................... 2
APPEL Modules ....................................................................................................................................... 2
About the offline programme........................................................................................................................ 3
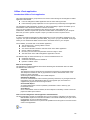
This eDocumentation ................................................................................................................................... 4
eDocumentation different approaches ..................................................................................................... 4
eDocumentation search functions ............................................................................................................ 5
Search functionalities............................................................................................................................ 5
eDocumentation icons.............................................................................................................................. 6
General ........................................................................................................................................................... 7
Workflow overview ....................................................................................................................................... 7
Humanitarian action workflow overview ................................................................................................... 7
Search ......................................................................................................................................................... 8
Search in general ..................................................................................................................................... 8
Search criteria .......................................................................................................................................... 9
Drop down lists ..................................................................................................................................... 9
Select an item from a list ................................................................................................................... 9
Conditions used in search elements ................................................................................................. 9
Input Fields ......................................................................................................................................... 11
Radio buttons ..................................................................................................................................... 12
Options used in Search elements ................................................................................................... 12
Functions search tab .......................................................................................................................... 13
Calendar tool ...................................................................................................................................... 14
Select a date ................................................................................................................................... 14
Search filters....................................................................................................................................... 15
Result lists .............................................................................................................................................. 16
Result lists .......................................................................................................................................... 16
Standard result lists......................................................................................................................... 16
eRequest result list ............................................................................................................................. 17
Grant Agreements result list ............................................................................................................... 18
List of eDocuments per Operations .................................................................................................... 19
eDocument status ............................................................................................................................... 20
Status of the operation........................................................................................................................ 21
Export to MS Excel ............................................................................................................................. 22
Training Modules ........................................................................................................................................... 23
Introduction training modules ..................................................................................................................... 23
Training modules.................................................................................................................................... 23
eDocument training modules ..................................................................................................................... 24
eDocument ............................................................................................................................................. 24
Initial eRequest ...................................................................................................................................... 24
New version of an eRequest .................................................................................................................. 24
Modification Request.............................................................................................................................. 24
Reports................................................................................................................................................... 24
Offline eTools application training modules ............................................................................................... 25
Functions of the offline application ......................................................................................................... 25
eSingleForm offline ................................................................................................................................ 25
Access rights ................................................................................................................................................. 26
Register in ECAS ....................................................................................................................................... 26
Introduction ............................................................................................................................................ 26
The registration process in ECAS .......................................................................................................... 27
Register for ECAS .................................................................................................................................. 28
Change the login domain for ECAS ....................................................................................................... 29
Complete the ECAS registration process ............................................................................................... 30
Initialise your ECAS password ............................................................................................................... 31
The ECAS password requirements .................................................................................................... 31
Register in APPEL ..................................................................................................................................... 32
Request for APPEL login activation ....................................................................................................... 32
ii
Table of Contents
Register for FPA ............................................................................................................................................ 33
Registration form (Step 1) ......................................................................................................................... 33
Registration form (step 2) .......................................................................................................................... 34
Refused questionnaire ............................................................................................................................... 35
APPEL ........................................................................................................................................................... 36
eDocument ................................................................................................................................................ 36
Browser functions................................................................................................................................... 36
Print or export an eDocument ................................................................................................................ 37
Annexing files ......................................................................................................................................... 38
File types ................................................................................................................................................ 39
Track changes........................................................................................................................................ 40
Track changes result .............................................................................................................................. 41
eSingleForm .............................................................................................................................................. 42
Introduction eSingleForm ....................................................................................................................... 42
Paper version versus eDocuments ........................................................................................................ 43
Guidelines .............................................................................................................................................. 44
Limitations of the fields ....................................................................................................................... 44
Financial overview .............................................................................................................................. 44
Screen structure ..................................................................................................................................... 45
eDocument ......................................................................................................................................... 45
Heading .............................................................................................................................................. 46
Navigation tab..................................................................................................................................... 47
Content tab ......................................................................................................................................... 48
Chapter status icons ........................................................................................................................... 49
eDocument Functions ......................................................................................................................... 50
Content functions................................................................................................................................ 51
Reference number .............................................................................................................................. 52
Letter Of Intent ....................................................................................................................................... 53
Introduction Letter Of Intent ................................................................................................................ 53
Functions ............................................................................................................................................ 54
Create a new Letter of Intent........................................................................................................... 54
Submit a Letter of Intent .................................................................................................................. 55
New version of the Letter of Intent .................................................................................................. 56
Create a new eRequest from a LOI................................................................................................. 57
eRequest ................................................................................................................................................ 58
Introduction eRequest......................................................................................................................... 58
Functions ............................................................................................................................................ 59
Create a new eRequest .................................................................................................................. 59
Submit an eRequest........................................................................................................................ 60
Create a new version of an eRequest ............................................................................................. 61
Chapters ............................................................................................................................................. 62
Complete chapter 1: General information (RQ)............................................................................... 62
Complete chapters 2 to 9 (RQ) ....................................................................................................... 64
Complete subchapter 4.3.1: Logical framework (RQ) ..................................................................... 65
Complete subchapter 4.3.2: More detailed information on specific objectives and results (RQ) ..... 66
Complete chapter 8: Contingency measures and security (RQ) ..................................................... 67
Complete chapter 10: Human resources (RQ) ................................................................................ 68
Complete chapter 11: Financial overview (RQ)............................................................................... 69
Complete chapter 12: Administrative information (RQ) ................................................................... 70
Complete Annex A: Procurement table (RQ) .................................................................................. 71
eModification Request............................................................................................................................ 72
Introduction eModification Request .................................................................................................... 72
Functions ............................................................................................................................................ 73
Create a new eModification Request .............................................................................................. 73
Submit an eModification Request ................................................................................................... 74
Create a new version of an eModification Request ......................................................................... 75
Chapters ............................................................................................................................................. 76
Amendment request (MR) ............................................................................................................... 76
Complete chapters 1 to 12 (MR) ..................................................................................................... 77
Complete subchapter 4.3.1: Logical Framework (MR) .................................................................... 78
Complete Annex A: Procurement table (MR) .................................................................................. 79
iii
APPEL eDocumentation
eIntermediate Report ............................................................................................................................. 80
Introduction eIntermediate Report ...................................................................................................... 80
Functions ............................................................................................................................................ 81
Create a new Intermediate Report .................................................................................................. 81
Submit an Intermediate Report ....................................................................................................... 82
Chapters ............................................................................................................................................. 83
Complete chapters 1 to 10 (IR) ....................................................................................................... 83
eFinal Report.......................................................................................................................................... 84
Introduction eFinal Report .................................................................................................................. 84
Functions ............................................................................................................................................ 85
Create a new eFinal Report ............................................................................................................ 85
Submit an eFinal Report ................................................................................................................. 86
Chapters ............................................................................................................................................. 87
Complete chapters 1 to 10 and Annex A (FR) ................................................................................ 87
Complete chapter 11 (FR)............................................................................................................... 88
Complete chapter 13 (FR)............................................................................................................... 89
Useful links ................................................................................................................................................ 90
Useful links ............................................................................................................................................. 90
FAQ ........................................................................................................................................................... 91
Frequently Asked Questions APPEL ...................................................................................................... 91
General questions .............................................................................................................................. 91
eSingleForm questions ....................................................................................................................... 92
Technical questions ............................................................................................................................ 93
PDF eSingleForm .......................................................................................................................................... 95
Introduction to the PDF eSingleForm......................................................................................................... 95
Guidelines .................................................................................................................................................. 96
Limitations and improvements................................................................................................................ 96
Fields...................................................................................................................................................... 97
Text fields ........................................................................................................................................... 97
Date field ............................................................................................................................................ 98
Save and validate................................................................................................................................... 99
Save ................................................................................................................................................... 99
Validate............................................................................................................................................... 99
Screen structure ...................................................................................................................................... 100
PDF eSingleForm................................................................................................................................. 100
Adobe PDF Reader functions .................................................................................................................. 101
Navigate through the eSingleForm....................................................................................................... 101
Highlight mandatory fields .................................................................................................................... 102
Change auto correction language ........................................................................................................ 103
Change colours .................................................................................................................................... 105
Annex documents ................................................................................................................................ 107
eSF Functions.......................................................................................................................................... 108
Download PDF ..................................................................................................................................... 108
Import an xml file .................................................................................................................................. 109
Complete a Humanitarian Action.......................................................................................................... 110
Complete the logical framework ........................................................................................................... 111
Add notes ............................................................................................................................................. 112
Highlight changes................................................................................................................................. 113
Export XML file ..................................................................................................................................... 114
Upload an offline completed Humanitarian Action................................................................................ 115
Offline eTools application ............................................................................................................................ 116
Introduction Offline eTools application ..................................................................................................... 116
Guidelines ................................................................................................................................................ 118
General ................................................................................................................................................ 118
Enriched text features (bold, colours…)............................................................................................ 118
Save to avoid data loss..................................................................................................................... 118
Renaming XML files.......................................................................................................................... 118
Copy/paste ........................................................................................................................................... 119
Tables in text fields .............................................................................................................................. 120
Table properties................................................................................................................................ 120
Screen structure ...................................................................................................................................... 122
iv
Table of Contents
eSingleForm start screen ..................................................................................................................... 122
The Offline eTools application start screen....................................................................................... 122
Functions ................................................................................................................................................. 124
Install the application............................................................................................................................ 124
Upgrade to a new version .................................................................................................................... 125
Start the application ............................................................................................................................. 126
'ECHO – working offline' is not shown .............................................................................................. 126
My computer does not recognize a ZIP file....................................................................................... 126
The URL http://localhost:8080/waitserver.html does not show the Welcome screen ........................ 126
Username and password ..................................................................................................................... 128
Create a new Humanitarian Action offline ............................................................................................ 130
Complete a Humanitarian Action.......................................................................................................... 131
Your Humanitarian Action is not shown in the action list .................................................................. 131
Auto save.......................................................................................................................................... 131
Validation .......................................................................................................................................... 131
Upload an offline Humanitarian Action ................................................................................................. 132
Upload an offline eDocument ............................................................................................................... 133
Export an eDocument to the Offline eTools application........................................................................ 134
Archive an action.................................................................................................................................. 135
eSingleForm ............................................................................................................................................ 136
Introduction eSingleForm ..................................................................................................................... 136
Online versus Offline ............................................................................................................................ 137
Guidelines ............................................................................................................................................ 138
Transfer of information...................................................................................................................... 138
Validate............................................................................................................................................. 138
Enriched text features (bold, colours,…)........................................................................................... 138
Limitations and mandatory fields ...................................................................................................... 138
Financial overview ............................................................................................................................ 138
Notes .................................................................................................................................................... 140
Show/Hide the notes......................................................................................................................... 140
Add a note ........................................................................................................................................ 140
Respond to a note ............................................................................................................................ 141
Text field ........................................................................................................................................... 141
Letter Of Intent ..................................................................................................................................... 142
Copy the template ............................................................................................................................ 142
Create a new Letter of Intent offline.................................................................................................. 143
eRequest .............................................................................................................................................. 144
Functions .......................................................................................................................................... 145
Create a new eRequest ................................................................................................................ 145
Chapters ........................................................................................................................................... 146
Complete chapter 1: general information (RQ) ............................................................................. 146
Rules to respect......................................................................................................................... 146
Complete chapter 2 to 4 (RQ) ....................................................................................................... 148
Complete subchapters 4.3.1: Logical Framework (RQ) ................................................................ 149
Complete subchapter 4.3.2: more detailed information per result (RQ) ........................................ 150
Complete subchapters 4.4 and 4.5: Work plan and monitoring (RQ) ............................................ 152
Complete chapter 5 to 9 (RQ) ....................................................................................................... 153
Complete chapter 10 and 11 (RQ) ................................................................................................ 154
Complete annex A: Procurement table (RQ)................................................................................. 155
Rules to respect......................................................................................................................... 155
Complete Partner internal follow-up informations (RQ) ................................................................. 156
eModification Request.......................................................................................................................... 157
Functions .......................................................................................................................................... 158
Create a new eModification Request ............................................................................................ 158
Chapters ........................................................................................................................................... 159
Complete chapter 1: general information (MR) ............................................................................. 159
Complete chapter 2 to 4 (MR) ....................................................................................................... 160
Complete subchapter 4.3.1: objectives, results and activities (MR) .............................................. 161
Complete subchapter 4.3.2: more detailed information per result (MR) ........................................ 162
Complete subchapters 4.4 and 4.5 (MR) ...................................................................................... 163
Complete chapter 5 to 9 (MR) ....................................................................................................... 164
v
APPEL eDocumentation
Complete chapter 10 to 11 (MR) ................................................................................................... 165
Complete chapter 13 (MR) ............................................................................................................ 166
Complete annex A: Procurement table (MR) ................................................................................ 167
Complete Partner internal follow-up informations (MR)................................................................. 168
eIntermediate Report ........................................................................................................................... 169
Functions .......................................................................................................................................... 170
Create a new eIntermediate Report .............................................................................................. 170
Chapters ........................................................................................................................................... 171
Complete chapter 1 to 4 (IR) ......................................................................................................... 171
Complete subchapters 4.3.1 and 4.3.2 (IR) .................................................................................. 172
Complete subchapters 4.4 and 4.5 (IR) ........................................................................................ 173
Complete chapter 5 to 8 (IR) ......................................................................................................... 174
Complete chapters 9 to 11 (IR) ..................................................................................................... 175
Complete annex A and internal follow up informations (IR) .......................................................... 176
Complete annex A: Procurement table ...................................................................................... 176
Complete Partner internal follow-up informations ...................................................................... 176
eFinal Report........................................................................................................................................ 177
Functions .......................................................................................................................................... 178
Create a new eFinal Report .......................................................................................................... 178
Chapters ........................................................................................................................................... 179
Complete chapter 1 to 4 (FR)........................................................................................................ 179
Complete subchapters 4.3.1 and 4.3.2 (FR) ................................................................................. 180
Complete subchapters 4.4 and 4.5 (FR) ....................................................................................... 181
Complete chapters 5 to 8 (FR) ...................................................................................................... 182
Complete chapters 9 to 11 (FR) .................................................................................................... 183
Complete conclusions, annexes and internal follow up (FR)......................................................... 184
FAQ ......................................................................................................................................................... 185
Frequently Asked Questions Offline ..................................................................................................... 185
General questions ............................................................................................................................ 185
Technical questions .......................................................................................................................... 185
Glossary ...................................................................................................................................................... 187
Index ........................................................................................................................................................... 189
vi
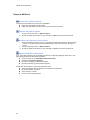
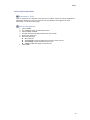
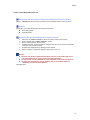
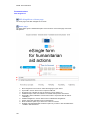
Welcome
APPEL is a tool for a two-way electronic exchange of information between DG ECHO and its
Partners.
APPEL gives the opportunity to organisations that are not yet recognised as DG ECHO Partners, to
become known to DG ECHO by applying for the Framework Partnership Agreement (FPA) in order
to become a partner of DG ECHO.
To connect to APPEL, the candidate Partner first has to create an ECAS (European Commission
Authentication System) account by registering in ECAS starting from the APPEL
authentication screen. An ECAS account consists of a single personal identifier (user id or email
address, password) making it possible to establish a protected connection with a wide range of
Commission information systems using this same mode of authentication instead of having to
create a specific identifier for each application.
To consult or modify the APPEL data, the user should activate his account and his user rights
starting from the APPEL home screen.
APPEL is used by existing ECHO partners to update their administrative data and manage their
humanitarian projects.
To manage humanitarian projects, the application is composed of:
♦ eRequest: used to create or consult a request.
♦ Agreement: used to consult Grant Agreements, to create or consult eModification
requests, eInterim and eFinal reports.
♦ Downloads: used to download the Offline eTools application.
This eDocumentation groups the how to's and the online trainings of the APPEL application of DG
ECHO. To learn how to work with the APPEL application you follow the online trainings modules
and read the Step by Step explanation in this eDocumentation on how to perform any functionality
of the online application.
This eDocumentation groups the how to's and the trainings of the Offline eTools application of DG
ECHO.
♦ Learn the Offline eTools application with the online training modules.
♦ Follow the Step by Step explanation on how to perform any functionality of the application
in the section 'Offline eTools application'.
The Offline eTools application provides you with the possibility to prepare and follow up on a
humanitarian action without the need of an internet connection.
Once you have created a humanitarian action with the aid of the offline application, all
modifications, different requests and reports are bundled within one file on your computer.
Each time you want to upload a request or report you make use of this unique file.
In order to work with the Offline eTools application you have to install the application on your
computer.
This application is provided to you by CD or by the download module of the OSOR website.
Once installed, you can start the 'Offline eTools application' and create an account.
The different steps to create and follow up on a new humanitarian action are:
♦ Create the new action.
♦ Create the Initial eRequest.
♦ Upload it to APPEL online.
This eDocumentation is also available online at https://webgate.ec.europa.eu/appel/
1
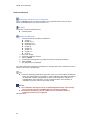
About
About APPEL
APPEL gives the opportunity to organisations that are not already recognised as ECHO partners, to
become known to ECHO by applying for the Framework Partnership Agreement (FPA) in order to
become an ECHO partner.
Organisations which are already ECHO partners can access their organisation data if the account
and the user rights are validated by a contact person of the organisation. The organisations have to
request the activation of the users account before doing any update.
As soon as the user account is activated, APPEL can be used by existing ECHO partners to update
their administrative data. It allows partners to update operational and financial information which
can then be used by ECHO for the periodic assessment of partners foreseen under the FPA.
APPEL Modules
E-request
Here you can:
♦ Search for eRequests of your organization.
♦ Modify eRequests of your organization.
Agreement
Here you can:
♦ Search for Grant Agreements of your organization.
♦ Modify Grant Agreements of your organization.
Downloads
Here you can:
♦ Download the Offline eTools application.
2
About
About the offline programme
The Offline eTools application enables you to complete an eDocument for a humanitarian action
without being connected to the internet.
♦
♦
♦
Install the 'eSingleForm offline' application on your computer.
Create or complete your eDocument at any given moment, without an internet connection.
Once completed, connect to the internet and upload the eDocument. Your modifications
are now visible online.
3
APPEL eDocumentation
This eDocumentation
eDocumentation different approaches
The different approaches of this eDocumentation are:
♦ Written eDocumentation: The written eDocumentation represents the largest part of this
entire eDocumentation. You can find your way through all these texts by using one or
more search functions of this eDocumentation.
♦ Interactive trainings: By following different interactive trainings, you get accustomed to
the different functionalities within the application. You get an overview of the application
and how each module interacts with each other.
♦ Screen information: The screen information, also known as online help, provides more
specific information about a screen. The information is application based. When moving
the mouse over certain titles within the application, the screen information is shown in an
extra window.
The eDocumentation is available through the internet. Click on the question mark at the top right of
the APPEL menu bar.
Remarks
♦ This eDocumentation aims to get you accustomed with an application; it does not
aim to give detailed information on how to manage a Humanitarian Aid project.
4
About
eDocumentation search functions
There are several possible ways to search for your information in this eDocumentation. The
different search functionalities are available in the top menu of this eDocumentation.
Search functionalities
1. Contents: Click on a book icon, representing a topic. Different titles are shown as links.
Click on the preferred title.
2. Search: Introduce one or more search criteria in the search field and press enter. A result
list is shown with all the pages containing your search criteria. Click on any page.
3. Index: An alphabetical list is shown. As soon as you introduce e.g. 'reference' in the
search field, the cursor goes to the first keyword that begins with 'reference'.
5
APPEL eDocumentation
eDocumentation icons
The eDocumentation makes use of different icons; these indicate different content or attention
points.
Action paths, ways to navigate
The 'action path' icon illustrates the different paths for going to a specific screen in the application.
Next to the icon, you have a start point and a function, for example: Menu > eRequest. 'Menu' is the
start point, 'eRequest' is the function. Below the icon, the result of the action is shown, for example
'The search results list is shown'.
Step by step information
The 'step by step icon' is followed by an action. A list of steps is shown below. The steps are shown
in the correct order and explain the action in details.
Profiles
The 'Profiles' icon explains which profile you need to undertake a certain action.
Tips
♦
The 'Tips' icon provides extra tips.
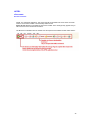
Remarks
♦ The 'Remarks' icon indicates a matter of importance. The important remark is
always written in red.
6
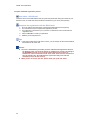
General
Workflow overview
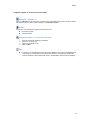
Humanitarian action workflow overview
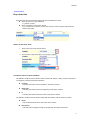
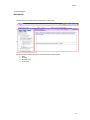
The following picture illustrates the workflow for preparing a humanitarian action in APPEL.
7
APPEL eDocumentation
Search
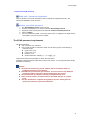
Search in general
The APPEL application makes use of a lot of standard actions and functions. The different search
possibilities are the same for the eRequests and Agreements.
The search screens are built from different elements to help you and to allow refining your search.
The search screens are built to optimise and facilitate the search operation:
♦
♦
First select a search condition.
Then introduce the value related to that condition.
This allows for a minimal of information encoding.
In a lot of cases the combination of 2 or more elements are required.
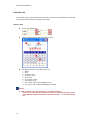
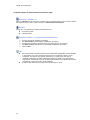
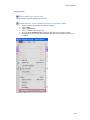
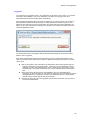
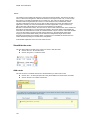
The following picture illustrates an example: to search on 'Amount' you use a drop down list to
select a condition and then you introduce a value related to that condition.
The different elements to search with are:
♦ Drop down lists.
♦ Input Fields.
♦ Radio buttons.
♦ Functional buttons.
♦ Calendar tool.
♦ Filters.
To start the search you click on 'Search'.
Tips
♦
♦
8
The search fields are not case sensitive; you can introduce lower or uppercase characters.
The 'undo typing' button returns to the last executed and saved search action; it does not
clear all the fields.
General
Search criteria
Drop down lists
Drop down lists are used to define criteria and can have different functions:
♦ Select an item from a pre-defined list.
e.g. Select a country.
♦ Select a condition to refine other criteria.
e.g. To search for an amount, use the drop down list, select an option and introduce a
value for this option.
Select an item from a list
1. Click on the arrow at the right of the list.
2. The list opens. Click on the item of your choice to select it.
Conditions used in search elements
The different conditions used to refine a search criterion with strings. A string can be a combination
of characters, numbers and special characters:
♦
Contains
The string introduced can be anywhere in the search criterion.
♦
Begin with
The string introduced is the exact beginning of that search criterion.
♦
Is
The string introduced is the exact value of that search criterion.
The different conditions used to refine an input field with numbers, like for instance “Amount”:
♦
Equal
The number introduced is the exact value of the amount.
♦
Not equal to
This returns all the projects except the projects with the amount introduced.
9
APPEL eDocumentation
10
♦
Greater than
This returns all the projects with a value higher than the number introduced.
♦
Less than
This returns all the projects with a value lower than the number introduced.
General
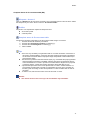
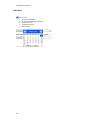
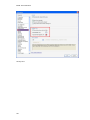
Input Fields
An input field can contain a lot of different information; text, numbers, values… to help you refine
your search. The input fields are used in combination with another element such as a drop down
list.
The following picture illustrates an input field in combination with a drop down list:
Remarks
♦ Do not use full stops or commas in the input fields, not even when searching for
an amount. E.g. 5.000,00 euros should be introduced as 5000 without the full stop
or the comma.
♦ The search results are not correct or the application returns an error if you do use
a full stop or a comma.
11
APPEL eDocumentation
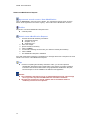
Radio buttons
Radio buttons help you to refine your search and helps you to find only the projects you wish to see.
Clicking in the circle in front of a criterion brings down the search results to the selected criteria.
You can only select one item of the provided options.
Options used in Search elements
The possible options as shown in the illustration to search for e-Requests are:
♦
♦
♦
All
This option is the default option and shows all the e-Requests.
Draft Version 1
This option shows the e-Requests that are still in draft version and are not yet submitted
to DG ECHO.
Last submitted version
This option only shows the last submitted version of the e-Requests.
The possible options as shown in the illustration to search for Agreements are:
♦
♦
♦
12
All
This option is standard and shows all the Grant Agreements.
Ongoing
This option shows the Grant Agreements that are still in action.
Closed
This option only shows the finished Grant Agreements, due to a refusal of a proposal or
ending an operation.
General
Functions search tab
The standard available functions:
1. Undo typing
Dismisses the last introduced criterion and returns to previous state of the search tab.
2. Clear
Dismisses all the introduced criteria and returns to the begin state of the search tab.
3. Search
Initiate the search, based on the introduced criteria
4. Greyed out buttons
The function cannot be used at that moment.
13
APPEL eDocumentation
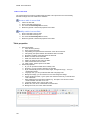
Calendar tool
The calendar tool is a pop-up window that is activated if you click on the calendar icon on the right
of a date input field. It helps you to quickly select a date.
Select a date
♦
Click on the calendar icon
♦
A pop-up window appears. Select the date you wish.
♦
The different functions of the calendar tool are:
1. Month.
2. Year.
3. Go back 1 year.
4. Go back 1 month.
5. Go to today
6. Go forward 1 month.
7. Go forward 1 year.
8. The number of this day is highlighted in red.
9. The day you wish to select is highlighted in dark red.
Remarks
♦ After selecting a date, the calendar tool is sometimes hidden.
If you click on the calendar tool again and it does not automatically show, you go
to the Windows taskbar and select the tab 'Please choose…' to view the calendar
tool.
14
General
Search filters
To facilitate recurring search processes, you can save your search criteria by creating a filter.
Create a search filter for eDocuments
1. Introduce your search criteria.
2. Introduce a name in the field next to 'Filter name'.
3. Click on 'Search'.
The next time you want to search with the same criteria, you use the previously created search
filter.
15
APPEL eDocumentation
Result lists
Result lists
To access a project or create requests and reports, APPEL uses the search functions to let you
navigate to an eRequest or Grant Agreement.
The result lists are always displayed under the search screen;
♦ eRequest result list indicates the specific eSingleform.
♦ Grant Agreement result list combines the different eSingleforms and Reports by
Agreement number.
Standard result lists
♦
♦
♦
♦
Click on the 'title of the column' in the results list to order the list according to the
corresponding criteria. Click once and the list is ordered ascending, click twice and the
list is ordered descending.
Move the mouse over a line and click on it to view more detailed information.
Export the results list to MS Excel.
Contracts are shown in black or in red.
♦ The black contracts are the amendments.
♦ The red contracts are previous versions of the initial contract.
Remarks
♦ You can introduce one or more search criteria. It is not mandatory to complete the
entire form to start a search. The results list depends on the criteria introduced in
the form.
16
General
eRequest result list
The following picture illustrates the result list by eRequests:
The different functions of the eRequest result list are:
1. The search button.
2. The action buttons are at the top of the list.
3. Click on the column title to order the result list.
4. The yellow line shows the selected item in the list. Click on the yellow row to open the
selected item.
5. The track changes button compares two items of the list; therefore two items must be
selected.
Tips
♦
♦
The green rows indicate a draft version of an item.
The grey rows indicate passive or refused items that can be consulted only.
Remarks
♦ Clicking on 'Track changes' without selecting two items of the list, causes the
following message: 'You have to choose two documents to compare'.
17
APPEL eDocumentation
Grant Agreements result list
The following picture illustrates the result list by Grant Agreements:
The different functions of the Grant Agreement result list are:
1. Click on the column title to order the result list.
2. Search button.
3. The yellow line shows the select item in the list.
Click on the yellow row to open the list of eDocuments of the operation.
4. The traffic light icon provides a quick overview of the operation status.
Tips
♦
18
The grey rows indicate closed items that can only be consulted.
General
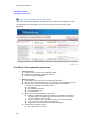
List of eDocuments per Operations
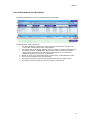
The following illustration shows the list of eDocuments of an Operation:
The different parts of the result list are:
1. The Grant Agreement information tab. This consists out of the Reference number, the
country, title, amount and the status of the Operation.
2. The eDocuments for the specific operation. This can consist out of the Initial Request and
the different versions, the Modification request and the different versions, the Interim
Report and the Final report. The track changes button allows you to overview the
differences between two versions of an eDocument.
3. Buttons to create a new Intermediate report, an eFinal report, an eModification request.
4. The list of annexes linked to the grant agreement.
5. The page and the disk icons are used to generate a PDF without checking the box.
6. The check box and the 'create zip' functions are used to create the zip.
19
APPEL eDocumentation
eDocument status
The eDocument can have 3 document statuses during its project life cycle;
♦ Draft
The document is created and saved but there has been no validation yet.
♦ Submitted
The document is submitted and awaits activation and verification from the DG ECHO
Desk. . During this period, creating and submitting a new version is possible, if the
system is not 'locked' for this function. The locking mechanism is either automatic
activated by the systems workflow or it is activated manually by the Desk Officer e.g. to
have more time to finish the appraisal. A draft version of a new version can be created
but not submitted, no alteration of any information is possible.
♦ Refused
The proposal is not accepted by DG ECHO and can only be viewed, no modifications are
allowed after a refusal.
The Operation can have 3 modification statuses during its project life cycle;
♦ Under Negotiation
As soon as a new request is created and submitted for a project, the status of the project
changes to UNDERNEG.
♦ Ongoing
As soon as a proposal is accepted and an agreement is made the project status changes
to ONGOING.
♦ Closed
The project status changes to closed due to a refusal of a proposal or ending an
operation.
20
General
Status of the operation
The following picture illustrates the traffic light icon and its functions:
The different indicators on the traffic light are:
1. Initial eRequest (RQ).
2. Intermediate report (IR).
3. Final report (FR).
4. Modification request (MR).
The colors used on the traffic light are:
♦ Grey; None submitted.
♦ Yellow; Draft version.
♦ Green; Favourable.
♦ Orange; Active.
♦ Pink; Refused.
For example;
This illustration shows the traffic light icon for a successfully completed operation, no eModification
Request has been submitted during the action. The operation name will appear in grey in the list,
the status of the operation will indicate 'Closed'.
This illustration shows the traffic light icon for an operation that has been granted but has been
suspended upon the refusal of the eIntermediate Report. The operation name will appear in grey in
the list, the status of the operation will indicate 'Closed'.
Tips
♦
♦
While holding the mouse hit on traffic lights, a help indicator appears and provides
information using abbreviations of the indicator followed by the status.
For example: RQ-Favourable, IR-Active, FR-None, MR-None.
21
APPEL eDocumentation
Export to MS Excel
Results list > Export to Excel
To export the list to MS Excel you have two possibilities:
♦ Export the complete list with all criteria.
♦ Export only the criteria you wish to have in your MS Excel document.
Export a list with all criteria
1. On top of the screen click on 'Export to Excel'
2. Choose to 'save' the document to your hard disk or 'open' the document in MS Excel.
Export a list with some of the criteria
1. Click on the fields you wish to view in your results list while pressing [Ctrl] to select several
of them. To scroll through the list of possible criteria, click on the arrows on the right of
the list.
2. On top of the screen click on 'Export to Excel'
3. Choose to 'save' the document to your hard disk or 'open' the document in MS Excel.
Adjust the MS Excel document
If you notice that numbers in the generated Excel file are not properly displayed, make sure to use
the following decimal and thousands separators:
♦ In the Excel file, go to Tools/Options/International tab.
♦ Deselect 'Use system separators'.
♦ Introduce a comma [,] as decimal separator.
♦ Introduce a full stop [.] as thousands separator.
It might also be necessary to format the problematic cells:
♦ Select the cells that are not displayed as expected in the Excel file.
♦ Go to Format/Cells.../Number.
♦ Select category 'number'.
♦ Choose your formatting options.
22
Training Modules
Introduction training modules
The training modules show you the most important functionalities of the application.
After taking one or more training modules, you are able to start using the application and you can
perform the different actions needed for your activities.
Training modules
♦
♦
♦
♦
♦
General training module: Shows you how to work with the training modules.
Create an ECAS account: Shows you how to create an ECAS account in order to logon to
APPEL.
Request APPEL login activation: Shows you how to request an activation of your APPEL
login.
eDocument training modules: Shows you the icons and buttons of the eDocument, shows
you how search for eDocuments, create eRequests and Reports,…
Offline eTools application training modules: Shows you how to work with the offline
programme.
23
APPEL eDocumentation
eDocument training modules
eDocument
♦
♦
♦
♦
♦
♦
Search for an eDocument.
Icons and buttons used to create or consult an eDocument.
Navigating in an eDocument.
Add or delete a row in an eDocument.
Upload a file to attach to an eDocument.
Introduce information in the Logical Framework Matrix.
Initial eRequest
♦
Draft and submit an eRequest.
New version of an eRequest
♦
Draft and submit a new version of an eRequest.
Modification Request
♦
Draft and submit an eModification Request.
♦
♦
Draft and submit an eIntermediate Report
Draft and submit an eFinal Report
Reports
24
Training Modules
Offline eTools application training modules
The training modules for the Offline eTools application show you the main actions that are needed
to complete an offline activity.
Functions of the offline application
♦
♦
General functions of the offline application.
Functions within the eSingleForm.
eSingleForm offline
♦
♦
♦
♦
♦
Create an eRequest offline.
Create an eModification Request offline.
Create an eIntermediate or eFinal Report.
Complete subchapters 4.3.1 and 4.3.2.
Upload Requests and Reports.
25
Access rights
Register in ECAS
Introduction
To connect to APPEL, you will first need to create an ECAS user name and a password. Each user
of your organisation must create his/her own ECAS account. ECAS allows the use of the same
personal identifier for several European Commission information systems. Your user name will be
linked to the email address that you provided when you singed up. Emails about your account will
only be sent to this email address. Please make sure you remember the email address, user name
and password in order to access APPEL.
26
Access rights
The registration process in ECAS
APPEL > Authentication screen
The 'APPEL authentication' screen is shown.
The registration process in ECAS
1. The 'APPEL authentication' screen is shown.
2. Click on 'Register in ECAS' to create an account if you don't have and ECAS account
yet. (See remark)
3. The 'ECAS login' screen is shown.
4. Change the login domain to external, if necessary.
5. Register for ECAS.
6. Complete the registration with this ECAS mail.
7. Initialise the ECAS password.
8. Request for the APPEL login activation'.
Remarks
♦ If you already have an ECAS account, you don't have to recreate an account
specifically for APPEL. Activate your ECAS account to receive the user rights for
APPEL.
27
APPEL eDocumentation
Register for ECAS
APPEL > Authentication screen
The 'APPEL authentication' screen is shown.
Profiles
People who need to sign up for ECAS are:
♦ Members of an external organisation who need to connect to APPEL and do not yet have
an ECAS username or password.
People who already have an ECAS account and who want to access APPEL, can directly request
for APPEL login activation.
Register in ECAS
1.
2.
3.
4.
5.
6.
7.
8.
9.
10.
11.
12.
13.
14.
15.
16.
17.
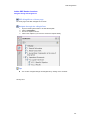
Click on 'Register in ECAS'.
The 'ECAS login' screen is shown.
Change the login domain to 'External' if necessary.
Click on 'Not registered yet' to create an account.
The 'ECAS user registration form' is shown.
Introduce a username of your choice (optional). (See tips)
Introduce your first name.
Introduce your last name.
Introduce your e-mail address.
Repeat your e-mail address for verification.
Select your preferred language for the communication.
Read the privacy statement.
Select the box below to acknowledge that you have read and understood the privacy
statement.
Introduce the characters shown on the image to do a security check.
Click on 'Submit'.
The confirmation screen 'Thank you for registering, you will receive an email allowing
you to complete the registration process' is shown.
Complete the ECAS registration process with the mail you received.
Tips
♦
♦
♦
♦
♦
The user domain has to be 'External' because you are a member of an organisation
external to the European Commission.
When you do not introduce a username in the ECAS user registration form, the system
generates one for you. The assigned username is informed to you afterwards. You
receive it in the confirmation mail to complete the ECAS registration process.
Click on the printer icon or the link 'privacy statement' to see a printer friendly version of
the privacy statement.
The security check is not case sensitive.
Click on 'Try a different image' to receive another security code when the characters of
the security check image are illegible.
Remarks
♦ All fields with an asterisk [*] are mandatory and have to be completed.
♦ The introduced e-mail address has to be personal. It is used to inform you about
your account. Be aware that the European Commission will never ask you for
your username and password.
28
Access rights
Change the login domain for ECAS
APPEL > Authentication screen
The 'APPEL authentication' screen is shown.
Profiles
People who need to change the login domain for ECAS to 'external' are:
♦ Members of an external organisation who wish to sign up for APPEL.
♦ Members of an external organisation who wish to login to APPEL.
Change the login domain to 'External'
1.
2.
3.
4.
5.
6.
7.
Click on 'Register in ECAS' listed under the new authentication system.
Click on 'change it' if the domain is not 'External'.
The 'Domain selection' screen is shown.
Select 'Neither an institution nor a European body'.
Select 'Remember my choice' if necessary.
Click on 'Select'.
You are redirected to the previous screen (step 2) and the domain has changed to
'External'.
Tips
♦
The user domain has to be 'External' because you are a member of an organisation
external to the European Commission.
Remarks
♦ When you try to login to a wrong domain, your username and password are not
accepted. An error message is shown: 'Incorrect username or password supplied
for the selected domain. If you are not a member of this domain, please change
it'. Click on the link in the error message to change the domain.
29
APPEL eDocumentation
Complete the ECAS registration process
Your inbox > ECAS mail
Check the inbox of the email address that you previously introduced during the creation of your
ECAS account. An email from the ECAS Service should be in your inbox. (See remarks)
Complete the registration with the ECAS mail
1. Go to the mail from the European Commission Authentication Service (ECAS).
2. You received this mail to complete the registration process.
3. Your username is informed to you if you have not introduced one in the 'ECAS user
registration form'.
4. Click on 'this link' to create your password.
5. Initialise your ECAS password.
Tips
♦
If 'this link' provided in the mail does not work, you can always use the internet address
listed below in the same mail.
Remarks
♦ The mail is automatically sent after you have submitted the registration form for
the ECAS account. You have 90 minutes to validate your account. According to
the INTERNET provider, there could be a delay between the moment of
submission of the form and the arrival of the email. If the mail has arrived more
then 90 minutes later, the authentication system will ask you to redo the
validation process for the account.
♦ When you do not receive the mail, please check your 'junk mail' inbox.
30
Access rights
Initialise your ECAS password
ECAS mail > Password initialisation
Click on 'this link' in the ECAS confirmation mail to complete the registration process. The
'Password initialisation' screen is shown.
Initialise your ECAS password
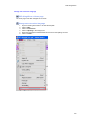
1.
2.
3.
4.
5.
The 'New ECAS password' screen is shown.
Introduce a password of your choice in the field 'New ECAS password'.
Repeat the newly chosen password in the field 'Confirm new ECAS password'.
Click on 'Submit'.
You are connected to APPEL. The screen that is shown, is adjusted to the rights that are
associated to your user account for APPEL.
The ECAS password requirements
The ECAS password
♦ may not include your username.
♦ must contain at least 10 characters chosen from at least 3 groups of the following 4
character groups:
♦ Upper case: A to Z
♦ Lower case: a to z
♦ Numeric: 0 to 9
♦ Special characters: !"#$%&'()*+,-./:;<=>?@[\]^_`{|}~
Only these characters are permitted, as well as the white space.
Examples of passwords are provided at the bottom of the screen. You can generate other sample
passwords if necessary.
Remarks
♦ All fields with an asterisk [*] and all chapters with an exclamation mark are
mandatory and have to be completed.
♦ Remember the password that you introduce. You will not receive any additional
confirmation mail to remind you which password you have chosen.
♦ The password that you initialise cannot be changed within 24 hours.
♦ Due to security reasons, the system asks for password changes on a regular
basis.
♦ You have 90 minutes to complete the registration process, starting from the
moment you submit your personal information.
31
APPEL eDocumentation
Register in APPEL
Request for APPEL login activation
Login with ECAS > APPEL home screen
Click on 'Connect to APPEL' on the 'APPEL authentication' screen. The 'ECAS login' screen is
shown. Login with your ECAS account. The 'APPEL home' screen is shown.
Request for APPEL login activation
1.
2.
3.
4.
5.
6.
7.
8.
9.
10.
11.
12.
Click on 'Request for APPEL login activation'.
The 'Request login activation' screen is shown.
Select the search term.
Introduce your information in the search field.
Click on 'Request'.
The search result list with the possible organisations is shown.
Click on your organisation.
Select 'yes' or 'no' to indicate whether or not you are a user rights administrator for your
organisation (see tips).
Click on 'Confirm'.
Your login activation request for your organisation has been registered. An email is sent to
you as soon as your user account is activated for APPEL.
Click on 'home'.
The 'APPEL home' screen is shown.
Tips
♦
32
Select 'yes' if you are a contact person between DG ECHO and your organisation. The
contact person(s) manage(s) the user rights for all members of an organisation.
Register for FPA
Registration form (Step 1)
Login with ECAS > APPEL home screen
Click on 'Connect to APPEL' on the 'APPEL authentication' screen. The 'ECAS login' screen is
shown. Login with your ECAS account. The 'APPEL home' screen is shown.
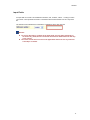
Registration form (Step 1)
1. Click on 'Register your organisation to become candidate to the FPA'.
2. The 'Registration form (step 1)' screen is shown. Read the text on the screen carefully.
1. At the left of the screen, you will see a list of links to the different sections of the form,
some are read only some can be completed.
2. Click on 'General information' and on 'Self assessment' and complete the forms.
3. Click on 'Save' to save your data.
4. Click on 'Check' to check if the Form is ready for evaluation.
5. If the message 'Ready for evaluation' appears, click on 'Evaluation' to go to the
next step.
6. The screen 'Info on Step 2' is shown.
7. Read the text on the screen carefully and click on 'Continue' at the bottom of the
screen.
3. The 'Registration form (Step 2)' screen is shown.
Tips
♦
♦
♦
Move the mouse over the fields to get more information in the section 'General
information'.
Click on 'Help' next to a question to get more information In the section 'Self-Assessment'.
You have 4 months to complete the registration process.
Remarks
♦ All fields with an asterisk [*] are mandatory and have to be completed.
♦ Please save regularly during the completion of the questionnaire. An APPEL
session expires after 90 minutes of inactivity.
33
APPEL eDocumentation
Registration form (step 2)
'Info on step 2' > Registration form (step 2)
The screen 'Info on step 2' is shown. Read the text carefully and click on 'Continue' at the bottom of
the screen. The 'Registration form (step 2)' is shown.
Registration form (Step 2)
1. The screen 'Info on step 2' is shown. Read the text carefully and click on 'Continue'.
2. On the 'Registration form (step 2)' you need to:
1. Click on each section and continue the completion of the Registration form. The
section which where 'read only' in the first step are now adaptable. The selfassessment section becomes 'read only' and can no longer be modified.
2. Click on 'Save' to save your data.
3. Click on 'Check' to check if the Form is ready for submission.
4. Once all mandatory fields are completed, you can submit the form.
3. Click on 'Submit'.
4. You receive the confirmation message 'Thank you for completing the questionnaire'.
5. To finalise and formalise your application, you must send DG ECHO the mandatory
documents listed on the screen.
Tips
♦
♦
You have 4 months to send the complete application to DG ECHO.
Once you've completed the questionnaire, you are a candidate for FPA.
Remarks
♦ Before submitting the form, please make sure you completed all fields in all
sections. Once the application is submitted, you cannot make any modifications
anymore.
♦ Please save regularly during the completion of the questionnaire. An APPEL
session expires after 90 minutes of inactivity.
♦ After the completion of the online questionnaire, you need to send a printed paper
version to DG ECHO. An authorised member of your organisation needs to sign
the printed version and send it with the other mandatory documents. When you
failed to send the documents within the given time limit, your application will be
cancelled.
34
Register for FPA
Refused questionnaire
Your application might be refused at the end of the selection process. The European Commission
reserves the right to refuse applicants to the FPA if they do not satisfy the stated requirements.
The full responsibility for the accuracy of the information provided to the Commission by an FPA
applicant lies with the applicant organisation. When false information is provided to DG ECHO, the
FPA candidate is excluded from the FPA for two years.
When your application is refused, you can
♦ Apply to reconsider your case after rejection.
♦ Launch an appeal procedure.
♦ Make a complaint to the European Ombudsman.
You can find the links for these actions on the 'Request for admission' screen.
Go the 'APPEL home' screen. Click on 'Register your organisation to become candidate to the FPA'
and the 'Request for admission' screen is shown.
35
APPEL
eDocument
Browser functions
APPEL is a web based application. This means that all functionalities are shown within a browser
window. The browsers toolbar is automatically visible as well.
Please do not use the functionalities of the browser toolbar: Error messages may appear and you
will loose some of the introduced information.
The Browser functionalities are not needed since all required functionalities are built within APPEL.
36
APPEL
Print or export an eDocument
eDocument > 'Print'
Click on 'Agreement' or 'e-Request' in the main menu of APPEL. Search for a Grant Agreement or
eRequest in the search screen. The function 'Print' is available in the navigation tab of the
eDocument or at the end of each page.
Print an eSingleForm
1.
2.
3.
4.
5.
6.
Click on 'Print'.
The application opens a pdf download screen.
Click on 'Open' or 'Save'.
The PDF document including the PDF menu bar is shown.
Click on the printer icon.
Select the print range:
♦ 'all' to print all;
♦ 'current view' to print the selection that is shown at the moment;
♦ 'current page' to print the page that you are on
♦ 'pages' to select the pages you wish to print.
7. Click on 'Ok'.
37
APPEL eDocumentation
Annexing files
eDocument > 'Annexes'
Click on 'Agreement' or 'e-Request' in the main menu of APPEL. Search for a Grant Agreement or
eRequest in the search screen. The function 'Annexes' is available in the navigation tab of the
eDocument.
The eDocuments are based on the original 'paper' forms. If necessary you can attach other
documents, pictures, excel files… to the electronic version.
Annex files to the eDocument
1.
2.
3.
4.
5.
6.
7.
8.
9.
Click on 'Annexes' in the navigation tab.
An overview of the annexed files is shown in the content tab.
Click on 'Browse…' next to the field 'File to upload'.
A pop-up window is shown.
Select the file that you want to annex and click on 'Open'.
The document path is shown in the field 'File to upload'.
Introduce a description of the file in the field 'File description'.
Click on 'Upload' at the bottom right of the screen.
The file is now shown in the content tab.
Tips
♦
♦
♦
♦
To upload several files at a time, please compress them first in a ZIP archive.
The description of the file can be changed after uploading it.
Click on the page icon or the floppy disc icon to open or save the file.
Click on the red cross in the list to remove the file from the project.
Remarks
♦ The allowed file types for uploading are: .csv, .doc, .gif, .htm, .html, .jpg, .jpeg, .pdf,
.png, .rtf, .txt, .xls or .zip files.
♦ If the file you upload is bigger than 5 megabyte, the message 'Error to upload the
file: Maximum size is exceeded' is shown.
38
APPEL
File types
The file types supported by the system for uploads are the ones with the following extensions:
♦ .csv: From within Microsoft Excel or a different spreadsheet program export as csv. The
CSV ("Comma Separated Value") file format is often used to exchange data between
disparate applications. The file format, as it is used in Microsoft Excel, has become a
pseudo standard throughout the industry, even among non-Microsoft platforms.
♦ .doc: Microsoft Word document. In computing, DOC or doc (an abbreviation of 'document')
is a file extension for word processing documents; most commonly for Microsoft Word.
♦ .gif: Image file format. The Graphics Interchange Format (GIF) is an 8-bit-per-pixel bitmap
image format that was introduced by CompuServe in 1987 and has since come into
widespread usage on the World Wide Web due to its wide support and portability.
♦ .htm - .html: Internet / webbased file format. HTM or HTML, an initialism of HyperText
Markup Language, is the predominant mark-up language for web pages. It provides a
means to describe the structure of text-based information in a document — by denoting
certain text as links, headings, paragraphs, lists, and so on — and to supplement that
text with interactive forms, embedded images, and other objects. HTML is written in the
form of tags, surrounded by angle brackets
♦ .jpg - .jpeg: Image file format. JPG or JPEG (pronounced JAY-peg) is a commonly used
method of compression for photographic images. The degree of compression can be
adjusted, allowing a selectable tradeoff between storage size and image quality. JPEG
typically achieves 10 to 1 compression with little perceivable loss in image quality.
♦ .pdf: Adobe PDF files. The Portable Document Format (PDF) is the file format created by
Adobe Systems in 1993 for document exchange. PDF is a fixed-layout format used for
representing two-dimensional documents in a manner independent of the application
software, hardware, and operating system.
♦ .png: Image file format. Portable Network Graphics (PNG) is a bitmapped image format
that employs lossless data compression. PNG was created to improve upon and replace
the GIF format, as an image-file format not requiring a patent license.
♦ .rtf: Text document format. From within a word processing application use export (or save)
as rtf. The Rich Text Format (RTF) is a free document file format developed by Microsoft
in 1987 for cross-platform document interchange. Most word processors are able to read
and write RTF documents.
♦ .txt: Text document format. From within a word processing application use export (or
save) as txt. txt is a filename extension for files consisting of text usually contain very
little formatting (ex: no bolding or italics). The precise definition of the .txt format is not
specified, but typically matches the format accepted by the system terminal or simple text
editor. Files with the .txt extension can easily be read or opened by any program that
reads text and, for that reason, are considered universal (or platform independent).
♦ .xls: Microsoft Excel Spreadsheet document. Microsoft Excel (full name Microsoft Office
Excel) is a proprietary spreadsheet application written and distributed by Microsoft for
Microsoft Windows and Mac OS X. It features calculation, graphing tools, pivot tables
and, except for Excel 2008 for Mac OS X, a macro programming language called VBA
(Visual Basic for Applications). It is overwhelmingly the dominant spreadsheet application
available for these platforms and has been so since version 5 in 1993[citation needed],
and is bundled as part of Microsoft Office.
♦ .zip: Compression file format. Mainly used to put together multiple documents. The ZIP file
format is a popular lossless data compression and archival format. A ZIP file contains
one or more files that have been compressed, to reduce their file size, or stored as-is.
39
APPEL eDocumentation
Track changes
To compare two different versions of an eDocument, you search for eRequests or Agreements. In
the result list on the right there is a column with check boxes.
The following picture illustrates an example how to use track changes:
1. In the result list, you select two versions to compare.
2. Click on the check box to select two documents to compare.
3. Click on 'Track changes' at the bottom right of the screen.
Tips
♦
Click on the column title 'Reference Number' to order the result list.
Remarks
♦ Click on 'Track changes' without checking two items of the list and the following
message is be shown: 'You have to choose 2 documents to compare'.
40
APPEL
Track changes result
The following picture illustrates the different elements for a result with 'track changes':
1. The project information for the first selected eDocument.
2. The project information for the second selected eDocument.
3. The changes are highlighted in red.
41
APPEL eDocumentation
eSingleForm
Introduction eSingleForm
All documents of the Project Cycle Management of a Humanitarian Operation are called
eDocuments. The whole of eDocuments are brought together to reflect to the eSingleForm on
paper that have been used in the previous years.
The different eDocuments are:
♦ eRequest (eRQ): The first proposition and new version to validate by DG ECHO. It can be
sent by the Partner or encoded by the Archivist if the Partner sends only a paper version.
♦ eModification Request (eMR): The Partner sends it to report changes in the project. The
modifications need to be validated by DG ECHO.
♦ eIntermediate Report (eIR): to report on intermediate progress within the Humanitarian
project, to introduce unilateral changes. The eIR also needs to be validated by DG
ECHO.
♦ eFinal Report (eFR): Document is the last report to send to DG ECHO, it reports on the
results of the Humanitarian project. The financial report is not included in the eFR, it is
attached as an annex to it. The e-FR also need to be validated by DG ECHO.
Partners submit eDocuments to DG ECHO via APPEL, DG ECHO has to appraise any
eDocument. Each eDocument is appraised by a tandem Desk Officer/Field Expert.
The appraisal process is split into two major workflows:
♦ The pre-appraisal: where the actual appraisal is prepared;
♦ The Appraisal: in which the eDocument (e-RQ, e-MR, e-IR) are verified, validated or
refused.
An appraisal can lead to a Favourable opinion or a refusal. According to the eDocument, the
appraisal may require the submission of a new version of the eDocument.
The following chapters guide you through the process of completing each of the eDocuments.
42
APPEL
Paper version versus eDocuments
The differences between the paper version and the eDocuments are numerous:
♦ Formal validation of eDocuments;
♦ Possibility to trace on the screen the status of the action and the status of the documents;
♦ The Partner can work on a draft version before submitting the eDocument to DG ECHO;
♦ Different possibility of temporary validations before the formal “sent” to DG ECHO;
♦ Sending of up to date versions of eRequest , eModification;
♦ Possibility to annex files (documents, images, excel files,…).
The advantages are obvious:
♦ Possibility for distance control;
♦ Possibility to add data's any time;
♦ Progressive integration of financial data;
♦ Possibility to create .XML files for upcoming versions;
♦ Simplification and reduction of paper exchange between Partners and ECHO;
♦ Simultaneous consultation of eDocuments;
♦ Online exchange of information between the field, field offices, the headquarters and DG
ECHO;
♦ Certainty that what you see is the last version.
43
APPEL eDocumentation
Guidelines
The input fields in the eDocument have some limitations and possibilities.
Limitations of the fields
♦
♦
♦
♦
♦
♦
♦
The number of characters that can be introduced per field are limited. The maximum is
indicated at the bottom of the input field. If you want to introduce more information,
upload a file as an annex.
Only the chapters and subchapters with an icon in front can be changed.
All chapters of the form, indicated with the mandatory icon (!) have to be saved even if
you do not alter any of the information.
You can paste text and tables from Word.
♦ The following message might be shown: 'The text you want to paste, seems to be
copied from Word. Do you want to clean it before pasting?'
Click on 'cancel' to maintain the text style as in Word.
The information shown in green is automatically completed by the system.
The fields shown in black have to be completed if required.
If a bar with an arrow is shown at the top of a field, you have the possibility to format the
introduced information. Click on the arrow to open the formatting toolbar. This toolbar
can be used to introduce tables, special characters, numbered lists,… in the field.
'Background colour' highlights the text.
Financial overview
The financial overview becomes annex II of the signed Agreement. This financial overview is also
strongly related to the Final financial report. For more details and advice, please consult the
Guidelines of the Final Financial Report on the DG ECHO intranet.
♦
♦
♦
♦
44
Eligible cost of Action
The partner can use another representation of eligible costs in line with the current
practice in its organisation. These headings will become the chapters of the final financial
reporting. In case personnel costs and the costs on information, communication and
visibility are not explicitly available in section 4.3.2, these have to be explicitly mentioned
in this table.
Subtotal direct eligible costs
This amount has always to be equal to the total of all 'total amounts per result' and the
'total amount other costs' in section 4.3.2.
Direct revenue from the Action
In case the Action itself creates income, the budgeted/finally real amount has to be
mentioned here. As this income will be considered as income, it can increase the overall
amount of the Action. It will also be deducted when fixing DG ECHO's contribution.
DG ECHO % of total funding
In the case of multi donor contracts, the % of DG ECHO funding is not required.
Total Costs will always be equal to 'Total Funding'.
APPEL
Screen structure
eDocument
The following picture illustrates the general layout of the screen:
The eDocument and Grant Agreement screens contain the following tabs:
1. Menu
2. Heading
3. Navigation tab
4. Content tab
45
APPEL eDocumentation
Heading
The heading shows a brief overview of the eDocument or the Grant Agreement.
As soon as the initial eRequest is submitted to DG ECHO a project reference number is created.
During the life cycle of a project the eDocuments and the Grant Agreement can have several
statuses.
46
APPEL
Navigation tab
The following picture illustrates the general layout of the navigation tab:
The navigation tab contains the following information:
1. Functionalities affecting the entire eDocument
2. Project number.
3. Type of the Document.
After submitting the initial eRequest, all eDocuments for that project will be added
automatically in the tree view.
Click on '-' to collapse the tree view.
Click on '+' to expand the tree view.
4. The chapters and sub-chapters for the selected eDocument.
Click on the icons or the name of the subchapter to navigate through the form.
The different icons indicate mandatory fields, saved information
5. Scroll bar.
Click the up or down arrow to scroll through the tree view.
Drag the vertical scroll box to scroll through the tree view.
47
APPEL eDocumentation
Content tab
The following picture illustrates the general lay out of the content tab:
This tab displays the information of the active form section, as shown in the title.
The content tab contains the following information:
1. The chapter or title.
2. The sub-chapters or eDocument section.
3. The different form fields to introduce (text fields, option buttons, list boxes…).
4. The function buttons.
5. Text indicating the status of the section:
♦ 'Modified' appears as soon as information is introduced.
♦ 'Draft' appears after clicking 'Save as draft'.
♦ 'Saved' appears after clicking 'Save'.
48
APPEL
Chapter status icons
The little icons used in the navigation tab in front of a section or chapter indicate the following:
The information is read only as indicated by the magnifying glass.
The information is optional and has not been changed from the previous version.
The information is mandatory as indicated by the red exclamation mark and has not been
changed from the previous version.
The information is optional and has been saved as indicated by the green check mark.
The information is mandatory and has been saved as indicated by the red exclamation mark and
the green check mark.
The information is optional and has been saved as draft as indicated by the red capital 'D'.
The information is mandatory and has been saved as draft as indicated by the red exclamation
mark and the red capital 'D'.
49
APPEL eDocumentation
eDocument Functions
The functions in the navigation tab affect the entire eDocument. There are three possible
combinations of functions that are shown.
The standard available functions:
1. Annexes
In read only mode the Annexes function shows a list of all the attached documents to the
eDocument.
♦ In all other modes the Annexes function shows a list of the already attached
documents to the eDocument and allows uploading other documents to attach.
2. Print
Generates a PDF document of only this screen or chapter. The PDF document can then
be
♦ Sent to a printer.
♦ Saved on your hard disk or network disk.
♦ Previewed in the content tab.
The functions available when creating a new eDocument:
3. Delete
Deletes a draft eDocument before submitting it. Click on 'OK' to confirm the suppression
of this draft document, or click on 'Cancel' to continue creating the document and no
information will be lost.
4. Submit
Sends the eDocument to DG ECHO. Once the form is dispatched to a DG ECHO Unit,
the partner receives an acknowledgment receipt.
5. Upload
Uploads a document, created with the offline application. Sends the eDocument to DG
ECHO.
The function available to create a new version of an eDocument:
6. New version.
This function creates a new version of an already existing eSingleForm. The version
number will be automatically shown in the project information tab. This function is active
once an eDocument is dispatched to a DG ECHO unit.
Remarks
♦ If the status of a project is locked, the function 'New version' is not active. A
project can be locked by a Desk Officer for example if he/she awaits additional
information from a Field Expert. The project is locked by the system depending
on the activity that is in operation.
50
APPEL
Content functions
The standard available functions:
1. Save as draft
Saves the information you introduced into the screen. It does not check the validity of the
information yet.
2. Save
Saves the information you introduced into the screen after validating the data and the
mandatory fields. The missing mandatory information is indicated in red or with a red line.
3. Undo typing
Dismisses all the information introduced and returns to the last saved version of that
screen.
4. Print
Generates a PDF document of only this screen or chapter. The PDF document can then
be;
♦ Sent to a printer.
♦ Saved on your hard disk or network disk.
♦ Be previewed in the content tab.
Remarks
♦ Always click on 'Save as draft', 'Save' or 'Undo typing' before navigating to another
chapter or screen! If not the following message is shown 'Do you want to save
your changes? Click OK to save or Cancel for leaving.'
♦ If you click 'OK' the data introduced will be validated and saved when clicking
'Cancel' newly introduced changes will not be saved.
51
APPEL eDocumentation
Reference number
The reference number, also called eDoc ID, is automatically generated as soon as the initial
eRequest is created.
There are several types of reference numbers;
♦ Initial eRequest before submitting consists out of four digits.
♦ After submitting the initial eRequest, all eDocuments have the following structure;
The reference number contains the following information:
1. The year when the first eRequest for a project was submitted, it consists out of four digits.
2. The sequential project number contains five digits.
3. The type of eSingleForm is a two characters string:
♦ RQ = Request.
♦ MR = Modification Request.
♦ IR = Intermediate Report.
♦ FR = Final Report.
4. The sequential request or report number for a particular eDocument.
5. The version number of the request or report.
52
APPEL
Letter Of Intent
Introduction Letter Of Intent
With the publication of a HIP, DG ECHO informs its partners of the availability of funds for a specific
country or crisis and of the planned procedure for allocation of these funds.
Because of the increased level of transparency, DG ECHO expects to receive more proposals from
some countries than was the case in the past. In such cases, Partners might be asked to submit
Letter of Intent (LOI) in order to give DG ECHO a global view on how Partners expect to cover the
identified needs, without having to draft a full Single Form.
The information to be provided in the Letter of Intent for the first assessment round will be precised
in the HIP. It will generally include at least:
♦ area of intervention
♦ sector
♦ duration
♦ beneficiaries
♦ context/needs assessment
♦ proposed response (results, activities)
♦ estimated costs
♦ requested contribution
♦ contact details
The proposal that is created as a result of the Letter Of Intent has to be created as a new version of
the LOI, not as a new eRequest.
The term Letter Of Intent is often abbreviated to LOI.
November 2012
53
APPEL eDocumentation
Functions
Create a new Letter of Intent
eRequests search screen > New Letter of Intent
Click on 'e-Request' in the main menu of APPEL. The 'e-Requests search' screen is shown. The
function 'New Letter of Intent' is shown.
Profiles
People who can create Letters of Intent have:
♦ An Encoder profile.
♦ A Sender profile.
Create a new Letter of Intent
1.
2.
3.
4.
Click on 'New Letter of Intent'.
Click on 'OK' to confirm the creation of a new Letter of Intent.
Start completing the Letter of Intent by clicking on each chapter (see tips).
Click on 'Submit'.
Tips
♦
♦
♦
You can also use the 'upload' function to upload a validated Letter of Intent made in the
Offline eTools application.
Click on 'Validate' to verify whether all mandatory chapters and fields are completed.
In order to be able to submit at least one result as needed, you should encode an amount
(an estimation of the amount or one symbolic euro if you don't know the amount yet).
Remarks
♦ The indications in the fields of the Letter Of Intent are only in English, e.g. the
fields that are not mandatory in the LOI contain the remark ‘Facultative for Letter
Of Intent unless specified in HIP’.
♦ All fields with an asterisk [*] and all chapters with an exclamation mark are
mandatory and have to be completed, unless they contain the text 'Facultative for
Letter of Intent unless specified in HIP'.
♦ Add at least one result and complete the details for this result.
♦ In chapter 11 'Financial overview', you need to add the amounts of your results so
the 'Total amount' is correct.
♦ In chapter 11 'Financial overview', you need to add at least 1€ in the 'Eligible costs
of action' field. This symbolic amount can be added in case you don't have any
financial information yet. When adding it, please make sure that the other fields
are empty so you can validate this section with 1€ as the 'total financing' amount.
November 2012
54
APPEL
Submit a Letter of Intent
eRequests search screen > New Letter of Intent
Click on 'e-Request' in the main menu of APPEL. The 'e-Requests search' screen is shown.
Search for the lLetter of Intent of your choice and click on it.
Profiles
People who can submit Letters of Intent have:
♦ A Sender profile.
Submit a Letter of Intent
1.
2.
3.
4.
5.
6.
7.
8.
9.
Introduce at least all mandatory information. Please see the previous topic if necessary.
Save each chapter.
Upload the necessary annexes.
Click on 'Submit'.
A confirmation message is shown, click on 'ok'.
Another confirmation message with your reference number is shown (See remarks).
Click on 'print the acknowledgement receipt' if necessary.
Click on 'Back'.
The Letter of Intent is now submitted.
If the desk needs more information or clarifications, a message will be sent to the Partner to ask to
submit a new version of the Letter of Intent.
Remarks
♦ The confirmation message serves as an acknowledgement receipt. This message
has a legal value. It proves that DG ECHO has received the document.
November 2012
55
APPEL eDocumentation
New version of the Letter of Intent
eRequests search screen > New version of Letter of Intent
Click on 'e-Request' in the main menu of APPEL. The 'e-Requests search' screen is shown.
Profiles
People who can create new versions of the Letter of Intent have:
♦ An Encoder profile.
♦ A Sender profile.
Create a new version of the Letter of Intent
1.
2.
3.
4.
Search for the 'Letter of Intent' for which you want to create a new version.
Click on the title of the 'Letter of Intent' to open it.
Click on 'New version' in the navigation tab.
A window is shown, where you need to click on 'New version of the Letter Of Intent' to
create a new version for that Letter of Intent. The Desk might ask for an eRequest
instead of a new version of the Letter of Intent. In this case, please create a new
eRequest starting from the LOI.
5. Complete the eSingleForm by clicking on each chapter.
6. Click on 'Submit'.
Remarks
♦ A new version can be created and submitted as soon as a Desk Officer was
assigned for the appraisal of the Letter of Intent.
♦ The Desk Officer can 'lock' the Request (the status is shown on the traffic lights of
the Grant Agreement search result list) and no new version can be submitted.
♦ No new version can be submitted once the evaluation of the desk is terminated.
♦ All fields with an asterisk [*] and all chapters with an exclamation mark are
mandatory and have to be completed unless they contain the text 'Facultative for
Letter of Intent unless specified in HIP'.
November 2012
56
APPEL
Create a new eRequest from a LOI
eRequests search screen > eRequest starting from Letter of Intent
Click on 'e-Request' in the main menu of APPEL. The 'e-Requests search' screen is shown.
Profiles
People who can create eRequests from Letters of Intent have:
♦ An Encoder profile.
♦ A Sender profile.
Create an eRequest starting from a Letter of Intent
1.
2.
3.
4.
Search for the 'Letter of intent' for which you need to create a new version.
Click on the title of this 'Letter of Intent' to open it.
Click on 'New version' in the tree view.
A window is shown, click on 'Create an eRequest from the LOI' to create an eRequest
starting from this Letter Of Intent.
5. Complete the eSingleForm by clicking on each chapter.
6. Click on 'Submit' to submit the eRequest created from your LOI.
Remarks
♦ The Desk can 'lock' the eRequest (the status is shown on the traffic light icon in
the Agreements list) so a new version cannot be submitted.
♦ No new version can be submitted once the evaluation of the Desk is terminated.
♦ All fields with an asterisk [*] and all chapters with an exclamation mark are
mandatory and have to be completed.
November 2012
57
APPEL eDocumentation
eRequest
Introduction eRequest
The eRequest is the first document of all the different eDocuments. It is the initial Request that the
Partner sends to DG ECHO.
This initial Request can be accepted or denied by DG ECHO. When it is denied, the Partner will
have to create a new version of the Request. When the eRequest is accepted, the Partner is
considered to be a candidate for the Humanitarian Action.
58
APPEL
Functions
Create a new eRequest
eRequests search screen > New eRequest
Click on 'e-Request' in the main menu of APPEL. The 'e-Requests search' screen is shown. The
function 'New e-Request' is shown.
Profiles
People who can create eRequests have:
♦ An Encoder profile.
♦ A Sender profile.
Create a new eRequest
1.
2.
3.
4.
Click on 'New e-Request'.
Click on 'OK' to confirm the creation of a new eRequest.
Start completing the eRequest by clicking on each chapter.
Click on 'Submit'.
Tips
♦
♦
You can also use the 'upload' function to upload a validated eRequest made in the Offline
eTools application.
An eRequest can also be created starting from the Letter of Intent.
Remarks
♦ All fields with an asterisk [*] and all chapters with an exclamation mark are
mandatory and have to be completed.
November 2012
59
APPEL eDocumentation
Submit an eRequest
eRequests search screen > eRequest
Click on 'e-Request' in the main menu of APPEL. The 'e-Requests search' screen is shown.
Search for the eRequest of your choice and click on it.
Profiles
People who can submit eRequests have:
♦ A Sender profile.
Submit an eRequest
1. Introduce at least all mandatory information for:
♦ Chapter 1;
♦ Chapter 2 to 9;
♦ Subchapter 4.3.1;
♦ Subchapter 4.3.2;
♦ Chapter 8;
♦ Chapter 10;
♦ Chapter 11;
♦ Chapter 12;
♦ Annex A.
2. Save each chapter.
3. Upload the necessary annexes.
4. Click on 'Submit'.
5. A confirmation message with your reference number is shown (See remarks).
6. Click on 'Back'.
7. The eRequest is now submitted.
If the desk needs more information or clarifications, a message will be sent to the Partner to ask to
submit a new version of the eRequest.
Tips
♦
Instead of introducing all mandatory information online, you can also upload an eRequest
which was created offline. Only chapter 12 contains mandatory information that needs to
be added after uploading the eRequest, because not all information in chapter 12 is
available offline. Some information can only be selected online. This information is
available in the system, linked to the Partner module.
Remarks
♦ The confirmation message serves as an acknowledgement receipt. This message
has a legal value. It proves that DG ECHO has received the document.
♦ All fields with an asterisk [*] and all chapters with an exclamation mark are
mandatory and have to be completed.
November 2012
60
APPEL
Create a new version of an eRequest
eRequests search screen > eRequest
Click on 'e-Request' in the main menu of APPEL. The 'e-Requests search' screen is shown.
Profiles
People who can create new versions of eRequests have:
♦ An Encoder profile.
♦ A Sender profile.
New version of an eRequest
1. Search for the 'eRequest' for which you want to create a new version.
2. Click on the 'e-Request' of your choice.
3. Click on 'New version' in the navigation tab to confirm the creation of a new version for
that eRequest.
4. Complete the eSingleForm by clicking on each chapter.
5. Click on 'Submit'.
Remarks
♦ A new version can be created and submitted as soon as a Desk Officer was
assigned for the appraisal of the proposal of the action.
♦ The Desk Officer can 'lock' the Request (the status is shown on the traffic lights of
the Grant Agreement search result list) and no new version can be submitted.
♦ No new version can be submitted once the evaluation of the desk is terminated.
♦ All fields with an asterisk [*] and all chapters with an exclamation mark are
mandatory and have to be completed.
November 2012
61
APPEL eDocumentation
Chapters
Complete chapter 1: General information (RQ)
eRequest > Chapter 1
Click on 'e-Request' in the main menu of APPEL. The 'e-Requests search' screen is shown. Select
the eRequest of your choice. Click on chapter 1 'General information'.
Profiles
People who can complete the chapters of eRequests have:
♦ An Encoder profile.
♦ A Sender profile.
Complete chapter 1: General information
1. Introduce at least all mandatory information.
2. The 'name of Humanitarian Organisation/Country of registration' are already shown
in the field. They are automatically completed by the system according to your
organisation's information. They have been introduced previously just before launching
the creation of a new eRequest.
3. Click on the calendar icon and select a 'Start date'. If the Action has already started, you
introduce the reason that justifies this situation (e.g. Primary Emergency or Urgent
Action).
4. Is the start date for eligibility of expenditure equal to the date of submission?
1. Yes: introduce the explanation of the expenses charged to the budget between date
of submission and start date of the action.
2. No: click on the calendar icon, select the 'start date' and introduce an explanation.
5. Select the requested funding modality for this agreement:
1. 100% financing: justify the request.
2. Co-financing.
6. Urgent action:
1. Yes: select 'ECHO Primary emergency decision', 'ECHO emergency decision' or
'Other ECHO Decision'. If you select the last option, justify it.
2. No.
7. The fields 1.9 and 1.10 are greyed out. Later on, they will be automatically completed by
the system with information from within the application.
8. Click on 'Save'.
Tips
♦
♦
♦
♦
62
The mandatory field 'Title of the Action' can no longer be modified after signature of the
Agreement. The Partner should avoid data that might change, such as the number of
beneficiaries, the exact location or sub-region of implementation, etc. It may include
some notion of the sector of the Action and mention the country/ies.
The exact locality/ies for the 'Area of intervention' will be detailed under 4.1 with maps and
relevant reference points.
The start date of the action should be the actual starting date of the Action in the field, it
should not necessarily be the first day of a month. It may be different from the date for
eligibility of expenditure. If the Action has already started explain the reason that justifies
this situation.
The mandatory field 'Duration of the Action in months' covers the implementation period of
the Action in the field from the start date. It covers the entire duration of the Action. It
should be preferably in whole months. E.g. 2 months and 10 days or 3 months and 0
days (the fields 'months' and 'days' cannot be empty. So even when it are zero days, you
need to introduce '0'). Fractions of months should be avoided. The period for finalising
the final report (max 3 months) is not included in the total duration.
APPEL
♦
♦
♦
The nature of expenditure corresponding to the eligibility period (time elapsed between the
eligibility date and start date) should be clearly identified at chapter 4.3.2 and agreed with
DG ECHO.
The 100% financing option is an exception that has been foreseen for Humanitarian
Actions in duly justified circumstances. The Partner must provide relevant justification on
the 100% funding.
The 'Action total amount' and the 'DG ECHO contribution requested' in chapter 1.7 are
copied from chapter 11.
Remarks
♦ The duration of any Action cannot go beyond the duration of the ECHO Financing
Decision, except in case of suspensions during the implementation of the Action.
♦ Click on 'Add a row' to add another area of intervention if necessary.
♦ All fields with an asterisk [*] and all chapters with an exclamation mark are
mandatory and have to be completed.
63
APPEL eDocumentation
Complete chapters 2 to 9 (RQ)
eRequest > Chapter 2 to 9
Click on 'e-Request' in the main menu of APPEL. The 'e-Requests search' screen is shown. Select
the eRequest of your choice. Click on chapter 2 to 9.
Profiles
People who can complete the chapters of eRequests have:
♦ An Encoder profile.
♦ A Sender profile.
Complete chapters 2 to 9
1. Click on each chapter and subchapter in the navigation tab on the left side of the screen.
2. Introduce at least all mandatory information for each chapter and subchapter.
3. Click on 'Save'.
Tips
♦
♦
♦
♦
♦
♦
Field 2.3 'Summarise findings of the assessment…' should form the basis for the
intervention logic. If there is a report of the assessment it may be annexed and the
results summarised here with regard to the proposed Action. When relevant, assessment
of risks potentially arising from natural disasters should be provided.
For field 3.1 'Humanitarian Organisation's presence in the area of intervention…', you
indicate:
♦ A brief overview of current and future strategy in the country;
♦ The current and recent activities in the country;
♦ A brief overview of the presence in the country (number of years, type of intervention,
regions, type of set-up).
Click here for more details about the logical framework of chapter 4.
Click here for more details about 'Other costs' of chapter 4.
Click here for more details about chapter 8.
To delete a line, select the check box on the left and click on 'Save'.
Remarks
♦ All fields with an asterisk [*] and all chapters with an exclamation mark are
mandatory and have to be completed.
64
APPEL
Complete subchapter 4.3.1: Logical framework (RQ)
eRequest > Subchapter 4.3.1
Click on 'e-Request' in the main menu of APPEL. The 'e-Requests search' screen is shown. Select
the eRequest of your choice. Click on subchapter 4.3.1 'Operational overview of the action: logframe'.
Profiles
People who can complete the chapters of eRequests have:
♦ An Encoder profile.
♦ A Sender profile.
Complete subchapter 4.3.1: Operational overview of the action: logframe
1. The 'Title of the Action' is already completed by the system.
2. Introduce the 'principal objective'.
3. Specific objective:
1. Introduce the 'Specific objective'.
2. Click on '+i' to add an indicator for the specific objective.
3. Introduce the necessary information in the fields.
4. Click on 'X' to delete the indication and its source of verification.
5. Introduce the 'Preconditions'.
4. Results (See remarks):
1. Click on '+r' to add a result.
2. Introduce the 'result'.
3. Click on '+i' to add an indicator for the specific objective.
5. Introduce the necessary information in the fields.
6. Click on 'X' to delete the indication and its source of verification.
7. Activities:
1. Click on '+a' (in the result field) to add an activity.
2. Introduce the 'activity'.
Tips
♦
♦
♦
♦
♦
♦
Select 'yes' or 'no' for 'Autosave' at the top of the screen if you wish to automatically save
the introduced information.
The title of the action should be the same as the one of chapter 1.2. It is automatically
copied by the system from chapter 1.2, once 1.2 has been completed.
The principal objective should be in line with one of the relevant DG ECHO financing
decision specific objectives, if it is already available.
Click on 'Maximize' to open a new window for 4.3.1.
Click on the pink exclamation mark of each field to have more information about the field.
Tips on the limitations and mandatory information to complete the logical framework.
Remarks
♦ The detail of each introduced result can be completed on this screen, or on
subchapter 4.3.2.
♦ You can give the details for each of the added results in subchapter 4.3.2.
♦ The information introduced in subchapter 4.3.2 is partly visible in the logical
framework.
♦ You can add maximum 5 indicators.
♦ The logical framework shows only a maximum of 3 main activities per result. If
there are more activities, the 3 most important activities should be put first when
completing subchapter 4.3.2.
65
APPEL eDocumentation
Complete subchapter 4.3.2: More detailed information on specific objectives and
results (RQ)
eRequest > Subchapter 4.3.2.
Click on 'e-Request' in the main menu of APPEL. The 'e-Requests search' screen is shown. Select
the eRequest of your choice. Click on subchapter 4.3.2. 'More detailed information on specific
objective and results'.
Profiles
People who can complete the chapters of eRequests have:
♦ An Encoder profile.
♦ A Sender profile.
In subchapter 4.3.2.1 you introduce the details and objectively verifiable indicators of the specific
objective. The details of every result in subchapter 4.3.1 are shown under subchapter 4.3.2.2 and
the following subchapters. The number of subchapters depends on the number of results that you
have.
Complete subchapter 4.3.2.2 and the following subchapters
1.
2.
3.
4.
Click on the result of your choice.
Click on 'Detail'.
Click on 'Detail' in subchapter 4.3.2 in the navigation tab on the left side of the screen.
The form of the 'Detail' has four tabs: 'Details', 'Objectively Verifiable Indicators',
'Activities' and 'Means and costs'.
5. Click on each tab and introduce at least all mandatory information.
6. Click on 'Save' to save the data on each tab.
Tips
♦
♦
♦
♦
♦
The information introduced under subchapters 4.3.2.2 and the following subchapters, is
partly visible under subchapter 4.3.1.
Select 'Automatic saving' at the top of the screen if you wish to automatically save the
introduced information.
Click on '+' to add an indicator, activity or mean.
Click on 'Delete' to delete information.
Click on 'X' to delete a cost.
Remarks
♦
♦
♦
♦
♦
♦
♦
♦
66
The Result's short description should not be left empty.
The Global Cost should not be left empty.
At least one Sector should be selected.
The number of beneficiaries cannot be empty.
At least one Type of beneficiaries should be selected.
You can add maximum 5 indicators.
The Short description on the Indicator tab should not be left empty.
The Short description on the Activities tab should not be left empty.
APPEL
Complete chapter 8: Contingency measures and security (RQ)
eRequest > Chapter 8
Click on 'e-Request' in the main menu of APPEL. The 'e-Requests search' screen is shown. Select
the eRequest of your choice. Click on chapter 8 'Contingency measures and security'.
Profiles
People who can complete the chapters of eRequests have:
♦ An Encoder profile.
♦ A Sender profile.
Complete chapter '8. Contingency measures and security'
1. Introduce at least all mandatory information.
2. Has a specific security protocol for this action been established?
1. Yes: introduce an explanation of the protocol
2. No.
3. Standard procedures.
3. Click on 'Save'.
Tips
♦
♦
For the contingency measures under 8.1, in case some of the assumptions or risks
materialize, the Partner should explain how he would react in order to mitigate their
effects on the implementation of the Action and what other options would be proposed for
the achievement of the foreseen results.
To delete a line, select the check box on the left and click on 'Save'.
67
APPEL eDocumentation
Complete chapter 10: Human resources (RQ)
eRequest > Chapter 10
Click on 'e-Request' in the main menu of APPEL. The 'e-Requests search' screen is shown. Select
the eRequest of your choice. Click on chapter 10 'Human resources'.
Profiles
People who can complete the chapters of eRequests have:
♦ An Encoder profile.
♦ A Sender profile.
Complete chapter '10. Human resources'
1. Introduce at least all mandatory information.
2. Introduce the 'person/month per project'.
♦ For example; 5 persons working on a project for 6 months equals 30 people/month.
3. Click on 'Add a row' to introduce more global figures per function and status.
4. Click on 'Save'.
Tips
♦
♦
♦
68
Personnel meeting only one or none of the criteria for the status shall fall under the
category of 'local staff'.
Information on implementing partner staff is needed for key staff, in particular when no
expatriate staff of the partner directly manages the Action at the local level.
To delete a line, select the check box on the left and click on 'Save'.
APPEL
Complete chapter 11: Financial overview (RQ)
eRequest > Chapter 11
Click on 'e-Request' in the main menu of APPEL. The 'e-Requests search' screen is shown. Select
the eRequest of your choice. Click on chapter 11 'Financial overview'.
Profiles
People who can complete the chapters of eRequests have:
♦ An Encoder profile.
♦ A Sender profile.
Complete chapter '11. Financial overview'
1.
2.
3.
4.
Introduce at least all mandatory information.
Click on '+' to add a cost.
Click on 'X' to delete a cost.
Click on 'Save'.
Tips
♦
In chapter 11 of the eSingleForm, the left column (Eligible cost of Action) should reflect the
main chapters of the Partners financial reporting structure, as these lines will become
later the chapters of the final financial report. It is advisable to have around 10 headings.
69
APPEL eDocumentation
Complete chapter 12: Administrative information (RQ)
eRequest > Chapter 12
Click on 'e-Request' in the main menu of APPEL. The 'e-Requests search' screen is shown. Select
the eRequest of your choice. Click on chapter 12 'Administrative Information'.
Profiles
People who can complete the chapters of eRequests have:
♦ An Encoder profile.
♦ A Sender profile.
Complete chapter '12. Administrative Information'
1.
2.
3.
4.
5.
Introduce at least all mandatory information.
The 'FPA number' is automatically completed by the system.
Introduce the necessary information in the three fields phone, fax and email.
The 'Bank account' information is automatically completed by the system.
Click on 'Save'.
Tips
♦
♦
70
The various people to be kept informed in the Humanitarian Organisation can be identified
in subchapter 12.3, which contains the person(s) to be mentioned in Article 7 of the
Agreement. The Partner may add the names of up to 2 persons who may launch
unilateral modifications as well as amendment request on behalf of the Humanitarian
Organisation. All information sent out by DG ECHO Brussels for the related Action will be
automatically copied via e-mail to these addresses.
To delete a line, select the check box on the left and click on 'Save'.
APPEL
Complete Annex A: Procurement table (RQ)
eRequest > Annex A
Click on 'e-Request' in the main menu of APPEL. The 'e-Requests search' screen is shown. Select
the eRequest of your choice. Click on Annex A 'Procurement table'.
Profiles
People who can complete the chapters of eRequests have:
♦ An Encoder profile.
♦ A Sender profile.
Complete annex A: Procurement table
Introduce the necessary information in the Procurement table and give a comment.
1. Introduce at least all mandatory information.
2. Introduce the 'launch date procedure' as dd/mm/yyyy.
3. Introduce the 'contracting date' as dd/mm/yyyy.
4. Click on 'Save'.
Tips
♦
♦
♦
♦
Annex A is only mandatory for Agreements with an A-control mechanism. All sections of
this section should be filled in. It regroups the main significant procurement procedures
for this Action and will be filled in at proposal stage and updated at intermediate report
and final report stage.
The Partner may attach a table with another layout (e.g. used inside the project) provided
that all necessary information is available. Partners that signed an agreement with a Pcontrol mechanism do no have to provide such a table with the Single Form at proposal
or reporting stages. A whole procurement procedure will be dealt with per row.
A procurement procedure cannot to be split because it is used in several activities. If a
procurement procedure has to be split, an explanation has to be given. The dates for
launching and contracting can also be expressed in number of weeks after the start of
the Action.
To delete a row, select the check box on the left and click on 'Save'.
Remarks
♦ You need to click on 'save' even if you do not introduce any information.
71
APPEL eDocumentation
eModification Request
Introduction eModification Request
The eModification Request provides a way to adjust the original eRequest after it has already been
granted by DG ECHO.
The eModification permits to request modifications to the signed Agreement. The modifications are
limited though. Not all data can be changed.
For example the title of the Action and the Principal Objective can no longer be modified after
signature of the Agreement. Also the control mechanism that is applied cannot be modified for a
specific Action during its lifetime. For the eligible cost of action, the denomination of headings
cannot be modified during the lifetime of the Action. New headings can be added if necessary.
To modify the eRequest before the Agreement is signed, you can create a new version of the
eRequest.
72
APPEL
Functions
Create a new eModification Request
Agreements search screen > New eModification
Click on 'Agreement' in the main menu of APPEL. The 'Agreements search' screen is shown.
Search for an Agreement in the status 'ongoing'. The function 'New e-Modification' is shown.
Profiles
People who can create eModification Requests have:
♦ An Encoder profile.
♦ A Sender profile.
Create a new eModification Request
1.
2.
3.
4.
5.
6.
7.
Click on 'New e-Modification'.
Click on 'OK' to confirm the creation of a new eModification.
Click on the chapters that need to be modified.
Introduce the required information in the fields. (See tips)
Click on 'Save'.
Click on 'Annexes' at the top of the navigation tab to add annexes.
Click on 'Submit' at the top of the navigation tab.
Tips
♦
♦
The fields that you modify for the eModification Request have to be completed the same
way as in the eRequest. Go to the eDocumentation about the eRequest to learn how to
complete the fields of the eModification Request.
You can also use the 'upload' function to upload a validated eModification that was
completed in the Offline eTools application.
Remarks
♦ All chapters with an exclamation mark are mandatory and have to be completed.
♦ Annexes are not mandatory.
♦ The eModification request can be submitted only if the mandatory screens are
completed.
73
APPEL eDocumentation
Submit an eModification Request
Agreements search screen > New eModification
Click on 'Agreement' in the main menu of APPEL. The 'Agreements search' screen is shown.
Search for an Agreement in the status 'ongoing'. The function 'New e-Modification' is shown.
Profiles
People who can submit eModification Requests have:
♦ A Sender profile.
Submit a new eModification Request
1. Introduce at least all mandatory information:
♦ Amendment Request;
♦ Chapters 1 to 12;
♦ Subchapter 4.3.1.
2. Save each chapter.
3. Upload annexes if necessary.
4. Click on 'Submit'.
5. A confirmation message is shown with your reference number (See remarks).
6. Click on 'Back'.
7. The eModification Request is submitted.
If the desk needs more information or clarifications, a message will be sent to the partner to ask to
submit a new version of the eModification Request.
Tips
♦
Instead of completing all mandatory information online, you can also upload an
eModification Request that was created offline. Only chapter 12 contains mandatory
information that should be added after having uploaded the eModification Request,
because chapter 12 is not available in the Offline eTools application.
Remarks
♦ The confirmation message serves as an acknowledgement receipt. This message
has a legal value. It proves that DG ECHO has received the document.
♦ All fields with an asterisk [*] and all chapters with an exclamation mark are
mandatory and have to be completed.
74
APPEL
Create a new version of an eModification Request
Agreements search screen > New version of an eModification
Click on 'Agreement' in the main menu of APPEL. The 'Agreements search' screen is shown.
Search for an Agreement. Select the Grant Agreement for which you wish to create a new version
of the eModification Request.
Profiles
People who can create new versions of eModification Requests have:
♦ An Encoder profile.
♦ A Sender profile.
Create a new version of an eModification Request
1. Click on the Grant Agreement for which you wish to create a new version of the
eModification Request.
2. Click on the eModification Request linked to this Grant Agreement.
3. Click on 'New version' in the navigation tab to confirm the creation of a new version for
that eModification request.
4. Click on 'OK' to confirm the creation of a new eModification.
5. Click on the tabs that need to be modified.
6. Introduce the required information in the fields. (See tips)
7. Click on 'Save'.
8. Click on 'Annexes' at the top of the navigation tab to add annexes.
9. Click on 'Submit' at the top of the navigation tab.
Tips
♦
The fields that you modify for the eModification Request have to be completed the same
way as in the eRequest. Go to the eDocumentation about the eRequest to learn how to
complete the fields of the eModification Request.
Remarks
♦ All chapters with an exclamation mark are mandatory and have to be completed.
♦ The eModification request can only be submitted if the mandatory screens are
completed.
75
APPEL eDocumentation
Chapters
Amendment request (MR)
eModification Request > Complete the amendment request
Click on 'Agreement' in the main menu of APPEL. The 'Agreements search' screen is shown.
Search for an Agreement. Select the Agreement of your choice. Go to the eModification Request
and complete the chapter 'Amendment Request'.
Profiles
People who can create amendment requests have:
♦ An Encoder profile.
♦ A Sender profile.
Request Amendments
1. Introduce the 'Name', 'Telephone', 'Fax' and 'eMail' of the people who request the
amendments.
2. List of the requested amendments.
1. Introduce the information relative for the amendment request.
2. If other amendments are requested, click on 'Add a line'.
An amendment is a modification to an Agreement to reflect operational or other changes in the
implementation of the Action. A unilateral modification can be done by an eIntermediate Report.
Modifications that results in an Exchange of Letters or a Supplementary Agreement must be done
through a Modification Request.
For the paper version of the eSingleForm it is possible to ask for an amendment by way of the
Intermediate Report. In the paper version of the eSingleForm, a modification to an Agreement is to
reflect operational or other changes in the implementation of the Action. In APPEL, it is no longer
possible to ask for an amendment by use of the Intermediate Report.
Tips
♦
♦
There should be one row for each change in a chapter that affects the Grant Agreement
(chapters 1 to 5 and 8). For unilateral changes this is not necessary.
To delete a line, select the check box on the left and click on 'Save'.
Remarks
♦ All fields with an asterisk [*] and all chapters with an exclamation mark are
mandatory and have to be completed.
76
APPEL
Complete chapters 1 to 12 (MR)
eModification Request > Complete the chapters
Click on 'Agreement' in the main menu of APPEL. The 'Agreements search' screen is shown.
Search for an Agreement. Select the Agreement of your choice. Go to the eModification Request
and complete chapters 1 to 12.
Profiles
People who can complete the chapters of eModification Requests have:
♦ An Encoder profile.
♦ A Sender profile.
Chapters 1 to 12
1. Click on each chapter and under each chapter in the navigation tab to the left of the
screen.
2. For each chapter and subchapter, complete, modify and introduce an explication in the
appropriate fields.
3. Click on 'Save'.
Tips
♦
♦
♦
Click here for more details about the logical framework of chapter 4.
Chapter 10: Human resources
♦ You can modify global figures per function and status.
♦ New functions can be added.
Chapter 11: Financial overview
♦ The total Cost and total Funding are automatically calculated by the system.
♦ If an Intermediate Report has been submitted, the intermediate budget will be
present. If no Intermediate Report was submitted, the Intermediate budget will
remain empty. The Intermediate budget cannot be altered in the Modification
Request stadium.
♦ Total Cost and Total Funding must be equal.
Remarks
♦ In most chapters, the information is completed by the system. This information
has been provided with the creation of the initial eRequest. You can complete
and/or modify the information.
♦ The eModification Request gives you the possibility to modify and/or complete
existing information.
♦ All fields with an asterisk [*] are mandatory and have to be completed.
♦ Introduce the revised work plan if it has been changed after proposal.
77
APPEL eDocumentation
Complete subchapter 4.3.1: Logical Framework (MR)
eModification Request > Complete the Logical Framework
Click on 'Agreement' in the main menu of APPEL. The 'Agreements search' screen is shown.
Search for an Agreement. Select the Agreement of your choice. Go to the eModification Request
and complete the Logical Framework.
Profiles
People who can complete the chapters of eModification Requests have:
♦ An Encoder profile.
♦ A Sender profile.
Complete subchapter 4.3.1: Logical framework
1.
2.
3.
4.
5.
6.
7.
8.
9.
Select 'Yes' or 'No' for the autosave.
The 'Title of the action' remains the same as introduced in the eRequest.
The 'principal objective' remains the same as introduced in the eRequest.
Specific objective.
1. The 'specific objective' remains the same as introduced in the eRequest.
2. Click on 'I+iI' to add an indicator for the specific objective.
3. Introduce the necessary information in the fields.
4. Click on 'IxI' to delete the indicator and its source of verification.
5. Introduce the 'Preconditions'.
Results
1. Click on '+r' to add a result.
2. Introduce the 'result'.
3. Click on 'I+iI' to add an indicator for the result.
Introduce the necessary information in the fields.
Click on 'IxI' to delete the indicator and its source of verification.
Click on 'IeditI' to edit the result.
Activities
1. Click on 'I+aI' (in the result field) to add an activity.
2. Introduce the 'activity'.
Remarks
♦ Select 'Autosave' at the top of the screen if you want to automatically save the
introduced information.
♦ Objectives, results and activities data were completed by the system as the
information was provided upon creating the initial eRequest.
♦ The Title of the action, the Principal objective and the Specific objective remain as
introduced in the eRequest, they cannot be modified.
♦ New indicators for the Specific objective can be added.
♦ The eModification will allow you to complete the information and to add new
results and/or new activities.
♦ Click on the pink question mark to see more information about the desired data to
introduce.
78
APPEL
Complete Annex A: Procurement table (MR)
eModification Request> Annex A
Click on 'Agreement' in the main menu of APPEL. The 'Agreements search' screen is shown.
Search for the Agreement for which you wish to create an eModification Request or click on an
existing eModification Request linked to this Grant Agreement. Click on Annex A 'Procurement
table'.
Profiles
People who can complete chapters of eModification Requests have:
♦ An Encoder profile.
♦ A Sender profile.
Complete Annex A: Procurement table
If any change has occurred in the procurements, complete the Procurement table and give a
comment.
1. Click on 'Add a row', Introduce the necessary information in the fields and click on the
arrow to select 'Yes' or 'No'
2. Click on the calendar icon to add the launch date of the procedure.
3. Click on the calendar icon to add the contracting date.
4. If necessary you can introduce a comment.
5. If necessary introduce the reference of the documents that you will annex.
6. Click on 'Save'
Tips
♦
To delete a line, select the check box on the left and click on 'Save'.
Remarks
Repeat steps 1 to 3 for each change in the procurements.
This chapter is mandatory and you have to click on 'Save' even if you do not alter any
of the information.
79
APPEL eDocumentation
eIntermediate Report
Introduction eIntermediate Report
For each humanitarian action an intermediate report has to be sent to DG ECHO to report on the
progress of the project. The Intermediate Report should be used as a monitoring tool. To apply any
modifications, the eModification Request should be used.
As in the Initial Request all chapters indicated with the mandatory icon have to be saved even if you
do not alter any of the information.
The information shown in green is automatically copied from the Initial Request, only the fields
written in black have to be completed if necessary. Only the chapters and subchapters with an icon
in front can be changed.
80
APPEL
Functions
Create a new Intermediate Report
Agreements search screen > Agreement
Click on 'Agreement' in the main menu of APPEL. The 'Agreements search' screen is shown.
Search for an Agreement in the status 'ongoing'. The function 'New e-Interim' is shown.
Profiles
People who can create eIntermediate Reports have:
♦ An Encoder profile.
♦ A Sender profile.
Create a new eIntermediate Report
1.
2.
3.
4.
5.
6.
7.
Click on 'New e-Interim'.
Click on 'OK' to confirm the creation of a new e-Intermediate report.
Click on each chapter starting from the first.
Introduce the required information in the fields.
Click on 'Save'.
Click on 'Annexes' at the top of the navigation tab to add annexes.
Click on 'Submit' at the top of the navigation tab.
Tips
♦
You can also use the 'upload' function to upload a validated eIntermediate Report made in
the Offline eTools application.
Remarks
♦ All fields with an exclamation mark are mandatory and have to be completed.
♦ The activity can only be submitted after having completed all mandatory fields.
81
APPEL eDocumentation
Submit an Intermediate Report
Agreements search screen > Agreement
Click on 'Agreement' in the main menu of APPEL. The 'Agreements search' screen is shown.
Search for an Agreement in the status 'ongoing'. The function 'New e-Interim' is shown.
Profiles
People who can submit eIntermediate Reports have:
♦ A Sender profile.
Submit an eIntermediate Report
1. Introduce at least all mandatory information:
♦ Chapters 1 to 10;
2. Save each chapter.
3. Upload annexes if necessary.
4. Click on 'Submit'.
5. A confirmation message is shown with your reference number (See remarks).
6. Click on 'Back'.
7. The eIntermediate Report is submitted.
If the desk needs more information or clarifications, a message will be sent to the partner to ask to
submit a new version of the eIntermediate Report.
Tips
♦
Instead of completing all mandatory information online, you can also upload an
eIntermediate Report that was created offline.
Remarks
♦ The confirmation message serves as an acknowledgement receipt. This message
has a legal value. It proves that DG ECHO has received the document.
♦ All fields with an asterisk [*] and all chapters with an exclamation mark are
mandatory and have to be completed.
82
APPEL
Chapters
Complete chapters 1 to 10 (IR)
eIntermediate Report > Complete chapters 1 to 10
Click on 'Agreement' in the main menu of APPEL. The 'Agreements search' screen is shown.
Search for the Agreement for which you wish to create an eIntermediate Report or click on an
existing Intermediate Report linked to this Grant Agreement. Click on chapters 1 to 10.
Profiles
People who can complete chapters of eIntermediate Reports have:
♦ An Encoder profile.
♦ A Sender profile.
Complete chapter 1: General Information
If any supplementary agreement(s) have been appraised towards this action complete the field 1.11
1.
2.
3.
4.
5.
6.
Click on 'Add a row'.
Click on the calendar icon to add the date of request.
Click on the calendar icon to add the date of Agreement.
Introduce the subject of the agreement.
If necessary you can introduce the reference of the documents that you will annex.
Click on 'Save'.
Remarks
♦ Repeat these steps for each supplementary agreement.
Chapters 2 to 10
For each chapter, complete the fields to reflect the evolution of the Action:
1. Introduce the necessary information for each question of the chapter.
2. Introduce, if necessary, the reference to the documents that are annexed.
3. Click on 'Save'.
Remarks
♦ All chapters with an exclamation mark are mandatory and have to be completed.
You have to click on 'Save' even if you do not alter any of the information.
83
APPEL eDocumentation
eFinal Report
Introduction eFinal Report
The eFinal Report gives the possibility to report any relevant or significant activities, changes and
problems.
At final report stage, it is recommended to mention particular difficulties faced during the
implementation, lessons learnt, ideas for future projects and to provide any other information which
is considered useful for a better understanding/evaluation of the implemented actions and its
achievements. Chapter 13 of the eFinal Report permits you to add conclusions and comments.
Descriptions of the related costs and means can be required, as well as any copies of press
releases, press cuttings, all publications and audiovisual materials produced and any relevant
visibility items or pictures thereof. As described in the guidelines for the Final Financial Report, the
documents which complete the Final Report have to be annexed to the Final Report.
84
APPEL
Functions
Create a new eFinal Report
Agreements search screen > New eFinal Report
Click on 'Agreement' in the main menu of APPEL. The 'Agreements search' screen is shown.
Search for an Agreement in the status 'ongoing'. The function 'New e-Final' is shown.
Profiles
People who can create eFinal Reports have:
♦ An Encoder profile.
♦ A Sender profile.
Create a new eFinal Report
1.
2.
3.
4.
5.
6.
7.
Click on 'New e-Final'.
Click on 'OK' to confirm the creation of a new e-Final report.
Click on each tab starting from the first.
Introduce the required information in the fields.
Click on 'Save'.
Click on 'Annexes' at the top of the navigation tab to add annexes.
Click on 'Submit' at the top of the navigation tab.
Tips
♦
You can also use the 'upload' function to upload a validated eFinal Report made in the
Offline eTools application.
Remarks
♦
♦
♦
♦
Tabs with a magnifying glass are 'read only'.
All tabs with an exclamation mark are mandatory and have to be completed.
Annexes are mandatory.
The activity can only be submitted after having completed all mandatory fields.
85
APPEL eDocumentation
Submit an eFinal Report
Agreements search screen > New eFinal Report
Click on 'Agreement' in the main menu of APPEL. The 'Agreements search' screen is shown.
Search for an Agreement in the status 'ongoing'. The function 'New e-Final' is shown.
Profiles
People who can submit eFinal Reports have:
♦ A Sender profile.
Submit an eFinal Report
1. Introduce at least all mandatory information:
♦ Chapters 1 to 10.
♦ Chapter 11;
♦ Chapter 13.
2. Save each chapter.
3. Upload annexes if necessary.
4. Click on 'Submit'.
5. A confirmation message is shown with your reference number (See remarks).
6. Click on 'Back'.
7. The eFinal Report is submitted.
If the desk needs more information or clarifications, a message will be sent to the partner to ask to
submit a new eFinal Report.
Tips
♦
Instead of completing all mandatory information online, you can also upload an eFinal
Report that was created offline.
Remarks
♦ The confirmation message serves as an acknowledgement receipt. This message
has a legal value. It proves that DG ECHO has received the document.
♦ All fields with an asterisk [*] and all chapters with an exclamation mark are
mandatory and have to be completed.
86
APPEL
Chapters
Complete chapters 1 to 10 and Annex A (FR)
eFinal Report > Chapters 1 to 10 and Annex A
Click on 'Agreement' in the main menu of APPEL. The 'Agreements' search screen is shown.
Search for an Agreement. Select the Agreement for which you wish to create an eFinal Report or
click on an existing eFinal Report linked to this Agreement. Click on chapters 1 to 10 and Annex A.
Profiles
People who can complete the chapters of the eFinal Reports have:
♦ An Encoder profile.
♦ A Sender profile.
Chapters 1 to 10 and Annex A
1. Click on each chapter on the left side of the screen.
2. Introduce a justification in the fields of each chapter. Explain why a progress, goal or
result was achieved or why not.
3. Complete the fields that are additionally shown.
Remarks
♦ Chapters 1 to 10 and Annex A have been completed by the system.
♦ The newly added fields in these chapters have to be completed.
87
APPEL eDocumentation
Complete chapter 11 (FR)
eFinal Report > Chapter 11
Click on 'Agreement' in the main menu of APPEL. The 'Agreements' search screen is shown.
Search for an Agreement. Select the Agreement for which you wish to create an eFinal Report or
click on an existing draft eFinal Report linked to this Agreement. Click on chapter 11.
Profiles
People who can complete the chapters of the eFinal Reports have:
♦ An Encoder profile.
♦ A Sender profile.
Complete chapter 11: Financial overview
1.
2.
3.
4.
Introduce the 'Final Budget' for each listed operation.
Introduce the 'Final Budget' of the indirect costs.
Click on 'Save'.
If the introduced amounts do not comply with the validation rules, the financial overview is
not saved and the message 'Data validation' is shown.
5. Correct the amounts and click on 'Save' once more.
Tips
♦
♦
♦
♦
♦
Click on the green exclamation mark right of the title to see a description of the fields and
the list of the validation rules of the data.
Only the 'Final Budget' is introduced in the Final Report.
The 'Initial Budget', the 'Modified Budget' and the 'Committed amount' are introduced by
the system because they have been provided upon the submission of the initial
eRequest, the eModification Request and Intermediate Report.
The total costs and the total financing are automatically calculated by the system.
The intermediate and final budgets are automatically calculated by the system.
Remarks
♦ All fields with an asterisk [*] and all chapters with an exclamation mark are
mandatory and have to be completed.
♦ As described in the guidelines for the Final Financial Report, the documents which
complete the Final Report have to be annexed to the Final Report.
88
APPEL
Complete chapter 13 (FR)
eFinal Report > Chapter 13
Click on 'Agreement' in the main menu of APPEL. The 'Agreements' search screen is shown.
Search for an Agreement. Select the Agreement for which you wish to create an eFinal Report or
click on an existing draft eFinal Report linked to this Agreement. Click on chapter 13.
Profiles
People who can complete the chapters of the eFinal Reports have:
♦ An Encoder profile.
♦ A Sender profile.
Complete chapter 13: Conclusions and comments on the humanitarian
organisation
1. Introduce the 'Comments and conclusions'.
2. Click on 'Save'.
Remarks
♦ Chapter 13 only appears at the level of the eFinal Report.
89
APPEL eDocumentation
Useful links
Useful links
To obtain more information about the Framework Partnership Agreement and the eSingleForm click
the links below:
♦ More information on the FPA general web page.
♦ More information on the eSingleForm (final!) guidelines.
♦ More information on the Partner helpdesk site.
The following list shows you the Frequently used pages of the eDocumentation:
♦ Grant Agreement result list
♦ Status of the operation
♦ Screen structure
♦ eDocument functions
90
APPEL
FAQ
Frequently Asked Questions APPEL
General questions
What is APPEL used for?
APPEL gives the opportunity to organisations that are not yet recognised as ECHO Partners, to
become known to ECHO by applying for the Framework Partnership Agreement (FPA) in order to
become an ECHO Partner.
APPEL is also used by existing ECHO Partners to update their administrative data. This helps the
smooth and fast management of projects.
At the same time, it allows Partners to update operational and financial information which can then
be used by ECHO for the periodic assessment of Partners foreseen under the FPA.
The ECHO Partner submits the eDocuments of the eSingleForm to ECHO via APPEL. He can
follow up on these eDocuments at all times.
Why are there two authentication systems in APPEL?
APPEL is currently being transformed to a more comprehensive tool for a two-way electronic
exchange of information between ECHO and its Partners.
Therefore, a new authentication system based on ECAS is being introduced.
The previous authentication system is still available, however Partners and potential Partners are
encouraged to create their own ECAS account as soon as possible in order to familiarize
themselves with the new authentication system.
Which are the types of access in ECAS?
ECAS allows three different types of profiles to access APPEL and other applications that require
an ECAS account:
♦ A profile to consult;
♦ A profile to update;
♦ A profile to submit.
Who should use the new authentication system in APPEL?
The new authentication system is recommended for connecting to APPEL. It has to be used by all
new organisations that wish to apply for the Framework Partnership Agreement (FPA).
In order to be able to connect to APPEL via the new authentication system, you first need to create
your ECAS account by registering yourself in ECAS.
How can I work with the system APPEL?
You go to the site https://webgate.ec.europa.eu/appel/.
1. If you are already registered in ECAS
♦ Click on 'connect to APPEL' listed under the new authentication system.
♦ The 'ECAS login' screen is shown.
♦ Change the login domain to 'External' if necessary.
♦ Introduce your ECAS username and password.
♦ Click on 'Submit'.
♦ The 'APPEL home' screen is shown.
2. If you are already registered and you have an APPEL username and password
♦ Introduce your APPEL username and password under the old authentication system.
♦ Click on 'Login'.
♦ The 'APPEL home' screen is shown.
3. If you are not yet registered in ECAS or APPEL
♦ Click on 'Register in ECAS' listed under the new authentication system.
♦ Follow the registration process in ECAS.
What is the legality of the green colour for the traffic light?
91
APPEL eDocumentation
The green status of the traffic light icon is given to the action as soon as ECHO signed the
Agreement and sent it to the Partner. The traffic light itself is not legally binding.
What is the difference between 'save' and 'save as draft'?
The 'save' function checks the validity of the data and saves when the information is correct. When
you save, you can still change the information afterwards as long as you haven't submitted the
data. 'Save as draft' only saves the information without validating. The information always has to be
saved before it is submitted.
When is an eRequest visible to DG ECHO?
The eRequest or any other eDocument is only visible in DG ECHO when it is submitted.
What is a new version of an eRequest?
As soon as you submit your eRequest, you cannot change it anymore or add extra attachments. If
you want to change or add information or attachments you can use the function 'New version'.
The system provides you a copy of your original version and you can alter any information.
The function 'New version' becomes available as soon as you have submitted an eRequest and the
Desk Officer starts with the appraisal/evaluation of your proposal.
A new version can be used to introduce changes to the initial request before the signature of the
Agreement.
How can an eDocument be changed once it has been submitted to DG ECHO?
eDocuments that have been submitted to DG ECHO cannot be modified. However, a new version
can be created from the previous one. As long as this new version is in the status 'Draft', you can
make all required changes. The new version of the eDocument will have to be submitted to DG
ECHO again.
I updated the partner data in APPEL, but the changes are not visible in the system. Why?
Before your modifications are visible, DG ECHO has to approve them. Once accepted, the data will
be visible in the system.
In the offline eTools application, there is a 'validation' button. Why can't I see it in APPEL?
In APPEL, the validation is done when clicking on 'save'. In the offline eTools application, there is
an automatic saving function without validation. Therefore, you have a 'validation' function in the
offline eTools application.
Go to the FAQ of the offline eTools application.
Is it possible to modify the control status (A or P)?
You cannot change the control status, it is automatically added by APPEL. The control status
depends on your FPA. When the control status is revised, APPEL will take this into account.
E.g. projects that started before a certain date will keep control status A, and the projects as of a
certain date will have control mechanism P.
eSingleForm questions
You can find quite some questions about the eSingleForm on the site of the DG ECHO Partner's
helpdesk.
Can APPEL be used for primary emergencies?
Yes, APPEL can be used for primary emergencies.
You can select 'yes' for the question 'Urgent action' in chapter 1 of the eRequest. Then you select
'ECHO Primary emergency decision', 'ECHO emergency decision' or 'Urgent action in the
framework of another decision'.
The emergency type determines the amount of fields and the validation rules. When you create a
primary emergency, fewer fields will need to be completed.
How to create a create a proposal from a Letter Of Intent?
To create a proposal starting from a Letter of Intent, you go into your LOI and click on 'New version'.
A window is shown, click on 'Create an eRequest starting from the LOI' to create an eRequest
starting from the LOI.
92
APPEL
How do I submit a revised proposal?
You should submit a new version of an eRequest:
1. Go to APPEL/Requests.
2. Search for the 'eRequest' for which you want to create a new version.
3. Click on the 'e-Request' of your choice.
4. Click on 'New version' in the navigation tab to confirm the creation of a new version for
that eRequest.
5. Complete the eSingle Form by clicking on each chapter.
6. Click on 'Submit'.
Why can't I submit a new version of an eRequest?
This can be caused by two reasons:
♦ You cannot submit a new version when the Desk is still working on the last submitted
eRequest.
♦ You cannot submit a new version of the eRequest when the signature of the agreement
has been launched. The system has a security control option to avoid that the Request is
changed while the process for the signature is ongoing. However, the responsible Desk
Officer can stop the process for the signature and allow the submission of a new version.
Why can't I create a new version of an eRequest?
New versions cannot be created or submitted during certain stages of the evaluation process.
E.g. It is impossible to create / submit a new version
♦ until the eDocument is assigned to a Desk Officer
♦ after the finalisation of the appraisal.
In case you still have to create / submit a new version, please contact the Desk Officer how to
proceed.
Why can I only add 3 activities in the Logical framework, subchapter 4.3.1 of the eRequest?
The logical framework follows the FPA guidelines. The fact to have only 3 activities in the logical
framework was discussed at length during the consultation on the new 2008 FPA.
The logical framework has to provide a good overview of the proposed action in line with the basics
of project cycle management. It is an abbreviated version which contains a maximum of 3 main
activities per result and no means and costs. The means and costs should be provided in
subchapter 4.3.2. As a general rule, the logical framework should contain a maximum of three
pages.
The idea is that the main activities are presented in the logical framework and all the details should
be explained under subchapter 4.3.2. The logical framework in subchapter 4.3.1 should not merely
be a copy of subchapter 4.3.2.
For more information, please consult the DG ECHO Partner's helpdesk.
I can introduce maximum 5 indicators per result in the logical framework. Why?
In the paper SingleForm, it was technically possible to give more than 5 indicators in the logical
framework, but this was in fact not according to the rules of the eSingleForm. So in fact, the
limitation to 5 indicators per result has not changed. APPEL follows the rules of the Single Form
guidelines.
Technical questions
Which are the configuration requirements for APPEL?
The technical requirements for external access to APPEL are:
♦ An internet connection of > 256 Kb is recommended
♦ Internet browser IE 6.x or higher
♦ A screen resolution of 1280 x1024 is Recommended
Which browser should I use?
The online application runs with Internet Explorer. The offline application runs with Internet Explorer
or Firefox.
Should I submit the Modification Request (MR) first, or the Intermediate Report (IR)?
93
APPEL eDocumentation
In case you wish to submit a MR and an IR simultaneously, there are two ways to submit the
Intermediate Report and the Modification Request:
♦
First the IR, then the MR
When the Intermediate Report is created, it is based on the last submitted eSingleForm.
Therefore, the Intermediate Report cannot take the changes of the MR into account.
♦
First the MR, then the IR
In this case, the creation of the IR will have to wait until the MR is approved. This way the
Intermediate Report is based on the last agreed data of the MR. The changes of the MR
are reflected in the IR.
A Modification Request can be submitted any time, regardless of the IR.
94
PDF eSingleForm
Introduction to the PDF eSingleForm
The PDF eSingleForm is a document that presents the eSingleForm in a PDF format.
This format has been developed to replace the current Offline eTools application.
Like the present Offline eTools application, the new PDF eSingleForm is linked to an XML file.
The method for working offline has been simplified thanks to a form presented in one document and
entirely reusing the eSingleForm.
To start working on an eDocument, you simply need to import an empty or a started XML file,
depending on what you would like to do.
The eDocument can be exchanged with your colleagues or can be exported to be transferred to the
online application.
In order to understand the functioning of this new tool, please read the step-by-step documentation
explained in the chapters following this introduction.
You can also contact the DG ECHO partners helpdesk to receive more information about the
functionality of the PDF eSingleForm.
January 2013
95
APPEL eDocumentation
Guidelines
Limitations and improvements
This new PDF eSingleForm contains several improvements but also contains some
inconveniences:
♦
♦
♦
♦
The system contains a limitation of bytes for each field, which is 3800 bytes for most fields.
You can introduce more than 3800 bytes per field, but this amount has to be reduced to
3800 before exporting the file. A warning message is shown to indicate that you went
over the byte limitation.
The system doesn't allow the creation of the copy/pasting of tables in the fields. This is
technically impossible with the PDF technology.
It is not advised to work simultaneously on the same PDF file when it is placed on a
shared drive. You may lose information.
The technical improvements provided by the PDF eSingleForm are the following:
♦
♦
The logical framework is one of the most important tools for preparing and managing
humanitarian aid actions. The visualisation of the matrix has improved to give a better
overview of the vertical logic and also the relations between the objectives, the results,
the indicators, the activities and the risks that come along.
The PDF format also provides the possibility to highlight the modifications from other
colleagues in different colours. This function, which will be explained in detail later on,
facilitates the cooperation between the different people working on the document.
In general you will see that the navigation between the different chapters of the eSingleForm has
been simplified compared to the previous Offline eTools application.
January 2013
96
PDF eSingleForm
Fields
Text fields
Introduce text
1.
2.
3.
4.
Click in the text field.
Introduce or paste text.
Click outside the field to see your text.
The amount of used bytes is shown left below the field.
Format text
1.
2.
3.
4.
Select the text that needs to be formatted.
Right-click with your mouse.
Go to 'text style'.
Select the styles that you prefer.
Tips
♦
♦
You can also use the short key CTRL+E to format text.
Among the formatting options, the following styles will stay: bold, colour, underline and
italic.
Remarks
♦ The text fields do not support any tables. If you want to import an XML file
containing tables, these will be transformed into non-formatted text. A warning
message will be shown to inform you.
♦ For consultation, the tables in non-formatted text are attached to the PDF in HTML
format. These cannot be transferred online.
♦ If you wish to add tables, please annex them via APPEL online.
97
APPEL eDocumentation
Date field
Insert date
1.
2.
3.
4.
5.
98
Click in the date field.
An arrow is shown right of the field.
Click on the arrow.
A calendar is shown.
Select a date.
PDF eSingleForm
Save and validate
Save
♦
The floppy disc icon on the top left of your screen saves your document but it doesn't
validate it.
Tips
♦
When you leave or when you lock your pc, please save the PDF file by clicking on the
floppy disc icon in order not to lose any introduced information.
Validate
You can either validate the entire eSingleForm, or validate per chapter or section:
♦
♦
To validate the entire eSingleForm, you go to the home page and click on 'Validate
eSingleForm'. This validation can also be done on the last page of the PDF at the end
on the eSingleForm.
To validate per chapter or section, you click on 'Validate Chap x' in the top right corner of
the PDF eSingleForm page.
The result of the validation can be different:
♦
♦
If the eSingleForm or the chapter isn't ok, a new page 'Form validation: validation error
details' will be shown at the end of the PDF file. This page contains a list of mistakes in
the eSingleForm or in the validated chapter with the location and description of the
errors.
If the eSingleForm or the chapter is ok, the message 'Validation successful' is shown.
Tips
♦
♦
♦
To facilitate the correction of the indicated mistakes in the validation form, you can
navigate through the mistakes by clicking on 'Go to next error' in the bottom right corner
of the eSingleForm PDF page.
Fields that are not validated are indicated in red.
Underneath each chapter, an icon is shown, which is either a green 'V' or a red 'D'. If the
icon is a red 'D', the chapter is not ok. If the icon is a green 'V', the chapter is validated
and ok.
Janvier 2013
99
APPEL eDocumentation
Screen structure
PDF eSingleForm
PDF eSingleForm > Home page
The home page of the PDF eSingleForm is shown.
Home page
The image below gives a detailed description of the functions on the home page of the PDF
eSingleForm:
1.
2.
3.
4.
5.
6.
7.
8.
9.
100
EN for English or FR for French: Select the language of your choice.
Import XML: Click on this function to import an XML file.
Document type: Indicates the type of document you are working on.
Validate & Export: Click on this function to validate and export the eDocument.
Export XML without validation: Click on this function to export the XML file without
validating it.
Validate eSingleForm: Click on this function to validate the eSingleForm.
Version of the PDF eSingleForm and of the XML file.
Notes: Select this option if you want to the notes to be shown.
Highlight changed/added fields: Select this option of you want to see all modifications
created in this eDocument.
PDF eSingleForm
Adobe PDF Reader functions
Navigate through the eSingleForm
PDF eSingleForm > Home page
The home page of the PDF eSingleForm is shown.
Navigate through the eSingleForm
1.
2.
3.
4.
Import an existing eDocument or an XML file template.
Click on 'Bookmarks'.
The list of chapters is shown.
Click on the chapter of your choice to access the chapter directly.
Tips
♦
You can also navigate through the eSingleForm by clicking on the scroll bar.
January 2013
101
APPEL eDocumentation
Highlight mandatory fields
PDF eSingleForm > Home page
The home page of the PDF eSingleForm is shown.
Highlight mandatory fields
1.
2.
3.
4.
5.
6.
Import an existing eDocument or an XML file template.
Click on 'Highlight Existing Fields' in the top right corner of your screen.
The modifiable and mandatory fields are shown in red frames.
Complete the eSingleForm.
The modified fields are highlighted in yellow.
To delete the red frames, click on 'Highlight Existing Fields' once more in the top right
corner of your screen.
7. The modified fields stay highlighted in yellow.
Tips
♦
♦
♦
♦
Only mandatory fields have a red frame.
Modifiable fields have a background color.
Non-modifiable fields have a white background.
In certain stages of the eSingleForm, there will be fields that become inactive. E.g. in the
eIntermediate Report, only the fields of the eIntermediate Report can be changed.
January 2013
102
PDF eSingleForm
Change auto correction language
PDF eSingleForm > Home page
The home page of the PDF eSingleForm is shown.
Change auto correction language
1.
2.
3.
4.
5.
6.
Import an existing eDocument or an XML file template.
Click on 'Edit'.
Click on 'Preferences'.
Click on 'Spelling' in the category list.
Select the language that Adobe Reader should use for the spelling corrector.
Click on 'Check'.
103
APPEL eDocumentation
Tips
♦
♦
In the image above, the system will correct in 'English (United States)'. If you want the
system to correct e.g. in 'French (France)', then you need to select this language (as
shown below) and click on 'Up' to move this language to the top of the list.
Click on a language and click on 'UnCheck' to deselect the language.
January 2013
104
PDF eSingleForm
Change colours
PDF eSingleForm > Home page
The home page of the PDF eSingleForm is shown.
Change colours of the highlighted fields or mandatory fields
1.
2.
3.
4.
5.
6.
Import an existing eDocument or an XML file template.
Click on 'Edit'.
Click on 'Preferences'.
Click on 'Forms' in the category list.
Go to the frame 'Highlight color' and click on the colour that you wish to modify.
The background colour of the fields and the field frames of the mandatory fields can be
modified.
105
APPEL eDocumentation
January 2013
106
PDF eSingleForm
Annex documents
PDF eSingleForm > Home page
The home page of the PDF eSingleForm is shown.
Annex documents
1. Import an existing eDocument or an XML file template.
2. Click on the icon 'Annexes'.
3. Click on 'Add' to attach a document.
Tips
♦
When you add annexes to the PDF, don't forget to add these annexes in APPEL
afterwards because the annexes are not exported together with the eSingleForm content.
Remarks
♦ The annexes need to be added afterwards in APPEL.
♦ Only the XML file (not the annexes) will be imported in APPEL.
January 2013
107
APPEL eDocumentation
eSF Functions
Download PDF
DG ECHO Partners Helpdesk > Download the PDF
Go to the site http://www.dgecho-partners-helpdesk.eu and to the section 'eTools' to download the
PDF.
Download the PDF
1. Click on the most recent version of the PDF eSingleForm.
2. Create a new file on your desktop, on a USB stick or elsewhere on your pc and name the
file e.g. 'PDF eSingleForm'.
3. Download the PDF file onto the newly created file.
Tips
♦
For more information about the functioning of the PDF eSingleForm, please follow the
interactive trainings and consult the FAQs on the DG ECHO partner helpdesk site. The
contact information for support are available on the site.
January 2013
108
PDF eSingleForm
Import an xml file
PDF eSingleForm > Home page
The home page of the PDF eSingleForm is shown.
Import an XML file
1. Click on the function 'Import XML'.
2. Select the XML file that you wish to open.
3. The type of the imported eDocument will be shown in blue on the home page.
Tips
♦
After importing the file, you select a language on the home page of the eSingleForm.
January 2013
109
APPEL eDocumentation
Complete a Humanitarian Action
PDF eSingleForm > Home page
The home page of the PDF eSingleForm is shown.
Complete a Humanitarian Action
1.
2.
3.
4.
Import an existing eDocument or an XML file template.
Go through the PDF eSingleForm file.
Complete at least all mandatory information.
On the home page or on the last page of the PDF eSingleForm, click on 'Validate the
eSingleForm' to verify the form.
5. If the eSingleForm is not ok, a new page 'Form validation: Validation error details' is
added at the end of the PDF file. This page contains a list with the errors that were found
in the form, with a description and the location of the errors.
6. If the eSingleForm is ok, the message 'Validation successful' is shown.
7. Click on 'Ok'.
Tips
♦
♦
♦
♦
♦
Please also check the chapter 'Save and validate'.
The system contains a limitation of bytes for each field, which is 3800 bytes for most fields.
You can introduce more than 3800 bytes per field, but this amount has to be reduced to
3800 before exporting the file. A warning message is shown to indicate that you went
over the byte limitation.
If a field contains more than 3800 bytes, the field cannot be exported. You need to reduce
the amount of bytes before exporting the file.
When you move the mouse over a field, you receive tips about the content of the field.
January 2013
110
PDF eSingleForm
Complete the logical framework
PDF eSingleForm > Home page
The home page of the PDF eSingleForm is shown.
Complete the logical framework
1.
2.
3.
4.
5.
6.
7.
8.
9.
10.
11.
12.
13.
Import an existing eDocument or an XML file template.
Go to chapter 4.3.1.
Introduce the 'Principal objective'.
Introduce the 'Specific objective'.
Click on 'Add an indicator'.
Complete the fields of the indicator.
Click on 'Add a result'.
Complete the fields of the result.
The 'Total amount' of the result is shown after introducing it in chapter 4.3.2.
Add and complete all the results that are needed.
Go to chapter 4.3.2.
The information introduced in chapter 4.3.1 is copied to chapter 4.3.2.
Complete and introduce details in the fields wherever needed.
Tips
♦
♦
♦
♦
♦
♦
♦
You can add maximum 10 indicators for the specific objective and maximum 5 indicators
per result.
Only the three first activities per result are shown in the system.
Only 3 activities can be added per result in chapter 4.3.1.
You can add more activities per result in chapter 4.3.2.
Click on 'X' on the right of the field to delete the field.
Click on 'Delete' to delete an element.
Click on 'Show' to see the result details in chapter 4.3.2.
January 2013
111
APPEL eDocumentation
Add notes
PDF eSingleForm > Home page
The home page of the PDF eSingleForm is shown.
Add notes
1. Import your XML file.
2. Select 'Notes' at the bottom of the home page in the PDF eSingleForm.
3. Add notes in the field 'Notes' that is shown at the bottom of each chapter.
Tips
♦
♦
♦
♦
The text introduced in the field 'Notes' can be formatted the same way as the other text
fields.
The fields for the notes do not have a byte limit. The field can contain as many characters
as you want.
Deselect 'Notes' to hide the notes.
Click on 'Delete notes' to delete the notes.
January 2013
112
PDF eSingleForm
Highlight changes
PDF eSingleForm > Home page
The home page of the PDF eSingleForm is shown.
Highlight changes
1. Import an XML file.
2. Select 'Highlight changed/added fields' at the bottom of the home page of the PDF
eSingleForm.
3. Introduce your name in the field 'Current reviewer'.
4. The colour of the field with your name, is the colour that indicates your changes.
5. Start your changes.
Change reviewer
1.
2.
3.
4.
Go to the bottom of the home page of the PDF eSingleForm.
Click on 'Change reviewer'.
Introduce your name (new reviewer).
Start your changes.
Stop tracking changes without validation
1.
2.
3.
4.
Go to the bottom of the home page of the PDF eSingleForm.
Deselect 'Highlight changed/added fields'.
The name(s) of the reviewer(s) stay visible after deselecting this option.
The modified fields stay highlighted in the colour of the reviewer.
Validate the changes and stop highlighting changes
1. Go to the bottom of the home page of the PDF eSingleForm.
2. Click on the 'V' that is shown next to the reviewer to validate the modifications of this
person(s) and to stop the track changes.
3. The names of the reviewers are no longer shown.
4. The changed fields are no longer highlighted.
January 2013
113
APPEL eDocumentation
Export XML file
PDF eSingleForm > Home page
The home page of the PDF eSingleForm is shown.
Export an XML file
1. At the bottom of the PDF eSingleForm, click on 'Validate and export XML' to validate
and export your eSingleForm, completed offline. Click on 'Export XML without
validation' to export without validating.
2. The message 'Save as' is shown.
3. Save the XML file.
Remarks
♦ If one of the fields in the eSingleForm contains more bytes than authorised, you
will not be able to export the file. The fields with too many bytes will be
mentioned on the last page of the eSingleForm.
♦ If the eSingleForm is not ok, the validation error details will be shown on the last
page of the eSingleForm.
♦ The file can either be uploaded completely or partially into APPEL online.
January 2013
114
PDF eSingleForm
Upload an offline completed Humanitarian Action
APPEL > eRequests
The eRequests search page is shown.
Profiles
People who can create eRequests have:
♦ An Encoder profile.
♦ A Sender profile.
Upload an offline completed Humanitarian Action
Upload an eSingleForm that was completed offline into APPEL online.
1. Click on 'New letter of Intent' or 'New eRequest'.
2. A confirmation message for the creation of the new Letter of Intent or a new eRequest is
shown. Click on 'Ok'.
3. Click on 'Upload' at the bottom of the screen.
4. A confirmation message is shown for the creation of a new document starting from an
XML file. Click on 'Ok'.
5. Click on 'Browse'.
6. In the message 'Choose file':
1. Choose the XML file corresponding to the eSingleForm that needs to be uploaded.
This XML file is located on your pc (where you saved it)
2. Click on 'Open'.
7. Select 'Full upload' or 'Partial upload' for your XML file (See tips).
8. Click on 'Upload offline document' if you wish to submit the selected XML file.
9. If you selected 'Partial upload', select the parts of the document that you wish to upload.
10. Click on 'Process upload'.
11. The message 'Upload of project is ok' is shown.
12. Click on 'Back to eDocument'.
13. The offline completed humanitarian action is now accessible online.
Tips
♦
♦
♦
Chapter 12 cannot be completed offline, it needs to be completed online.
When you only completed a part of the eSingleForm, the person uploading the file
(Sender) has the possibility to upload only that completed part by selecting 'Partial
upload'.
To upload an eIntermediate Report, an eRequet, and eModification Request or an eFinal
Report, please consult the APPEL manual or click on 'Help' online.
Remarks
♦ When you select the incorrect XML file to upload, an error message is shown.
♦ The annexes need to be added when working online.
♦ If you only upload a part of the project, you need to validate the chapters one by
one in APPEL online, also those chapters that have no new content after the
upload. When everything is uploaded, click on 'Validate' in the top left corner of
the online eDocument.
♦ After having uploaded the eSingleForm, you click on 'Save' and 'Submit' online, to
complete the eDocument. The eDocument is now submitted to DG ECHO.
January 2013
115
Offline eTools application
Introduction Offline eTools application
This online eDocumentation groups the how to's and the online trainings of the eSingleForm offline
application of DG ECHO.
♦ Learn the eSingleForm offline application with the online training modules.
♦ Follow the Step by Step explanation on how to perform any functionality of the application.
The eSingleForm offline application provides you with the possibility to prepare and follow up on a
humanitarian action without the need of an Internet connection.
Once you have created a Humanitarian Action with the aid of the offline application, all
modifications, different requests and reports are bundled within one document on your computer.
Each time you want to upload a request or report you make use of this unique document.
Get started
In order to work with the eSingleForm offline application you have to install the application on your
computer. You open and install the provided 'offline_esf_x.exe' or you go to the APPEL home page
where you can download the latest version from the 'downloads' menu to your computer.
Once installed, you double click on the 'Offline' application;
♦ The window 'ECHO – working offline' is shown.
♦ Click on 'start browser'.
♦ Your Internet browser shows the welcome screen of the offline application.
♦ Click on 'offline e-SingleForm'.
♦ Introduce your user name and password and click on login or enter.
♦ The start screen of the offline eSingleForm application is shown.
The different steps to create and follow up on a new Humanitarian Action are:
♦ Create the new action.
♦ Create the Initial eRequest and validate it.
♦ Upload it to APPEL online.
What is the eSingleForm
The eSingleForm combines different eDocuments describing the Humanitarian Action in detail.
The different eDocuments are:
eRequest
The eRequest is the first document and contains the proposal for a Humanitarian Action.
The eRequest is needed in order to get permission to start a Humanitarian Action. This
results in a Grant Agreement.
All following documents link/refer to this initial eRequest.
eModification Request
As soon as a Humanitarian Action has been granted by DG ECHO, any changes should be
requested by use of an eModification Request. Once agreed upon, this results in a
supplementary agreement and exchange of letters.
eIntermediate Report
An eIntermediate Report can be requested by DG ECHO in order to follow up your
Humanitarian Action.
eFinal Report
Once a Humanitarian Action is finished, an eFinal Report is mandatory in order to close the
project and make up the balance.
How to use the eSingleForm offline application eDocumentation
The eDocumentation consists out of different parts you can consult by navigating in the left column;
How to learn; Explains how the eDocumentation is structured and allows you to get to know
the application by use of interactive trainings.
eSingleForm; Describes how to perform the possible actions and gives an overview of each
screen of the application.
Tips
116
Offline eTools application
♦
To consult the online eDocumentation, click on the following link:
https://webgate.ec.europa.eu/appel/ and click then on the question mark.
117
APPEL eDocumentation
Guidelines
General
To work with the Offline eTools application, you should keep the following tips in mind:
Enriched text features (bold, colours…)
Text boxes contain buttons to add enriched text features, its functioning is similar to visual editors
as in MS Word.
Save to avoid data loss
Before the computer is left unattended or locked, you need to save any unfinished offline file and
close the browser window to avoid data loss.
Renaming XML files
If a Partners wishes to rename the xml file, the file name cannot contain any space or any special
character (accents,…). It can contain underscores or special characters. The extension always has
to be .xml, otherwise the online application will not recognize the file. E.g. project_offline_01.xml is
a good file name.
118
Offline eTools application
Copy/paste
The system has a copy/paste function. The copied text can be either a .doc format, or a .rtf format
which offers the possibility to copy more characters in the field. The copying is done in an
intermediate window that the system opens automatically.
Each text field has a limited amount of bytes, for example an 'é' contains 2 bytes. The number of
bytes allowed is indicated under the text field. To better evaluate the number of bytes in a text,
please use the notes function of the eTools offline. The 'Notes' field has no bytes limitations and
allows you to correct the text before inserting it in the field. The more bytes the fields contain, the
slower the application will be.
The intermediate window only appears with the browser Internet Explorer, the browser Firefox
allows a direct copy/paste.
Many times the destination field does not support the size of the copied buffer. Besides, in this
case, the actual size of the buffer remains unknown. Before reducing the text itself, some checks
can be done:
♦
♦
♦
Bear in mind that the size of the data in the Web format will be always greater than the
number of characters of the copied portion. That is why it is recommended to add the
character counter in the toolbar (in Word : Tools – WordCount; in Open Office : Tools –
Statistics) and to check that the selection has no more characters than the destination
size.
Many times the document has many style definitions which are transmitted in the
copy/paste. To get rid of them, you can create an empty document, and paste a first time
the copied data into it, specifying to "match to the destination format". The pasted text
gets rid of many useless data, and its size is reduced.
If the size is still too big, then the copy/paste must be done on less text, and you have to
process text simplification.
119
APPEL eDocumentation
Tables in text fields
The system allows the creation of tables inside text fields. This option has to be used carefully,
because the large size of the tables in the database.
Create a table in a text field
1.
2.
3.
4.
Click in the text field;
Click on the table inserting icon;
The screen 'Insert/modify table' is shown;
Define the general or advanced properties of the table.
Modify a table in a text field
1.
2.
3.
4.
Click on the table in the text field;
Click on the table inserting icon;
The screen 'Insert/modify table' is shown;
Define the general or advanced properties of the table.
Table properties
1. General properties
1. Cols; columns (vertical).
2. Rows; rows (horizontal);
3. Cell padding; the space between the border of the cell and the text.
4. Cell spacing; the space between the individual cells in the table.
5. Alignment; the place of the table within the text field.
6. Border; the frame around the table.
7. Width; the width of each cell in the table.
8. Height; the height of each cell in the table.
9. Class; formats the text in the table.
10. Table caption; adds a caption to the table.
2. Advanced properties
1. Id; you can provide the table with an identity code.
2. Summary; you can provide a summary for the table.
3. Style; automatically summons the width, height, background image,… that you
introduced in before.
4. Language code; you can provide the table with a language code.
5. Background image; you can introduce a url for the background image.
6. Frame; adjusts the frame, e.g. the option 'lhs' creates a frame only on the left hand
side of the table.
7. Rules; determines how the table is divided, e.g. the option 'rows' shows no frame
division between the cells on one row.
8. Language direction; left to right or right to left.
9. Border color; the colour of the border around the table.
10. Background color; the colour within the table.
120
Offline eTools application
Tips
♦
♦
When working in a table, the other functions of the table are activated in the toolbar (see
illustration above).
This text field is limited to 4000 bytes.
121
APPEL eDocumentation
Screen structure
eSingleForm start screen
Login screen > Offline eTools application
Login to the Offline eTools application. The start screen of the Offline eTools application is shown.
The image below shows the details of the functions of the start screen of the Offline eTools
application:
The Offline eTools application start screen
1. General functions:
♦ Create new action: starts a new Humanitarian Action.
♦ Update Action Repository: updates the action list.
♦ Disconnect: stops the application.
2. Details of an action:
♦ Humanitarian Action: action name as introduced by the creator.
♦ Status: status of the active eDocument: D for 'Draft' and V for a 'Validated' document.
♦ Documents: the current document type is shown together with all possible
eDocuments to manage a Humanitarian Action:
♦ RQ: eRequest
♦ MR: eModification Request
♦ IR: eIntermediate Report
♦ FR: eFinal Report
♦ Actions: four actions are possible per eDocument:
♦ Validate: to validate the introduced information. The validation is necessary to
be able to upload a complete project and to be able to move on to the next
document (create an IR, FR or MR).
♦ Archive: to delete the action from the action list, but not from the computer.
♦ Copy: create a new action based on this document.
♦ Create a PDF: create a PDF file of this offline eSingleForm.
♦ Creation Date / Filename: contains:
♦ The creation date of the action
122
Offline eTools application
♦
♦
♦
The filename of the project which is used to upload eDocuments to the online
application.
The project number: (If available). The project number is only available when
you submitted the eRQ and exported the file.
Agreement number: (if available). The Agreement number is only available when
the eRQ is approved and you exported the file.
3. Login information and notes status
♦ Profile icon: the profile icon shows with which account/name has been logged on to
the Offline eTools application.
♦ Notes status: you can click on the notes icon to show or hide the notes.
4. Page number and number of actions shown per page:
♦ Go to the first page in the action list.
♦ Go back one page in the action list.
♦ Page number: page number of the actions that are shown.
♦ Go one page further in the action list.
♦ Go to the last page of the action list.
Tips
♦
♦
Click on the title of the column in the action list to order the list according to the
corresponding criteria. Click once and the list is ordered ascending, click twice and the
list is ordered descending.
The document availability can change during the life cycle of a humanitarian action. The
availability is indicated with the colours green and grey:
Green border: selected or active.
Dark grey border: inactive but accessible.
Greyed out: inactive and not accessible.
Remarks
♦ The notes are only to be used for communication within your organisation. They
are only available in the Offline eTools application and cannot be uploaded to
APPEL.
123
APPEL eDocumentation
Functions
Install the application
DG ECHO partners helpdesk > eTools download
Go to http://www.dgecho-partners-helpdesk.eu/etools/download and download
'ECHO_eTools_Offline_xx' from the DG ECHO Partners helpdesk.
Install the application
1. Click on the most recent version of the Offline eTools application.
2. Create a new folder called 'ECHO-eTools' on your desktop or elsewhere on your pc, or
even on a USB memory stick. Do not place it anywhere else, to avoid security issues or
malfunctions.
3. Download the zip file and save it in this folder.
4. Unzip the file:
♦ For Windows XP and later: Right click on the zip file and choose: 'Winzip: Extract to
here'.
♦ For Mac OSX: Double click on the .zip file.
5. Several files and folders are installed, such as:
♦ Project_repository: the folder containing your offline files.
♦ Offline: to start the application.
6. Double click on 'Offline' (.jar file) to start the Offline eTools application.
Tips
♦
♦
The Offline eTools application works on any PC (Win XP/Vista/7)/Mac(OSX)/Linux that is
equipped with Java version 1.5 and higher, and a Web browser, Mozilla Firefox is
advised for its speed of execution, but it can be Internet Explorer 7 and higher.
Opera, Google Chrome and Safari are no recommended browser systems for the Offline
eTools application. Even if they may perform well for most of the processing, the
development team does not guaranty any support to users having problems with these
browsers.
Remarks
♦ Security warnings might be shown. If so, please click on 'run' to continue.
♦ Please make sure not to install the application on a shared drive, as this may
cause issues with the Offline eTools application. If your desktop is on a shared
drive, please install the application elsewhere, e.g. on a USB memory stick or on
the hard drive of your pc.
124
Offline eTools application
Upgrade to a new version
www.osor.eu/projects/echooffline
Go to http://www.osor.eu/projects/echooffline and download 'ECHO_eTools_Offline_xx' from
OSOR.eu.
Upgrade the application
1. Go to the location where the Offline eTools application is installed on your pc.
2. Copy the folder 'partner' from ECHO_eTools_offline\ project_repository\ partner to
somewhere else and remember this location.
3. Uninstall or delete the old version of the Offline eTools application from your pc.
4. Download and install the new version of the Offline eTools application to your pc.
5. Replace the 'partner' folder from ECHO_eTools_offline\ project_repository\ partner of
the new Offline eTools application with the 'partner' folder copied from the old version of
the Offline eTools application.
Due to an upgrade, you might have problems with old .xml projects that were created in a previous
version of the Offline eTools application. It is possible to reuse old .xml projects.
Reuse old .xml project
1.
2.
3.
4.
Upload the old .xml projects to the online version.
Online, you create a new draft document with the old .xml project.
Export the draft document to the Offline eTools application.
Make sure you complete all fields, because some fields might loose their data when
uploading them to the online application.
Tips
♦
An old xml project needs to be uploaded online so that the .xml file receives all necessary
files and the correct structure.
125
APPEL eDocumentation
Start the application
Your desktop > ECHO eTools folder
This is the location where you installed the files and folders for the Offline eTools application.
Start the application
1.
2.
3.
4.
5.
6.
7.
8.
9.
10.
Double click on 'Offline.jar'.
The window 'ECHO – working offline' is shown.
Click on 'Start browser'.
The Offline module screen is shown in your internet browser with the URL
http://localhost:8080/waitserver.html.
Click on 'offline e-SingleForm' .
Introduce your user name in the field 'username' (default 'partner').
Introduce your password in the field 'password' (default 'echo').
The language can be chosen by selecting 'English' or 'French' in the drop down list.
Click on 'login' or enter to continue.
The 'Offline module' start screen is shown.
'ECHO – working offline' is not shown
If nothing happens the first time you double click on 'Offline.jar', do the following to resolve the
problem:
In the location where you saved the 'Offline.jar', you also see a file named 'init.bat'. Double click on
'init.bat'. Possible outcomes:
1. The 'ECHO – working offline' screen is shown; you can continue as described in step 3.
2. The following error message is shown in the screen:
'JAVA_HOME environment variable is set incorrectly or Java runtime could not be
located.
Please set the JAVA_HOME variable appropriately.'
Java 1.5 or a higher version is required to run the application. If this error message is
shown, you go to http://www.java.com and install the java application on your computer.
Once done, you double click on 'Offline.exe' to start the eSingleForm application and
continue as described in the step by step information.
My computer does not recognize a ZIP file
It may happen that Windows does not know what to do with a Zip file. To overcome this problem,
you can either install WinZip if your organisation has licenses on this product, or 7-zip, a free Open
source file extractor that works very well (get it at http://www.7-zip.org/).
The URL http://localhost:8080/waitserver.html does not show the
Welcome screen
This problem happens often in secured configurations, where localhost is not defined as the local
machine. In this case use the following URL: http://127.0.0.1:8080/waitserver.html
Remarks
♦ Click on the arrow next to 'e-SingleForm offline module' to go back to the previous
screen.
126
Offline eTools application
♦ Keep the window 'ECHO – working offline' open while working with the Offline
eTools application. If you close this window, no data is saved in the file even
though the programme looks functional. This window must be left open all the
time.
127
APPEL eDocumentation
Username and password
Login screen > Offline eTools application
The 'Offline eTools application' login screen is shown.
Options of the login screen
1.
2.
3.
4.
5.
'username' field.
'password' field.
'login' function: Introduce your username and password and click on 'login' or enter.
'change password' function: Click on 'change password' to change your password.
'create new account' function: Click on 'create new account' to create a new account.
Change your password
1.
2.
3.
4.
5.
6.
Introduce your 'username'.
Introduce your current 'password'.
Choose and introduce a 'new password'.
Introduce the new password again in 'confirm new password' to prevent typing errors.
Click on 'change password'.
One of the following messages is shown:
1. 'Change password procedure has failed, Wrong user password.'
Your username or old password is incorrect. Please try again.
2. 'The specified password is null or has not been correctly confirmed.'
'New password' and 'confirm new password' do not match, or nothing was
introduced. Please try again.
3. 'Password modified successfully.'
Your current password is now the one you introduced as 'new password'.
7. Click on 'Get back to homepage' to go back.
Create a new account
1. Introduce a 'new username'.
2. Select one or more 'role(s)':
1. Expert
2. Partner
3. Introduce a 'new password'.
4. Introduce the new password again in 'confirm new password' to prevent typing errors.
5. Click on 'create new account'.
6. One of the following messages is shown:
1. 'Creation of new account procedure has failed'.
The account you try to create already exists; the username has already been used.
You forgot to select the role(s) or to introduce a new username or password.
Please try again.
2. 'The specified password is null or has not been correctly confirmed'.
'New password' and 'confirm new password' do not match.
Please try again.
3. 'Account created successfully'.
The new account can now be used.
7. Click on 'Get back to homepage' to go back.
Tips
♦
♦
♦
128
Both username and password are case sensitive.
Always introduce a username and password.
The default username is 'partner' and the default password is 'echo'. You can create new
accounts in order to see who adjusts something in the Offline eTools application.
Offline eTools application
♦
Changing or creating passwords, usernames and accounts in the offline module does not
affect the given passwords, usernames and accounts for the online application.
129
APPEL eDocumentation
Create a new Humanitarian Action offline
Login screen > Offline eTools application
The 'Offline application' start screen is shown.
Create a new Humanitarian Action offline
1. Click on 'Create new action'.
2. Introduce the basic data:
1. Introduce the 'Title of the Action'
2. 'Urgent action': select 'yes' or 'no'.
3. If you select 'yes': click on the arrow to select the kind of urgent action from the drop
down list.
4. Click 'Save' or 'Cancel'.
3. The action is created.
4. The saved action is shown in the list.
After the creation of a Humanitarian Action, four types of documents can be completed:
1. eRequest;
2. eModification Request;
3. eIntermediate Report;
4. eFinal Report.
Remarks
♦ The title can no longer be modified after signature of the Agreement.
♦ The title should not contain data that might change, such as the number of
beneficiaries.
♦ The title should include the geographical sector and the country/ies.
♦ All fields with an exclamation mark or an asterisk [*] are mandatory and have to be
completed.
130
Offline eTools application
Complete a Humanitarian Action
Login page > Offline eTools application
The 'Offline application' start screen is shown.
Complete a created Humanitarian Action offline
1.
2.
3.
4.
5.
Click on the eDocument for your Humanitarian Action.
Click on a chapter in the tree view.
Introduce at least the mandatory information.
Click on 'validate' to check the form for incomplete information.
One of the following messages is shown:
♦ 'Validation is ok' and you can continue.
♦ 'Validation is not ok', with the incomplete information listed below.
6. Click on 'close'.
7. Repeat these steps until the Humanitarian Action is completed and validated.
8. Click on the arrow in the bar above your action to go back to the action list.
Your Humanitarian Action is not shown in the action list
If your Humanitarian Action is not shown in the action list, try the following solutions:
♦ Click on the arrows at the top to search for the action on another page in the action list.
♦ Click on 'Update action repository' to make sure the action list is up to date.
Auto save
Complete the action and introduce your information in the fields. The information is saved
automatically when leaving a field.
Validation
By validating, you can check for mistakes;
♦ To check one page for mistakes, click on 'validate' in the form.
♦ To check the entire eDocument for mistakes, click on 'validate' in the list of Humanitarian
Actions.
Tips
♦
You can create a PDF file of a certain chapter by clicking on the PDF icon next to
'Validate' at the top. If you need a PDF file of the entire Humanitarian Action, you click on
the PDF icon in the list of Humanitarian Actions.
Remarks
♦ All fields with an exclamation mark or an asterisk [*] are mandatory and have to be
completed.
131
APPEL eDocumentation
Upload an offline Humanitarian Action
APPEL > eRequest
The search for eRequests screen is shown.
Profiles
People who can upload an offline Humanitarian Action to the online application have:
♦ An encoder profile.
♦ A Sender profile.
Upload an offline Humanitarian Action
To upload a completed Humanitarian Action to the online application:
1. Click on 'new Letter of Intent' or on 'new eRequest'.
2. A confirmation message is shown, click on 'OK'.
3. Click on 'Upload'.
4. A confirmation message is shown, click on 'OK'.
5. Click on 'Browse'.
6. In the screen 'Choose file':
1. Select the XML file corresponding to the eSingleForm, which can be found under
'offline > project repository > Partner' on your computer.
2. Click on 'Open'.
7. Select 'Full upload' or 'Partial upload' of your XML file. (See tips)
8. Click on 'Upload offline document' to submit the selected eSingleForm .xml file.
9. If you selected a partial upload, you need to select the part(s) of document that you want
to upload.
10. Click on 'Process upload'.
11. A summary of the activity with the message 'Upload of project is ok' is shown.
12. Click on 'Back to the eDocument.
13. The offline completed Humanitarian Action is now accessible online.
Tips
♦
♦
♦
The name of the xml file is shown on the 'eSingleForm Offline start screen' in the 'action
list' in the column 'Detail'.
Chapter 12 cannot be completed offline, it has to be completed online.
If you are only responsible for a part of the eSingleForm, the Sender can upload only that
part by choosing a partial upload.
Remarks
♦ An error message is shown if the wrong file is chosen to upload.
♦ Annexes have to be added while working online.
♦ After uploading only one or a few chapters of the project, you will have to validate
all chapters one by one online. You will also have to validate the chapters that
have not been uploaded to the online version. The uploaded content is shown
online.
♦ After uploading the Humanitarian Action, use the online functions 'Save' and
'Submit' to complete the eDocument. The eDocument is then submitted to DG
ECHO.
132
Offline eTools application
Upload an offline eDocument
APPEL > Agreement
Upload an offline eModification Request, eIntermediate or eFinal Report
As soon as the eRequest is validated and accepted online, the reports that were created in the
Offline eTools application can also be uploaded online.
To upload a completed eDocument to the online application:
1. Select the appropriate Agreement in the search result list.
2. Click on 'New eModification Request', 'New eIntermediate Report' or 'New eFinal
Report' depending on the eDocument you wish to upload.
3. A confirmation message is shown.
4. Click on 'OK'.
5. Click on 'Upload'.
6. A confirmation message is shown.
7. Click on 'OK'.
8. Click on 'Browse'.
9. In the screen 'Choose file':
1. Select the XML file corresponding to the eSingleForm, which is found under 'offline >
project repository > partner ' on your computer.
2. Click on 'Open'.
10. Select 'Full upload' or 'Partial upload' of your XML file. (See tips)
11. Click on 'Upload offline document' to submit the selected eSingleForm .xml file.
12. If you selected a partial upload, you need to select the part(s) of document that you want
to upload.
13. Click on 'Process upload'.
14. A summary of the activity with the message 'Upload of project is ok' is shown.
15. Click on 'Back to the eDocument'.
16. The offline completed eSingleForm is now accessible online.
Tips
♦
♦
♦
The name of the xml file is shown on the 'Offline eTools start screen' in the 'action list' in
the column 'Detail'.
Chapter 12 cannot be completed offline, so it has to be completed online.
If you are only responsible for a part of the eSingleForm, the Sender can upload only that
part by choosing a partial upload.
Remarks
♦ An error message is shown if the wrong file is chosen to upload.
♦ Annexes have to be added while working online.
♦ When you upload only part of a project, you have to validate all chapters
afterwards. If you upload a complete project, you do not need to validate the
project anymore afterwards. Whenever you upload a file partially, all chapters
become 'draft' again. So first you should upload all partial documents, and at the
end you save each chapter online.
♦ After uploading the Humanitarian Action online, use the functions 'Save' and
'Submit' to complete the eDocument.
133
APPEL eDocumentation
Export an eDocument to the Offline eTools application
APPEL > Agreement
Export an eDocument to the Offline eTools application
1.
2.
3.
4.
5.
6.
7.
8.
9.
10.
134
Search for the Grant Agreement of your choice.
Click on the Grant Agreement in the results list.
Click on 'Export'.
The window 'File Download' is shown.
Click on 'Save' to save the XML file.
Select the path 'Offline > project repository > partner'.
Click on 'Save'.
Connect to the Offline eTools application.
Click on 'Update action repository'.
The action linked to the exported eDocument is shown in the list with Humanitarian
Actions offline.
Offline eTools application
Archive an action
Login screen > Offline eTools application
The 'Offline application' start screen is shown.
Archive an action
1. In the action list, you click the box icon 'archive action'.
2. The project has disappeared from the action list, but not from the computer. Archived
projects are placed in the 'Archive repository' on your pc.
Move an archived project back to the humanitarian action list
1.
2.
3.
4.
Go to the location where you installed the Offline eTools application.
Navigate to archive_repository/partner in the Offline eTools application.
Select your project from the archived projects and copy or cut it.
Navigate to project_repository/partner in the Offline eTools application and paste the
project in the project repository.
Tips
♦
Archived projects are placed in the 'Archive repository' on your pc. This repository can also
be opened by clicking on 'open archive folder' in the 'ECHO - working offline' screen that
is shown when you start the Offline eTools application.
135
APPEL eDocumentation
eSingleForm
Introduction eSingleForm
All eDocuments of the Project Cycle Management of a Humanitarian Operation are called
eDocuments. All eDocuments are similar to the paper version of the SingleForm.
The different eDocuments are:
♦
♦
♦
♦
eRequest (referred to as RQ).
The eRequest is the first document and contains the proposal for a Humanitarian Action.
The eRequest is needed in order to get permission to start a Humanitarian Action. This
results in a Grant Agreement.
All following documents link/refer to this initial eRequest.
eModification Request (referred to as MR).
As soon as a Humanitarian Action has been granted by DG ECHO, any changes should
be requested by use of an eModification Request. Once agreed upon, this results in a
supplementary agreement and exchange of letters.
eIntermediate Report (referred to as IR).
An eIntermediate Report can be requested by DG ECHO in order to follow up your
Humanitarian Action. It can also be sent by the Partner to ask for additional prefinancing
and/or unilateral modifications.
eFinal Report (referred to as FR).
Once a Humanitarian Action is finished, an eFinal Report is mandatory in order to close
the project and liquidate final payments.
These four documents constitute the paper version of the SingleForm. All chapters of the form,
indicated with the mandatory icon have to be saved even if you do not alter any of the information.
136
Offline eTools application
Online versus Offline
The eSingleForm online is globally the same as the eSingleForm offline. There are some
differences though.
The main differences between the eSingleForm online and the eSingleForm offline are the
following:
♦
♦
♦
♦
♦
♦
♦
♦
♦
♦
Layout: The layout of the offline version is different from the layout of the online version.
Tables: The tables function in the Offline eTools application is more advanced than the
tables function in the online application. More information can be found in the tips file.
Save automatically: In the Offline eTools application, the system automatically saves the
information field per field.
Communication: The Offline eTools application is used as a means of communication, by
exchanging the XML files and the notes. It is only used internally or to communicate with
the Field Officer, Desk or RSO.
Notes: The notes function is limited to the offline eTools application, and is not available
online.
Question marks: The users of the offline eTools application can click on the question
mark to get an explanation about the screen that is shown.
Subchapters 4.3.1 and 4.3.2: Subchapters 4.3.1 and 4.3.2 of the eSingleForm differ in
the online and the offline systems. In the online version, encoding the results of the
logical framework (4.3.2) can be done under 4.3.1. In the offline version the results have
to be encoded in 4.3.2., they cannot be encoded under 4.3.1.
Chapter 11: In the Offline eTools application, chapter 11 'Financial overview of the Action'
contains three columns extra: one for the intermediate committed amount, one for the
Final Committed Amount and one for the Final state.
Chapter 12: Chapter 12 cannot be completed offline. It can only be completed online
because it contains administrative data that is only available in APPEL.
Partner internal follow up informations: The chapter 'Partner internal follow up
informations' is only available in the offline application. The information entered in this
chapter is not part of the eSingleForm and will not be visible in the online eSingleForm
transmitted to DG ECHO. It is for internal use only.
137
APPEL eDocumentation
Guidelines
To complete the different chapters of the eDocuments of the eSingleForm, it is necessary to follow
these guidelines:
Transfer of information
As soon as you save the chapter 'General Information', some of the information introduced is
transferred by the system to the Operational Framework. In this screen subchapter 4.3.1.2, the title
of the action is copied from subchapter 1.2 and has been introduced by the system.
Validate
Above the Logical Framework, the function 'Validate' is shown. Before validating introduced
information, you need to leave the modified field. Once you click on 'Validate', the system checks
whether your information was introduced correctly.
Enriched text features (bold, colours,…)
Text boxes contain buttons to add enriched text features, its functioning is similar to visual editors
as in MS Word.
Limitations and mandatory fields
To complete the Logical Framework please consider the following limitations;
1. When clicking in a field, the maximum number of characters is shown below.
2. 4.3.1. Operational Overview;
♦ At least 1 result for the project has to be introduced.
♦ Per result you can add a maximum of 5 indicators.
♦ The content of a result cannot be null.
3. Result details;
♦ The result's global costs must be greater or equal than the sum of the costs of all
related activities.
♦ If the emergency is other than a primary emergency, the sector and sub sector are
mandatory.
Financial overview
The financial overview becomes annex II of the signed Agreement. The final financial report should
remain consistent with the financial overview.
To complete the financial overview, please take the following points into account:
♦ Eligible cost of Action
The Partner can use another representation of eligible costs in line with the current
practice in its organisation. These headings will become the chapters of the final financial
reporting. In case personnel costs and the costs on information, communication and
visibility are not explicitly available in section 4.3.2, these have to be explicitly mentioned
in this table.
♦ Subtotal direct eligible costs
This amount has always to be equal to the total of all 'total amounts per result' plus the
'total amount of other costs'.
♦ Direct revenue from the Action
In case the Action itself creates income, the budgeted/finally real amount has to be
mentioned here. This income can increase the overall amount of the Action. It will also be
deducted when deciding DG ECHO's contribution.
138
Offline eTools application
139
APPEL eDocumentation
Notes
The 'Notes' function enables the Partner to communicate with DG ECHO. The Partner can add a
note to a field of the eSingleForm. DG ECHO members can respond to this note, in order to help
the Partner to complete the eSingleForm in a better way. The notes can also be used by the
members within an organisation as a means of communication for the Humanitarian Action.
The files containing the notes can only be sent as XML format to be used in the Offline eTools
application, and they can never be transferred to the online application. Only the online form,
without the notes, will be taken into account for the evaluation by DG ECHO.
Besides a communication means, the notes can be used to make a draft version of the answers for
the fields of the eSingleForm. The characters introduced in the answer fields of the eSingleForm
are limited. The notes field can contain an unlimited number of bytes. The use of the notes enables
you to see the number of bytes of the text before inserting it in the appropriate answer field.
Copying a text from MS Word directly into the field of the eSingleForm might cause trouble,
because the characters are counted in Word, not the bytes. It is advisable to edit the text in the
'Notes' field before putting it in the field of the eSingleForm.
An illustrated explanation of the use of the notes function:
Show/Hide the notes
The icon 'Notes status' top right on the screen can show or hide the notes:
♦ Click on the red '-' to show the notes.
♦ Click on the green '+' to hide the notes.
Add a note
The note is shown in a field at the bottom of the field where you wish to add a note:
♦ Click on the '+' to add a principal note in the yellow field that is shown below each field.
♦ Click on the bin icon to delete a main note.
140
Offline eTools application
Respond to a note
To respond to a note:
♦ Click on the '+' on the right side of the notes field.
As shown here, the notes are shown as a dialog under the field of the eSingleForm.
Tips
♦
♦
The notes are only to be used for communication within your organisation. They are only
available in the offline eSingleForm and cannot be uploaded to APPEL.
The standard username and password are 'partner' and 'echo'. You can change this
standard username and password if you wish to.
Text field
To estimate the size of your text, you can use the notes field before introducing your answer in the
field of the eSingleForm:
♦ The Notes field can contain an unlimited number of bytes.
Remarks
♦ The number of bytes in the 'Reply' of the eSingleForm are limited.
141
APPEL eDocumentation
Letter Of Intent
Copy the template
http://www.dgecho-partners-helpdesk.eu > Template for the Letter of
Intent
Go to the DG ECHO Partner helpdesk site via the link http://www.dgecho-partnershelpdesk.eu/preparing_an_action/financing_decision/intention_letter.
Copy the template of the Letter of Intent
1. Save the zipped file with the template that will allow you to start a Letter of Intent in the
Offline eTools application.
2. Unzip the zipped file on your pc.
3. Copy and paste the .xml file of the Letter of Intent template into the file 'Project
repository/partner' that can be found on your pc on the location where you installed the
Offline eTools application.
Tips
♦
The template can also be exported from APPEL. When creating a new Letter of Intent
online, you can click on 'export' and use the exported file to work in the Offline eTools
application.
November 2012
142
Offline eTools application
Create a new Letter of Intent offline
Offline eTools application > Start screen
This function shows the Offline application start screen with the list of humanitarian actions.
New Letter of Intent
1.
2.
3.
4.
5.
6.
7.
Start the Offline eTools application.
Click on 'Update action repository'.
Click on 'RQ' to complete the Letter of Intent.
Click on each chapter and complete the necessary information.
On each completed page, you click on 'Validation' to validate the data.
In the list with humanitarian action, you click on the 'V' to validate the entire eDocument.
Upload the xml file to APPEL online.
Tips
♦
In order to be able to submit at least one result as needed, you should encode an amount
(an estimation of the amount or one symbolic euro if you don't know the amount yet).
Remarks
♦ All fields with an asterisk [*] and all chapters with an exclamation mark are
mandatory and have to be completed, unless they contain the text 'Facultative for
Letter of Intent unless specified in HIP'.
♦ Add at least one result and complete the details for this result.
♦ In chapter 11 'Financial overview', you need to add the amounts of your results so
the 'Total amount' is correct.
♦ In chapter 11 'Financial overview', you need to add at least 1€ in the 'Eligible costs
of action' field. This symbolic amount can be added in case you don't have any
financial information yet. When adding it, please make sure that the other fields
are empty so you can validate this section with 1€ as the 'total financing' amount.
November 2012
143
APPEL eDocumentation
eRequest
144
Offline eTools application
Functions
Create a new eRequest
Offline eTools application > Start screen
This function shows the Offline application start screen with the list of humanitarian actions.
New eRequest
1.
2.
3.
4.
5.
The 'humanitarian action' list is shown.
Click on 'RQ' next to the action to create an eRequest.
The empty form of the eRequest is shown.
Click on each chapter to complete the eRequest.
Click on 'Validation' to verify the eRequest.
Tips
♦
To see how to create a new humanitarian action, click here.
Remarks
♦ All fields with an exclamation mark or an asterisk [*] are mandatory and have to be
completed.
145
APPEL eDocumentation
Chapters
Complete chapter 1: general information (RQ)
Offline eTools application > Request
Select your Humanitarian Action in the list. Click on 'RQ'. The Request is shown. Click on chapter
1.
Complete chapter 1: General Information
1. Not applicable.
2. The 'Title of the Action' was completed before, but you can change it if necessary.
3. Click on the arrow of the drop down list and select one (or more) 'Continent' and
'Country'. Click on '+' to add the area of intervention and specify the 'Region'.
4. Click on the first calendar icon and select a 'Start date'. If the Action has already started
introduce the reason that justifies this situation. With the second calendar icon you delete
the introduced date.
5. Introduce the number of months and days of the 'Action duration'.
6. Is the start date for eligibility of expenditure equal to the date of submission?
♦ Check 'Yes' or 'No'.
♦ If yes, introduce the explanation of the expenses charged to the budget between
date of submission and start date of the action.
♦ If no, click on the calendar icon, select the 'start date' and introduce an explanation.
7. Select the requested funding modality for this agreement.
♦ In case of 100% financing, introduce the justification of the request.
8. Urgent action
♦ Check 'Yes' or 'No'.
♦ If 'Yes', select between, 'ECHO Primary emergency decision', 'ECHO emergency
decision' and 'Urgent action in the framework of another decision'.
♦ If you check 'Urgent action in the framework of another decision', introduce a
justification.
Rules to respect
♦
♦
♦
♦
♦
The exact locality/ies for the 'Area of intervention' will be detailed under 4.1 with maps and
relevant reference points.
The start date of the action should be the actual starting date of the Action in the field, it
should not necessarily be the first day of a month. It may be different from the date for
eligibility of expenditure. If the Action has already started explain the reason that justifies
this situation.
The mandatory field 'Duration of the Action' covers the implementation period of the Action
in the field from the start date. It covers the entire duration of the Action. It should be
preferably in whole months. E.g. 2 months and 10 days or 3 months and 0 days (the
fields 'months' and 'days' cannot be empty. So even when it are zero days, you need to
introduce '0'). Fractions of months should be avoided. The period for finalising the final
report (max 3 months) is not included in the total duration. The duration of an action
cannot be longer than the duration of the ECHO financing Decision, except when there
are suspensions during the implementation of the action.
The nature of expenditure corresponding to the eligibility period (time elapsed between the
eligibility date and start date) should be clearly identified at chapter 4.3.2 and agreed with
ECHO.
The 100% financing option is an exception that has been foreseen for Humanitarian
Actions in duly justified circumstances. The partner must provide relevant justification on
the 100% funding.
Tips
146
Offline eTools application
♦
To learn more about the notes function, click here.
Remarks
♦ You need to add as many countries as involved in the humanitarian action.
♦ All fields with an exclamation mark or an asterisk [*] are mandatory and have to be
completed.
147
APPEL eDocumentation
Complete chapter 2 to 4 (RQ)
Offline eTools application > Request
Select your Humanitarian Action in the list. Click on 'RQ'. The Request is shown. Click on chapters
2 to 4.
Complete chapter 2: Needs Assessment
♦
♦
♦
From question 2.1 to question 2.3, introduce the appropriate information in the fields.
Annex the necessary tables (see tips).
Introduce the supplementary information tables if necessary.
Field 2.3 'Summarise findings of the assessment…' should form the basis for the intervention
logic. If there is a report of the assessment it may be annexed and the results summarised here
with regard to the proposed Action. When relevant, assessment of risks potentially arising from
natural disasters should be provided.
Complete chapter 3: Humanitarian organization in the area of
intervention
For questions 3.1 and 3.2; introduce the appropriate information in the fields.
For field 3.1 'Humanitarian Organisation's presence in the area of intervention…', you indicate:
♦ A brief overview of current and future strategy in the country;
♦ The current and recent activities in the country;
♦ A brief overview of the presence in the country (number of years, type of intervention,
regions, type of set-up).
Complete chapter 4: Operational framework
1. Introduce
♦ A location next to each added country.
♦ The reference of the document 'Map of action location' that you can annex online.
2. Beneficiaries
1. Introduce the 'Total number of direct beneficiaries' and add possible comments.
2. Select one or more 'Status of the direct beneficiaries'.
3. Introduce the appropriate information in the field.
4. Introduce the appropriate information in the field.
5. Introduce the appropriate information in the field.
6. Introduce the number of the 'Other potential beneficiaries' and introduce more
information in the required field.
7. Select one or more sectors and introduce the 'Number of beneficiaries' per
selected sector.
Tips
♦
♦
Annexed files can be attached during the upload to the online application.
To learn more about the notes function, click here.
Remarks
♦ All fields with an exclamation mark or an asterisk [*] are mandatory and have to be
completed.
148
Offline eTools application
Complete subchapters 4.3.1: Logical Framework (RQ)
Offline eTools application > Request
Select your Humanitarian Action in the list. Click on 'RQ'. The Request is shown. Click on
subchapters 4.3.1.
Complete subchapter 4.3.1: Objectives, results and activities
Operational overview of the action: Logical framework.
1. Introduce the 'principal objective'.
2. Introduce the 'risks and assumptions'.
3. Specific objective.
1. Introduce the 'Specific objective'.
2. Click on '+' to add an indicator for the specific objective.
3. Introduce the 'indicator'.
4. Introduce the 'target value'.
5. Introduce the 'source of verification'.
6. Click on the 'bin' icon to delete the indicator and its source of verification.
4. Introduce the 'Preconditions'.
5. Results
1. Click on '+r' to add a result.
2. Introduce the 'result'.
3. Click on the 'bin' icon to remove a result.
Tips
♦
♦
Click on the question mark on the right of the title '4.3.1 Operational overview of the action:
log- frame' to show the help screen that explains how to complete this subchapter.
To learn more about the notes function, click here.
Remarks
♦ The principal objective has to be according to une of the specific objectives of the
corresponding ECHO Financial Decision.
♦ The result can be completed from here or from 4.3.2.
♦ Under subchapter 4.3.2 you can give the details for each of the added results.
♦ The information introduced at 4.3.2 is partly visible here.
149
APPEL eDocumentation
Complete subchapter 4.3.2: more detailed information per result (RQ)
Offline eTools application > Request
Select your Humanitarian Action in the list. Click on 'RQ'. The Request is shown. Click on
subchapter 4.3.2.
Complete subchapter 4.3.2: More detailed information per result
4.3.2
More detailed Information per result
The details of each result introduced under subchapter 4.3.1 are shown under subchapter 4.3.2.
In the navigation tab, click on the result you want to complete.
The information introduced under this subchapter is partly visible under subchapter 4.3.1.
The 'Detail' screen has four tabs:
♦ Details
♦ Verifiable indicators
♦ Activities
♦ Means and costs
1. Click on the 'Details' tab.
1. Introduce a 'Result's short description'.
2. Introduce the 'Total amount (eur)'.
3. Click on the drop down list and select a 'Sector' and a 'Sub-sector'.
4. Introduce the 'number of beneficiaries'.
5. Select the 'status of beneficiaries'.
6. Introduce a 'Detailed description'.
2. Click on the 'Objectively verifiable indicators' tab.
1. Click on 'Add tab' to add an indicator.
2. Introduce the 'Short description' of the indicator.
3. Introduce the 'target value'.
4. Introduce the 'Sources of verification'.
5. Introduce a 'Detailed description'.
6. Click on 'delete' to delete an indicator.
3. Click on the 'Activities' tab.
1. Click on 'Add tab' to add an activity.
2. Click on the calendar icon and select a 'Start date'.
3. Click on the calendar icon and select an 'End date'.
4. Introduce a 'Short description'.
5. Introduce a 'Detailed description'.
6. Click on 'delete' to delete an activity.
4. Click on the tab 'Means and costs'.
1. Click on 'Add tab' to add a mean.
2. Introduce a 'Short description'.
3. Introduce a 'cost'.
4. Introduce a 'Detailed description'.
5. Click on 'delete' to delete a mean.
4.3.2.4. Other costs
1. Click on '+' to add a new cost.
2. Introduce an 'Other cost'.
3. Introduce the 'Initial amount'.
4. Click on the 'bin' icon to delete a cost.
150
Offline eTools application
Tips
♦
♦
To learn more about the notes function, click here.
Click on 'Remove' to delete the result that is shown. This option is only available for the
results.
Remarks
♦ You can add maximum 5 indicators.
151
APPEL eDocumentation
Complete subchapters 4.4 and 4.5: Work plan and monitoring (RQ)
Offline eTools application > Request
Select your Humanitarian Action in the list. Click on 'RQ'. The Request is shown. Click on
subchapters 4.4 and 4.5.
Complete chapter 4.4: Work Plan
4.4 Introduce the description of the 'Work Plan'.
Complete chapter 4.5: Monitoring, evaluation, audit and other studies
4.5.1 Introduce the explanation of the 'Monitoring of activities' in the field.
4.5.2 Indicate the studies that will be undertaken by selecting 'Yes' or 'No' for each study.
4.5.3 Other studies:
1. Select 'Yes' or 'No'.
2. If 'Yes', introduce an explanation in the field.
Tips
♦
♦
152
To learn more about the notes function, click here.
Click on the question mark on the right of the title to show the help screen that explains
how to complete the chapter.
Offline eTools application
Complete chapter 5 to 9 (RQ)
Offline eTools application > Request
Select your Humanitarian Action in the list. Click on 'RQ'. The Request is shown. Click on chapters
5 to 9.
Complete chapter 5: Cross-cutting issues
From question 5.1 to question 5.3, introduce the appropriate information in the field.
Complete chapter 6: Field coordination
From question 6.1 to question 6.3, introduce the appropriate information in the field.
Complete chapter 7: Implementing Partners
From question 7.1 to question 7.3, introduce the appropriate information in the field.
Complete chapter 8: Security and contingency measures
1. Introduce the 'Contingency measures' in the field.
2. Security considerations
1. Introduce 'Security situation in the field'.
2. Has a specific security protocol for this action been established?
1. Click on the arrow of the drop down list and select 'Yes', 'No' or 'Standard
procedure'.
2. If you check 'Yes', introduce an explanation of the protocol.
3. Are field staff and expatriates informed of and trained in these procedures?
1. Check 'Yes' or 'No'.
For the contingency measures under 8.1, in case some of the assumptions or risks materialize, the
Partner should explain how it would react in order to mitigate their effects on the implementation of
the Action and what other options would be proposed for the achievement of the envisaged results.
Complete chapter 9: Communication, visibility and information
activities
From question 9.1 to question 9.3, introduce the appropriate information in the fields.
Tips
♦
To learn more about the notes function, click here.
153
APPEL eDocumentation
Complete chapter 10 and 11 (RQ)
Offline eTools application > Request
Select your Humanitarian Action in the list. Click on 'RQ'. The Request is shown. Click on chapters
10 or 11.
Complete chapter 10: Human resources
1. Indicate global figures per function and status.
1. Click on '+' to add a function.
2. Introduce the 'Title/function'.
3. Click on the arrow of the drop down list and select a 'Status'.
4. Introduce the 'Number of persons'.
5. Introduce the 'Person/month per project'.
For example; 5 persons working on a project for 6 months equals 30 man/months.
6. Introduce 'Comments'.
7. Click on '+' to introduce more global figures per function and status.
Complete chapter 11: Financial Overview
1. Financial Overview (See remarks)
1. Click on '+' to add a cost.
2. Introduce the 'Initial Budget' for each cost.
3. Introduce the 'Initial Budget' for each contribution.
In chapter 11 of the eSingleForm, the left column (Eligible cost of Action) should reflect the main
chapters of the Partners financial reporting structure, as these lines will become later the chapters
of the final financial report. It is advisable to have around 10 headings.
Tips
♦
♦
♦
Click on the question mark on the right of the title to show the help screen that explains
how to complete the chapter.
Chapter 11 contains the columns
♦ 'Initial Budget' which can only be completed in the eRequest,
♦ 'Intermediate Committed Amount' which can only be completed in the Intermediate
Report
♦ 'Final Committed Amount' and the 'Final state' which can only be completed in the
Final Report.
To learn more about the notes function, click here.
Remarks
♦ Click on '+' to add more information lines.
♦ The total cost and total funding are automatically calculated.
♦ The total cost and total funding must be equal. Click here for more information.
154
Offline eTools application
Complete annex A: Procurement table (RQ)
Offline eTools application > Request
Select your Humanitarian Action in the list. Click on 'RQ'. The Request is shown. Click on 'Annex
A: Procurement table'.
Complete Annex A: Procurement table
Introduce the necessary information in the Procurement table and give a comment.
1. Click on '+' to add a line.
2. Complete the fields 'Description', 'Quantity', 'Amount (EUR)' and 'Procurement
procedure'.
3. Select 'Yes' or 'No' for the 'Derogation'.
4. Click on the calendar icon to add the 'Launch date procedure (literal)'.
5. Introduce the 'duration (weeks)' in the field.
6. Click on the calendar icon to add the Contracting date (literal)'.
7. Introduce the 'Duration (weeks)' in the field.
8. Introduce any necessary comments.
Rules to respect
♦
♦
The Partner may attach a table with another layout (e.g. used inside the project) provided
that all necessary information is available. Partners that signed an agreement with a Pcontrol mechanism do no have to provide such a table with the Single Form at proposal
or reporting stages. A whole procurement procedure will be dealt with per row.
A procurement procedure cannot to be split because it is used in several activities. If a
procurement procedure has to be split, an explanation has to be given. The dates for
launching and contracting can also be expressed in number of weeks after the start of
the Action.
Tips
♦
♦
Click on the question mark on the right of the title to show the help screen that explains
how to complete the chapter.
To learn more about the notes function, click here.
Remarks
♦ Click on '+' to add a new 'Description' of the supplies, services or works in the
fields.
♦ Repeat these steps for each change in the procurement table.
155
APPEL eDocumentation
Complete Partner internal follow-up informations (RQ)
Offline eTools application > Request
Select your Humanitarian Action in the list. Click on 'RQ'. The Request is shown. Click on Partner
internal follow-up information.
Complete Partner internal follow-up information
1.
2.
3.
4.
5.
Click on '+' to add an information line.
Click on the 'calendar icon' to add a 'Date'.
Click on the arrow to select an 'Action'.
Introduce a 'Description' and a 'User ID'.
Introduce 'Other comments' if applicable.
Tips
♦
To learn more about the notes function, click here.
Remarks
♦ This chapter does not upload to the online application. It is for internal follow-up
purposes only.
156
Offline eTools application
eModification Request
157
APPEL eDocumentation
Functions
Create a new eModification Request
Offline eTools application > Start screen
This function shows the eSingleForm start screen with the list of humanitarian actions.
New eModification Request
1.
2.
3.
4.
5.
The 'humanitarian action' list is shown.
Click on 'MR' next to the action to create an eModification Request.
The eModification Request is shown.
Click on each chapter to complete the eModification Request.
Click on 'Validation' to verify the eModification Request.
Tips
♦
To see how to create a new humanitarian action, click here.
Remarks
♦ All fields with an exclamation mark or an asterisk [*] are mandatory and have to be
completed.
158
Offline eTools application
Chapters
Complete chapter 1: general information (MR)
Offline eTools application > Request
Select your Humanitarian Action in the list. Click on 'MR'. The Modification Request is shown. Click
on chapter 1.
Complete chapter 1: General Information
1. Chapter 1 is completed by the system from the moment that this information has been
introduced during the creation of the initial eRequest.
2. Modify and/or complete, if necessary, the active fields (not greyed out) of chapter 1.
3. The two new greyed out fields that are shown in chapter 1 of the eModification Request
are not activated until the Intermediate or Final Report.
1.10
[INT] List the supplementary agreements and exchange of letters after signature of
the Agreement up to the Intermediate Report stage:
♦ Date of request
♦ Date of agreement
♦ Subject
♦ Reference
1.11
[FIN] List the supplementary agreements and exchange of letters after signature of
the Agreement up to the Final Report stage:
♦ Date of request
♦ Date of agreement
♦ Subject
♦ Reference
Tips
♦
♦
♦
Greyed out fields are not modifiable.
The information between brackets [ ] indicate at which stage of the eSingleForm a
question will be activated: [INT] indicates the Intermediate Report and [FIN] indicates the
Final Report.
To learn more about the notes function, click here.
159
APPEL eDocumentation
Complete chapter 2 to 4 (MR)
Offline eTools application > eModification Request
Select your Humanitarian Action in the list. Click on 'MR'. The Modification Request is shown. Click
on chapters 2 to 4.
Complete chapters 2 to 4
1. Chapters 2 to 4 are completed by the system from the moment that this information has
been introduced during the creation of the initial eRequest.
2. Modify and/or complete, if necessary, the active fields (not greyed out) in the chapters 2 to
4.
3. Complete the newly active fields that are shown in the eModification Request.
4. The new greyed out fields that are shown in chapter 2.4 of the eModification Request are
not activated until the Intermediate or Final Report.
♦ 2.4 [INT] If changes in needs assessment at intermediate report stage, please
explain.
♦ 2.5 [FIN] If changes in needs assessment at final report stage, please explain
♦ 3.3 [FIN] List other actions carried out by the humanitarian organisation or its
implementing partners in the same period in that area of intervention and how risks
for double funding were avoided.
♦ 4.2.8 [INT] In case of changes, please explain.
♦ 4.2.9 [FIN] In case of changes, please explain.
♦ 4.2.10 [FIN] Estimate per type of beneficiaries.
Tips
♦
♦
♦
160
Greyed out fields are not modifiable.
The information between brackets [ ] indicate at which stage of the eSingleForm a
question will be activated: [INT] indicates the Intermediate Report and [FIN] indicates the
Final Report.
To learn more about the notes function, click here.
Offline eTools application
Complete subchapter 4.3.1: objectives, results and activities (MR)
Offline eTools application > eModification Request
Select your Humanitarian Action in the list. Click on 'MR'. The Modification Request is shown. Click
on subchapter 4.3.1.
Complete subchapter 4.3.1: Objectives, results and activities
1. The subchapter 'objectives; results and activities' is completed by the system from the
moment that this information has been introduced during the creation of the initial
eRequest.
2. Modify and/or complete the active fields of the subchapter 4.3.1. These fields are 'Risks
and assumptions' and 'Results'.
Tips
♦
♦
Greyed out fields are not modifiable.
To learn more about the notes function, click here.
Remarks
♦ The result can be completed from here or from 4.3.2.
♦ Under subchapter 4.3.2 you can give the details for each of the added results.
♦ The information introduced at 4.3.2 is partly visible here.
161
APPEL eDocumentation
Complete subchapter 4.3.2: more detailed information per result (MR)
Offline eTools application > eModification Request
Select your Humanitarian Action in the list. Click on 'MR'. The Modification Request is shown. Click
on subchapter 4.3.2.
Complete subchapter 4.3.2: More detailed information per result
1. The subchapter 'More detailed information per result' is completed by the system from the
moment that this information has been introduced during the creation of the initial
eRequest.
2. Modify and/or complete the active (not greyed out) fields of the subchapter 4.3.2.
Tips
♦
♦
♦
♦
162
Greyed out fields are not modifiable.
The information between brackets [ ] indicate at which stage of the eSingleForm a
question will be activated: [INT] indicates the Intermediate Report and [FIN] indicates the
Final Report.
All fields of subchapter 'More detailed information per result' are modifiable.
To learn more about the notes function, click here.
Offline eTools application
Complete subchapters 4.4 and 4.5 (MR)
Offline eTools application > eModification Request
Select your Humanitarian Action in the list. Click on 'MR'. The Modification Request is shown. Click
on subchapters 4.4 to 4.5.
Complete subchapter 4.4 and 4.5
1. The subchapters 'monitoring, evaluation, audit and other studies' are completed by the
system from the moment that this information has been introduced during the creation of
the initial eRequest.
2. Modify and/or complete the active (not greyed out) fields of the subchapter 4.4 and 4.5.
3. The new greyed out fields that are shown in chapter 4.4 of the eModification Request are
not activated until the Intermediate Report.
4.4.1 [INT] Revised work plan, if changed after proposal
Tips
♦
♦
♦
Greyed out fields are not modifiable.
The information between brackets [ ] indicate at which stage of the eSingleForm a
question will be activated: [INT] indicates the Intermediate Report and [FIN] indicates the
Final Report.
To learn more about the notes function, click here.
163
APPEL eDocumentation
Complete chapter 5 to 9 (MR)
Offline eTools application > eModification Request
Select your Humanitarian Action in the list. Click on 'MR'. The Modification Request is shown. Click
on chapters 5 to 9.
Complete chapters 5 to 9
1. Chapters 5 to 9 are completed by the system from the moment that this information has
been introduced during the creation of the initial eRequest.
2. The eModification Request gives you the possibility to modify and/or complete the active
fields of the mentioned chapters.
3. The new greyed out fields that are shown in chapters 5 to 9 of the eModification Request
are not activated until the Intermediate or Final Report.
♦ 5.4 [INT] In Case of changes or problems to be adressed, please explain.
♦ 5.5 [FIN] In Case of changes or problems to be adressed, please explain.
♦ 6.4 [INT] In case of changes or coordination problems, please explain.
♦ 6.5 [FIN] In case of changes or coordination problems, please explain.
♦ 7.4 [INT] In case of changes, please explain.
♦ 7.5 [FIN] In case of changes, please explain.
♦ 8.3 [INT] In case of changes or problem to be addressed, please explain.
♦ 8.4 [FIN] In case of changes or problem to be addressed, please explain.
♦ 9.4 [INT] In case of changes, please explain.
♦ 9.5 [FIN] In case of changes, please explain.
Tips
♦
♦
♦
164
Greyed out fields are not modifiable.
The information between brackets [ ] indicate at which stage of the eSingleForm a
question will be activated: [INT] indicates the Intermediate Report and [FIN] indicates the
Final Report.
To learn more about the notes function, click here.
Offline eTools application
Complete chapter 10 to 11 (MR)
Offline eTools application > eModification Request
Select your Humanitarian Action in the list. Click on 'MR'. The Modification Request is shown. Click
on chapters 10 to 11.
Complete chapters 10 to 11
1. Chapters 10 to 11 are completed by the system from the moment that this information has
been introduced during the creation of the initial eRequest.
2. Modify and/or complete the active (not greyed out) fields of the chapters 10 and 11.
3. The new greyed out fields that are shown in chapters 10 to 11 of the eModification
Request are not activated until the Intermediate or Final Report.
10.2 [INT] In case of changes, please explain.
10.3 [FIN] In case of changes, please explain.
11.1 [FIN] In case of other donors, please identify the donors and the amount provided
Tips
♦
♦
♦
Greyed out fields are not modifiable.
The information between brackets [ ] indicate at which stage of the eSingleForm a
question will be activated: [INT] indicates the Intermediate Report and [FIN] indicates the
Final Report.
To learn more about the notes function, click here.
165
APPEL eDocumentation
Complete chapter 13 (MR)
Offline eTools application > eModification Request
Select your Humanitarian Action in the list. Click on 'MR'. The Modification Request is shown. Click
on chapter 13.
Complete chapter 13: conclusion and comments of the humanitarian
organisation
1. The eModification request contains the new chapter 'Conclusions and comments of the
humanitarian organisation'.
2. This chapter contains one question:
13. [FIN] Conclusions and comments
Tips
♦
To learn more about the notes function, click here.
Remarks
♦ Field 13 is not activated until the Final Report.
166
Offline eTools application
Complete annex A: Procurement table (MR)
Offline eTools application > eModification Request
Select your Humanitarian Action in the list. Click on 'MR'. The Modification Request is shown. Click
on Annex A.
Complete annex A: Procurement table
1. Chapter 'Annex A' has been completed by the system from the moment that this
information has been introduced during the creation of the initial eRequest.
2. Modify and/or complete the active (not greyed out) fields of the subchapter 4.3.2.
Tips
♦
♦
Greyed out fields are not modifiable.
To learn more about the notes function, click here.
167
APPEL eDocumentation
Complete Partner internal follow-up informations (MR)
Offline eTools application > eModification Request
Select your Humanitarian Action in the list. Click on 'MR'. The Modification Request is shown. Click
on Partner internal follow-up information.
Complete Partner internal follow-up information
1. The chapter Partner internal follow-up informations is automatically completed by the
system as soon as the information is provided when creating the initial eRequest.
2. The eModification allows you to modify and/or complete the information.
Tips
♦
To learn more about the notes function, click here.
Remarks
♦ This chapter does not upload to the online application. It is for internal follow-up
purposes only.
168
Offline eTools application
eIntermediate Report
169
APPEL eDocumentation
Functions
Create a new eIntermediate Report
Offline eTools application > Start screen
This function shows the eSingleForm start screen with the list of humanitarian actions.
New eIntermediate Report
1.
2.
3.
4.
5.
The 'humanitarian action' list is shown.
Click on 'IR' next to the action to create an eIntermediate Report.
The eIntermediate Report is shown.
Click on each chapter to complete the eIntermediate Report.
Click on 'Validation' to verify the eIntermediate Report.
Tips
♦
To see how to create a new humanitarian action, click here.
Remarks
♦ All fields with an exclamation mark or an asterisk [*] are mandatory and have to be
completed.
170
Offline eTools application
Chapters
Complete chapter 1 to 4 (IR)
Offline eTools application > Intermediate Report
Select your Humanitarian Action in the list. Click on 'IR'. The Intermediate Report is shown. Click on
chapter 1 to 4.
Complete chapters 1 to 4
1. Chapter 1 and chapters 2 to 4 are completed by the system during the creation of the
initial eRequest and the eModification Request.
2. Complete the newly active fields that are shown in chapter 1 and chapters 2 to 4 of the
eModification Request. The fields are activated in the Intermediate Report.
Tips
♦
♦
Greyed out fields are not modifiable.
To learn more about the notes function, click here.
171
APPEL eDocumentation
Complete subchapters 4.3.1 and 4.3.2 (IR)
Offline eTools application > Intermediate Report
Select your Humanitarian Action in the list. Click on 'IR'. The Intermediate Report is shown. Click on
subchapters 4.3.1 to 4.3.2.
Complete subchapter 4.3.1: Operational overview of the action - Logical
framework
All fields completed from the moment the information has been introduced during the creation of the
initial eRequest and the eModification Request are greyed out and are no longer modifiable.
Complete subchapter 4.3.2: More detailed information per result
1. Subchapter 4.3.2 is completed during the creation of the initial eRequest and the
eModification Request.
2. Complete the new fields:
Tab Details:
♦ Introduce the 'Actual number of beneficiaries'.
♦ Add a comment in the field ' Detailed description comment'.
Tab Objectively verifiable indicators:
♦ Introduce, for each indicator, the necessary information.
♦ Add a comment for each indicator.
Tab Activities
♦ Add a comment for each activity.
Tab Means and costs
♦ Introduce, for each mean, the necessary information.
♦ Add a comment for each mean.
Subchapter 4.3.2.4 Other costs
♦ Introduce the 'Intermediate Amount'.
Tips
♦
♦
172
Greyed out fields are not modifiable.
To learn more about the notes function, click here.
Offline eTools application
Complete subchapters 4.4 and 4.5 (IR)
Offline eTools application > Intermediate Report
Select your Humanitarian Action in the list. Click on 'IR'. The Intermediate Report is shown. Click on
subchapters 4.4 to 4.5.
Complete subchapters 4.4 and 4.5
1. The subchapters 'Work plan' and 'Monitoring, evaluation, audit and other studies' are
completed from the moment the information has been introduced during the creation of
the initial eRequest and the eModification Request.
2. Complete field 4.4.1 is greyed out in subchapter 4.4 of the eModification Request.
Tips
♦
♦
Greyed out fields are not modifiable.
To learn more about the notes function, click here.
173
APPEL eDocumentation
Complete chapter 5 to 8 (IR)
Offline eTools application > Intermediate Report
Select your Humanitarian Action in the list. Click on 'IR'. The Intermediate Report is shown. Click on
chapter 5 to 8.
Complete chapters 5 to 8
1. Fields completed from the moment the information has been introduced during the
creation of the initial eRequest and the eModification Request are greyed out and are no
longer modifiable.
2. Complete the new greyed out fields in chapters 5 to 8 of the eModification Request. These
fields are active in the eIntermediate Report.
Tips
♦
♦
174
Greyed out fields are not modifiable.
To learn more about the notes function, click here.
Offline eTools application
Complete chapters 9 to 11 (IR)
Offline eTools application > Intermediate Report
Select your Humanitarian Action in the list. Click on 'IR'. The Intermediate Report is shown. Click on
chapter 9 and 11.
Complete chapters 9 to 11
1. Chapter 9 and Chapters 10 to 11 completed from the moment the information has been
introduced during the creation of the initial eRequest and the eModification Request are
greyed out and are no longer modifiable.
2. Complete, if necessary, the greyed out 'Actual intermediate amount' in the initial
eRequest. The field can only be completed in the Intermediate Report.
3. Complete the new greyed out fields of chapter 9 and chapters 10 to 11 of the
eModification Request. These fields are active in the Intermediate Report.
Tips
♦
♦
Greyed out fields are not modifiable.
To learn more about the notes function, click here.
175
APPEL eDocumentation
Complete annex A and internal follow up informations (IR)
Offline eTools application > Intermediate Report
Select your Humanitarian Action in the list. Click on 'IR'. The Intermediate Report is shown. Click on
Annex A or internal follow up information.
Complete annex A: Procurement table
Fields completed and modified in the initial eRequest and the Modification Request can still be
updated in the Intermediate Report.
Complete Partner internal follow-up informations
Fields completed and modified in the initial eRequest and the Modification Request can still be
updated in the Intermediate Report.
Tips
♦
To learn more about the notes function, click here.
Remarks
♦ The chapter 'Partner internal follow-up informations' does not upload to the online
application. It is for internal follow-up purposes only.
176
Offline eTools application
eFinal Report
177
APPEL eDocumentation
Functions
Create a new eFinal Report
Offline eTools application > Final Report
This function shows the eSingleForm start screen with the list of humanitarian actions.
New eFinal Report
1.
2.
3.
4.
5.
The 'humanitarian action' list is shown.
Click on 'FR' next to the action to create an eFinal Report.
The eFinal Report. is shown.
Click on each chapter to complete the eFinal Report.
Click on 'Validation' to verify the eFinal Report.
Tips
♦
To see how to create a new humanitarian action, click here.
Remarks
♦ All fields with an exclamation mark or an asterisk [*] are mandatory and have to be
completed.
178
Offline eTools application
Chapters
Complete chapter 1 to 4 (FR)
Offline eTools application > Final Report
Select your Humanitarian Action in the list. Click on 'FR'. The Final Report is shown. Click on
chapter 1 to 4.
Complete chapters 1 to 4
1. Chapter 1 and chapters 2 to 4 are completed from the moment the information has been
introduced during the creation of the initial eRequest and the eModification Request.
2. Modify and/or complete, if necessary, active fields (not greyed out) in the chapters 1 to 4.
3. Complete the new fields of chapter 1 and chapters 2 to 4 of the eModification Request.
These fields are active in the eFinal Report.
Tips
♦
♦
Greyed out fields are not modifiable.
To learn more about the notes function, click here.
179
APPEL eDocumentation
Complete subchapters 4.3.1 and 4.3.2 (FR)
Offline eTools application > Final Report
Select your Humanitarian Action in the list. Click on 'FR'. The Final Report is shown. Click on
subchapters 4.3.1 to 4.3.2.
Complete subchapter 4.3.1: Operational overview of the Action: Logical
framework
All fields completed from the moment the information has been introduced during the creation of the
initial eRequest and the eModification Request are greyed out and are no longer modifiable in the
eFinal Report.
Complete subchapter 4.3.2: More detailed information per result
1. Subchapter 4.3.2 is completed from the moment the information has been introduced
during the creation of the initial eRequest, the eModification Request and Intermediate
Report.
2. Complete the new fields:
Tab Details:
♦ Introduce the 'Final actual value' in the field 'Amount'.
♦ Introduce the 'Final actual number of beneficiaries'.
♦ Add a comment in the field ' Detailed description comment'.
Tab Objectively verifiable indicators:
♦ Introduce, for each indicator, the necessary information.
♦ Add a comment for each indicator.
Tab Activities
♦ Add a comment for each activity.
Tab Means and costs
♦ Introduce, for each mean, the necessary information.
♦ Add a comment for each mean.
Subchapter 4.3.2.4 Other costs
♦ Introduce the 'Final Amount'.
Tips
♦
♦
♦
180
Greyed out fields are not modifiable.
Certain fields, completed and modified during the initial eRequest and the eModification
Request are greyed out and can no longer be modified in the eFinal Report.
To learn more about the notes function, click here.
Offline eTools application
Complete subchapters 4.4 and 4.5 (FR)
Offline eTools application > Final Report
Select your Humanitarian Action in the list. Click on 'FR'. The Final Report is shown. Click on
chapter 4.4 to 4.5.
Complete subchapters 4.4 and 4.5
The subchapters 'Work plan' and 'Monitoring, evaluation, audit and other studies' are completed
from the moment the information has been introduced during the creation of the initial eRequest,
the eModification Request and the eIntermediate Report.
Tips
♦
♦
♦
Greyed out fields are not modifiable.
Certain fields, completed and modified during the initial eRequest and the eModification
Request are greyed out and can no longer be modified in the eFinal Report.
To learn more about the notes function, click here.
181
APPEL eDocumentation
Complete chapters 5 to 8 (FR)
Offline eTools application > Final Report
Select your Humanitarian Action in the list. Click on 'FR'. The Final Report is shown. Click on
chapter 5 to 8.
Complete chapters 5 to 8
1. Chapters 5 to 8 are completed from the moment the information has been introduced
during the creation of the initial eRequest, the eModification Request and the
eIntermediate Report.
2. Complete the new greyed out fields in chapters 5 to 8 of the eModification Request. These
fields are active in the eFinal Report.
Tips
♦
♦
182
Greyed out fields are not modifiable.
To learn more about the notes function, click here.
Offline eTools application
Complete chapters 9 to 11 (FR)
Offline eTools application > Final Report
Select your Humanitarian Action in the list. Click on 'FR'. The Final Report is shown. Click on
chapter 9 to 12.
Complete chapters 9 to 11
1. Chapter 9 and chapters 10 to 11 are completed from the moment the information has
been introduced during the creation of the initial eRequest, the eModification Request
and the eIntermediate Report.
2. Complete, if necessary, the greyed out 'Actual final amount' in the initial eRequest. The
field can only be completed in the eFinal Report.
3. Complete the new greyed out fields of chapter 9 and chapters 10 to 11 of the
eModification Request. These fields are active in the eFinal Report.
Tips
♦
♦
Greyed out fields are not modifiable.
To learn more about the notes function, click here.
183
APPEL eDocumentation
Complete conclusions, annexes and internal follow up (FR)
Offline eTools application > Final Report
Select your Humanitarian Action in the list. Click on 'FR'. The Final Report is shown. Click on
Conclusions, Annexes and internal follow up.
Complete the conclusions and humanitarian organizations comments
Chapter 13 is new and is shown in the eFinal:
13 Introduce 'Conclusions and humanitarian organizations comments'
Complete Annex A: Procurement table
Fields completed and modified in the initial eRequest and the Modification Request can still be
updated in the Final Report.
Complete the internal follow-up informations
Fields completed and modified in the initial eRequest and the Modification Request can still be
updated in the Final Report.
Tips
♦
To learn more about the notes function, click here.
Remarks
♦ Chapter 'Partner internal follow-up informations' does not upload to the online
application. It is for internal follow-up purposes only.
184
Offline eTools application
FAQ
Frequently Asked Questions Offline
General questions
What is the offline eTools application?
The offline eTools application gives you the possibility to follow up on a Humanitarian Action without
being connected to the internet.
How do I install the offline eTools application?
To install the offline eTools application, please go to the topic 'Install the offline eTools application
on your computer'.
What is the difference between a full upload and a partial upload?
A partial upload is used to upload one or a few chapters of the document. You can choose 'Upload'
-> 'Partial Upload' in APPEL and then indicate which chapters you want to upload to the draft
document in APPEL.
A partial upload results in a non-validated document in APPEL. This means that you will need to go
to each chapter and click the 'save' button at the bottom of the screen.
After uploading a chapter, the whole document in APPEL becomes draft again, even if some of the
chapters were validated or saved online before. Therefore, it is best to upload all chapters first, then
save them, and then submit the document.
A full upload is used to upload an entire document. It is best to validate it in the offline eTools
application. A complete validated upload results in a document that is also validated in APPEL.
How are different users created in the offline eTools application?
A user account only works on the computer where you added the new account.
Go to the 'username and password' topic in the eDocumentation to learn how to create a new user
account.
Technical questions
Which browser should be used?
The offline application runs with Internet Explorer or Firefox. The online application runs with
Internet Explorer.
The error message 'resource not found' is shown. What should I do?
The error message 'resource not found' can be shown when starting the offline eTools application
due to security settings on some computers.
The standard url in the offline eTools application browser window is
http://localhost:8080/waitserver.html. You can change this standard url to
http://127.0.0.1:8080/waitserver.html to avoid this error message.
To learn more about possible startup problems, please go to the topic 'Start the application'.
Can the filename of the .xml be changed?
Changing the name of the .xml file directly in the offline eTools application is not possible.
To change the .xml filename, you can go to 'offline > project repository > partner ' on your
computer, and rename the filename here. You can choose any name, however no special
characters can be used not even accents (e.g. 'é'). You cannot use spaces either, underscores can
be used instead. These rules should be respected to avoid problems when uploading the file to
APPEL.
Can the action repository be moved, e.g. to a shared server?
185
APPEL eDocumentation
This is not possible at the moment, because the offline eTools application was created to be used in
the field, where there is no access to internet or a shared server. It is only recently that the offline
eTools application is used at the office as well, due to the efficiency of the application.
My text is not too long according to MS Word, why can't I paste it in the offline application?
This is because word counts the characters of the text, and the offline eTools application counts the
bytes of the text when copy/pasting.
So each text field in the offline application has a limited amount of bytes, for example an 'é' contains
2 bytes. To better evaluate the number of bytes in a text, please use the notes function of the
eTools offline.
Should I uninstall the offline eTools application before I install a new version?
No, you don't have to uninstall the offline eTools application before you install a new version.
You can have different versions of the offline eTools application on your computer. They will not
conflict with each other, or affect each other.
Can I use my previously created .xml files in the new version of the offline eTools
application?
Yes you can. When you upgrade to a new version of the offline eTools application, you can reuse
the .xml files that you created in the previous version of the offline eTools application. You will just
have to follow these steps:
1. Upload the old .xml projects to the online version.
2. Online, you create a new draft document with the old .xml project.
3. Export the draft document to the Offline eTools application.
4. Check whether all fields are completed. The fields can loose information during the upload
process.
186
Glossary
A
Action: A humanitarian aid Operation implemented by a Humanitarian Organisation and funded by the
European Commission.
Ad Hoc Decision: One of the four categories of Financing Decisions. It intends to give a one-off
response to meet localised humanitarian needs, and is generally built on the basis of a limited
set of elements. It can be articulated on the basis of a single sector or theme of intervention, a
single or limited number of Partners or a limited set of specific objectives.
Agreement: A generic term covering both Grant Agreements and Contribution Agreements.
Encompasses the General Conditions, Special Conditions, Annexes I and II(description of the
Action; financial overview), and Action proposal.
Amendment: Gives you the possibility to modify a signed contract. After the creation of the amendment,
the contract has different versions. These are shown in the search results list of a contract and
the consultation screen of a contract.
APPEL: The web application of DG ECHO that permits the partners of DG ECHO to manage
humanitarian projects.
C
Commitment: A commitment of payments and recovery orders that come from the information systems
ABACWKFL and ABACFED.
Committed costs: Costs for which a legal obligation exists (e.g. on the basis of a contract) and is
entered into the Partner's accounts. (See also Eligible Costs).
D
Decision: A financial decision about a humanitarian action taken by DG ECHO to provide assistance to
victims of humanitarian disasters in the world. Decisions are also a module of the HOPE
intranet application, accessible through the intranet of DG ECHO.
Decommitment: An annulment of a commitment.
DG ECHO: The Directorate General European Commission Humanitarian Organisation.
Direct costs: Any expenditure directly linked to the implementation of the Action.
E
ECAS: The European Commission Authentication System which is an authentication system
recommended for the use of APPEL. An ECAS account consists of a unique personal identifier
(username and password) that permits to establish a secured connection with all applications
of the commission that use the same authentication system instead of having to create a
different identifier for each application.
Eligible costs: Costs that are (i) necessary and reasonable for the implementation of the Action, (ii)
actually incurred, complying with the principles of sound financial management, (iii) committed
during the Eligibility Period of the Action, (iv) identifiable, recorded in the accounting records of
the Humanitarian Organisation or its implementing partners, (v) determined according to the
applicable accounting standards of the country where the Humanitarian Organisation is
established and according to the usual costaccounting practices of the Humanitarian
Organisation, (vi) backed by original supporting evidence, verifiable, and (vii) complying with
the requirements of applicable tax and social legislation.
Emergency (financing) decision: One of the four categories of Financing Decisions covering new
crises and established humanitarian crises where humanitarian aid is already under way, but
where continuing uncertainty and instability requires an appropriate, rapid and flexible
response, e.g. where there are sudden deteriorating weather conditions within a natural
disaster situation (a crisis within a crisis).
187
APPEL eDocumentation
eSingleForm: The form to be completed by the Partners for the submission of their Action proposals
and reports. The single form evolves along with the Action it refers to. The eSingleForm
evolves with the action that it is linked with.
F
Financing Decision: Act by which the Commission allocates funds from the General Budget to finance
humanitarian Actions. It identifies i.e. the objectives of humanitarian interventions, the region,
and type of activities, funds to be committed, eligibility period and potential partners. There are
4 categories of Financing Decisions: Primary Emergency Decisions, Emergency Decisions,
Global Plans and Ad Hoc Decisions.
Framework Partnership Agreement (FPA): An agreement between DG ECHO and the NGOs which
establishes the principles of partnership between DG ECHO and the NGOs defines their
respective roles, rights and obligations and establishes the rules applicable to the Actions
implemented by the NGOs and financed by DG ECHO.
G
Grant Agreement: An agreement signed by DG ECHO and an NGO, covering an Action. This
agreement results from the appoval of the final proposition of the financial request sent by the
partner to DG ECHO.
I
IDP: Internally Displaced People. These people were forced to flee from their residence but stayed
within their home country.
Indirect costs: Costs necessary for the functioning of the organisation which cannot be directly linked
to the implementation of the Action. They amount to a maximum of 7% of the total Direct Costs.
M
Modification: A modification is a convention to reflect operational or other changes in the execution of
the action. A modification can be a unilateral modification, of an exchange of letters or of a
complementary convention.
P
Partner: A Humanitarian Organisation which has signed one of the following partnership agreements:
the Framework Partnership Agreement with Non- Governmental Organisations, the Framework
Partnership Agreement with International Organisations and the Financial and Administrative
Framework Agreement between the United Nations and the European Community
Primary emergency (financing) Decision: One of the four categories of Financing Decisions designed
to cover the first immediate needs of the people concerned in the hours and days after the
outbreak of a new humanitarian crisis. Such crises are unpredictable in terms of where, when
and how they strike. It is a first initial response which does not aim to cover all needs. The
Primary Emergency Financing Decision is appropriate in the case of sudden onset of conflicts
or natural disasters such as earthquakes.
R
Request: A financial request of a humanitarian action sent by a partner to DG ECHO.
188
Index
A
I
Activity .................................................... 134, 135
Interactive trainings........................................... 26
Agreement ........................................................ 19
Intermediate report ........................................... 90
L
Amendment ................................................ 79, 80
Annex A .............................. 74, 82, 160, 172, 181
Lists ............................................................ 10, 17
APPEL .................................................... 3, 27, 94
Logical Framework ..... 25, 67, 154, 166, 177, 185
N
Application.............................................. 128, 130
C
Notes .............................................................. 144
Complete .................................................. 32, 135
Numbers ..................................................... 48, 54
O
Create .................................. 25, 76, 84, 134, 175
D
Overview ............................................................. 8
Q
Download ......................................................... 40
E
Questionnaire ................................................... 37
R
ECAS ............................................. 28, 29, 31, 33
eFinal ....................................................... 88, 183
Report ......................................... 84, 88, 175, 183
eIntermediate83, 84, 86, 90, 160, 172, 175, 176, 179, 180,
181, 184 18, 19, 67, 69, 81, 155, 166, 167, 168, 177, 178, 185, 18
Results17,
S
eModification .......................... 17, 76, 78, 81, 163
eRequest .............................. 5, 17, 18, 54, 61, 63
Screen structure ............................................... 47
Exporting files ................................................... 39
Search .......................................................... 9, 16
F
Search result list ................................... 17, 18, 19
Final report ................................................. 54, 90
Status ............................................................... 22
Submit .................................................. 62, 85, 89
Financial ......................................................... 170
T
Form ................................................. 44, 126, 135
G
Tab ............................................................. 49, 50
Tips ................................................................... 46
Grant Agreement .............19, 76, 84, 88, 175, 183
H
To do list ........................................................... 53
Training................................................. 5, 6, 7, 24
Human resources ........................................... 159
W
Humanitarian action ............................... 134, 135
Workflow ............................................................. 8
189