1
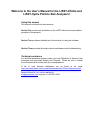
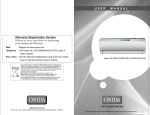
LISST-Infinite / LISST-Hydro Particle Size Analyzer User’s Manual Version 2.0 (December 2011) Sequoia Scientific, Inc. 2700 Richards Road Suite 107 Bellevue, WA, 98005, USA Phone: +1 425-641-0944 ; Fax: +1 425-643-0595 [email protected] ; www.SequoiaSci.com Welcome to the User’s Manual for the LISST-Infinite and LISST-Hydro Particle Size Analyzers! Using this manual This manual is divided into three sections. Section One contains an introduction to the LISST-Infinite instrument and the principles of its operation. Section Two provides a detailed set of instructions for using the software. Section Three provides information about maintenance and troubleshooting. Technical assistance For technical assistance please contact your local Distributor or Sequoia if the instrument was purchased directly from Sequoia. Please be sure to include the instrument serial number with any correspondence. A list of local Sequoia distributors can be found at our www: http://www.sequoiasci.com/contact/international.aspx?SectionName=contact Sequoia Scientific, Inc. can be reached at [email protected] or phone +1-425-641-0944. Contents SECTION 1: INTRODUCTION .................................................................................................................. 1 SECTION 2: OPERATION ...................................................................................................................... 4 2.1: LISST-INFINITE MASTER CONTROLLER SOFTWARE ............................................................................. 5 2.2. LISST-INFINITE MONITOR SOFTWARE ............................................................................................... 16 2.2.1. LISST-Infinite Monitor, Master Controller Mode ..................................................................... 18 2.2.2. LISST-Infinite Monitor , Monitor Mode .................................................................................... 20 2.2.3. LISST-Infinite Monitor , Archive Mode ..................................................................................... 30 STEP BY STEP PROCEDURES ............................................................................................................... 31 STEP BY STEP: DATA COLLECTION WITH LISST-INFINITE MASTER CONTROLLER SOFTWARE .................. 32 STEP BY STEP: DATA COLLECTION WITH LISST-INFINITE MONITOR , MASTER CONTROLLER MODE ....... 33 STEP BY STEP: VIEW DATA WITH LISST-INFINITE MONITOR , MONITOR MODE ....................................... 36 STEP BY STEP: VIEW ARCHIVED DATA ...................................................................................................... 38 SECTION 3: TROUBLESHOOTING AND MAINTENANCE ............................................................. 39 3.1. WARNING MESSAGES ......................................................................................................................... 40 3.2. MAINTENANCE ................................................................................................................................... 42 APPENDIX A: SIZE RANGES ................................................................................................................. 46 APPENDIX B: FILE FORMATS .............................................................................................................. 47 WARRANTY ............................................................................................................................................... 50 Section 1: Introduction Introduction The LISST-Infinite is a suspended sediment sensor that uses laser diffraction to measure the detailed size distribution and concentration of particles suspended in water. It has an auto-dilution system that allows a sample of water to be automatically diluted with clean water. This automatic dilution enables for the accurate measurement of water with concentration up to approximately 30,000 ppm (by mass). Instrument Overview The LISST-Infinite system consists of a main optics and control unit, a submersible pump (optional), associate power and control hardware, a source of filtered water, and a Windows based PC running the data collection software. LISST-Infinite Main optics and control unit details The LISST-Infinite main optics and control unit system consists of the following main components: 1) LISST-Infinite flow through cell and optics 2) Upper and lower 3-way pinch valves 3) Dilution Chamber and mixing pump 4) Valve controller and main electronics board. Figure 1. LISST-Infinite Main components. Main components include a) LISST-Infinite flow through cell and optics, b) Upper 3-way pinch valve, c) Set of Lower 3-way pinch valve d) Dilution Chamber; e) Mixer Pump; f) Valve controller and elctronics boards, g) Clean water tank level sensor. 1 Data Collection The data collection is controlled by the LISST-Infinite software running on a PC. The software will communicate with the LISST-Infinite main optics and controller. River water will flow or be pumped be pumped through the LISST-Infinite sensor. If needed, the water will be diluted to obtain accurate results. The raw data is then transferred to the LISST-Infinite software where it is processed into detailed size distributions. The software will display a time history of the concentrations and display warning flags as the concentration approaches critical levels. The process of acquiring a measurement of suspended sediment is divided into five processes: 1) Clean water background measurement 2) Undiluted pumped river water sampling 3) Captured Sample dilution sampling 4) Transmit data to LISST-Infinite software on PC for display 5) System flushing and preparations for next sample Clean Water Background The first step in acquiring a measurement of suspended sediment is to acquire a clean water background measurement. The system is automatically filled with clean filtered water prior to sampling. This allows the system to turn on the laser and optics and record the optical scattering from the clean water only. This background measurement effectively “zeros” the instrument and compensates for any potential build-up of particles on the optical windows over time. Since a background is obtained before each and every sample, drifts in the measurement due to fouling of the optical windows are eliminated. The current background scattering is available for viewing in the LISSTInfinite software. Comparisons can be made with the original factory background values to determine if window cleaning is required. Window cleaning should be part of the scheduled monthly instrument maintenance. Undiluted River water sampling After obtaining a clean water background, the valve systems on the LISST-Infinite opens up to let water flow through the LISST-Infinite optical cell. If a pump is attached, a command is sent to the pump to turn on and start pumping. The pinch valves in the instrument are configured to allow the turbid water to flow through the optical cell. This is done to make sure that the water from the previous measurement is completely flushed out of the system and the optics. After a pre-determined amount of time, which the user can set, the laser beam is turned on and the light scattering is measured. 2 If the concentration is within the acceptable level, a measurement of the detailed size distribution will be made and the data will be transmitted to the PC for processing and display. If the concentration is higher than acceptable levels an accurate measurement of concentration and size distribution cannot be made. In this situation a dilution of the turbid water will be performed. Capture sample and dilute If the concentration of the sediment is determined to be too high a sample capture and dilution must be performed. To capture a sample the values above and below the optical cell are closed. This trapped known volume of water is then recirculated with a known volume of clean water. This procedure performs a 15 to 1 dilution of the turbid water. The diluted turbid water is then recirculated through the optical cell where a measurement of detailed size distribution if performed. Once a measurement of detailed size distribution and concentration is obtained the results are transmitted to the PC for processing and display. The system then prepares itself for the next sample by flushing out the old sample and rinsing with clean water. System Flushing and preparation for next sample After obtaining a measurement the system must reset itself before the next sample can be measured. The steps performed will vary depending on if a sample dilution was performed. If a dilution was not performed the preparation for the next sample is simply to check the water level in the external water tank and fill the dilution chamber as needed. If a dilution was performed a series of flushing cycles will be performed to make sure there are no residual particles remaining in the system that would bias the next diluted measurement. Upon completing the flushing procedure the system is now ready to accept commands from LISST-Infinite software. 3 Section 2: Operation General Introduction to LISST-Infinite software The software that you must use with your LISST-Infinite or LISSTHYDRO will vary depending on how many instruments you have connected to your PC. It is possible to have anywhere from 1 to 5 instruments connected, and displaying data in real-time. One instrument? If you have one instrument connected to your instrument, you can only use the software called LISST-Infinite monitor, which can be operated in one of three modes: Two or more instruments? Master Controller Mode Monitor Mode Archive Viewer Mode If you have two or more instruments connected (for example, 2 LISST-Infinite’s, or a LISST-Infinite and 2 LISST-HYDRO’s), you must use the software called LISST-Infinite Master Controller. Note that this is different from the Master Controller Mode in the LISST-Infinite Monitor Software. Since most users have two or more LISST-Infinite and/or LISSTHYDRO instruments connected we will deal first with this situation and the use of the LISST-Infinite Master Controller software. Proceed with Section 2.1 LISST-Infinite Master Controller Software if you have two or more instruments connected. Proceed with Section 2.2 LISST-Infinite Monitor Software, Master Controller Mode if you have one instrument connected 4 2.1: LISST-Infinite Master Controller Software LISST-Infinite Master Controller SOFTWARE The LISST-Infinite Master Controller Software should only be used 1) if you have two or more LISST-Infinite or LISST-HYDRO’s connected to your PC OR 2) you have a LISST-Infinite or LISST-HYDRO with the optional 420 mA output. If you have only have one LISST-Infinite or LISST-HYDRO connected, and you do not have the optional 4-20 mA output on your instrument, proceed to section 2.2. LISST-Infinite Monitor Software, Master Controller Mode. Installing LISSTInfinite Master Controller Software A LISST-Infinite software CD is provided with each LISST-Infinite. This CD contains the software necessary to operate the LISST-Infinite. An install program is included on the CD that will extract the files into the proper locations. To start the install process, run the SetupInfinite.EXE program on the CD. You will be prompted to select a location to install the program. The default folder is C:\Program Files\Sequoia\LISSTMstController or C:\Program Files (x386)\Sequoia\LISSTMstController. Other folders may also be selected. However, it is recommended that the default folder be selected. After extracting the files the LISSTInfinite software can be started from the Start menu. Step 1: Start LISST-Infinite Master Controller Start the LISST-Infinite Master Controller Software by selecting Start / All Programs / Sequoia Scientific / LISSTMstController, then select the LISST-MstController to start the program: 5 Step 2: View the Master Controller Main Screen The main screen of the Master Controller shows. It is divided into 2 parts; the Control Panel Display and the Current Values Display Control Panel Display To the left is the Control Panel, which shows the current status of the software (typically, is the software collecting data or not), the date and time of the last sample, the time remaining (in seconds) until the next sample, and the sample update rate. Current Values Display To the right is the Current Values display. This display shows how many instruments are connected to the LISST-Infinite Master Controller. In this example 5 instruments; 1 LISST-Infinite and 4 LISSTHYDRO’s are connected and sampling. The Instrument serial number is listed, together with instrument type (LISST-Infinite or LISSTHYDRO). For LISST-Infinite instruments, the total concentration in PPM by mass (mg/l), the mean particle size (in µm), a dilution code (1 if no dilution took place, 2 if a dilution took place) and the water level in the clean water tank is displayed. For LISST-HYDRO instruments, the total concentration in PPM by mass (mg/l), the mean particle size (in µm), the optical transmission in %, and the water level in the clean water tank is displayed. Step 3: Select Instruments to Display in Current Values Display Before we start sampling, we must select the instruments to be displayed in the Current Values Display. Select the Settings menu, then select the Instruments tab. The Settings dialog box will show. 6 In the text box that reads ‘Instrument #1 Label’, enter a descriptive label for Instrument number 1. In this example ‘Infinite206’ has been entered, but the text could be more descriptive, e.g. ‘Siltation Basin, Entrance’, or ‘Turbine # 1’. However, it is recommended that you always include the instrument serial number in the label, as this makes troubleshooting easier. Then use the drop down menu to select the instrument type for Instrument #1. Your choices are LISST-Infinite, LISST-HYDRO, LISST100X, or None. Select the appropriate instrument. If you select ‘[None]’, no instrument will be displayed in the space for that instrument in the Current Values Display. Continue labeling as necessary for the remaining instruments. Step 4: Set Time Between Samples Next, on the Instruments tab you need to select the time between samples. This cannot be less than 5 minutes. In the example above, the time between samples has been set to 6 minutes. The instruments do NOT all sample at the same time. They are sampled sequentially. When Instrument #1 has completed its sampling, Instrument #2 will begin and so on. The time between Samples is the desired time between the start of sampling for instrument #1. If several instruments are connected, the time to actually obtain a sample for all instruments may be longer than the Time Between Samples. In this case Instrument#1 will start sampling as soon as the last instrument (in this case Instrument #5) has completed its sampling. Click the OK button when you are satisfied with the Instrument Labels and the Time Between Samples. 7 Step 5: Select 420 mA output As an optional feature, the LISST-Infinite can output the total concentration and average particle size as a 4-20 mA signal, for easy incorporation into an existing SCADA system. In each of the MIN fields on the 4-20 mA tab, enter the value for concentration and particle size that you would like to correspond to a 4 mA output. For example, it makes sense to have a concentration of 0 µl/l and a particle size of 0 µm correspond to the minimum output signal of 4 mA. A loss of signal would then result in negative concentrations and particle sizes, which is physically impossible. Likewise, in each of the MAX fields on the 20 mA tab, enter the value for concentration and particle size that you would like to correspond to a 20 mA output. Step 6: Select File Location Before we start sampling, we need to specify the location where the data files from the instruments are to be saved. Select Settings, and then click the File Location tab. The File Location dialog box appears. 8 Use the browse button to select the Directory where you want the data from the instruments are to be stored, and then click OK. Note that also the location of the LisstMstController.ini file is displayed here. The instruments obtain their calibration constants from this file. The user cannot change this location; it is displayed only for informational purposes. In order to open and view the content of the .INI file, click the View button. 9 Step 7: Select Serial Port As the last setting to be completed before we can start sampling, we must select the serial port that the instruments are connected to. Select Settings, then click the Serial Port tab. In the dropdown menu, select the Serial Port the instruments are connected to. Then click the OK button. Step 8: Start Sampling If the instruments have both been installed according to the installation instructions (see separate installation manual), the clean water tank is filled, the instruments are connected to the turbid source, and all settings are as desired, it is now time to start sampling. To start sampling, click the Start Button below the Control Panel display in the LISST-Infinite Master Controller Software. The Start button is the only way to start sampling with the LISSTInfinite Master Controller Software. Step 9: Stop Sampling You will notice that the Start button turns into a Stop button after you start sampling. To stop sampling, click the Stop button. If you start sampling after having stopped it, the new data will be appended to the existing data files. Step 10: Observe Collected Data When the sampling has been started, the Current Values Display will update with the data from each instrument as they have been received and processed by the monitoring PC. The system will display warning symbols and messages as needed (see warnings and maintenance section). 10 The last sample obtained from each instrument is available for viewing on the Current Values Display. In the example below, Instrument #1 has completed its data collection, Instrument #2 is currently acquiring data, and instruments #3-5 are pending. Step 11: Detailed It is possible to more detailed view the data from the last sample that was obtained by the LISST-Infinite Master Controller Software. From Data View the menu bar, select Display, then select if you want to display the detailed size distribution, the raw data or system values from an individual instrument. In this example, we want to view the detailed size distribution. 11 Next, you have to select the instrument you want to view. In this example, we want to view data from instrument #3. Step 12: Display Particle Size Distribution of last sample The detailed size distribution for the last sample from Instrument 3 then displays. The numbers on the Y-axis are the sediment concentration in ppm by mass (equivalent to mg/l), and the numbers on the X-axis are the 32 size classes for the LISST instruments (1.9-381 µm; 0.0019 – 0.381 mm). 12 If you are interested in knowing the exact concentration in a size class you can move the mouse to the blue bar on the size class of interest and hold it there for a second. The other bars will turn light blue and the actual concentration in the selected size class will display. In the example below, the concentration in size class 13 is 28.15 ppm. Step 13: Display Raw Data of last Sample If you click the Raw Data tab (or select Display Raw Data from the Display Menu), the uncalibrated raw data from the last sample will show. This can be useful for troubleshooting and to get an idea of the signal-to-noise ratio in the sample. In the Raw Data display, the blue bars show the signal level of the last sample (in units of digital counts). The green line (circles) is the factory background and the red line (triangles) is the current background. The background measurements are always obtained before a sample, using water from the clean water tank. 13 If you are interested in knowing the exact value of the raw data on a detector you can move the mouse to the blue bar on the detector of interest and hold it there for a second. The actual value of digital counts on the selected detector will display, as shown in the example below. Step 14: Display System Values for last Sample If you click the System Values tab (or select Display System Values from the Display Menu), the auxiliary data from the last sample will show. This can be useful for troubleshooting and to get an idea of the overall health of the instrument. Step 15: Viewing Time History (Strip Charts) of Concentration Once the sampling has been started and the LISST-Infinite Master Controller Software is running, you might be interested in viewing strip charts from the individual instruments, showing the time history of the concentration. For this purpose we use the LISST-Infinite Monitor Software, so proceed now with sections 2.2.2 and 2.2.3 describing the use of the LISST-Infinite Monitor Software and its use in Monitor Mode and Archive Mode. 14 15 2.2. LISST-Infinite Monitor Software Installing LISST-Infinite Monitor Software A LISST-Infinite software CD is provided with each LISST-Infinite. This CD contains the software necessary to operate the LISST-Infinite. An install program is included on the CD that will extract the files into the proper locations. To start the install process, run the SetupInfinite.EXE program on the CD. You will be prompted to select a location to install the program. The default folder is C:\Program Files\Sequoia\LISSTInfinite or C:\Program Files (x386)\Sequoia\LISST-Infinite. Other folders may also be selected. However, it is recommended that the default folder be selected. After extracting the files the LISSTInfinite software can be started from the Start menu. The LISST-Infinite Monitor Software can be operated in one of three modes: Master Controller Mode (Section 2.2.1) Monitor Mode (Section 2.2.2) Archive Viewer Mode (Section 2.2.3) Master THE MASTER CONTROLLER MODE IS THE ONLY TRIGGER FOR Controller Mode DATA COLLECTION for the LISST-Infinite Monitor Software. No data will be stored if this mode is not running on the computer connected to the LISST-Infinite or the LISST-HYDRO. The Master Controller mode can only be used on a computer that is physically connected to a LISST-Infinite or to a LISST-HYDRO via its serial port. When running in the Master Controller mode the software will trigger the LISST-Infinite or LISST-HYDRO to collect a sample and transmit the raw data across the serial port. The raw data is read by the software and processed into detailed size distributions. The LISST-Infinite Monitor, Master Controller Mode should ONLY be used if no more than one instrument is connected to the monitoring PC. Monitor Mode The Monitor mode allows other computers to view the current and previous samples collected by the Master Controller. When the Master Controller receives raw data from the LISST-Infinite it processes it and displays it. It will also save the values to a shared directory. Other users can run the LISST-Infinite software and access this saved data and view it on a display that very similar to the Master Controller display including warning alarms. When new data is received the Monitor screen will be updated. Archive Mode At the beginning of each month the data for that month will be saved to 16 an Archive file. This will happen when the first sample in a new month is obtained. The archive file can be viewed using the Archive Viewer mode. The display is very similar to the other two modes with the exception that the data will not be updated and the alarms will not be displayed. 17 2.2.1. LISST-INFINITE MONITOR, MASTER CONTROLLER MODE This section is designed to give the user a quick introduction to the operating procedures for the LISST-Infinite Monitor Software, master Controller Mode. It assumes that the LISST-Infinite system has already been installed, is connected to the PC, and that the LISST-Infinite or LISST-HYDRO instrument(s) are operating and sending data to the PC. For this tutorial we will assume that the LISST-Infinite or LISSTHYDRO is physically connected to the computer that the software was just loaded onto. If the computer that the software was loaded onto is not connected to the LISST-Infinite but is connected to the network that can access the shared data files, skip to Section 2.2.3. LISST-Infinite Monitor , Archive Mode Step 1: Start program Start the program by selecting it from the Start menu under All Programs > Sequoia Scientific> LISSTInfMonitor > LISST-InfMonitor. The program will start and 4 plots will be displayed. The text “No Data Available” will be displayed in each plot. Until you select the Monitor Mode the software will not know which data to display. Before opening the Master Controller mode we must first confirm that the software settings are configured as desired. To do this, now follow steps 1 through 6 in Section 2.2.2. LISST-Infinite Monitor , Monitor Mode, then return to step 2 below. Step 2: Open Master Controller Now that we have the software configured we can start collecting data. From the File menu choose Open Master Controller. 18 You can also click on the Open Session button Controller, then click the OK button. and choose Master This will start the data collection. If data has been collected in the past it will be immediately displayed on the Monitor screen. The first thing the software will do is command the instrument to take a measurement. The instrument will do the various steps required to get a measurement and then transmit the raw data to the software. The software will process the raw data into size distributions and then add a data point to the 4 displays. The procedure will repeat at the update rate that was set in Step 3 in section 2.2.2. Step 3: Monitor data using Monitor Mode The LISST-Infinite Monitor , Master Controller Mode is only being used to start the sampling of data from a LISST-Infinite or a LISST-HYDRO connected to the PC. Since we have now started the data collection from the connected instrument, we can proceed with the monitoring of the data. In order to monitor the data stream from the instrument, please proceed with section 2.2.2. LISST-Infinite Monitor , Monitor Mode 19 2.2.2. LISST-INFINITE MONITOR , MONITOR MODE This section is designed to give the user a quick introduction to the operating procedures for the LISST-Infinite Monitor Software, Monitor Mode. It assumes that the LISST-Infinite system has already been installed, is connected to the PC, and that the LISST-Infinite or LISST-HYDRO instrument(s) are operating and sending data to the PC. For this tutorial we will assume that the LISST-Infinite or LISSTHYDRO is physically connected to the computer that the software was just loaded onto. If the computer that the software was loaded onto is not connected to the LISST-Infinite but is connected to the network that can access the shared data files, skip to Section 2.2.3. LISST-Infinite Monitor , Archive Mode Step 1: Start program Start the program by selecting it from the Start menu under All Programs > Sequoia Scientific> LISSTInfMonitor > LISST-InfMonitor. The program will start and 4 plots will be displayed. The text “No Data Available” will be displayed in each plot. Until you select the Monitor Mode the software will not know which data to display. Figure 2. LISST-Infinite Monitor, Monitor Mode window after starting the software Step 2: Set display scale for each plot Before opening the Monitor Mode mode we must first confirm that the software settings are configured as desired. To view and change the setting click on the Settings button or choose Program Settings from the Settings menu. 20 The Settings window has tabs across the top that lets you select the different setting pages. The first page allows the user to set the vertical scale for each of the four plots showing the concentration. ENTER THE DESIRED VALUES FOR THE MINIMUM AND MAXIMUM CONCENTRATION TO DISPLAY. Step 3: Set update rate Below the settings for the vertical scale is the setting for the horizontal time axis on the strip chart and the Time Between Samples. NOTE: If you have two or more instruments connected, the Time Between Samples cannot be changed in LISST-Infinite Monitor, Monitor Mode. The sample interval when two or more instruments are connected MUST be set using the LISST-Infinite Master Controller Software described in section 2.1. 21 Enter the number of hours to display in the monitor window. Sequoia recommends that you select a value somewhere between 48 and 96 hours to get a good visual idea of how the sediment concentration has been varying in the past. If you select a value of 12 hours or less you will not be able to see what the natural daily variability is, if there is any. In the example shown here, the display period has been set to 96 hours (4 days). Below the display period is the setting for the Time Between Samples - the sample update rate if you like. This value sets the time between measurements. Since it can take almost 5 minutes to acquire a new measurement the shortest possible update rate is 5 minutes. Enter the desired time in minutes. In the example shown here, the time between samples has been set to 15 minutes. When you click OK the values you have entered will be saved as default so you do not have to re-enter them if you close the Monitor program. Step 4: Set Alarm Levels The second tab on the Settings window contains the settings for the Alarm level for each of the four plots. When the value reaches this Alarm level a visual and audible alarm activate. The alarm is not activated unless the average value exceeds the Alarm level. 22 In the example shown, the alarm level for the 3 sub-ranges has been set to 18,400 PPM for each. The alarm level for the total concentration has been set to 40,000 PPM. If just one of these thresholds is exceeded the alarm will go off. As part of the alarm system is a calculation of the time until the alarm is triggered, or if it is already set, the time to clear the alarm. This is calculated by fitting at straight line through the last 5 measurements and finding the time until the alarm level is reached. The time is only a prediction based on the current trend. Real conditions may, of course, be much different. Step 5: Confirm Serial Port settings In order for the LISST-Infinite or LISST-HYDRO to communicate with the LISST-Infinite Monitor Software, the serial port settings must be correct. The software automatically detects the available communication ports. All you have to do is to select the correct port. 23 Select the port you have the LISST-Infinite connected to from the drop down menu. Verify that the Baud Rate is 9600 baud – DO NOT CHANGE THE BAUD RATE – IT SHOULD ALWAYS BE 9600. Step 6: Set shared file location If you are using the LISST-Infinite Master Controller Software to collect data from two or more instruments you must skip this step. In the Master Controller Mode raw data is acquired from the LISSTInfinite instrument and processed into detailed size distribution and the four size ranges shown on the main display. A copy of this data is automatically saved to a folder that is selected using the File Location tab of the Settings window. If the folder selected is shared folder on a local network, then other 24 computers can open this data and view the same data that the Master Controller is displaying. Running the software in this way is called Monitor mode. Please note that it is highly recommend that the folder selected be located on the local hard drive of the computer running the InfMonitor program. A recommend folder is C:\Program Files\Sequoia\LISSTInfMonitor\Shared_data. However, any folder on the local hard drive can be used. If a folder on another computer is selected the extra time required to access the folder can cause problems. Also note that the folder selected is not automatically configured as a shared folder. You will need to use standard Windows procedures for making a shared folder. Consult your network administrator. Step 7: Start Monitoring You are now ready to start monitoring the time history of concentration. Step 7a: Monitoring with one instrument connected If you have are connected to one instrument, the data will start displaying in the monitor window as soon as the instrument has collected data. Step 7b: Monitoring with two or more instruments connected If you have two or more instruments connected, you must first select *which* instrument you want to monitor in the LISST-Infinite Monitor , Monitor Mode Window. Click File > Open Monitor Then select the Instrument you want to display. In this example we are displaying Instrument #3 out of 5. 25 Step 8: View concentration history The concentration history for the selected instrument now shows in four strip charts. Each strip chart shows the concentration in for sub size ranges: Particles larger than 200 µm (0.2 mm), between 75 and 200 µm (0.075 mm to 0.2 mm), less than 75 µm (0.075 mm), and the total concentration of particles between 1.9 and 381 µm (0.0019 to 0.381 mm). The time history of these 4 values is displayed on the screen. adjustable warning level can be set for each value (see step When this level is exceeded an audible and visual warning will displayed. A prediction of the time to alarm is also displayed each value. Step 9: Customize colors and lines An 4). be for If you right click on a data point in one of the strip charts you have an option to change color, line width, and display data labels for each data point on the strip chart. 26 Step 10: Open Full Size distribution window More detailed information, such as detailed size distribution, raw light scattering values, and system values, is available for each measurement. To access this information, double click on a measurement point in the Total Concentration plot (the bottom strip chart). To open the most current sample double click on the right most sample. A window will appear that shows the current detailed size distribution. The plot shows the 32 log spaced size classes. Size class 1 is 2.5 microns and size class 32 is 500 microns. The date and time of the sample is shown on the title of the display. Step 11: View raw light scattering and background light levels To access the raw light scattering for this sample click on the Raw Data tab at the top of the size distribution display window. The raw light scattering is useful in trouble shooting any technical problems. For example, for the system to work properly the optical windows that the laser beam passes through must be clean. To correct for any additional scattering coming from these windows a clean water background is obtained before each measurement. If the windows are slightly dirty this background measurement will automatically correct the data before processing the size distribution. This clean 27 water background is displayed as a line with blue triangle points. The original factory values for this instrument are also displayed as a line with red circle points. The current light scattering is shown as light blue bars. Step 12: View system values The third tab on the top of this display window can be used to show the current system values. The system values include Laser Power, Battery voltage, Dilution Code, and Clean water tank value. The values displayed are for the selected sample only. To see the most current values be sure to double click on the most current sample in the Total concentration display when opening the Detail Info display. Step 13: Monitor current values from a remote computer A unique feature of the LISST-Infinite software is the ability to view the same particle size information displayed on the Master Controller PC from remote locations. The only requirement is that the computer in the remote location has access to a shared folder on the Master Controller PC. In other words, the computers must be on a shared network. In step 6 the location of the shared data was selected. The recommend folder was C:\Program Files\Sequoia\LISST_Infinite\Shared_data. On the Master Controller PC this folder is where data files will be saved. On a remote computer running in Monitor mode this folder is where the software will look for data. When selecting the folder be sure to include the full network path name or select the folder using the browse button. After making sure that the data folder is selected correctly we can open the Monitor mode by choosing Open Monitor from the file menu. The display very similar to the Master Controller display should appear. As new data is save by the Master Controller the 28 display on the Monitor computer will automatically update. All of the same display features available on the Master Controller are also available on the Monitor computer. The only exception is the options effecting sample rates. All of the warning messages and size distribution displays are available. 29 2.2.3. LISST-INFINITE MONITOR , ARCHIVE MODE The third mode of operation is the Archive View mode. The first sample of each month will trigger an automatic archiving of the date from the previous month into an archive file. These archive files can be used to easily locate data for previous year’s data. The archive files will be saved in the shared data folder. The file name will be automatically generated and will be in the following format: INFyyyymm.bin where yyyy is the 4 digit year and mm is the two digit month. For example, INF200508.bin will be the archive file for August 2005. Open an Archive File To open an archive file select the Open Archive option from the File menu. You will be asked to select an Archive file. Click on the desired file and press Open. The data will now be displayed on the screen in the same plot format as in Monitor Mode. The features available are similar to the Monitor Mode with the exception that the data will not update with new data and the alarms will not be activated. 30 Step by Step procedures The following topics are covered with Step by Step instructions: Start data collection with the LISST-Infinite Master Controller Software Start data collection in Master Controller Mode with the LISST-Infinite Monitor Software View data in Monitor Mode with the LISST-Infinite Monitor Software Open and View Archive File with the LISST-Infinite Monitor Software 31 Step by Step: Data Collection with LISST-Infinite Master Controller Software Step Action Result 1 Start LISST-MstController. On the Windows Start menu click on All Programs. Then Sequoia Scientific. Then LISSTMstController and then LISST-MstController. Program should start and display Control Panel and Current Values display on the main screen. 2 From Settings menu of LISST-MstController program select the Instruments tab. Settings window will be displayed. Confirm that the Time Between Samples is set to the desired value Time between Samples set. 3 From Settings menu, select File Location tab for storing data files 4 Start Sampling by clicking the Start button below the Control Panel display. Samples displaying on the main screen. 5 Either: View the last sample from an instrument by selecting Display Size Distribution in the Display Menu Display the last sample for the selected instrument 6 Or: View the time history from an instrument using the LISST-Infinite Monitor , Monitor Mode Display the time history of concentration for the selected instrument 32 Step by Step: Data Collection with LISST-Infinite Monitor , Master Controller Mode Step Action 1 Start LISSTInfMonitor program. On the Windows Start menu click on Programs. Then Sequoia Scientific and then LISSTInfMonitor. Program should start and show four plots with the words “No Data Available”. 2 From Settings menu of LISSTInfMonitor program select Program Settings. Settings window will be displayed. Confirm that the Time Between Samples is set to the desired value. When the system is configured with the submersible pump running continuously the time between samples can be set to as little as five minutes. However, when the submersible pump is configured to run in AUTO mode, where it is controlled to turn on and off automatically, the minimum recommend time between samples is 15 minutes. Short time intervals could cause damage to the submersible pump. Time between Samples set. 3 4 Result From File menu of LISSTInfMonitor program select Open Master Controller. Data previously acquired will be displayed on the four plots. Commands will be sent to the instrument to initiate sample. Text in the lower left of the window will inform the user of the current status of the data collection. When the data collection is complete the LISST-Infinite will transmit the data to the Monitor PC where the LISSTInfMonitor software will receive it and process the raw 33 Data Collection started. data into size distributions. When the processing is complete the new value will be displayed on the four plots. 5 After displaying the current plot the program will wait until program time between samples before sending the next command to acquire a sample. 6 Data collection will continue until operating mode is change to Monitor or Archive mode or if the window is closed. Note: Minimizing the window will not have an effect on the data collection. Samples will still be collected when the window is minimized. It is also possible to open a second copy LISSTInfMonitor for viewing Archive files without effecting data collection. 34 Data Collection continuing. Notes: 35 Step by Step: View Data with LISST-Infinite Monitor , Monitor Mode Step Action Result 1 Start LISSTInfMonitor program. On the Windows Start menu click on Programs. Then Sequoia Scientific and then LISSTInfMonitor. Program should start and show four plots with the words “No Data Available”. 2 From Settings menu of LISSTInfMonitor program select Program Settings. Click on the File Locations tab. Settings window will be opened and File Location screen is displayed. Confirm that the folder listed is the shared folder where files are being written to by the PC running File Locations set. in Master Controller mode. Only the folder which is actively being updated will provide real-time updates of the values in the Monitor mode. Click on the check box next to Save as default and Select OK to continue. 3 From File menu of LISSTInfMonitor program select Open Monitor. Note: As new measurements are obtained the shared data file will be updated. The Monitor mode will see that the file has been updated and refresh the display screen. Alarms will respond to the at the alarm levels configured on the PC current running the Monitor mode. The alarm levels of the Master Controller PC do not affect the alarms of other computers viewing the data in Monitor mode. 36 Data from selected shared monitor file is displayed. Monitor mode display is very similar to the Master Controller mode display. Notes: 37 Step by Step: View Archived Data Step Action Result 1 Start LISSTInfMonitor program. On the Windows Start menu click on Programs. Then Sequoia Scientific and then LISSTInfMonitor. 2 From File menu of LISSTInfMonitor program select View Archive. Select the desired archive file to open. Note: The file name will be in the following format: INFyyyymm.bin where yyyy is the 4 digit year and mm is the two digit month. For example, INF200508.bin will be the archive file for August 2005. Notes: 38 Program should start and show four plots with the words “No Data Available”. Archived data displayed. Section 3: Troubleshooting and Maintenance This chapter contains information about the implications of the warning messages that the system can issue, and how to remedy them. Section 3.1 explains the various warning messages issued by the system Section 3.2 walks the user through the 39 3.1. Warning Messages A number of error messages can display in LISST-Infinite Master Controller or LISST-Infinite Monitor. They are accompanied by a warning icon, similar to the one pictured on the left. In the following these error messages are described in detail, together with their solutions. Error Message Possible Solution No data received from instrument. Readings will resume automatically after instrument responds. Check the serial port connection – is the cable plugged in? Is the correct serial port selected? Is the instrument turned on? Instrument windows appear to be dirty. Clean the windows. See section 3.2.x – Cleaning is recommended. To clean Window Cleaning. windows, follow instructions in Manual. If not cleaned, instrument will continue to operate, but data quality will suffer. After cleaning, this warning will disappear automatically. LISST-Infinite Dilution Chamber did not fill. Clean Water Tank may be empty. Readings will resume automatically after Tank is filled. This error can stem from 2 factors: 1) The dilution chamber is empty because the clean water tank is empty. Check that the clean water tank is full. Check that the hose connecting the clean water tank to the instrument is not obstructed and that it has no kinks. Check that the outflow from the clean water tank is open. 2) Upon start of sampling procedure the dilution chamber drains a small amount of water. If it does not drain (e.g. if the drain tubes are plugged, or the pinch valves malfunctioning), it will return this error. Check that the drain hose from the dilution chamber is not obstructed, that it drains freely to atmospheric pressure, and that the pinch valves are working. Dilution Chamber error. Optical Water Level The optical water level sensor in the dilution sensor may require cleaning. System will chamber must be cleaned. 40 function normally but use additional clean water. Low level in Clean Water Tank. Fill tank. Readings will resume automatically after tank is filled. The water level in the clean water tank is low. Refill the tank as soon as possible with clean and particle-free water. High turbidity (Optical transmission below 30%). Accuracy may be reduced, see Manual. The measurements will be progressively affected, the lower the optical transmission. Immediately around 30% transmission the measurements are not affected to any significant degree. If the transmission drops below 20% the measurements will become questionable, and you should confirm the quality of the measurements by obtaining a water sample. Below 10% the measurements should not be used. 41 3.2. Maintenance Window Cleaning (LISST-Infinite) Step 1 Disconnect the turbid water supply, so that water will not flow through the system while you clean the optics. Disconnect the power so that the instrument does not attempt to sample while you clean. Then open the front door on the LISST-Infinite. Step 2 Drain the water out of the system by pressing in solenoid valve #3. Step 3 Loosen the screws holding the optics cell port in place Step 4 Remove the port. Be careful not to lose the screws! 42 Step 5 Use a 1/8” diameter cotton swab Step 6 Insert the cotton swab into the cleaning port and clean the windows on the right and left Step 7 Replace the cotton swabs several times and use water, glass cleaner or mild soap solution to clean the windows until cotton swabs come out 43 clean. Step 8 Clean the area around the O-ring and the cleaning plug for sealing purposes. Step 9 Re-Install the optics cell port and fasten the screws. Step 10 Fill the optics cell with water. The FC command in MotoCross will fill the cell and the dilution tank. Check the background values. 44 45 Appendix A: Size Ranges Size Ranges There are 32 size ranges logarithmically placed from 2.5 - 500 microns in diameter (0.0025 to 0.500 mm) or from 7.5 – 1,500 microns (0.0075 to 1.500 mm). The table below shows the mid-point of each of the 32 size classes. For clarity the table is shown with multiple rows. In the output data file the data for each size class is oriented in one row from small to large. Size range for the LISST-Infinite and the LISST-Hydro instruments (2.5-500µm) Bin # Size Bin # Size Bin # Size Bin # Size 1 2.06 9 7.79 17 29.5 25 111 2 2.43 10 9.20 18 34.8 26 132 3 2.87 11 10.9 19 41.1 27 155 4 3.39 12 12.8 20 48.5 28 183 5 4.01 13 15.1 21 57.3 29 217 6 4.73 14 17.9 22 67.7 30 256 7 5.59 15 21.1 23 79.9 31 302 8 6.60 16 24.9 24 94.3 32 357 Size range for the LISST-Infinite 1500 instrument (7.5-1,500µm) Bin # Size Bin # Size Bin # Size Bin # Size 1 8.14 9 30.64 17 115.22 25 433.30 2 9.61 10 36.16 18 135.97 26 511.32 3 11.35 11 42.67 19 160.45 27 603.40 4 13.39 12 50.35 20 189.35 28 712.05 46 5 15.80 13 59.42 21 223.44 29 840.26 6 18.64 14 70.11 22 263.67 30 991.57 7 8 22.0 25.96 15 16 82.74 97.64 23 24 311.15 367.18 31 32 1170.12 1380.82 Appendix B: File Formats Introduction The LISST-Infinite stores 4 types of files: .ASC, .BIN, .PSD, and .RAW files. The .BIN and .RAW files are binary files, designed to be read into the LISST-Infinite Monitor and LISST-Infinite Master Controller for viewing of archived data on the PC. However, often the user needs to view the data in EXCEL or another spreadsheet. The .ASC and .PSD files are for this purpose. The .ASC file The .ASC file is a Comma separated file that has 10 columns with data for each LISST-Infinite measurement, as per the table below: Column # 1 (A) 2 (B) Parameter YYYY MM DD 3 (C) 4 (D) 5 (E) 6 (F) 7 (G) 8 (H) 9 (I) 10 (J) HH MM SS MC in largest size range MC in medium size range MC in smallest size range Total MC MC is the Mass Concentration (mg/l) of the suspended particles being pumped through the instrument. Open .ASC file in EXCEL Open EXCEL. Click File, Open Navigate to the folder where the LISST-Infinite stores data. Select ‘All Files’ Then select the .ASC file you would like to open. Then click Open. NOTE: If you do not know where the LISST-Infinite stores the data, open up LISSTInfinite Monitor or 47 LISST-Infinite Master Controller program and click on Settings in the Menu bar, then Program Settings, then File Location. The Text Import Wizard Opens up. On Step 1 of 3, choose Delimited file type, then click Next Step 2 of 3. Check the ‘Comma’ box and then click Finish. The data will now open up in EXCEL. Each row is one measurement, and the 10 columns A-J are as described above The .PSD File PSD is short for Particle Size Distribution. The .PSD file contains the actual size distribution for the measurement, not just a summary of the concentration in the 3 size ranges being displayed on the LISSTInfinite Monitor software. The .PSD file is opened exactly as 48 described above for the .ASC file. The format of the PSD file is as follows: Column # 1 (A) 2 (B) 3 (C) 4 (D) 5 (E) 6 (F) 7-38 (GAL) 39 (AM) Paramete r YYYY MM DD HH MM SS MC in size bins 1-32 Optical transmission Column # 40 (AN) 41 (AO) 42 (AP) 43 (AQ) 44 (AR) 45 (AS) 46 (AT) Paramete r Voltage Dilution factor (1 if no dilutions took place, 2 if a dilution took place) Clean water tank level in percent YYYY HH*100+SS when sampling ended 49 DDD*100+H H when sampling ended Warranty STATEMENT OF LIMITED WARRANTY AND LIABILITY This Statement of Limited Warranty applies to all Sequoia Scientific, Inc. (“SEQUOIA”) products ("Products"). Any additional or different terms, including any terms in any purchase order, will be of no effect unless agreed to in writing by an authorized representative of SEQUOIA as reflected in a written SEQUOIA quotation. 1. Limited Warranty SEQUOIA warrants that upon delivery by SEQUOIA (a) the Products will be free from defects in materials and workmanship, (b) the Products will perform substantially in accordance with SEQUOIA's applicable specifications, and (c) any Products (or components or parts thereof) that are manufactured by SEQUOIA do not infringe any U.S. patent or copyright. 2. Correction of Non-Compliance If, during the twenty-four months after installation, or thirty months after delivery, whichever comes first (the “Warranty Period”), any Product does not comply with the warranties set forth in 1(a) and 1(b) above, SEQUOIA will, at its option, either (a) repair the Product, (b) replace the Product, or (c) refund the purchase price paid by Customer to SEQUOIA for the Product; provided that Customer gives SEQUOIA written notice of the noncompliance within the Warranty Period and ships the Product to SEQUOIA within one month after the end of the Warranty Period. As to any Product repaired or replaced by SEQUOIA, the Warranty Period will end upon the later of the end of the original Warranty Period or 90 days after SEQUOIA's delivery of the repaired or replacement Product to Customer. Any Product, component, part or other item replaced by SEQUOIA becomes the property of SEQUOIA. SEQUOIA may use refurbished components in the repair of Products supplied hereunder. SEQUOIA's warranties shall be void and not apply if the Product has been subjected to misuse or alteration or repaired by a party not approved by SEQUOIA or the serial number on a product (if applicable) has been altered or defaced. SEQUOIA shall not be liable for normal wear and tear (such as replacement of consumables), nor for defects or failure caused by maintenance, misuse, negligence or failure resulting from non-compliance with SEQUOIA’s specifications, operating or maintenance manuals. 3. Infringement Indemnification If any Product does not comply with the warranty set forth in 1(c) above, SEQUOIA will defend and indemnify Customer against any third-party claim asserted in any proceeding against Customer based on this noncompliance; provided that Customer gives SEQUOIA prompt written notice of the claim, SEQUOIA has exclusive control over the defense and settlement of the claim, Customer provides such assistance as SEQUOIA may request in connection with the defense and settlement of the claim (in which event SEQUOIA will reimburse the reasonable out-of-pocket costs incurred by Customer to provide such assistance), Customer does not settle the claim without the prior written consent of SEQUOIA and, upon SEQUOIA's request, Customer returns the Non-Complying Product to SEQUOIA for modification, replacement or a refund of the purchase price paid by Customer to SEQUOIA for the Non-Complying Product, less a reasonable allowance for Customer's use prior to return. 4. Exclusive Warranties THE WARRANTIES SET FORTH IN PARAGRAPH 1 ABOVE ARE EXCLUSIVE AND IN LIEU OF ALL OTHER WARRANTIES, EXPRESS OR IMPLIED. SEQUOIA DISCLAIMS ANY AND ALL WARRANTIES, EXPRESS OR IMPLIED (INCLUDING, BUT NOT LIMITED TO, ANY IMPLIED WARRANTY OF MERCHANTABILITY OR FITNESS FOR A PARTICULAR PURPOSE, AND ANY IMPLIED WARRANTY ARISING FROM COURSE OF PERFORMANCE, COURSE OF DEALING, OR USAGE OF TRADE) OTHER THAN THOSE SPECIFICALLY SET FORTH IN PARAGRAPH 1. 5. Exclusive Remedies CUSTOMER'S RIGHTS AND REMEDIES SET FORTH IN PARAGRAPHS 2 AND 3 ABOVE ARE EXCLUSIVE AND IN LIEU OF ANY AND ALL OTHER RIGHTS AND REMEDIES FOR ANY BREACH OF OR OTHER FAILURE TO COMPLY WITH ANY WARRANTY WITH REGARD TO ANY PRODUCT. 6. No Consequential Damages 50 SEQUOIA will not be liable for any indirect, incidental, special or consequential damages, any cover, or any loss of revenue, profit, data or use. 7. Limitations of Liability SEQUOIA's liability (whether in contract, tort, or otherwise; and notwithstanding any fault, negligence, strict liability or product liability) with regard to any Product (including, but not limited to, any breach of or default by SEQUOIA) will in no event exceed the purchase price paid by Customer to SEQUOIA for such Product. Further, SEQUOIA will not be liable for, or be in breach of or default on account of, any delay or failure to perform as a result of any cause, condition or circumstance beyond SEQUOIA's reasonable control. 8. Indemnification by Customer Customer acknowledges that the Products are designed and manufactured for use in non-critical, monitoring situations. If Customer chooses to purchase a Product or Products for use in applications that could result in damages in excess of the price of the Product if the Product does not operate properly or otherwise fails, Customer acknowledges and agrees that it is Customer’s responsibility to provide for redundancy and/or other safety or back-up measures sufficient to assure that failure of a Product(s) will not cause such damages. Customer agrees that it will defend and hold SEQUOIA harmless from any and all claims and costs (including but not limited to attorney’s fees and other costs of defense against such claims) in excess of the price of the Products arising directly or indirectly from such Customer’s use of the Products. Such indemnification is a critical part of the consideration being provided by Customer (over and above the price paid for the Product(s)) for the right to use the Products for such purposes and Customer shall not use a Product or Products for such purposes if it is unwilling or unable to provide such indemnification. 9. Statute of Limitations Customer will not commence any action based on breach of warranty with respect to any Product more than 30 months after SEQUOIA's delivery of such Product. 10. Software The Products may include or be delivered with certain computer programs, databases or other software that is proprietary to SEQUOIA. SEQUOIA hereby grants Customer a nonexclusive license to use such software solely for the purpose of operating Products. Customer will not: use any such software for any other purpose; modify, adapt, translate, or create derivative works based on any such software; or disassemble, decompile or reverse engineer any such software. No title to or ownership of any software or intellectual property rights are transferred to Customer. 11. U.S. Government Restricted Rights Notice All software, data, technical information, and written materials provided by SEQUOIA are provided with restricted rights. Use, duplication, or disclosure by the government is subject to restrictions as set forth in subparagraph (c)(1)(ii) of the Rights in Technical Data and Computer Software clause at 48 C.F.R. § 252.227-7013 or in subparagraph (c)(2) of the Commercial Computer Software-Restricted Rights clause at 48 C.F.R. § 52.227-19, as applicable. Portions of these items may be unpublished. SEQUOIA reserves all rights under applicable copyright laws. 12. Controlling Document In the event of any conflict or inconsistency between any provision of this Statement of Limited Warranty and any other provision of the Order, the provision of this Statement of Limited Warranty will control. 13. Controlling Law This Statement of Limited Warranty will be governed by the laws of the State of Washington without reference to its rules relating to choice of law for the purpose of applying another jurisdiction’s law. The U.N. Convention on Contracts for the International Sale of Goods will not apply. 51