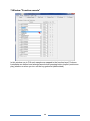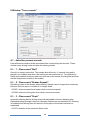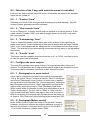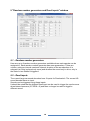
1
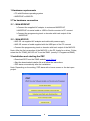
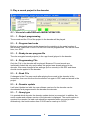
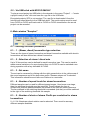
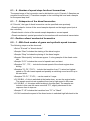
ZSP ZIMO sound programmer User manual(Version 3.2) Content 1 Hardware requirements .................................................................................................... 3 2 The hardware connection ................................................................................................ 3 2.1 - With MXDEUP ............................................................................................................ 3 2.2 - With MX31ZL .............................................................................................................. 3 3 Installation and starting the ZSP ................................................................................... 3 4.1 - Shop ............................................................................................................................. 4 4.2 - Store............................................................................................................................. 4 5- Play a sound project in the decoder ............................................................................ 5 5.1 - Via serial cable/USB with MXDECUP/MX31ZL .................................................. 5 5.2 - Via USB-stick with MX31ZL/MXULF .................................................................... 6 6 -Main window "Samples" ................................................................................................. 6 6.1 - Defining the basic parameters .............................................................................. 6 6.2 - Realize a diesel mechanical locomotive ............................................................ 7 6.3 - Add new samples (.wav files) to your project .................................................. 8 6.4- Define the loop-points of sample ........................................................................ 10 6.5 - Remove samples, steam, or diesel sets........................................................... 12 6.6 - Previewing a steam or diesel sets ..................................................................... 12 7 Window "Function sounds" .......................................................................................... 13 8 Window "Trace sounds" ................................................................................................ 14 8.1 - Selection process sounds ................................................................................... 14 8.2 - Selection of the F keys with which the sound is controlled ....................... 17 8.3 - Configure the servo outputs ............................................................................... 17 9 "Random number generators and Reed inputs" window ..................................... 18 9.1 - Random number generators ............................................................................... 18 9.2 - Reed inputs .............................................................................................................. 18 10 "CV settings" window ................................................................................................... 19 11 Settings in ZSP ............................................................................................................... 21 11.1 - COM port select .................................................................................................... 21 11.2 - Decoder type set .................................................................................................. 21 1 11.3 - Select sound card ................................................................................................ 21 11.4 - Window options .................................................................................................... 21 11.5 - Online update ........................................................................................................ 21 2 1 Hardware requirements PC with Windows operating system MXDECUP or MX31ZL 2 The hardware connection 2.1 - With MXDEUP Connect the supplied AC adaptor to mains and MXDECUP MXDECUP via serial cable or USB to Serial converter to PC connect Connect the programming track or decoder with track output of the MXDECUP 2.2 - With MX31ZL MX31ZL via supplied AC adaptor and cable with power supply MX31ZL means of cable supplied with the USB port of the PC connect Connect the programming track or decoder with track output of the MX31ZL Note: After the first connection of the MX31ZL to the PC it asks for a driver. Folder, select the file "ZIMO_MX31ZL.inf" from the ZIMO. (mostly C:\Programme\ZIMO) 3 Installation and starting the ZSP Download SPC from the ZIMO website www.Zimo.at Start the downloaded installer file and follow the instructions ZSP starts automatically after the installation Note: Depending on the setting, ZSP starts with a home screen or the last open project. 3 4. - Load and save a sound project 4.1 - Load With SPC, a sound is already installed project. Other projects must be downloaded on demand from the ZIMO website. The projects are downloaded in a compressed ZIP archive and must be compresses before using them in any folder on the hard disk. Alternatively, the user can open directly the .zip archive, and will then automatically after: "...\Eigene Dateien\ZIMO\Projekte\" unpacked and opened. Each project consists of a project file and a number of WAV files that must reside in the same folder as the project file or a subfolder thereof. To the download of a project on the home screen "open existing sound project for the purpose of processing" or in the main window on "Project" - press "load". Then select the folder in which the project located, select the project file (.zpr) and click "Open". 4.2 - Save Click to save the project under the same name, click "Save". To save the project under a new name "store under" click. Another folder as the current is selected in all .wav associated with the project are copied files to the new folder. In order to pass on the project after savingSave project as zip'click. It, the entire folder into a zip file is packed which can be sent for example by E-mail. To the project than to pass single file no longer editable or encrypted on "ready to use project to create" click. A separate program is needed to encrypt which provided for sound provider. 4 5- Play a sound project in the decoder 5.1 - Via serial cable/USB with MXDECUP/MX31ZL 5.1... 1 - Project programming The sounds and the CVs of the project in the decoder will be played. 5.1... 2 - Program load code Before an encrypted sound can be played up the matching to the serial number of the decoder "load code" in the CV's 260-263 must be programmed. This can be done here, too--SPC. 5.1... 3 - Ready-to-use program file Thus be encrypted sound projects (in the .zpp format) played in the decoder. 5.1... 4 - Programming CVs Only the CVs in the decoder will be played. Because CVs and sounds are inextricably linked this only works when this project was already played in the decoder, then were changed a few settings (but no sounds) in the SPC and these should now be applied in the decoder. 5.1... 5 - Read CVs If changes to the CVs were made after playing the sounds in the decoder in the locomotive, then can this from the locomotive out again in ZSP read and stored in the project. 5.1... 6 - Decoder update It will start Update tool with the new software versions for the decoder can be downloaded and programmed in the decoder the decoder. 5.1... 7 - Query type It is queried which decoder the decoder update device is connected. In addition, the serial number and software version of the decoder is displayed. The serial number is required for example if a load code should be requested when a sound provider. Alternatively, the serial number from CV250 can be read up to CV253. 5 5.2 - Via USB-stick with MX31ZL/MXULF To play a sound project via USB-stick in the decoder in the menu "Project" → "create a project ready to use" click and save the .zpp file to the USB stick. Encrypted projects, SPC is not required. The .zpp file is downloaded it from the Internet and saved directly to the USB flash drive. The serial number must be read from CV250 to CV253 and load code in CV260 to CV263 stored before the sound project can be recorded. 6 -Main window "Samples" 6.1 - Defining the basic parameters 6.1... 1 - (Steam, diesel) locomotive type selection There are the types of steam locomotive and diesel locomotive available with electric locomotives are also defined as a diesel locomotive. 6.1... 2 - Selection of steam / diesel sets Up to 32 locomotives can be defined for each locomotive type. This can be used to make several variations of a sound project then via CV265 or can be switched even during operation with a key definable in CV345. 6.1... 3 - Set name The set can be renamed by clicking with the right mouse button in the yellow area of the sound sequence and in the drop-down menu "Rename steam set" is selected. This information should be sent later over Railcom to a controller. 6.1... 4 - Number of speed levels for steam locomotives Different samples can be used for different speed ranges. Used more as a stage, then the switching threshold must be specified. These indicate the time in milliseconds that has passed between the release of the last two steam hammers. The time defined in the switching threshold is exceeded (ride fast) so will be switched to the right of the switching threshold this sample. 6.1... 5 - Number of shots of steam Chuffs per revolution for steam locomotives 2, 4, 6 Or 8 beats per wheel rotation can be selected. There must be as many different samples available. 6 6.1... 6 - Number of speed steps for diesel locomotives The speed range of the locomotive can be divided into up to 10 levels. 3 Samples are required for each level. 2 Transition samples to the including this level and a sample for the speed step itself. 6.1... 7 - Subspecies of the diesel locomotive At "S levels", the type of diesel locomotive can be specified more precisely. Diesel-hydraulic: choice of the sound sample depends on the target speed (set at the controller) Diesel-electric: choice of the sound sample depends on current speed Diesel-mechanical: special procedure for locomotives with mechanical transmission 6.2 - Realize a diesel mechanical locomotive 6.2... 1 - With fixed number of gears and synthetic speed increase The following steps must be observed: Set at "S levels" to "diesel-electric" Sample "Start" includes the starting of the diesel engine Sample "Stop" includes the placing of the diesel engine Sample "Municipality" includes an approx. 2 s-long sample of the diesel motor idle Sample "S-F1" includes the sound of speed insert and start Samples "F1", "F2",... include the lowest speed of the diesel engine when driving Samples "F1-F2', 'F2-F3,... include the transition from F1, raised on highest speed on F2 with lowest speed and possibly a switching sound so shift up to the next aisle. Samples "F2-F1", "F3-F2,... can be made in 2 ways: CV158 Bit1 = 0 this is switched at the brake down, so use the engine brake. The sample must include a gradient from low to high speed in this case. CV158 Bit1 = 1 this stops when braking in the idle state. The sample can include in this case the same sound as "F2", slightly shortened to the response time to improve. Sample "F1-S" includes the transition from "F1" to "Stand" CV364 contains the speed of the diesel motor is switched high falls back to the 7 CV365 contains the speed of the diesel engine maximum revs up 6.2... 2 - With real acceleration noise This procedure has the advantage of better sound of the diesel engine when accelerating. Disadvantage is that the number of gears of the length of the "speed" samples and the acceleration in CV3. The following settings are to perform. Introduced " "S levels" on "Diesel mechanical". Samples start, stand" and sounds as described above include 'Stop'. Sample "power" involves a short sound (< 1s) by inserting the Ganges. Sample "Speedin" includes a real inclusion of the accelerometer noise of the locomotive. The last 0, 5 sec of the sample must have a Fade-Out. (Volume goes to 0) The value of "Factor" over the "Speedin" sample determines how fast the sample of "Motor" artificially raised in the frequency. Should the length of the "Speedin" as a benchmark samples in seconds born 3 be taken. If the transition from the acceleration noise to the constant noise level has a frequency hopping that can be corrected with this value. The sample of "Motor" includes the constant noise of the motor at low vehicle speed. It should be about 2 seconds long and must be playable without crackling in the loop. The sample of "Demolition" includes the sound of switching high and must in the first 0 5 s a Fade-In (slow show) have. At the end it has to match with the "stand" sample. 6.3 - Add new samples (.wav files) to your project In the "Directory" list window can be changed in the project directory or a subdirectory thereof. In the "Files" list window which are on the hard disk in the above set directory of existing samples (.wav files) displayed. To add a sample to the project must this with the left mouse button marks and then moved into one of the designated window with left mouse button held and dropped in there. 8 6.3... 1 - Add steam blow samples on steam locomotives The 3 fields "H", "M" and "L" are each speed level. Always samples must be associated with the "M" fields. The "H" and "L" fields are optional. Other samples should be used when accelerating so they can be mapped to fields the "H". If the "L" are mapped to fields samples, then these are played by the decoder during braking. Is an "H" or "L" field blank samples from the "M" field be used automatically. A sample is assigned to a field it changes color from gray to green. "H deviating from the" M "field" and "L" fields are displayed with additional colors. The associated file is then in the "steam hammers:" fields is displayed. If the last character in the file name (before the .wav) is a number from 1 to 8, this is information taken to the umpteenth blow of steam Chuffs per revolution it is and associated with the sample accordingly. If the file names of the various samples of steam only in this figure are different (E.g. Dampf_1.wav, Dampf_2.wav,...) then only the first sample must be associated and that others follow automatically. If a sample was associated in the square this is replaced by the new. When using the left mouse button on one of the assignment fields (M1, M2,...) clicked then will be in the "steam hammers:" fields display the currently assigned samples. 6.3... 2 - Add driving noise for diesel locomotives "Start" field: starting sounds of the motor Field "Stand": sound of the diesel engine "Stop" field: diesel engine Field "S-F1": transition of sound on the first speed level Box "F1": engine noise in the first speed level Box 'F1-S': transition from the first speed level to the sound 3 more samples are required for each additional level of driving 6.3... 3 - Add upgrade and fan noise for electric locomotives "Start" field: upgrading the electric locomotive Field "Stand": sound of the electric locomotive "Stop" field: teardown of the electric locomotive Field "S-F1": running the driving motor fan Box "F1": fan noise loop Box "F1-S": switch off the driving motor fan 6.3... 4 - Add additional driving noises Following noise must associate if required, see "User Stationary noise for steam locomotives (also called "boil") Samples": Brake squeal 9 Draining the cylinder Change of direction sound Thyristor-Sound Electric Rear engine sound derailleur sound Turbocharger sound In the "properties of sample window", which opens, the matching 'class' must be selected. (except for change of direction sound) The field of "Information" can be used freely. 6.3... 5 - Add other sounds All other sound (whistles, compressor,...) "User Samples" are associated with the window. To assign a new sound opens a window in which the sample can be defined closer. Select a "class" is not absolutely necessary in these samples, but facilitates the change of sound on the CV300 procedure (see decoder operating manual). The text entered in the "About" box is later intended to send the names of the sounds of Railcom to a controller. 6.4- Define the loop-points of sample Loop points must be defined with sounds that will be played permanently (looped). An example would be a whistle which has an initial part, which is played once when you turn the sounds, a middle section which is played as long as the button on the controller is on and a final part which is played after the function is switched off. Thus a set-up and teardown can be realized at the boiling noise of steam locomotives. To define the loop at a sound associated with the project (in the window "User Samples") points this first select with the left mouse button, then with the right button 10 of the mouse open the drop-down menu and click "Select a loop region". The sound is now graphically displayed in the window that opens. Click to define the beginning of the loop area with the left mouse button on the desired location in the sound. It is then drawn a black stroke. "Home brand" define"press the button what down the line is green. The end of the loop area "End point" define"is used in the same way with the switch and turns red. To the sound in the decoder looped play are the "Loop" checkbox must be used. Should the sound move ahead when the key is switched off immediately to the end point "Short" check box must be set. Short can be used in addition, but also alone to loop. With the button "Play" can simulate a driving console button and immediately controlled so the result and be changed also during playback. The "Zoom" function can be used as a zero crossing of the sound to put on start and end point to prevent a crackling in the sound. 6.4.. 1 - Associating a function output to a sound In the selection box is usually "No. func" an output can be selected which always switched on if this sound is currently playing. For example, this can be used to control a red led in the Firebox always when the coal shoveling sound is played. For steam locos with pulsed smoke, there is still the special function of "Smoke fan" to the select which causes at the playing of sounds "Help wind" comes more smoke from the chimney. 6.4... 2 - Put the "start"cloud on diesel locomotives with smoke generator Especially large railway models of diesel locomotives, where smoke generators are fitted with cooling fan, the fan control for generating a "start"cloud possibility. The 11 beginning of this cloud of start is by setting the "loop end pointer" defined. The fan motor is controlled then with from this brand until the end of the sound samples full speed. 6.5 - Remove samples, steam, or diesel sets Select to remove user samples these select with the left mouse button with the right mouse button open the drop-down menu and "Remove sample". Steam blow samples can be deleted individually but only replaced with new. Select to delete the whole set of steam blow with the right mouse button on the yellow area between the steam blow fields and in the drop-down menu "delete steam set". In "Steam set remove" all subsequent steam sets for a place be moved in addition upwards. 6.6 - Previewing a steam or diesel sets Ready sets can be monitored on the PC. Do this with the right mouse button click on the yellow area between the steam or diesel fields and in the Pop-Up menu click on "Steam set preview". Can be left in the window that opens up one of the 32 steam or diesel sets chosen and this before then heard. Already associated sounds can the volume be changed, and so the volume of the sound to each other are matched. Previewing the running sounds is currently only available for steam sets. 12 7 Window "Function sounds" In this window can to F19 each sample are mapped to the function keys F0 whose Lautstärke are defined and selected sound when pressing button looped (continuous play) whether or when you turn off the key geshortet (abbreviated). 13 8 Window "Trace sounds" 8.1 - Selection process sounds Here all these sounds must be associated later controlled by the decoder. These include many driving noise and also the starting whistle. 8.1... 1 - Flow sound "Boil" Sound of a steam locomotive. The sample should be min. 2 seconds long and is played in an endless loop when the running sound is switched on. To implement a Setup and teardown these sounds front and rear to the sound of boiling add and then set the loop points correctly in the middle. 8.1... 2 - Flow sound "Brakes Squeak" Squeaking noise of the wheels when braking. Sample can be longer than necessary because it at the stop or is hidden if no longer slows. CV287: minimum speed level under which comes the squeal CV288: minimum driving time from which comes the squeal 8.1... 3 - Flow sound "Drain" Automatic draining before driving away with adjustable minimum standing time. Optional draining through a key can manually switched on and switched off. Draining is enabled while driving then the sound in the rhythm of the steam hammers is modulated. CV272: duration of the automatic drain noise 14 CV273: starting delay when drainage noise comes CV274: minimum downtime so that drainage noise 8.1... 4 - Flow sound "Starting whistle" Automatic starting whistle when driving away. CV274: CV154 minimum downtime so that starting whistle Bit7: 1 = start delay played up to driving whistle to end 8.1... 5 - Flow sound "Change of direction" Is played when changing the direction of travel. 8.1... 6 - Flow sound "Thyristors" Thus, the thyristor sound of a locomotive can be realized. In the sample, the thyristor sound must have the lowest frequency because the playback speed in the decoder, depending on the speed level, is lifted. The sample should be at least 2 s long and shall have the "start mark" of the "Loopbereichs" an introduction which is played once when driving away (E.g. scale Taurus-Lok). Of course, the process to be used for other applications can be like for example a second diesel engine track to mixed only when accelerating to the other sound to change the sound when accelerating. CV289: levels effect at the raise the pitch if value > 1 CV290: pitch at the speed that is set in CV292 (0-100) CV291: pitch at maximum speed (0-100, 100 = twice the fundamental frequency) CV292: speed of the pitch rises to the value defined in CV290 CV293: volume at a constant speed CV294: volume acceleration CV295: volume braking CV357: speed level reduces the volume above the CV358: How quickly the volume decrease is if the speed exceeds the value set in CV357. (Values from 1 to 10 are useful, higher hide is faster) CV362: Speed is switched over on a different sound of the thyristor. The second thyristor sound is associated with "Thyristor2". 8.1... 7 - Flow sound "Electric motor" This process is optimized to simulate an electric motor of an electric locomotive or diesel-electric locomotive. 15 CV296: volume of the E-motor noise CV297: speed of the electric motor is audible above the CV298: slope of the volume with increasing speed (1 = slow, 255 = fast) CV299: Rise in frequency with increasing speed. (0 = None, maximum slope = 100) CV372: volume Acceleration (0 = no function, 1 min. = 255 = max) CV373: volume during braking (0 = no function, 1 min. = 255 = max) 8.1... 8 - Flow sound "Derailleur" Trace to the simulate the rear derailleur of an old electric locomotive. In the sample, the sound of a setting should be. CV350: how long does rear derailleur after driving away (useful if the first switching stage already in the sample "stand > F1" is included) CV359: playing time as long rear derailleur sound in the loop [0, 1] CV360: time how long rear derailleur after the stop comes [0, 1s] (simulating reset of the electric brake if available) CV361: Time until the sound during acceleration may come back after he was currently playing. [0, 1] CV363: number of gears over the speed range 8.1... 9 - Flow sound "Turbocharger" This procedure is used to simulate the sound of a turbocharger, a diesel locomotive. CV366: volume of the turbocharger sound CV367: depending on the frequency of the driving speed CV368: depending on the frequency of the difference to current driving level (accelerate/brake) CV369: minimum load so that the turbocharger will ever be heard CV370: how fast the turbocharger increases the frequency CV371: how fast the turbocharger reduces the frequency 16 8.2 - Selection of the F keys with which the sound is controlled Here you can define multiple keys with which, for example the sound in the decoder inputs can be turned off. 8.2... 1 - "A noise / from" Switching on and off of the driving sounds including set-up and teardown. Also the random number generators are thus activated. 8.2... 2 - "User sounds / from" Is set on "Always on" to trigger sounds such as whistles in off driving noise or to the same value as "a noise / from" to be able to trigger these sounds with it only when the running sound. 8.2... 3 - "A dewatering / from" There is a special procedure which takes care of the draining of the cylinders for steam locomotives. To take advantage of this must a sample with the class "Cylinder valve" to the "user"samples will be added and this is associated with the flow sound "Drain". The draining is then automatically raised when driving away or the adjustable here button. 8.2... 4 - "A mute / from" This button can the complete sound be turned on or off. In CV314, how fast to show or hide the sound can be adjusted. 8.3 - Configure the servo outputs The most Zimo decoder have servo outputs. For large rail decoders, there are 4 outputs. The H0 decoders are 2 outputs which can be used as an alternative to Susi. The servos can be controlled via buttons or from internal functions. 8.3... 1 - Pantographs on servo control Up to 4 servo outputs can be used for the control of pantographs. To E.g. the output "Servo1" must as a function "Panto1" be defined and then at "Pantograph" when Position1 a button and, if wanted, driving direction to be adjusted. The "Sound dependent" option then the pantograph at the sound of "Start" (upgraded) runs high at the right moment and at the sound of "Stop" (teardown) back down. When exactly within the sounds of panto up or shuts down is set at "Select a loop region". Do this, click on "Start" or "Stop" with the right mouse button and "select loop region" then click on the point. Now in the graphic of the sound mark the spot where the panto up or down to, click "End point" define"and leave the window with"OK". 8.3... 2-. Pantograph Motors control In the MX645 there to control the ability of Pantos with 2 motors. However, this function requires an external additional circuitry on the loco circuit board. Is activated this function via CV154 Bit0 = 1. For further information, please contact ZIMO. 17 9 "Random number generators and Reed inputs" window 9.1 - Random number generators Here are up to 8 random number generators available where each sample can be assigned to. Each random number generator has more parameters. These are volume, minimum interval maximum interval, duration of the sounds when it is released (at 0 this is played only once) and whether the sound only in drive, only in the State or two States is triggered. 9.2 - Reed inputs The current large-car sound decoders have 3 inputs for Reed switch. The current H0 sound decoder have an input. Sounds can be triggered using these inputs. It should be noted that the highest Reed input can be used to trigger the synchronous wheel steam hammers (if CV268 > 0) and then no longer be used to trigger a different sound. 18 10 "CV settings" window Here all the functions can be set that still cannot be defined in SPC elsewhere. The areas of CV CV #269-286 and CV #315-342 could be defined individually for each locomotive, the remaining CVs are global and apply to all locomotives. More convenient is the configure of the CVs tool "ZCS" by Oliver Zoffi, under which: http://mobazi.zoffi.NET/tipps/zimotool/zimottol.htm can be loaded. Note the there ONLINE help! The CV settings relevant for a sound project, can be found in the tab "Soundsetting configuration": 19 And under the basic settings at CV 154 and CV158: To call the tool ZCS from ZSP, the file path and name must be specified in SPC under the tab "Ext.Programm"! 20 11 Settings in ZSP 11.1 - COM port select After the first launch of SPC and once is connected to the programming unit (MXDECUP or MX31ZL) should this function be called for ZSP to choose the correct COM port. 11.2 - Decoder type set Here can be set for which decoder, the project is intended. This information is used to correctly display the storage size and possibly non-existent features to hide ZSP. 11.3 - Select sound card If multiple sound cards in your system are installed the sound card can be changed here. 11.4 - Window options 11.4... 1 - Download automatically last project at startup At program startup, the startup screen is skipped and equal to the most recently used project loaded. 11.4... 2 - Program continue on timeout This option can help poor transmission conditions 11.4... 3 - Language There are currently available in the languages of German and English 11.5 - Online update It is whether there is a new version of SPC controlled (with existing Internet connection) and it is downloaded on demand and installed. 21