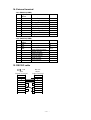
1
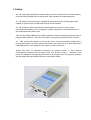
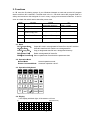
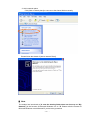
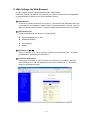
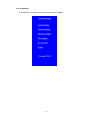
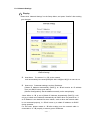
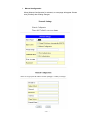
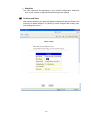
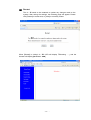
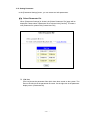
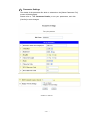
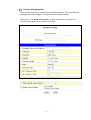
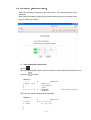
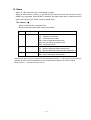
KRS-SYSTEM NC Data Communicator User’s Guide Ver. 1.01 (Machine Ver. 5.1.0.2) KYORITSU SYSTEM MACHINE, LTD. INDEX 1. Outline ............................................................................ 3 2. Functions ....................................................................... 4 3. Operation ....................................................................... 5 3 – 1 Output Data ........................................................... 6 3 – 2 Input Data .............................................................. 9 3 – 3 Copy File ............................................................... 13 3 – 4 Delete File ............................................................. 16 3 – 5 Display Files .......................................................... 19 3-6 Editing Parameters ................................................. 20 3-7 Switch Operation Mode .......................................... 25 4. Supplement of Data Input ............................................. 26 5. Communication Protocol .............................................. 29 6. Special Function ............................................................ 32 7. Parameter ....................................................................... 33 7 – 1 Parameter File ..................................................... 33 7 – 2 Parameter Details ................................................ 33 7 – 3 Parameter Details ................................................ 35 7-4 Default Parameter Files ........................................ 46 7 – 5 Setting/Editing Parameters .................................. 47 7 – 6 Directory Path Setting .......................................... 48 7 – 7 Backup and Restoration of Parameters................ 49 8. USB Memory ................................................................ 50 9. Remote Command Mode ............................................. 51 10. Network Drive and Share Folder ............................... 54 11. Web Settings (by Web Browser) ............................... 59 11 – 1 Displays .............................................................. 60 11 – 2 Setup Menu ........................................................ 61 11 – 3 Current Settings ................................................. 62 11 – 4 Network Settings ................................................ 63 11 – 5 Setting Parameter............................................... 68 11 – 6 Time Settings (Maintenance Menu) .................. 72 11 – 7 Restart................................................................ 74 12. FTP .............................................................................. 75 13. Alarm........................................................................... 76 14. External Terminal ....................................................... 78 15. RS232C Cable ............................................................ 78 -2 - 1. Outline ●D-Ⅶ makes high speed DNC transfer of large amounts of data and NC controller Memory In/Out functions possible with its compact size, easy operation and reasonable price. ●D-Ⅶ makes it easy and quick to upload and store large amounts of NC program data, created on systems such as CAD/CAM, through out the network. ●D-Ⅶ contains a safety semiconductor disk designed to be used in many varying environmental conditions, such as vibrations, extreme temperatures and electrical noise. It also retains data after power reset. ●The use of portable USB memory makes it possible to directly transferring large amounts of program data created on a PC to an NC machine and directly store data from NC machine. ● D-Ⅶ's compact size allows it to not only be used in environments which already have a local network system, but it also allows the machine to be carried out of an office which has a CAD/CAM system, to an operation area or place out side of the office. ●Users who have no equipment investment for network system, or have adverse environmental conditions such as electric noise, may be able to use D-Ⅶ, which is low priced, but capable of managing large amounts of NC program data. The long time operation with the large data makes better efficiency at the present facility. -3 - 2. Functions D-Ⅶ uses the file sharing system of your Windows Network to send and receive NC program data to and from NC controllers. The flash disk in the D-Ⅶ which stores NC program data is a safety semiconductor disk designed for use in many varying environmental conditions. It can be seen as a hard disk which retains data after power reset. Mode Function FROM TO 1 OUT(Output Data) Designated Directory COM1 / COM2 2 IN(Input Data) COM1 / COM2 Designated Directory 3 COPY(Copy File) Designated Directory Designated Directory 4 DEL(Delete File) Designated Directory 5 PRM(Set Parameter) 2-1. Mode OUT(Output Data) IN(Input Data) COPY(Copy File) DEL(Delete File) PRM(Set Parameter) Output NC data in a designated NC data file to the NC machine. Write NC data from NC machine to a designated file. Copy a designated data file into a designated directory. Delete a designated NC data file. Select a parameter file and edit the parameter data. 2-2. Operation Mode Normal Mode Remote Command Mode Normal operation mode. Automatic operation via NC. 2-3. Operational Keyboard 2-4. Display LCD Display with back light, 20 characters x 4 lines (1) (20 Characters) -4 - 3. Operation □ Start up Display <Normal Mode> Mode OUT >DATA0005 SEL DATA-1 DATA0006 F: DATA0007 6 R: 216.3M Filenames in the designated DIR (directory). DATA0008 Push to scroll filenames to right and push to scroll filenames to left Currently designated DIR (directory) Name F: Number of files R: Remaining capacity > To switch to Remote command mode on this display, press displays ”Remote Command?”. Please press and it to confirm. For more details, please refer to 3-6. Switch Operation Mode. <Remote Command Mode> The D-Ⅶ is waiting for a command from the NC when this display is shown, and will go to the next display once it receives a command. Remote Command: (For more details about the display after different commands are received, please refer to 9. Remote Mode) >To switch to Remote command mode from this display, press RESET. For more details, please refer 3-6. Switch Operation Mode. □ Display Firmware version:Press to display the D-Ⅶ’s firmware version in the bottom of Parameter Setting Mode display. PRM SEL >DEFAULT USER001 USER002 ファームウェアバージョン Ver 5.1.0.2 USER003 Firmware Version -5 - 3-1. Output Data (1) Function : Output NC data in a designated NC data file to the NC machine. *Note: This is the default mode upon power on and on finishing an operation/reset. File Selection Mode Select DIR (Directory) Using the numeric keypad Select File Type File Name directly Confirm File Action Press START Processing the data output <Done> Press RESET OUT Mode (File Selection Mode) -6 - (2) Process ① Select Function: Press to display File Selection Mode. ② Select Data File: Use the cursor keys to select a file. Press to display the file name which has over 9 characters and press to go back to the first line of the file name list on the display. And, select ”ALL” at the bottom of the list to select the all data in the shown directory. <Display> 1 1 OUT 10 SEL 20 Characters >DATA0005 2 DATA-1 DATA0006 3 F: 6 DATA0007 4 R: 216.3M ALL Manually typing the filename To type filename directly, press the key for Direct Typing mode. *Please refer 4. Supplement of Data Input for Direct Typing dada. Note: If the typed file name cannot be found, D-Ⅶ displays “Not found”. To go back to File Selection Mode, please press . Filtering Filter the file names to display only specified files whose name begins with same keyword characters. *Please refer 3-5. Display Files. Change Directory The LCD will display the Directory name which is currently selected. (max: 10 characters) To change Directory, press and select the desired directory with the numeric keypad. DIR Number 0 : For USB Memory Stick 1-9 : Directories for data: [DIR1] ~ [DIR9] <Display> 1 1 OUT 10 SEL 20 Characters >DATA0001 2 DATA-2 DATA0002 3 F: 6 DATA0003 4 R: 216.3M DATA0004 -7 - ③ Confirm File: To confirm the file to output, press . rd The date and size of file will be displayed on the 3 line of the LCD. And, the first two blocks of the file details will be displayed on the 4th line of LCD. Maximum first 10 blocks of the data can be displayed on the LCD; to check, use the up /down cursor keys. <Display> 1 1 OUT 10 STOP 20 Characters P:PARAM000 2 DATA-1 DATA0006 3 00/01/01 00002048 ← Currently valid parameter file ← Date and Size of data ← A block of data 4 G01F200 Note: To change file, press . The display will be back to File Selection Mode. ④ Process Start: Press to start processing. (Output) Process status will be displayed on 3rd and 4th lines of LCD. <Display> 1 1 OUT 10 RUN 20 Characters P:PARAM000 2 DATA-1 DATA0006 3 00000123 00002048 ← Currently valid parameter file ← Output Data amount / Data Size ← Indicator to show process status 4 >> ⑤ Process Finish: When the display shows the process is done, press to go back to File Selection Mode. <Display> 1 1 OUT 10 END 20 Characters P:PARAM000 2 DATA-1 DATA0006 3 00000123 00002048 ← Output Data amount / Data Size ******* ← Indicator to show the process is done 4 ******* END -8 - 3-2. Input Data (1) Function: Write NC data from NC machine to a designated file. File Selection Mode Select DIR (Directory) Using the numeric keypad Select File Type File Name directly Confirm File Action Press START Processing the data input <Done> Press RESET OUT Mode (File Selection Mode) -9 - (2) Process ① Select Function: Press to display File Selection Mode. ② Select Data File: (1) Choose existing file and overwrite. Press , to display the file name which has over 9 characters and press to go back to the first line of the file list on the display. Select a file. And press to confirm. <Display> 1 1 IN 10 SEL 20 Characters >DATA0005 2 DATA-1 DATA0006 3 F: 6 DATA0007 4 R: 216.3M DATA0008 (2) Manually type the filename as a new file. To type filename directly, press the key for Direct Typing mode. *Please refer 4. Supplement of Data Input for Direct Typing dada. <Display> 1 1 IN 10 STOP 20 Characters P:PARAM000 2 DATA-1 DATA1234 3 New File ← New Filename 4 If the existing file is chosen or typed, D - Ⅶ will display the message 「Overwrite? Yes/No」 to make sure if the file is ok to be overwrote. After confirm if it is ok, press Yes, press No to go back to File Selection Mode. *Attention Once “Yes” was pressed, the existing file will be deleted completely and the overwriting operation cannot stop until it is done. <Display> 1 1 IN 10 STOP 20 Characters P:PARAM000 2 DATA-1 DATA0006 3 4 Overwrite? [Yes] No -10 - ← Chosen/Typed File name Use the cursor keys to select Yes/No. Or numeric keypad, Yes: / No: , and press to confirm. (3) All Input Mode When NC machine sends all files to D-Ⅶ (Punch all mode), choose [ALL] which is on the very last line of the file list. In All Input Mode, D-Ⅶ uses O-number to name the files from NC and stores them by order. If the file extension is set by parameter #21, the files will be stored with naming with file extension. And press to confirm. <Display> 1 1 IN 10 SEL DATA0005 2 DATA-1 DATA0006 3 F: 6 DATA0007 4 R: 216.3M 20 Characters >[ALL] Change Directory The LCD will display the Directory name which is currently selected. (max: 10 characters) To change Directory, press and select the desired directory with the numeric keypad. Note: To change file, press . The display will be back to File Selection Mode. ③ Process Start: Press to start processing. (Input) Process status will be displayed on the 3rd and 4th lines of the LCD. <Display> 1 1 IN 10 RUN 20 Characters P:PARAM000 2 DATA-1 DATA0006 3 00000123 00002048 ← Currently valid parameter file ← Input Data amount / Data Size ← Indicator to show the processing 4 >> ④ Process Finish: When the display shows the process is done, press to return to File Selection Mode. <Display> 1 1 IN 10 END 20 Characters P:PARAM000 2 DATA-1 DATA0006 3 00000123 00002048 ← Input Data amount / ******* ← Indicator to show the process is done 4 ******* END -11 - Data Size Attention: When parameter #19 is set [1] (% Set) When parameter #19 is set [1] (% Set) and you use to finish the data input instead of DC4, the display will NOT show the process is done, but instead jump to File Selection Mode. -12 - 3-3. Copy File (1) Function: Copy a designated data file or all files into the designated directory. Original File Selection Mode Select DIR (Directory) Using the numeric keypad Select File Type File Name Directly Confirm Original File Select Target file Target File Selection Mode Select DIR (Directory) Using the numeric keypad Select File Type File Name Directly (To create new file) Confirm Target File Action Press START Processing File Copy <Done> Press RESET OUT Mode (File Selection Mode) -13 - (2) Process ① Select Function: Press to display Copy Mode. ② Select Original File: Use cursor keys to select original file. Press , to display the file name which has over 9 characters and press to go back to the first line of the file list on the display. To copy all files, select ALL on the very last line. After selecting the file, press to confirm. <Display> 1 10 1 COPY SEL1 20 Characters >DATA0005 2 *DATA-1 DATA0006 3 DATA0007 4 [ALL] Manually typing the File Name To type filename directly, press the key for Direct Typing mode. *Please refer 4. Supplement of Data Input for Direct Typing dada. Filtering Filter the file names to display only specified files whose name begins with same keyword characters. *Please refer 3-5. Display Files. Change Directory LCD will display the Directory name which is currently selected. (Max. 10 characters) To change Directory, press and select a directory with the numeric keypad. DIR Number 0 : For USB Memory Stick 1-9 : Directories for data: [DIR1] ~ [DIR9] ③ Select Target File: Use cursor key to select target file. * Same way as “#2: Select Original File”. <Display> 1 10 1 COPY 2 SEL2 20 Characters >DATA0005 DATA-1 DATA0006 3 *DATA-1 DATA0007 4 DATA0008 -14 - ④ Process Start:Press to start copying file. <Display> 1 10 1 COPY RUN 20 Characters P:PARAM000 2 DATA-1 DATA0006 ← Original DIR and File name 3 DATA-2 DATA-WK ← Target DIR and File name 4 Note: If there is a file has same name already in the directory, D-Ⅶ shows alarm #17: Copy Disable [27]. Press to return to File Selection Mode. ⑤ Process Finish: When the display shows the copy is done, press to return to File Selection Mode. <Display> 1 10 1 COPY END 20 Characters P:PARAM000 2 DATA-1 DATA0006 ← Original DIR and File name 3 DATA-2 DATA-WK ← Target DIR ← Indicator to show the process is done 4 ******* END ******* -15 - and File name 3-4. Delete File (1) Function : Delete a designated NC data file. File Selection Mode Select DIR (Directory) Using a numeric keypad. Select File Type File Name directory Confirm File Action Press START Processing delete file <Done> Press RESET OUT Mode (File Selection Mode) -16 - (2) Process ① Select Function: Press to display File Delete Mode. ② Select File to delete: Use cursor key to select file to delete. Press , to display the file name which has over 9 characters and press to go back to the first line of the file list on the display. To delete all files in the directory, select ALL at the very last line. <Display> 1 1 DEL 10 SEL 20 Characters >DATA0005 2 DATA-1 DATA0006 3 DATA0007 4 ALL Manually type the filename as a new file. To type filename directly, press the key for Direct Typing mode. *Please refer 4. Supplement of Data Input for Direct Typing dada. Filtering Filter the file names to display only specified files whose name begins with same keyword characters. *Please refer 3-5. Display Files. Change Directory LCD will display the Directory name which is currently selected. (max: 10 characters) To change Directory, press and select the desired directory with the numeric keypad. DIR Number 0 : For USB Memory Stick 1-9 : Directories for data: [DIR1] ~ [DIR9] <Display> 1 1 DEL 10 SEL 20 Characters >DATA0001 2 DATA-2 DATA0002 3 DATA0003 4 DATA0004 -17 - ③ Confirm File: To confirm the file to input, press . rd The date and size of file will be displayed on the 3 line of LCD. And, first two blocks of the file details will be displayed on the 4th line of LCD. Maximum first 10 blocks of the data can be displayed on the LCD; to check with going up /down cursor key. <Display> 1 1 DEL 10 STOP 20 Characters P:PARAM000 2 DATA-1 DATA0006 3 00/01/01 00002048 4 G01F200 Note: To change file, press . The display will be back to File Selection Mode. ④ Process Start: Press to start deleting file. D-Ⅶ will display the message to make sure if the file is ok to be deleted. After confirm if it is ok, press Yes, press No to go back to File Selection Mode. Use the cursor keys to select Yes/No. Or numeric keypad, Yes: / No: , and press to confirm. <Display> 1 1 DEL 10 END 20 Characters P:PARAM000 2 DATA-1 DATA0006 3 00/01/01 00002048 4 Sure? [ Yes ] No When [Yes] is selected, D-Ⅶ excuses delete. <Display> 1 1 DEL 10 END 20 Characters P:PARAM000 2 DATA-1 DATA0006 3 00/01/01 00002048 4 ******* END ******* ← Indicator to show the process is done ⑤ Process Finish: When the display shows the copy is done, press Output Mode. -18 - to return to 3-5. Display Files (1) Rearrange : Rearrange the data files in the designated directory to be displayed on the D -Ⅶ’s display. Data files can be rearranged numbers first and alphabet next by ascending or descending order and be reset the order. ① Press or to go Output Mode or Input Mode. ② Order Files: Use numeric key to choose how to rearrange. : Ascending order (Number 0-9 → Alphabet A-Z) : Descending order (Alphabet Z-A → Number 9-0) : Reset (Reset to the original order) *File display can be loop scrolled. (It goes back to the beginning when the cursor key scrolls to the end.) (2) Filtering : Filter the file names to display only specified files whose name begins with same keyword characters. ① Press on the file selection mode. ② Type specified keyword characters on the display and press to enter. The display will go back to the file selection mode and only the file names which has the keyword characters will be displayed. To cancel/change the keyword characters, press . To chancel the filtering, delete all keyword characters by pressing to enter. (3) Display long file name : Display long file names which has over 9 characters. ① Press press , to display the file name which has over 9 characters and to go back to the first line of the file list on the display. -19 - , and press 3-6. Editing Parameters (Please refer to the “Parameter” section for more details) (1) Function: Select a parameter file and edit the parameter data. File Selection Mode Select Parameter File Set File Data Edit Mode Data Change Mode Input Data Confirm Data Update Parameter File <Done> RESET OUT Mode (File Selection Mode) -20 - (2) Process ① Select Function: Press to display Parameter Setting Mode and use the cursor keys to select a parameter file. <Display> 1 10 1 PRM 20 Characters SEL >DEFAULT 2 PARAM001 3 PARAM002 4 PARAM003 Note: To confirm the current network settings, please choose [NW] at the very last line of this display. Please refer “(4) Confirm the current network settings” for more details. ② Confirm File: Press to confirm the parameter file. <Display> 1 10 1 PRM STOP 20 Characters P:DEFAULT 2 > 0 = DEFAULT 3 1 = 1 4 2 = 4800 ← Current cursor position ③ Select Parameter Number: Use cursor keys to select parameter number to edit. <Display> 1 10 1 PRM STOP 20 Characters P:DEFAULT 2 0 = DEFAULT 3 1 = 1 4 > 2 = 4800 ④ Edit Parameter File: Adjust the cursor to the parameter file to edit and press to enter Data Input Mode. Data Input Mode There are two modes to input data Mode1: Input at current display. Mode2: Input at Input Display. Mode2 is only used for parameter #41-49 (Directory Pass Name). For other parameters, use Mode1. -21 - (1) Mode1 At Mode1, input data directly to the selected parameter line on the display. Once the parameter is selected, current data will be disappeared and the blinking cursor will wait for the new data. After inputting parameter data by via the numeric keys, press If Alphabetical characters are necessary, please refer to “4-1. Input Alphabet” for more information. to confirm. <Display> 1 10 1 PRM STOP 2 0 = DEFAULT 3 1 = 1 4 > 2 = 20 Characters P:DEFAULT Input Error Each parameter has limitations: such as, type, range and character amount. If the data input is unmatched or over the limit, the display shows the alarm 「# 3:Incorrect」. Please refer [7. Parameter] for more detail of each parameter’s limitations. <Display> 1 10 1 PRM ALRM 2 0 = DEFAULT 3 > 1 = 3 4 # 3:Incorrect 20 Characters P*DEFAULT [1] ← Alarm Return from input error (Alarm) Press to go back to Data Edit Mode. On the Data Edit Mode, the display shows [?] mark next to the invalid parameter data. If there is any invalid parameter data with [?] mark, the file cannot be saved but shows alarm until valid data input. <Display> 1 10 1 PRM STOP 2 0 = 3 > 1 =?3 4 2 = 20 Characters P*DEFAULT DEFAULT ← Error :[?] mark / Invalid data 4800 -22 - (2) Mode2 The display switches to Input Display and the blinking cursor will wait for the new data input. After inputting parameter data via the numeric keys, press to confirm. If Alphabetical characters are necessary, please refer to “4-1. Input Alphabet” for more information. <Display> 1 10 1 Input 20 Characters parameter: 2 3 4 Error: Same as Mode1. Cancel Data Input Press to cancel Data Input Mode. ⑤ Save Data: To save input parameter data, press . This process is necessary whenever the parameter settings are edited. Parameters which have been edited will have a [*] mark before the 1st line of the parameter name. (Before edit) PRM STOP P:PARAM000 STOP P*PARAM000 ↓ (After edit) PRM After saving the data, the display shows “END”. <Display> 1 1 PRM 10 END 20 Characters P:DEFAULT 2 3 4 ******* END ******* ⑥ Finish Parameter Setting: Press to go back to File Selection Mode. -23 - (3) Attention for editing parameters D - Ⅶ can have plural parameter files and each file can be edited. After editing parameters, please press to confirm the changes. If is pressed before confirmation, the updates will not be saved to the parameter file. The parameter settings which are set before power off will restore upon the next power on. (4) Confirm the current network settings ①To check the current network settings on D-Ⅶ’s display, choose [NW] on the very last line of parameter selection mode, and press . <Display> 1 10 1 PRM SEL 20 Characters DEFAULT 2 PARAM001 3 PARAM002 4 ← last line >[NW] ②D-Ⅶ displays detail of the current network settings <Display> 1 10 20 Characters 1 NW: DHCP 2 IP: 192.168.0.100 3 NM: 255.255.255.0 4 GW: 192.168.0.1 ③Finish the confirmation of network setting: Press to go back to Parameter Selection Mode. -24 - 3-7.Switch Operation Mode (1) Function: The operation mode upon power on, is depending on the parameter setting (parameter # 29). However, the operation mode is still able to be switched manually after the power on. (Normal Mode ⇔ Remote command Mode) (2) Process > Normal Mode → Remote command Mode ① Press display default mode (OUT Mode). <Display> 1 1 OUT 10 SEL 20 Characters >DATA0005 2 DATA-1 DATA0006 3 F: 6 DATA0007 4 R: 216.3M DATA0008 ② Press to switch modes, and use <Display> 1 10 1 Remote Command? 2 3 4 [START] or keys to select [START]. 20 Characters RESET > Remote command Mode → Normal Mode ① During Remote command mode, press Mode) of Normal mode. -25 - to go back to default mode (OUT 4. Supplement of Data Input 4-1. Input Alphabet Alphabetical characters are available for input when typing filename directly and editing parameter data. Use a numeric keypad to type alphabetical characters. Press a numeric key on which has an alphabet character you want to type, and keep pressing until displaying the character you want. It displays the numbers first, capital letters of alphabet next and small letters of alphabet last. To backspace, press . Ex: Type “N” ① Press . <Display> 1 10 1 PRM STOP 2 >0 = 5 3 1 = 1 4 2 = 4800 ② Press 20 Characters P:DEFAULT twice. <Display> 1 10 1 PRM STOP 2 >0 = N 3 1 = 1 4 2 = 4800 20 Characters P:DEFAULT When any other key except for is pressed, the character on the display is selected and the cursor moves to the next position to wait for the next character. Display by Each time pressing key key, D-Ⅶ displays like following repeatedly. [Number] ⇒[Cap.1] ⇒[l.c.1] ⇒[Cap.2] ⇒[l.c.2] ⇒[Cap.3] ⇒[l.c.3] (Ex) 5 ⇒ M ⇒ m ⇒ N ⇒ n ⇒ O ⇒ o ⇒ 5 -26 - 4-2. Characters Limit There is a limit to how many Characters can be entered when typing filenames directly and/or entering parameter data. For typing filenames, the limit is max 59 Characters, and the parameter data depends on the parameter number. Please refer 7. Parameter for each individual parameter limits. If Characters are typed over the maximum, the beginning of the string will be erased. (Ex) Parameter Name (Max: 8 Characters) 0 = PARAM000 ← If [1] is typed here. ← [P] will be erased. ↓ 0 = ARAM0001 . 4-3. Select Directory to change the current Directory while in File Selection Mode. Use Press to go to Directory Selection Mode, and use a numeric keypad:0-9 to select the directory. DIR#0: For USB Memory Stick DIR#1-9: For [DIR1] ~ [DIR9] Set the Directory Pass Name for each directory, on parameter #41-49. #41 #42 #43 #44 #45 #46 #47 #48 #49 Directory Pass Name [DIR1] Directory Pass Name [DIR2] Directory Pass Name [DIR3] Directory Pass Name [DIR4] Directory Pass Name [DIR5] Directory Pass Name [DIR6] Directory Pass Name [DIR7] Directory Pass Name [DIR8] Directory Pass Name [DIR9] DAT:DATA1 ← DAT:DATA2 ← DAT:DATA3 ← DAT:DATA4 ← DAT:DATA5 ← DAT:DATA6 ← DAT:DATA7 ← DAT:DATA8 ← DAT:DATA9 ← Pass name of Directory #1 Pass name of Directory #2 Pass name of Directory #3 Pass name of Directory #4 Pass name of Directory #5 Pass name of Directory #6 Pass name of Directory #7 Pass name of Directory #8 Pass name of Directory #9 Please refer 7. Parameter for parameter settings. -27 - No NC Data file in the directory. If the directory does NOT have a data file which has the same extension as the one set by parameter #21, the LCD will display “Not Found”. (Display Ex.) 1 1 OUT 10 20 Characters SEL 2 DATA-1 Not Found 3 4 !!! Attention !!! D - Ⅶ can tell the difference between capital and small letter of the extension. For example, if parameter #21 is set as “DAT”, LCD does not display the files have the extension: “dat”, and will say “Not Found” instead. The files should have the same extension to be displayed. In this manual, “Directory” is the same as “Folder” in Windows. -28 - 5. Communication Protocol The Communication Protocol for data communication with NC machines or CAD/CAM systems is the RS232C interface. 5-1. Output (Data out) : D-Ⅶ → NC Makes RTS signal, “H”. Check if DSR signal is “H”. Wait until CTS signal becomes “H”. When receiving code DC1, start outputting data. (It is possible to make outputting start without waiting DC1 by a parameter setting.) ⑤ Stop outputting data when receiving DC3. ⑥ When receiving code DC1, start outputting data again. ⑦ When all data is output, D-Ⅶ finishes the operation. It makes RTS signal “Lo” to finish the operation. (It is possible to finish the operation when CTS signal becomes “Lo” after receiving code DC3 by a parameter setting.) ① ② ③ ④ Mode Processing DTR RTS DSR CTS DC1 DC3 RxD TxD -29 - DC1 DC3 5-2. Input (Data in) : NC → D-Ⅶ ① ② ③ ④ ⑤ ⑥ ⑦ ⑧ Makes RTS signal, “H”. Check if DSR signal is “H”. When CTS signal becomes “H”, send code DC1. Wait for code DC2. (It is possible not to wait DC2 by a parameter setting.) If the buffer does not have enough capacity, send DC3. When the buffer receives enough capacity, send DC1 again. Stop the operation upon receiving DC4. After finishing operation, send DC3 and make RTS signal “L”. Mode Processing DTR RTS DSR CTS DC1 DC3 DC1 TxD RxD -30 - DC3 5-3. Input (Data in) %Set: NC → D-Ⅶ ① Makes RTS signal, “H”. ② Check if DSR signal is “H”. ③ Wait for code DC2. (It is possible not to wait DC2 by a parameter setting.) ④ Wait for the first % code. ⑤ If the buffer does not have enough capacity, send DC3. ⑥ When the buffer receives enough capacity, send DC1 again. ⑦ When receiving the second % code, finish getting the data for the file. (continue receiving) ⑧ Upon receiving DC4 or pressing the RESET key, finish the operation. ⑨ After finishing operation, send DC3 and make RTS signal “L”. Mode Processing DTR RTS DSR CTS DC1 DC3 DC1 DC3 TxD RxD DC2 % % DC4 File data -31 - 6. Special Function 6-1. Sub-Program If there is a Sub-Program Name formatted properly, D-Ⅶ will send the Sub-Program. Also the Sub-Program’s Nest may be called. The Sub-Program has to be in the same directory that the processing program is in. <Format> <Keyword for Subprogram Execution><File name of the Sub-Program> Keyword for Subprogram Execution: Description Key Word of Sub-Program.(Max: 13 characters) Set at Parameter number #22. Default Setting: “M98P/O“ File name of the Sub-Program: Should be in the same Directory. *Subprogram name has to be written properly including extension in the main program. <Ex> Subprogram name: O3001.DAT Keyword for Subprogram Execution: M98P/O → M98P3001.DAT *When parameter number #22 is set “M98P/Prefix”, a Sub-Program is able to be called repeatedly by specifying “Separator” character and number of times. <Ex> Subprogram name: O3001 Keyword for Subprogram Execution: M98P/O Number to times: 5 Separator character: L → M98P3001L5 Key word needs to be at the beginning of the block. If there is any character, such as “ / “, before the key word, subprogram execution will not work. Code M02, M30 and % in the called Sub-Program will be ignored. (The block includes M02, M30 and % will not be sent.) 6-2. Automatic Rewind If this function is ON, after sending data, the NC data file will be rewound and prepared to be sent again, instead of finishing the process. After sending data, wait for the next code DC1 to be set. After receiving code DC1 from NC, start sending data from beginning. -32 - 7. Parameter 7-1. Parameter File Parameters are stored in a parameter file: “*****.PRM” (There can be more than one parameter file.) The extension of parameter files should be ”.PRM” in capital letters. 7-2. Parameter Details (0) Parameter name to be displayed: Nickname of parameter for display on D-Ⅶ. (1) COM Port: COM1/COM2 for communication I/F with NC. (2) Baud Rate: 2400-38400BPS (3) Stop Bit: 1bit/2bit (4) Character Length: 7bit/8bit (5) Parity: NONE / EVEN / ODD (6) Character Code: ISO / EIA / ASCII (In protocol B mode, ISO/EIA is automatic distinction) (7) DC1 Character Code: DC1 Code (Usually HEX11) (8) DC2 Character Code: DC2 Code (Usually HEX12) (9) DC3 Character Code: DC3 Code (Usually HEX93) (10) DC4 Character Code: DC4 Code (Usually HEX14) (11) Insert NULL: Insert NULL to the beginning of data (12) During output, wait for DC1: During output, wait for DC1 from NC before starting (13) ACK Character Code: Set when using any codes except DC1 during output (14) Output start interval: Interval between receiving DC1 and starting data output (mm sec) (15) During input, wait for DC2: After DC2 code, create a file with the data during input (DC2 is NOT included) (16) Auto rewind: Rewind the operation during data output. (17) CTS Control during output: Flow control during data output (DC1/DC3 or CTS) (18) RTS Control during output: Flow control during data input (DC1/DC3 or RTS) (19) Input file punctuation format: File punctuation of the created file during data input. (DC2/DC4/%) (20) Percentage of Communication Delay: Invalid (21) File Extension: Extension of data file (22) Keyword for Subprogram Execution: Keyword for calling a file from the main program (M98P/Prefix-keyword / *- / free-word) (23) Ignore DSR: Ignore DSR from the NC machine during data input/output. (24) Wait for DC3 to finish output: Finish outputting data after receiving DC3 code. (25) Output pattern of '%': How to operate “%” in program data during output. (26) Begin/End mark of remote command: Set the marks by character code. (27) Spare: (28) Monitoring: For monitoring IO when optional DI/DO is used. (29) Startup operation mode: Operation mode when the system starts up. (30) Startup drive: Drive when the system starts up. -33 - (31) Directory Name [DIR1]: (32) Directory Name [DIR2]: (33) Directory Name [DIR3]: (34) Directory Name [DIR4]: (35) Directory Name [DIR5]: (36) Directory Name [DIR6]: (37) Directory Name [DIR7]: (38) Directory Name [DIR8]: (39) Directory Name [DIR9]: (40) (41) (42) (43) (44) (45) (46) (47) (48) (49) (50) (51) (52) (53) (54) (55) Nickname of drive #1 to find with DIR key. (Actual name of drive/directory is set at parameter #41.) Nickname of drive #2 to find with DIR key. (Actual name of drive/directory is set at parameter #42.) Nickname of drive #3 to find with DIR key. (Actual name of drive/directory is set at parameter #43.) Nickname of drive #4 to find with DIR key. (Actual name of drive/directory is set at parameter #44.) Nickname of drive #5 to find with DIR key. (Actual name of drive/directory is set at parameter #45.) Nickname of drive #6 to find with DIR key. (Actual name of drive/directory is set at parameter #46.) Nickname of drive #7 to find with DIR key. (Actual name of drive/directory is set at parameter #47.) Nickname of drive #8 to find with DIR key. (Actual name of drive/directory is set at parameter #48.) Nickname of drive #9 to find with DIR key. (Actual name of drive/directory is set at parameter #49.) Spare: Directory pass Name [DIR1]: Actual name of Drive #1. Directory pass Name [DIR2]: Actual name of Drive #2. Directory pass Name [DIR3]: Actual name of Drive #3. Directory pass Name [DIR4]: Actual name of Drive #4. Directory pass Name [DIR5]: Actual name of Drive #5. Directory pass Name [DIR6]: Actual name of Drive #6. Directory pass Name [DIR7]: Actual name of Drive #7. Directory pass Name [DIR8]: Actual name of Drive #8. Directory pass Name [DIR9]: Actual name of Drive #9. Spare: Communication Protocol: Protocol B / MAZATROL [MZ] command response mode: [MZ] parity: [MZ] command response delay: [MZ] command response time out: *When parameter #51 is [Protocol B], #52-55 are invalid. Please refer “7-3” to setup #52-55 (56) (57) (58) (59) (60) (61) Display network settings: Method to set IP Address: IP Address: Subnet mask: Gateway: Name Server: Display parameter #56-61, or not display Set IP Address of D-Ⅶ via DHCP / Manual setting IP Address of D-Ⅶ Subnet Mask of Network IP Address of Gateway Server IP Address of Name Server -34 - 7-3. Parameter Details (0) Parameter name to be displayed : Nickname of parameter for display on D-Ⅶ. <Parameter type> Character line <Maximum character amount> 8 Characters <Range> Option <Default> DEFAULT (1) COM Port : For communication I/F with NC <Parameter type> Numerical Value <Maximum character amount> 13 Characters <Range> 1/2 1 = COM1 2 = COM2 <Default> 1 (2) Baud Rate : For communication baud rate with NC <Parameter type> Numerical Value <Maximum character amount> 13 Characters <Range> 1200 / 1800/ 2400 / 4800 / 9600 / 19200 / 38400 <Default> 4800 (3) Stop Bit : Select Stop Bit (1bit / 2bit) <Parameter type> Numerical Value <Maximum character amount> 13 Characters <Range> 1/2 1 = 1bit 2 = 2bit <Default> 2 (4) Character Length : Select Character Length(7bit / 8bit) <Parameter type> Numerical Value <Maximum character amount> 13 Characters <Range> 7/8 1 = 7bit 2 = 8bit <Default> 2 -35 - (5) Parity : Select Parity (NONE/EVEN/ODD) <Parameter type> Numerical Value <Maximum character amount> 13 Characters <Range> 0/1/2 0 = NONE 1 = ODD 2 = EVEN <Default> 0 (6) Character Code : Select Character Code (ISO/EIA/ASCII) <Parameter type> Numerical Value <Maximum character amount> 13 Characters <Range> 1/2/3 1 = ISO 2 = EIA 3 = ASCII <Default> 1 (7) DC1 Character Code DC1 Code : Set by hexadecimal number (Usually 11H) <Parameter type> Numerical Value (hexadecimal number) <Maximum character amount> 13 Characters <Range> 00 - FF <Default> 11 (8) DC2 Character Code DC2 Code : Set by hexadecimal number (Usually 12H) <Parameter type> Numerical Value (hexadecimal number) <Maximum character amount> 13 Characters <Range> 00 - FF <Default> 12 (9) DC3 Character Code DC3 Code : Set by hexadecimal number (Usually 93H) <Parameter type> Numerical Value (hexadecimal number) <Maximum character amount> 13 Characters <Range> 00 - FF <Default> 93 -36 - (10) DC4 Character Code DC4 Code : Set by hexadecimal number (Usually 14H) <Parameter type> Numerical Value (hexadecimal number) <Maximum character amount> 13 Characters <Range> 00 - FF <Default> 14 (11) Insert NULL : Insert NULL to the beginning of data <Parameter type> Numerical Value <Maximum character amount> 13 Characters <Range> 0/1/2 0 = NOT Insert NULL 1 = Insert NULL 2 = Insert NULL 10 characters both beginning and end of the data <Default> 0 (12) During output, wait for DC1 : During output, wait for DC1 from NC before starting <Parameter type> Numerical Value <Maximum character amount> 13 Characters <Range> 0/1 0 = Wait DC1 1 = NOT Wait DC1 <Default> 0 (13) ACK Character Code : Set when using codes other than DC1 to start output : Set by hexadecimal number : Available with the codes other than [0]. (0 = DC1) <Parameter type> Numerical Value (hexadecimal number) <Maximum character amount> 13 Characters <Range> 00 - FF <Default> 0 (14) Output start interval : Interval between receiving DC1 and start outputting data (mm sec) <Parameter type> Numerical Value <Maximum character amount> 13 Characters <Range> 0 / 2<Default> 0 -37 - (15) During input, wait for DC2 : After DC2, create a file with the data code during data input. (DC2 is not included) <Parameter type> Numerical Value <Maximum character amount> 13 Characters <Range> 0/1 0 = Wait for DC2 1 = Not Wait for DC2 <Default> 0 (16) Auto rewind : Rewind the operation during data output. <Parameter type> Numerical Value <Maximum character amount> 13 Characters <Range> 0/1 0 = Do NOT Auto rewind 1 = Do Auto rewind <Default> 0 (17) CTS Control during output : Flow control during data output <Parameter type> Numerical Value <Maximum character amount> 13 Characters <Range> 0/1 0 = Control by DC1 / DC3 1 = Control by CTS <Default> 0 (18) RTS Control during output : Flow control during data input <Parameter type> Numerical Value <Maximum character amount> 13 Characters <Range> 0/1 0 = Control by DC1 / DC3 1 = Control by RTS <Default> 0 (19) Input file punctuation format : File punctuation of the created file during data input (DC2/DC4/%) <Parameter type> Numerical Value <Maximum character amount> 13 Characters <Range> 0/1 0 = Punctuated by DC2/DC4 1 = Punctuated by [%] 2 = Create file without punctuation code <Default> 0 -38 - (20) Percentage of Communication Delay: Invalid * D-Ⅶ will ignore if this parameter regardless if it is changed. <Parameter type> Numerical Value <Maximum character amount> 13 Characters <Range> Random <Default> 50 (21) File Extension : Extension of data file * D-Ⅶ distinguishes between capital and small letters. <Parameter type> Character line <Maximum character amount> 3 Characters <Range> Random <Default> DAT(*capital letter) (22) Keyword for Subprogram Execution : Keyword for calling a file from the main program Choose, M98P/Prefix-keyword(ex:O, :),*-,or free-word. <Parameter type> Character line <Maximum character amount> 13 Characters <Range> Random <Default> M98P/O (O: as prefix-keyword) *When parameter number #22 is set “M98P/Prefix”, a Sub-Program is able to be called repeatedly by specifying “Separator” character and number of times. (ex: M98P/O/L) *Push to put “-“. (23) once and 6times to put “*”, and Push Ignore DSR : Ignore DSR from the NC machine during data input/output. <Parameter type> Numerical Value <Maximum character amount> 13 Characters <Range> 0/1 0 = Error with DSR=”L” 1 = Ignore DSR <Default> 1 (24) Wait for DC3 to finish output : Finish outputting data after receiving DC3 code. <Parameter type> Numerical Value <Maximum character amount> 13 Characters <Range> 0/1 0 = Wait for DC3 1 = NOT wait for DC3 <Default> 1 -39 - once and twice (25) Output pattern of '%' : How to operate “%” in program data during output. <Parameter type> Numerical Value <Maximum character amount> 13 Characters <Range> 0/1/2/3/4/5/6/7 0 = No Operation 1 = Add % to the beginning of data 2 = Add % to the end of data 3 = Add % to the both beginning and end of data 4 = No Operation 5 = Add %+CRLF to the beginning of data 6 = Add %+CRLF to the end of data 7 = Add %+CRLF to the both beginning and end of data <Default> 0 (26) Begin/End mark of remote command : Set Begin/End marks by ISO or ASCII character code. <Parameter type> Character line <Maximum character amount> 5 Characters <Range> Random <Default> 28/A9 (27) Spare (28) Monitoring : For monitoring IO when optional DI/DO is used. <Parameter type> Numerical Value <Maximum character amount> 13 Characters <Range> 0/1 0 = Don’t use monitoring 1 = Use monitoring <Default> 0 (29) Startup operation mode : Operation mode when the system starts up. <Parameter type> Numerical Value <Maximum character amount> 13 Characters <Range> 0/1 0 = Normal (Normal Mode) 1 = Remote (Remote Command Mode) <Default> 0 (30) Startup drive : Setting the drive when the system starts up. <Parameter type> Numerical Value <Maximum character amount> 13 Characters <Range> 0-9 <Default> 1 -40 - (31) Directory Name [DIR1] : Nickname of drive #1 to find with DIR key. Actual name of drive/directory is set at parameter #41. <Parameter type> Character line <Maximum character amount> 10 Characters <Range> Random <Default> DATA-1 (32) Directory Name [DIR2] : Nickname of drive #2 to find with DIR key. Actual name of drive/directory is set at parameter #42. <Parameter type> Character line <Maximum character amount> 10 Characters <Range> Random <Default> DATA-2 (33) Directory Name [DIR3] : Nickname of drive #3 to find with DIR key. Actual name of drive/directory is set at parameter #43. <Parameter type> Character line <Maximum character amount> 10 Characters <Range> Random <Default> DATA-3 (34) Directory Name [DIR4] : Nickname of drive #4 to find with DIR key. Actual name of drive/directory is set at parameter #44. <Parameter type> Character line <Maximum character amount> 10 Characters <Range> Random <Default> DATA-4 (35) Directory Name [DIR5] : Nickname of drive #5 to find with DIR key. Actual name of drive/directory is set at parameter #45. <Parameter type> Character line <Maximum character amount> 10 Characters <Range> Random <Default> DATA-5 (36) Directory Name [DIR6] : Nickname of drive #6 to find with DIR key. Actual name of drive/directory is set at parameter #46. <Parameter type> Character line <Maximum character amount> 10 Characters <Range> Random <Default> DATA-6 -41 - (37) Directory Name [DIR7] : Nickname of drive #7 to find with DIR key. Actual name of drive/directory is set at parameter #47. <Parameter type> Character line <Maximum character amount> 10 Characters <Range> Random <Default> DATA-7 (38) Directory Name [DIR8] : Nickname of drive #8 to find with DIR key. Actual name of drive/directory is set at parameter #48. <Parameter type> Character line <Maximum character amount> 10 Characters <Range> Random <Default> DATA-8 (39) Directory Name [DIR9] : Nickname of drive #9 to find with DIR key. Actual name of drive/directory is set at parameter #49. <Parameter type> Character line <Maximum character amount> 10 Characters <Range> Random <Default> DATA-9 (40) Spare (41) Directory Path Name of [DIR1] : Actual path name of Drive #1 to find with DIR key. * Please refer to [7-5. Directory Pass Name Settings] to set the format. <Parameter type> Character line <Maximum character amount> 59 Characters <Range> Random <Default> DAT:DATA1 (42) Directory Path Name of [DIR2] : Actual path name of Drive #2 to find with DIR key. * Please refer to [7-5. Directory Pass Name Settings] to set the format. <Parameter type> Character line <Maximum character amount> 59 Characters <Range> Random <Default> DAT:DATA2 (43) Directory Path Name of [DIR3] : Actual path name of Drive #3 to find with DIR key. * Please refer to [7-5. Directory Pass Name Settings] to set the format. <Parameter type> Character line <Maximum character amount> 59 Characters <Range> Random <Default> DAT:DATA3 -42 - (44) Directory Path Name of [DIR4] : Actual path name of Drive #4 to find with DIR key. * Please refer to [7-5. Directory Pass Name Settings] to set the format. <Parameter type> Character line <Maximum character amount> 59 Characters <Range> Random <Default> DAT:DATA4 (45) Directory Path Name of [DIR5] : Actual path name of Drive #5 to find with DIR key. * Please refer to [7-5. Directory Pass Name Settings] to set the format. <Parameter type> Character line <Maximum character amount> 59 Characters <Range> Random <Default> DAT:DATA5 (46) Directory Path Name of [DIR6] : Actual path name of Drive #6 to find with DIR key. * Please refer to [7-5. Directory Pass Name Settings] to set the format. <Parameter type> Character line <Maximum character amount> 59 Characters <Range> Random <Default> DAT:DATA6 (47) Directory Path Name of [DIR7] : Actual path name of Drive #7 to find with DIR key. * Please refer to [7-5. Directory Pass Name Settings] to set the format. <Parameter type> Character line <Maximum character amount> 59 Characters <Range> Random <Default> DAT:DATA7 (48) Directory Path Name of [DIR8] : Actual path name of Drive #8 to find with DIR key. * Please refer to [7-5. Directory Pass Name Settings] to set the format. <Parameter type> Character line <Maximum character amount> 59 Characters <Range> Random <Default> DAT:DATA8 (49) Directory Path Name [DIR9] : Actual path name of Drive #9 to find with DIR key. * Please refer to [7-5. Directory Pass Name Settings] to set the format. <Parameter type> Character line <Maximum character amount> 59 Characters <Range> Random <Default> DAT: DATA9 -43 - (50) Spare (51) Communication Protocol :Select Protocol B or MAZATROL <Parameter type> Character line <Maximum character amount> 13 Characters <Range> B/M/T B = Protocol B M = MZ-M Protocol (For MAZATROL M2/T2/M32/T32/M-plus/T-plus) T = MZ-T1 Protocol (For MAZATROL M1/T1) <Default> B *”MBS plotocol” which is displayed on Web setting display is not available. *Parameter #52-55 are only available when #51 is set to M or T. (52) [MZ] Command response Mode <Parameter type> Numerical Value <Setting> 00 (53) [MZ] parity <Parameter type> <Range> <Setting> Numerical Value 0/1 0 = Not insert 1 = Insert 1 (54) [MZ] command response delay <Parameter type> Numerical Value <Setting> 0 (55) [MZ] command response time out <Parameter type> Numerical Value <Setting> 5 (56) Display Network Settings : Display parameter #56-60 or not display <Parameter type> Numerical Value <Maximum character amount> 13 Characters <Range> 0/1 0 = Display 1 = Not Display <Default> 1 -44 - (57) Method to Set IP Address : Set IP Address of D-Ⅶ via DHCP / Manual setting. <Parameter type> Numerical Value <Maximum character amount> 13 Characters <Range> 1/2 1 = DHCP 2 = Manual Setting <Default> 1 (58) IP Address : IP Address of D-Ⅶ <Parameter type> Numerical Value <Maximum character amount> 13 Characters <Range> 0-9 <Default> 192.168.0.100 (59) Subnet mask : Subnet Mask of the Network <Parameter type> Numerical Value <Maximum character amount> 13 Characters <Range> 0-9 <Default> 255.255.255.0 (60) Gateway : IP Address of Gateway Server <Parameter type> Numerical Value <Maximum character amount> 13 Characters <Range> 0-9 <Default> (61) Name Server : IP Address of Name Server <Parameter type> Numerical Value <Maximum character amount> 13 Characters <Range> 0-9 <Default> In this manual, “Directory” is the same as “Folder” in Windows. -45 - 7-4. Default Parameter Files *Default parameter is set “DEFAULT”. No. 0 1 2 3 4 5 6 7 8 9 10 11 12 13 14 15 16 17 18 19 20 21 22 23 24 25 26 27 28 29 30 31 32 33 34 35 36 37 38 39 40 41 42 43 44 45 46 47 48 49 50 51 52 53 54 55 56 57 58 59 60 61 Parameter File Name Parameter name to be displayed COM Port Baud Rate Stop Bit Character Length Parity Character Code DC1 Character Code DC2 Character Code DC3 Character Code DC4 Character Code Insert NULL During output, wait for DC1 ACK Character Code Output start interval During input, wait for DC2 Auto rewind CTS Control during output RTS Control during output Input file punctuation format Percentage of Commmunication delay File Extension Keyword for Subprogram Execution Ingnore DSR Wait for DC3 to finish output Output pattern of '%' Begin/Eng mark of remote command Spare Monitoring Startup operation mode Startup drive Directory Name [DIR1] Directory Name [DIR2] Directory Name [DIR3] Directory Name [DIR4] Directory Name [DIR5] Directory Name [DIR6] Directory Name [DIR7] Directory Name [DIR8] Directory Name [DIR9] Spare Directory pass Name [DIR1] Directory pass Name [DIR2] Directory pass Name [DIR3] Directory pass Name [DIR4] Directory pass Name [DIR5] Directory pass Name [DIR6] Directory pass Name [DIR7] Directory pass Name [DIR8] Directory pass Name [DIR9] Spare Communication Protocol [MZ]command response mode [MZ]Parity [MZ]command response delay [MZ]command response time out Display network settings Method to set IP Address IP Address Subnet mask Gateway Name Server DEFAULT.PRM DEFAULT 1 4800 2 8 0 1 11 12 93 14 0 0 0 0 0 0 0 0 0 50 DAT M98P/O 1 1 0 28/A9 USER096.PRM USER096 1 9600 2 8 0 1 11 12 93 14 0 0 0 0 0 0 0 0 0 50 DAT M98P/O 1 1 0 28/A9 USER192.PRM USER192 1 19200 2 8 0 1 11 12 93 14 0 0 0 0 0 0 0 0 0 50 DAT M98P/O 1 1 0 28/A9 USER384.PRM USER192 1 38400 2 8 0 1 11 12 93 14 0 0 0 0 0 0 0 0 0 50 DAT M98P/O 1 1 0 28/A9 MZTRL.PRM MZTRL. 1 4800 2 8 0 1 11 12 93 14 0 0 0 0 0 1 0 0 0 50 DAT M98P/O 1 1 0 28/A9 0 0 1 DATA-1 DATA-2 DATA-3 DATA-4 DATA-5 DATA-6 DATA-7 DATA-8 DATA-9 0 0 1 DATA-1 DATA-2 DATA-3 DATA-4 DATA-5 DATA-6 DATA-7 DATA-8 DATA-9 0 0 1 DATA-1 DATA-2 DATA-3 DATA-4 DATA-5 DATA-6 DATA-7 DATA-8 DATA-9 0 0 1 DATA-1 DATA-2 DATA-3 DATA-4 DATA-5 DATA-6 DATA-7 DATA-8 DATA-9 0 0 1 DATA-1 DATA-2 DATA-3 DATA-4 DATA-5 DATA-6 DATA-7 DATA-8 DATA-9 DAT:DATA1 DAT:DATA2 DAT:DATA3 DAT:DATA4 DAT:DATA5 DAT:DATA6 DAT:DATA7 DAT:DATA8 DAT:DATA9 DAT:DATA1 DAT:DATA2 DAT:DATA3 DAT:DATA4 DAT:DATA5 DAT:DATA6 DAT:DATA7 DAT:DATA8 DAT:DATA9 DAT:DATA1 DAT:DATA2 DAT:DATA3 DAT:DATA4 DAT:DATA5 DAT:DATA6 DAT:DATA7 DAT:DATA8 DAT:DATA9 DAT:DATA1 DAT:DATA2 DAT:DATA3 DAT:DATA4 DAT:DATA5 DAT:DATA6 DAT:DATA7 DAT:DATA8 DAT:DATA9 DAT:DATA1 DAT:DATA2 DAT:DATA3 DAT:DATA4 DAT:DATA5 DAT:DATA6 DAT:DATA7 DAT:DATA8 DAT:DATA9 B 00 1 0 5 1 1:DHCP 192.168.0.100 255.255.255.0 B 00 1 0 5 1 1:DHCP 192.168.0.100 255.255.255.0 B 00 1 0 5 1 1:DHCP 192.168.0.100 255.255.255.0 B 00 1 0 5 1 1:DHCP 192.168.0.100 255.255.255.0 M 00 1 0 5 1 1:DHCP 192.168.0.100 255.255.255.0 -46 - 7-5. Setting/Editing Parameters (1) How to set There are the following three methods to edit parameters. Function on D-Ⅶ Web (Web browser) 【Recommended】 Direct editing of parameter files (2) Function on D-Ⅶ Parameters may be set without a network connection with this method. Please refer to [3-5. Editing Parameters] for more details. * It is easier to edit parameters via the following method (Web) if D-Ⅶ is connected to a network because using a function on D-Ⅶ may have difficulties, such as: the display only showing the parameter number and its value, and the operation is only via a numeric keypad. (3) Web (Web browser) D-Ⅶ has a Web server function for the setting system and parameter settings. If D-Ⅶ can be connected to a network, this method is the most effective way to edit parameters. Here are some merits: Not only parameter number but also the parameter details are visible. Easy to understand with the detail next to the parameter value and simply selecting the desired parameter without entering a numerical value. Please refer [10. Web Settings] for more details. (4) Direct editing of parameter files D-Ⅶ’s parameter file is in text format so the file in the shared folder may be edited via notepad or some other text based editor. However, this method might cause a system error if there is a mistake after editing. Therefore, this method is not recommended. -47 - 7-6. Directory Path Settings <Setting Format> DAT:[/]<Directory Name>[/<Directory Name>/...] USB:[/]<Directory Name>[/<Directory Name>/...] SMB://<Computer Name>/<Share Folder Name>[/<Directory Name>/...] The item in [ ] can be omitted. Identifier: 「 DAT : 」 means the stored drive in D - Ⅶ , 「 USB : 」 means USB memory and 「SMB:」 means network drive. <Directory of stored drive> DAT:[/]<Directory Name>[/<Directory Name>/...] Punctuation between directories is 「/」 (Slash). First 「/」 can be omitted. (Example) DAT:DATA1 DAT:DATA1/TEST DAT:/DATA1 <Directory of USB memory> USB:[/]<Directory Name>[/<Directory Name>/...] Punctuation between directories is 「/」 (Slash). First 「/」 can be omitted. (Example) USB:DATA USB:DATA/TEST USB:/DATA <Directory of Network Drive> SMB://<Computer Name>/<Share Name>[/<Directory Name>/...] Punctuation is 「/」 (Slash). The first mark is 「//」 which can NOT be omitted. <Computer Name> and <Share Name> can NOT be omitted. (Example) SMB://PC1/DNC SMB://PC1/DNC/DATA -48 - 7-7. Backup and Restoration of Parameters Backup The parameter file can be downloaded to a PC from the share folder with a file sharing function or FTP. Backed up parameter files can be shared with or moved to another D-Ⅶ, and used for system restoration in case D-Ⅶ needs to be replaced. Please periodically backup your parameter file. Restoration The parameter file backups downloaded to a PC can be restored to the D-Ⅶ in cases where the D-Ⅶ parameter file becomes corrupt. Please upload the parameter file to the share folder from a PC with file sharing function or FTP. Parameter file will be available in D-Ⅶ by uploading to the share folder. Please refer [11. FTP Function] for FTP function, and [9-3. Share Folder] for sharing folder of parameter file. -49 - 8. USB Memory Use of a portable USB memory stick makes it possible the directly transfer large amounts of data created on a pc to the NC machine, and directly storing the data taken from the NC machine. For facilities which do not have a network system, D-Ⅶ can still be used with USB memory for long continuous operation. (1) Select root directory of USB memory. There are no special settings for reading/writing to the root directory of USB memory. Just press during file selecting mode to go Directory Selecting mode. Then press [0] to access the root directory of your USB memory. (2) Select sub directory on USB memory. To read/write to a sub directory on your USB memory because the NC data is saved on there, it is necessary to set the sub directory on the parameter #41-#49 (Directory Pass Name) first. (Example) USB:DATA USB:DATA/TEST Please refer to [7-5. Directory Pass Settings] for more information on settings. After setting these parameters, please go to Directory Selecting mode. Then, choose the DIR number which was set to the sub directory of USB memory. ※ If your USB memory is switched to the another one, D-Ⅶ may need to be reset before processing may continue. It depends on the type of USB memory. -50 - 9. Remote Command Mode While following the commands from an NC machine, the output file is prepared and the data is sent when the D-Ⅶ receives the command to start sending data. 9-1. Command Detail (1) CF450 emulation command <Description of Code> SPACE Space code (Any 1 byte code) ? ‘+’, ‘/’, ‘:’, ‘&’ or ‘?’(The character that is not used in NC data) Input folder name instead of ‘FOLDER1’ and ‘FOLDER2’. Input File name instead of ‘FILENAME’. ①F01: Output data from D-Ⅶ to NC with subprogram if subprogram execution command is in the program Process 1) Punch-out remote command program from NC: (Create command program with a program number) % Oxxxx (F01SPACEFOLDER1?FOLDER2?FILENAME) % 2) Request command to D-Ⅶ from NC: (NC has to be Program Read function) Data will be started sending out when D-Ⅶ receives DC1 (set by parameter #7) from NC. ② F11: Output data from D - Ⅶ to NC without subprogram if subprogram execution command is in the program Process 1) Punch-out remote command program from NC: (Create command program with a program number) % Oxxxx (F01SPACEFOLDER1?FOLDER2?FILENAME) % 2) Request command to D-Ⅶ from NC: (NC has to be Program Read function) Data will be started sending out when D-Ⅶ receives DC1 (set by parameter #7) from NC. -51 - ③F02: Input and save data to D-Ⅶ from NC. It corresponds to each program punch-out from NC. Process 1) Punch-out remote command program from NC: (Create command program with a program number) % Oxxxx (F02SPACEFOLDER1?FOLDER2?FILENAME) % 2) Output data from NC ④F20: Input and save data to D-Ⅶ from NC. It corresponds to punch-out of all programs (punch-all) which is punctuated O/L number from NC. Input programs to D-Ⅶ will automatically be saved with using O number as file name. Process 1) Punch-out remote command program from NC: (Create command program with a program number) % Oxxxx (F20) % ←You can not specify folder name and file name. 2) Output data from NC Note: Any remote program requires CRLF right before begin mark and right after end mark. (Begin/end marks can be set by parameter #25) When the parameter #29 is set to “0” (Normal mode), remote command will be available to the directory which is displayed right before switching to Remote command mode. When the parameter #29 is set to “1” (Remote command mode), remote command will be available to the directory which is set by parameter #30. The files have an extension which is set by parameter #21 is available to be output/input. Do not write extension after the file name in remote command begin/end marks because the extension set by parameter #21 will be automatically add. If output/input the files have more than one kind of extension, please keep the parameter #21 blank and write file name including extension in remote command begin/end marks. When you use Remote command ‘F01’, ‘F11’ or ‘F02’, you can specify only sub folders that are set by parameter #41~#49. You do not have to input the folder names that have been set by parameter #41~#49 in Remote command. -52 - (2) FC cassette protocol emulation command Note: When the parameters between NC and D-Ⅶ are matched and input/output device is set as F Floppy Cassette or F Handy File, remote command will be automatically sent. 9-2. Cancel output <Cancel, before sending data> For both above commands ① and ②, press on D-Ⅶ’s operation panel. D-Ⅶ will then wait for a command, and will return to Normal Mode when is pressed. <Cancel, after data is sent> For both above commands ① and ②, press on D-Ⅶ’s operation panel. D-Ⅶ will then wait for a command, and will return to Normal Mode when is pressed. Some NC machines send “SYN”, “NAK” and “CAN” codes through RS232C interface when their reset switches are pressed. When D-Ⅶ received these codes, it will stop output and display waiting for a command. 9-3. Display of Remote command ①When D-Ⅶ is waiting for command: Remote Command: ②During D-Ⅶ is receiving command: FA01 1st line: The received designated remote command (ex)FA01, 1234 2nd line: (Directory Name)and(the designated output file name) 3rd line: (Current output data amount by 2KB) and (File byte size) 4th line: The indicator “>>>” during output or error details if D-Ⅶ has any error -53 - 10. Network Drive and Share Folder D-Ⅶ has a file sharing function via Windows network so that the uploading and storage of large amounts of NC program data created on systems such as CAD/CAM can be made easily and speedily through out the network. Also, it is possible to directly send NC data stored on network drive to NC machine. 10-1. Network Settings To access a network drive and a share folder, it is necessary that the network settings of D-Ⅶ are set properly. Please use a PC which is on the same network to check if D-Ⅶ accesses on the network properly Please refer to [10-4. Network Settings] for more information on network settings. 10-2. Network Drive A directory which can connect to an external PC via the file sharing function is called a “Network Drive”. (1) Setting a Network Drive To set a Network Drive, describe a path name for the share folder on a PC that you want D-Ⅶ to connect to, in parameters #41-#49 (Directory Path Name). (Example) SMB://PC1/DNC SMB://PC1/DNC/DATA Please refer to [7-5. Directory Path Settings] on how to format these settings. After setting up these parameters, please go to Directory Selecting mode. Then, choose the DIR number of the USB memory sub directory for Read/Write. (2) Settings for PCs which D-Ⅶ connects to. D-Ⅶ uses Guest Connections to connect to a Network Drive. D-Ⅶ needs to be set to Guest Connection on any system which can supply Network Drives, such as: CAD/CAM systems or PCs. D-Ⅶ does not have an authorization function because of its limitations. We strongly recommend that you select the folders you want to share to prevent issues with security. If you have any question about guest connections and sharing folders, please refer a manual for your system or ask your system vendor. -54 - (3) In case D-Ⅶ can NOT connect to a network drive. D-Ⅶ tries to connect to the network drive when the DIR number which was set to the network drive in the Directory Selection mode is selected. On selection, a timeout error will occur if there is a parameter description error, wiring error or a problem with the communication channel. D-Ⅶ will display “Not Found”. In this case it is not an alarm. Timeout is about 1minute, however, it depends on your network environment. -55 - 10-3. Share Folder D-Ⅶ shares the store directory for NC data file on an internal flash disk as well as the parameter file. This parameter which is shared with the network is called “Share Folder” on D-Ⅶ. This manual assumes that the user uses Microsoft Windows XP. If you use a different Operating System, you may still use sharing functions with your network. Please refer the manual for your system. (1) Sharing Folder Name D-Ⅶ shares a store directory for NC data file as well as parameter file. Please go to “My Network” on Windows, and use this share name. NC data file Parameter file : KRS-DATA : KRS-PARAM These files and folders can be created, edited and erased. So please carefully take care of these files and folders. (2) Limitation of file and folder name Please do NOT use Japanese for file and folder names for a sharing folder because the D - Ⅶ can NOT display Japanese and it might cause an unexpected error. (3) Change parameters #41-#49 To change the folder name or use a newly created folder, it is necessary to change parameters #41-#49 to make the DIR number selection available. Please refer to [7-5. Directory Path name Settings] for setting. In case the shared folder does not show up on “My Network”. With regard to the specifications of Windows network system, it may take awhile to display the shared folder of D-Ⅶ or sometimes it may not show up at all. If so, please connect to the shared folder with the following steps. 1 2 [Tool(T)]-[Map Network Drive ...] to assign the drive name to the shared folder. Use [Add a network place] of [My Network] and connect manually. -56 - 1. Assign Drive name to the shared folder [Tool(T)]-[Map Network Drive ...] Please follow the wizard of [Map Network Drive ...] -57 - 2. Add a network place Click [Add a network place] to connect to the shared folder manually. Please follow the wizard of [Add a network Place]. □ Note The method we introduced at [In case the sharing folder does not show up on “My Network”] is the function of Microsoft Windows not D-Ⅶ. Please refer the manual of Microsoft Windows or ask Microsoft if you have any questions -58 - 11. Web Settings (by Web Browser) D-Ⅶ’s network settings may be configured via a Web browser. Parameter settings may also be set in this way. It is easier to set because an explanation of each parameter is shown next to each parameter number. (1) Valid Browser There are no specific browsers for use with D-Ⅶ because the Web Setup does not use JavaScript, Java Applet or Adobe FLASH. Text based browsers, such as: Lynx and w3m may also be used. However, it may be possible that the layout will be out of order. (2) Valid Items to set These following items may be set on via Web Setup Network Settings (for D-Ⅶ) Parameter Settings Time Settings Restart (3) IP address of D-Ⅶ If the IP address of D-Ⅶ is unknown, please check parameter #51. To display parameter #51, parameter #50 should be “1”. (4) Connect to Web server Please open a browser on your PC which is connected to your network, and input the IP address of D-Ⅶ. The Setup Menu and Current Settings of D-Ⅶ will be shown in the browser window. KRS -59 - 11-1. Displays The display will show the Setup Menu and Current Settings first. To go to each setting, click each link in the Setup Menu. KRS About the pictures on this chapter The pictures on this chapter are by Microsoft Windows XP SP2 Internet Explorer 6.0 SP2. -60 - 11-2. Setup Menu The Setup Menu is always shown on the left side of the display. -61 - 11-3. Current Settings Please verify the Current Settings of D-Ⅶ before you make changes. You may use this page to compare between the default system settings and your new settings. KRS -62 - 11-4. Network Settings (1) Display Please click “Network Settings” on the Setup Menu, and press “Confirm” after making your changes. KRS Display of Network Settings (Default Setting) Host Name: The name of D-Ⅶ on the network. It will automatically be named [KRS[192.168.0.100](krs-100)] if no name is set. How to set: Parameter settings, such as IP address. [Obtain IP Address Automatically (DHCP)]: D-Ⅶ will receive an IP address from your DHCP server upon start up. [Manual Configuration]: Set the address manually on the setup display. *Note: When D-Ⅶ is set to [Obtain IP Address Automatically (DHCP)], it will only try to obtain an IP Address automatically via DHCP when it’s powered on. If an IP Address is not obtained for some reason, such as when the network cable is not connected properly, D-Ⅶ will never try to obtain IP address via DHCP during operation. For this case, please restart D-Ⅶ after making sure the network cable is connected to D-Ⅶ properly in order to get an IP Address. -63 - Work Group: for Windows network. Automatically set to 「WORKGROUP」 if no name is set. Authentication : Authentication settings, such as the User Account and Password of the PCs which D-Ⅶ will connect to for file sharing are set in “User Authentication” to the share folders. -64 - Manual Configuration When [Manual Configuration] is selected, an extra page will appear. Please click [Confirm] after making changes. KRS -65 - Attention The value should be set depending on your network configuration. Please be sure or your network configuration before saving these settings. (2) Confirm and Save After clicking [Confirm], the page of [Updated settings] will appear. Please click [Confirm] to update settings, or [Cancel] to make changes after making sure your settings are correct. KRS -66 - (3) Restart The D-Ⅶ needs to be restarted to update any changes made to the system. After saving the settings, the following page will appear. Please click [Restart] to restart now, or [Later] to manually restart. D-Ⅶ When [Restart] is clicked, D-Ⅶ’s LCD will display 「Rebooting .....」 and the browser will display [■■ Restart ■■■] -67 - 11-5. Setting Parameter In the [Parameter Settings] menu, you can create and edit parameters. (1) Select Parameter file When [Parameter Settings] is clicked, the [Select Parameter File] page will be displayed. Please select a parameter file to edit and click [Confirm]. To create a new parameter file, please click [Create New File]. File List [File List] shows the parameter files which have been saved on the system. The item on the left side is the parameter file name. On the right side is the parameter display name. (Parameter #0) -68 - (2) Parameter Settings The details of the parameter file which is selected on the [Select Parameter File] screen will be displayed. Please refer to 「7-3. Parameter Details」 to set your parameters, and click [Confirm] to save changes. Confirm or Cancel -69 - Save parameter under a new name To save a parameter file with a new name, type a new file name in the box and click [Confirm] to save. Attention If the typed name already exists, it will be overwrite the previous file without any advance notice. Please be careful when choosing file names. Type a new name Switch parameter A Web browser is only used for editing parameter files. Changes will not be reflected in the parameters currently in use, because the parameter settings are always available even if D-Ⅶ is communicating with an NC machine via RS232C. To change the parameter settings, please follow the steps bellow. 1 Press PRM on the keypad of D-Ⅶ to go to Parameter Setting Mode. 2 Display the details of the parameter file you want to use. 3 Confirm by pressing the START key. The parameter which is set by this step will remain even after D-Ⅶ is reset. -70 - (3) Create a new parameter When [Create New File] is selected on the [Select Parameter File], the [Parameter settings] page will be displayed. The parameter will be default setting.. Please refer 「7-3. Detail of Parameter」 to write a parameter file name, and [Confirm] which places at very bottom of the page. -71 - 11-6. Time Settings (Maintenance Menu) When [Time Setting] is selected on the setting menu. The time setting page will be displayed. After editing the settings, please press [Confirm] which places at very bottom of the page to confirm the settings. Time settings by machine side ①Press ②Find and press [DATE] which locates very bottom of the parameter file selection mode and press to select. <Display> 1 1 PRM 10 SEL 20characters DEFAULT 2 PARAM001 3 [NW] 4 Ver5.3.0.2 >[DATE] ← ③The current network settings will be displayed. <Display> 1 10 20characters 1 DATE <2011>/12/16 2 TIME 14:37:00 3 4 -72 - most bottom of the page ④Use keys to move <> until getting to the value to change. ⑤Enter the value at this mark■ is blinking in the bottom. <Display> 1 10 20characters 1 DATE <2011>/12/16 2 TIME 14:37:00 3 4 YEAR ⑥Press : ■ to enter. (※The settings are NOT confirmed yet at this moment) ⑦To confirm the settings, press To cancel the settings, press . The new settings will be saved and available. key, instead of press <Display> 1 10 20Characters 1 DATE <2011>/12/16 2 TIME 14:37:00 3 4 ******* END ******* -73 - key. 11-7. Restart Restart D-Ⅶ When [Restart] is chosen from the Setup Menu, the following page will be displayed. If it is ok to restart D-Ⅶ, please click [Restart]. D-Ⅶ After [Restart] is clicked, the LCD will display [Rebooting .....] and 「■■■ Restart ■■■」 on the web browser. -74 - 12. FTP D-Ⅶ also has an FTP server function. With the ftp command or applications, such as: FFFTP, you can login to the shared folder where NC data files and parameter files are stored. This function may be useful for situations in which file sharing via Windows network is not available. You must have some kind of connection to a network however. (1) IP address of D-Ⅶ Use IP address to connect by FTP. To check the IP address of D-Ⅶ, please refer [10. Web Settings (3) IP address of D-Ⅶ]. (2) Limitation for connecting simultaneously FTP server of D-Ⅶ is not available for connections from more than one client. If there is a client which has already connected to the FTP server, other clients will be refused. (3) Login Please use the ftp command or applications, such as: FFFTP for Windows to login to the FTP server, depending on your system. (4) Username and Password The following are the usernames/passwords for accessing NC data and Parameter data files. Username D7-DATA D7-PARAM Password Nothing Nothing Detail For access to NC data file For access to Parameter data file Note: The usernames for NC data and Parameter data are different. Password is not necessary for command and applications. (5) Root Directory When the login is successful, the root directory will display as follows. User Name KRS-DATA KRS-PARAM Root Directory Share folder stored NC data file Share folder stored parameter file Once logged into one shared folder, you can not move to another folder. -75 - 13. Alarm When D-Ⅶ receives an error, it will display an alarm. While an alarm status is active, D-Ⅶ will stop the current process and will wait until the RESET key is pressed. When RESET is pressed, the alarm status will be removed and the system will return to OUT mode, except in special case. 13-1. Alarm: 0 Alarm: 0 means there is a system error. Please restart the system after solving the problem. Alarm # 1 Message Detail System Error 2 No Memory 3 Incorrect System Error [1] Setting is not defined [2] Invalid operation mode [24] Error of optional command line [25] Fail the change for priority order [63] Unexpected error* Memory Error [3] Memory Shortage(Buffer assignment) [4] Memory Shortage(Character line assignment) Parameter Error [23] Wrong description of parameter *System Error [63]: This error comes from the LINUX Kernel which D-Ⅶ uses as its OS. LINUX is operates various functions simultaneously and occasional generates an error from overflow. Please restart D-Ⅶ when this error occurs. -76 - 13-2. Alarm: 1 Flash disk error or file error. Please press RESET to reset the alarm. If this error occurs during operation, the operation will stop. Alarm # 11 Message Detail Disk Full [5] No available space on disk 12 No Media [7] USB memory is not set 13 SMB Error [8] Can not connect to the network drive 14 Disk Error 15 File Error 16 Not Found [6] [9] [10] [11] [12] [14] [15] [16] [17] [32] [13] Can not remount Disk error Failed to open directory Directory reading error Failed to change directory Failed to open file File mapping error Failed to read file condition Disable file Writing error Not found file 17 Copy Disable [27] Copy without permission 13-3. Alarm: 2 RS232C Error Please press RESET to reset the alarm. If this error occurs during operation, the operation will stop. Alarm # 21 Message Detail DSR Drop 22 NC Error 23 RS232 Error [20] DSR is set “L” [21] No descriptive keyword for sub-program [22] Data block error [28] Input character error [29] Decode error [30] Invalid character in buffer memory [31] Error inside buffer memory [18] Can not open serial device [19] RS232 setting value error [26] Flow control setting error -77 - calling 14. External terminal 14-1. RS232-1(COM1) Pin # Signal Detail Name Carrier Detect 1 CD Receiving Data 2 RD Sending Data 3 SD Data Terminal Ready 4 DTR Signal Ground 5 GND Data Set Ready 6 DSR Request Signal 7 RTS Clear to send 8 CTS Ring indicator 9 RI 14-2. RS232-2(COM2) Pin # Signal Detail Name Carrier Detect 1 CD Receiving Data 2 RD Sending Data 3 SD Data Terminal Ready 4 DTR Signal Ground 5 GND Data Set Ready 6 DSR Request Signal 7 RTS Clear to send 8 CTS Ring indicator 9 RI Direction IN IN OUT OUT IN OUT IN IN Direction IN IN OUT OUT IN OUT IN IN 15. RS232C cable LT330 side D-Ⅶ KSM9pins (female connector) Pin No. 1 2 3 4 5 6 7 8 9 NC side 25pins (male connector) Pin No. 1 2 3 4 5 6 7 8 20 -78 - D-Ⅶ User’s Manual Ver. 1.01 2012.4 KYORITSU SYSTEM MACHINE, LTD. 1-1-19 Kita-shinjyuku, Shinjyuku-ku, Tokyo, Japan 169-0074 Tel: +81-3-3369-6021 Fax: +81-3-3369-6045 Website: http://www.kyoritsu-s.co.jp/ All Rights Reserved -79 -