1
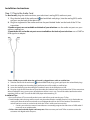
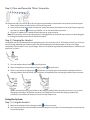
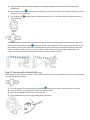
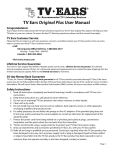
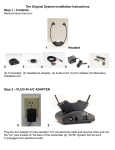
TV Ears 2.3 User Manual
Congratulations!
You’ve taken the first step toward the TV Ears television experience. TV Ears 2.3 System will help you
hear TV better and at your own volume. To ensure the best TV listening experience please read the
following manual thoroughly.
TV Ears Customer Service
Please feel free to contact us with any questions, concerns, or problems about your TV Ears product.
Here are a few ways to contact your local TV Ears customer service:
• Call:
US: 1-866-611-9934
Canada: 1-800-263-4864
US Corporate Office Toll Free: 1-888-883-3277
Monday – Friday 7AM – 4PM PST
• Visit www.tvears.com
Lifetime Service Guarantee
Your new TV Ears 2.3 Wireless Headset system comes with a Lifetime Service Guarantee. The Lifetime
Service Guarantee ensures TV Ears, Inc. will provide repairs and replacements at a nominal fee (plus
shipping) after the limited warranty has expired. Refer to the limited warranty for full terms.
30-day Money Back Guarantee TV Ears, Inc. honors a 30-day money back guarantee for all TV Ears
products purchased through TV Ears. If for some reason you are not fully satisfied within 30-days of the
purchase date, please call one of the customer service numbers listed above. We will issue a Return
Merchandise Authorization (RMA) number. All returns must have a RMA number.
Important Safety Instructions
1. Read all instructions completely and heed all warnings. Install in accordance with TV Ears, Inc.’s
instructions.
2. Keep these instructions in a safe place for future reference.
3. Do not use or submerge TV Ears products near water, moisture, or other liquids.
4. Clean with a dry cloth.
5. Do not install near any heat sources such as radiators, heat registers, stoves, or other apparatus
(including amplifiers) that produce heat.
6. For safety purposes, do not deface the prongs on the AC adapters. If the provided plug does not
fit into your outlet, purchase the correct adapter or consult an electrician for replacement of the
obsolete outlet.
7. Protect the power cord from being walked on or pinched particularly at plugs, convenience
receptacles, and the point where the cord exits from the transmitter.
8. TV Ears recommends using a surge protector to protect your TV Ears from power surges.
9. Only use attachments and accessories specified by TV Ears, Inc. with your TV Ears system.
10. Refer all servicing to qualified service personnel. Servicing is required when the TV Ears product
has been damaged in any way, such as power-supply cord or plug is damaged, liquid has been
spilled or objects have fallen into the TV Ears product, the TV Ears product has been exposed to
rain or moisture, does not operate normally, or has been dropped, cracked, or broken.
Warnings
Warning: To reduce the risk of fire or electric shock, do not expose the TV Ears product to rain or
moisture. The TV Ears product should not be exposed to dripping or splashing liquids. Do not place
objects filled with liquid such as vases on or near the TV Ears product.
Warning: Keep batteries out of reach of children. Discard the battery faceplate (leave batteries installed
in faceplate) appropriately and carefully. If swallowed, call:
US: The National Button Battery Ingestion Hotline: 202-625-3333
Warning: The magnetic field emitted by the TV Ears ear tip speakers is minimal. When used as indicated,
TV Ears headsets should not cause magnetic interference with pacemakers or internal defibrillators. The
magnetic field strength of the speakers is less than 1 Gauss when within1 inch (3 cm) of the pacemaker
or internal defibrillator. It is recommended that the user keep the ear tips at least an inch away from any
pacemaker or internal defibrillator.
We have not had any customers indicate a problem using TV Ears in the presence of a pacemaker or
internal defibrillator. We recommend not placing the ear tip ends of the headsets (where the speakers
are) on your chest or directly in the vicinity of a pacemaker or defibrillator. If you have concerns, we
recommend you contact your physician.
Included in Box
1 - 2.3 Headset
1 - 2.3 Transmitter
1 - Faceplate with battery (attached)
1 - AC adapter (power supply)
1 - Audio Cord
I
2.3 Headset
On / Off and Volume Control
Tone Control
TV Ears Tips w/ Snap Tip adapters (attached)
Faceplate w/ battery (attached)
II
2.3 Transmitter
Infrared Diodes
Charging Indicator Light
Charging Cradles
Audio Port
12V port
III
Installation Guide
AC adapter (power supply)
Audio Cord
Installation Instructions
Step 1 | Plug in the Audio Cord
For best results, plug the audio cord into your television’s analog (RCA) audio out ports.
1. Plug the dual end of the audio cord
(red and black male plugs) into the analog (RCA) audio
out ports on the back of the television. *
2. Plug the single end of the audio cord into the port labeled ‘Audio’ on the back of the TV Ears
transmitter.
*If audio out ports are not available on the back of your television: use the audio out ports on your
cable or satellite box.
*If outside the U.S and audio out ports are not available on the back of your television: use a SCART to
RGB signal out adapter.
To use a DVD player or VCR when the audio cord is plugged into a cable or satellite box:
(red and black male plugs); gently pull apart the red and black plugs.
1. Take the dual end of the audio cord
2. Insert the red plug into the analog (RCA) audio out ports of the cable or satellite box.
3. Insert the black plug into the analog (RCA) audio out ports of the DVD player or VCR.
4. Plug the single end of the audio cord into the audio port labeled ‘Audio’ on the back of the TV Ears transmitter.
When installed this way, you must turn off whichever device is not in use. Turn off the cable/satellite box when
watching a DVD or video. Turn off the DVD/VCR player when watching TV.
Installation Tips:
• Ports on the front of TVs are usually audio in ports and will not send sound to your TV Ears.
• Fixed/Variable Audio Setting: audio out ports may be marked fixed or variable/fixed or R & L. A fixed audio out
setting will allow the television volume to work independently from the TV Ears headset. The television
volume can be on mute or at a low level while the TV Ears’ volume can be turned up.
o Consult your television manual / manufacturer to manually program the television to FIXED audio if
currently set to variable audio.
• TV Ears does not work with digital audio out ports. Please contact your local TV Ears customer service for
assistance with digital audio out ports.
Step 2 | Place and Power the TV Ears Transmitter
The transmitter lights must be in direct line of sight with the headset so the headset can receive the infrared signal.
1. Place the transmitter on a flat surface 3-5 feet off the ground.
2. Point the front of the transmitter towards the seating area where the headset will be used. Plug the opposite
into the port labeled ‘12V’ on the back of the transmitter.
end of the AC adapter
3. Plug the AC adapter into a standard electrical outlet or surge protector.
Note: The transmitter will not operate properly if unplugged from an electrical source and must remain pluggedin to charge the headset and transmit the infrared signal.
Step 3 | Charging the Headset
The headset comes pre-charged with enough battery power for 10 minutes of use. The headset will last up to 10 hours
on a full charge, depending on volume level. A fully exhausted battery will take between 8-10 hours to charge
completely. The automatic 1-hour “Quick Charge” feature will rapidly charge a partially drained battery sufficiently for
typical use, 2-4 hours.
1. Turn the headset volume knob
to the off position.
2. Place the headset in the transmitter-charging cradle
facing forward.
3. Check to see that the charging light
illuminates. It will glow green if the headset is placed in the front
charging cradle of the transmitter and it will glow red if placed in the rear-charging cradle of the transmitter.
TV Ears recommends storing the headset in the charging cradle of the transmitter when not in use, to avoid
damaging the headset. The headset cannot be over charged. If returned to the charging cradle of the
transmitter, the headset will always be easy to find and ready for use.
Using the System
Step 1 | Using the Headset
1. Remove the headset from the charging cradle
of the transmitter.
2. The writing on the front of the headset should face away from your body. The infrared signal is received on the
front of the headset.
3. Using both hands, gently separate the bow arms and place earpieces into each ear (similar to placing a
stethoscope).
4. The VOLUME control
will be located on the RIGHT side. Rotate the dial to turn ON the headset and set the
volume to your comfort level.
5. The TONE control
(bass and treble) will be located on the LEFT side. Rotate the dial to adjust the tone to
your preference.
The TV Ears headset receives an invisible infrared signal from the transmitter that is connected to the television.
Be certain that the infrared diodes
located on the front of the transmitter are in direct sight with the front of
the headset to receive the signal. The infrared signal from the transmitter to the headset should be clear of any
obstruction (plants, books, furniture, etc.) The infrared signal cannot pass through walls or solid objects. The
headset can only pick up the infrared signal in the same room as the transmitter.
Step 2 | Removing the Headset after use
Always use two hands to place and remove your headset from your ears. Using one hand may loosen or tug on the bow
arms and damage your headset.
1.
2.
3.
4.
Turn the headset OFF by rotating the VOLUME dial , reducing the volume until you feel or hear a click.
Using both hands, gently separate the bow arms from your ears.
Remove the headset by lowering it under your chin.
Place the headset into the charging cradle of the transmitter.
Maintenance
Replacing Ear Tips:
Your headset comes with foam TV Ears Tips
attached. Some users may prefer using our
Silicone Ear Tips. The foam ear tips must be used with black snap tip adapters; the silicone ear
tips do not use snap tip adapters. Ear tips can be purchased from your local TV Ears customer
service.
Replacing the foam TV Ears Tips with new foam TV Ears Tips:
Note: Depending on usage, TV Ears Tips will become dirty and frayed. Replace TV Ears Tips if they are
soiled or show signs of wear. Do not re-attach or reuse ear tips after they have become detached. For
safety purposes, we recommend replacing TV Ears Tips every 30-60 days.
1. Use the top portion of the TV Ears Tips package to remove the ear tip from the headset. Place the
ear tip into the triangular cutout of the package.
2. Slide the ear tip to a corner and gently pull the ear tip off. The black snap tip adapter should
remain on the headset. If a white o-ring remains on the tip of the snap tip adapter, remove it
before attempting to install a new ear tip.
3. Open the package of ear tips and place it on a level surface.
4. Place the pointed end of the snap tip adapter into the center hole of the new ear tip and push
down until you feel the new ear tip snap on the snap tip adapter.
5. Gently pull the headset away from the tray.
Replacing the foam TV Ear Tips with the Silicone Ear Tips:
Note: Depending on usage, silicone ear tips will become discolored and dirty with use. For cleanliness
wash the silicone ear tips with mild soap and warm water every 30 days. We recommend replacing
silicone ear tips every 6 months or as needed.
1. If you have the foam TV Ears Tips installed on your headset and are replacing them with the
silicone ear tips, remove the black snap tips adapters. To remove the snap tip adapters, you will
need something with a flat edge such as a butter knife or a spoon.
2. Place your flat object in the gap between the snap tip adapter and the headset. Gently force the
snap tip adapter off the headset.
3. Once the foam ear tips and snap tip adapters are removed from the headset, place each silicone
ear tip directly onto the tip of the headset where the snap tip adapter was initially located.
Replacing the Silicone Ear Tips with foam TV Ears Tips:
Heed all above warnings and notes about foam TV Ears Tips and Silicone Ear Tips.
1. If you are already using silicone ear tips, remove them prior to installing TV Ears Tips. They will
easily pull of the headset.
2. Install the snap tip adapters by gently twisting them onto the ends of the headset.
3. Open the package of ear tips and place it on a level surface.
4. Place the pointed end of the snap tip adapter into the center hole of the new ear tip and push
down until you feel the new ear tip snap on the snap tip adapter (see diagram above).
5. Gently pull the headset away from the tray.
Replacing the Battery:
Batteries will last up to 1-2 years depending on usage. If you notice reduced sound and range it may be
time to replace the battery. Only use proprietary batteries purchased from TV Ears. Be sure to purchase
the same model battery as the headset you own.
To replace the batteries, you will need:
•
•
•
New faceplate with TV Ears batteries installed
representatives)
TV Ears headset
Small #1 Phillips head screwdriver
(can be purchased from TV Ears
Replacement Instructions:
If you are uncomfortable or have trouble replacing the battery yourself, contact your local TV Ears
customer service.
1. Turn the headset OFF.
2. Place the headset on a level surface, front side down.
3. Using the small #1 Phillips head screwdriver, remove the two screws on the back of the
headset next to each bow arm.
4. Turn the headset over and remove the faceplate with the TV Ears logo.
5. Place the new faceplate with batteries on the headset and turn over.
6. Using the same screwdriver gently put the screws in place and attach the new faceplate.
7. Place the headset on the transmitter-charging cradle and allow your TV Ears to charge for at
least 1 hour.
Note: The supplied rechargeable batteries can be recycled. In order to protect the environment,
only dispose of exhausted rechargeable batteries at a recycling facility. Do not dispose of
batteries in trash.
Repairs
Before sending in your TV Ears products for repair, please call our customer service representatives for
troubleshooting assistance. If we are unable to resolve the problem or if the product needs to be
repaired a Return Merchandise Authorization (RMA) number will be issued. RMA numbers allow TV Ears
to keep track of your product and return it to you quickly. Be sure to get the address of the local repair
center when obtaining a RMA number. All returned items must have a RMA number.
Obtain a RMA number by calling TV Ears Customer Service:
• US: 1-866-611-9934
• US Corporate Office Toll Free: 1-888-883-3277
o Monday - Friday 7:00AM - 4:00PM PST
Additional Accessories & Replacement Parts
Additional accessories and replacement parts can be purchased to extend your TV Ears system.
Additional Headset: The transmitter is designed to hold, charge, and transmit to two headsets at a
time. Additional headsets can be used when more than one household member wants to use TV
Ears. Be sure to purchase the same model headset as the system you own.
Seat Side Charger: This charger keeps your headset charged right next to your seating area. The
charger does not transmit an infrared signal.
Foam TV Ears Tips : Pack of 10 replacement ear tips. Replace TV Ears Tips if they are soiled or
show signs of wear. Discard ear tips after they are detached, do not re-attach. For safety purposes,
we recommend changing TV Ears Tips every 30-60 days.
Silicone Ear Tips: Sold as a pair or in a pack of 10 individual ear tips. For cleanliness wash the
silicone ear tips with mild soap and warm water every 30 days. We recommend replacing silicone
ear tips every 6 months or as needed.
TV Ears Replacement Battery : TV Ears batteries are designed to last 1-2 years depending on
usage. Only use proprietary batteries purchased from TV Ears. Be sure to purchase the same model
battery as the headset you own.
Alternate Installation Kit: This kit includes a power microphone, extender cord, and headphone jack
adapter. This kit can be used if you cannot access analog (RCA) audio out ports or if there is no
analog (RCA) audio out ports on your television, satellite box, or cable box.
Items can be purchased online, by telephone, or purchased by visiting an Authorized TV Ears dealer.
• Online: www.tvears.com
• Call Customer Service:
o US: 1-866-611-9934
o US Corporate Office Toll Free: 1-888-883-3277
Monday - Friday 7:00AM - 4:00PM PST
• Visit a local Authorized TV Ears Dealer:
To find a TV Ears dealer near you, go to the TV Ears website at www.tvears.com. Please call the dealer to
confirm the desired item is in stock.
Frequently Asked Questions (FAQ’s)
1. How do TV Ears work?
TV Ears has 5 infrared lights on the front of the transmitter, which sends an infrared signal to the receiver in
the front of the headset.
2. Why is the sound so clear?
TV Ears Voice Clarification Circuitry takes the sound of the television and enhances the speech frequencies
above the background noise, so the dialog is more clear.
3. Why do my TV Ears mute when I mute the TV?
Fixed audio out will allow the television volume and TV Ears volume to work independently from one another.
Some televisions have to be manually switched from the “Variable” audio setting to the “Fixed” audio setting
by using your TV menu. Not all TVs have the ability to switch from a variable to a fixed audio out (consult your
television manual or manufacturer). When the TV is set to a “Variable” audio out setting, the volume of the TV
Ears headset will be the same volume as the TV.
4. Why do I hear a television station when I’m watching a DVD/video?
When the audio cord is plugged into the analog (RCA) audio out port of a cable or satellite box AND an analog
(RCA) audio out port of a DVD player or VCR, you must turn off whichever device is not in use. Turn off the
cable/satellite box when watching a DVD or video. Turn off the DVD/VCR player when watching TV.
5. How do I charge the headset?
Turn the headset off and gently place into the charging cradle of the transmitter. Be sure the charging light on
the front of the transmitter illuminates. See Step 3 of Installation.
6. How do I know the headset is charging?
The charging light will be green when the headset is placed in the front charging cradle of the transmitter
and red if the headset is placed in the rear-charging cradle of the transmitter. If there are two headsets
charging at the same time, the light will appear amber.
7. Will the lights change colors once the headset is fully charged?
No, the charging light will remain a constant color as long as a headset is placed in the charging cradle. We
recommend keeping the headset in the charging cradle when not in use, for safekeeping.
8. Why is the charging light off?
A headset must be in the charging cradle of the transmitter in order for the charging light to illuminate. Once
the headset is removed from the transmitter, the charging light will no longer be illuminated. If the charging
light does not illuminate when the headset is in either charging cradle, pick up the headset and replace it in
the charging cradle (it should rock into place). Ensure the transmitter is receiving power. Check that the
charging posts in the cradle are positioned straight up.
9. Can I over charge the headset/battery?
No, the battery will not over charge if left in the charging cradle of the transmitter. We recommend storing
the headset in the charging cradle of the transmitter for safekeeping and to ensure that the headset is always
charged and ready for use.
10. What is the lifetime of the batteries?
The rechargeable battery is designed to last between 1-2 years depending on usage.
11. How do I get a new battery or ear tips?
TV Ears Replacement batteries and TV Ears Tips are sold through TV Ears representatives.
• Online: www.tvears.com
• Call Customer Service:
o US: 1-866-611-9934
o US Corporate Office Toll Free: 1-888-883-3277
Monday – Friday 7AM – 4PM PST
• Visit a local Authorized TV Ears Dealer:
To find a TV Ears dealer near you, go to the TV Ears website at www.tvears.com. Please call the dealer to
confirm the desired item is in stock.
12. What does 2.3 MHz mean?
2.3 MHz is the frequency of the infrared signal that is sent by the transmitter to the headset. Infrared signals
are invisible light signals and are not disturbed by electrical storms.
For additional technical questions, consult our troubleshooting guide on the next page.
If you have further questions please call one of the customer service numbers or visit our website.
Troubleshooting Guide
Problem:
Yo u hear static o r interference
The lights o n fro nt o f transmitter do
no t light up ( infrared dio des are
difficult to see in day light) .
The charging light do es no t co me o n
when headset is in the cradle.
No te: The light will be green if the headset
is in the front charging cradle and red if the
headset is in the back charging cradle.
The TV vo lume do es no t wo rk
independently fro m TV Ears vo lume.
Yo u hear a televisio n statio n when
yo u watch a DVD o r video .
Yo u have a Blu- Ray player.
Yo u have a Digital Co nverter Bo x o r
similar.
Check the Following:
• The audio cord is plugged into an analog (RCA)
audio OUT port on the TV, cable box, or
satellite box.
• The audio cord is NOT plugged into a digital
audio out port.
• The transmitter is plugged into a working
power outlet.
• The audio cord is plugged into the audio port
of the transmitter.
• The audio cord is plugged into the ports on the
TV and transmitter completely.
• The infrared lights of the transmitter are facing
the headset and are illuminated.
• The transmitter is 3-5 feet off the ground.
• Battery may need replacement if older than 12 years, depending on usage. • TV Ears has more
than one model. Be sure that the headset
model matches the transmitter model. For
example, you must use a 2.3 headset with a 2.3
transmitter.
• Cover all large windows.
• Cup your hand over the lights and see if 5
infrared lights are glowing red.
• AC power adapter is completely plugged into
the power outlet and 12V port on back of the
transmitter.
• Remove and replace headset to realign in the
charging cradle.
• Use your fingertips to gently rock the headset
right to left, making sure the headset is sitting
properly in the charging cradle.
• AC power adapter is completely plugged into
the power outlet and 12V port on back of the
transmitter.
• The audio cord is in the fixed audio out port
and television is set on fixed audio television
settings.
See Question 3 of FAQs.
• Turn the cable or satellite box off when you
watch a DVD or video. See Question 4 of FAQs.
Note: This is only if audio cord is plugged into
audio out port of a cable or satellite and DVD or
VCR player.
• Hook your Blu-Ray player up the same way you
would a DVD or VCR.
See Step 1 of Installation Instructions.
• Hook your Digital Converter Box or similar up
the same way you would a cable or satellite
box.
See Step 1 of Installation Instructions.
Specifications
System
Modulation
Carrier frequencies
Range
Audio frequency response
THD
Signal to Noise Ratio
Infrared, Mono
2.3 MHz
600 sq. ft (55 m2)
100-16,000 Hz
< 1%
70 dB
Headset
Max SPL
Power Supply
Operating Time
Weight
Height
120 dB
NiMH (Nickel Metal Hydride) rechargeable
up to 10 hours
1.6 oz (45g)
7.75 in (19.7 cm)
Transmitter
Audio / Microphone connection
Power Supply
Weight
Dimensions (H x W x D)
Mini headphone/RCA cable/ Microphone
DC Power Supply 12v, 200mA
3 oz (85g)
1.4” x 1.12” x 3.4” (3.6cm x 2.8cm x 8.6cm)
Manufacturer Declaration
Limited Warranty – 90-days from date of purchase
For a period of 90-days from the date of purchase, TV Ears warranties this product against defects in material and workmanship. The TV Ears headset,
transmitter, and all parts (excluding the disposable TV Ears Tips) are under warranty and will be replaced or repaired at no charge to the owner. The
proof of purchase (POP) is required at the time of return.
Repairs or alterations performed by non-authorized TV Ears representatives will void the warranty and may damage the equipment.
This warranty is provided at the discretion of TV Ears, Inc. and does not cover cosmetic damage or damage due to acts of nature, accident, misuse,
abuse, negligence, commercial use, or modification of or to any part of the product.
Returns & Repairs
TV Ears provides repair service for the life of the product. A minimal fee may be applied. Proof of purchase is required for claims within the warranty
period.
TV Ears Declaration
All content, marks, and brand logos are property of TV•EARS® Inc. TV•EARS® Inc. reserves the right to change product content and product
specifications without notice.
CE Declaration of Conformity
TV Ears is in compliance with the essential safety requirements and other relevant provisions of Standard IEC 60065:2001 + Ammd 1:2005 / EN
60065:2002 and Directive 2004/108/EC; 2006/95/EC, 89/336/EEC, 92/31/ EC, 93/68/EEC. Before putting the device into operation, please observe
the respective country specific regulations.
Rechargeable Batteries
The supplied rechargeable batteries can be recycled. In order to protect the environment, only dispose of exhausted rechargeable batteries at a
proper recycling facility. Do not dispose of batteries in trash.
WEEE Declaration
TV Ears products are developed and manufactured with high-quality materials and components that can be recycled and/or reused. This symbol
indicates that electrical and electronic equipment must be disposed of separately from normal waste at the end of its operational lifetime. Please
dispose of this product by bringing it to your local collection point or recycling center for such equipment. This will help to protect the
environment.