1
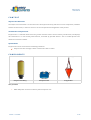
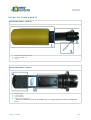
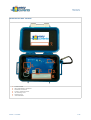
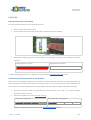
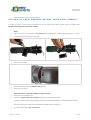
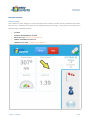
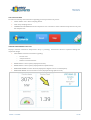
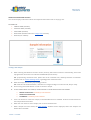
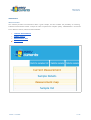
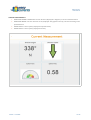
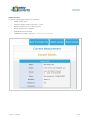
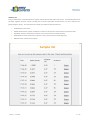
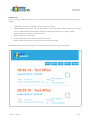
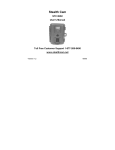
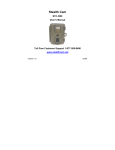
EasyCurrents
User Manual
User Manual
Version 1.0 / BASIC
1 / 28
EasyCurrents
User Manual
INDEX
CONTEXT
Object of this document
Introduction to EasyCurrents
Specifications
COMPONENTS
DETAILED COMPONENTS
EASYCURRENTS BUOY - EXTERIOR
EASYCURRENTS BUOY - INTERIOR
RECEPTION UNIT BOX - EXTERIOR
RECEPTION UNIT BOX - INTERIOR
CHECKS
BUOY BATTERY CHECK - LED CODING
CONNECTING THE RECEPTION UNIT TO THE INTERNET
RECEPTION UNIT POWER SUPPLY INDICATOR
CHARGING THE RECEPTION UNIT
USAGE RECOMMENDATIONS
SETTING UP EASYCURRENTS BEFORE YOUR FIRST SAMPLE
Conventions and default values
QUICK - START GUIDE
ASHORE
IN THE WATER
SOFTWARE
Availability
Sections
MEASURE CURRENTS
About this window
Creating a New Sample
VIEW DETAILS
About this window
CURRENT MEASUREMENT
SAMPLE DETAILS
MEASUREMENT MAP
SAMPLE LIST
VIEW HISTORY
About this window
ACTIONS
SAMPLES LIST
Import Samples
Version 1.0 / BASIC
2 / 28
EasyCurrents
User Manual
Remove Samples
Export Samples
CONFIGURATION
Measurement Options
Identifiers Management
Wifi Settings
Software Update
FAQs
TROUBLESHOOTING
MAINTENANCE RECOMMENDATIONS
SUPPORT
TELL US ABOUT YOUR EASY CURRENTS EXPERIENCE!
Version 1.0 / BASIC
3 / 28
EasyCurrents
User Manual
CONTEXT
Object of this document
The object of this document is to introduce users to EasyCurrents buoy and how to use its components, available
features and functions, in order to ensure a correct and optimised management of the product.
Introduction to EasyCurrents
EasyCurrents is a reduced dimensions buoy, which measures water current intensity and direction, and displays
this information in a user friendly web interface, accessible by portable devices such as mobile phones and
tablets via a wireless network.
Specifications
EasyCurrents can be used under the following conditions:
✓
EasyCurrents wifi coverage is within a maximum radius of 100m.
COMPONENTS
EasyCurrents Buoy
Reception Unit
Drag Anchor
Also provided:
✓
MINI USB power connection cable to power Reception Unit.
Version 1.0 / BASIC
4 / 28
EasyCurrents
User Manual
DETAILED COMPONENTS
EASYCURRENTS BUOY - EXTERIOR
1.
2.
3.
Top yellow styrofoam cover
Bottom leaded nut
Clasp
EASYCURRENTS BUOY - INTERIOR
1.
2.
3.
4.
Battery pack
Power switch
Serial number
Electronic components*
* Electronic components must not be handled with. No support will be provided for manipulated
buoys.
Version 1.0 / BASIC
5 / 28
EasyCurrents
User Manual
5.
Power check button
RECEPTION UNIT BOX - EXTERIOR
1.
2.
Lock fasteners
Clasp
Version 1.0 / BASIC
6 / 28
EasyCurrents
User Manual
RECEPTION UNIT BOX - INTERIOR
1.
2.
3.
4.
5.
6.
7.
Power switch
Mini USB Power connector
Ethernet connector
Power + Ethernet Leds
SD memory card
Battery Pack
Serial Number
Version 1.0 / BASIC
7 / 28
EasyCurrents
User Manual
CHECKS
BUOY BATTERY CHECK - LED CODING
In order to check the battery of your EasyCurrents buoy:
1.
Power ON your EasyCurrents buoy.
2.
Click on the EasyCurrents power check button, located in the top of the buoy.
3.
If RED LED is lighted, batteries are NOT empty. If no LED lights up, batteries are empty and should be
replaced:
Enough batteries (>2 volts)
Empty batteries (<2Volts)
Troubles checking the power of your EasyCurrents buoy? Visit our TROUBLESHOOTING section.
CONNECTING THE RECEPTION UNIT TO THE INTERNET
When ashore, and wanting to update your EasyCurrents software (internet connection is strictly required) and/or
view the samples which have been carried out during the day, you can connect your EasyCurrents Reception Unit
to the Internet, which will enable Internet via your EasyCurrents wifi network. Please follow the below steps:
1.
Connect an ethernet cable (not provided) from the reception unit to the to an internet network
connection station or router.
2.
Check out the LEDS colour code (view LED location):
Connected to the Internet
Power
NOT Connected to the Internet
Power
Troubles connecting to the Internet? Visit our TROUBLESHOOTING section.
Version 1.0 / BASIC
8 / 28
EasyCurrents
User Manual
RECEPTION UNIT POWER SUPPLY INDICATOR
In order to verify that the reception unit is powered ON, please ensure that the RED POWER LED is LIGHTED.
(Power LED is most interior light to the left; view LED location).
Enough batteries
Empty batteries
RED LIGHT
NO LIGHT OR TILTING LIGHT
Power
Power
CHARGING THE RECEPTION UNIT
✓
Use the provided mini-usb cable in order to charge the reception unit to the power supply.
✓
Connect the the mini USB side of the cable to the reception unit’s mini USB connector.
✓
Connect the USB side of the cable to any USB powered device.
✓
DO NOT charge for more than 6 hours.
Troubles charging your EasyCurrents Reception Unit? Visit our TROUBLESHOOTING section.
USAGE RECOMMENDATIONS
Please follow the below recommendations for an optimal usage of your EasyCurrents buoy and components:
✓
Before starting to use your EasyCurrents product, read the full EasyCurrents manual +
FAQs section carefully and refer to your EasyCurrents support team in case you have any
doubt regarding how to use EasyCurrents. Misuse will not be covered by EasyCurrents’
Warranty.
✓
Do not hold or open/close your EasyCurrents buoy by the yellow styrofoam cover, always hold it by the
grey hardware bottom.
✓
Always ensure your EasyCurrents buoy is closed tightly before introducing it into the water.
✓
Always ensure you perfectly close your EasyCurrents Reception Unit while carrying out samples.
✓
For optimal measurement values, always ensure your EasyCurrents Buoy + Reception Unit’s batteries are
fully charged.
✓
Always ensure you are not next to a building or a high wall when taking an EasyCurrents sample, it may
affect the time it takes the GPS to obtain a 1st position.
✓
When carrying out a sample, it is recommended to keep a visual contact with your EasyCurrents buoy.
✓
For an optimal battery usage, ensure you power OFF your EasyCurrents Buoy and Reception Unit after
every daily use.
✓
For security reasons, and to prevent other EasyCurrents buoy’s interferences, change WIFI name and
password before first use. Please beware sharing EasyCurrents passwords, as it may cause a network
Version 1.0 / BASIC
9 / 28
EasyCurrents
User Manual
overload and/or confusion with samples.
SETTING UP EASYCURRENTS BEFORE YOUR FIRST SAMPLE
In order to ensure a correct initial configuration of your EasyCurrents buoy, please follow the below steps
BEFORE CARRYING OUT YOUR FIRST SAMPLE:
BUOY
1.
Open the buoy, and introduce 2 AA batteries (provided when purchasing EasyCurrents). A small
screwdriver may be needed for this task.
2.
Power ON your buoy.
3.
Check the power using the POWER CHECK button.
4.
Power OFF your buoy.
RECEPTION UNIT + PORTABLE MOBILE / TABLET DEVICE
1.
Power ON your reception unit.
2.
Connect to EasyCurrents WIFI network using your smartphone or tablet.
Once the reception unit has been powered ON, the wifi network may take from 15 to 60 seconds to show up.
This time may vary according to the smartphone or tablet which is being used.
3.
In your browser, GOTO URL 192.168.42.1
Version 1.0 / BASIC
10 / 28
EasyCurrents
User Manual
4.
GOTO menu option SYSTEM CONFIGURATION.
5.
Within the MEASURE SCREEN OPTIONS, revise the following settings are according to your needs:
6.
✓
CURRENT SPEED UNITS.
✓
CURRENT ARROW DIRECTION (To / from).
✓
WIND ARROW DIRECTION (To / from). - Available for PRO VERSION.
✓
WAVES ARROW DIRECTION (To / from). - Available for PRO VERSION.
Within the MANAGE IDENTIFIERS toggle, please give your EasyCurrents buoy an ALIAS NAME (write on
the text field, and click on the UPDATE BUTTON to save).
7.
Change your WIFI NETWORK name and password (Do not forget to save your settings!).
✓
DEFAULT WIFI NAME: easycurrents_BuoyAlias.
✓
DEFAULT WIFI PASSWORD: easycurrents.
TIP: At this point, in order to be able to make effective your new wifi settings, you will need to POWER
OFF and POWER ON your reception unit and reconnect to your new wifi network, with the new
name and password.
YOUR EASYCURRENTS EQUIPMENT IS NOW READY TO PROVIDE YOUR FIRST SAMPLES!
Conventions and default values
✓
1 SAMPLE = N Measurements.
✓
TIME = UTC.
✓
CURRENT SPEED UNITS: m/s.
✓
CURRENT DIRECTION: Current from.
✓
DEFAULT WIFI NAME: easycurrents_BuoyAlias.
✓
DEFAULT WIFI PASSWORD: easycurrents.
Version 1.0 / BASIC
11 / 28
EasyCurrents
User Manual
QUICK - START GUIDE
ASHORE
1.
Ensure your EasyCurrents Buoy has enough batteries to carry out your samples (replace batteries if needed).
2.
Ensure your EasyCurrents Reception unit has been fully charged for an optimal performance.
IN THE WATER
1.
Stop your boat.
2.
Power ON your Reception Unit.
3.
Open and power ON EasyCurrents buoy.
Close your EasyCurrents buoy.
TIP / During the open/close procedures, make sure you do not grab the buoy from the yellow styrofoam over.
Please hold the grey hardware to ensure a safe adjustment.
4.
Connect Drag Anchor.
5.
Connect to EasyCurrents WIFI network using your smartphone or tablet.
6.
In your browser, GOTO URL 192.168.42.1
7.
GOTO menu option MEASURE CURRENTS.
8.
Wait for first GPS position.
TIP / To know when first GPS position has been transmitted, check that the time displayed in EasyCurrents
matches the current time (please note EasyCurrents provides UTC times). This process may take from 10’’
to 60’’, according to GPS coverage or buoy battery levels.
9.
Place EasyCurrents into the water.
TIP / Place the buoy before the drag anchor.
10. Wait until the drag anchor is completely sunk, and buoy is separated from boat, motor or
any external interference.
11. Start measuring, enjoy EasyCurrents!
TIP / For an optimal maintenance and performance, when finished with EasyCurrents measurements for
the day, please ensure you power OFF the buoy, and rinse with non-salted water.
Version 1.0 / BASIC
12 / 28
EasyCurrents
User Manual
SOFTWARE
Availability
Your EasyCurrents software is available via your web browser, through your EasyCurrents wifi network at the
following URL:
192.168.42.1 (Check out the EasyCurrents Quick-Start-Guide for further instructions and
recommendations). You will be able to access your EasyCurrents website via a PC, tablet or any mobile device
with a wifi connection module.
Sections
EasyCurrents Website main menu consists of the following options; each of them will be further detailed in this
user Guide:
✓
MEASURE CURRENTS
In order to create new EasyCurrent samples.
✓
VIEW HISTORY
In order to view your past EasyCurrent samples.
✓
SYSTEM CONFIGURATION
Configuration parameters..
✓
ABOUT EASYCURRENTS
✓
HELP
Learn more about EasyCurrents project.
Help with EasyCurrents.
TIP! Clicking on the top bar at any of the windows and sections always returns the user to the index menu page.
Version 1.0 / BASIC
13 / 28
EasyCurrents
User Manual
MEASURE CURRENTS
About this window
This window has been designed to create new EasyCurrents samples, and will provide connection information
with the buoy. Real-time information will be displayed during each sample. This window is structured into 5
different sections, below presented:
✓
TOP BAR
✓
CURRENT MEASUREMENT SECTION
✓
METEO SECTION - Available for PRO VERSION.
✓
SAMPLE INFORMATION SECTION
✓
COMMENTS SECTION - Available for PRO VERSION.
Version 1.0 / BASIC
14 / 28
EasyCurrents
User Manual
TOP FUNCTION BAR
Provides functionality and information regarding your EasyCurrents buoy status:
✓
START / RESET: Start / Reset sampling button.
✓
STOP: Stop sampling button.
✓
CONNECTION INFORMATION ICON: Represents the connection status between EasyCurrents buoy and
the reception unit.
CURRENT MEASUREMENT SECTION
Displays real-time information EasyCurrents buoy is providing. Structured in boxes to optimise viewing and
responsive design:
✓
STATUS BOX: Provides information regarding:
○
Current time.
○
Sample duration.
○
Number of measurements.
✓
SPEED KNOTS: Current speed, (displayed in Knots).
✓
SPEED KNOTS: Current speed, (displayed with a Speedometer).
✓
DIRECTION DEGREE: Current direction (displayed in degrees and as a cardinal point).
✓
DIRECTION ARROW: Current direction arrow (displayed with graphical arrow).
Version 1.0 / BASIC
15 / 28
EasyCurrents
User Manual
SAMPLE INFORMATION SECTION
This section displays information about the sample and the author who is carrying it out.
INFORMATION:
✓
SAMPLE NAME (editable)
✓
AUTHOR E-MAIL (editable)
✓
USER NAME (editable)
✓
BUOY ALIAS (editable within the configuration window)
✓
BUOY ID (not editable)
Creating a New Sample
1.
When entering the Measure Currents section, the buoy will initiate connection automatically; ensure the
top-right hand connection icon indicates CONNECTED (Green Arrow).
TIP: If experiencing connection issues, please click on the connection icon, and buoy will start re-connection
protocol. Visit our Trouble Shooting section, regarding further connection issues.
2.
WAIT until EasyCurrents buoy is providing positions.
TIP: Check the Last measurement box; when time is running according to current UTC time, buoy is ready.
3.
Click on the green START button in order to initiate a sample.
4.
AT ANY TIME DURING THE SAMPLE, SAMPLE DETAILS CAN BE INTRODUCED AND VIEWED:
5.
✓
METEO CONDITIONS - Available for PRO VERSION.
✓
SAMPLE INFORMATION
✓
COMMENTS - Available for PRO VERSION.
If the user wishes to restart the sample, a blue RESTART button is available. Previous measurements for
that sample will be discarded..
6.
When the user wants to end a sample, click on the red STOP button.
7.
When sample has been ended, the VIEW DETAILS window will be displayed, where the sample’s full
details will be available.
Version 1.0 / BASIC
16 / 28
EasyCurrents
User Manual
VIEW DETAILS
About this window
This window provides full information about a given sample, and also enables the possibility of removing
individual measurements within a sample in order to optimise the sample’s quality. VIEW DETAILS is structured
into 5 different sections, which are below detailed:
✓
CURRENT MEASUREMENT
✓
SAMPLE DETAILS
✓
MEASUREMENT MAP
✓
SAMPLE LIST
Version 1.0 / BASIC
17 / 28
EasyCurrents
User Manual
CURRENT MEASUREMENT
✓
DIRECTION DEGREE / DIRECTION: Current direction (displayed in degrees) / Current cardinal direction.
✓
DIRECTION ARROW: Current direction arrow (displayed with graphical arrow), coloured according to the
speed direction.
✓
SPEED KNOTS: Current speed, (displayed in Speedometer).
✓
SPEED KNOTS: Current speed, (displayed in Knots).
Version 1.0 / BASIC
18 / 28
EasyCurrents
User Manual
SAMPLE DETAILS
Full details regarding the samples are presented:
✓
NAME: Sample name
✓
AUTHOR: Sample’s author username + e-mail.
✓
PERIOD: Sample’s From / To date and time.
✓
BUOY: Sample’s Alias / ID White.
✓
DURATION: Sample duration.
✓
COMMENTS: Sample’s comments. - Available for PRO VERSION.
Version 1.0 / BASIC
19 / 28
EasyCurrents
User Manual
MEASUREMENT MAP
The full sample is presented in the map, printing the position of each measurement which has been carried out
during the given sample.
The initial point is accordingly tagged green, and the end point is tagged with
EasyCurrents’ icon.
Version 1.0 / BASIC
20 / 28
EasyCurrents
User Manual
SAMPLE LIST
Every measurement comprehended in the given sample will be listed within this section. The following details are
provided, together with the feature of being able to remove individual measurements in order to improve the
global sample’s quality. The measurement’s details provided are below presented:
✓
TIME: Measurement time.
✓
SPEED: Measurement speed, calculated in relation to the previous measurement (metres/second).
✓
DISTANCE: Distance calculated in relation to the previous measurement (metres).
✓
DIRECTION: Direction calculated in relation to the previous measurement (degrees).
✓
DELETE: Delete measurement option.
Version 1.0 / BASIC
21 / 28
EasyCurrents
User Manual
VIEW HISTORY
About this window
This window displays the list of samples which have been carried out with EasyCurrents. Filtering options are
available. Samples details will be displayed when clicking on a given sample. This window is structured into 2
different sections, below presented:
✓
ACTIONS
✓
SAMPLE LIST
ACTIONS
Several actions are available within EasyCurrents historic sample list; they are below presented:
✓
FILTERS: Filtering options are available, in order to search for different samples according to the
following criteria:
○
INIT DATE / END DATE: Search for samples carried out between the given INIT and END dates.
○
TEXT: Free text can be introduced in order to search and filter sample names and observations
fields.
○
USER: Samples can be filtered per user.
○
BUOY ID: In case of having several buoys, samples can be filtered per buoy.
○
CLEAR BUTTON: Clears previously used filters.
○
FILTER BUTTON: Applies selected filters.
✓
IMPORT: Provides the feature of importing samples from other buoys (only EasyCurrents format .ec).
✓
REMOVE: Provides the feature of deleting unwanted samples (deletes the user checked samples in the
list).
✓
EXPORT: Provides the feature of exporting samples (exports the user checked samples in the list). Can
be exported in different formats).
✓
COMPARE SAMPLES: When checking 2 or more samples and clicking on the COMPARE SAMPLES button,
they will be displayed within a single map, providing comparison references between them. - Available
for PRO VERSION.
Version 1.0 / BASIC
22 / 28
EasyCurrents
User Manual
SAMPLES LIST
The list of stored samples will be presented as a table, where the following information will be displayed for each
sample:
✓
CHECKBOX: A checkbox is available in order to select the samples.
✓
SAMPLE NAME: Sample name the user chose when creating the sample. When clicking on the sample
name, the VIEW DETAILS window will be displayed, providing full information on a given sample.
✓
PERIOD: Displays the sample’s init and end times.
✓
DATE: Displays the sample’s date.
✓
AUTHOR: Displays the user who has created each sample.
✓
BUOY: Displays the buoy alias + ID which has carried out each sample.
VIEW DETAILS: When clicked upon the title link, full details regarding a given sample are provided.
Version 1.0 / BASIC
23 / 28
EasyCurrents
User Manual
Import Samples
Samples which have been carried out with other buoys or within past sessions (previously exported) can be
imported into different databases in .ec format. In order to import new samples:
1.
Click on the IMPORT SAMPLE button.
2.
Choose the .ec file from your local device, by using the browsing window.
3.
Click on the UPLOAD button.
4.
Your samples will be available within your VIEW HISTORY list.
Remove Samples
Sample’s can be completely removed by checking on the sample’s checkbox, and then clicking on REMOVE
SAMPLE. A confirmation message will be displayed before permanently removing a sample.
Export Samples
One or more samples can be externally exported in the following available formats:
✓
EASYCURRENTS: .ec/ Own EasyCurrents format.
✓
CSV: .csv/ CSV summary + CSV sample list. - Available for PRO VERSION.
✓
KML: .kml/ KML. - Available for PRO VERSION.
✓
NETCDF: .nc/ Netcdf standard formats. - Available for PRO VERSION.
✓
JSON: .json/ Json. - Available for PRO VERSION.
Version 1.0 / BASIC
24 / 28
EasyCurrents
User Manual
CONFIGURATION
Measurement Options
This section provides the possibility of modifying the units in which currents are provided. Furthermore, users
can modify the values in which the graphical arrows are presented, according to the conventions, TO and FROM
direction (Available for PRO VERSION).
Identifiers Management
In this section, you can provide an alias for your EasyCurrents buoy. Furthermore, in case of importing samples
from other EasyCurrents buoys, alias can be given to them too, in order to be able to difference samples from
different buoys. Unique identifiers are provided for each EasyCurrents buoy, which cannot be modified in any
way.
Wifi Settings
This section provides the possibility of changing the name and password of the wifi network created by
EasyCurrents. It is mandatory in the case other EasyCurrents buoys are being used within the same area.
Software Update
EasyCurrents team will regularly update the software in order to enhance its performance, solve any minor bugs
and to add extended functionalities. In order to update your EasyCurrents software:
1.
Make sure your base station is connected to the power.
2.
Connect your base station to the network using an ethernet cable.
3.
Power ON your reception unit.
4.
Connect to EasyCurrents WIFI Network.
5.
Access EasyCurrents Software via your browser: 192.168.42.1.
6.
Backup your Samples using the EXPORT SAMPLES features.
7.
Access the CONFIGURATION MENU, and Open the UPDATE SOFTWARE TAB.
8.
Click on the UPDATE BUTTON, and wait until you get a successful update message.
9.
Enjoy your new EasyCurrents software version!
FAQs
✓
What is the optimal sampling time to obtain reliable results?
We recommend an sampling time from 2 - 4 minutes.
✓
What happens if the buoy drifts beyond the 100m wifi radius while sampling?
The sample timing will continue, but only measurements within the radius will be taken into account when
sample is stopped.
Version 1.0 / BASIC
25 / 28
EasyCurrents
User Manual
TROUBLESHOOTING
My buoy does not connect
Ensure to be within the scope radius of the buoy.
Try clicking on the top right-hand side connection icon to re-start
the connection protocol.
Carry out a buoy battery check.
Ensure your Reception Unit is fully charged.
First GPS position takes too long
Ensure to be within an open air location, away from buildings or
high walls.
Try clicking on the top right-hand side connection icon to re-start
the connection protocol.
I get a NOT FOUND page in my
browser
Ensure to be connected to EasyCurrents wifi network.
I forgot my WIFI network password
Connect your reception unit to the internet via an ETHERNET
CONNECTION,
and
reset
your
settings
via
the
Configuration/WIFI-Settings Menu.
I cannot check my buoy’s battery
status
Ensure to have EasyCurrents buoy’s switch powered to ON.
I cannot charge my Reception Unit
Ensure your USB cable is connected to a power supply (NOT PC).
External USB-Power connectors may be necessary (as those used
for universal mobile phones for example).
I cannot connect my Reception Unit
to the Internet
Ensure your ethernet cable is correctly connected to your
Reception Unit (you will hear a click sound when so).
Make sure your ethernet cable is correctly connected to a
working internet connection.
Make sure your Reception Unit has enough battery charge.
MAINTENANCE RECOMMENDATIONS
Please follow the below recommendations for an optimal maintenance of your EasyCurrents buoy and
components:
✓
Rinse your EasyCurrents buoy with fresh non-salted water after every use.
✓
Do not charge your EasyCurrents Reception Unit for more than 6 hours.
✓
Be careful when connecting or disconnecting any components within the Reception Unit.
✓
Do not hit your EasyCurrents buoy against any hard surface.
✓
Do not squash your EasyCurrents buoy below any heavy hardware.
✓
Do not expose your EasyCurrents components to direct sunlight or heat supplies.
✓
Do not remove extractable components, such as SD card or USB nano wifi, unless strictly necessary or
specified so by EasyCurrents support team.
✓
Remove the batteries from your EasyCurrents buoy if buoy is not going to be used for more than 10
days.
Version 1.0 / BASIC
26 / 28
EasyCurrents
User Manual
✓
Check for any visible scratch on the buoy o-ring before closing or any other damage that could affect
buoy watertightness. If o-ring is damaged, change for a new one.
✓
Version 1.0 / BASIC
27 / 28
EasyCurrents
User Manual
SUPPORT
Contact our EasyCurrents Support Team at:
✓
[email protected]
✓
Customer Support Contact Form at EasyCurrents’ Website:
(http://www.easycurrents.com/customer-support/).
TELL US ABOUT YOUR EASY CURRENTS EXPERIENCE!
FACEBOOK / TWITTER / YOUTUBE
Version 1.0 / BASIC
28 / 28