1
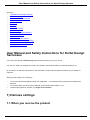
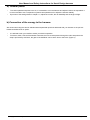
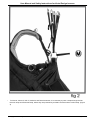
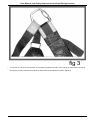
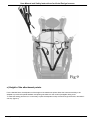
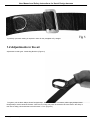
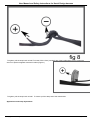
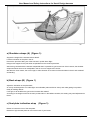
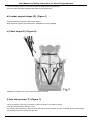
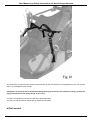
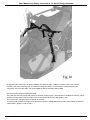
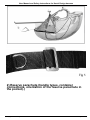
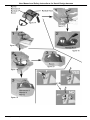
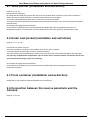
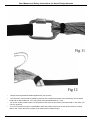
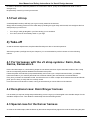
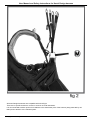
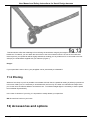
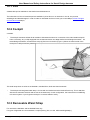
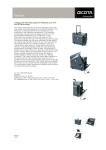
User Manual and Safety Instructions for Kortel Design harness
Extrait du Kortel Design
http://www.korteldesign.com
User Manual and Safety
Instructions for Kortel Design
harness
- Technical Support -
Date de mise en ligne : Wednesday 15 July 2009
Kortel Design
Copyright © Kortel Design
Page 1/30
User Manual and Safety Instructions for Kortel Design harness
Summary
• User Manual and Safety (…)
• 1) Harness settings
• 2) Reserve parachute (handle
• 3) Pre-flight Check
• 4) Take-off
• 5) In flight
• 6) Landing
• 7) Use with a winch
• 8) Tandem flight
• 9) Flight in a controlled (…)
• 10) Lateral protection
• 11) Accelerator
• 12) Accessories and options
• 13) Wood and carbon seat (…)
• 14) Maintenance, repair, (…)
• 15) Manufacturing defects
User Manual and Safety Instructions for Kortel Design
harnesses
You have just acquired a Kortel Design harness and we thank you for your choice.
For your own safety we strongly recommend you read this manual and follow the instructions before use.
By no means, can either this document or the information on this web site replace the advice of your retailer or
instructor.
Warning; before flying it is compulsory:
•
•
•
To sit in the harness and adjust it whilst it is suspended. - To install the reserve parachute as explained in
chapter 2.
To correctly attach the risers of the paraglider to the harness (see chapter 1.1 b).
To adjust the speed bar (chapter 11); Danger if too short!!!!!
1) Harness settings
1.1 When you receive the product
Copyright © Kortel Design
Page 2/30
User Manual and Safety Instructions for Kortel Design harness
a)- General points
•
•
To avoid unpleasant surprises in the air, it is essential to sit in the harness and adjust it whilst it is suspended. It
is recommended to use a suspension system that emphasizes roll to adjust the harness stability.
By means of the settings listed in chapter 1.2, adjust the comfort, the roll instability and the angle of flight.
b)-Connection of the canopy to the harness.
We recommend using the steel or stainless steel trapezoidal quick-links delivered with your harness or the pin-lock
karabiners delivered as an option.
•
•
It is advised to ask your retailer to assist you with this operation.
For Karma, Kairn, Kuik and Kamasutra harnesses, the link must be passed through the main strap where the
strap is protected by red fabric; the gate of the karabiner can be at the front or the back. (Figure 2)
Copyright © Kortel Design
Page 3/30
User Manual and Safety Instructions for Kortel Design harness
•
For Karver, Karma II, Kuik II, Kanibal 2 and Race harnesses, it is necessary to pass 3 straps through the link:
the main strap and the dorsal strap, where they are protected by red fabric and the lumbar comfort strap. (Figure
3)
Copyright © Kortel Design
Page 4/30
User Manual and Safety Instructions for Kortel Design harness
•
For the link to stay in the correct axis, it is necessary to attach the risers of the canopy in order that the A riser of
the canopy is on the outside; which allows a direct route for the speed bar system. (figure 9)
Copyright © Kortel Design
Page 5/30
User Manual and Safety Instructions for Kortel Design harness
c) Height of the attachment points.
For the Kanibal Race, the adjustment of the height of the attachment points allows the harness sensitivity to be
adapted to provide the optimal feedback and piloting sensations for the model of paraglider being used.
To make the setting permanent, it is necessary to pass the adjustment strap 3 times through the buckle; otherwise it
can slip. (figure 5)
Copyright © Kortel Design
Page 6/30
User Manual and Safety Instructions for Kortel Design harness
A perfectly symmetric setting is required in order for the paraglider to fly straight.
1.2 Adjustments in the air
Adjustment buckle types: Interlocking Buckles: (Figure 6)
To tighten: pull the black “Kortel Design” buckle downwards. To loosen: pull the grey “Kortel
Design” buckle towards the back. With time, this strap may stick as the buckle anchors itself in the strap. In
this case a sharp pull towards the back will loosen it. Trim: (Figure 4)
Copyright © Kortel Design
Page 7/30
User Manual and Safety Instructions for Kortel Design harness
To tighten: pull the strap back on itself. To loosen: press the metal lever protruding from the buckle taking care to
control the amount of pressure applied. Plastic buckle (Figure 8)
Copyright © Kortel Design
Page 8/30
User Manual and Safety Instructions for Kortel Design harness
To tighten: pull the strap back on itself To loosen: lift the front (rounded) part of the buckle taking care to control the
amount of pressure applied Automatic buckles (Figure 7)
To tighten: pull the strap back on itself To loosen: pull the strap end of the male buckle.
Applications and strap adjustments.
Copyright © Kortel Design
Page 9/30
User Manual and Safety Instructions for Kortel Design harness
a) Shoulders straps (A) (Figure 1):
Support the weight of the harness before takeoff.
Limit the inclination of the pilot in the air.
Prevent the pilot from falling out of the harness in upside down flight.
Help provide support for the pilot when suspended from the reserve parachute.
After having checked with the harness suspended that it is possible to get into and out of the harness, the shoulder
straps sometimes have to be re-adjusted in the air for more support and comfort.
We advise a close contact, but not too tight, to allow freedom of movement of the shoulders in the air and at takeoff
and landing.
b) Back straps (B) (Figure 1)
Adjust the inclination of the pilots back.
An overly reclined position can make flight uncomfortable (reduced field of vision) and make getting into position
ready for landing difficult.
If too tight, it will be difficult to get into the harness after takeoff.
According to the weight carried in the main pocket and/or in the ballast container, this setting may need adjustment in
the air.
c) Seat plate inclination strap
(Figure 1):
Raises or lowers the front of the seat plate.
Raised too high the seat plate can cut into the back of your knees.
Copyright © Kortel Design
Page 10/30
User Manual and Safety Instructions for Kortel Design harness
If too low, piloting precision is lost and the pilot can slide forward in the harness.
The front of the seat plate should be raised less for flying with a pod.
d) Lumbar support straps (D) (Figure 1)
:
Increase comfort by supporting the lumbar regions.
When tightened, improve the transmission of feedback from the paraglider.
e) Chest straps (E) (Figure 9):
Maintains shoulders in the correct axis and improves comfort.
f) Foot-stirrup strap (F) (Figure 1):
It is not necessary to put a lot of pressure on the foot-stirrup; it is a waste of energy.
If too tight, effectiveness in the turn is lost.
Tip: pushing asymmetrically on the foot stirrup will help improve the quality of a turn. Example: pushing with the right
foot will help improve the quality of a right turn.
Copyright © Kortel Design
Page 11/30
User Manual and Safety Instructions for Kortel Design harness
Permanent light pressure generates a beneficial tonic effect in the muscles of your lower back, knees, and ankles.
g) Waist strap: (G)
(Figures 9 and 10)
Copyright © Kortel Design
Page 12/30
User Manual and Safety Instructions for Kortel Design harness
The waist strap must be set to the distance recommended by the manufacturer of the paraglider that you use. Please
refer to your paragliders user manual.
Paragliders are tested at the recommended settings and flying a harness with a different setting can alter the
flying characteristics and safety ratings of your wing.
Too wide: roll sensitivity increases and the risk of twists decreases.
Too tight, the risk of twists increases and roll sensitivity decreases.
h) Roll control
Copyright © Kortel Design
Page 13/30
User Manual and Safety Instructions for Kortel Design harness
We use 1 of 2 systems according to the model of harness: V straps or classic ABS.
V Straps (H): the leg straps start from the centre of the seat plate, pass between the legs and are fixed near the
attachment points. They are adjustable in length. The more they are tightened, the more the harness is stable; the
less they are tightened the more the harness is unstable.
The stability of the harness is independent of the distance between the risers. (Figure 9)
ABS (L): The leg straps start outside of the thighs and are attached to the waist strap approximately 10 cms from the
main strap. (Figure 10).
Copyright © Kortel Design
Page 14/30
User Manual and Safety Instructions for Kortel Design harness
By tightening the waist strap, the angles between the straps change, stability increases, but the risk of twists
increases. We recommend the use of V straps from beginner level to confirmed pilot. Confirmed pilots and
competitors may have the skill to use normal ABS as well as harnesses without ABS.
Attachment point height and seat plate width
The lower the centre of gravity with respect to the back straps (Figure 1 Strap B) the more stable the harness will be.
(Please note the reference is the height of the back strap B and NOT the attachment point).
The narrower the seat plate the more stable the harness.
The Kanibal Race allows the height of the attachment points to be adjusted with precision thus making the harness
customisable. (Figures 1 and 5) strap I
Copyright © Kortel Design
Page 15/30
User Manual and Safety Instructions for Kortel Design harness
2) Reserve parachute (handle types, container
connections, orientation of the reserve parachute in
the pocket).)
Copyright © Kortel Design
Page 16/30
User Manual and Safety Instructions for Kortel Design harness
Copyright © Kortel Design
Page 17/30
User Manual and Safety Instructions for Kortel Design harness
2.1. Back pocket (installation and extraction)
(Figures 14, 15, 16)
Handle with two metal pins.
Be careful that the bridle that connects the reserve to the container does not prevent proper reserve extraction
Ideally, the reserve handle should be connected to the extremity of the container.
The bridle is placed against the pilots back in order not to hinder the extraction.
The lines of the reserve parachute are placed between the parachute and the outer side of the pocket (not against
the pilots back).
Do not forget to engage the two small flaps.
The parachute is extracted by a movement towards the outside right made by straightening the arm to a
perpendicular position. The parachute must be extracted in the axis of the opening of the parachute pocket.
2.2 Under seat pocket (installation and extraction)
(Figures 14, 17, 18, 19)
Handle with two plastic wire pins.
The reserve handle is connected to the container in the centre of the container.
It is placed against the pilots back in order to facilitate extraction.
The reserve lines are placed between the parachute and the outer side of the pocket (not against the pilots back).
The specially shaped handle compensates, up to a certain point, reserve/container connections that are too
short, without preventing the pins from releasing.
Do not forget to engage the two small flaps.
The parachute is extracted by a movement towards the outside right made by straightening the arm to a
perpendicular position.
2.3 Front container (installation and extraction)
Please refer to the containers manual supplied by the manufacturer.
2.4 Connection between the reserve parachute and the
harness:
(Figures 11 and 12)
Copyright © Kortel Design
Page 18/30
User Manual and Safety Instructions for Kortel Design harness
•
•
•
•
Use the reserve parachute bridles supplied with your harness.
The connection can be made by attaching the lines of the reserve parachute to the central loop of the reserve
bridle with a Lark's head knot, or by using a quick link (thread diameter 0.7 cms).
Do not use a Lark's head if there is no loop sewn in the centre of the reserve parachute bridle. In this case, use
a 0.7cm quick link.
If a 0.7cm quick link is used, it is preferable to block the position of the lines on the quick link and to channel
them in the correct direction by means of an elastic band or adhesive tape.
Copyright © Kortel Design
Page 19/30
User Manual and Safety Instructions for Kortel Design harness
3) Pre-flight Check
3.1 Reserve parachute
Before each take off:
•
•
Check that the flaps and needles are correctly in place.
Check that the handle is correctly fixed in its slot, or correctly attached to its Velcro.
3.2 Settings
In theory, your harness is correctly adjusted, but & maybe you let a friend try it??!!
If so check that the settings have been correctly readjusted.
Particularly the back position.
3.3 Back protection
The Kuik comes with a small removable 12cm protector that is fitted in a compartment under the seat via the rear
pocket.
The Kamasutra II, Kanibal II and Kanibal Kanibal Race are now equipped as standard with the combo 10+7 are LTF
certified with it.
•
The Karma II is equipped with the Krashbox system consisting of a permanent airbag under the seat and an
inflatable dorsal section. The foam structure of the crash box fits in the back pocket in the compartment under
the seat and is attached by 5 Velcro straps. Remember to close the zip of the back compartment for optimum
efficiency of the system. In order to ensure that the dorsal protection functions correctly the back pocket zip can
be locked by a Velcro strap. The air-intake scoop that inflates the dorsal section can be folded away. Remember
to lay it flat when folding the harness and to put it back in place before each take off!
Three sorts of foam bag plus one specific to the Kuik are available. See the summary table on the detachable page.
Do not use back protection which is not supplied with the harness.
The back protection must be correctly installed and secured in the harness in order to function optimally in the case
of lateral shocks. This is even more the case for pod harnesses.
Make sure that the internal Velcro is fitted properly and does not rub against the back protection as this can cause
damage to the outer bag reducing the protection.
3.4 Accelerator
If the speed bar line is too short there is a risk that the paraglider be permanently accelerated making it very difficult
and dangerous to pilot.
Copyright © Kortel Design
Page 20/30
User Manual and Safety Instructions for Kortel Design harness
It's better to land and to solve the problem or to cut the line in the air (Carry an accessible hook knife in case of
emergencies).
Be particularly careful if you lend your harness.
3.5 Foot stirrup
A well-adjusted foot stirrup will help you to get correctly seated in the harness.
Simply take off exerting pressure on the waist strap by bending the upper body well forward, look straight at the foot
stirrup and put your feet on it!
•
•
If too long it could get tangled in your feet causing you to stumble&
If too short ,there is unnecessary strain on your legs.
4) Take-off
As well as harness adjustments, the pilots takeoff technique is also of utmost importance.
After having made a pre-flight check (see chapter 3), it is recommended to put the harness on in the following
manner:
4.1 For harnesses with the «V strap system»: Kairn, Kuik,
Karma, Kamasutra 2.
Put the shoulder straps on, check that leg straps are not twisted, and then clip the automatic buckles of the V strap
into the corresponding buckles situated near the attachment points.
Fasten the plastic chest buckle (incorporated whistle), and connect your cockpit instrument holder, your ballast
instrument holder or your reserve parachute front container following the manufacturers recommendations.
Every time you fasten an automatic buckle, check that there is no sand or object stuck between the male and female
parts; pull on it firmly to verify that it is correctly closed.
From the moment one buckle is closed, one leg is secured and you cannot fall out of the harness.
4.2 Exceptional case: Kairn/Kruyer harness
It is necessary to step into the leg straps whilst taking care to not get your feet tangled in the shoulder straps. Put the
shoulders straps on next. Then fasten the waist strap with the interlocking buckle.
4.3 Special case for the Karver harness
As it has no shoulder straps, take the Karver by the lumbar strap and firmly tighten it around the waist using the pass
Copyright © Kortel Design
Page 21/30
User Manual and Safety Instructions for Kortel Design harness
through buckle with the K logo so as the harness does not slip. Then attach the thigh straps making sure that the
red cleats securely lock the buckles.
4.4 Special case for the Karma II harness:
As standard the Karma II comes equipped with a non-forgettable security strap linking the anchor point to the right
quick link. This configuration requires the right leg to be passed through the strap in order to be able to put the
harness on. It guarantees that the pilot cannot fall out of the harness even if none of the buckles are fastened. If the
system is judged to be too constrictive it can be removed at the pilots own risk.
4.5 For harnesses with classic strap attachment system,
with or without ABS:
Put the shoulder straps on, check that the leg straps are not twisted then fasten the automatic buckles of the leg
straps one after the other; fasten the automatic buckles of the cockpit with integrated waist strap or the detachable
waist strap with ABS.
Fasten the chest buckle.
Every time you fasten an automatic buckle, check that there is no sand or object stuck between the male and female
parts; pull on it firmly to verify that it is correctly closed.
Tip: leaning the upper body forward and applying pressure to the waist strap with the torso during take off prevents
the harness from riding up your back. After takeoff simply lean back in order to sit back in the harness.
It is sometimes necessary to wiggle your bum in order to get seated right back in the harness.
4.6 Pod
Getting into the pod is easier when either all the flaps are open or only one of them is closed during takeoff.
It is easy to close the pod later, during the first calm transition for instance.
5) In flight
Every phase of flight has its preferred harness position:
In thermals and during transitions close to the terrain, use a more upright position in order to see obstacles more
clearly and observe information coming from below.
In thermals and transitions near cloudbase, live with the air, forget the ground and observe the clouds. Fly in a supine
position!
In strong turbulence, sit upright, and pull your legs in towards you. Use the abdominal and lumbar muscles whilst
applying pressure against the main straps with the outside of the thighs in such a manner as to anticipate and control
roll movements.
To improve piloting efficiency try to find different ways of using your harness which can have an influence on the
quality of the turn: turning your shoulders, pressing down briefly on the front edge of the seat plate, swinging your
hips, crossing your legs whilst applying pressure to the foot stirrup on the inside of the turn, using inverse roll to make
Copyright © Kortel Design
Page 22/30
User Manual and Safety Instructions for Kortel Design harness
a flatter turn etc.
Each pilot has their own perception and their own techniques to improve piloting efficiency. Be curious, try new
things.
6) Landing
Is the most delicate stage of the flight&
Fatigue, dehydration, a lack of proprioception of the lower limbs, the euphoria of the most beautiful flight of your life,
etc. will inevitably have an effect on your vigilance.
It is time to concentrate again! To analyze your environment and to get your legs down ready to run they are your
landing gear.
If the flight was long and cold, move your ankles and knees to restore the mobility to your legs
Take your feet out of the pod very early, open the left flap for more ease, release your foot stirrup and prepare to land
on your legs and not on the back protection.
7) Use with a winch:
(Figure 2)
Copyright © Kortel Design
Page 23/30
User Manual and Safety Instructions for Kortel Design harness
All Kortel Design harnesses are compatible with winch flight.
There are no specific buckles to connect to a winch on Kortel harnesses.
It is recommended to add a quick link or karabiner to the attachment point of the harness (strap protected by red
fabric) and to attach it to the release system.
Copyright © Kortel Design
Page 24/30
User Manual and Safety Instructions for Kortel Design harness
It is important to use a separate karabiner or quick link for the quick release system, do not use the link / karabiner
that connects the harness to the canopy.
8) Tandem flight
All Kortel Design harnesses can be used in tandem flight for the passenger or pilot.
However, no solo harness can accept the volume of a tandem reserve parachute.
It is thus strongly recommended to use a specific “tandem” model of harness to be able to fly with a
tandem reserve parachute.
It is important to check that the back protection of the harness used for the passenger does not hinder the pilot and to
choose the spreaders accordingly.
Only the Karver can be equipped with an optional tandem parachute container.
9) Flight in a controlled environment (over water)
In order to facilitate the use of the reserve parachute and to soften any violent shock on landing in the water, we
recommend that you keep the foam back protection in the harness. Experience shows that the “turtle
effect” problem in the water is a secondary issue.
10) Lateral protection
Kortel Design harnesses are not designed to be used with lateral protection.
Any adaptation originating from a personal initiative must take into account the routing of the speed bar line, and the
system of sliding straps used to ensure the comfort of the harness.
11) Accelerator
11.1 General point
Only the Kanibal race is delivered with a three step speed bar. The Kanibal race (as well as the Kanibal 2 with the
pod option) is designed to allow the speed bar to retract under the seat plate; thus increasing the range by 10 cms!
Each pilot can adjust the distance between bars to optimize the performance of the paraglider.
It is possible to connect the speed bar with a quick link, split hooks, or with a larks head knot (connection technique
used for kites) (Figure 13).
Copyright © Kortel Design
Page 25/30
User Manual and Safety Instructions for Kortel Design harness
This last solution offers the advantage of not reducing the accelerator range by the length of the hooks or small
karabiners. For takeoff, you can attach the second bar to the Velcro fastener which is in front of the under-seat
reserve pocket; your speed bar will be slightly raised thus avoiding you any hindrance if it is connected to the foot
stirrup by the small elastic supplied with your harness. (Figure 1)
Danger:
If your speed bar is set too short, your paraglider can be permanently accelerated!!!!
11.2 Piloting
Without a foot stirrup or pod it is possible to accelerate with both feet; the speed bar setting is perfectly symmetrical
in this case. With a pod, it is necessary to accelerate with one foot only! The other one maintains the shape of the
pod. In this case, the harness deforms and tends to turn. To maintain straight flight it is necessary to set the speed
bar somewhat asymmetrically.
In the case of closures of your wing, it is imperative to totally release your speed bar.
NB. Be careful of hooks on your boots.
12) Accessories and options
Copyright © Kortel Design
Page 26/30
User Manual and Safety Instructions for Kortel Design harness
12.1 Pod
A detachable pod is available for the Kanibal 2 and Kamasutra 2.
The instructions of how to install the pod are available in photo form on our web site. In the air, the pod has
advantages and disadvantages; in order to make an educated choice we invite you to read “A Few Thoughts
On Pod Harnesses”
12.2 Cockpit
2 models:
•
The Kockpit instrument holder fits all models of harnesses thanks to its connection to the main karabiners/quick
links. Conversely, any cockpit equipped with an identical device can adapt itself to Kortel Design harnesses. On
Kortel Design harnesses, a small 20mm strap (K) fixed next to the link (Figure 1) allows the male buckle of the
Kockpit to be left permanently attached.
This small strap does not exist on the Kanibal 2, Kanibal Race, Kuik and Kairn harnesses.
•
The Kockpit with integrated waist strap is for use with the Kanibal 2 and the Kanibal Race only. This is attached
with the two automatic buckles and serves as the waist strap. In this configuration, the harness has no stabilising
roll control system. If you forget the Kockpit, it is recommended to not fly.
12.3 Removable Waist Strap
For use with the Kanibal 2 and the Kanibal Race only.
For types of flight that do not necessitate a cockpit (soaring, SIV, on skis, whilst travelling…)
Copyright © Kortel Design
Page 27/30
User Manual and Safety Instructions for Kortel Design harness
The cockpit can be replaced by a removable waist strap.
A significant degree of roll dampening can be obtained by connecting the ABS straps to the harness. (Figure 10)
12.4 Ballast
Ballast containers are attached in the same way as cockpits: either directly to the main links used to connect the
harness to the paraglider, or by using the 20mm straps (K) located near the attachment point.
13) Wood and carbon seat plates
_A broken seat plate can be replaced by the pilot.
Copyright © Kortel Design
Page 28/30
User Manual and Safety Instructions for Kortel Design harness
In this respect, each harness is different. Refer to the photos on our web site in the technical support section.
It is very important to put the straps correctly back in place.
Important : the edges of Carbon seat plates must be protected by a thick adhesive tape so as not to alter the
position or cause damage to straps and fabric inside their slot.
This must be regularly checked.
14) Maintenance, repair, washing, checks
14.1 Checks
Even if incidents due to the ageing of harnesses are almost inexistent, it is important to check that the main webbing,
back protection and core stitching of the harness remain in satisfactory condition.
UV, humidity, and abrasion, can alter the properties of the materials used in the construction of the harness.
Although unlikely, premature ageing of parts of the harness due to defective materials is possible.
We recommend that you have your harness visually checked every two years according to its use; particularly in the
event of a landing in trees, rocks, and even in the case of the intervention of rescue services.
Contact your retailer, who will refer you to a competent professional.
14.2 Repair
In the case of rips or tears, damaged sewing or premature wear, contact your retailer who will refer you to a suitable
repair workshop.
14.3 Washing
You can wash your harness with fresh water and mild soap.
Then leave the harness to dry somewhere that is well aired and not humid.
Do not use a dryer, and do not exceed 30°C for the wash.
Do not wash the back protection, or the seat plate!!!
Rinse carefully, dry in an aired and shaded place avoiding overexposure to sunlight.
14.4 Storage
Ideally the harness should be stored at a mild temperature in a dry place away from direct exposure to light.
Avoid compressing the back protection.
Take care to not fold parts of the harness which contain stiffer materials.
Copyright © Kortel Design
Page 29/30
User Manual and Safety Instructions for Kortel Design harness
14.5 In the case of a water landing
In sea water: rinse your harness with the fresh water then dry it. See washing chapter 12.3.
In fresh water: follow the washing procedure chapter 12.3.
14.6 In the case of a heavy landing
Check your reserve parachute is not damaged and verify its extraction.
Check the back protection is in good condition, there are no holes in the cover, and that it has returned to its normal
shape correctly.
Check that the seat plate is not broken.
Check there is no destructive abrasion on any vital part of the harness, including the sewing.
15) Manufacturing defects, wear, serial number
In the back pocket of the harness you will find a sticker listing the main directions for use, on which you will find the
serial number of your harness.
On harnesses without back pockets (mountain harnesses&), the sticker is attached directly to the harness.
In case of problems of wear, rupture of sewing or materials, please indicate the serial number to allow us to check
the others harnesses of the same series.
Beyond the legal period of 1 year, we will only repair free of charge problems which prove to be due to a
manufacturing or design defect.
For any questions or supplementary photos, please consult our web site or contact us at the address below.
Kortel Design
1096, av. André Lasquin
74700 Sallanches
Phone (+33)950107327
Email: [email protected]
Copyright © Kortel Design
Page 30/30