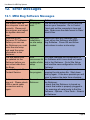
1
Measured by Experience
User Manual for
Soil Moisture Monitoring
with
MEA
Bug
Version 2.4
August 2010
User Manual for MEA Bug Systems
Notices
Copyright
All rights reserved. Under the copyright laws, this manual may not be copied, in
whole or in part without the written consent of Measurement Engineering Australia
Pty. Ltd.
Copyright © Measurement Engineering Australia Pty. Ltd.
Design Changes
Measurement Engineering Australia Pty. Ltd. reserves the right to change the
designs and specifications of its products at any time and without prior notice.
Measurement Engineering Australia Pty. Ltd.
41 Vine Street
MAGILL SA 5072
Telephone
08 8332 9044
Fax:
08 8332 9577
Email:
[email protected]
Web:
www.mea.com.au
www.mea.com.au
Page 2
User Manual for MEA Bug Systems
Contents
1. Introduction...........................................................................5
1.1. Compliance Information............................................................. 6
1.2. Parts List.................................................................................... 6
2. Quick Start Guide..................................................................8
2.1.
2.2.
2.3.
2.4.
Prepare a Detailed Plan of your Installation . ........................... 8
Install the MEA Bug Software on your Computer....................... 8
Configure the Software.............................................................. 8
Test data Collection and Download............................................ 8
3.1.
3.2.
3.3.
3.4.
3.5.
3.6.
3.7.
3.8.
System Requirements................................................................ 9
Installation of MEA Bug Software............................................... 9
Installation of USB to Serial Adaptor.......................................... 9
Using your Computer Control Panel to Check the COM Port.. 10
Running MEA Bug.................................................................... 10
Entering a Site Setup............................................................... 16
Sending the Site Setup to Your Retriever................................ 21
Updating the Retriever Configuration....................................... 23
4.1.
4.2.
4.3.
4.4.
Installing a GBug...................................................................... 24
Installing a GTBug................................................................... 24
Installing a TBug...................................................................... 25
Installing an ABug ................................................................... 25
3. Software Installation.............................................................9
4. Installing Your Bug.............................................................24
5. Using the Retriever.............................................................26
5.1. The Retriever Menu and Keyboard.......................................... 26
5.2. Using the Retriever to Read Bugs........................................... 27
5.3. Reviewing Readings on the Retriever...................................... 30
6. Transferring Retriever Data to a Computer......................33
7. The MEA Bug Demonstration Data...................................35
8. Using MEA Bug Software to View Data.............................36
8.1.
8.2.
8.3.
8.4.
8.5.
General Icons:.......................................................................... 36
Viewing Data as a Graph......................................................... 36
Viewing Data as a Table........................................................... 39
Viewing a 48 Hour summary.................................................... 39
Changing the Way Graphs are Displayed................................ 39
9.1.
9.2.
9.3.
9.4.
Deleting a Bug from the Software............................................ 44
Clearing Retriever Data........................................................... 44
Checking and Setting the Retriever’s Time.............................. 44
Exporting Data from the MEA Bug Software............................ 45
9. Miscellaneous Software Functions...................................44
www.mea.com.au
Page 3
User Manual for MEA Bug Systems
9.5.
9.6.
9.7.
9.8.
9.9.
9.10.
9.11.
Set Up Irrigation and Rainfall Information................................ 47
Reviewing the Retriever Configuration.................................... 52
Checking the Status of the Bug batteries................................. 53
Displaying a Wiring Diagram.................................................... 53
Using the Retriever on Slow Speed......................................... 53
Multiple Tables......................................................................... 53
Creating a New Season........................................................... 57
10.1.
10.2.
10.3.
10.4.
Creating a Backup................................................................... 59
Location of Backup Data.......................................................... 60
Restore / Import Data............................................................... 61
Transfer Data From One Computer to Another........................ 63
10. Backing Up Your Data........................................................59
11. Bug and Retriever Maintenance........................................65
11.1. Retriever Maintenance............................................................. 65
11.2. Bug Maintenance..................................................................... 65
12. Error Messages...................................................................68
12.1. MEA Bug Software Messages................................................. 68
12.2. Retriever Error Messages........................................................ 70
13. Frequently Asked Questions.............................................72
Index...........................................................................................74
www.mea.com.au
Page 4
User Manual for MEA Bug Systems
1. Introduction
The MEA range of Bug loggers in conjunction with the MEA Retriever, creates a low
cost, continuous soil moisture monitoring system.
The Bug is a data logger to which up to four sensors may be attached. There are
four Bug models:
GBug accepts up to 4 gypsum blocks
GTBug one temperature sensor and 3 gypsum blocks
TBug
accepts 4 Theta Probes
ABug
accepts 1 or 2 AquaFlex sensors
GBug and GTBug log the sensor readings at 2 hourly intervals and store up to 20
days worth of readings. TBugs and ABugs log every 15 minutes and store up to 28
days worth of readings, the last 20 days at 2 hourly intervals.
Data stored in the Bugs is collected using the Retriever, which talks to the Bugs
using a wireless connection. The Retriever will hold data from between 25 and
100 Bugs (depending on the mix of Bug types). Readings can be reviewed on the
Retriever in the field and then downloaded to a computer running MEA Bug PC
software for analysis.
This manual covers installation and use of the Bugs, the Retriever, and the MEA Bug
PC Software.
If you have any difficulties with any of these products, please contact your MEA
reseller for assistance.
Compatibility and Version Information
This manual (Version 2.3) is written to cover the features of the following product
models:
GBug
All
GTBug
All
ABug
All
TBug
All
MEA Retriever
All
MEA Bug PC Software
Version 6.02.01 and later
Note that the ABug and TBug will only work with Retriever Version 3 or later.
www.mea.com.au
Page 5
User Manual for MEA Bug Systems
1.1. Compliance Information
Radio Frequency Compatibility
The MEA Bug is classified as a Low Interference Potential Device (LIPD) and is
operated under the LIPD Class License 2000, Schedule 1, Item 17.
Electromagnetic Compatibility
The Retriever employs digital electronic circuits that operate above a frequency
of 10 KHz. Although designed to strict engineering principles, these circuits may
radiate electromagnetic energy.
The Retriever must be operated in line with the manufacturer’s recommendations to
minimise the risk of interference to other devices from these emissions.
The operation in Australia of devices which may create Electromagnetic Interference
is governed by the Electromagnetic Compatibility (EMC) framework established
under the Radio-communications Act 1992 and administered by the Australian
Communications Authority.
The Retriever has been tested to AS/NZS 2064.1/2 and found to meet the
requirements for Level 2 products.
1.2. Parts List
Each product includes the following components.
MEA Retriever Box
MEA Retriever
MEA Retriever Download Cable and USB cable
MEA Bug PC Software CD
MEA Bug User Manual (this document)
9 Volt PP3 Alkaline Battery
GBug Box
GBug
9 Volt PP3 Alkaline Battery
Scotchloks (8)
Cable Ties (2)
Fixing Screws 10G 20mm (2)
GBug Wiring Diagram and Installation Instructions
GTBug Box
GTBug with soil temperature probe attached
9 Volt PP3 Alkaline Battery
Scotchloks (6)
www.mea.com.au
Page 6
User Manual for MEA Bug Systems
TBug Box
ABug Box
Cable Ties (2)
Fixing Screws 10G 20mm (2)
GTBug Wiring Diagram and Installation Instructions
TBug
1.5 Volt D-size Alkaline batteries (4)
Cable Ties (2)
Fixing Screws 10G 20mm (2)
TBug Wiring Diagram and Installation Instructions
ABug
1.5 Volt D-size Alkaline batteries (4)
Cable Ties (2)
Fixing Screws 10G 20mm (2)
ABug Wiring Diagram and Installation Instructions
Theta Probes and Aquaflex sensors are supplied with connectors fitted.
www.mea.com.au
Page 7
User Manual for MEA Bug Systems
2. Quick Start Guide
A comprehensive description of the Bug system is included from Section 3 onwards.
This quick start guide may be used for those experienced in using soil moisture
sensors.
2.1. Prepare a Detailed Plan of your Installation
Include the name of each measurement site (e.g. Shiraz, Merlot etc.), the depths
or positions at which the sensors are to be installed (e.g. 20cm, 50cm, 70cm), and
the type of sensor (e.g. GBLite, GBHeavy, Temperature, Theta Probe, AquaFlex)
installed at each location.
2.2. Install the MEA Bug Software on your Computer
2.3. Configure the Software
●●
●●
●●
●●
●●
●●
For first time installation, see Section 3.3
To change the site setup at any other time, select
Options ⇒ Modify Site Setup
Confirm that you have communication with the Retriever
Install batteries into the Bugs. A red light will flash on the circuit board
Enter the details for each measurement site into the Site Setup screen
Print a copy of the configuration details and wiring diagram for use in the
field
2.4. Test data Collection and Download
●●
●●
●●
●●
●●
●●
●●
●●
Gently tap each Bug in turn and check communication between it and the
Retriever
Connect the Retriever to your computer using the Download Cable
From the MEA Bug PC software menu, select Connect Retriever and
download the information from the Retriever into the computer
Check the status report after the download to ensure the number of readings
downloaded from each Bug matches the time they have been running (e.g.
12 readings per day for GBugs, 4 readings per hour for A/TBugs)
Open the Graph for each site and check that the data has been downloaded
and is displaying correctly
Install the Bugs and sensors in the field
Install the sensors and then connect them to the Bug according to the
Sensor Installation Guide supplied with the Bug
Verify with the Retriever that the Bugs are operating and collecting data
www.mea.com.au
Page 8
User Manual for MEA Bug Systems
3. Software Installation
3.1. System Requirements
The minimum specifications for a computer on which to run the MEA Bug Software
are:
Processor
Display
Serial Port
Printer
Pentium 500MHz or above
XGA (min. resolution 1024 x 768)
One free serial port (or USB to serial adaptor)
Any Windows compatible printer
3.2. Installation of MEA Bug Software
Each Retriever is supplied with a copy of the MEA Bug Software.
Note: This software is compatible with Windows 2000, XP and Vista (32-bit version).
The software will operate on Windows 98 and ME, however we no longer provide
technical support for these operating systems.
It will not run under earlier versions (Windows 3.0, 3.1, 3.11, 95)
Install the software on your computer as follows:
●● Insert the MEA Bug installation CD into the CD Rom drive on your computer
●● The MEA Bug Software Installer application should auto-start when the
CD-ROM is loaded (If it does not, open Windows Explorer, log onto the CDROM and then double click on the file setup.exe)
●● The installer will then continue with MEA Bug Software installation
MEA regularly publishes updates to the software on its web site. You can download
the latest version from: www.mea.com.au (follow the links to the Downloads page).
Note: Do not connect the MEARetriever to the USB adaptor until after the USB
driver is installed.
3.3. Installation of USB to Serial Adaptor
The following instructions apply to the UR-11 USB to Serial Adaptor supplied by
MEA (Part Number 2303):
●● Do not plug your USB-Serial adaptor in until instructed to do so further down
this page
●● If it is not already loaded, load the MEA Bug software installation disk into
your computer’s CD-Rom drive
www.mea.com.au
Page 9
User Manual for MEA Bug Systems
●●
●●
●●
●●
●●
●●
Navigate to the folder ‘USB-Serial Driver’ and open it
Double-click on the file ‘PL2303-Driver.exe’. Windows InstallShield will
automatically install the driver
Plug the USB-serial adaptor into a free USB port on your computer (if you
do not have a free USB port you may have to unplug an existing device or
purchase a USB hub)
Windows will detect the device and the message ‘Found New Hardware’
will appear in the System Tray at the bottom-Right corner of your screen,
followed soon by a message that says ‘Your new hardware has been
installed and is ready to use’
When the MEA Bug PC software is started for the first time, it will scan all
COM Ports to locate the Retriever
You can also use the MEA Bug PC software to locate the Retriever COM
port at any time (eg. if the USB to Serial adaptor is moved to another USB
port). Connect the Retriever then select
Options ⇒ Com Ports ⇒ Search for Retriever
Note: Always use the same USB port on the computer. If you change to another
USB port, Windows will allocate a different COM port number. On some computers,
the USB to serial adaptor may not function correctly until Windows is restarted
3.4. Using your Computer Control Panel to Check the
COM Port
If you wish to check which COM port the driver is installed on:
●● Make sure your USB-Serial adpator is plugged into its usual USB port
●● From the Start menu select
Start ⇒ Control Panel
●● When Control Panel starts, double click on the System icon
●● In the System Properties area, click on the Hardware tab, then select Device
Manager
●● When the device list appears, look down the list until you find the Ports
(Com and LPT) entry
●● When you expand the ports (by clicking on the “+” symbol) you should see
an entry named Prolific USB-to-Serial Comm Port (COMx), where x is the
number for the Com port
3.5. Running MEA Bug
The software installation will create an “MEA Bug” shortcut on the
Windows desktop. Double click this shortcut to run the MEA Bug PC
Software.
www.mea.com.au
Page 10
User Manual for MEA Bug Systems
Alternatively choose from the Windows Start menu:
Start ⇒ Programs ⇒ MEA Bug ⇒ MEA Bug
Before you start the program check that you have the Bug serial numbers.
3.5.1.
First Time Installation
The first time the MEA Bug PC software is started after installation, or if no site setup
has been configured, the following screen will be displayed:
The MEA Bug PC software allows you to either import an existing site setup or
create a new site setup. Select an option and read the information displayed on the
screen.
If you have the older GBug program installed on the computer and you are
upgrading to the MEA Bug PC software (or upgrading your version of MEA Bug)
select Import an existing site setup and soil moisture data.
www.mea.com.au
Page 11
User Manual for MEA Bug Systems
To proceed with the selected option, click Next. The next screen explains the
optional entry of irrigation and rainfall data.
Select Yes or No, click Next.
You may activate the Use Irrigation / Rainfall data option at a later time from the
main menu:
Options ⇒ Use Irrigation/Rainfall data
If you selected ‘Create a new site setup’, proceed to Section 3.6.
3.5.2.
●●
●●
●●
Importing an Existing Site Setup
If you are upgrading from the older GBug program (and GBug is installed
on the computer), the default import folder shown will be the GBug program
data folder
If you are transferring the site setup from another computer, transfer the files
to a removable drive (USB memory stick) or network drive
The import procedure can read Bug or GBug files (either original files or
backup sets)
www.mea.com.au
Page 12
User Manual for MEA Bug Systems
●●
●●
●●
●●
The Bug Site Setup Import Wizard will be displayed
To select another folder, click Browse
Select the folder (local or
removable drive) containing
the data files to be imported.
Click OK
The MEA Bug PC Software
will examine the folder
contents. If the folder
contains valid Bug or GBug
files a summary of the Site
Setup will be displayed. This
includes Table Name, the
number of sites and details
for each site including Site
Name, Bug type and Bug
Serial Number
www.mea.com.au
Page 13
User Manual for MEA Bug Systems
●●
●●
Check the contents of the selected folder
Click Import to transfer the files to the MEA Bug PC software data folders. A
confirmation message will be shown:
●●
Click Yes to continue. A screen will appear showing progress of the file
import process. Once the files have been copied, the following message will
appear:
●●
If the import is successful, connect the Retriever when prompted. The
program will search for the Retriever on all COM ports
Once the Retriever is found, the Modify Site Setup screen will be displayed
Make any required changes to the Site Setup
After you have finished in Modify Site Setup, the site setup will be sent to
the Retriever
●●
●●
●●
3.5.3.
Creating a New Site Setup
If you selected Create a New Site Setup the program will take you through the
following steps:
●● Connecting to the Retriever
●● Entering a site setup
●● Sending the Site Setup to the Retriever
3.5.4.
Connecting to the Retriever
When you first run the Bug software and elect to Create a New Site Setup, you will
be prompted to connect the Retriever to the PC.
●●
●●
Connect the USB to serial adaptor or serial cable between the Retriever and
the PC and press the On/Mode button.
Click Yes. The software will automatically search for the Retriever on all
www.mea.com.au
Page 14
User Manual for MEA Bug Systems
●●
●●
●●
●●
●●
●●
●●
●●
3.5.5.
available serial ports in the range COM1 through to COM16. The search
may take up to one minute.
If the software can communicate with the Retriever, the Retriever screen will
show the message PC Connected.
The bottom left of the PC software screen will show a message showing the
Retriever communications port
If you are creating a new site setup for the first time the program will
automatically take you to the Modify Site Setup screen
To modify the site setup at any other time, from the main menu, select
Options ⇒ Modify Site Setup
If you have already programmed your Retriever you will see a message
prompting you to download any data from it prior to making the changes
If your Retriever does hold data that you want to keep, cancel the changes,
download the data and then start again
Press the ON/Mode button on the Retriever
On a brand new Retriever the screen initially will display
No Site Setup: Connect to PC
Retriever Connection Time Out
If the software cannot communicate with the Retriever, you will see the following
message:
If this occurs:
●● Check that the cable is properly connected to the Retriever and computer
●● Turn the Retriever On and select from the main menu
Options ⇒ Com ports ⇒ Search for Retriever
If it still does not communicate, try manually selecting the communications port:
●● From the main menu, select
●● Options ⇒ Com ports
●● A tick will appear alongside the currently selected port
●● Select the communication port that matches the one on your computer
●● If you are using a USB to serial adaptor, see Section 3.3 or seek the
assistance of a computer technician
You may view the currently selected serial port at any time from the main menu:
www.mea.com.au
Page 15
User Manual for MEA Bug Systems
●●
Options ⇒ Com ports
A tick will appear alongside the currently selected port
If you move the Retriever to another serial port (or if you move the USB to serial
adaptor to another USB port), you can perform a search on all available serial ports:
●●
●●
Connect the Retriever and press the ON/Mode button
From the MEA Bug menu, select
Options ⇒ Com ports ⇒ Search for Retriever
3.6. Entering a Site Setup
Once you are connected, and have responded to any warning messages, the Modify
Site Setup dialogue box will display:
3.6.1.
Preliminary settings
Before entering your site setup, check that the other options displayed on the screen
match how you wish to use the program:
●●
●●
Table Name Use this field to identify your property. This name will appear
on Graphs and Tables.
Show Table Name on Retriever Display If you check this box, the Table
Name will display on the screen of the Retriever when it is turned on.
www.mea.com.au
Page 16
User Manual for MEA Bug Systems
●●
●●
Show Refill Point / Full Points This box should normally be checked so that
full and refill lines can be displayed on your Graphs.
Show Filtering Control on Graph Legend This box controls whether you will
have access to data smoothing from within your Graphs. Data smoothing
is used to remove spikes from some sensor data. If it is not checked, the
level of smoothing to apply is set in the Site Setup screen. If this option is
checked, a selection box will display on the Graphs produced for each ABug
or TBug site.
Going down the table you will see that there is a place for you to enter the name of
each site and then an area in which relevant details for the Bug logger to be installed
are displayed.
The different Bugs support the following sensor configurations:
●● GBug up to 4 gypsum block sensors
●● GTBug up to 3 gypsum block sensors (fourth sensor is always a pre-wired
soil temperature sensor)
●● TBug up to 4 Theta Probes
●● ABug up to 2 AquaFlex sensors
To enter the details for your property, select the site you wish to edit, then double
click with the mouse on this line or select it with the mouse (so it displays with a
highlight) then click on the Edit Site button.
The Edit Site Info screen will display. A series of prompts will be displayed on the
right side of each field to indicate what information to enter. The form should be
www.mea.com.au
Page 17
User Manual for MEA Bug Systems
filled in as follows:
●● Site name Enter the name with which you wish to identify this Bug – usually
the patch, variety or planting name e.g. Merlot, Brassicas, Almonds etc.
●● Bug Type Click on this field to display a list of the available bug types.
Select the type of Bug you are installing from the list.
●● Bug ID Enter the serial number corresponding to the Bug you are installing.
When you have completed these details, click on OK. Options that are specific to
each type of Bug will then display.
3.6.2.
Adding a GBug
For each GBug you need to enter the sensor type and an appropriate label (which
will display alongside the Graph of sensor values) in the GBug Settings area of the
screen:
www.mea.com.au
Page 18
User Manual for MEA Bug Systems
●●
●●
3.6.3.
Sensor Type
From the drop down list, select either GBHeavy,GBLite or Not Used
(Note: The fourth sensor position has an option Temperature. This setting
should only be used for a GTBug.)
Label
In this field, type in the description you wish to appear against this sensor,
eg. “10cm” or “Carrots”.
Adding a GTBug
For each GTBug you need to enter the sensor type and an appropriate label (which
will display alongside the Graph of sensor values) in the GTBug Settings area of
the screen. Note that the fourth sensor will automatically be assigned as a Soil
Temperature sensor.
●● Sensor Type
From the drop down list, select either GBHeavy,GBLite or Not Used
(Note: The fourth sensor position has an option Temperature. This setting
should only be used for a GTBug.)
●● Label
In this field, type in the description you wish to appear against this sensor,
eg. “10cm” or “Carrots”.
3.6.4.
Adding a TBug
When the TBug Settings screen displays, enter the details for that site:
●● Sensor Type
For each input on the TBug, select the Theta Probe sensor and the
calibration to be used. The Mineral or Standard setting is used with all soils
and the Organic setting with potting mixes and artificial media.
●● Label
Type in the description you wish to appear against the sensor in the
software.
●● Data Smoothing
By default Data smoothing is turned off when you add a TBug. Click on
the Smoothing Level option and select High (if your data is very noisy),
Medium or Low (if your data is very clean and you want the fastest possible
response time).
www.mea.com.au
Page 19
User Manual for MEA Bug Systems
3.6.5.
Adding an ABug
When the ABug Settings screen displays, enter the details for that site:
●● Number of AquaFlex Sensors
Select either 1 or 2.
●● Label
Type in the description you wish to appear against the sensor in the
software, eg. installation depth in cm.
●● Data Smoothing
By default, Data smoothing is turned off when you add an ABug. Click on
the Smoothing Level option and select High (if your data is very noisy),
Medium or Low (if your data is very clean and you want the fastest possible
response time).
www.mea.com.au
Page 20
User Manual for MEA Bug Systems
3.7. Sending the Site Setup to Your Retriever
When you have finished setting up all of your Bugs, click on the Print button and the
software will print out a copy of the Site set Up. This page will show you the details
for each site. Store it somewhere safe in case you ever have to load the setup from
scratch again. Then click on OK to save the changes.
Once you have saved the changes to the Site Setup, the software will write them in
to your Retriever automatically – the Retriever will automatically turn on.
Note: Do not unplug the Retriever until the changes have been completed and the
Retriever screen reverts to the normal menu.
If at any time you wish to force the Setup to be written into the Retriever, select:
Options ⇒ Send Complete Setup to Retriever
Messages will display on screen to show that the details are being sent to the
Retriever. When the transfer has finished, the Retriever will display the following
www.mea.com.au
Page 21
User Manual for MEA Bug Systems
message meaning it contains no data and is ready for use in the field:
Retriever Empty
3.7.1.
Data Protection for Retriever Data
You can program the Retriever to prevent it collecting readings from a Bug if the
Retriever already holds readings for that site. This prevents the accidental overwriting of data after changing batteries in the Bug. If data protection is turned on,
you need to erase the data stored in the Retriever each time you download it into the
computer. If data protection is turned off, you can collect data from a Bug multiple
times without needing to clear the Retriever memory. By default data protection is
turned off.
If Data Protection is turned on, when you try to collect data from a site that already
has data stored, the Retriever will display an alternating message on the top line
Site Locked and Latest readings. The bottom line of the screen will show the most
recent reading for each sensor but the data will not be written into the Retriever.
To check whether Data Protection is on or off (Retriever Model 3 or later):
●● Turn the Retriever on and select the Info option on the menu
●● Press the Next key repeatedly until the Data Protection status displays eg.
Data Protection is OFF
To turn Data Protection on or off:
●● Connect the Retriever to the computer
●● From the menu select
Options ⇒ Use Data Protection
●● A tick will display next to this option in the menu to indicate that Data
Protection is enabled
●● Save the configuration into the Retriever by selecting
Options ⇒ Send Complete Setup to Retriever
3.7.1.1.Over-writing Data Protection When Reading Bugs
If Data Protection is turned on, you can still force the new readings to over-write the
old ones held in the Retriever:
●● When you are ready to pick up data from the Bug, turn on the Retriever and
select Collect mode
●● When the message prompting you to tap the Bug displays, press and hold
the Select key, then tap the Bug
●● When the transfer begins the message Receiving data from Site xx appears.
Release the Select key and the data previously stored in the Retriever will
be over-written with the new readings
www.mea.com.au
Page 22
User Manual for MEA Bug Systems
3.8. Updating the Retriever Configuration
If you change the way your system is configured, eg. by adding an extra site or
changing the details for a given site, you must update the configuration in the
Retriever.
Note: The Retriever configuration cannot be updated if it holds data that hasn’t been
downloaded. In this case, an error message confirms that you cannot update the
configuration until you have downloaded the data.
To write the setup to the Retriever:
●● Connect the Retriever to the PC and download any new data. Select Yes
when prompted as to whether to clear the Retriever memory
●● If you do not want to keep the data you may clear the data directly by
selecting
Options ⇒ Clear Retriever Memory
●● Connect the Retriever when prompted
●● Then from the menu, select
Options ⇒ Send Complete Setup To Retriever
●● You will be prompted to confirm that you wish to update the Retriever
configuration
●● Select Yes and then plug the Retriever in to the computer
●● The full setup will now be transferred to the Retriever. Do not unplug the
Retriever until its screen returns to the main menu
Collect – View – Power Off – Info
www.mea.com.au
Page 23
User Manual for MEA Bug Systems
4. Installing Your Bug
4.1. Installing a GBug
Install the batteries into each GBug before taking them into the field. After 1-2
seconds the Red LED (Light Emitting Diode) on the lower left of the printed circuit
board inside the box should flash three times and then go out. By inserting the
batteries all at the same time this ensures readings of the sensors are taken around
the same time in the field.
Confirm the serial number of each GBug you wish to install matches your planned
site set up.
Materials Required:
●● GBug and contents of GBug carton
●● Bull nosed pliers (to connect sensors)
●● Phillips Head Screwdriver (Size No. 1)
●● Printed copy of your “site set up”
●● Electrical tape
Each GBug comes fixed to a bright red plastic backing plate, which makes it easy to
locate in your crop. You can write on the backplate using a permanent marker (e.g.
SITE 4 – ONIONS).
Fix the GBug to a suitable post using the supplied screws or cable ties. Try to use
a ‘protected’ location where the Bug is least likely to suffer damage from harvesters,
quad-bikes etc. Keep the enclosure as vertical as possible.
Install the sensors then connect the sensor wires to the GBug. Please refer to the
Soil Moisture Sensor Installation Guide that came with your GBug.
4.2. Installing a GTBug
Follow the same procedure for installing a GBug – see Section 4.1.
The GTBug caters for up to three gypsum block sensors. The wires for the fourth
sensor are factory fitted with a soil temperature sensor.
Install the gypsum blocks and soil temperature sensor. The wires from the gypsum
blocks must now be connected to the GTBug. Please refer to the Soil Moisture
Sensor Installation Guide that came with your GTBug.
www.mea.com.au
Page 24
User Manual for MEA Bug Systems
4.3. Installing a TBug
The TBug can be used with Theta Probes. Up to 4 sensors can be connected to a
TBug.
Remove the TBug from its carton and undo the 4 screws to remove the lid. Release
the Velcro straps in the battery compartment and install the batteries – make sure
they are correctly aligned. As soon as the batteries are installed the LED indicator
will flash in the following sequence: one short flash, followed by a long flash, then 3
short flashes and a long flash. If this does not occur, remove the batteries, wait 60
seconds and try again.
Tighten the Velcro straps securely and replace the lid, taking care that the lid sits
correctly to ensure a good seal against ingress of water. Some flexible acrylic sealer
along the top of the lid once it is closed will help guard against water.
Install the sensors then connect them to the TBug. Please refer to the Soil Moisture
Sensor Installation Guide that came with your TBug.
4.4. Installing an ABug
The ABug works with the AquaFlex Sensor (Model SI99) which logs temperature
and soil moisture. One or two AquaFlex sensors can be connected to each ABug.
Follow the installation procedure for installing a Tbug – see Section 4.3.
Install the AquaFlex Sensor(s) then connect them to the ABug. Please refer to the
Sensor Installation Guide that came with your ABug.
www.mea.com.au
Page 25
User Manual for MEA Bug Systems
5. Using the Retriever
The process for reading the Bugs with the Retriever is quick and easy. The
Retriever also provides visible confirmation that the transfer has been successfully
completed.
5.1. The Retriever Menu and Keyboard
The keys on the front panel of the Retriever perform the following functions:
●● ON/Mode
Turns the Retriever on and moves to the next menu option
●● Select
Chooses the highlighted menu option
●● Next
Moves to the next reading or value
●● Prev
Moves to the previous reading or value
5.1.1.
Menu Options
The Retriever has the following Main Menu options:
●● Collect
Prepares the Retriever to collect data from a Bug
●● View
Allows you to scroll through the data stored for each Bug site
●● Power Off
Turns the Retriever off
●● Info
Displays information about how the Retriever has been configured
Note: The Info menu is only available on Retriever Model 3 or later.
5.1.2.
Info Menu
Press the ON/Mode button to turn on the Retriever. Then press the ON/Mode button
again until Info flashes. At this stage press Select. Once you are in the Info menu,
press the Next or Prev key to move through the various sub-menu options. If you do
not press a key for 20 seconds, the Retriever will go back to the Main menu.
●●
●●
Version/Sites Read
Displays the Retriever firmware version number and the number of bug sites
that currently hold data.
Current Time and Date
Displays the current time and date. If Time not correct displays, either the
Retriever time has not been set or its battery has been removed. If this
www.mea.com.au
Page 26
User Manual for MEA Bug Systems
●●
●●
●●
●●
●●
●●
●●
●●
●●
occurs, set the time using the Bug software:
Options => Check Retriever Time.
The Retriever time will also be set whenever you collect data or whenever
the Site Setup is updated on the Retriever.
Last Site Read
Shows the number of the site for which data was last read. If the battery
level at that site was low, a Low Battery message will also display (displays
--- if no sites have been read).
Bug Battery Level
Shows the status of the battery in the last Bug read (OK or Low or Not
Available if no sites have been read).
Bug log time
Displays a message showing the number of minutes until the next read
(shows Not Available if no sites have been read).
Retriever Battery Level
Shows the status of the battery in the Retriever (OK or Low).
Do Bug Test
Allows you to test a Bug. After selecting this option, tap the Bug. The
Retriever will display the latest readings from the Bug so you can check it
is performing properly – the data will not be stored. If the ID number for the
Bug in question has been programmed into the Retriever; it will display the
message Latest Data.
Retriever ID
Displays the unique serial number for the Retriever and its build date. This
serial number is used to ensure that a Retriever can only be used with the
correct computer software setup.
Custom Message String
When selected, the message displayed when the Retriever is turned on
will show on screen. If the message has not been set, the screen will show
Message not Used.
Data Protection ON-OFF
Shows whether the Data Protection is turned on or off.
Sensor Ranges
Select this option to display the various sensor ranges (default and custom).
Press Select to select this option and then use Next and Prev to scroll
through the list.
Press the ON/Mode button at any time to go back to the main menu.
5.2. Using the Retriever to Read Bugs
To read the Bugs:
●● Take the Retriever out to the Bug you want to read
www.mea.com.au
Page 27
User Manual for MEA Bug Systems
●●
●●
●●
●●
●●
●●
●●
●●
●●
●●
●●
●●
Turn the Retriever on by pushing the ON/Mode button
The Retriever will turn on and display a message showing how many sites
(Bugs) it has collected data from:
MEA Retriever
3 Sites Read
The Table name will then be displayed for 3 seconds (if this option has been
selected in the Site Setup)
Press the ON/Mode button to skip straight to the main menu
After several seconds, the function select menu will display:
Collect View
Power Off Info
The word Collect should be flashing (if not, press the ON/Mode key until
Collect flashes)
Push the Select button to get ready to take a reading. The Retriever will
display the following message:
Now tap Bug box to collect data
Hold the Retriever less than a metre away from the Bug and slightly above it
(you may wish to rest the Retriever on top of the Bug)
Tap the centre front of the Bug to start data transfer
The Retriever display will show the Site Number for the Bug it is
communicating with:
Receiving data from site x
When the transfer has finished, the last data reading for the site will be
displayed eg:
# 1 6pm 21-Jan
21 24 26 40
If there are no new readings in the Bug (ie. you have just fitted a new
battery) the following message will display:
# 1 No Data
Note: DO NOT USE THE RETRIEVER TO TAP THE BUG. This can cause serious
damage to the Retriever that is not covered under warranty.
5.2.1.
Problems with Collecting Readings
5.2.1.1.No Data is Collected:
The Retriever will wait for a radio signal from the Bug for up to 15 seconds. If no
signal is detected in that time, the Retriever will return to the main menu. If this
happens, select Collect again and repeat with the Retriever closer to the Bug (and
slightly above it). If the problem persists, the Bug may have a flat battery or may not
be waking up. To check:
●● Using a screwdriver, undo the screws holding the lid on the Bug and free the
www.mea.com.au
Page 28
User Manual for MEA Bug Systems
●●
●●
●●
lid
Tap the middle of the lid and watch carefully to see if the small LED on the
printed circuit board inside the Bug flashes
if the LED does not flash, fit fresh batteries and try again (the LED should
flash 3 times when you install the new batteries)
if you still cannot wake the Bug contact your MEA Reseller for assistance
5.2.1.2.Error During Collection:
If an error occurs during data transmission the Retriever will display:
Error - please try again
●● Try to avoid sudden movement of the Retriever while data is being collected
●● Allow this message to disappear before trying again
●● If the transmission was interrupted, hold the Retriever on top of the Bug
and try again. If you still cannot communicate with this Bug, try again with
another Bug. If the Retriever will read other Bugs but not this one, the Bug
may have a flat battery or be defective. Replace the battery and try again
5.2.2.
Cancelling a Reading
You can abandon a Collect operation if you have not yet tapped the Bug by pressing
the ON/Mode button. The Retriever will display the following message to show you
that the Collect operation has been cancelled:
Abandoning ...
After about 10 seconds the Retriever will then return to the main menu.
You cannot cancel a Collect operation once the Bug has started transmitting data.
5.2.3.
Using the Retriever to read the Bug Serial Number
If the label on the Bug is unreadable and you need to check the serial number, use
the Retriever to identify the serial number of a Bug. Hold the Retriever close to the
Bug in question and use one of the following methods to put the Retriever into Bug
identification mode:
●● Press and hold the Select key on the Retriever. Then press the ON/Mode
button (whilst still holding the Select key). The Retriever will turn on and go
into the Bug Identification mode. When the message Now tap Bug box for
Serial No. displays, release the buttons
OR
●● Turn the Retriever on and press the ON/Mode button 3 times so the Info
option flashes. (This option is only available on Retriever Version 3 or later).
Then press the Select key to bring up the Info menu. Press the Next button
until you reach the Do Bug Test option. Press the Select key again and the
message Now tap Bug box for Test will display
www.mea.com.au
Page 29
User Manual for MEA Bug Systems
●●
●●
Tap the Bug to wake it and the serial number will be displayed, eg:
No. 16787
Write the Serial Number on the bottom of the Bug using a permanent maker.
Press the Mode button to return to the menu
When you have identified all of your Bugs, turn off the Retriever to leave Bug
identification mode.
5.2.4.
Low Battery Monitoring
When the Bug battery is getting low, a warning message will appear on screen after
the readings from the Bug have been collected.
Site # Battery is low
This indicates that the battery is nearing the end of its life. The Bug will continue to
function but if you see this message, change the Bug battery as soon as possible.
If the Bug battery level is very low, then the Retriever will display the message:
Urgent replace Site # battery
You should change the battery as soon as possible to avoid data loss. Always use
good quality Alkaline batteries, never Heavy Duty.
5.2.5.
Battery Monitoring During Transfer to the Computer:
The battery level for each Bug is transferred to the computer software so you can
keep track of battery behaviour. After selecting Connect Retriever and initiating the
transfer of readings to the computer, a summary screen is shown. This lists all Bugs
included in the Site Setup and shows the number of readings collected from each
along with the battery voltage.
To check the battery levels for at any stage after the transfer, from the menu select:
View ⇒ Show Battery Levels
●● The battery voltage history for the Site currently selected will be shown on
screen. The table displays the battery voltages at each date when readings
were collected from the Bug
5.3. Reviewing Readings on the Retriever
Once you have read a Bug, you can review the readings on the Retriever screen.
This makes it possible to make simple scheduling decisions “on the go”.
After Reading a Bug, the last reading will remain on screen. If the Retriever
automatically powers off, or you wish to open up a reading at a later time:
●● Turn the Retriever on by pressing the ON/Mode button
●● Press the Mode button until the word View flashes
www.mea.com.au
Page 30
User Manual for MEA Bug Systems
●●
Press Select to choose the View function, and the View data screen will
display
The general format of the View screen is:
Site Number Reading time Date
Sensor 1 Sensor 2 Sensor 3 Sensor 4
●● The Site Numbers may be in the range 1 to 100
●● Data displayed from a GBug is displayed in kPa and will look like the
following:
# 87 11am 20-Jan
230 215 150 --(the “---“ indicates there is no sensor at this depth, ie. only 3 of the 4
possible sensors have been installed at the site)
5.3.1.
Moving Around Within the Readings:
You can use the Select,Next and Previous buttons on the Retriever to locate the site
or reading you want:
●● Press Select until the function you wish to view (Bug ID, Reading Time or
Date) flashes
●● Then press the Next button to go to the next Bug, reading or day
●● Or press the Prev button to go to the previous Bug, reading or day
You can also jump quickly to the first or last reading for a Bug:
●● To go to the start of the data, press and hold the Prev key and then press
the Select key
●● To go to the end of the data, press and hold the Next key and then press the
Select key
5.3.2.
Viewing Data from a GTBug
The data from a GTBug is very similar to that from a GBug. The difference is in how
the last sensor reading is displayed. The format of the View screen for a GTBug is:
Site Number Reading time Date
GB 1 GB 2
GB 3
ST
“ST” is the soil temperature sensor reading. The soil temperature is displayed in
degrees Celsius.
5.3.3.
Viewing Data from a TBug
The data is displayed in units of soil moisture percentage. The format of the View
screen is:
Site Number Reading time Date
Sensor1 Sensor2 Sensor3 Sensor4
www.mea.com.au
Page 31
User Manual for MEA Bug Systems
Only the last 8 days readings are available for display on the Retriever screen (the
data for all 28 days is stored and transferred to the PC).
5.3.4.
Viewing Data from an ABug
The data is displayed in units of soil moisture percentage and degrees Celsius. The
format of the View screen for an ABug is:
Site Number
Reading time
Date
Sensor1 % Sensor 1 o Sensor2 % Sensor2 °
Where “%” indicates the percentage moisture reading and “O” indicates the soil
temperature reading for the respective sensor. Only the last 8 days readings are
available for display on the Retriever screen (the data for all 28 days is still stored
and transferred to the PC).
5.3.5.
Fast Scroll Mode
In View mode, pressing the Last and Next key moves you through the data one
reading at a time. As the TBug and ABug read the sensors every 15 minutes, the
number of samples stored in the Retriever can be very large. If you press and hold
either the Next or Prev key for more than 2 seconds, the Retriever will go in to
fast scroll mode. As you continue to hold down the button, the scrolling speed will
accelerate. Release the Next or Prev key to return to normal scrolling mode.
5.3.6.
To View the Number of Readings in Memory
The number of readings stored for a site in the Retriever memory can also be
viewed when reviewing data on the screen. With the time or the day flashing,
press and hold the Next and Prev keys at the same time. The display will show
the number of readings on the bottom line. Release the keys, and the data will be
displayed again on the bottom line.
www.mea.com.au
Page 32
User Manual for MEA Bug Systems
6. Transferring Retriever Data to a
Computer
Open the MEA Bug software.
●●
●●
●●
If you are using Multiple Tables, select the Table matching the one loaded
into your Retriever. The Table Name is shown on the Retriever display
when you turn it on if you activated this option during site setup.
Plug the Retriever into your computer using the download cable supplied
with the Retriever.
From the software menu select Connect Retriever. The software will display
a dialogue box asking you to Connect the Retriever now and press the ON
button. If the Retriever does not turn on automatically, press the ON/Mode
button.
The software will now try to communicate with the Retriever and download its
readings
●● If the software cannot communicate with the Retriever you will see the
message
Retriever Connection Timeout on COM <x>. Please check serial cable
connection and try again
If this occurs, ensure that you have selected the correct Communications
port, re-check your connections and try again
When MEA Bug software establishes communication with the Retriever, the
download will begin.
If you are using Multiple Tables, the MEA Bug PC software will check that the site
setup in the Retriever matches the currently loaded Table. A warning will be shown
if the Tables do not match and the data download will not continue.
When the download has finished a message will display on the screen showing a
summary of the transfer. This message box shows:
●● The status of the Retriever battery
●● How many readings were received from each Bug site. The number of
readings is a useful check on how long the units have been running for. If
the Bugs have been logging for more than 20 days (GBug and GTBug) and
28 days (ABug and TBug), this number should remain the same
●● The status of the battery in each Bug. A warning will appear when the Bug
battery gets low
www.mea.com.au
Page 33
User Manual for MEA Bug Systems
After clicking on the Continue button, you will be asked if wish to clear the
Retriever’s memory
●● If you wish to retain the old readings in the Retriever, select No
●● If you select Yes, a message will display advising you that the Retriever
memory is being cleared
●● Next time you turn the Retriever on, the following message will display
Retriever Empty
The updated readings will now be available for viewing from within the software.
www.mea.com.au
Page 34
User Manual for MEA Bug Systems
7. The MEA Bug Demonstration Data
The MEA Bug software comes with some demonstration data that you can use to
help become familiar with the program.
To view the demonstration data:
●● Open the MEA Bug PC software
●● From the menu, select
File ⇒ Open Demonstration
●● The demonstration data will be loaded
When you open the demonstration data, all of the data for each view will be shown.
Use the Calendar button or the icons at the bottom of the screen to move back or
forward in time through the data. The icons at the bottom of the screen will become
active once you narrow the span of the data (e.g. 2 days).
You can create custom views using the sensors from these sites and manipulate the
Graph and Table views as you would with real data. You cannot alter the Site Setup
or communicate with a Retriever when in the demonstration data.
To return to your own data, from the menu select
File ⇒ Close Demonstration
www.mea.com.au
Page 35
User Manual for MEA Bug Systems
8. Using MEA Bug Software to View Data
Open the MEA Bug Software by clicking on the icon on your desktop, or from the
Start menu selecting:
Start ⇒ Programs ⇒ MEA Bug
When the MEA Bug Software opens a number of icons appear on screen. The
following section gives an explanation of how each is used.
8.1. General Icons:
The general icons are available throughout the program.
Click on the Graph icon to show the data as a
Graph
Click on the Table icon to view all data for the site
as a Table
Click on the Last 48 hours icon to view two day’s
data for the site
Click the Site icon to choose a site to view
Show: Controls how much data to view
Symbols: To place symbols on the Graph traces
8.2. Viewing Data as a Graph
Click on the Graph icon to display a Graph, or from the menu select
View ⇒ Graph
Once a Graph is on screen, this icon will be greyed out (inactive), indicating that you
are looking at a Graph, and from there you can change to one of the Table views.
8.2.1.
Select a Site
When the MEA Bug Software opens, choose the site to view by clicking on the Site
icon and then selecting the one required
from the list.
Click on either the Graph, Table or Last 48 hours button to control how you wish to
view the data:
●● Graph will display the data as a Graph
●● Table shows the data in tabular form
●● Last 48 hours shows the data for the last 2 days in tabular form.
www.mea.com.au
Page 36
User Manual for MEA Bug Systems
8.2.2.
Choose How Much Data to View
Once you have selected the site, click on the Show icon to
control how much data to display across the screen (from 2
days to 2 years). The data is always referenced to the right hand side of the screen,
that is the most recent readings.
8.2.3.
Putting Symbols on a Graph
You can turn on markers to help identify the time at
which readings were taken. Once you have clicked on
the Symbols icon, select how you want the markers to appear:
●● None for no markers
●● Start of day to put a marker at the start of each day
●● Middle of day for markers at midday
●● Every 2 hours to put a marker every 2 hours
●● Every 4 hours to put a marker every 4 hours
All samples to put a marker by each reading
8.2.4.
Navigating around a Graph
Use the icons on the side and bottom of the screen to move around within the data.
Click on this icon to change the span of the data:
- The Top scale adjusts the maximum reading that can be
displayed and the Bottom adjusts the minimum value
- the up arrow increases the range (zooms out)
- the down arrow decreases the range (zooms in)
Click on the Full Scale button to expand the scale to the maximum
range
Click to go to the start of the data (the first reading)
Click to go to the end of the data (the last reading)
Click to go back one screen (e.g. 1 week, 1 day)
Click to go forward one screen
Click to go back one day (or 1 week in longer
views)
www.mea.com.au
Page 37
User Manual for MEA Bug Systems
Click to go forward one day (or 1 week in longer views)
8.2.5.
Temperature Scale
When data for a GTBug is selected, a temperature scale (in degrees Celsius) will
show on the right hand side of the screen. Use the range buttons to control the
maximum and minimum temperatures on the scale:
●● Top controls the maximum temperature to be displayed
●● Bottom controls the minimum temperature to be displayed
●● Use the up and down arrows to increase or decrease the settings in 5oC
increments
●● The available temperature range is -5 to +45oC and the smallest range that
can be displayed is 10 oC
8.2.6.
The Calendar
The Calendar button lets you move
quickly to any date for which data has
been stored. When you click on the
calendar button, a date selection window
will appear; showing the date currently
selected
●● Click on the month arrows to
move back or forward one
month at a time
●● Then click on the desired day
●● If there is no data for the
selected date, a message will
display advising of the date at
which data starts or ends
8.2.7.
The Cursor
A vertical bar on the Graph indicates the cursor position. The display at the top of
the Graph screen shows the values of the soil moisture and temperature readings
at the current cursor location. Whenever your mouse cursor is over the Graph area,
the cursor will follow the mouse movement. Battery voltages are also displayed at
dates when the Retriever was unloaded.
www.mea.com.au
Page 38
User Manual for MEA Bug Systems
8.2.8.
Normal vs. Inverted Scaling
By default soil moisture Graphs display wet readings (low tensions or high
percentage) at the top of the screen and dry readings (high tension or low
percentage) at the bottom of the screen. You can swap the orientation of the
Graphs (to wet at the bottom and dry at the top) at any time to suit your personal
preferences.
To reverse the Graph scale, from the menu select:
Options ⇒ Invert Graph Scale
Once an orientation is selected, Graphs will be displayed in that orientation until
changed again from the menu.
8.3. Viewing Data as a Table
To change to a Table view, click on the Table icon, or from the menu select
View ⇒ Table
The on screen display will change to a Table showing you all the data readings. Use
the scroll bar to move back and forward through the data.
8.4. Viewing a 48 Hour summary
To change to a two day Table view, click on the Last 48 hours icon, or from the menu
select
View ⇒ Last 48 hours
This view shows you two day’s worth of data for the selected site at a time. The
First, Next, Previous and Last icons can now be used to move through the data.
8.5. Changing the Way Graphs are Displayed
Graphs have been tailored to display features most often used in irrigation
scheduling. When Bugs are added to the Site Setup, a default Graph is created for
each unit that shows each sensor fitted to the Bug on a common vertical axis. You
can also create Custom Views that combine readings from different Bugs on the one
Graph (providing the sensors display in the same units).
8.5.1.
Creating Custom Views of Data
You can create your own views of your soil moisture sites to display the data in your
preferred format. This is useful if, for example, you wish to view the top sensor from
all sites on the one Graph.
A maximum of 8 sensors can be included on a custom view. From the menu, select
Options ⇒ Custom Views
www.mea.com.au
Page 39
User Manual for MEA Bug Systems
A screen showing you any existing views will display:
●●
●●
●●
●●
●●
●●
●●
●●
●●
Click on the New button to create a new view
When prompted, give the view a name, e.g. “Top sensors”
From the list of sites and sensor depths, click on each sensor you wish to
include in the view, then click on the Add button
When combining sensors, make sure the units for each are compatible, i.e.
all tension (kPa) or all volumetric (%)
The software will caution you if you try to combine sensors with differing
units
The sensor you selected will now show in the list of sensors available in the
view
If you make a mistake and add the wrong block to the list in the bottom right,
click on its name to highlight it and then click on the Remove button
When you have finished click on the Save button
The new view you have created will now show up in the list of sites
when you click on the Site option. In the Site list custom views are easily
recognisable, as there is no Bug ID number alongside them
8.5.1.1.Deleting a Custom View
To delete a Custom View created previously, select Custom Views as above:
●● From the drop down list of views, select the one to delete
●● Click on the Delete button on the right side of the screen and confirm that
you wish to remove this view
www.mea.com.au
Page 40
User Manual for MEA Bug Systems
8.5.2.
Creating Sum and Average Graphs
The standard presentation of data shows data for each sensor as “Separate Level”
traces on a common vertical axis. Using the Sum and Average functions, you can
create additional Graphical views of the data from a Bug that display either the total
moisture (for volumetric sensors) or average moisture (for tension sensors) through
the profile.
To access the Sum and Average functions:
●● Select the Bug from the Site list for which you want to create the new Graph
●● Then from the menu, select:
Options ⇒ Graph Options
●● The Graph Options dialogue box will display
●●
●●
●●
●●
●●
You can then choose whether to display a Summed Graph, an Average
Graph or both by clicking on the selection boxes
A diagram will then display showing the sensors at the site
Remove the tick from any sensor to exclude it from the Graph (for example
if the bottom sensor is a drainage sensor and is not being included)
When you OK the changes, the additional options will now display in the
information panel at the top of the Graph
To change between the default Separate Level Graph and the Average or
Sum Graph, simply click on the required item
8.5.2.1.Summed Graphs
The Sum Graph is useful for displaying data from volumetric sensors such as a set
of Theta Probes. An estimate of the total moisture in millimetre per metre (mm/m)
of soil can be obtained by looking at the moisture levels as 10cm slices of soil at the
depths of the various sensors and then interpolating for any missing sensors. This
is illustrated in the diagram over the page:
www.mea.com.au
Page 41
User Manual for MEA Bug Systems
●●
●●
●●
●●
●●
A 10% reading in each 10cm (100mm) slice of soil is means that that body
of soil contains 10mm of water
The 20cm and 40cm readings are calculated as the average of the readings
above and below them
The total equates to 100mm of moisture in the 0.5m root zone or 200mm
per metre
If the profile for example could hold 300mm/metre (150mm per half metre),
then 50mm of water could be applied to return it to field capacity
When you select a Summed Graph, the vertical axis changes from % to mm
8.5.2.2.Average Graphs
The Average Graph is useful for displaying average moisture levels in the profile
when using soil tension sensors such as gypsum blocks. The Average Graph is
most often used to view changes in moisture levels across the season, and is useful
when establishing different full and refill points for different stages of the growing
season.
The units displayed on the vertical axis of the Average Graph will vary according to
the type of sensor selected:
●● Tension sensors (GBHeavy, GBLite): the result is displayed in kPa
●● Content sensors (Theta Probe, Aquaflex): the result is displayed as a
percentage
www.mea.com.au
Page 42
User Manual for MEA Bug Systems
8.5.3.
Setting Full and Refill Points
The Bug software allows you to set a Full point (when to stop
watering) and Refill point (when to start watering) on the various
Graphs. Full and Refill point icons appear at the bottom of the
screen only if you have selected View Refill Point / Full Point in the Site Setup.
To check if these are enabled:
●● From the menu, select
View ⇒ View Site Setup
●● The Site Setup screen will display
●● At the top right of the screen is a check-box labelled Show Refill Point/Full
Point. If this is checked the lines will display
●● If you have not enabled the display of full and refill points in your Site Setup,
you must connect the Retriever and make the changes under
Options ⇒ Modify Site Setup.
To adjust Refill and Full Point Values:
●● Open a Graph
●● Click on the Refill/Full Point icon.
A dialogue box will appear
●● Tick the Do not set a value entry
if you don’t want to see one of
these lines on the Graph
●● Otherwise, tick the Enter a value
entry and then type in a value
●● When using GBugs and
GTBugs, the Full and Refill
points will display in kPa, in all
other cases they will display as
“%”
●● The settings chosen will now
appear at the bottom of the
Graph alongside the Graph
navigation icons
www.mea.com.au
Page 43
User Manual for MEA Bug Systems
9. Miscellaneous Software Functions
9.1. Deleting a Bug from the Software
If you are using the Bugs in seasonal crops or change the location at which a unit is
installed, you may wish to remove a site from the setup. To prevent you from losing
data, the software does not allow you to completely delete a Bug. Instead, it marks
the site as Not Used.
To remove a Bug:
●● Connect the Retriever to your computer
●● From the menu select
Options ⇒ Modify Site Setup
●● Locate the unit you wish to remove and either click on it and select Edit or
double click on it
●● When the details for the site are displayed, over-type the Bug ID number
with 0, then click on the Clear button
●● Then save the changes. Note that the Site Name will be cleared and
replaced with the text “Not Used”
9.2. Clearing Retriever Data
By default, data from the Retriever is not deleted automatically once you download it
into your computer.
To force the software to erase the data in the Retriever, go to the menu and select
Options ⇒ Clear Retriever Memory
●● The software will prompt you to plug in the Retriever and turn it on
●● Do not unplug the Retriever until prompted to do so
●● The data in the Retriever will then be erased
9.3. Checking and Setting the Retriever’s Time
It is the Retriever clock that time stamps the readings taken from the Bugs. You can
check and change the time on the Retriever as follows:
●● Plug the Retriever into your computer using the Download cable
●● From the MEA Bug Software menu, select
Options ⇒ Check Retriever Date and Time
●● The software will display the current PC time/date and ask you if it is correct
●● If the date/time set on your computer is incorrect, select No and change the
settings from the Windows Control Panel
●● If the date/time is correct, select Yes. You will be asked if you wish to check
the Retriever time. The Bug software will communicate with the Retriever
www.mea.com.au
Page 44
User Manual for MEA Bug Systems
●●
and display its current time setting
If the Retriever and computer settings are significantly different, you can
then choose to overwrite the Retriever date/time settings with those from the
computer
9.4. Exporting Data from the MEA Bug Software
Once data is collected in the Bug Software, you can send it to other programs such
as a spreadsheet for further analysis. You can choose to do this for all sites, or for
just one site.
9.4.1.
Exporting Data to a File or as an Image
To export data into a file or as a Graph image:
●● From the menu select
File ⇒ Export Results
●● The Export Options screen will display
The first two options save data to a comma separated variable (CSV) file for use in
a spreadsheet program. The first option will save the data for the currently selected
site and the second option will save the data for all sites. The procedure is the same
for both options:
●● A screen will be displayed that allows you to select the export range of data
to be exported. There are four options available: Export All Data, Latest
data since the last export, Select the number of days (eg. the last 4 days)
and Select the Start and End Dates (using a calendar)
●● To use the calendar, click on the drop down box for either start or end date.
The calendar will pop up
www.mea.com.au
Page 45
User Manual for MEA Bug Systems
A warning message will be displayed if the selected Start and End dates are beyond
the range of the available data.
You can also select the default folder to use when the exported results are saved:
●● Click Change Folder, select a different folder, click OK
●● If you wish to include site setup information (site names, sensor types),
place a tick in the Include Site Setup information with exported data box
●● The file save dialog will be shown with a default file name. If necessary,
modify the folder and/or file name. Click Save
●● The file will be created as an ASCII text file (with the extension ‘.CSV’) that
can be opened in a spreadsheet
●● You will then be prompted as to whether or not to include the site setup in
the file. If you select Yes, a header will be added to the start of the file with
information on how the sites are configured to help interpret the contents of
the file
●● To import this file into Excel, open the file from Windows Explorer
(double click the left mouse button). Files with the extension ‘.CSV’ are
automatically recognised as Excel (CSV) files
●● Alternatively, open Excel and from the File menu select Open.
●● Navigate to the folder where the file you want to open is stored, and in the
www.mea.com.au
Page 46
User Manual for MEA Bug Systems
●●
field Files of Type, select Text Files (*.prn; *.txt; *.csv)
You will now be able to see any .csv files in the folder. Select the one you
want and either double left-click on it or highlight it and click on the Open
button
The Copy the graph to clipboard option places a picture of the current Graph on the
Windows Clipboard, from where you can paste it into any other Windows application.
9.4.2.
Exporting Data to ARKIVE Software
Bug users may export data in a form suitable for ARKIVE software. This option is
not available if your site setup contains TBugs, or ABugs.
9.5. Set Up Irrigation and Rainfall Information
The MEA Bug PC software allows you to record and display irrigation and rainfall
data.
The data may be recorded separately for each “irrigation shift” and for a number of
rain gauges. Shifts and rain gauges may be assigned to any selection of Bug sites.
If you did not select irrigation and rainfall recording the first time you started MEA
Bug, you may activate it at any time via the Options menu:
Options ⇒ Use Irrigation/Rainfall data
●● If you wish to modify only the Irrigation Shifts and Rain gauges, click
Options ⇒ Modify Irrigation/Rainfall Setup
●● On the Bug setup screen you will see the following
www.mea.com.au
Page 47
User Manual for MEA Bug Systems
●●
Click on the drop down list next to Irrigation Shift
●●
The available choices for Irrigation Shift are None, the site name (eg
‘Merlot’) and Add a new Irrigation Shift
If you change the name of the Site, then the name of the Irrigation Shift will
be automatically updated.
If you only have one Bug to monitor each irrigation shift, the simplest
arrangement is to use the same name for both the Bug site and its irrigation
shift.
If you wish to use a more complex allocation of sites and shifts, you can
enter separate names of your own choice.
Otherwise, click Add a new Irrigation Shift. Type in the name of the shift and
click OK. You cannot type in a name if it has already been used as a Site
Name. The new irrigation shift will be added to the drop down list and may
be used by any other site.
If you have more than one Bug monitoring an area covered by an irrigation
shift, then you may also select any other Site – just Click on the box next to
Show all site names. All sites will now be listed in the Irrigation Shift drop
down list.
If an Irrigation Shift has events recorded you will see a message on the
screen Irrigation Shift already set (18 events recorded)
When you have completed changes to the Site, click OK
●●
●●
●●
●●
●●
●●
●●
Note: Once you have entered events for an Irrigation Shift you will not be able to
modify the Irrigation Shift unless all events on that particular Shift are deleted.
9.5.1.
Recording Irrigation and Rainfall Events
Irrigation/Rainfall events can be entered for any date and time with a resolution of 15
minutes. To record irrigation and rainfall events, click the Irrigation/Rainfall Events
button on the menu bar.
www.mea.com.au
Page 48
User Manual for MEA Bug Systems
The Irrigation/Rainfall Data Entry screen will be shown.
To enter a new Irrigation / Rainfall event, first select the date for this event by either
of these methods:
●● Click the Today button to show today’s date
●● Use the red and yellow date navigation buttons. The yellow buttons change
the date by 1 day, while the red buttons change the date by 1 week
●● Click the Calendar button to pop up the Calendar. Use the mouse to modify
the displayed date and then click Select or Cancel
●●
Click the button Enter a new event for this day. A dialog will be displayed so
you can select the time for this event. Adjust the displayed time by clicking
on the up and down arrows
www.mea.com.au
Page 49
User Manual for MEA Bug Systems
●●
Click Continue. The screen will display tables with rows for each Irrigation
Shift and Rain Gauge
●●
Enter the amounts of water (in mm) for this event into the row for each
Irrigation Shift or Rain Gauge
If you wish to enter the same amount for all rows, type the amount in the
first row and click Apply to All
Once data entry is completed for the chosen time, click the Close button. If
you have more data to enter, click the Accept button
●●
●●
The data will be plotted on the Graph as a pale blue bar for irrigation events and a
dark blue bar for rainfall events. As you move the mouse pointer over the Graph,
the time and amount of water for each event is shown in the Graph legend.
9.5.2.
Navigating Through Existing Irrigation / Rainfall data
Events.
Once you have entered a few irrigation / rainfall events, you can move around
the database by using the calendar and date navigation buttons (described in the
previous section), or by using the black event navigation buttons.
www.mea.com.au
Page 50
User Manual for MEA Bug Systems
●●
●●
●●
●●
9.5.3.
As you change the date using the calendar navigation buttons, if there are
events available for that day, the times for each event will be shown in the
Events table at the left of the screen. If there are no events on that day, you
will see No events displayed
Use the event navigation buttons to move to the first, previous, next or last
events in the database
As you move through the events, the data for the currently selected event
will be shown in the table
If more than one event is available for a given day, the times will be listed in
the Events table. Click the left mouse button on any event time to show the
data. The blue highlight bar indicated the currently selected event
Modifying and Deleting Events
When existing data is displayed the Modify and Delete buttons will be visible on the
screen:
●●
To change water value or the time of an event, click Modify. You will see the
following dialog
www.mea.com.au
Page 51
User Manual for MEA Bug Systems
●●
●●
●●
●●
Select an action and click Continue
If you selected Change the event time, click the up and down arrows to
modify the time. Click Accept
If you selected ‘Modify the irrigation/rainfall values’, the first entry in the
Irrigation will be highlighted. Change the values, then click Accept.
To delete all Irrigation and Rainfall amounts for a given event, click Delete.
You will be asked to confirm.
Note: Data for all Irrigation Shifts and Rainfall in the currently selected event will be
cleared. If you just need to delete data for one irrigation shift in the current event,
use Modify instead.
9.5.4.
Irrigation / Rainfall Data Entry Options
There are two options that may be set in the Irrigation / Rainfall Data Entry options
screen.
Click the Options button to set:
●● The default start time for new events
●● Use Display water values in both mm and points. If this box is ticked, the
points are shown in brackets next to the value in mm
9.6. Reviewing the Retriever Configuration
At any time you can review the configuration of your system. You can do this
without having the Retriever connected. To view the current configuration, from the
menu bar select
View ⇒ View Site Setup.
The Site Setup table will display in read only form.
www.mea.com.au
Page 52
User Manual for MEA Bug Systems
9.7. Checking the Status of the Bug batteries
When you download data from the Retriever into your computer, the battery status
of each unit you have collected data from is displayed (along with the number of
readings collected). You can display the battery information from the last download
at any time by selecting:
View ⇒ Show Battery Levels
Click on either the Graph or Table icon to close the battery voltage view.
9.8. Displaying a Wiring Diagram
As an aid when setting up new Bugs, a wiring diagram can be displayed and printed
from within the software. To display the wiring diagram, from the menu bar select:
View ⇒ Wiring Diagram
●● When the Wiring Diagram dialogue box displays, click on the tab
corresponding to the type of Bug you are installing.
●● Click on the Print icon to print a hard copy
9.9. Using the Retriever on Slow Speed
The Retriever Model 3 and 4 are capable of communicating with the PC at high
speeds. However, on some slow computers and with certain USB to Serial adaptors
the computer cannot keep up with the Retriever and the user may see the message:
Data error during results download. Expecting xxx, Buffer count yyy
If you experience problems with the communications between your computer and
the Retriever, try selecting the slower communications speed option. From the
menu bar select:
Options ⇒ Use Low Speed (9600)
9.10. Multiple Tables
The Multiple Tables option allows you to collect data for more than one Table on the
same computer. When you first install the Bug PC software, the Multiple Tables
option is turned off. To activate Multiple Tables, from the menu bar select
Options ⇒ Allow Multiple Tables
A confirmation message will be shown.
Once this option has been activated, it
cannot be turned off. Click Yes to enable
the Multiple Tables option. Once you have
activated the Multiple Tables option, the
menu item will be greyed out.
www.mea.com.au
Page 53
User Manual for MEA Bug Systems
There are two ways to add extra Tables:
●● Create a new table. Use this option if you wish to start the new Table with
a blank site setup. The Retriever must be connected to the computer while
you enter the site setup details.
●● Import an existing site setup and data files. Use this option if you wish to
import data from another computer. The Retriever is not required while
importing data.
9.10.1. Creating a New Table
The Retriever must be available to use this option. If the Retriever contains data for
another Table, you must download or clear the data before you continue.
To create a new Table, from the main menu select
Options ⇒ Create a New Table
●● An information panel will be displayed explaining the use of Multiple Tables.
●●
●●
To continue, click Create a New Table
You will be asked to enter a name for this Table. The default name
displayed is the number of the Table. The site setup and data files for each
Table are stored in a separate folder. The Table number is used internally
by the program to set the name of the folder where the data files are stored.
www.mea.com.au
Page 54
User Manual for MEA Bug Systems
●●
Type in a name for the Table and click OK. The name must be unique. If
you type in a name that has already been used by an existing Table, you will
be asked to select a different name.
Note: Once you have set the Table name, we recommended that you do not change
it once you start collecting data. The Table name is used during data collection from
the Retriever to load the correct Table and also when you transfer data from another
computer using Backup and Restore/Import Data.
●●
●●
●●
You will be prompted to connect the Retriever
The Modify Site Setup screen will be shown. Enter the details of your site
setup
Once you have finished modifying the site setup, click OK. The Site Setup
will be sent to the Retriever
9.10.2. Importing an Existing Site Setup and Data to a New Table
For more information on importing site setup and data files from another computer,
see Section 10.3, Restore/Import Data.
●●
If the Multiple Tables option has been activated and the name of the
imported Table does not match an existing Table, you will be asked if you
wish to import the site setup and data to a new Table.
●●
Click Yes to create a new Table using the imported data. If you select No,
the import process will be cancelled.
www.mea.com.au
Page 55
User Manual for MEA Bug Systems
●●
●●
The new Table will be added to the list of available Tables displayed when
you start the program or when you select File ⇒ Open Table
When Multiple Tables are in use, the Retriever shows the name of the
currently loaded Table on the screen when it is turned on.
Note: The Retriever can only hold site setup details for one Table at a time. Before
you collect from your Bugs, you must ensure that the Retriever contains the correct
Table.
9.10.3. Opening a Table
When the MEA Bug PC program is started, if there is more than one Table in used a
menu of the available Tables will be displayed.
●●
Use the mouse or the up and down arrow keys to move the highlight. To
open the Table, either double-click the left mouse button or click the Open
Selected Table button.
9.10.4. Location of Data Folders
On Windows XP, 2000 and earlier, the data folder is
C:\Program Files\MEA Bug
On Windows Vista or later, the data folder is
C:\Users\Public\Documents\Program files\MEA Bug\Data
If you are using Multiple Tables, the data for the first Table is located in the data
www.mea.com.au
Page 56
User Manual for MEA Bug Systems
folder, while files for Tables 2, 3 etc are located in separate subfolders under the
main data folder (\table002, \table003 etc).
To find the location of the data files for the currently loaded Table, click Help, About.
The information on the screen includes the current Table name and the data folder.
9.11. Creating a New Season
In normal operation, new Bug data is added to a single set of data files. This is
ideal for perennial crops and allows you to easily scroll the Graph back to data for
previous years.
If you have annual crops or have made changes to crop type or Bug positions then
you may commence a new season with blank data files. This provides a logical
separation between data for each crop or season. Your existing soil moisture data is
automatically archived and a blank Graph is created from the current date.
The Create a New Season option is only available once the current season contains
data for at least 60 days.
To create a New Season:
●● Select Options ⇒ Create a New Season
●● A dialog will be shown that provides information about the process. A
default season comment will be displayed based on the current date (eg.
“Season from 2-Mar-08”)
●● Modify the season comment to describe the new season and click the
Create a New Season button to continue. You will be asked to confirm
●● Click Yes to continue
The MEA Bug PC software will then make a backup copy of your current data. The
new season retains your existing site setup and the new season will start off with
no data. If your Bug layout has changed, you can modify the site setup before
www.mea.com.au
Page 57
User Manual for MEA Bug Systems
collecting data from the Bugs.
You may view data for previous seasons at any time. To display a list of available
seasons, select
View ⇒ View Historical Data
Select a season and the data will be plotted. To show the data for the most recent
season again, click
View ⇒ View Latest Season
www.mea.com.au
Page 58
User Manual for MEA Bug Systems
10. Backing Up Your Data
To help protect against failure of your computer system or software, the data from
the MEA Bug PC Software should be regularly backed up to a removable or network
drive – a weekly backup schedule is recommended as a minimum. In the event that
you have to transfer the information to a new or repaired computer, you can then
use the Restore/Import Data function to re-load your data. You can also use the
Backup and Restore/Import functions to transfer data from one computer to another
within your company.
10.1.Creating a Backup
From the menu bar, select:
Options ⇒ Backup Data
The Backup MEA Bug Files screen will then display:
To make a Backup to an external or removable drive (recommended):
●● Make sure that the Make an additional backup to another location (network
or removable storage) option is selected,
●● Click on the Browse Folders button to select the path to which you wish to
write the backup files
●● The Browse for Folders dialogue box will display
●● From the list of drives and folders, select the location to which you want the
backup to be saved
Use a removable USB drive, CD-Rom burner, or a network drive.
If you select an invalid folder a warning message will be displayed and you will be
asked to select another folder. Invalid folders include C:\ and C:\Program Files\MEA
www.mea.com.au
Page 59
User Manual for MEA Bug Systems
Bug and Windows system folders.
If you are using Multiple Tables an additional option will be displayed. You may elect
to backup all available Tables or just the currently loaded Table. For example, you
may wish to transfer the data for the current Table to another computer.
●●
●●
●●
●●
Click on the Backup Files button to proceed with the backup, or click on
Cancel if you do not wish to go ahead
A dialogue box will display warning you that any existing files in the
destination folder will be over-written
The Copying Files box will show you the progress as each file is copied to
the backup location
At the end of the backup a message will display advising you that the
backup details have been written to the file “readme.txt” (stored in the same
directory as the backup files). This file can be reviewed if you ever need to
confirm that each file was written successfully to the backup
To make a quick Data Backup in the Backup data folder on the local hard drive:
●● Leave the Make an additional backup to another location (network or
removable storage) option unchecked
●● Click on Backup Files to start the backup
Note: Remember that the backup is being made to your own local hard disk – if the
hard disk fails you will lose your backup.
10.2.Location of Backup Data
The backup operation creates copies of the site setup and data files in the folders \
backup1 and \backup2 below the data folder for each Table on the local hard disk.
The folder for MEA Bug data on the local hard disk for Windows XP and older
operating systems is
C:\Program Files\MEA Bug
The data folder on Windows Vista is
C:\Users\Public\Documents\program files\mea bug\Data
If you are using Multiple Tables, then the files for Table 2, Table 3, etc are located in
folders named \table002, \table003 under the above folders. When you select an
additional backup to a network or removable drive, the files for the first Table are
copied directly to the selected folder. If you are using Multiple Tables, then the files
for Table 2, Table 3, etc will be copied to folders named \Table002, \Table003 under
the selected folder backup folder.
www.mea.com.au
Page 60
User Manual for MEA Bug Systems
10.3.Restore / Import Data
The Restore/Import Data option allows you to import site setup and data from
a removable drive or to restore data files in the event of data file corruption.
Consultants can use the Multiple Tables option (see Section 9.10, Multiple Tables)
with the Restore / Import option to maintain data for a number of customers.
To import a Table of site setup and soil moisture data, from the menu bar select:
Options ⇒ Restore/Import Data
An information panel will be displayed.
www.mea.com.au
Page 61
User Manual for MEA Bug Systems
●●
Click Continue. The Bug Site Setup Import Wizard will be displayed:
●●
Click Browse. The Browse for folder dialog will be displayed.
●●
Select the folder containing the Table data to be imported. Click OK. The
contents of the selected folder will be displayed, with a summary of the
Table name, the number of sites and details for each site including site
www.mea.com.au
Page 62
User Manual for MEA Bug Systems
●●
●●
●●
●●
●●
●●
name, Bug type and Bug ID.
Check that you have selected the correct Table. Click Import. A
confirmation message will be shown.
If you are only using a single Table (ie. Multiple Tables are not activated),
then the imported Table will overwrite the existing site setup and data. You
will be asked to confirm that the existing data is to be overwritten.
If the Multiple Tables option is activated, then the MEA Bug PC software
will search the current list of Tables. If a matching Table Name is found, the
imported data will be copied to the data folder for that Table.
If none of the existing Tables match the imported Table, then you will be
prompted to import the Table as a new Table. If you proceed, then the files
for the imported Table will be saved to the data folder corresponding to the
new Table number (ie. for the second Table, the data folder is \table002).
The imported Table name will be added to the list of available Tables
displayed when the program starts and also when you select File, Open
Table from the main menu.
Click Yes to continue. A screen will appear showing progress of the file
import process. Once the files have been copied, a confirmation message
will appear.
Click OK. If you are using a single Table, the Graphs will be redrawn with
the imported data. If you are using more than one Table, the Open Table
dialog will be displayed.
10.3.1. Restoring Data from the Archive Folder
If the two hard disk backups and the backup files on removable drives are corrupted
and unusable then there is a further level of backup files available called archive
files. These are files that are copied to an archive folder every time you collect data
from your Retriever. These files are given a specific file name to indicate the date
that the archive file was produced. The archive folder is \arcd and is located under
the data folder for the current Table.
10.4.Transfer Data From One Computer to Another
To transfer data from one computer to another, transfer the data files to a USB
memory stick by either:
●● The Backup function
●● Windows Explorer to copy files.
10.4.1. Transferring data using Backup Function
●●
●●
Use the backup procedure as described in Section 10.1, Creating a Backup.
Ensure the option Make an additional backup to another location (network or
removable storage) is selected. Browse to the USB memory stick
Use the Restore/Import Data option to transfer the data from the USB
www.mea.com.au
Page 63
User Manual for MEA Bug Systems
memory stick to the destination computer. See Section 10.3, Restore/Import
Data for further instructions
10.4.2. Transferring data using Windows Explorer
●●
●●
●●
●●
Open Windows Explorer and navigate to the MEA Bug PC software data
folder. To determine the name of the data folder for the currently loaded
Table.Click Help About
Copy the entire folder contents to a USB memory stick. Note: Do not
include the program file (Bug.exe)
If you are using Multiple Tables, copy any sub-folders named \table002, \
table003 etc.
Use the Restore / Import Data option to transfer the data from the USB
memory stick to the destination computer. See Section 10.3, Restore/
Import Data for further instructions
www.mea.com.au
Page 64
User Manual for MEA Bug Systems
11. Bug and Retriever Maintenance
11.1. Retriever Maintenance
The Retriever should be kept clean and dry. When not in use it should be stored
in its carry case (these may be ordered through your MEA Reseller). Other than
changing the battery, no maintenance is required.
11.1.1. Checking and Changing the Retriever Battery
The Retriever is powered by a PP3 9-volt Alkaline battery. When the battery voltage
gets low, a message will display on the Retriever screen advising you to change the
battery. You can check the battery voltage at any time from the Info menu on the
Retriever.
To replace the battery:
●● Check that the Retriever is turned off
●● Slide open the battery cover on the back of the Retriever case
●● Unclip the old battery and wait for at least 30 seconds
●● Now insert the new battery and replace the battery cover
●● Only use good quality Alkaline batteries
After changing the battery, a message will display on the screen advising you to
check the Retriever’s clock:
Connect to PC to set clock
●● Connect the Retriever to the computer using the download cable
●● From the MEA Bug Software menu select
Options ⇒ Check MEA Retriever Time
●● The software will display the time currently set on your computer and ask
to confirm that it is correct before programming the Retriever with the same
time. If your computer time is wrong, correct it and repeat the process
11.2. Bug Maintenance
The Bugs should be kept clean. Regular inspections of the site should be
completed to detect and fix any damage to the cables or unit. To protect them from
attack by rabbits, foxes and machinery, the sensor wires can be enclosed in PVC
conduit or poly-pipe.
If you have opened the Bug for any reason, ensure the rubber gasket that seals the
lid is seated correctly in its groove and free from dirt or obstructions before replacing
the lid. A bead of flexible acrylic sealer placed along the top of the lid of the Bugs
will help keep the enclosure sealed in heavy weather.
www.mea.com.au
Page 65
User Manual for MEA Bug Systems
11.2.1. GBug and GTBug Maintenance
The GBug and GTBug are powered by one PP3 9-volt Alkaline battery. The
battery in the Bugs should be changed when the PC software shows a low battery.
(The Battery State entry in the Table that displays after the Retriever has been
downloaded is highlighted). A low battery warning is also displayed on the Retriever
after you collect readings from the Bug.
To change the battery:
●● Make sure that you have collected the readings from the Bugs
●● Only use good quality Alkaline batteries
●● Unscrew the cover of the Bug
●● Pull the battery out of the clip
●● Wait 30 seconds
●● Place a new battery in the clip, trying to connect one terminal and then the
other as cleanly as possible: make sure that you get the polarity correct
●● After 1-2 seconds, the red LED on the circuit board should flash three times
and then go out
●● If it does not flash three times, or stays on permanently, take the battery out,
wait about 30 seconds, and then try once more
●● The LED should flash again after between 5 and 35 seconds to indicate that
the Bug has read the sensors
●● Check that the battery strap is firmly closed up and that the end will not get
caught in the lid when it is replaced
●● Screw the lid back on; make sure it seals correctly
To verify that the Bug is reading the sensors properly:
●● Collect a reading from the Bug with the Retriever, and confirm that you have
a reading by scrolling in the View screen
Note: Removing the battery from a GBug or GTBug will clear all the readings in its
memory
11.2.2. TBug and ABug Maintenance
The TBug and ABug are powered by a set of four “D” sized Alkaline batteries. The
batteries should be changed when a low battery message is displayed either during
the data collection or when transferring the data to your computer. To ensure
satisfactory battery life and to ensure operation over the full temperature range, only
use good quality Alkaline batteries.
Before changing the batteries make sure that you collect the data from the Bug with
the Retriever.
www.mea.com.au
Page 66
User Manual for MEA Bug Systems
To change the batteries:
●● Undo the 4 screws holding the lid to the Bug box and remove the lid
●● Undo the Velcro straps holding the batteries in place
●● Remove the old batteries from the holder and dispose of them thoughtfully
●● Install 4 new D size Alkaline batteries in the holder and re-fasten the Velcro
straps
●● Replace the lid checking to ensure that the seal is intact and the lid sits
squarely
To verify that the Bug is reading the sensors properly:
●● Collect a reading from the Bug with the Retriever, and confirm that you have
a reading by scrolling in the View screen
www.mea.com.au
Page 67
User Manual for MEA Bug Systems
12. Error Messages
12.1. MEA Bug Software Messages
Message
The system date on
this computer is not set
correctly. Please exit
this program and adjust
the system date and
time.
Welcome to the
Retriever PC software.
Before you can use
the Retriever you must
enter the site setup
and send the setup
information to the
Retriever.
The site setup must
be updated on the
Retriever before you
can collect data from
the Bugs.
Error loading site file:
Contact Service
Retriever connection
time out. Please check
USB or serial cable
connection and try
again.
www.mea.com.au
When
At program
start.
Action
The MEA Bug Software cannot read the
time on your computer. Go to Control
Panel and set the computer’s time and
date. Make sure the date format is Date/
Month/Year
First time
installation –
no site setup
loaded.
Before you take any readings, you
must set up the Retriever and MEA
Bug Software. Press OK and follow
instructions to enter a site setup.
You have changed the configuration of
the Software and it now does not match
that in the Retriever. Go to Site Setup
and load the new configuration into the
Retriever
When starting The software has had a problem when
the program opening the site setup file. Shut down
and try again. If the error persists you will
have to restore the data from a backup.
Connect
The software could not communicate with
Retriever
the Retriever:
- check that the Retriever is turned on
- check that cable is properly plugged in
- try scanning all serial ports to find the
Retriever. Options – Com Ports – Search
for Retriever
After
unsuccess-ful
update of site
setup
Page 68
User Manual for MEA Bug Systems
Message
Retriever not found...
The Retriever must be
connected to the PC
during changes to site
setup. ‘Continue with
Modify Site setup?
When
Modify Site
Setup.
Clear Retriever
memory? (Yes/No).
After Data
download.
Retriever has no new
results.
After data
download.
You cannot exit the
During data
program until data
download.
download is completed.
Lost contact with
Retriever
After data
download
An error occurred
during download, try
again.
Connect
Retriever
(Data
download)
www.mea.com.au
Action
The software could not communicate with
the Retriever:
- check that the Retriever is turned on
- check that the USB or serial cable is
properly plugged in
- check COM port settings in Options,
Com Port number must match the
number you are plugged in to.
You can choose to clear the data in the
Retriever after downloading, or to leave it
there . Select YES to clear all data on the
Retriever.
You downloaded but there was no new
data to view. This may be because the
memory has been cleared and the Bug
has not taken any new readings
You have tried to close the program while
the Retriever is still sending data to the
software. Wait until the download finishes
and then try again.
This message will display if you
disconnect the Retriever before it has
finished clearing its memory. The data
has downloaded properly but is still in
memory. You can clear it again anytime.
The Retriever was disconnected during
the download process. Reconnect the
Retriever and try again
Page 69
User Manual for MEA Bug Systems
Message
Data error during results
download. Expecting
xxx, Buffer count yyy
When
Connect
Retriever
(Data
download)
Invalid argument to date Connect
encode
Retriever
(Data
download)
Action
1. The data being returned from the
Retriever has been corrupted during
storage or transmission. Try setting
the Retriever to Slow Speed (from the
Options Menu)
2. Alternatively, try adjusting the Receive
and Transmit Buffer settings for the COM
port. In Windows, select Control Panel
--> Device Manager --> Ports (COM &
LPT). Right-click on the port your cable
is attached to, and select ‘Properties’.
Go to the ‘Port Settings’ tab and select
‘Advanced’. Try sliding the Receive and
Transmit Buffer sliders toward the ‘Low’
end.
The software has been unable to process
the Retriever. Send the Site Setup to the
Retriever and try again
12.2. Retriever Error Messages
Message
Connect to PC to set
clock
When
Retriever
turned on
No site setup: Connect
to PC
Retriever
turned on
Retriever – Retriever
empty
When turned
on
www.mea.com.au
Action
The Retriever clock has lost its time.
This may be because the battery ran flat
or it took too long for the battery to be
changed. Connect the Retriever to the
computer running the MEA Bug Software
and set the Retriever time again
This error message displays if the
Retriever has not been configured.
Connect it to the computer, select Site
Setup from the MEA Bug Software and
download your setup to it
The Retriever contains a valid site setup
but does not contain any new data.
This message will not appear if Bug
information has been transferred into the
unit.
Page 70
User Manual for MEA Bug Systems
Message
Abandoning…
When
When
downloading
from GBug
Err
When
displaying
soil moisture
readings
Error – please try again When
downloading
from a Bug
Data already stored
Or
Site Locked
When
transferring
data from a
Bug into the
Retriever
Error loading site setup
file
When
program
starting
www.mea.com.au
Action
The Retriever did not receive any
information from the Bug, - hold the
Retriever closer to the Bug and try again.
If still unsuccessful, replace the Bug
battery.
This occurs if the soil moisture sensor’s
resistance reading is below the minimum
value stored in the calibration table and
usually means a sensor or the sensor
wires are short circuited. Check the
wiring – make sure you have used two
Scotchloks, one for each wire
Communications between the Bug
and Retriever were not successful or
interrupted
- try holding the Retriever closer, or on top
of, the Bug and try again
- note that you must wait for the Bug to
finish transmitting before trying again
- try also with another Bug. If it works
with another Bug, try fitting a new battery
to the Bug. If it does not work with
another Bug, have the Retriever unit
tested.
The Retriever is already holding data
for the current Bug and you are trying to
transfer data into it before downloading
the last data to your PC.
Transfer the data to the computer and try
again.
To force the Retriever to over-write the
existing data, press and hold down the
Select key during the transfer.
The RETSET01.CFG file which holds the
Site Setup has been corrupted
- the program will try to restore the file
from the Backup sets
- if this is not successful try restoring from
backup files.
Page 71
User Manual for MEA Bug Systems
13. Frequently Asked Questions
Q. How often do the Bugs take readings and how many readings can it store?
A. The G and GTBug takes a reading every 2 hours and will hold 20 days worth of
readings. After 20 days, the oldest readings are progressively over-written with new
readings.
ABugs and TBugs take readings every 15 minutes, and store 8 days worth of data
at the 15 minute rate and a further 20 days at a 2 hour rate. With the A and TBugs,
only the last 8 days of readings can be reviewed on the Retriever display.
Q. How often will I have to change my gypsum blocks?
A. The blocks will break down over time. The life of the sensor depends on the
salinity of the soil and will range from 2 to over 5 years (with the lowest life in acid
soils). When a block is nearing the end of its life, readings will became erratic when
the soil is wet.
Q. What is the maximum cable length for gypsum blocks?
A. MEA recommends a maximum distance of 10 metres but longer extensions have
been used. A cable extension is useful when installing the GBugs under centre
pivots: the sensors can be installed some distance from the GBug to ensure that the
area around the sensors is not disturbed.
Q. A GBug does not have a reading even though it is past two hours since the
last reading time.
A. When the GBug battery is installed, it is possible that the first reading will be
taken apparently more than two hours later. This will only occur when a battery is
replaced.
Q. Where can I obtain the most recent MEA Bug software?
A. Download software from http://www.mea.com.au/downloads/mea-bug/.
Q. I have just installed a GTBug and the soil temperature readings are not
making sense.
A. Check that the software setup has the Temperature selected at Sensor position 4.
Temperature will display on the vertical axis on the right of screen.
Q. My Retriever seems to be losing time.
A. The Retriever time is set from within the Bug software when the Retriever is
programmed. Check and reset the time from the software by selecting
Options ⇒ Check MEA Retriever Date and Time
If the problem persists, return the Retriever for repair.
www.mea.com.au
Page 72
User Manual for MEA Bug Systems
Q. I have purchased an ABug/TBug and cannot get it to work with my
Retriever.
A. The ABug and TBug will operate with Retriever Models 3 or later. The Retriever
model number is displayed when it first powers up:
MEA RETRIEVER MK 3.xx
If your Retriever is an earlier model, contact MEA to organise a quotation for
upgrading it to the current model.
Q. I have just collected data from my Bugs and although Site 16 showed data
on the Retriever, none displays on the computer.
A. Download the latest version of the software from MEA’s web site to rectify the
problem.
Q. I am trying to Back Up my data but when I do so I get an error message.
A. Download the latest version of the software from MEA’s web site to rectify the
problem.
Q. I have just replaced the batteries in my TBug, but the Retriever shows
“Urgent replace site # battery”. I have measured the replacement batteries
and they are not flat, what is the problem?
A. If you are using SM200 sensors, there might be a manufacturing issue with some
of the cables. Please contact MEA to discuss the problem. (Note: SM200s were
obsoleted in August 2010. MEA no longer distributes or services these sensors.
If you have an SM200 sensor that has malfunctioned, contact MEA to discuss
replacement of the SM200 with a Theta Probe)
www.mea.com.au
Page 73
User Manual for MEA Bug Systems
Index
Q
A
R
ABug
Adding to Site Setup 24
Batteries 70
Data Smoothing 24
Installation 29
View readings on Retriever 36
Retriever
Bug low battery monitoring 34
Changing the battery 69
Changing the time 48
Clear the memory 38
Configuration 27
Connecting to 18
Data protection 26
Data protection over-writing 26
Downloading 37
Forcing clear memory 48
Maintenance 69
Menu and keyboard 30
Reading bugs 31
Problems 32
Reviewing readings 34
Sending Site Setup to 25
Transfer data to computer 37
B
Backup Data
Location 64
Windows Vista 64
Windows XP 64
C
COM Port
Checking 14
D
Data
Create backup 63
Location of backup data 63
Restore / Import 65
Transferring between computers 67
G
GBug
Adding to Site Setup 22
Battery 70
Installation 28
View readings on Retriever 34
GTBug
Adding to Site Setup 23
Battery 70
Installation 28
View readings on Retriever 35
www.mea.com.au
Quick start guide 12
S
Site Setup
Adding a GBug 22
Adding a GTBug 23
Adding an ABug 24
Adding a TBug 23
Creating 20
Sending to Retriever 25
Software
Backing up your data 63
Bug battery monitoring after data
transfer 34
Check the COM Port 14
Custom views 43
Deleting a bug 48
Demonstration data 39
Entering a Site Setup 18
Export data 49
Page 74
User Manual for MEA Bug Systems
First time installation 15
Full and refill point 47
General icons 40
Graphs 40
GTBug temperature scale 42
How much data to show 40
Importing an existing site setup and
data 16, 59, 65
Last 48 hour view 43
Printing your site setup 25
Reviewing the configuration 56
Starting the program 14
Sum and Average graphs 45
Symbols 41
System requirements 13
Tables 43
Transfer data between computers
67
USB to serial adaptor 13
Wiring diagram
Printing 57
Viewing 57
T
TBug
Adding to Site Setup 23
Batteries 70
Data Smoothing 23
Installation 29
View readings on Retriever 35
www.mea.com.au
Page 75
User Manual for MEA Bug Systems
Notes
www.mea.com.au
Page 76