1
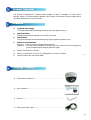
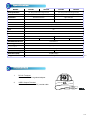
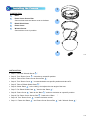
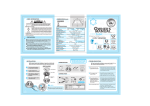
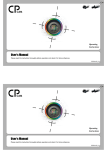
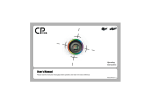
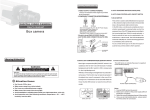
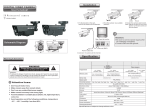
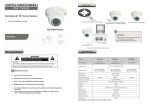
.
VANDAL PROOF
Vandal Proof Color Dome Camera
User’
User’s Manual
Please read instructions thoroughly before operation and retain it for future reference.
Vandal V1.1
CAUTION
RISK OF ELECTRIC SHOCK
CAUTION:
To reduce the risk of electric shock, do not expose this apparatus to rain or moisture.
Only operate this apparatus from the type of power source indicated on the label. Failure to do so
may cause injury or death by electric shock and invalidates the warranty.
The lightning flash with arrowhead symbol, within an equilateral
triangle, is intended to alert the user to the presence of uninsulated
“dangerous voltage” within the product’s enclosure that may be of
sufficient magnitude to constitute a risk of electric shock to persons.
This exclamation point within an equilateral triangle is intended to
alert the user to the presence of important operating and
maintenance (servicing) instructions in the literature accompanying
the appliance.
Product Overview
The product is designed for locations where subject to abuse, vandalism, or other violent
damage. Made of vandal-resistant materials, this camera could sustain violent impact which
will surely disable other normal cameras.
Features
Crystal & Clear Image :
1/3" Sony Super HAD CCD image sensor to provide superior pictures
High Resolution :
Support high resolution (Model No. CPC393, CPC394)
Vandal Proof :
The special material could withstand strong impact against the dome cover.
BuiltBuilt-in auto switch filter :
Day time ~ Rich and colorful image during day time
Night time ~ The filter will be switched off during night time, allow CCD sensor exposed to
more infuriated light for brighter picture at night.
Built in Auto Electronic Shutter
Minimum illumination of 0.5Lux / F2.0 (Model No. CPC391, CPC392)
Signal-to-noise ratio more than 48dB
P.1
Package Contents
Vandal Dome Camera * 1 …………………………………………..
User’s Manual * 1 ………………………………………………….…
Wrench * 1 ……………………………………………………………
Power and Video Cable * 1 ………………………………………...
P.2
Specification
MODEL
CPC391
Pick up Element
Number of Pixel
CPC392
CPC393
1/3" Sony Color CCD image sensor
CPC394
1/3" Sony Color CCD image sensor
510(H)x492(V) <NTSC> / 500(H)x582(V) <PAL> 768(H)x494(V) <NTSC> / 752(H)x582(V) <PAL>
Resolution
Min. Illumination
Standard resolution
High resolution
0.5Lux / F2.0
1Lux / F2.0
S/N Ratio
More than 48dB (AGC off)
Electronic Shutter
1/60 (1/50) to 1/100,000 sec.
Flickerless
Off
BLC
On
AGC
Max
White Balance
ATW
CRLESS
On
IR Shifter Switch
Auto Switch Filter
Standard Board Lens
Auto Switch Filter
f3.6 mm/F2.0
Lens Angle
92
Video Output
1.0Vp-p composite, 75
Power Source
DC12V 10% regulated
Current Consumption
90mA
Dimension (mm)
Weight
160mA
93.4(Ø) x 69(H)
282g
P.3
Connections
1.
DC12V Terminal:
Connect to DC 12V regulated adapter
2.
VIDEO Output Terminal:
Connect to monitor with 75coaxial cable.
2
1
P.4
Installing the Camera
1
COMPOSITION:
•1
Base
•2
Dome Cover Secure Rim:
Secure shield case and dome cover to the base.
•3
Black Shield Case
•4
Dome Cover
•5
Wrench Screw:
Secure dome cover in position.
2
3
4
5
P.5
INSTALLATION:
Step 1. Unscrew “Wrench Screw 5 ”
Step 2. Turn “Dome Cover 4 ” clockwise to a specific position.
Step 3. Take off the “Dome Cover Secure Rim 2 ”
Step 4. Turn “Dome Cover 4 ” counterclockwise to a specific position and take off it.
Step 5. Take off “Black Shield Case 3 ”.
Step 6. Screw “Base 1 ” to the ceiling. And adjust the view angle of the lens.
Step 7. Put “Black Shield Case 3 ” back to the “Base 1 ”.
Step 8. “Dome Cover 4 ” back to the “Base 1 ” and turn clockwise to a specific position.
Step 9. Put “Dome Cover Secure Rim 2 ” back to the “Base
”.
Step 10. Turn “Dome Cover 4 ” counter-clockwise to lock.
Step 11. Fasten the “Base 1 ” and “Dome Cover Secure Rim 2 ” with “Wrench Screw 5 ”.
P.6