1
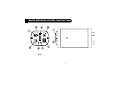
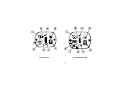
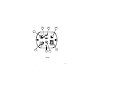
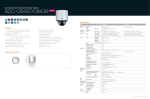
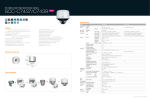
Operating
Instructions
User’s Manual
Please read this instruction thoroughly before operation and retain it for future reference.
REGULAR EU-V1.1
Thank-You Note Before You Get Start
First of all, we would like to express our gratitude to you for purchasing CPcam
products. Once again, this product is designed uniquely to meet all your personal needs
with our great industry-designing ability and our everlasting perseverance to the quality
of all our products.
This manual will introduce you how to install this camera. Please keep it well for your
future reference.
Now, we would like to invite you to personally experience this user-friendly manual and
all of the powerful functions this CPcam product offers.
http://www.avc.com.hr
WARNING
The apparatus shall not be exposed to dripping. No objects filled with liquids, such as vases, shall be
placed around the apparatus.
The lightning flash with arrowhead symbol, within an equilateral
triangle, is intended to alert the user to the presence of uninsulated
"dangerous voltage" within enter the product's enclosure that may be
of sufficient magnitude to constitute a risk of electric shock to
persons.
The exclamation point within an equilateral triangle is intended to alert
the user to the presence of important operating and
maintenance-(servicing) instructions in the literature accompanying
the appliance.
PACKAGE CONTENT
Camera
C mount
adaptor ring
HEX wrench
Iris connector
User’s Manual
1
CONNECTION
STEP 1. Mount the lens onto the camera.
STEP 2. Set the lens selection switch (AES/AI).
STEP 3. Connect the camera video output and the monitor video input with a 75 coaxial cable.
STEP 4. Connect the camera audio output and the monitor audio input with a coaxial cable.
STEP 5. Connect the power terminal of the camera to a right power supply.
STEP 6. Adjust the focus or flange-back. (refer to page 3)
!
ATTENTION: When using DC 12V camera, it must connect with regulated power
adaptor ONLY.
2
FOCUS OR FLANGEFLANGE-BACK ADJUSTMENT
The following adjustment
should be made by qualified
service personnel or system
installers.
Flange Back Adjusting Ring
Back focal lock hexagonal bolt
1. Mount the lens by turning it clockwise on the lens mount of the camera.
2. Loosen the screws on the flange-back adjusting ring.
3. Turn the flange-back adjusting ring to the desired position.
4. Tighten the hexagonal bolt on the flange-back adjusting ring with the HEX wrench.
3
AUTO IRIS LENS CONNECTOR INSTALLATION
Installation of Auto Iris Lens Connector
Install the lens connector when using auto Iris Lens.
The installation should be accomplished by qualified technician or system installers.
Cut the iris control cable at the edge of the lens connector to remove the existing lens connector
and then remove the outer cable cover of the supplied connector as shown in the diagram.
The pin assignment of the auto iris lens connector is as follows:
Video Drive Lens
Direct Drive Lens
Pin 1:
Power source
Damp-
Pin 2:
Video signal
Damp+
Pin 3:
Not used
Driver+
Pin 4:
Ground, Shield
Driver-
Solder the lens cable to the pins of the supplied connector.
4
FEATURES
CP
111
Sony CCD sensor
211
212
213
311
High Resolution
Min.Illumination 0.06Lux / F1.2 / 30 IRE
312
313
315
316
Min.Illumination 0.1Lux / F1.2 / 50 IRE
Min.Illumination 0.25Lux / F1.2 / 50 IRE
V.D / D.D / AES selectable
Signal-to-Noise ratio is more than 48dB (AGC off)
Backlight compensation ON/OFF selectable
White balance mode ATW/HOLD selectable
Support audio function
DAY & NIGHT function, compatible with IR lens
Flickerless ON PAL:1/120 /OFF selectable
Color rolling Less ON/OFF selectable
5
SPECIFICATION
Model
CPC111
Pick up Element
1/3" B / W CCD sensor
CPC211
Resolution
Min. Illumination
Number of Pixel
CPC212
1/3" Sony Color CCD sensor
Standard
0.06 Lux / F1.2
0.1 Lux / F1.2
500 (H) x 582 (V) <PAL>
500 (H) x 582 (V) <CCIR>
S / N Ration
More than 48dB (AGC off)
Electronic Shutter
1/60(1/50) to 1/100,000 sec.
Iris Mode
V.D / D.D / AES selectable
White Balance
-
BLC
-
Hold / ATW
ON / OFF
AGC
Sharpness
Auto
-
Soft / Sharp
Microphone
Yes
Video Output
1.0 Vp-p composite, 75
Lens Mount
C / CS mount changeable
Power Source
Current Consumption
DC12V 10% regulated
120 mA
110 mA
Operating Temperature
0 ~40 Dimension (mm)
65.5 (W) 50 (H) 107.3 (L)
Gross Weight
356g
6
Model
CPC213
Pick up Element
1/3" Sony Color CCD sensor
Resolution
Min. Illumination
Number of Pixel
CPC311
CPC312
1/3" Sony Color CCD sensor (W / Sony DSP)
H.R.
Standard
0.25 Lux / F1.2
0.04 Lux / F1.0
500 (H) x 582 (V) <PAL>
752 (H) x 582 (V) <PAL>
S / N Ration
More than 48dB (AGC off)
Electronic Shutter
1/60(1/50) to 1/100,000 sec.
Iris Mode
V.D / D.D / AES selectable
Flickerless
-
ON PAL:1/120 / OFF selectable
White Balance
Hold / ATW
ATW
ON / OFF
BLC
AGC
Auto
Sharpness
Soft / Sharp
Normal / Max
-
Microphone
Yes
Video Output
1.0 Vp-p composite, 75
Lens Mount
C / CS mount changeable
Power Source
DC12V 10% regulated
Current Consumption
110 mA
120 mA
Operating Temperature
0 ~40 Dimension (mm)
65.5 (W) 50 (H) 107.3 (L)
Gross Weight
356g
7
Model
CPC313
Pick up Element
Resolution
Min. Illumination
Number of Pixel
CPC315
H.R.
0.18 Lux / F1.2
752 (H) x 582 (V) <PAL>
Standard
H.R.
0.04 Lux / F 1.0
0.18 Lux / F1.2
500 (H) x 582 (V) <PAL>
S / N Ration
More than 48dB (AGC off)
Electronic Shutter
1/60(1/50) to 1/100,000 sec.
Iris Mode
ON PAL:1/120 / OFF selectable
Hold / ATW
ATW
BLC
ON / OFF
AGC
Normal / Max
CRLESS
ON / OFF
Hold / ATW
-
Microphone
ON / OFF
Yes
Video Output
1.0 Vp-p composite, 75
Lens Mount
C / CS mount changeable
Power Source
DC12V 10% regulated
Current Consumption
160 mA
AC24V / DC12V 10%; AC230V 10%
3W
0 ~40 Operating Temperature
Dimension (mm)
Gross Weight
752 (H) x 582 (V) <PAL>
V.D / D.D / AES selectable
Flickerless
White Balance
CPC316
1/3" Sony Color CCD sensor (W / Sony DSP)
65.5 (W) 50 (H) 107.3 (L)
356g
616g
8
MAJOR OPERATING CONTROL AND FUNCTIONS
VIDEO
AUDIO
V.D.
D.D.
AES
AI
OFF
FL 1/100
BLC
OFF
AGC
MAX
ATW
HOLD
OFF
1
3
2
4
CRLESS
LEVEL
PL
L
DC 12V
H
AUTO IRIS
(313)
9
V IDEO
AUDIO
V.D .
VIDEO
D .D .
A ES
AI
O FF
FL 1 /100
B LC
OFF
A GC
MAX
A TW
O FF
AI
OFF
FL 1/100
BLC
OFF
HOL D
AGC
MAX
CRL ESS
ATW
HOLD
3
AC 24 V
L
AC 100V
230V
D.D.
AES
1
LE V EL
PL
AUD IO
V.D.
OFF
1
3
2
4
CRLESS
DC 12 V
H
2
4
LEVEL
PL
AUT O IRIS
L
H
AUTO IRIS
(316 AC230V)
(316 AC24V/DC12V)
10
VIDEO
VIDEO
AUDIO
V .D.
D .D .
AE S
AUD IO
V.D.
AI
1
3
D.D.
AES
AI
BLC
OFF
AGC
MAX
B LC
OFF
AG C
MA X
O FF
FL
1/100
OFF
FL
1/100
AC 24 V
1
3
2
4
DC 12 V
L E VEL
PL
L
230V
H
2
LEVEL
PL
4
L
H
AU TO I RIS
AUTO IRIS
(315 AC230V)
( 315 AC24V/DC12V )
11
VIDEO
AUDIO
V .D.
AES
OFF
AGC
MAX
OFF
FL
1/100
AUDIO
V.D.
AI
BLC
D.D.
AI
1
3
AES
BLC
SOFT
HOLD
OFF
SHARP
ATW
1
3
LEVEL
PL
L
DC 12V
VIDEO
D.D.
H
LEVEL
PL
2
4
AUTO IRIS
L
DC 12V
(311 / 312)
H
2
4
AUTO IRIS
(211 / 212 / 213)
12
9
8
10
7
VIDEO
AUDIO
V.D.
D.D.
AES
AI 00
1
3
2
4
LEVEL
L
H
S
PL
DC 12 V
6
AUTO IRIS
5
4
3
(111)
13
The pin assignment of the Auto Iris Lens connector is as follows:
1.
Flange Back Adjusting Ring
It is suitable for CS-mount lens. When using C-mount lens, please use the CS-C conversion Ring.
2.
Back focal lock hexagonal bolt
The camera is set at the standard back focal position. Fine-tuning is inevitable according to the
lens types. Adjust the lens back-focus by turning the focusing knob.
3.
Auto Iris Lens Connector
It supplies power and controls signal to an Auto Iris Lens.
4.
DC Drive Level adjusting V.R
When using Direct Drive Lens, you can adjust the DC Drive Level for the bright of video output.
5.
Power LED Indicator
The Power LED Indicator indicates normal status during operation.
6.
Power Input Terminal
* For connecting the DC 12V regulated power supply.
* For connecting the AC 24V / DC 12V regulated power supply.
* For connecting to the regulated AC 100V / AC 230V power supply.
7.
Video Output Connector (VIDEO OUT)
For connecting coaxial cable to CCTV monitor video input.
14
8.
Function Select
1) AES/AI switch: AES(Automatic Electronic Shutter) – When using a manual iris lens or fixed iris
lens, set this switch to AES. AI (Auto Iris Lens Connector) – This connector is used to connect
with the auto iris by a 4 pin male connector.
2) OFF/FL 1/100 (NTSC) .FL 1/100 is Flickerless 1/100 (means shutter fixed at 1/100 second)
OFF/FL 1/120 (PAL) .FL 1/120 is Flickerless 1/120 (means shutter fixed at 1/120 second)
3) BLC(Backlight Compensation): Allows you to select the mode according to the position of the
object and light conditions on the screen.
4) AGC(Automatic Gain Control): Automatically adjust the image to compensate for low levels of
illumination.
5) ATW/HOLD: Select White Balance mode between Auto Tracing White balance and HOLD
white balance.
6) CRLESS: Decrease color rolling (Color rolling means image running under illumination of
fluorescent lamp. The image will shift from white color to bluish, pinkish and back to white over
again. This problem is caused by the AC power which is running 0n 50/60 Hz.).
Note: When the function “CRLESS” is ON, the function “hold white balance” is invalid.
9. V.D. / D.D. selectable
Auto Iris Lens selectable between Video Type (V.D.) and DC type (D.D.).
10. Audio Output Connector (AUDIO OUT)
For connecting the AUDIO IN connector of the recording device.
11. Ground screw Terminal
For connecting with the ground (earth) of power supply cable.
15