1
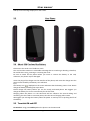
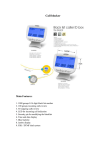
User manual
X550- Qube
User Manual
Page 1 of 24
User manual
INTRODUCTION
Thank you for purchasing this mobile phone. To obtain the best performance of your
phone, please read this user manual carefully.
Page 2 of 24
User manual
Table of Contents
1
Safety ................................................................................................................. 4
2
1.1 Safety Precautions ........................................................................................ 4
Introduction ....................................................................................................... 5
3
2.1
Phone and Accessories .......................................................................... 5
2.2
To Lock/Unlock ...................................................................................... 5
2.3
Your Phone ............................................................................................ 6
2.4
About SIM Card and the Battery ............................................................ 6
2.5
To switch ON and OFF ........................................................................... 6
Phonebook ......................................................................................................... 7
4
3.1
To Add a contact.................................................................................... 7
3.2
To View a contact .................................................................................. 7
3.3
To Call a contact .................................................................................... 7
3.4
To Delete a contact................................................................................ 7
3.5
To Mark a contact.................................................................................. 7
3.6
To Copy a contact to phone memory ..................................................... 7
3.7
Add a contact to Blakclist ...................................................................... 7
3.8
Send a contact via vCard ....................................................................... 8
3.9
Fixed dialing .......................................................................................... 8
3.10
Memory details ..................................................................................... 8
3.11
Speed dial ............................................................................................. 8
3.12
Caller groups ......................................................................................... 8
Calling ................................................................................................................ 8
5
4.1
To dial from the Phonebook .................................................................. 8
4.2
Call waiting............................................................................................ 8
4.3
Call Barring............................................................................................ 9
4.4
Call divert .............................................................................................. 9
Call Logs ........................................................................................................... 10
6
5.1
Missed calls/dialed calls/received calls/blocked calls ........................... 10
Messages.......................................................................................................... 10
7
6.1
Write SMS ........................................................................................... 10
6.2
SMS Inbox ........................................................................................... 10
6.3
SMS Draftbox .......................................................................................11
6.4
SMS Outbox .........................................................................................11
6.5
Sent items ............................................................................................11
6.6
Templates.............................................................................................11
6.7
Voice Mail Server .................................................................................11
6.8
Broadcast Message.............................................................................. 12
6.9
SMS Settings ....................................................................................... 12
6.10
MMS Settings ...................................................................................... 12
6.11
Memory Status.................................................................................... 12
Phone & Call Settings ....................................................................................... 13
Page 3 of 24
User manual
8
7.1
Customized General Settings/Phone Settings/ Connection Settings ..... 13
User Profiles ..................................................................................................... 13
9
8.1
User Profile Setup ............................................................................... 13
Entertainment .................................................................................................. 15
9.1
Camera ............................................................................................... 15
9.2
Image Viewer ...................................................................................... 15
9.3
Video Recorder ................................................................................... 15
9.4
Video Player ........................................................................................ 15
9.5
Audio Player ........................................................................................ 16
9.6
Sound Recorder................................................................................... 16
9.7
FM Radio ............................................................................................. 16
10 Fun & Games .................................................................................................... 17
10.1
Games ................................................................................................. 17
11 Bluetooth ......................................................................................................... 17
11.1
To Activate/Deactivate Bluetooth Connectivity .................................... 17
11.2
Paired devices ..................................................................................... 17
11.3
To Search devices ................................................................................ 17
11.4
Settings ............................................................................................... 17
12 Organizer.......................................................................................................... 18
13 File Manager .................................................................................................... 19
14 WAP & JAVA Services ....................................................................................... 20
14.1
WAP Browser ...................................................................................... 20
14.2
Java ..................................................................................................... 20
15 STK ................................................................................................................... 21
15.1
STK Services ........................................................................................ 21
16 Inputting Text ................................................................................................... 21
17 Maintenance .................................................................................................... 22
18 Taking Care of your Device ............................................................................... 23
19 After Services ................................................................................................... 24
1 Safety
1.1 Safety Precautions
Please read through the following briefings carefully, and act in accordance with
these rules, so as to prevent causing any danger or violating any law.
Safe driving
1) Do not use the phone while driving. When you have to use the phone, please use
the personal hands-free kit.
2) Please put the phone safely in the phone stand. Do not put it onto any passenger
Page 4 of 24
User manual
seat or any place from which it may fall down in case of vehicular collision or
emergency braking.
Turn off during a flight: Flight is influenced by interference caused by the phone. It is
illegal to use a phone on the airplane. Please turn off your phone during a flight.
Turn off the phone when within an area where blasting takes place: Be sure to
strictly observe the related laws and statutes by turning off the phone when you are
within, or in the vicinity of, an area where blasting takes place.
Turn off the phone when any dangerous goods are in vicinity: Please turn off your
phone when you are close to a gas station or in the vicinity of any place where fuel
and chemical preparations, or any other dangerous goods are stored.
In hospital: Please obey the related rules or bylaws of the hospital when using your
phone in a hospital. Be sure to turn off your phone when near any medical
equipment. Your use of any wireless transmission equipment, inclusive of the phone,
will interfere with any medical equipment that is not protected fully, and other
electronic equipment items, too. Should you have any question in this regard, please
consult a related physician or medical equipment supplier.
Interference: Each and every phone’s performance may be affected due to radio
interference.
Professional service: The phone must be installed or repaired by no other personnel
than professionals. You are likely to suffer a huge risk when you install or repair this
phone by yourself, which also goes against the warranty rules.
Fittings and battery: You shall use the fittings and battery acknowledged by the
phone manufacturer only. Using unauthorized accessories may tamper the warranty
of the device.
Proper use: Please use the phone in the normal way. Do not touch the antenna
unnecessarily after the phone is turned on.
Emergency call: You may enter a telephone number (112, etc.) to ask for emergency
help after making sure that the phone has been turned on and is in the service status.
Press the Send Key to call out.
Disclaimer: Micromax will not bear any responsibility for any incompliance with the above
mentioned guidelines or improper usage of the mobile phone. Micromax keeps the right to
make modifications to any of the content here in this user guide without public
announcement in advance. The content of this manual may vary from the actual content
displayed in the mobile phone. In such case, the latter shall govern.
2 Introduction
2.1 Phone and Accessories
Open the packing box of the phone and check that you have the Phone, Standard Charger,
Standard Battery, USB cable, Earphone, Service Guide, Software CD, Leather pouch and
Warranty Card.
2.2 To Lock/Unlock
To lock your phone, press the small button on the top side of the phone. To unlock the phone
Page 5 of 24
User manual
slide up on the message displayed on the screen.
2.3
Your Phone
2.4 About SIM Card and the Battery
Please store the cards out of childrens reach.
The card and the contacts are vulnerable to damage due to scratching or bending. Therefore,
be careful when using, inserting or removing the cards.
Be sure to switch off the phone before you insert or remove the battery or the card,
otherwise, the phone may be damaged.
Insert the plug of the charger into the interface of the phone, and insert the charger into the
power socket carefully. The battery icon will blink.
Tips:
The battery icon
displayed on the screen indicates that the battery power is low. Please
charge the battery following the steps above.
Please charge the battery before you use the newly purchased phone. We suggest you
charge the battery for 4 hours continuously for the first time.
Charging when the phone is in the ON mode will not influence the normal dialing and
answering, but this needs to consume power, thus the time of charging will increase.
We suggest you recharge the battery when the power is used up so as to prolong the life of
the battery.
2.5 To switch ON and OFF
To switch on: Long press End key when the phone is in the OFF mode.
Page 6 of 24
User manual
If the phone lock has been activated, you need to enter the 4-digit password to unlock. (The
preset unlock code is 0000.)
If the SIM card has been inserted in the phone, and the related PIN code protection is
activated, you need to enter the 4-8 digit password to unlock.
Warning: If you enter three wrong PIN codes in a row, the SIM card will be locked and you
need to enter the PUK code to unlock. Both the PIN code and PUK code are provided by the
network operator.
To switch ON/OFF: In the standby mode, press the key on the top side of the phone to
power on and off.
3 Phonebook
You can store names and phone numbers in the memory of the phone or SIM card.
Menu > Phonebook
3.1 To Add a contact
Menu>Phonebook>Options>New
Or in idle, tap on the calling icon to enter phone numbers and save a contact.
3.2 To V iew a contact
Menu>Phonebook>Options>View
In the contact list of the Phonebook, select to view the required name card
3.3 To Call a contact
Menu>Phonebook>Options>Call
View the contact number to make calls
3.4 To Delete a contact
Menu>Phonebook>Options>Delete
Allows you to delete a contact
3.5 To Mark a contact
Menu>Phonebook>Options>Mark
Mark the currently viewed contact or mark all contacts in the phonebook
3.6 To Copy a contact to phone memory
Menu>Phonebook>Options>Copy
Copy the contact to the phone memory
3.7 Add a contact to Blakclist
Menu>Phonebook>Options>Add to blacklist
Add the contact to the blacklsit
Page 7 of 24
User manual
3.8 Send a contact via vCard
Menu>Phonebook>Options>vCard
Send a contact via vCard. You can also import & export contact to and from the
phonebook.
3.9 F ixed dialing
Menu>Settings>Phone >Fixed dialing
3.10 Memory details
Menu>Phonebook>Options>Memory details
View the memory used and left in the Phone and SIM memory
3.11 Speed dial
Menu>Settings>Phone >Speed dial
You can specify speed dial numbers to frequently used phone numbers.
Long press the number keys 2-9 on the dial plate to display a corresponding phone number.
3.12 Caller groups
Menu > Phonebook > Caller groups
To view the ‘caller groups’ folder tap on the fourth key above- to select the group to
be set in the preset groups mentioned in the phone. Like- Friends, family, colleagues,
others and more.
4 Calling
Note: Once you attend a call your phone will display a series of functions from you to choose
from. For example- Mute, Send message, Hold call and more. Choose anyone feature to carry
out the desired functions.
4.1 To dial from the Phonebook
Enter the Phonebook, select an entry from the entry list and press on the ‘tick symbol’ to
dial.
4.2 Call waiting
Menu > Settings > Phone> Call settings>Call Waiting
This function allows you to put the current call on hold and then answer a second one.
If, during a call, a new call comes in, you will hear a special alert sound and the screen will
display the number of the new incoming call, which indicates that a third-party call is coming
in and waiting for to answer.
Page 8 of 24
User manual
4.3 Call Barring
Menu > Settings > Phone >Call Barring
The function is a GSM network service and can restrict outgoing and incoming calls
selectively. If you need to change the settings of Restrict Calls, please contact your network
operator to obtain the password for opening this service.
4.4 Call divert
Menu > Settings > Phone> Call divert
With the Call Divert function (needs network support), you may divert incoming calls to
another mobile phone or a direct line telephone, but not to any extensions of a fixed
telephone.
Page 9 of 24
User manual
5 Call Logs
5.1 Missed calls/dialed calls/received calls/blocked calls
Press the keys displayed on top of the screen to view> Dialed calls / Received calls/ Missed
calls/ BlockedCalls
You may select
View: View the desired entry
Call: Call the desired entry
Save to Phonebook: to save the number to the Phonebook
Edit: to edit the number to dial or save to the phonebook.
Send SMS/MMS: To write SMS/MMS to send to the number.
Delete: To delete the entry.
Delete All: Delete all the registered entry in one go.
Call timer: View the call timers for the last/received/dialed calls or reset
Call cost: View the call costs
6 Messages
6.1 Write SMS
Menu > Messages > Write SMS/MMS
Write the content of the SMS, Options >
Input Method: select Multitap abc/Numeric/Insert Symbol
Insert template: select a phrase from the list and insert it into the SMS.
Advanced: Insert object/Insert contact/Format text (embellish the characters of text)/ Insert
bookmark.
Save to Drafts: Allows you to save a message that you wish to send later to ‘drafts’
6.2 SMS Inbox
Menu > Messages > Inbox
To read a message, move to the entry and press OK
When reading a SMS, you can select Options >
Open: Allows you to view the SMS received.
New Message: Allows you to type a new SMS or MMS
Reply: Allows you to reply to the SMS/MMS received.
Delete: Allows you to delete the SMS received
Copy to SIM: Allows you to copy the SMS to the SIM memory
Copy to phone: Allows you to copy the SMS to the phone memory.
Export SMS: Allows you to export the message to phone memory
Mark: Allows you to mark a single or all messages
Sort by: Allows you to sort the messages by date/sender/subject
View details: Allows you to view the details of the SMS received.
Page 10 of 24
User manual
6.3 SMS Draftbox
Menu > Messages > Drafts
Open: Open a new message
New message: Allows you to type a new SMS or MMS
Delete: Delete the received message
Copy to SIM: Copy the received message to the SIM memory
Mark: Allows you to mark a single or all messages
Sort by: Allows you to sort the messages by date/sender/subject
View details: Allows you to view the details of the SMS received.
6.4 SMS Outbox
SMS that have been sent and saved are stored in Outbox.
Menu > Messages > Outbox
To read a message, move to the entry and press OK
When reading an SMS, you can select Options >
Resend: select how to send.
New message: Allows you to type a new SMS or MMS
Delete: Delete the message.
Delete all: Delete all the messages from the Outbox.
Move to Draft: Move the to the drafts folder.
Sort by: Allows you to sort the messages by date/sender/subject
View details: Allows you to view the details of the SMS received.
6.5 Sent items
Menu>Messages>Sent items
View the messages sent by you to other numbers
Open: Allows you to view the SMS received.
New Message: Allows you to type a new SMS or MMS
Delete: Allows you to delete the SMS received
Copy to SIM: Copy the sent message to the SIM memory
Export SMS: Allows you to export the message to phone memory
Mark: Allows you to mark a single or all messages
Sort by: Allows you to sort the messages by date/sender/subject
View details: Allows you to view the details of the SMS received.
6.6 Templates
Menu > Messages > Templates>SMS/MMS
The phone has preset frequently used phrases which may be selected and added to the text
when you are editing an SMS & MMS. Preset phrases may be modified.
6.7 Voice Mail Server
Menu > Messages > Voice mail
The phone supports Voice Mail.
Page 11 of 24
User manual
6.8 Broadcast Message
Menu > Messages > Broadcast Message
The phone supports Broadcast Message. It is supported by GSM network. Broadcast
messages are single-way messages sent to the users of the network operators by the
message service center. For the contents and channel setup of broadcast messages, consult
your network operator.
6.9 SMS Settings
Menu > Messages > Settings>SMS/MMS
Edit/Change settings for the folders belowSMS
SMS Signature
MMS
Broadcast Message
Voice mail
6.10 MMS Settings
Menu > Messages > Settings> MMS
Edit/Change settings for the folders belowMMS profiles
Profiles Settings
6.11 Memory Status
Menu > Messages > Memory status
View the used and available memory in the phone & SIM memory
Page 12 of 24
User manual
7 Phone & Call Settings
7.1 Customized General Settings/Phone Settings/ Connection Settings
Menu>Settings>General Settings
1.General Settings
Personalization: Personalize the Display/Standby view & Language settings/Pen
Calibration/Wallpaper
Date/Time: Personalize the Date & Time
Schedule power on/off: Choose to switch ON/OFF to play the power ON/OFF music
Security: Choose to edit settings for PIN/Phone/ Auto keypad/Self rescue/SMS blacklist
Note: Default password for all applications in your phone is 0000
Restore Factory Settings: The default password to reformat your phone is 0000
2. Phone Settings
Menu>Settings>Phone
Choose from a list of features below to carry out your desired functions
Call Settings- Choose to edit settings under call waiting/caller identity & more
Call Divert- Divert all calls to another number
Call Barring- Bar all incoming calls
Network settings- Edit/Change the preset network settings
Standby mode- To enable the SIM under this option enter the default password 0000.
Speed dial- Select contact numbers that you wish to add to the speed dial list
3. Connection Settings
Menu>Settings>Connection
Data Accounts-: Allows you to select your GPRS connection
Wap Settings: Allows you to set the WAP settings (Please refer to the WAP settings
mentioned ahead in this manual)
MMS Settings: Allows you to set the MMS settings
Java Settings: Allows you set the JAVA settings
8 User Profiles
8.1 User Profile Setup
Functions
Activate the profile mode
Description
Menu > User profiles > Desired mode>Options > Activate
Alert Type
Menu>User
Alert type
Volume
Menu > Settings > User profiles > Options > Personalize>
profiles>Desired
mode>Options>Personalize>
Volume
Set the ringtone
incoming tone
Set the ringtone
message tone
Calendar tone
for Menu > User profiles > Desired mode>Options > Personalize >
Incoming tone
for Menu>User profiles> Desired mode> Options> Personalize>
Message tone
Menu>User profiles> Desired mode> Options> Personalize>
Page 13 of 24
User manual
Calendar tone
Set the ringtone for key Menu>User profiles> Desired mode> Options> Personalize>
pad tone
Keypad tone
Silent Mode
On the idle screen tap on the dial key to view the keypad and
press the # key to activate the silent mode.
Page 14 of 24
User manual
9 Entertainment
9.1 Camera
Menu > Camera
Choose from a list of functions below to carry out the desired task
Image size: Set the size of the image
Image quality: Set the image quality
Night mode: Switch ON/OFF the night mode
Effect: Normal/Mono/Sepia/Negative/Sketch/Oil painting/Emboss/Mosaic/Zipper and Blur
Continuous Shots: Choose the number of shots you prefer in one single click
Timer: Set the timer
White balance: Set the white balance
Banding: Set the banding
Sound: Switch ON/OFF the sound
9.2 Image V iewer
Menu > Image viewer
On the Image viewer list screen, open the image and select Options>
Wallpaper: Choose to set the image as a wallpaper.
Contact: Choose to set the image as a caller picture for a desired contact
Screen saver: Choose to set the image as a screen saver
Power ON: Choose to the set the image as a power on image
Power OFF: Choose to set the image as a power off image
9.3 V ideo Recorder
Choose from a list of functions below to carry out the desired taskVideo size: Set the video size
Video quality: Set the video quality
Night mode: Switch ON/OFF the night mode
Effect: Normal/Mono/Sepia/Negative/Sketch/Oil painting/Emboss/Mosaic/Zipper and Blur
White balance: Set the white balance
Banding: Set the banding
Sound: Switch ON/OFF the sound
File size limit: Set a file size limit
Rec time limit: Set a recording time limit
EV: Set the ‘exposure value’ for your pictures
Storage: Select phone or memory card.
Video size: Select the video size
9.4 V ideo Player
Menu > Video player>Choose to view videos stored in Phone/SIM memory
Page 15 of 24
User manual
On the video player list screen, select Options >
Play: Play the video
Send: Send the video by MMS or Bluetooth.
Rename: Rename the video
Delete: Delete the highlighted file.
Mark: Mark the video to either delete or send the video via MMS or bluetooth
View details: View details of thevideo
9.5 Audio Player
Menu > Music
In the audio player you can carry out the following functions:
Play: Play the song by tapping on the play button displayed on your screen
Stop: Stop the song
Repeat: Choose to repeat one or all songs or turn OFF this application
Shuffle: Switch ON/OFF
Equalizer: Set the equalizer as per your preference
3D Surround: Switch ON/OFF the 3D surround sound
Lyrics Display: Switch ON/OFF to display or not display the lyrics of the song playing
Set cover:
9.6 Sound Recorder
Menu > Multimedia > Sound recorder
On the Sound Recorder list screen, you can select:
Play: play the highlighted recording.
New: Record a new sound file
Send: Send the highlighted record by MMS, Bluetooth or Email.
Set as: Set the sound as a ringtone, contact tone or alarm
Rename: Rename the highlighted recording.
Delete: Delete the highlighted recording.
View files
9.7 FM Radio
Menu > FM radio
To search channelsOptions>Search channel>Auto search
To save the channel listSelect one or all channels and add them to the channel list.
To recordPress the red icon on the display screen to record a programme or songs playing currently.
To change channelsLong press on the ‘>’ key to change to the next channel
To continue to play songs even while on idle screenPage 16 of 24
User manual
Select to highlight the music key
while on idle screen.
displayed on the screen to allow the radio to play even
10 Fun & Games
10.1 Games
Menu > Games
Your phone has 3 preloaded games in it. Choose the game you wish to play and keep yourself
entertained.
11 Bluetooth
You can connect wirelessly to other compatible device with Bluetooth technology.
Compatible devices may include computers, mobile phones. You can use Bluetooth
connectivity to send images, music and sound clips, video clips, and notes.
Since devices with Bluetooth wireless technology communicate using radio waves, your
device and the other devices need to be within a range of 10 meters from each other, but the
connection may be subject to interference or could face obstruction from stuff such as wall
or from other electronic devices. Use the wireless technology of bluetooth to be able to
consume battery quantity of electric charge. If you are restricted by something when using
bluetooth technology, consult your local Micromax support/service station.
11.1 To Activate/Deactivate Bluetooth Connectivity
Menu > Bluetooth > Power(On/Off)
11.2 Paired devices
Menu>Bluetooth>Paired devices
Switch ON the Bluetooth to view other Bluetooth connections in your periphery and pair it
up with a desired contact.
11.3 To Search devices
Menu > Bluetooth > Search devices
Tip: Please activate the Bluetooth first.
11.4 Settings
Menu > Bluetooth > Settings
View the following options to change/edit the Bluetooth settingsVisibility- Switch ON/OFF to display your Bluetooth device visbility
Device name- Edit your Bluetooth device display name
Receive folder- View items received via Bluetooth in the phone/SIM memory
Device information- View details about your Bluetooth device.
Page 17 of 24
User manual
12 Organizer
Functions
View the calendar
Notes
Description
Menu > Calendar
Menu > Notes
Tasks
Menu > Tasks
Options > View
Or: Menu > Calendar
Options > View tasks
Menu > Alarm > Edit
Menu > World clock
Menu>Countdown times
Menu > Stopwatch > Typical stopwatch > Split timing/Lap timing
/ View record
Press Start to start timing, and press Split / Lap continuously to
record more than one time. Press Done to save the time.
Menu > Extra > Stopwatch > nWay stopwatch
Press Start to start timing, and press the corresponding
Navigation key to activate the sub-timing. The main timing will
continue to add. Select Stop to stop the main timing and the
sub-timing. Press Reset to clear all the time.
Menu > Calculator
Menu > Currency converter
Input the exchange rate and Press OK.
Select the exchange rate, input the figure and press OK.
Menu > Text reader
Menu>My cash
Use this feature to keep a check on your expenditure.
Set the alarm
World clock
Countdown timer
Stopwatch
Calculator
Currency converter
Text reader
My cash
Page 18 of 24
User manual
13 File Manager
When an USB cable is connected, you can use the phone as a USB mass storage.
Functions
Description
View folders
Menu > File manager> Options > Open
Create folders
Menu > File manager > Options > New folder
View
detailed Menu > File manager > Options > Open
infomation
Options > Detail
Page 19 of 24
User manual
14 WAP & JAVA Services
14.1 WAP Browser
For creating/editing a WAP accountYou need to make the relevant settings in WAP Setup before you use the WAP browser to
surf the web.
Menu> Connectivity>Data Accounts
To edit/add new WAP account- Add account > Add account name/ APN/ Username &
password > Save.
Menu> Connectivity>WAP settings>WAP Profile
Edit the profile settings- Account Name/ Homepage/ Data Account (select the previously
created data account) > Select connection type (HTTP/WAP- Indise HTTP & WAP ener the
correct proxy address & port > Done > Save the account >Go to the created account &
activate.
To activate your accountMenu>Connectivity>WAP settings>SIM1/2 profile
When the WAP browser is activated, if a homepage is set in WAP Setup, the phone will link
the website indicated by the homepage; otherwise, you may enter a website and the phone
will connect to it.
To surf the web, select
Menu>Internet>Choose SIM1/2 profile
Refresh: To refresh the web page.
Guidance>Homepage: To link the homepage.
Guidance> Input URL: input a website address.
Add Bookmark: Add to bookmark.
History: Toggle between the next & previous page
Set Homepage: set the URL as homepage.
Close: To exit the browser.
14.2 Java
Menu > Java
You can install Java applications to enhance the multimedia function. It also allows you to
connect to Snaptu, Nimbuzz and Operamini as well.
Java settings
Menu > Connectivity>JAVA settings
Page 20 of 24
User manual
15 STK
15.1 STK Services
If your SIM card supports STK, you may use the corresponding value-added services.
16 Inputting Text
You can enter text in English and digit.
Page 21 of 24
User manual
17 Maintenance
Use a dry soft cloth to wipe general dirt.
Do not use a hard cloth, benzene or thinner to wipe the phone, otherwise, the surface of the
phone will be scratched or could even result in the fading of colour.
Page 22 of 24
User manual
18 Taking Care of your Device
•Your device is a product of superior design and craftsmanship and should be
handled with care: The following suggestions will help you protect your phone:
•Always keep the small parts of the phone away from children.
•Keep the device dry. Precipitation, humidity, and all types of liquids or moisture
can contain minerals that will rust electronic circuits. If your device does get wet,
remove the battery, and allow the device to dry completely before replacing it.
•Do not use or store the device in dusty, dirty areas. Its moving parts and
electronic components can be damaged.
•Do not store the device in high or cold temperature. High temperatures can
shorten the life of electronic devices and damage batteries.
•Do not attempt to open the device other than as instructed in this guide.
•Do not drop, knock, or shake the device. Rough handling can break internal
circuit boards and fine mechanics.
•Do not use harsh chemicals, cleaning solvents, or strong detergents to clean the
device. Only use a soft, clean, dry cloth to clean the surface of the device.
•Do not paint the device. Paint can clog the moving parts and prevent proper
operation.
•Use chargers indoors
Page 23 of 24
User manual
19 After Services
For details, see the After Service Guide supplied with the phone.
Page 24 of 24