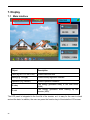
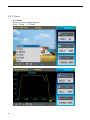
1
User Manual User Manual -Installation -Operation SR-13kW-TL SR-17kW-TL SR-20kW-TL Catalogue 1. 2. 3. 4. 5. 6. 7. Notes on this manual ............................................................................................................................... 3 1.1 General notes ..............................................................................................................................................3 1.2 Symbols Used ..............................................................................................................................................3 1.3 Target Group ...............................................................................................................................................3 Preparation ................................................................................................................................................ 4 2.1 Safety Instructions.......................................................................................................................................4 2.2 Explanations of Symbols on Inverter...........................................................................................................4 Product Information ................................................................................................................................. 7 3.1 Overview .....................................................................................................................................................7 3.2 Major Characteristics ..................................................................................................................................7 3.3 Technical Data .............................................................................................................................................9 Packing checklist ................................................................................................................................... 10 4.1 Assembly parts ......................................................................................................................................... 10 4.2 Product Appearance................................................................................................................................. 11 4.3 Product Identification .............................................................................................................................. 12 4.4 Further Information ................................................................................................................................. 14 Installation ............................................................................................................................................... 14 5.1 Safety........................................................................................................................................................ 14 5.2 dimensions, weight .................................................................................................................................. 14 5.3 Mounting Instructions .............................................................................................................................. 14 5.4 Safety Clearance ....................................................................................................................................... 16 5.5 Mounting Procedure ................................................................................................................................ 16 Electrical Connection ............................................................................................................................. 18 6.1 Safety........................................................................................................................................................ 18 6.2 Overview of Connection Area .................................................................................................................. 18 6.3 DC Side Connection .................................................................................................................................. 19 6.4 AC side connection ................................................................................................................................... 23 6.5 Communication and Monitoring connector............................................................................................. 24 Display ..................................................................................................................................................... 25 7.1 Main interface .......................................................................................................................................... 25 1 7.2 LCD Display ............................................................................................................................................... 27 7.2.1. Curve...................................................................................................................................................... 27 7.2.2. Parameters ............................................................................................................... 错误!未定义书签。 7.2.3. Tools & Options ..................................................................................................................................... 28 7.2.4. Information ............................................................................................................................................ 28 7.2.5. Error ....................................................................................................................................................... 31 7.2.6. Update ................................................................................................................................................... 31 7.3 State Information ..................................................................................................................................... 34 8. Troubleshooting ..................................................................................................................................... 43 9. Warranty .................................................................................................................................................. 45 10. Abbreviation ............................................................................................................................................ 47 11. Contact .................................................................................................................................................... 47 2 1. Notes on this manual 1.1 General notes The main purpose of this User’s Manual is to provide instructions and detailed procedures for installing, operating, maintaining, and troubleshooting the following three types of Z10 series Solar DANGER Inverters: Z10I13KDT Z10I17KDT Z10I20KDT DANGER indicates a hazardous situation which, if not avoided, will result in death or serious injury. 1.2 Please keep this user manual available at all times in case of emergency. 1.3 Symbols Used WARNING WARNING indicates a hazardous situation which, if not avoided, can result in death or serious injury or moderate injury. CAUTION CAUTION indicates a hazardous condition which, if not avoided, can result in minor or moderate injury. or moderate injury. NOTICE NOTICE indicates a situation that can result in property damage, if not avoided. 3 1.4 Target Group Chapter 1, 2, 3, 4, 7, 8, 9, 10 and chapter 11 are provided for anyone who is intending to use a Z10 Series Grid-tied Solar Inverter. Before any further action is taken, the operators must first read all safety regulations and be aware of the potential danger when operating high-voltage devices. Operators must also have a complete understanding of this device’s features and functions. WARNING Do not use this product unless it has been successfully installed by qualified personnel in accordance with the instructions in Chapter 5, “Installation”. Chapter 5 and Chapter 6 are only for qualified personnel who are intended to install or uninstall the Z10 Series Grid-tied Solar Inverter. Installation must be suitable for the on-site conditions and comply with local regulations and technical rules. NOTICE Qualified personnel means he/she has a valid license from the local authority in: • Installing electrical equipment and PV power systems (up to 1000 V). • Applying all relevant installation codes. • Analyzing and reducing the hazards involved in performing electrical work. • Selecting and using Personal Protective Equipment (PPE). 4 2. Preparation 2.1 Safety Instructions DANGER DANGER due to electrical shock and high voltage DO NOT touch the operating component of the inverter, it might result in burning or death. TO prevent risk of electric shock during installation and maintenance, please make sure that all AC and DC terminals are unplugged. DO NOT remains close to the instruments while there are severe weather conditions including storms, lightning etc. WARNING The installation, service, recycling and disposal of the inverters must be performed by qualified personnel who must comply with national and local standards and regulations. Please contact your dealer to obtain details about an authorized repair facility if the inverter requires maintenance or repair. Any unauthorized activities including the modification of product functionality of any kind will affect the extent of the warranty; Such actions may result in Zeus Appollo Solar not accepting any responsibility for that warranty. 5 NOTICE Public utility only The PV inverter is designed to feed AC power directly into the public utility power grid; do not connect the AC output of the device to any private AC equipment. CAUTION The PV inverter will become hot during operation; please don’t touch the heat sink or adjacent surface during or shortly after operation. Risk of damage due to modifications. Never modify or manipulate the inverter or other components of the system. 6 2.2 Explanations of Symbols on Inverter Symbol Description Dangerous electrical voltage This device is directly connected to public grid, consequently all work on the inverter shall only be carried out by qualified personnel. DANGER to life due to high electrical voltage! There might be residual currents present within the inverter because of large capacitors. Wait 10 MINUTES before you remove the front lid. NOTICE, danger! This device directly connected with electricity generators and the public grid. Danger of hot surface The components inside the inverter will generate heat during operation, DO NOT touch aluminum housing during operation. An error has occurred Please go to Chapter 8 “Trouble Shooting” to remedy the error. This device SHALL NOT be disposed of in residential waste Please go to Part 9 “Recycling and Disposal” for correct disposal management. Without Transformer This inverter does not use a transformer for the isolation function. CE Mark Equipment with the CE mark fulfils the basic requirements of the Guidelines Governing LowVoltage and Electromagnetic Compatibility. No unauthorized perforations or modifications Any unauthorized perforations or modifications are strictly forbidden, if any defect or damage (device/person) occurs,BLD Solar will not accept any responsibility for it. 7 3. Product Information 3.1 8 Overview Industrial Layout Excellent Heat Elimination Effective Shield For DC/AC/Communication Connections 3.2 Major Characteristics Z10 series inverter has following characteristics which make Z10 series inverter “High Efficiency, High Reliability, High Cost Effective Ratio” • Complies with multiple safety regulations of European, Asia Pacific and Oceanian countries. • Double MPPT Tracking, MPPT tracking accuracy up to 99.9%. • Max. Efficiency 98.2%, European Efficiency 97.8%. • Professional radiating design, protection Level IP65, which will ensure that the unit will perform correctly in severe outdoor conditions. • Complete safety protection, with an integrated DC switch. • Flexible input and output connections which support RS485, Ethernet and USB communication. • Transformerless design and high power density, ensuring lighter and more convenient for installation. 3.3 Technical Data Type 13K-TL 17K-TL 20K-TL 13500W 1000V 640V 250-800V 400-800V 300V 250V 22A/11A 25A/15A 2 A:3/B:3 MC4 connector 17600W 21200W 1000V 640V 1000V 640V 250-850V 440-850V 300V 250V 22A/22A 25A/25A 250-850V 480-850V 300V 250V 22A/22A 25A/25A 2 2 A:3/B:3 MC4 connector A:3/B:3 MC4 connector 13000VA 13000W 17000VA 17000W 19200VA 19200W Nominal AC Voltage 3/N/PE; 220/380V 3/N/PE; 230/400V 3/N/PE; 240/415V 3/N/PE; 220/380V 3/N/PE; 230/400V 3/N/PE; 240/415V 3/N/PE; 220/380V 3/N/PE; 230/400V 3/N/PE; 240/415V Nominal Grid Frequency Max. AC Current Grid Voltage Range* Grid Frequency Range* Power Factor Total Harmonic Distortion (THD) Feed in Starting Power Night time Power Consumption Standby Consumption 50Hz/60Hz 20.0A 185-276V 45-55Hz/55-65Hz 0.9i…1…0.9c <2% 60W <1W <12W 50Hz/60Hz 26.0A 185-276V 45-55Hz/55-65Hz 0.9i…1…0.9c <2% 50Hz/60Hz 29.0A 185-276V 45-55Hz/55-65Hz 0.9i…1…0.9c <2% 60W 60W <1W <12W <1W <12W Input (DC) Max. PV Power Max DC Voltage Nominal DC Voltage Operating MPPT Voltage Range MPPT Voltage Range at Nominal Power Start up DC Voltage Turn off DC Voltage Max. DC Current (A/B) Max. Short Circuit Current for each MPPT Number of MPP trackers Number of DC Connection DC Connection Type Output (AC) Max. AC Apparent Power Nominal AC Power (cos phi = 1) 9 AC Connection Type Type Plug-in connector Plug-in connector Plug-in connector 13K-TL 17K-TL 20K-TL 98.0% 97.5% 99.9% 98.1% 97.6% 99.9% 98.2% 97.8% 99.9% Efficiency Max. Efficiency Euro Efficiency MPPT Efficiency Safety and Protection DC Insulation Monitoring DC Switch Residual Current Monitoring Unit (RCMU) Grid Monitoring with Anti-islanding Protection Class Overvoltage Category Yes Optional Integrated Yes I (According to IEC 62103) PV II / Mains III (According to IEC 62109-1) Reference Standard Safety Standard EMC Standard Grid Standard EN 62109, AS/NZS 3100 EN 61000-6-1, EN 61000-6-2, EN 61000-6-3, EN 61000-6-4, EN 61000-311, EN 61000-3-12 VDE-AR-N-4105, VDE 0126-1-1, RD1699, G59/2, AS4777, CEI0-21, CQC Physical Structure Dimensions (WxHxD) Weight Environmental Protection Rating Cooling Concept Mounting Information 44.5kg 575x655x240mm 45kg IP 65 (According to IEC 60529) Fan cooling Wall bracket General Data Operating Temperature Range Relative Humidity Max. Altitude (above sea level) Noise Level Isolation Type Display Data Communication Interfaces Computer Communication Standard Warranty *The AC voltage and frequency range may vary depending on the specific country grid. 10 -20°C to +60°C(derating above 45℃) 0% to 98%, no condensation 2000m <45dB (with fan<50dB) Transformerless 800x480 TFT Graphic Display RS485 (Wi-Fi, GPRS optional) RS232 (USB) 5 Years (10 years optional) 45kg 4. Packing checklist 4.1 Assembly parts After you receive the Z10 series inverter, please check to see if there is any damage to the carton, and then examine the inverter and accessories for any visible external damage. Contact your dealer if anything is damaged or missing. . We will be glad to assist you if required. A B C D E F G H I J Object Quantity Description A 1 Z10 series inverter B 1 Wall mounting bracket C 1 User manual D 4 Screws (ST6x50) E 4 Expansion tubes F 1 AC cover 11 4.2 G 6 DC connectors negative) H 1 Ground nut (M6) I 5 Cord end terminals J 4 Screws (M4X12) x Product Appearance A Front D E F B G Object 12 (6 H Description A LED light(Green) – RUN B LED light(Red) – FAULT C LED light(Yellow) – COM D < left choice E > Right choice F ∧ up choice G ∨ down choice H Ok identify key Bottom C positive,6 x C B A H E F D G Left and right I Object Description 13 4.3 A DC switch B Plug connectors for DC input. C RS232 interface D RS485 interface E Earthing F Ethernet interface G USB interface H Terminal for grid connection (AC output) I Update and reset switch for display Product Identification You can identify the inverter by the side name plate. Information such as the type of inverter, as well as the inverter specifications are contained on the side name plate. The name plate is on the middle part of the right hand side of the inverter housing. And the following figure is an example of the side name plate on the Z10I17KDT 4.4 Further Information If you have any further questions concerning the type of accessories or installation, please check our website or contact our service hotline. 14 5. Installation 5.1 Safety DANGER DANGER to life due to potential fire or electricity shock. DO NOT install the inverter near any flammable or explosive items. This inverter will be directly connected with a HIGH VOLTAGE power generation device, the installation must be performed by qualified personnel only in compliance with national and local standards and regulations. NOTICE NOTICE An inadequate or incorrect installation may impact on the published lifespan of the inverter. An Installation under the direct sun is not recommended. The installation site MUST have adequate ventilation. 5.2 Dimensions, weight Model Z10I13KDT weight 44.5kg Dimension (L×W×D) Z10I17KDT 45kg 575mm×650mm×240mm Z10I20KDT 45kg 575mm×650mm×240mm 575mm×650mm×240mm 15 5.3 Mounting Instructions 16 Z10 series inverter is designed for interior and exterior installation Please mount the inverter in the direction as illustrated above It is recommended that the inverter is installed vertically, with a max.15 degrees backwards tilt. In order to view the LCD display and undertake maintenance activities, please install the inverter at eye level. Ensure that the wall selected for installation is strong enough the mounting screws and can bear the weight of the inverter Ensure the device is properly fixed to the wall It is not recommended that the inverter is exposed to strong sunshine, because the excess heat might lead to a power reduction The ambient temperature of installation site should be between -20 °C and +60 °C ( between -4 °F and 140 °F ) Make sure the ventilation of the installation location, insufficient ventilation may reduce the performance of the electronic components inside the inverter and shorten the life of the inverter 5.4 Safety Clearance Observe the following minimum clearances to walls, other devices or objects to guarantee sufficient heat dissipation and enough space for pulling the electronic solar switch handle. 20cm 30cm 30cm 40cm 5.5 Direction Minimum clearance Above 20 cm Below 40 cm Sides 30 cm Mounting Procedure 1) Mark 4 positions of the drill holes on the wall according to the paper installation position scale packed in the carton box. 17 2) Then where the wall is marked, drill 4 holes. Then insert four expansion tubes into the holes using a rubber hammer. Next insert the 4 screws through the mounting holes in the bracket, and then tighten the screws into the expansion tubes. 18 3) Check the 4 holes at the rear of the inverter. Then lift the inverter carefully, aligning the 4 holes in the inverter and the 4 hooks on the bracket, and finally lightly attach the inverter to the hooks. 4) Please carefully check the accessories in original carton to make sure every necessary part is used and nothing is missing during installation. 19 6. Electrical Connection 6.1 Safety DANGER DANGER to life due to potential fire or electricity shock. When the inverter powered up, comply with all applicable national regulations and legislation concerning accidents prevention. This inverter will be directly connected to a HIGH VOLTAGE power generation device; the installation must be performed by qualified personnel only in compliance with national and local standards, regulations and legislation. NOTICE Electrical connections must be carried out in accordance with the applicable regulations, such as conductor sections, fuses, and PE connections. 6.2 Overview of Connection Area C A 20 B H E F D G Object 6.3 Description A DC switch B Plug connectors for DC input. C RS232 interface D RS485 interface E Earthing F Ethernet interface G USB interface H Terminal for grid connection (AC output) DC Side Connection DANGER DANGER to life due to potential fire or electricity shock. NEVER connect or disconnect the connectors under load. NOTICE The DC Switch (Optional) may be integrated or external to Inverter, and it can be used to connect or disconnect the DC source from the Inverter. 21 For Z10I13KDT, Z10I17KDT and Z10I20KDT, there are two MPP Tracker, and the DC characteristics of them are illustrated as the following table. Inverter Type MPP Tracker Z10I13KDT Z10I17KDT Max. DC Power Max. DC Voltage 13500W 2 Z10I20KDT 17600W 21200W Max. DC Current 22/11A 1000V 22/22A 22/22A Connection procedure by MC4: Connect the PV modules and inverter using MC4 connectors below. Connect the positive and negative terminals from the PV modules to positive (+) terminals and negative (-) terminals on Z10 series inverter Connection Procedure: 1) Switch off the DC breaker and secure against being switched back on inadvertently. 2) Strip the cable 7 mm. 3) Insert striped cable into contact barrel and insure all conductor strands are captured in the contact barrel. 4) Crimp contact barrel by using a hex crimping die. Put the contact barrel with striped cable in the corresponding crimping notch and crimp the contact. 22 5) Insert contact cable assembly into back of the male and female connector. A “click” should be heard or felt when the contact cable assembly is seated correctly. 6) Wrest the cap by using the torque of 2.6~2.9NM. 7) After wrest the cap tightly, align the 2 half connectors and mate them together by hand until a “click” is heard or felt. 8) When the separation of connector is necessary, use the specified wrench tool to separate. Please make sure the wedge side of the fingers face the male connector and push the tool down. Then separate the connector by hand. See below figure. 9) If input connector is not enough, adopt“ Y ”connector ( optional ) just as below: 23 10) Please use sealing caps for tight sealing of unplugged PV connectors. If using H4 connector, the operating procedure is similar as that of MC4 connector. 6.4 AC side connection DANGER DANGER to life due to potential fire or electricity shock. NEVER connect or disconnect the connectors under load. NOTICE DC Switch (Optional) may be integrated or external to Inverter, and it can be used to connect or disconnect the DC source from Inverter. Connection Procedure 1) Strip the cable 12mm 12mm 24 2) Insert the striped cable into cord end terminal and insert the assembly into barrel. Then the line will like the picture below. 3) Insert the finished 5 lines into AC cover assembly with the following sequence: Open the plastic cover, use slot type screwdriver to press the shrapnel in the indicated position, and then put the line in the right hole, please note the sequence of the line shall in the right order: L1,L2,L3,N,PE 25 Cover the assembly, tightly screwed and then screw the cable gland 26 6.5 Communication and Monitoring connector There are RS232/RS485, Ethernet and USB interface in the bottom side of the Z10 series inverter as shown in the following figure: C B A H E F D G The function is as below: Object Description Function C RS232 interface Update the Software Version of the inverter D RS485 interface Connect with PMB F Ethernet interface Connect with Ethernet G USB interface Connect with USB I Display interface Update and reset switch for display I 27 7. Display 7.1 Main interface Object Description Time (e.g.2011-12-09 10:44) Current date and time Safety(e.g. Portugal) Current safety regulation selected Operation (e.g. normal ) Current operation condition E-today The energy generated today in kilo watt hours (kWh) E-total The energy generated since starting up the inverter (kWh) The LCD panel is integrated in the front lid of the inverter, so it is easy for the user to check and set the data. In addition, the user can press the function key to illuminate the LCD screen. 28 NOTICE The Z10 series inverter is not an aligned measuring instrument for current, voltage or power consumption. A slight deviation of a few percent points is inherent to the s ystem; the results from the inverter cannot be used for grid balance calculations. An aligned meter will be required to make calculations for the utility company. 7.2 LCD Display 29 7.2.1. Curve a. P-Now Draw curve of current power: Click “Curve”----“P-Now” 30 b. P-Day Draw curve of one day’s power: Click “Curve”----“P-Day” c. E-Month 31 Show one month’s generated energy: Click “ Curve” ----“ E-Month” d. E-Year 32 Draw curve of one year’s generated energy: Click “Curve”----“E-Year” e. E-Total 33 Draw curve of every year’s generated energy: Click “Curve”----“E-Total” 7.2.2. Parameters 34 a. AC Parameters Show AC parameter: Click “Actual Value”---“AC Actual Value” b. DC Parameters Show DC parameter, including following items: 35 Vpv (1-2), Ipv(1-2) Click“ Actual Value” ---“ DC Actual Value” 7.2.3. Tools & Options 36 a. Language and Time Setting of language & time Click“ Setting” ----“Language and Time” b. Safety Parameters 37 Setting of safety parameters: Click“ Setting” ----“Safety Parameters”。 38 c. Clear Data Clear Log: Click“ Setting” ----“Clear Data” 39 40 7.2.4. Information Device Info Kinds of inverter: 13K/17K/20K Vision number & serial number: Click“ Information” ----“ Device Info” 41 7.2.5. Error Error Info Show Error information: Click“ Error” ----“ Error Info” 42 7.2.6. Update Flash It’s used for updating the inverters’ firmware. After putting inverter’s ROM documents to related catalogue, users can update the Firmware by clicking the button. 7.2.7. State Information State Wait Display Waiting Connect State information Initialization & waiting Sec. Normal Normal SPI Failure: Communication Fails between M-S Connect Normal state SPI Failure: Communication Fails between M-S EEPROM R/W Fail EEPROM R/W Fail Fault Relay-Check Fail Relay-Check Fail DC Injection High DC Injection High The result of Auto Test Function is fail The result of Auto Test Function is fail DC bus is too high DC bus is too high The voltage reference inside is abnormal The voltage reference inside is abnormal AC HCT Failure AC HCT Failure GFCI Device Failure GFCI Device Failure Device fault Device fault M-S Version Unmatched M-S Version Unmatched Fac Failure: Fac Out of Range AC Voltage Out of Range Fac Failure: Fac Out of Range AC Voltage Out of Range 43 Utility Loss Utility Loss GFCI Failure GFCI Failure PV Over Voltage PV Over Voltage Isolation Fault Isolation Fault Fan Lock Fan Lock Over Temperature in Inverter Consistent Fault: Vac differs for M-S Consistent Fault: Fac differs for M-S Ground I differs for M-S DC inj. differs for M-S Consistent Fault: Fac, Vac Differs for M-S Flash Over Temperature in Inverter Consistent Fault: Vac differs for M-S Consistent Fault: Fac differs for M-S Ground I differs for M-S DC inj. differs for M-S Consistent Fault: Fac, Vac Differs for M-S High DC Bus High DC Bus Flashing Update inverter About the further information for each fault, please reference to Chapter “10.TROUBLESHOOTING”. 44 8. Troubleshooting Correctable Fault LCD display Possible actions Isolation Fault 1. Check the impedance between PV (+) & PV (-) and the inverter is earthed. The impedance must be greater than 2.4M. 2. Check whether the AC-side has contacts with earth. Ground I Fault 1. The ground current is too high. 2. After cut off the AC side connection, unplug the inputs from the PV generator and check the peripheral AC system. 3. After the cause is cleared, re-plug the PV panel and AC connection, and check PV-Inverter status. Grid Fault Fac Failure: Fac Out of 1. Wait for a moment, if the grid returns to normal, Range PV-Inverter automatically restarts. 2. Make sure grid voltage and frequency meet the AC Voltage Out of specifications. Range Utility Loss 1. 2. 3. 4. Grid is not connected. Check grid connection cables. Check grid usability. If grid is ok, and the problem persists, maybe the fuse in the inverter is open, please call service. Over Temperature in Inverter 1. The internal temperature is higher than specified normal value. 2. Find a way to reduce the ambient temperature. 3. Or move the inverter to a cooler environment. PV Over Voltage 1. Check the open PV voltage, see if it is greater than or too close to 1000VDC (for Z10I13KDT or Z10I17KDT or Z10I20KDT). 2. If PV voltage is less than 1000VDC, and the problem still occurs, please call local service. 45 Consistent Fault: Fac differs for M-S Vac differs for M-S Disconnect PV (+) or PV (-) from the input, restart the inverter. Fac, Vac Differs for M-S Ground I differs for M-S DC inj. differs for M-S AC Relay Check Fail Permanent Fault High DC bus DC Injection High EEPROM R/W Fail Fan Lock M-S Version Unmatched SPI Failure: Communication Fails between M-S AC HCT Fault GFCI Device Failure 46 1. Disconnect ALL PV (+) or PV (-). 2. Wait for a few seconds. 3. After the LCD switches off, reconnect and check again. 4. If the problems remain please call local service. 9. Warranty Dear Customer: Thanks for choosing Z10 series products. The warranty period for inverter is 60 months as standard, starting from the date of the purchase invoice date marked. Terms and Conditions BLD Solar offers 60 months from the date of purchase from retailer for Z10I13KDT/ 17KDT/20KDT on-grid inverters, subject to the conditions listed below. Please note that this does not apply for the accessories. If a product is suspected of being defective during the specified Omnik factory warranty period then BLD Solar will initially perform a pre-qualification of the issue. If a product is determined to be defective then BLD Solar will appoint a local installer who will conduct: On-site inspection & repair or; Exchange for same or similar replacement product In the latter case, the remainder of the warranty entitlement will be transferred to the repaired or replacement product. In such an event, you do not receive a new certificate, as your entitlement is documented at BLD Solar. Exclusion of Liability Circumstances where warranty is not provided Inverter damaged during transportation, installation, usage, connection, non compliance with the instruction manual or other man-made damage Operate the products beyond the applicable safety regulations The warranty card has been altered or its date is hard to recognize Change, modification of repair attempts of the product without authorization Product description nonconformity from the content of warranty card Information on the original nameplate missing or not clear enough to identify the delivery date and product model Use non-designed accessories Improper PV system design Force majeure (e.g. lightening, earthquake, flood or fire) Cosmetic changes to the unit from environmental conditions or accidents From the day the inverter is purchased, please correctly fill in the Warranty Card and submit to the appointed installers to sign/stamp and date. Any changes need to be made by the appointed installers. Please keep good custody of your Warranty Card and present it when you need the warranty service and keep the record provided by the service staff. 47 10. Abbreviation LCD Liquid Crystal Display LED Light Emitting Diode MPPT PV Photovoltaic Vdc Voltage at the DC side Vac Voltage at the AC side Vmpp Voltage at the Maximum Power Point Impp Amperage at Maximum Power Point AC Alternating Current ( Form of electricity supplied by Utility Company ) DC Direct Current ( Form of electricity generated by PV modules ) DC Switch 48 Maximum Power Point Tracking Switch in the DC Circuit. Disconnects DC source from Inverter. May be integrated or external to Inverter. 11. Contact Zhejiang BLD Solar Technology Co.,LTD Qinggang Industrial Zone, Yuhuan, Zhejiang, 317606 China Tel:+86-576-81731999 Fax:+86-576-81731990 E-mail:[email protected] http://www.bldsolar.com 49