1
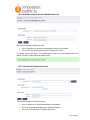
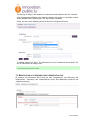
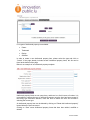
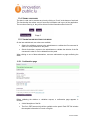
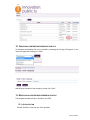
Luxembourg Portal for Research and Innovation Presenting your company or research unit User manual www.innovation.public.lu Manuel Utilisateur CONTENT LIST 1. HOME PAGE....................................................................................................................... 3 2. GLOBAL MENU .................................................................................................................. 3 3. TEMPLATES ....................................................................................................................... 3 4. REGISTRATION.................................................................................................................. 4 5. ACTIVATION....................................................................................................................... 5 6. CHANGING PASSWORDS................................................................................................. 5 7. SIGNING IN ......................................................................................................................... 7 8. USER HOME PAGE............................................................................................................ 7 9. PROFILE MODIFICATION.................................................................................................. 8 10. CREATING A RESEARCH UNIT PRESENTATION FILE ................................................ 8 10.1. DEPARTMENT PRESENTATION FILE ................................................................................... 9 10.2. INTERDISCIPLINARY CENTRE PRESENTATION FILE....................................................... 10 10.3. LABORATORY PRESENTATION FILE ................................................................................. 10 11. MODIFICATION OF A RESEARCH UNIT PRESENTATION FILE ................................ 11 11.1. COMPETENCES TAB ........................................................................................................... 12 11.1.1. Specific fields – Logo ........................................................................................................................... 12 11.1.2. Specific fields – Technology keywords ................................................................................................ 12 11.1.3. The specific case of a department with affiliated laboratories............................................................. 13 11.2. RESOURCES AND COLLABORATIONS TAB ...................................................................... 13 11.2.1. Specific fields – Contacts ..................................................................................................................... 14 11.3. INTELLECTUAL PROPERTY TAB ........................................................................................ 14 11.4. SAVING YOUR WORK .......................................................................................................... 16 11.5. VALIDATING OR DELETING YOUR WORK ......................................................................... 16 11.5.1. Confirmation page ................................................................................................................................ 16 12. CREATING AN ENTERPRISE PRESENTATION FILE.................................................. 18 13. MODIFYING AN ENTERPRISE PRESENTATION FILE ................................................ 18 13.1. ACTIVITIES TAB ................................................................................................................... 18 13.1.1. Specific fields – Logo ........................................................................................................................... 19 13.2. RDI TAB................................................................................................................................. 19 13.2.1. Specific field – Enterprise technology keywords ................................................................................. 19 13.2.2. Specific fields – Contacts ..................................................................................................................... 20 13.3. SAVING YOUR WORK .......................................................................................................... 21 13.4. VALIDATING OR DELETING YOUR WORK ......................................................................... 22 13.4.1. Confirmation page ................................................................................................................................ 22 14. VALIDATION/DELETION CONFIRMATION................................................................... 24 15. UNREGISTERING........................................................................................................... 24 16. HELP ............................................................................................................................... 24 Manuel Utilisateur INTRODUCTION This document presents the functionalities of the external application linked to the Luxembourg Portal for Innovation and Research (www.innovation.public.lu). This application allows innovative enterprises and public research institutes located in Luxembourg to present their skills and know-how on the portal. 1. HOME PAGE The home page of the application allows users to: Log in using their user name and password Register (new users) Reset their password 2. GLOBAL MENU On each page, users can: Access the “Help” page Consult the general terms of use Choose their preferred language: the application is available in French and English These functionalities are available in the menu located on the upper right-hand side. 3. TEMPLATES The following rules are common for all templates of the application: Compulsory fields are indicated with an asterisk (*) Manuel Utilisateur A help text [Help] is provided for fields requiring a specific format. When clicking on it, the help text is displayed below the field concerned. Fields incorrectly filled in are marked in red. A description of the error is displayed below the field concerned. Errors are indicated after submitting the template (by clicking on “Save” for instance). In case of errors, a general message is displayed at the top of the template. When data has been saved, a message is displayed at the top of the template (“The company has been saved”). In a template with several tabs, clicking on “Previous stage” or “Next stage” will save modifications. Clicking directly on the tabs allows for changing of tabs without saving. 4. REGISTRATION New users can be registered through the template accessible via the link “Register” on the home page. Fill in the template. Manuel Utilisateur Click on “Save”. A message will appear. The administrators will verify the information and activate your account. 5. ACTIVATION When an account is activated by the administrator, the user receives an activation email. If the user account has been created by the administrator, the user will receive an activation email that will also allow for a password reset. 6. CHANGING PASSWORDS The template that can be accessed via the link “Forgot your password?” on the home page will enable you to request the resetting of your password. Manuel Utilisateur A message is displayed and the user will receive an email including a link. The user needs to click on the link within the specified time period (48 hours) to access the following page. Once the change of password has been confirmed, the link provided will no longer be active. Manuel Utilisateur 7. SIGNING IN The signing in page requires the user name and the password. The user name is indicated in the subject of the email for activation and resetting of the password. 8. USER HOME PAGE The user home page includes a list of the presentation files of which the user is the owner. There are four different types of files: Department Interdisciplinary centre Laboratory Enterprise Clicking on the header of the column will permit the sorting of the table according to the selected column. By default, the files are sorted in alphabetic order. Users can see all their files, regardless of their status. Only files with the status “editable” can be edited. The others are not accessible to the user. This screen also allows you to create a file, using the menu at the top of the page. Manuel Utilisateur 9. PROFILE MODIFICATION After having logged in, users can modify a part of their profile by clicking on their name at the top of the page. They can also log out by clicking on “Logout”. The screen for modifying a user profile includes the information provided at registration. Only the field “username” cannot be modified. It is possible to change the password via this screen by entering and confirming a new password. If the user does not enter and confirm a new password, the original password will remain unchanged. 10. CREATING A RESEARCH UNIT PRESENTATION FILE In order to create a research unit presentation file, users have to go to their home page and select the following file types: “Department”, “Interdisciplinary centre” or “Laboratory”, and then click “Create”. Manuel Utilisateur 10.1. DEPARTMENT PRESENTATION FILE The creation template includes two parts: A list of institutions to which the departments are affiliated. It is possible to select several institutions by pressing the CTRL key during the selection. The name of the department in English and French. To validate, please click “Save”. The department file is thus created and can be edited. The user is redirected to an editing screen. Manuel Utilisateur 10.2. INTERDISCIPLINARY CENTRE PRESENTATION FILE The creation template includes two parts: A list of institutions to which the interdisciplinary centres are affiliated. The name of the interdisciplinary centre in English and French. To validate, please click “Save”. The interdisciplinary centre file is thus created and can be edited. The user is redirected to an editing screen. 10.3. LABORATORY PRESENTATION FILE The creation template includes three parts: A list of institutions to which the laboratories are affiliated. The list of departments affiliated to the selected institution. The name of the laboratory in English and French. Manuel Utilisateur The first step in filling out the template is to select the parent institution and click “Validate”. A list of departments affiliated to the selected institution will appear. It is possible to select several departments by pressing the CTRL key during the selection. Finally, the name of the laboratory should be filled out in English and French. To validate, please click “Save”. The laboratory file is thus created and can be edited. The user is redirected to an editing screen. 11. MODIFICATION OF A RESEARCH UNIT PRESENTATION FILE All research unit presentation files include the tabs “Competences” and “Resources and collaborations”. “Laboratory” and “Interdisciplinary centre” files additionally include the tab “Intellectual property”. Manuel Utilisateur 11.1. COMPETENCES TAB The tab “Competences” is the first one of the template. It can be validated once all compulsory fields have been filled out in both languages and in the right format. Certain fields allow for a more advanced presentation of the information: bold, italics and bullet points. The formats can be applied by using the buttons above the field. 11.1.1. Specific fields – Logo The field “Logo” allows the user to upload a logotype. This can be done by clicking on “Browse” to search for the logo. After saving, the uploaded logo will be displayed on the page. 11.1.2. Specific fields – Technology keywords The field “technology keywords” allows for the selection of several technological keywords. These keywords are used for indexing the activities of the research unit in a standardised way, thus facilitating users’ search for units of their interest. A maximum of 10 keywords can be selected. If this amount is exceeded, an error will be displayed when saving the page. It is compulsory to select at least 1 keyword. The list of technological keywords is structured on three levels. In the example above, the keyword on level 1 (“Electronics, IT and Telecomms”) includes three keywords on level 2 (“Electronics, Microelectronics”, “Information Processing, Information system, Workflow Manuel Utilisateur Management” and “IT and Telematics Applications”). The second keyword on level 2 subsequently includes several keywords on level 3 (“Advanced Systems Architecture” etc). It is possible to select keywords on levels 1, 2 and/or 3. When selecting a keyword, its subdomains are automatically taken into account. The boxes in front of the sub-domains become inaccessible and can no longer be selected (see the sub-domains of “IT and Telematics Applications” in the example above). Clicking on the link Uncheck all will uncheck all selected keywords. Clicking on the link Hide all (will) hide(s) all sub-levels of the list. The link View all will allow the user to view the complete list. In order to view one complete section, please click on “+”. In order to hide one section, please click on “-“. 11.1.3. The specific case of a department with affiliated laboratories A department with one or several affiliated laboratories resumes all technology keywords and competence areas selected for its affiliated laboratories. They cannot be modified on department level. However, when modifications are made at laboratory level, the owner of the department file will be notified by a message when editing the file. Once this tab of the department file has been saved, the message disappears. 11.2. RESOURCES AND COLLABORATIONS TAB Once the “Competences” tab has been saved, the “Resources and collaborations” tab becomes available. It can be accessed by clicking directly on the tab (any current modifications will not be taken into account) or by clicking on “Next” (in this case, the modifications are saved). Manuel Utilisateur 11.2.1. Specific fields – Contacts In the second tab, it is possible to add up to three contact persons. Clicking on “Delete the new contact” allows the user to delete the contact right above The user can add a new contact by clicking on “New contact”. Modifications can be saved by clicking on “Save”. If a contact is deleted by mistake, it is possible to recover it by clicking on “Cancel”. At least one contact has to be provided. 11.3. INTELLECTUAL PROPERTY TAB Once the tab “Resources and collaborations” has been saved, the tab “Intellectual property” becomes available. Manuel Utilisateur Four types of intellectual property are available: Patent Trademark Design Software In order to create a new intellectual property item, please select the type and click on “Create”. If the page already includes several intellectual property items, this list can be found at the bottom of the page. Below is an example of an intellectual property template: Intellectual property items are not compulsory, and there is no limit in terms of number. It is not possible to change the type of intellectual property once the item has been created. If the wrong type has been selected, users will have to delete the item and recreate it selecting the correct type. An intellectual property item can be deleted by clicking on “Delete this intellectual property” located below the item concerned. Clicking on “Save” saves intellectual property items that have been added, modified or deleted. Manuel Utilisateur 11.4. SAVING YOUR WORK The data in a tab can be saved at any time by clicking on “Save” at the bottom of each tab. This functionality thus allows users to save the information and log out of the application. The next time users log in, they will be able to find the information saved in the file. 11.5. VALIDATING OR DELETING YOUR WORK On the last available tab, two actions are available: Submit for validation: request to the administrator to validate the file concerned in order for it to be published on the portal. Submit for deletion: request to the administrator to validate the deletion of the file concerned in order for it to be deleted from the portal. When clicking on one of these alternatives, users are redirected to a page confirming the action. 11.5.1. Confirmation page Before validating the deletion or validation request, a confirmation page appears. It includes: A brief description of the file The file in PDF format which will be available on the portal. Each PDF file includes the complete information in French or English. Manuel Utilisateur A tick box for accepting the general terms of use For the deletion it includes: A brief description of the file The file in PDF format if available. After requesting the validation or the deletion of a file, the user can no longer modify it. It will appear as “To be validated” in the user’s list of files. After its validation by the administrator, the file will appear as “Validated” in the user’s list of files and will be published on the portal during the following 24 hours. It still cannot be modified by the user. After its publication on the portal, the file becomes editable by the user once again. Manuel Utilisateur 12. CREATING AN ENTERPRISE PRESENTATION FILE An enterprise presentation file can be created by selecting the file type “Enterprise” on the user home page and clicking on “Create”. After filling in the name of the company, please click “Save”. 13. MODIFYING AN ENTERPRISE PRESENTATION FILE The template includes two tabs: “Activities” and “RDI”. 13.1. ACTIVITIES TAB The tab “Activities” is the first one of the template. Manuel Utilisateur In order to validate the first tab, all information in the tab needs to be correct (compulsory fields filled out in two languages, fields in the right format). Certain fields allow for a more advanced presentation of the information: bold, italics and bullet points. The formats can be applied by using the buttons above the field. 13.1.1. Specific fields – Logo The field “Logo” allows the user to upload a logotype. This can be done by clicking on “Browse” to search for the logo. After saving, the uploaded logo will be displayed on the page. 13.2. RDI TAB The tab “RDI” is the second one of the template. It becomes available once the first tab has been saved successfully. 13.2.1. Specific field – Enterprise technology keywords Manuel Utilisateur The field “technology keywords” allows for the user to select several technological keywords. These keywords are used for indexing the activities of the company in a standardised way, thus facilitating users’ search for enterprises of their interest. The list of technological keywords is structured on three levels. In the example above, the keyword on level 1 (“Electronics, IT and Telecomms”) includes several keywords on level 2 (“Electronics, Microelectronics”, “Information Processing, Information system, Workflow Management”, “IT and Telematics Applications” and “Multimedia”). The keyword “Multimedia” on level 2 subsequently includes several keywords on level 3 (“Cultural Heritage” etc). It is possible to select keywords on level 1, 2 and/or 3. When selecting a keyword, its subdomains are automatically taken into account. The boxes in front of the sub-domains become inaccessible and can no longer be selected (see the sub-domains of “Multimedia” in the left-hand column in the example above). In order to allow companies to better describe their activities using the technology keywords, it is possible to indicate whether a certain keyword represents main or marginal activities or activities under development. For relevant keywords, users should thus check: The first column if it describes a main area The second column if it describes a marginal area The third column if it describes an area under development It is not possible to indicate a technology keyword as representing a main and a marginal activity at the same time. It is compulsory to select at least 1 keyword. The navigation in the list is done by clicking on the triangles . Clicking on will enable the user to view a complete section of the list. Clicking on hide a section. will Clicking on the link Uncheck all unchecks all selected keywords. Clicking on the link Hide all hides all sub-levels of the list. The link View all allows the user to view the complete list. 13.2.2. Specific fields – Contacts In the second tab, it is possible to add up to three contact persons. Manuel Utilisateur By clicking “Delete the new contact” the user can delete the contact right above. To add a new contact, click on “New contact”. Modifications can be saved by clicking on “Save”. If a contact is deleted by mistake, it is possible to find it again by clicking on “Cancel”. At least one contact has to be provided. 13.3. SAVING YOUR WORK The data in a tab can be saved at any time by clicking on “Save” at the bottom of each tab. This functionality thus allows users to save the information and log out of the application. The next time users log in, they will be able to find the information saved in the file. Manuel Utilisateur 13.4. VALIDATING OR DELETING YOUR WORK On the last available tab, two actions are available: Submit for validation: request to the administrator to validate the file concerned in order for it to be published on the portal. Submit for deletion: request to the administrator to validate the deletion of the file concerned in order for it to be deleted from the portal. When clicking on one of these alternatives, users are redirected to a page confirming the action. 13.4.1. Confirmation page Before validating the deletion or validation request, a confirmation page appears. It includes: A brief description of the file The file in PDF format which will be available on the portal. Each PDF file includes the complete information in French or English. A tick box for accepting the general terms of use For the deletion it includes: A brief description of the file The file in PDF format if available. After having requested the validation or the deletion of a file, the user can no longer modify it. It will appear as “To be validated” in the user’s list of files. Manuel Utilisateur After its validation by the administrator, the file will appear as “Validated” in the user’s list of files and will be published on the portal during the following 24 hours. It still cannot be modified by the user. After its publication on the portal, the file again becomes editable by the user. Manuel Utilisateur 14. VALIDATION/DELETION CONFIRMATION When users submit their files for validation or deletion, the administrator must confirm the action in order for the file to be published on/deleted from the portal. When the validation is completed, users will receive a confirmation or a rejection email. Below is an example of a confirmation email: 15. UNREGISTERING Only an administrator can delete a user account from the application. The administrator then also has to delete the associated presentation files or reassign them to new users. In order to unregister, please send an email to [email protected]. 16. HELP The Luxembourg Portal for Innovation and Research is managed by Luxinnovation, the National Agency for Innovation and Research. The portal administrators are available for users who need support, and can be contacted by email at [email protected] or by telephone +352 43 62 63 1. Manuel Utilisateur